SEARCH FINESCALE.COM

Enter keywords or a search phrase below:

100th Anniversary of WWI GB

75869 views
879 replies
1 rating 2 rating 3 rating 4 rating 5 rating
  • Member since
    October 2013
Posted by Big Blue on Friday, March 7, 2014 9:52 PM

going to be a long wait... that's what the Snipe is for!

  • Member since
    February 2006
  • From: Smithers, BC, Canada
Posted by ruddratt on Saturday, March 8, 2014 12:33 AM

You're gonna love both of those. The Eindecker is a sweet kit - everything fits like it should.  When you startin' the Snipe?  I've been at mine (the early version) for a bit over a week.  The way this kit is engineered has to be seen to be believed - it's as good if not better than their D.VIIs.

Mike

 "We have our own ammunition. It's filled with paint. When we fire it, it makes pretty pictures....scares the hell outta people."


  • Member since
    October 2013
Posted by Big Blue on Saturday, March 8, 2014 8:30 AM

I am probably a week or two away from starting.  I'm in the final leg of my P-47 for the 1944 GB, and want to finish that up first.  I may, however, start the Snipe's woodwork ahead of time to give the oil paint time to dry.

In the meantime, I have been drooling at amazing projects on the Vintage Aviator's site  (http://thevintageaviator.co.nz).  Just wow.

  • Member since
    April 2005
  • From: Piscataway, NJ!
Posted by wing_nut on Saturday, March 8, 2014 9:11 AM

Nice Blue. I really wanna do one of those Eindeckers.


I got nailed yesterday!  The "nails" for the WNW Albatros arrived.  If you saw the rivets on the 109F-4 Trop done recently, they are applied that same as the rivet, just after painting. 

Also from HGW Models, laser cut fabric seat belts for the Albi.  I cut a little of the "sprue" that is printed with a lozenge pattern to see what the stuff is like.  It is a very thin nylon (?) fabric that you crumple into a ball between your fingers, flatten it out a bit and give it a dirty wash.  Hard to see but there is a fret of PE buckles under the straps.  2 resin seats too. 


Can we change the start date to when Gavrilo Princip started to hatch his plan to assasinate the Arch Duke.  No clue when that was but isn't THAT really when the war statred Wink and it will move the date upWhistling

Marc  

  • Member since
    February 2006
  • From: Smithers, BC, Canada
Posted by ruddratt on Saturday, March 8, 2014 9:42 AM

Marc, I think that date was March 7th, but I could be wrong.  Whistling

Very nice look to those belts. Been eyeing 'em up on eBay - may have to pull the trigger on 'em now.

Blue, just two words for ya - Japan Dryer.  It'll have the oil paints set in one day.  Yes

Mike

 "We have our own ammunition. It's filled with paint. When we fire it, it makes pretty pictures....scares the hell outta people."


  • Member since
    October 2013
Posted by Big Blue on Saturday, March 8, 2014 12:06 PM

Good tip, thanks!

  • Member since
    April 2005
  • From: Piscataway, NJ!
Posted by wing_nut on Saturday, March 8, 2014 6:44 PM

Mike, my thinking is they are worth the money from what I've seen already,  A question about how much Japan dryer to use.  How much would you add to a blob about the size of a couple of pencil erasers?

Marc  

  • Member since
    February 2006
  • From: Smithers, BC, Canada
Posted by ruddratt on Saturday, March 8, 2014 8:15 PM

No doubt, Marc. What got my attention was the texture on 'em and how the wash really makes it pop. Very cool stuff!  I have a Roland in the build cue along with the Sopwith Tripe for this GB and they would both benefit from a set of those.

As for your question, for that amount of paint, no more than a drop of the dryer. A little of that goes a long way.

Mike

 "We have our own ammunition. It's filled with paint. When we fire it, it makes pretty pictures....scares the hell outta people."


  • Member since
    August 2007
  • From: back country of SO-CAL, at the birth place of Naval Aviation
Posted by DUSTER on Sunday, March 9, 2014 1:23 AM

Re: Japan Dryer

Take care, too much will darken the color and /or cause the paint to crack.  A fine case of "less is more"

http://www.jamestowndistributors.com/userportal/show_product.do?pid=3995

gives the same advice. Also note the ratio is 2-4OZ to a gallon.

But all that said, the stuff is a long used and good tool, when using oil based paint to speed the drying time.

So don't hesitate to use it, just be wise.

Steve

Building the perfect model---just not quite yet  Confused

  • Member since
    June 2010
  • From: Rochester, New York USA
Posted by rocker286 on Sunday, March 9, 2014 4:39 PM

ygmodeler4, I share your sentiments! My tiny Nieuport kit is sitting up on my bench- alone and neglected- while I work on other pursuits. I think I may end up doing the same thing that Big Blue will do with that Snipe...I have a Sopwith Camel lurking in my basement somewhere...I might drag that out after I'm done with my current project and build that in the meantime!

4badges

  • Member since
    January 2014
  • From: Toronto
Posted by Rob S. on Tuesday, March 11, 2014 2:58 PM

I concur with the guys itching to get going on this build. I have some keen new brass Spandau MGs and turnbuckles just arrived to install on my, yet, inbox WNW Roland!! Gettin' closer to the start date, one day at a time! Good thing I'm doing a big Lanc for the 1944 GB to sate my building habit.

______________________________________________________________________________


On the Bench: Nothing on the go ATM

  • Member since
    February 2006
  • From: Smithers, BC, Canada
Posted by ruddratt on Wednesday, March 12, 2014 8:37 PM

Yep, it's been tough waiting for this one to start. I'm really looking forward to seeing everyone's builds. On the bench, the Snipe is coming along quite nicely and hopefully I'll have some pics up soon.

Mike

 "We have our own ammunition. It's filled with paint. When we fire it, it makes pretty pictures....scares the hell outta people."


  • Member since
    October 2008
  • From: Georgia
Posted by Rigidrider on Thursday, March 13, 2014 4:48 AM

Agree with all! Along with my first choice of builds, I'm eying another when its complete. Counting down the days...

Doug

When Life Hands You A Bucket Of Lemons...

Make Lemonade!

Then Sell It Back At $2 Bucks A Glass...

  • Member since
    June 2010
  • From: Rochester, New York USA
Posted by rocker286 on Sunday, March 16, 2014 7:17 PM

Hey everybody, I just found a great WWI site whilst browsing the web...maybe some of you have already seen it:

www.wwiaviation.com/toc.html

There's plenty of aircraft profiles and a nice detailed history. I figured I'd pass it along just in case anyone was in need of some resources!

4badges

  • Member since
    October 2013
Posted by Big Blue on Monday, March 17, 2014 10:12 PM

Thanks Rocker.  There's some cool stuff there.

  • Member since
    December 2004
  • From: Houston, Texas
Posted by panzerpilot on Monday, March 24, 2014 12:08 PM

Hey, GreySnake.

I came across some LifeLike decals and decided to do this one, from Jasta 54s, instead of 'Rudolf Stark'. Thanks.

-Tom

  • Member since
    October 2013
Posted by Big Blue on Monday, March 24, 2014 12:14 PM

Started my "pre-GB-but-I-wanted-try-a-WWI/Wingnut-build-and-couldn't-wait" Snipe...

I get the hype, its a REALLY nice kit.  I have about a week of work into it (finding time in the evenings, a bit over the weekend), and 90% of it has been cockpit.  Incredible molded detail molded, and the dashboard decals are outstanding.  Lots of fine brush painting which I would not describe as a strength of mine!  I've been doing so much wood grain I feel like a carpenter, but damn if it doesn't look cool.  All kinds of new skills I'm learning.  Speaking of which...

Did the cockpit bracing with EZ-Line, which I have to say was pretty easy.  Biggest problem there was the Zap-A-Gap not grabbing I have to say that bit was frustrating.  Dip end of line in CA, attempt to jam line into little hole, hold for a few seconds and release.  Way too many times the line retracted like there was no glue at all.  I plan on doing the external rigging somewhat differently (eyelets/turnbuckles rather than tensioned line directly into the frame), so I hope the glue will have a better time with that.  Any suggestions are certainly welcome.  I plan on doing the control cables with mono, so we'l see how that goes.

This will be a fun GB.

  • Member since
    December 2002
  • From: Northern California
Posted by jeaton01 on Tuesday, March 25, 2014 2:33 AM

I can't successfully put glue on the EZLine first.  Better to hold the line in the hole and use an applicator to put the glue in, using thin CA.  I use clamps and fixtures to hold the EZLine to free up my hands to apply the glue.  The glue cures almost immediately in the EZLine and curls up the end when I try what you are doing.  My applicator is a twisted up piece of very fine wire with a little fork in the end to hold the glue.  The smaller the wire the smaller the amount of glue is transferred.

John

To see build logs for my models:  http://goldeneramodel.com/mymodels/mymodels.html


  • Member since
    April 2005
  • From: Piscataway, NJ!
Posted by wing_nut on Tuesday, March 25, 2014 8:32 AM

Here's a handy CA applicator made from a plastic pipette.  Cut the tapered end so it will fit snug on the tip of the bottle.  Heat the end like doing stretched sprue and give it a pull.  varying the heat and speed of the pull you can control the size for what you are doing.  I've gotten them very thin, smaller than a #80 bit, and it stays hollow and you can get some really tiny drops.  This one not as small since I needed to make bigger drops to replace the skin bumps along the creature's seam.  Works with thin of gap filling.  Sometimes just the heat from your fingers holding the bottle will get the juices flowing so a little practice is always a good idea.  Note the angle I pulled so the bottles not straight upside down when gluing.


Then I use this little tool made form a sewing needle dipped in a small bottle of accelerator to get the CA to set up in an instant.


Marc  

  • Member since
    October 2013
Posted by Big Blue on Tuesday, March 25, 2014 10:48 AM

Thanks to you both for the advice.  I use a twisted loop of very thin wire (basically an eyelet for rigging without cutting off the tail) attached to the end of a toothpick as an applicator.  My problem with that technique is the lack of a third hand!  I couldn't figure out how to 1) hold the EZ line with tweezers, 2) keep the interior framing piece stationary, and 3) use the glue applicator.

I have rigged about half of the control cables inside the cockpit using mono and looping through the attachment eyes and back into the tubing, and it seems to work fine.  This is closer to how I envision doing the actual rigging (ignoring the need to keep tension on the lines), so I am optimistic.  As long as I can thread the EZ line back through the metal tube, I think I should be ok.  I am looking forward to finding out!

  • Member since
    December 2002
  • From: Northern California
Posted by jeaton01 on Wednesday, March 26, 2014 6:16 PM

Here is a picture showing the clamps and clips I find useful, you can find them all at Radio Shack.  The vise in the background is useful for its weight in situations like your framing.  In my left hand is the glue application wire, sounds like you are using something similar.

John

To see build logs for my models:  http://goldeneramodel.com/mymodels/mymodels.html


  • Member since
    October 2013
Posted by Big Blue on Friday, March 28, 2014 11:56 AM

Thanks John, that is helpful.

The workings of CA remain a mystery to me.  One attempt it bonds instantly, another it is as useless as water.  

  • Member since
    August 2007
  • From: back country of SO-CAL, at the birth place of Naval Aviation
Posted by DUSTER on Monday, April 28, 2014 3:29 AM

knock knock -uh - is anyone home?                 its so quiet in here.

GreySnake?, Bish? ruddatt?  uh, GMorrison? wing_nut?  Any of you other guys? ...other guys..... other guys .........other g...

Man! the echos in here are sumthin'. 

Well I'll just pin this note on the door; that with along with my St Charmond (I know  Dave will add it to the list when he can) I just picked up MiniArt's "French Tank Crew" 

Even though they are WW II I think I can "adjust/mold/smash/tweak   them enough to add to the St. Charmond  - which comes with one figure already- so there are some more guys around the tank. 

Well as Maxwell says WHEEEEEE 

Steve

Building the perfect model---just not quite yet  Confused

  • Member since
    September 2013
  • From: San Antonio, Texas
Posted by Marcus McBean on Monday, April 28, 2014 6:40 AM

Still here, just been waiting for August so I can get started.

  • Member since
    February 2006
  • From: Smithers, BC, Canada
Posted by ruddratt on Monday, April 28, 2014 12:31 PM

Still here too. Been plugging away at the WnW Snipe and a Tamiya 1/32 Mk.XVI Spit.  Really looking forward to this GB.  Yes

Mike

 "We have our own ammunition. It's filled with paint. When we fire it, it makes pretty pictures....scares the hell outta people."


  • Member since
    December 2002
  • From: Bury St Edmunds, Suffolk, England
Posted by Bish on Monday, April 28, 2014 1:12 PM

Yep, still here. I am looking forward to this one and trying to work out when I will fit my build in.

I am a Norfolk man and i glory in being so


On the bench: Airfix 1/72nd Harrier GR.3/Fujimi 1/72nd Ju 87D-3

  • Member since
    January 2014
  • From: Toronto
Posted by Rob S. on Monday, April 28, 2014 1:22 PM

I did the 1944 GB, then off to the 1:72 O'Mania (which died, I think....just crickets chirping over there)...now waiting on the start up for this one.

______________________________________________________________________________


On the Bench: Nothing on the go ATM

  • Member since
    October 2011
  • From: Lake Villa, Illinois
Posted by Chuck Davis on Monday, April 28, 2014 1:32 PM

Still on board...just waitin'.

Actually, while I'm "live" - please put me down for an Eduard Albatros D.V in 1/72.  I have a dual combo in the stash, so I should be able to finish one, anyway...

Chuck Davis

  • Member since
    April 2006
  • From: ON, Canada
Posted by jgeratic on Monday, April 28, 2014 3:31 PM

Same, been here and there, keeping an eye out for new releases on the WWI era.  Seems as we get closer to the official anniversary, more kits are coming out.

Not sure how many of you follow the Perth Modelling news, but Tommy's War, which originally started with just 54mm figures, has come out with an interesting vehicle that definitely has that period look.  Two versions available, with one being an AA platform:

http://www.perthmilitarymodelling.com/newkitnews/tommyswar.html

-----------------------------------

Something to aspire to, there's a modeller that goes by the handle Arkady72 who recently built his first Wingnut Wings kit.  The quality of his work is incredible, and don't know how he does it, but last year he completed over 30 pieces, and all high caliber work.
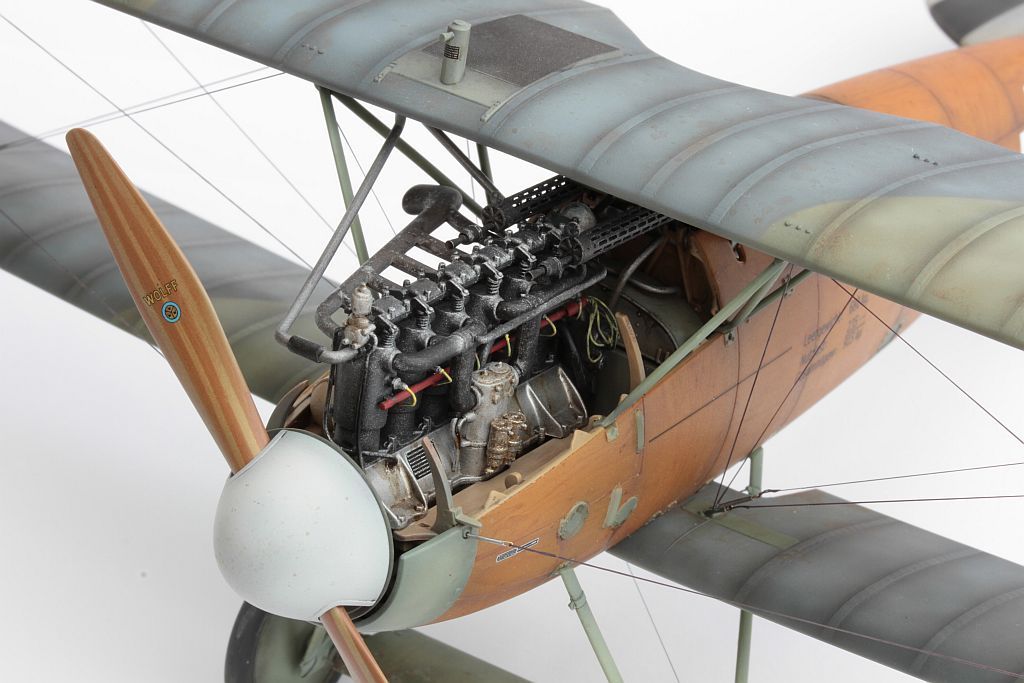
His complete set of the Albatros can be seen here:

http://www.britmodeller.com/forums/index.php?/topic/234959040-albatros-dva-wingnut-wings-132/

regards,

Jack

  • Member since
    April 2005
  • From: Piscataway, NJ!
Posted by wing_nut on Monday, April 28, 2014 9:31 PM

Hey, I am still on this side of the grass for this one too.  Waiting for this to get rolling. I see that grey snake has been MIA for a couple months. Dunno what that means for the GB.

I have to make an official build change. I just got commissioned to build 2 Snipes and an RE8 Harry Tate. The Snipes will be started soon but the RE8 should coincide with this nicely and will do that instead of the Albatros. 

And speaking of Snipes…  Any advice form Big Blue Mike as to any possible pitfalls or places to be careful etc will be greatly appreciated.  And if there was a build order thing you wish you had done differently I’d love to hear that too.

Marc  

JOIN OUR COMMUNITY!

Our community is FREE to join. To participate you must either login or register for an account.

SEARCH FORUMS
FREE NEWSLETTER
By signing up you may also receive reader surveys and occasional special offers. We do not sell, rent or trade our email lists. View our Privacy Policy.