SEARCH FINESCALE.COM

Enter keywords or a search phrase below:

P-40 GB 2014

55643 views
508 replies
1 rating 2 rating 3 rating 4 rating 5 rating
  • Member since
    November 2003
  • From: State of Mississippi. State motto: Virtute et armis (By valor and arms)
Posted by mississippivol on Sunday, February 2, 2014 9:16 PM

Finally got started with it tonight. I decided to try and scratch/kit bash the cockpit first, then the tail wheel area, and the coolers behind the scoop. I see that the cockpit floor is actually the top of the wing, and I remembered having a floor in the scrap box from an Accurate Miniatures P-51 that will pretty much fit the bill; I just need to widen it out to fill the whole area:

Right now, though, it's scribing panel lines and sanding the rivets off. Squadron's "In Action" book says they started using flush rivets, so they aren't that pronounced. I also had to square up the fuselage some as there are fit issues with what looks like ejector pin marks on the mating surfaces up top at the engine, and down low behind the wing.


  • Member since
    June 2013
Posted by bvallot on Sunday, February 2, 2014 4:40 PM

I also meant to mention how I tackle troublesome seams. I usually don't even worry about the seams till I have the fuselage together. Once I do, I'll take a sanding stick (something rougher like 1000) or whatever you have and carefully walk it along the curve never pushing to hard. Just enough to keep the two sides even and flush. When I'm happy with that I'll glue it together with a CA and keep it pressed together as it dries. Sand down any glue that pushes up. And voila.  Any low spots can actually be taken care of with a little more carefully  applicated CA and sanding it before it dries too hard.

Give it a shot.  

On the bench:  

Tamiya F4U-1  Kenneth Walsh


  • Member since
    November 2003
  • From: State of Mississippi. State motto: Virtute et armis (By valor and arms)
Posted by mississippivol on Sunday, February 2, 2014 4:15 PM

Josiah, you might can get away with shimming it with sheet plastic after you get the wing angle right, then taping it up to hold it there until the glue sets, then putty it if it still needs it. That's if you have already glued the wings together, if not, you can glue the top halves to the fuselage to eliminate that seam, then glue it to the bottom half of the wing and shim the gaps along the wing seam, which would be easier to do. That kit is sitting on deck for me as well; you've given me something to think about.

Glenn

  • Member since
    June 2013
Posted by bvallot on Sunday, February 2, 2014 4:12 PM

Looks like a good start so far. About the wing root... Since it'll be in flight, the wings will be pushed up. So in with keeping to that dihedral shape the wings will take on...try pushing the wings up into the fuselage when glueing it. I have the same kit and I don't think I'll have too many problems there (knock on wood).  As for the cowl flaps, if you stick with just what the kit offers then you don't really need to anything about them. There would naturally be a gap there. So if you did anything to it just saw into each of the flaps 1/4 of the way to separate them. That little bit of a gap from a cut would be enough. =]

On the bench:  

Tamiya F4U-1  Kenneth Walsh


  • Member since
    October 2004
  • From: Northern Virginia
Posted by ygmodeler4 on Sunday, February 2, 2014 3:25 PM

Well here's where I'm at so far... it's gonna be flying so I decided not to do anything with the cockpit since there's gonna be a pilot and I wouldn't see any of it anyways...

and the fuselage halves...

This thing is testing my skills building it straight out of the box...I've always been bad at seam lines, it's like...not matter how much sanding I do, after I put a coat of paint on, I can still see where I puttied it at....so the wings are definitely going to give me trouble...here's it dry fitted....

I'm not really sure how to tackle this....stretched sprue in that gap first then putty? .....help

-Josiah

  • Member since
    October 2004
  • From: Northern Virginia
Posted by ygmodeler4 on Sunday, February 2, 2014 3:14 PM

Wowsers Joe, once again your work is amazing.

-Josiah

  • Member since
    September 2011
Posted by fightnjoe on Saturday, February 1, 2014 4:17 PM

many thanks for the kindness.  

joe

Veterans,

Thank You For Your Sacrifices,

Never To Be Forgotten

Where you can find me:

Workbench on FaceBook  Google Plus  YouTube

  • Member since
    December 2003
  • From: Charleston, SC
Posted by sanderson_91 on Saturday, February 1, 2014 3:17 PM

Looking good Joe!


  • Member since
    June 2013
Posted by bvallot on Saturday, February 1, 2014 2:12 PM

I'm glad you're on here with this build Joe.  This will be great to see among all the other builds.  =]

On the bench:  

Tamiya F4U-1  Kenneth Walsh


  • Member since
    November 2003
  • From: State of Mississippi. State motto: Virtute et armis (By valor and arms)
Posted by mississippivol on Saturday, February 1, 2014 2:07 PM

That's the way to do it, Joe! Looks great.

  • Member since
    April 2010
Posted by Theuns on Saturday, February 1, 2014 11:23 AM

Damn that is allot of work you put in there! Nice.

Theuns

  • Member since
    September 2011
Posted by fightnjoe on Saturday, February 1, 2014 11:19 AM

ok when last we saw this project..........

or more precise, here is where i am on this.  note the only kit pieces so far are...

left and right fuse sides

cockpit floor and #5 bulkhead

"radiator" type thing forward the pit

firewall between pit and engine bay

so there i am.  this is my entry point to the group build.  

hopefully i will get to play some with it today.

joe 

Veterans,

Thank You For Your Sacrifices,

Never To Be Forgotten

Where you can find me:

Workbench on FaceBook  Google Plus  YouTube

  • Member since
    October 2004
  • From: Northern Virginia
Posted by ygmodeler4 on Saturday, February 1, 2014 10:17 AM

Well Ive gone full steam ahead on the P-40, everything up to putting the wings to the fuselage...Thats gonna be a bear.

Ill post some pictures when I get home from work.

-Josiah

  • Member since
    October 2004
  • From: Northern Virginia
Posted by ygmodeler4 on Thursday, January 30, 2014 8:11 PM

mississippivol

@ygmodeler: On that Tamiya Corsair, are you positioning the wings down or folded? I stole the folded wing spars for another project, and was curious if the wing fold was going to cause me problems if I installed them in the down position.

I'm putting in the down position, I did it with the Revell 1/48 as well (it has foldable wings as well) and both of them have given me some trouble. The way Tamiya's is set up is much better than Revell, however I think part of it might just be the Corsair is just one of those planes where the wings are just so odd, especially when they're foldable that it's gonna be finicky. Maybe when I build more Corsairs I'll get better at it haha. My build and questions I've asked about it is in the Pacific Carrier GB if you have any other questions, theres a lot of people who know much more about corsairs in there than I do.

(sorry for the off topic....I'm back to thinking about P-40's now I swear!)

-Josiah

  • Member since
    November 2003
  • From: State of Mississippi. State motto: Virtute et armis (By valor and arms)
Posted by mississippivol on Thursday, January 30, 2014 7:56 PM

"Hope that sheds some light on things!  (see what I did there?! =P)"


Big Smile

  • Member since
    June 2013
Posted by bvallot on Thursday, January 30, 2014 7:48 PM

Yeah, I have a couple of pictures for it that help show what you're looking at.  It would swing down not too unlike a Mustang landing light only this was mounted in the wing and not in the wheel bay.


Hawk by brittvallot, on Flickr

You can see it here plainly on the left wing.


IFF-LandingLight by brittvallot, on Flickr

Close up.  This light folds down.  You can make out the top piece that anchors it as well as some components of the lamp.


pk6cy by brittvallot, on Flickr

And here's a flight sim picture of what would happen.  I try not to rely on things like this as a reference, but sometimes you make do with what ya got.  =]

Hope that sheds some light on things!  (see what I did there?! =P)

On the bench:  

Tamiya F4U-1  Kenneth Walsh


  • Member since
    November 2003
  • From: State of Mississippi. State motto: Virtute et armis (By valor and arms)
Posted by mississippivol on Thursday, January 30, 2014 7:19 PM

Looks like a lot of old Monogram -40's are on the books! Who knew a mold from 1964 would still be that popular? I wonder what their return on investment is on that?

@bvallot: I wondered what that bump on the bottom of the wing was forEmbarrassed

@ygmodeler: On that Tamiya Corsair, are you positioning the wings down or folded? I stole the folded wing spars for another project, and was curious if the wing fold was going to cause me problems if I installed them in the down position.

  • Member since
    June 2013
Posted by bvallot on Thursday, January 30, 2014 4:07 PM

Thanks.  I'm trying.  This is my first P-40.  Yeah, Tamiya's Corsair can be a bit fidgety around the wingfolds, but when you get it in there they come out looking really nice.  Just take your time and don't force anything too much.  You'll get it.

As for the paint scheme, they had 99 different Flying Tigers for the AVG.  So, that's plenty to choose from.  lawdog114 (Joe)  sent me a link to an EagleCals series of decals for them. I would investigate that if you were looking for some options.  I've already bought one set and they look great! =]

www.ebay.com/.../131053381318

On the bench:  

Tamiya F4U-1  Kenneth Walsh


  • Member since
    October 2004
  • From: Northern Virginia
Posted by ygmodeler4 on Thursday, January 30, 2014 3:34 PM

Yes I am, this is the first Tamiya Corsair I've built, I've previously built Revell's but yeah its far better than that one...still can't seem to get the wings on correctly, maybe its just me.

I'm gonna be building Revell's 1/48 P-40B, I believe that's the same on you're doing, mine's going to be a lot more boring though, straight OOB. Not sure which paint scheme I'll use either because my dad's was the flying tiger version, which consequently is my favorite, but why have two of the exact same kits in the exact same paint scheme eh?

Yours is coming a long very nicely BTW.

-Josiah

  • Member since
    April 2010
Posted by Theuns on Thursday, January 30, 2014 11:40 AM

Hey Mr. Vance, when you joining in the fun then ;-)

Theuns

  • Member since
    February 2003
  • From: Rothesay, NB Canada
Posted by VanceCrozier on Thursday, January 30, 2014 10:59 AM

Nice work bvallot!

On the bench: Airfix 1/72 Wildcat; Airfix 1/72 Vampire T11; Airfix 1/72 Fouga Magister

  • Member since
    June 2013
Posted by bvallot on Thursday, January 30, 2014 1:34 AM

Okay!  One more before I'm gone for a while.  I thought I'd fix up the landing light since the Revell/Monogram one was a little...absent.  Well, it was there.  Only it was more of a bump.  So since I had the time I figured I'd try a new trick with this light.

I cut it out and fashioned a concave shaped piece of aluminum to make up the housing for the lamp.  I cut out a pie shape to bring the two sides together in order to make the shape.  I suppose if you have something thin and more malleable you could stretch it and cut around to keep the part you needed.  Seeing as my piece was less user friendly, I had to cut it.


image by brittvallot, on Flickr

Here it is installed.  It's just a simple hub with a small brass rod with a drop of CA to place in the center of it. The brass rod is painted black and i cut a 1mm piece of a thin plastic tube from a pipette to place just on top.  Then a smaller diameter brass rod which I believe was to stabilize the bulb in the housing.


image by brittvallot, on Flickr

I think it's a definite improvement over the usual lot of landing lights. I'll keep trying to improve this on later builds.  Any thoughts or suggestions are always welcome.  Later, I'll fix up a piece of acetate to use as the glass, and mask it for paint.

On the bench:  

Tamiya F4U-1  Kenneth Walsh


  • Member since
    June 2013
Posted by bvallot on Wednesday, January 29, 2014 11:51 PM

Are you speaking about the Corsair?  I love building Tamiya's Corsair.  LOVE IT!   =]  Which P-40 variant did you plan on doing?

On the bench:  

Tamiya F4U-1  Kenneth Walsh


  • Member since
    October 2004
  • From: Northern Virginia
Posted by ygmodeler4 on Wednesday, January 29, 2014 10:26 PM

Your build is certainly looki g good, I cant wait to start mine, Im nearing the end of construction phase for another build an  since its been so cold Ill be able to start this one before having to finish the other one....Im looking forward to it though....couple years back my dad built one and I remember how basic it was but Im looking forward to a basic build. Anyways, cant wait to see everyone elses P-40s as well.

-Josiah

  • Member since
    June 2013
Posted by bvallot on Tuesday, January 28, 2014 11:03 PM

Welcome aboard ygmodeler4!

I believe I will be putting together an Allison V-1710-33 engine for this P-40B I'm doing.  I found a resin block from a Canadian vendor Engine & Things.  Give them a look.  They have quite a few engines for variants that you won't find ordinarily.  Now the problem I'm looking at is how to display this engine.  I had originally planned to place it in flight.  I've found tiny round magnets that I may place inside to attach to a panel that covers it.  Only, I haven't actually done this yet to uncover any pitfalls along the way.  Anyone who's had any experience with this...I'd more than appreciate some pointers.  =]

I did however manage to get the cowl flaps started.  I cut off the kit flaps and replaced them with plasticard.  Next, measured out a thin ring to secure them on.
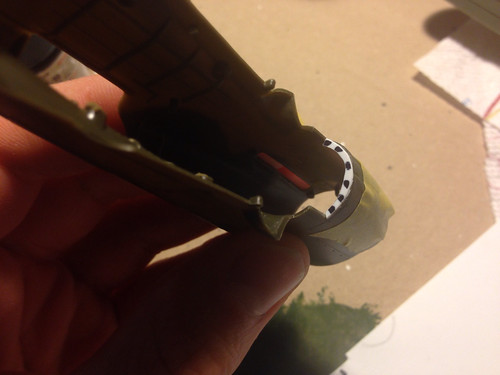

image by brittvallot, on Flickr

I glued the flaps in place (in an open position to show more of the radiator and engine block.
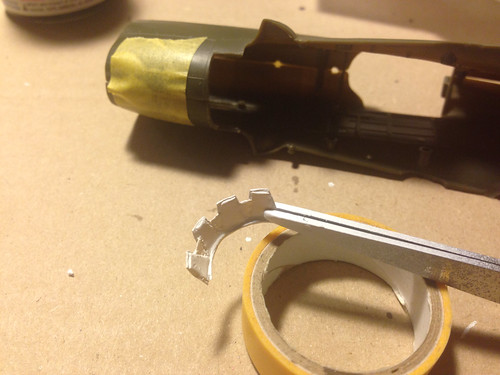

image by brittvallot, on Flickr

The aluminum band that these flaps would fit over like a sleeve was too thin for me to cut and shape.  So instead I settled for tamiya tape with a coat of primer to seal it.
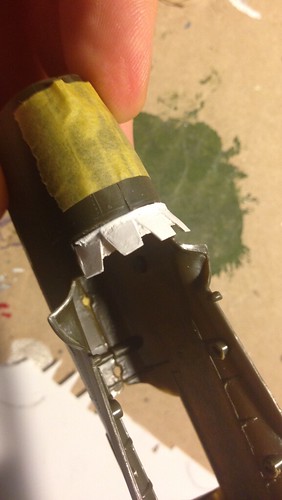

image by brittvallot, on Flickr

The inside of the flap was filed down to resemble the piece that receives the aluminum band.  The tape was cut to this and smoothed out.
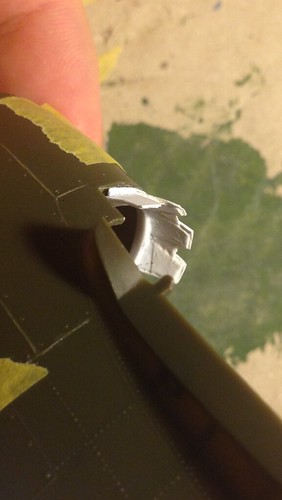

image by brittvallot, on Flickr
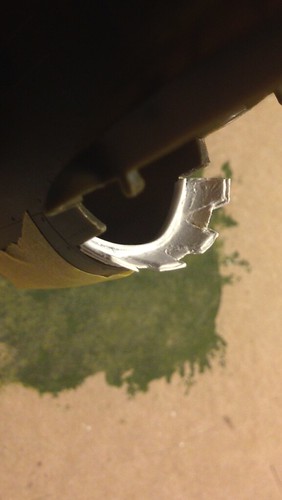

image by brittvallot, on Flickr

That's where I am for now.  I'll build up the actuators for the flaps once I get the engine fitted and the mounts rigged up.  That way I'll know better how all this stuff with fit.  =]

On the bench:  

Tamiya F4U-1  Kenneth Walsh


  • Member since
    April 2010
Posted by Theuns on Tuesday, January 28, 2014 10:42 PM

On the roster, welcome!

  • Member since
    October 2004
  • From: Northern Virginia
Posted by ygmodeler4 on Tuesday, January 28, 2014 10:29 PM

I'm willing to jump into this one if that's alright, I have Revell's 1/48 P-40

-Josiah

  • Member since
    April 2010
Posted by Theuns on Tuesday, January 28, 2014 9:32 AM

I have no idea on the size of the file. I think it looks good to me.

Theuns

  • Member since
    June 2013
Posted by bvallot on Tuesday, January 28, 2014 9:25 AM

It's the one on the first page.  Do you want it bigger so they can size it to what they want?


Screen Shot 2014-01-16 at 5.53.42 PM by brittvallot, on Flickr

On the bench:  

Tamiya F4U-1  Kenneth Walsh


  • Member since
    April 2010
Posted by Theuns on Tuesday, January 28, 2014 5:31 AM

Cool, will you post it so the guys who want it in the GB can grab one please?

Theuns

JOIN OUR COMMUNITY!

Our community is FREE to join. To participate you must either login or register for an account.

SEARCH FORUMS
FREE NEWSLETTER
By signing up you may also receive reader surveys and occasional special offers. We do not sell, rent or trade our email lists. View our Privacy Policy.