SEARCH FINESCALE.COM

Enter keywords or a search phrase below:

Dawn of the Jet Age GB

33754 views
403 replies
1 rating 2 rating 3 rating 4 rating 5 rating
  • Member since
    November 2008
  • From: Central Florida
Posted by plasticjunkie on Tuesday, October 28, 2014 9:25 PM

Thanks Bish

 GIFMaker.org_jy_Ayj_O


Too many models to build, not enough time in a lifetime!!

  • Member since
    December 2002
  • From: Bury St Edmunds, Suffolk, England
Posted by Bish on Tuesday, October 28, 2014 12:39 PM

Looking nice there PJ.

I am a Norfolk man and i glory in being so


On the bench: Airfix 1/72nd Harrier GR.3/Fujimi 1/72nd Ju 87D-3

  • Member since
    November 2008
  • From: Central Florida
Posted by plasticjunkie on Tuesday, October 28, 2014 10:24 AM

Ajd

Those are the joys of home ownership. I enjoy that kind of work around the house.

Gamera

Thanks. Yes she is small. I just recently got into 1/72 just because some subjects are not available in 1/48. Even though the Cutlass is available in 1/48, but after  I reading about several fit issues and poor details overall then decided to go with the 1/72 Fujimi which is very well made. Fisher makes a 1/32 resin one with awesome details but the price tag is a bit expensive.  :scared:

 GIFMaker.org_jy_Ayj_O


Too many models to build, not enough time in a lifetime!!

  • Member since
    November 2009
  • From: SW Virginia
Posted by Gamera on Tuesday, October 28, 2014 7:14 AM

PJ: Looks good, still a little amazed how small she is even in 1/72nd.

Ajd: Good luck, sounds like you've got your work cut out for you!

Still fumbling around on the F-86 here, I HATE trying to get a smooth perfect finish undercoat- I keep finding little blemishes to sand out and repaint.

"I dream in fire but work in clay." -Arthur Machen


  • Member since
    October 2013
Posted by ajd3530 on Monday, October 27, 2014 9:02 PM

Golly this is SO much more work than I originlly planned for. Going to repaint the whole interior and rip up the carpet and refinish the hardwood floors underneath.. And all that before we even move anything in! Hopefully I can get back on here and wirming in a week or two..

  • Member since
    November 2008
  • From: Central Florida
Posted by plasticjunkie on Sunday, October 26, 2014 9:57 AM

A quick update on my small Cutlass. Got the fuselage and wings together and was VERY impressed by the fit which needed no filler at all, making it a must when using Alclad. Everything just falls together and the fit is incredible.

 GIFMaker.org_jy_Ayj_O


Too many models to build, not enough time in a lifetime!!

  • Member since
    August 2012
Posted by AndrewW on Sunday, October 26, 2014 6:32 AM

Thanks, Bish.  The Tamiya kit is so nicely detailed, I just added some Eduard etch and hollowed out the tips of the 130's, a wash and a bit of dry brush really bring things out.  I'm planning to open up the ports on the cowl, so that the hollowed tips show through a bit.  

I spent most of last night with a bit of microweld, a touch and flow, and a lot of pressure in getting my halves together.  I think I misaligned something in the gun bay or pit, but the two halves did close up.  I'll need a touch of putty in the nose, but nothing too serious, and I'm sure it's only my own doing that caused the misalignment.

Next step is stabilizers, a light sanding and get the Reich Defense band painted on.

Life is hard, it's even harder when you're stupid - John Wayne.


  • Member since
    December 2002
  • From: Bury St Edmunds, Suffolk, England
Posted by Bish on Sunday, October 26, 2014 2:22 AM

Andrew, that's looking very nice, really like the gun bay.

I am a Norfolk man and i glory in being so


On the bench: Airfix 1/72nd Harrier GR.3/Fujimi 1/72nd Ju 87D-3

  • Member since
    July 2014
Posted by modelcrazy on Saturday, October 25, 2014 8:46 PM

adj,

Do you have a group patch made up yet?

Steve

Building a kit from your stash is like cutting a head off a Hydra, two more take it's place.


http://www.spamodeler.com/forum/

  • Member since
    August 2012
Posted by AndrewW on Saturday, October 25, 2014 8:04 PM

Oh, and forgot this one.

Life is hard, it's even harder when you're stupid - John Wayne.


  • Member since
    August 2012
Posted by AndrewW on Saturday, October 25, 2014 8:02 PM

TREY, I cannot see a single spot on your work that doesn't look right.  You must have done a great job at polishing that glob out!

Well, another week's work, and I've finished out the gun bay / forward landing gear bay, the fuselage sides and just now pinned the gun bay and cockpit into the fuselage.  Next step, run a little glue into the seams and close it all up.

I also got a little further along in removing slats and flaps.  My big point of concern now is the port wing, and the fact that I'd like to install a resin engine, and how very little I have to glue together for any structural strength.  My plan is to set the wings together prepped for the slats and flaps, get them solid, then remove the leading edge for the engine after the fact.  I figure this might give it a little more base to glue together, and hopefully, if it's going sideways I can see it in advance and just give up on the engine idea.

Life is hard, it's even harder when you're stupid - John Wayne.


  • Member since
    December 2002
  • From: Bury St Edmunds, Suffolk, England
Posted by Bish on Saturday, October 25, 2014 11:40 AM

TREY, it looks damn good to me.

Airbrushes, got to love em.

I am a Norfolk man and i glory in being so


On the bench: Airfix 1/72nd Harrier GR.3/Fujimi 1/72nd Ju 87D-3

  • Member since
    November 2008
  • From: Central Florida
Posted by plasticjunkie on Friday, October 24, 2014 6:53 AM

Trey

Been there too. It sucks when that happens but looks like a great recovery effort.Yes

 GIFMaker.org_jy_Ayj_O


Too many models to build, not enough time in a lifetime!!

  • Member since
    November 2009
  • From: SW Virginia
Posted by Gamera on Thursday, October 23, 2014 9:27 PM

Looks good to me Trey! I'll admit I've sometimes wondered if the purpose of an airbrush is to ruin a perfectly good paint-job...

"I dream in fire but work in clay." -Arthur Machen


  • Member since
    August 2009
  • From: Borlando Fla home of the rat
Posted by TREYZX10R on Thursday, October 23, 2014 4:27 PM

Finally able to squeeze in some bench time and had a epic a/b failure. Right in the finishing stages of a filter the a/b sneezed a big bunch of gobs on the tops surface. I had to go back and wet sand down then reapply some colors,the results are not as good as I would've liked but its better than it was.

  • Member since
    December 2002
  • From: Bury St Edmunds, Suffolk, England
Posted by Bish on Wednesday, October 22, 2014 12:22 PM

Nice looking pit there Andrew.

I am a Norfolk man and i glory in being so


On the bench: Airfix 1/72nd Harrier GR.3/Fujimi 1/72nd Ju 87D-3

  • Member since
    November 2008
  • From: Central Florida
Posted by plasticjunkie on Wednesday, October 22, 2014 10:56 AM

Andrew, you sneezed on the pit and gave a wash new meaning LOL!

The pit and underside look great. Can't wait to see more. Yes

Hope you get better otherwise you will need some..............

 GIFMaker.org_jy_Ayj_O


Too many models to build, not enough time in a lifetime!!

  • Member since
    November 2009
  • From: SW Virginia
Posted by Gamera on Tuesday, October 21, 2014 9:53 PM

Hey Andrew- looks pretty darn good to me!

"I dream in fire but work in clay." -Arthur Machen


  • Member since
    August 2012
Posted by AndrewW on Tuesday, October 21, 2014 4:17 PM

 I've had my name in here for a bit, and of course did nothing while I was away at work.  Since I've gotten home last Wednesday, I've started working, of course, on the office of the 262, in addition to fighting off a nasty flu.  I managed not to sneeze on any of the parts, so this is a good start to things.
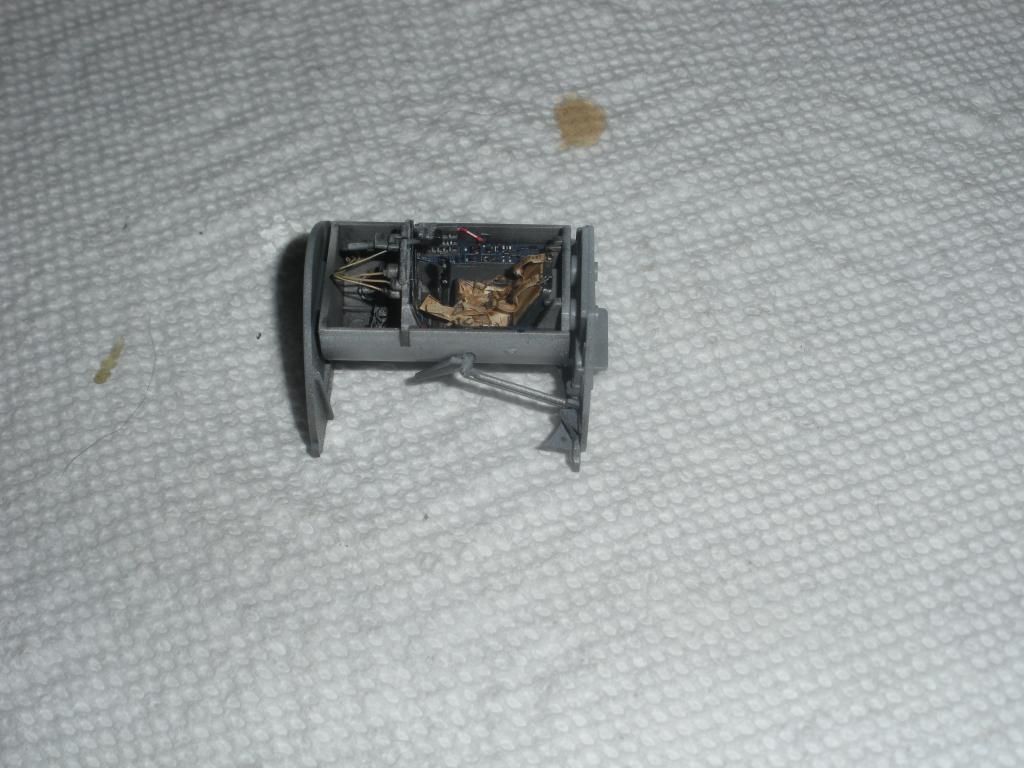
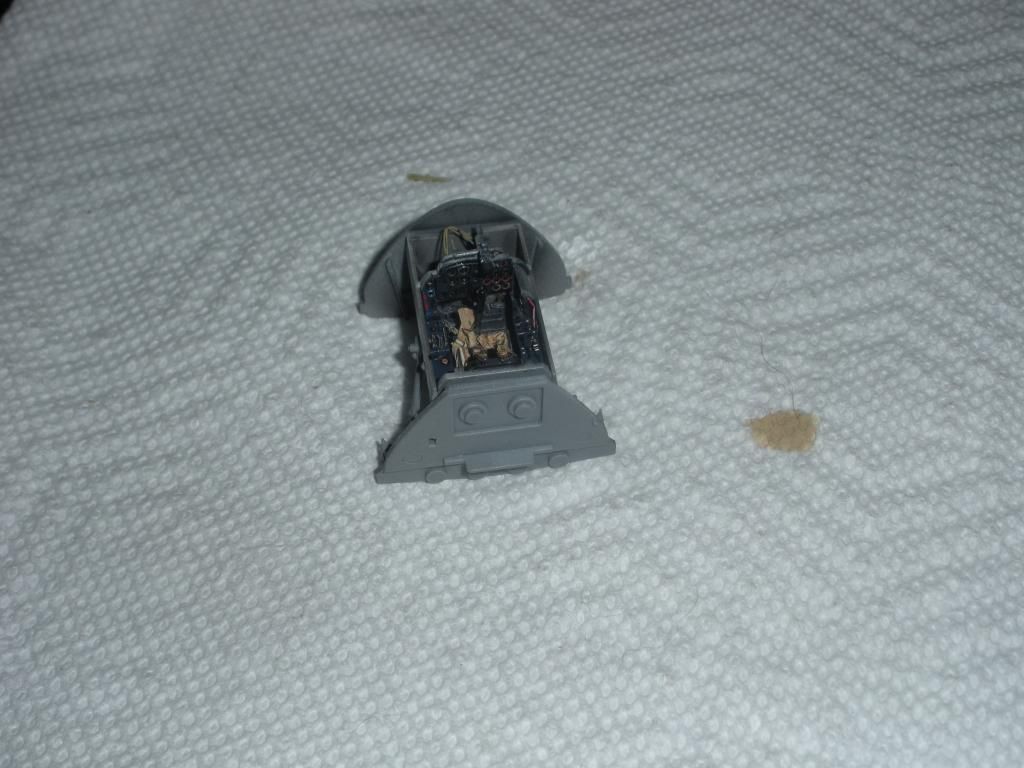
This is things so far, the kit tub, eduard's fabric belts, CMK's resin seat and yolk, and eduard's etch throughout.  I'm once again disappointed in eduard's 'pre painted' colors, but I guess I should learn to get over that.
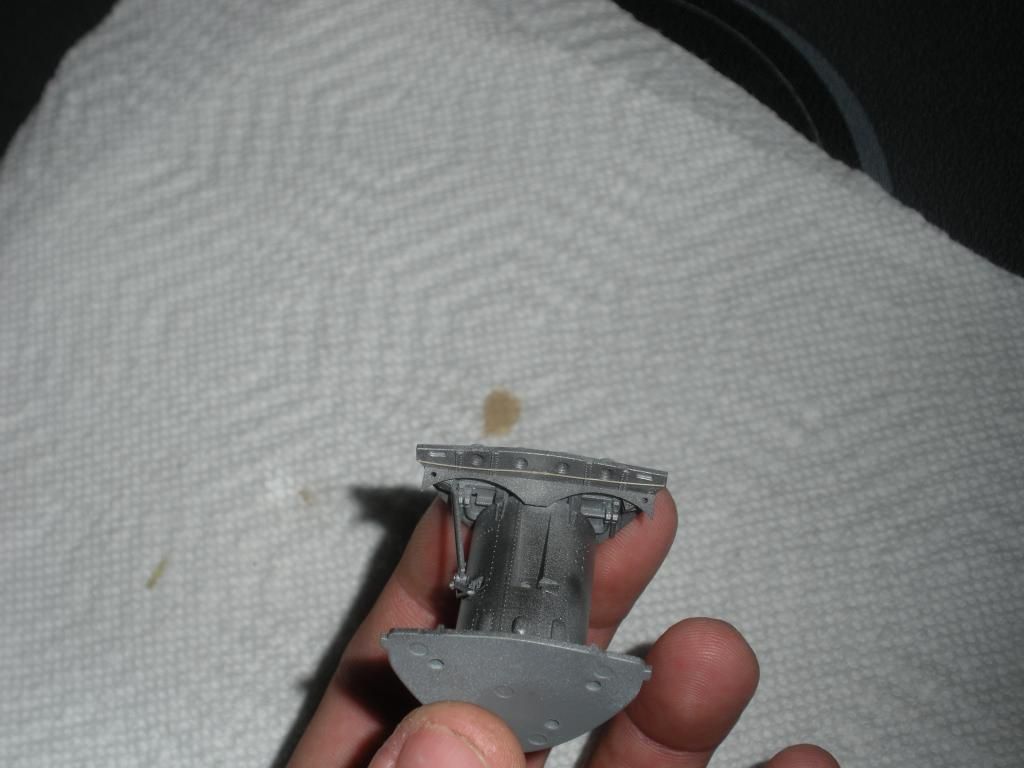
The bottom of the tub, which becomes a part of the wheel well, gave me a chance to play with some of my Alclad paints.
I've decided I'm going to use CMK's engine on the port wing, opened up, Aires slats and flaps on both wings (deployed), Aires elevators and the rudder (slightly akimbo), more photo etch, and a Quickboost FUG radio with the compartment opened up.  I'm also going to substitute in Scale Aircraft Conversions' metal landing gear and Aires tires. 

I liked the Tamiya box art, and the mottling on the White 3 shown on the box.  I know what a nightmare their decals can be, and I was thrilled to come across a set of Montex paint masks for the markings on White 3.  I think the only kit decal I will need to use will be the nose gear door 3.  Otherwise, I think I'll scrounge all of my stencils from an Eagle Cal set. 

The choice for me was the need to practice more on my mottling, a lot more.  So, I'm going to force myself at it. 

In addition to having the pit finished off, while laying on the couch for days, I began separating away some of the kit parts and dry fitting some of the resin.  Maybe I'm deceiving myself, but the Aires slats and flaps seem to fit like a dream!

Anyhow, happy building everyone, looks like some neat projects going on here and some good work!

Life is hard, it's even harder when you're stupid - John Wayne.


  • Member since
    November 2009
  • From: SW Virginia
Posted by Gamera on Friday, October 17, 2014 11:17 AM

Lol, I have the Italeri 1/48th Blackbird and it's already big enough! Dunno where I'd put it unless I hung it from the ceiling.

"I dream in fire but work in clay." -Arthur Machen


  • Member since
    November 2008
  • From: Central Florida
Posted by plasticjunkie on Friday, October 17, 2014 9:30 AM

Gamera

Imagine a Blackbird in 1/32 or 1/24 scale!  :madgrin:

 GIFMaker.org_jy_Ayj_O


Too many models to build, not enough time in a lifetime!!

  • Member since
    November 2009
  • From: SW Virginia
Posted by Gamera on Friday, October 17, 2014 9:22 AM

Thanks guys!

Bish: Sounds cool! I like shiny black, all my cars have been that colour, funny I've never built a SR-71 though...  

"I dream in fire but work in clay." -Arthur Machen


  • Member since
    November 2008
  • From: Central Florida
Posted by plasticjunkie on Friday, October 17, 2014 6:45 AM

Gamera

Thanks. This little guy is looking very impressive as I go into the build. Your 86 is looking good.

ajd

LOL! Isn't moving fun? I actually like it specially packing things and finding junk you thought you lost long ago. Have fun and good luck with your move.

 GIFMaker.org_jy_Ayj_O


Too many models to build, not enough time in a lifetime!!

  • Member since
    December 2002
  • From: Bury St Edmunds, Suffolk, England
Posted by Bish on Thursday, October 16, 2014 1:03 PM

Nice work there guys.

Gamera, my first ever kit was an Airfix 72nd F-86 and for some reason it was painted black. It may not have been accurate, but it certainly looked good.

I am a Norfolk man and i glory in being so


On the bench: Airfix 1/72nd Harrier GR.3/Fujimi 1/72nd Ju 87D-3

  • Member since
    November 2009
  • From: SW Virginia
Posted by Gamera on Thursday, October 16, 2014 11:27 AM

PJ: Looks pretty good to me, even has the intake trunking.

Ajd: Sounds cool, good luck with the move.

I did take a photo of the top of the F-86, which I didn't spill paint on! Still sanding and cleaning up the underside. She looks very sinister in black! 

"I dream in fire but work in clay." -Arthur Machen


  • Member since
    October 2013
Posted by ajd3530 on Wednesday, October 15, 2014 3:34 PM

Nice looking work ya'll! Will hopefully be closing on the new house and moving in the next few weeks. Then hopefully I can start work on my Shooting Star.

  • Member since
    November 2008
  • From: Central Florida
Posted by plasticjunkie on Wednesday, October 15, 2014 2:48 PM

Ok kids, I did a little more work on the Cutlass. I assembled and painted the inside of the trucking and fans which were Tenaxed in place.

Also added the fins and the top half of the wing assembly.

I'm impressed by the parts fit with this kit even though it's very old.

 GIFMaker.org_jy_Ayj_O


Too many models to build, not enough time in a lifetime!!

  • Member since
    November 2008
  • From: Central Florida
Posted by plasticjunkie on Wednesday, October 15, 2014 2:18 PM

Theuns, try thinning your black paint 50-50 to start with and see how it goes with your paint. You may need to add or subtract from the equation. I thin Testors enamel gloss about 50-50, dial down to 10-12  PSI and don't need to sand or polish at all. I do polish the plastic prior to painting and it won't hurt to knock down a tad of the raised details.

 GIFMaker.org_jy_Ayj_O


Too many models to build, not enough time in a lifetime!!

  • Member since
    April 2010
Posted by Theuns on Monday, October 13, 2014 12:47 PM

I hear you!

I have found that with the micromesh 8000 and 12000 it takes quite a bit of effort to go onto the plastic, I just sand very light pressure and soapy water.......and look frequintly!

I have not mastered the art of spraying so smooth that I don't need the sanding :-(

Theuns

  • Member since
    November 2009
  • From: SW Virginia
Posted by Gamera on Monday, October 13, 2014 11:20 AM

Actually Theuns, I'll confess it's mostly my own stupid fault. I sprayed the first coat of primer without the cap on the colour cup on my airbrush and splashed some paint onto the bottom of the port-side wing.  I thought I'd sanded it down flat and even but you know how even the slightest roughness shows.

So far I don't generally bother to sand and polish, well unless I splatter paint all over the thing...

"I dream in fire but work in clay." -Arthur Machen


JOIN OUR COMMUNITY!

Our community is FREE to join. To participate you must either login or register for an account.

SEARCH FORUMS
FREE NEWSLETTER
By signing up you may also receive reader surveys and occasional special offers. We do not sell, rent or trade our email lists. View our Privacy Policy.