SEARCH FINESCALE.COM

Enter keywords or a search phrase below:

2015 Messerschmitt Bf 109 Group Build

181140 views
2798 replies
1 rating 2 rating 3 rating 4 rating 5 rating
  • Member since
    April 2005
Posted by Thunderbolt379 on Wednesday, July 8, 2015 11:09 PM

SWEET mottle, Doug! I might try that technique on my next 32, which should be Hartmann's bird later in the year...

Just unmasking the canopy of the E-7 and the paint is shattering off as I expected... I'll keep you posted on the fix.

M/TB379

http://worldinminiature.blogspot.com/

  • Member since
    April 2005
Posted by Thunderbolt379 on Wednesday, July 8, 2015 11:42 PM

Okay, masking away, and the result is very unsatisfactory., I think I'm losing faith in Eduard masks, or my ability to use them properly, which is strange as I've used them on a lot of models!

So, back to the decal technique I used on the Stuka last year. If it works as well as last year, I may consider using it instead of masks in future. It's a nuisance, I should have been declaring this one done by now!

M/TB379

http://worldinminiature.blogspot.com/

  • Member since
    April 2005
Posted by Thunderbolt379 on Thursday, July 9, 2015 1:05 AM

Decal material done - it's Microscale decal paper in a 1" wide strip, base coated with 02, then 71 (Acryls) for the outside, and sealed with Micro Satin. I'll let it harden overnight, then cut strips with my razor guillotine and see how I go.

I didn't seal down the strips for that Stuka and at last check they were still adhering okay...

M/TB379

http://worldinminiature.blogspot.com/

  • Member since
    April 2013
Posted by SchattenSpartan on Thursday, July 9, 2015 6:29 AM

Doug: As usual, some great work form you! Both the mottling and engine both look really good and love the cockpit detailing.

Brandon: I absolutely love that camo scheme and you pulled it off perfectly!

Mike: That's one lovely Emil you got there! Very nice and clean work all around!

Moose: What I tend to do if the exhaust stacks can't be installed after painting the model is to mask off the area around them and then paint them as one of the last steps of my build.

Greg: I'm looking forward to seeing your build of that Zvezda Friedrich!

  • Member since
    April 2013
Posted by SchattenSpartan on Thursday, July 9, 2015 6:32 AM

Well, after a couple of days of cleaning and moving unfinished models around, my workbench is finally not a mess anymore. So I'll be continueing work on my Eduard Gustavs as soon as I get some supplies from my LHS (I need new cement and super glue, as well as airbrush thinner). I should have time for a visit there on Saturday...

  • Member since
    June 2014
Posted by BrandonK on Thursday, July 9, 2015 3:45 PM

I'm nearly to the finish line on this build. I have the decals complete and I think they came out real nice. This is a really nice build so I won't be weathering it up much. I will gloss coat the decals down and then do a light pen wash, and then flat coat. Final assembly won't take much but the landing gear and cowl. Hope you enjoy the pics. Thanks for looking.

BK

On the bench:

A lot !! And I mean A LOT!!

2024 Kits on deck / in process / completed   

                         14 / 5 / 2  

                              Tongue Tied

  • Member since
    November 2007
  • From: Wisconsin Rapids, WI
Posted by moose421 on Thursday, July 9, 2015 8:37 PM

Spartan, thanks for the tip.  I am trying something new by masking after painting the exhaust.  If it doesn't work the I will just have to repaint.

Brandon, she is looking great.  She is a real looker.

moose

  • Member since
    April 2005
Posted by Thunderbolt379 on Thursday, July 9, 2015 11:08 PM

Clemens -- thanks, mate!

Brandon -- that is a seriously nice model! The crispness of detail around the engine is superb! The airbrushing is also very sharp!

M/TB379

http://worldinminiature.blogspot.com/

  • Member since
    March 2012
  • From: Corpus Christi, Tx
Posted by mustang1989 on Friday, July 10, 2015 5:46 AM

Doug: You know that's a funny thing about your method of mottling. I found all that out by accident. I just kept at and kept at it until I got the effect that I was after. It started on my A8/R2 build a couple of years ago and I perfected my method on my tri color Dauntless build when I was feathering the borders of each color. I just applied it on to mottle patterns and it works great. Yours looks totally awesome good buddy. Wow!!!

Mike (TB): Man that decaling session yielded some great results!!! Nice and clean . Good lookin' E-7!!!

Clemens: Glad to have you back! Yes

moose: What Clemens suggested is a great alternative, Lookin' forward to the results.Wink


 Forum | Modelers Social Club Forum (proboards.com) 

  • Member since
    May 2013
  • From: Indiana, USA
Posted by Greg on Friday, July 10, 2015 10:53 AM

Great stuff going on here as usual.

  • Member since
    October 2008
  • From: Georgia
Posted by Rigidrider on Friday, July 10, 2015 11:10 AM

Guys, thank you all again. Very much appreciated.  

Joe... yup, thats how I do many things by trial and error until I achieve the look I want. Sometimes, I will just set at my bench and start doing paint just to see how it looks.

Doug

When Life Hands You A Bucket Of Lemons...

Make Lemonade!

Then Sell It Back At $2 Bucks A Glass...

  • Member since
    May 2013
  • From: Indiana, USA
Posted by Greg on Friday, July 10, 2015 8:33 PM

Proof of start, albeit late. This is the Zvezda 1/48 F2.

Man, does this photo reveal a lot of trouble I didn't see even under my optivisor!!!

So how long can an oil wash mix stay stored premixed? This is Windsor and Newton black in mona lisa, probably over  year old and I see it's all clumpy. Yuk!

So as you can see, I had a little accident with the Tamiya thin. And I tried to get cute and move the lift rings up high, only to find out that Brandon has them in the right place on his F4. And no, I'm not moving them! Old nerves were nearly shot after getting them on. Geeked

  • Member since
    June 2014
Posted by BrandonK on Friday, July 10, 2015 9:52 PM

Greg,

this Zvezda kit will try your patience if you move too quickly. It forced me, for the better, to slow way down and take it slow. I spent soooo much time on that engine. FYI, dry fit it to the cowl and all the little bits WAY before you commit to cement. The fit up front is extremely tight and I had to do some shaving on the valve covers to get the lower panel over the engine. If you have it open, it's not an issue, closed you WILL have fit issues.

BK

On the bench:

A lot !! And I mean A LOT!!

2024 Kits on deck / in process / completed   

                         14 / 5 / 2  

                              Tongue Tied

  • Member since
    May 2013
  • From: Indiana, USA
Posted by Greg on Friday, July 10, 2015 10:01 PM

Thanks for the tips, Brandon. I'm glad to have your WIP to refer to and you hopefully hanging around here. The kit looks very good and very challenging. You're not kidding about lots of fiddly bits!

  • Member since
    March 2012
  • From: Corpus Christi, Tx
Posted by mustang1989 on Friday, July 10, 2015 10:21 PM

Dang Greg! That looks great man!!!


 Forum | Modelers Social Club Forum (proboards.com) 

  • Member since
    October 2008
  • From: Georgia
Posted by Rigidrider on Saturday, July 11, 2015 6:45 AM

  Morning Greg... Like Brandon said, Just take your time... and yes the little PE parts are a challenge but with a tad of patience (Of which I have darn little) can be done. Some times when doing intricate little parts I switch to the extra thin CA from the LHS. And yes, the camera sees a lot of things your eyes miss. Just a bit of retouch and your golden!

  I'm glad your here and with a good kit to do! Fiddly parts are what set your build apart from a mediocre build. I've done my share of them (mediocre that is) and even though a PITA, prefer the fiddly parts.When my wife walks by and sees me checking out a kit at my bench she will grin and say" Let the cussing begin". LOLOL...  Keep it up, your doing great. OH... your oil wash mix can last as long as its kept sealed. I continuously add to mine with either a fresh batch or leftovers. Only after it will no longer provide the shade I want do I discard and start over.

Take care...

Doug

When Life Hands You A Bucket Of Lemons...

Make Lemonade!

Then Sell It Back At $2 Bucks A Glass...

  • Member since
    October 2008
  • From: Georgia
Posted by Rigidrider on Saturday, July 11, 2015 7:08 AM

Well I burned the midnight oil last night and got the decals on,

Always start at the tail... always have, just force of habit I guess...

Sorry, but when the decals begin, I often forget to stop and take pictures, Moving right along...

Also have much of the wash done. This time I chose to use a straight Vallejo, Oiled Earth (Darker Brown) water based wash. It goes on very easy and I clean off excess with a Qtip dipped in window cleaner then dried off just leaving the cotton slightly damp. Depending on the area and desired look I leave wet to spread around the excess to blend the look together.

Starting to work on the underside...

About done with decals and wash, and starting to fade with Alcohol.

OK, shes about faded as much as I want.

About all for now... Got all weekend to finish up, (after the Honey dos) Thanks...and take care,

Doug 

When Life Hands You A Bucket Of Lemons...

Make Lemonade!

Then Sell It Back At $2 Bucks A Glass...

  • Member since
    December 2009
  • From: Laurel, MD
Posted by Tucohoward on Saturday, July 11, 2015 7:18 AM

Looking good, Doug. I like it a lot.

Jay

The Mighty Mo says no.

  • Member since
    April 2005
Posted by Thunderbolt379 on Saturday, July 11, 2015 8:33 AM

I've done some work on the E-7. I applied sev4eral strips of painted decal and they've patched up the canopy struts reasonably well. I'm tempted to use the method in future form the git-go... There are a few touch-ups to go around the canopy, which I'll tackle tomorrow. I have added the radio mast and the underwing small parts, so after a few touch ups I'll be into the antenna wire and pigment weathering, she really is on the last leg now...

M/TB379

http://worldinminiature.blogspot.com/

  • Member since
    May 2013
  • From: Indiana, USA
Posted by Greg on Saturday, July 11, 2015 9:26 AM

Thanks Joe.

Appreciate your thoughts and also your response about the oil wash, Doug.

Very seldom hear of anyone using Vallejo wash here. What did you seal with before the wash? Sure looks good. I have some, just never learned how to use it.

  • Member since
    April 2005
Posted by Thunderbolt379 on Saturday, July 11, 2015 10:23 AM

Doug, looking superb!!!

M/TB379

http://worldinminiature.blogspot.com/

  • Member since
    October 2008
  • From: Georgia
Posted by Rigidrider on Saturday, July 11, 2015 11:22 AM

Thank you all... Like Bish says... I'm pretty chuffed with the way its coming out. Chuffed... I like that, Thank you Bish.... Hope your having a great time on holiday.

Greg, I use Pledge floor finish to gloss cote, (pre wash) then let the wash set about an hour. After that just begin your removal. As I had stated to someone earlier, I rarely ever do the whole thing at once, choosing to do a section (like a wing) at a time. I have a friend here that does his washes totally different then I do, He will gloss, decal, dull cote , then over dilute his wash (almost to the consistency of water) and apply with his air brush. Generally  he has very little removal to do due to the consistent application. I have watched he do this, and the dull cote does absorb the pigment and leave the rivets and panel lines hilited but very lightly. I have not yet tried this myself.

Doug

When Life Hands You A Bucket Of Lemons...

Make Lemonade!

Then Sell It Back At $2 Bucks A Glass...

  • Member since
    May 2013
  • From: Indiana, USA
Posted by Greg on Saturday, July 11, 2015 11:39 AM

Hmm. I would have expected  a solvent-based clear under the Vallejo wash. Thanks for the info, Doug.

  • Member since
    June 2014
Posted by BrandonK on Saturday, July 11, 2015 12:20 PM

Doug,  that bird is looking stunning. Looking forward to the big reveal.

BK

On the bench:

A lot !! And I mean A LOT!!

2024 Kits on deck / in process / completed   

                         14 / 5 / 2  

                              Tongue Tied

  • Member since
    March 2012
  • From: Corpus Christi, Tx
Posted by mustang1989 on Sunday, July 12, 2015 4:52 AM

Dayum Doug!!! Sometimes I wished I could build models at your pace................but then I'd have to figure out where to put 'em all!!Indifferent  Great job buddy!!! Yes


 Forum | Modelers Social Club Forum (proboards.com) 

  • Member since
    April 2005
Posted by Thunderbolt379 on Sunday, July 12, 2015 8:36 AM

Okay, I'm calling the Hasegawa E-7 done. There'll be proper gallery shots tomorrow, this is just a quick snap as evidence. The antenna wire was comparatively painless, but as with everything on this project, if something can go wrong, it will -- note the kink created by the holding clip in the short piece. It's not getting redone, I'm just going to hope that the slight tension it's under will gradually pull out the kink. As of tomorrow, I'm on another project!

Cheers, M/TB379

http://worldinminiature.blogspot.com/

  • Member since
    May 2013
  • From: Indiana, USA
Posted by Greg on Sunday, July 12, 2015 11:12 AM

One would never know you had challenges on this one, MIke. Looks great for where I sit and am looking fwd to seeing the gallery pics when you get around to them.

I like this scheme a lot. and you did it justice.

  • Member since
    November 2007
  • From: Wisconsin Rapids, WI
Posted by moose421 on Sunday, July 12, 2015 11:14 AM

Looks great T-bolt.  The weathering looks top notch.  I really like the exhaust stains.  Keep up the great work.

moose

  • Member since
    October 2008
  • From: Georgia
Posted by Rigidrider on Sunday, July 12, 2015 1:14 PM

Impressive! I like it Mike...Just shows you what perseverance will get you. Great finish!

Doug

When Life Hands You A Bucket Of Lemons...

Make Lemonade!

Then Sell It Back At $2 Bucks A Glass...

  • Member since
    October 2008
  • From: Georgia
Posted by Rigidrider on Sunday, July 12, 2015 6:53 PM

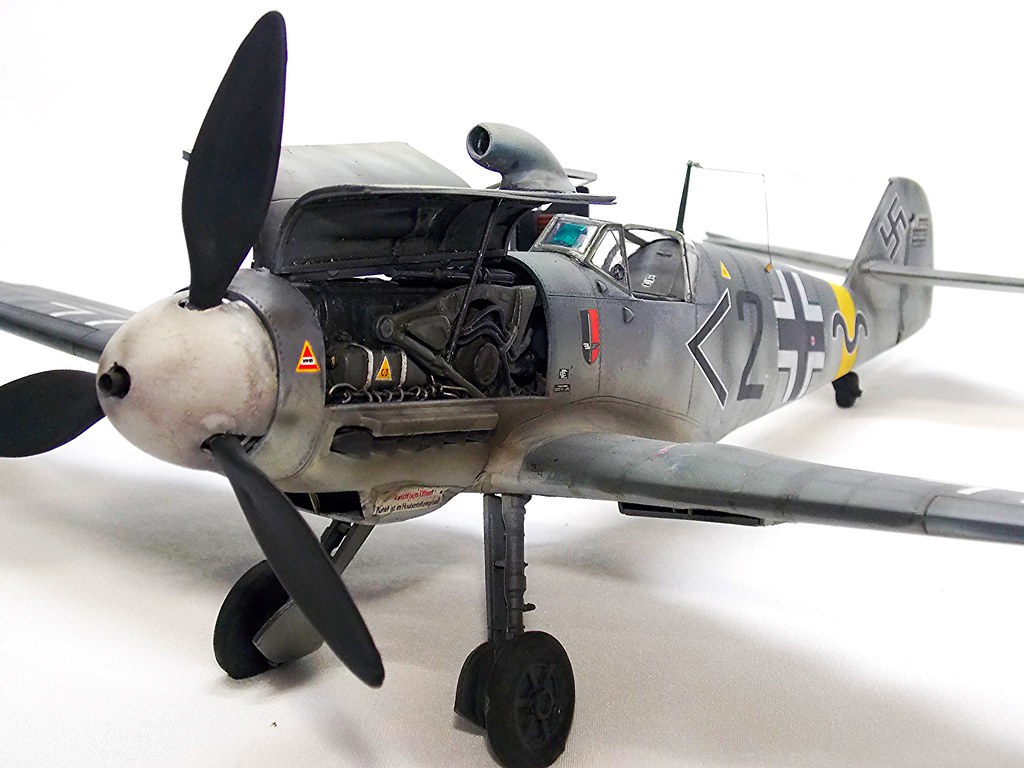
Evening all...Well it was hot as blazes here today, and I put off the outdoor choirs until it cools abit this coming week... Sooo, I got to work on my build. Sorry, but again, I got wrapped up in it and before I knew it I was done. Nothing really interesting, just fiddly bits and touchup, Antenna mast, Cable and springs, canopy, Like I said, fiddly bits, but all in all I like the way it came out. Nothing fancy, Just the Backbone fighter in use at the time. I really hope Hauptman (at the time) Rall , and all those whos craft we try to recreate, would smile on our efforts. Having said that, This again is a Revell 1/32 Bf109G 2, Black 2, of II/Jg52 piloted by Hauptman Gunther Rall, Russia, early 1943.

Well all in all not a bad old kit to build for being 25 yrs old. The only thing (other then some minor scratch items) that wasn't out of box, was the PE for the cockpit, and the metal landing gear. Thanks for the interest and the comments along the way, I have another commitment to satisfy at the present, but like Arnold says... I'll be back! (soon I hope) Keep up the amazing work going on here and Thanks again Joe for hosting! Take care all!

Doug

PS... comments, questions, or whatever, always welcome. 


When Life Hands You A Bucket Of Lemons...

Make Lemonade!

Then Sell It Back At $2 Bucks A Glass...

JOIN OUR COMMUNITY!

Our community is FREE to join. To participate you must either login or register for an account.

SEARCH FORUMS
FREE NEWSLETTER
By signing up you may also receive reader surveys and occasional special offers. We do not sell, rent or trade our email lists. View our Privacy Policy.