SEARCH FINESCALE.COM

Enter keywords or a search phrase below:

Aces Group Build

28235 views
266 replies
1 rating 2 rating 3 rating 4 rating 5 rating
  • Member since
    October 2009
  • From: Oil City, PA
Posted by greentracker98 on Saturday, May 9, 2015 4:22 PM

Thanks CMK

A.K.A. Ken                Making Modeling Great Again

  • Member since
    June 2014
Posted by BrandonK on Saturday, May 9, 2015 4:48 PM

Ken,

Don't sweat it. I'm surprised there isn't more action in here, really. I've been mired down in my Bf109 for the 109GB and decided I needed something easy so I've lit the fire on this one once again. I'm more motivated now and will keep them coming. Don't get discouraged either, it's a busy time of the year for most people. Do another GB and I'll sign on for sure. Hang in there mang!!

On the bench:

A lot !! And I mean A LOT!!

2024 Kits on deck / in process / completed   

                         14 / 5 / 2  

                              Tongue Tied

  • Member since
    July 2014
Posted by modelcrazy on Saturday, May 9, 2015 7:17 PM

Yeah Ken,

Not to worry. Like BK said, it's a busy time of year. I spend 1 to 2 hours every day after work mowing our huge lawn. It slows down during the summer. I'm getting closer to completing my ship for the 45 build and am going to start on either the Macchi of DR1 for this build.

I've noticed that GB's fluctuate as well. There will be nothing for a little bit, then all of a sudden, bang!  There are several going on now (I'm somewhat to blame for that), so that takes a lot of members time, as they finish one, they move onto another.

Hang in there man, the GB is doing fine.

Steve

Steve

Building a kit from your stash is like cutting a head off a Hydra, two more take it's place.


http://www.spamodeler.com/forum/

  • Member since
    September 2007
  • From: Finland funland
Posted by Trabi on Sunday, May 10, 2015 3:23 PM

Hi guys!

I found basis for figure. Hands and grey figure are from Hasegawa´s 1:72 Karl kit. White one is average Airfix pilot. Need to cut them and glue together.


Flight suit in Winter War was made from sheep  hide. For that I´m going to use  Brown Stuff. Basicly same, than GW Green stuff, but bit harder after cured.

Here´s how that flight suit should look:


And Maestro Sarvanto himself sitting in his Fokker:


"Space may be the final frontier, but it´s made in Hollywood basement." RHCP, Californication

  • Member since
    October 2009
  • From: Oil City, PA
Posted by greentracker98 on Monday, May 11, 2015 12:26 AM

Thanks everyone, any suggestions on how to get motivated would be extremely helpful.

anyway, I have MRI tomorrow. I wish it was over and done now. It is open MRI, am really glad it isn't the closed one

A.K.A. Ken                Making Modeling Great Again

  • Member since
    July 2014
Posted by modelcrazy on Monday, May 11, 2015 10:26 AM

There's really nothing to do for GB motivation, it just kinda goes by itself. Sometimes you can bump the thread up, but either members are building right now or they aren't.

Sorry to here about the MRI. Are you alright or is it routine?

Steve

Steve

Building a kit from your stash is like cutting a head off a Hydra, two more take it's place.


http://www.spamodeler.com/forum/

  • Member since
    September 2003
  • From: AandF in the Badger State
Posted by checkmateking02 on Monday, May 11, 2015 11:23 AM

Oh, I hope everything will be all right for you, Ken.  I've had the closed tube kind; very noisy and cramped.


  • Member since
    October 2009
  • From: Oil City, PA
Posted by greentracker98 on Monday, May 11, 2015 3:38 PM

I've had back problems for years now, but the last few months, its gotten worse. I've done both the opened and the closed. I did the closed once and never again.

I wasn't feeling very good last night & this morning with upset stomach, So I rescheduled it for Thursday. I thought it would be a problem laying still for so long.

Thanks again everyone. I'd say I'll respray the B-24 tonight. but when ever I promise something. it doesn't happen

A.K.A. Ken                Making Modeling Great Again

  • Member since
    September 2003
  • From: AandF in the Badger State
Posted by checkmateking02 on Monday, May 11, 2015 4:37 PM

Know what you mean, Ken, about back pain.  It's why I had an MRI,too.  I've had a disk (L-5/S-1) pressing on the sciatic nerve since around 2006.  

Had injections for the pain; it helped a little, but the only real fix is surgery--and I don't really want anyone cutting into my spine unless it's absolutely necessary.

Hope everything will go well for you.  At least, I find that sciatica does not interfere much with building models.


  • Member since
    June 2014
Posted by BrandonK on Monday, May 11, 2015 5:59 PM

Back pain, check. Got that for the last 21 years, bulge in L5. I've learned to just live with it. Some good days, some not so much, usually my fault. The thing that has helped me the most is ab and oblique crunches. My Doc has me doing them and they really do help. Simply crunch and hold to count 10, and repeat for obliques, do 3 sets. In a week or two the pain seldom comes around.

But hey, get well. We will be here when you get to feeling better.

On the bench:

A lot !! And I mean A LOT!!

2024 Kits on deck / in process / completed   

                         14 / 5 / 2  

                              Tongue Tied

  • Member since
    September 2003
  • From: AandF in the Badger State
Posted by checkmateking02 on Saturday, May 16, 2015 4:03 PM

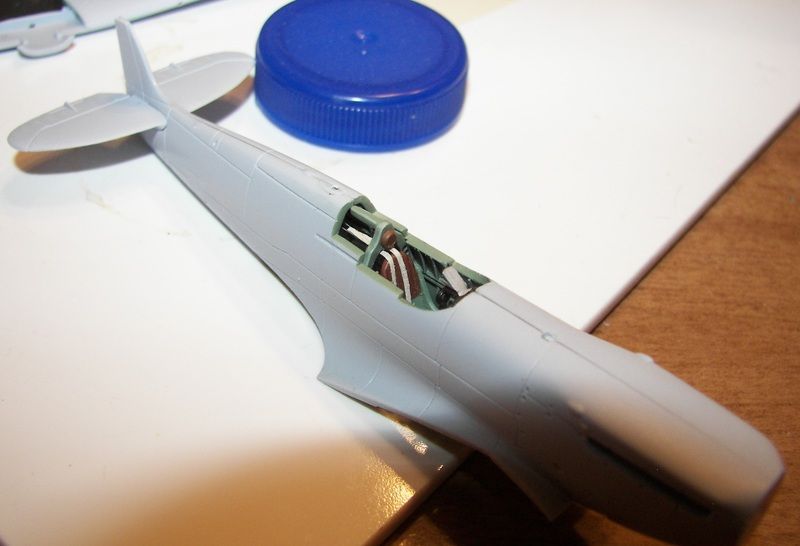
A few progress photos of Airfix's 1/72 Spitfire.

Inside of the fuselage, painted with WEM's Colourcoat's version of RAF interior green.  I used a lightened version for highlighting, then gave it a wash of acrylic black.  Several ejector pin marks were inside. I filled and sanded the ones I thought might show up when the fuselage is closed, and left the rest.

Glued on the horizontal stabilizers using a combination of Testors orange tube and Tamiya's liquid stuff.

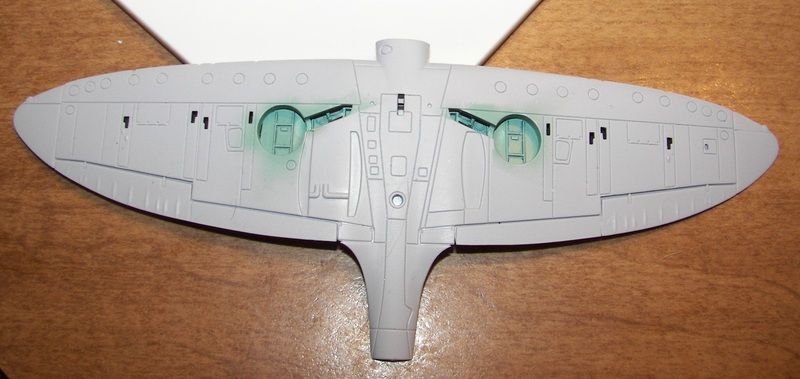
Painted the interior of the wings.  Found information on the web indicating that Sailor Malan's Spitfire had undersurfaces painted in light blue.  Used WEM's version of this.  Applied a dark blue acrylic wash and again higlighted with a lightened version of the blue base colo(u)r.

Parts for the cockpit painted and waiting assembly.  Again, note injector pin marks on IP.  Airfix included a decal for this, so hopefully it won't show up when the canopy is installed.

Thanks for looking.


  • Member since
    October 2009
  • From: Oil City, PA
Posted by greentracker98 on Saturday, May 16, 2015 10:07 PM

CMK  looking good! can't wait to see it finished

A.K.A. Ken                Making Modeling Great Again

  • Member since
    September 2003
  • From: AandF in the Badger State
Posted by checkmateking02 on Sunday, May 17, 2015 12:44 PM

Thanks, Ken.  I'll post some photos when I get the fuselage closed up and cleaned up.  


  • Member since
    October 2009
  • From: Oil City, PA
Posted by greentracker98 on Thursday, May 21, 2015 9:59 PM

Hey everyone,

I was sitting here and it dawned on me I hadn't been in for a few days. I've also joined a writers group. I have a book that I wrote (among other things) sitting on my computer. I live where the oil industry began in the United States, so that's what its about.

I'll be back to the models in a day or two after I get a couple of things taken care of

There isn't anything major with my back

L3 L4 is mildly decreased in height and mildly bulging

L4 L5 this disc is mildly decreased in height and bulging laterally

L5 S1 is normal in height and fluid signal there is  small central disc bulge

Nothing real bad, just enough to let me know it's all still there

Thanks everyone


A.K.A. Ken                Making Modeling Great Again

  • Member since
    October 2009
  • From: Oil City, PA
Posted by greentracker98 on Thursday, May 21, 2015 10:10 PM

PS. I have to change the figures for my builds. The 1/16 scale guys just aren't working out.

I also have to change planes for Lydia. I have the figure for her, but, I can't afford the 35 scale Yak 1b Its a resin model and it would cost about $140.00 plus shipping from England. So, I'll go with a 48 scale plane for her. She is 35 scale but If I place her right, Maybe no one will notice it. Maybe if I get some things cleared up (financially) I could get the resin kit later on this year.

A.K.A. Ken                Making Modeling Great Again

  • Member since
    September 2003
  • From: AandF in the Badger State
Posted by checkmateking02 on Thursday, May 21, 2015 10:29 PM

Glad to hear you got some good news, Ken.  Back pain is no fun.  Hope you can back to the plastic soon.

Some progress photos:

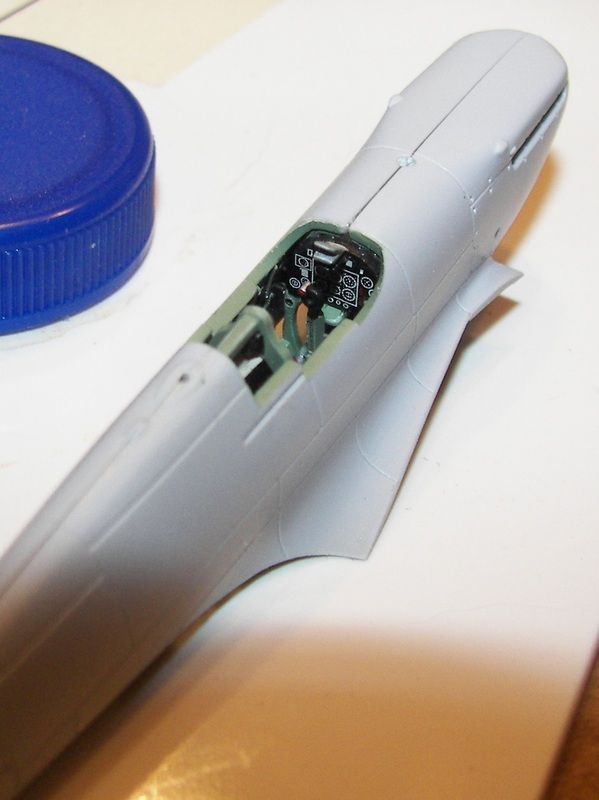
Cockpit installed; look at that sanding dust!  I need to remember to clean that up, or it'll be all over the canopy when it's closed up.  (The reason the dust is there is from sanding the wing root.  More about that below.)   At this point, I added a lot of superglue to both the cockpit parts and that oxygen tank.  On a previous Spit, I had the tank come loose and rattle around the interior after everything was closed up.

Top views of fuselage with cockpit installed, seams filled and sanded and panel lines restored.  The fuselage fit very well near the end of the nose, but tended to gap near the cockpit.  Could be that I didn't get the IP sanded/filed down enough.
Wings assembled; but here's where there's a problem--I've encountered it on other new-mould Airfix Spits.  If you push the top wing tightly to the bottom of the wing, at the ends, to minimize the joint, it tends to close the gap where the fuselage fits in.
  

The result is that the right wing won't settle in.  So I fiddled and filed the wing root (how the dust got into the cockpit).
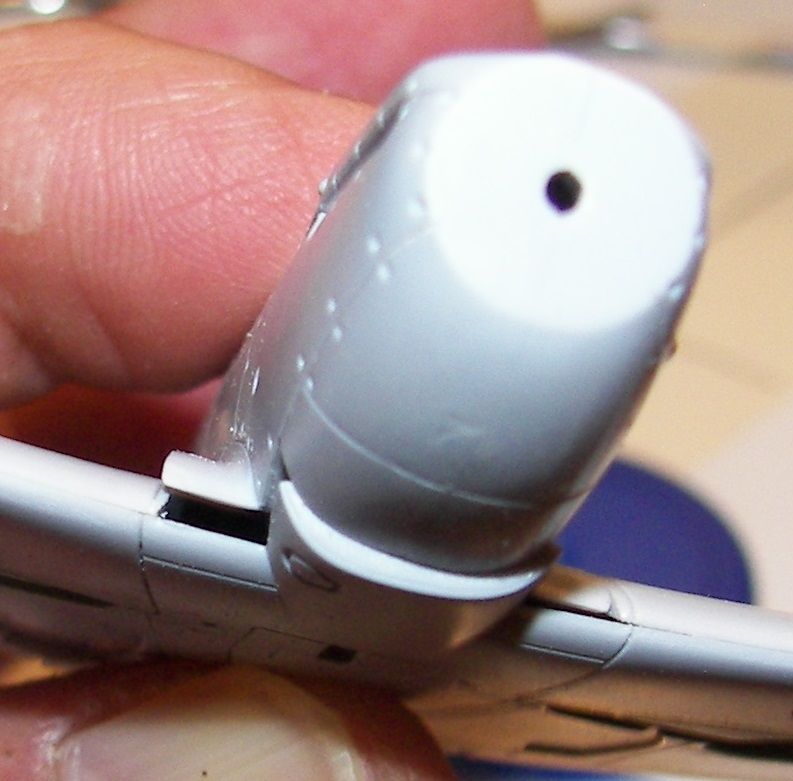
You need to go slow to avoid removing too much.  But then, if you press the wings down, causing them to spread out a little, you can "force" the pieces in place, and they will fit.  Looks like a little filler will be in order at the leading edge wing root.
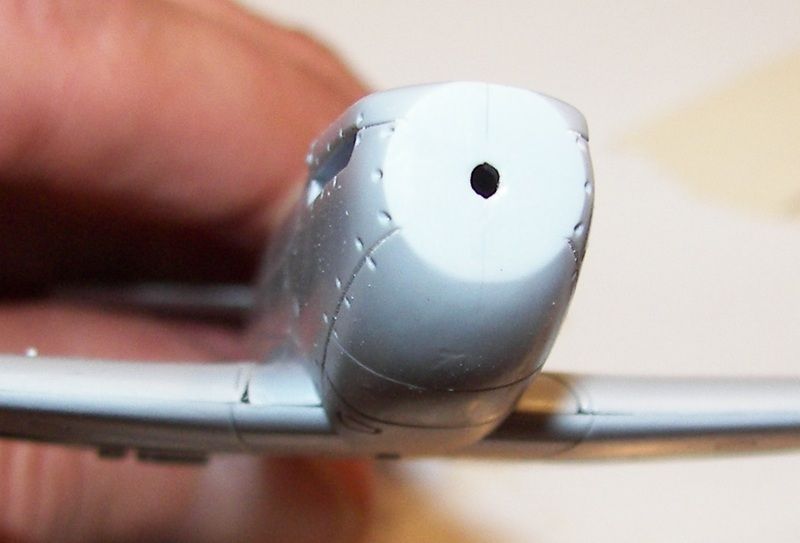
Result is such a tight fit, you almost can't see the join, and there's probably not much need for much filler.
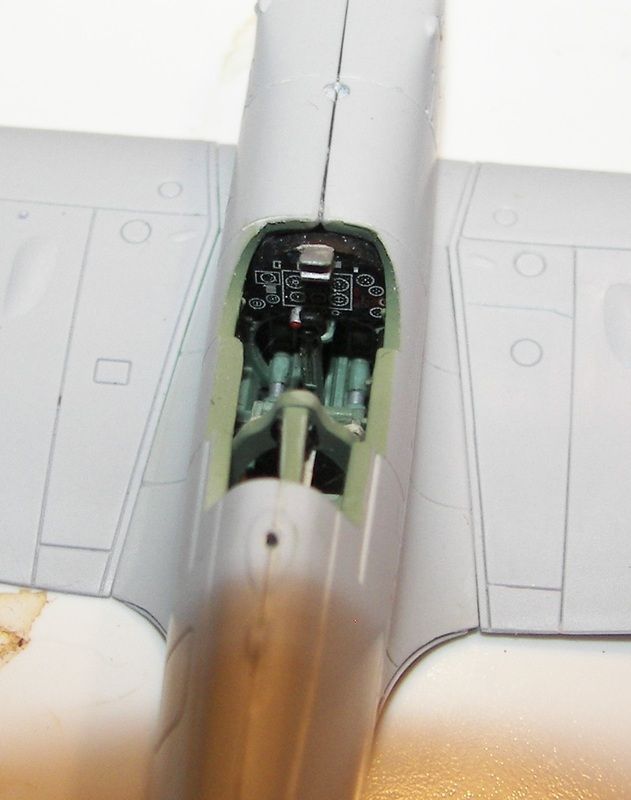
Next step will be to glue the wing in place, and there's where one of the principals of plastic modeling comes in:  everything fits when you dry-test it; as soon as you apply glue--it won't.

Thanks for looking.  Be seeing you.


  • Member since
    September 2003
  • From: AandF in the Badger State
Posted by checkmateking02 on Thursday, May 21, 2015 10:35 PM

Forgot to post these when I took the pictures:  the cockpit IP and seat assembly.

The Spitfire harness was attached to two cables that led back into the rear fuselage, and operated with pulleys.

One-cent piece puts the size into perspective.


  • Member since
    October 2009
  • From: Oil City, PA
Posted by greentracker98 on Friday, May 22, 2015 5:38 PM

Thanks CMK. I've been overdue for some good news. Now, If I could win a lottery LOL

A.K.A. Ken                Making Modeling Great Again

  • Member since
    September 2003
  • From: AandF in the Badger State
Posted by checkmateking02 on Friday, May 22, 2015 6:56 PM

Have you bought a ticket? Wink


  • Member since
    April 2014
  • From: Australia
Posted by lostagain on Wednesday, June 10, 2015 8:06 AM

CMK

The spitfire 'pit has come together really well. Looks like a nice little kit from Airfix.

Ken,

Good to hear the news on the back is not too drastic. Don't worry about the GB - if I am any indication, it all comes together at the end. And we have not got halfway through the year yet.

Trabi, the Fokker is looking very nice. Very impressed with the cowling. The figures in the winter coats look like a challenge.

Doug, I like the stand for the T'bolt - very dynamic.

I have yet to finish the plane for my offering - it is being worked on over in the Me 109 GB. In the meantime, I have started on the figures that will surround the model:

It will develop at my usual slow rate...

  • Member since
    September 2003
  • From: AandF in the Badger State
Posted by checkmateking02 on Wednesday, June 10, 2015 3:30 PM

Thanks, lost!  Good to see you around again.

I've actually finished painting the pilot and getting wings and fuselage together--just been too distracted to get any photography done.  I need to get my act together!


  • Member since
    September 2003
  • From: AandF in the Badger State
Posted by checkmateking02 on Sunday, June 14, 2015 10:56 PM

With the fuselage halves joined, next thing up is to install the propeller backing plate, which can be done from the inside.

Here are the pieces.

To accomplish this, I wrapped a piece of tape around a paint brush handle, put the plate on from outside, picked up the bushing with the tape and added a little glue then pushed the bushing onto the shaft that holds the backing plate.

You can see it in place here.

Attached the wings

and posed the pilot in the cockpit.


  • Member since
    June 2014
Posted by BrandonK on Monday, June 22, 2015 9:26 AM

CMK

That Spit is coming along splendidly. Love the pilot also.

I've managed to get a small amount of bench time of late and here is some progress thus far. I have painted the final pilot figure, Kart-Heinz Krahl and posed him with his mount. He still needs to be dull coated but otherwise he is complete.

The 109 is closed up and ready for paint in these shots. I applied the RLM 78 to the lower surface yesterday and will spray the upper RLM 79 today. Shots to follow. This bird was a better fit overall than the Spit I did previously from the same kit.

On the bench:

A lot !! And I mean A LOT!!

2024 Kits on deck / in process / completed   

                         14 / 5 / 2  

                              Tongue Tied

  • Member since
    September 2003
  • From: AandF in the Badger State
Posted by checkmateking02 on Monday, June 22, 2015 11:13 PM

Thanks, Brandon.  I like the looks of your pilot too.  Plane is moving along nicely as well.


  • Member since
    October 2009
  • From: Oil City, PA
Posted by greentracker98 on Wednesday, June 24, 2015 8:04 PM

checkmateking02

Have you bought a ticket? Wink

Yea, it was a loser.

Brandon, He's looking pretty good there.

I've decided on getting the resin kit for the 1/35 scale Yak 1b. It's expensive, but I don't usually get the expensive ones. It'll be a birthday present for me My birthday is October 4. I won't have it until (hopefully) autumn

A.K.A. Ken                Making Modeling Great Again

  • Member since
    June 2014
Posted by BrandonK on Saturday, June 27, 2015 3:36 PM

OK, so I managed to make some progress on the paint for my 109. I painted it both RLM 78 and 79 and I wish I had taken the extra time to lighten it up for sun fading but perhaps I can still fade it some with pastels, we'll see.

I didn't hit the demarcation line just where I wanted to but it's down and will have to do. I decided on this kit I would give my German 1/48 stencil kit a shot and see if I couldn't paint on the insignia's. The kit is made of tin or some sort of springy metal and on fairly flat surfaces it does great, but where the surface curves or undulates then it allows too much over spray. I managed to do the upper and lower surfaces of the wings but the fuselage isn't going to work that way so I'll use the decals for that.

Anyway, since this kit is lacking exterior detail I have hand painted the exhaust, which are molded in and the guns, which are also. It looks okay, but it's not a kit I would spend any additional time tricking out. Unless you like that sort of thing.

Next will be clear coat and decals.

BK

On the bench:

A lot !! And I mean A LOT!!

2024 Kits on deck / in process / completed   

                         14 / 5 / 2  

                              Tongue Tied

  • Member since
    October 2009
  • From: Oil City, PA
Posted by greentracker98 on Saturday, June 27, 2015 4:21 PM

Looks good BK

CMK Your pilot looks good as well. I have the pilot figure for Lydia and she is coming along nicely. Maybe I can get her finished in the next few days.

A.K.A. Ken                Making Modeling Great Again

  • Member since
    September 2003
  • From: AandF in the Badger State
Posted by checkmateking02 on Saturday, June 27, 2015 8:05 PM

Nice paint work, Brandon!  Smooth finish!

Thanks, Ken.  I think I need to add a little dark wash to his face.


  • Member since
    June 2014
Posted by BrandonK on Saturday, June 27, 2015 9:14 PM

I've given it some thought and I think I am going to use the stencils to cut some out of tape and spray, or attempt to spray, the other insignias on the sides and tail. Although not perfect, I am pretty happy with the overall look of the paint vs. decals. I'll post an update on how that goes.

Thanks everyone for your kind words.

BK

Well, I made the tape stencils this morning and applied them as shown below. I primed the area first to prep for white and then applied the white. Once this was dry, about an hour and a half, I removed the stencil and applied the second stencil and then sprayed the black. I used Mr Color 118 and 119, which is RLM 78 & 79 on the kit and I also used Mr Color 1, white, because is tends to be less transparent than Tamiya white. I used Tamiya gloss black X-1 for the main insignia. 

Overall I am please with the results, although not perfect, it does the job and gave me the practice I wanted for my other 109 that is nearing paint. This kit was mostly a test bed for that build. I would imagine that during war time the stencilling was anything but perfect and they cranked these planes out so some overspray and misaligned stencils is probably not too far fetched an idea. I think once I get it decalled and weathered it will look quite convincing. 

Anyway, it was a fun experiment. The stencil set was made by Alliance Modelworks. 

On the bench:

A lot !! And I mean A LOT!!

2024 Kits on deck / in process / completed   

                         14 / 5 / 2  

                              Tongue Tied

  • Member since
    September 2003
  • From: AandF in the Badger State
Posted by checkmateking02 on Sunday, June 28, 2015 6:42 PM

They look good!


JOIN OUR COMMUNITY!

Our community is FREE to join. To participate you must either login or register for an account.

SEARCH FORUMS
FREE NEWSLETTER
By signing up you may also receive reader surveys and occasional special offers. We do not sell, rent or trade our email lists. View our Privacy Policy.