SEARCH FINESCALE.COM

Enter keywords or a search phrase below:

Metal masters GB 2016 (1Feb to 31 July)

12849 views
250 replies
1 rating 2 rating 3 rating 4 rating 5 rating
  • Member since
    June 2013
Posted by bvallot on Wednesday, March 23, 2016 12:16 PM

Looking great so far Steve.  Can't wait to see what you come out with. =]

On the bench:  

Tamiya F4U-1  Kenneth Walsh


  • Member since
    April 2010
Posted by Theuns on Wednesday, March 23, 2016 12:55 PM

Man you guys are really moving now  :-D


Theuns

  • Member since
    July 2013
Posted by lzdaily@comcast.net on Thursday, March 24, 2016 6:15 PM

Steve,

That is one big model. It's looking great so far. Can't wait to see how you handle the NMF. I'm learning a lot from you guys.

Larry

  • Member since
    June 2013
Posted by bvallot on Friday, March 25, 2016 10:14 PM

Alright guys.  Here's what I'm getting started with...

 Untitled by Britt Vallot, on Flickr

I'm pretty much settled on converting this to an F-6D for Shomo's mount out in the PTO/CBI.  I found a great deal on eBay for all the Ultracast AM parts and a True Details cockpit so I jumped on it.  I mostly moved on it for the exhausts and the cockpit.  I've been wanting a comparison to the Aires cockpit for a good while now so here's my chance.  Right now I've got my front office parts cleaned and prepped to be primed and painted.  I'll get started on that over the weekend.  So thankful to have a less busy Easter Sunday. =]
 
 Untitled by Britt Vallot, on Flickr
 

On the bench:  

Tamiya F4U-1  Kenneth Walsh


  • Member since
    April 2010
Posted by Theuns on Saturday, March 26, 2016 12:07 AM
Ah those Tamiya 1/48 Mustprangs are very nice kits....think I should ket another one... Theuns
  • Member since
    June 2014
Posted by BrandonK on Saturday, March 26, 2016 3:09 PM

Alright, got another kit off the bench. Time to start this one. Here is my entry. I hope this will be a fairly quick build. Off to paint the pit.

BK


On the bench:

A lot !! And I mean A LOT!!

2024 Kits on deck / in process / completed   

                         14 / 5 / 2  

                              Tongue Tied

  • Member since
    July 2014
Posted by modelcrazy on Saturday, March 26, 2016 11:13 PM
I sprayed the Alclad today. I thought I was going to use a lot on such a large model but I didn’t. Next up is painting the metallic on the rear of the engines, decaling, installing the landing gear and slight weathering.
Steve

Steve

Building a kit from your stash is like cutting a head off a Hydra, two more take it's place.


http://www.spamodeler.com/forum/

  • Member since
    June 2014
Posted by BrandonK on Sunday, March 27, 2016 11:14 AM

That is looking very very nice, Steve. Great work.

BK

On the bench:

A lot !! And I mean A LOT!!

2024 Kits on deck / in process / completed   

                         14 / 5 / 2  

                              Tongue Tied

  • Member since
    July 2013
Posted by lzdaily@comcast.net on Sunday, March 27, 2016 11:56 AM

Looks great, Steve. Can't wait to see it done. Still amazed by the sheer size.

Larry

  • Member since
    January 2016
  • From: A Galaxy Far, Far Away
Posted by Hunter on Sunday, March 27, 2016 12:06 PM

Gentlemen - 

All of you have presented some very impressive work. I have fully enjoyed following along witnessing and learning from all of you. Thank you to all for sharing.

Hunter 


  • Member since
    June 2013
Posted by bvallot on Monday, March 28, 2016 2:57 PM

Brandon, nice to see you in here. =]  What kind of NMF are you looking at doing with that Mustang?

Steve,  I'm about as surpirsed as you with how little paint it took.  I have seen where I've overestimated in the past based on my air pressure and how thinned down my paints were.  So maybe you're mileage is varying due to something like that.  Any close up shots from above over the wings?

On the bench:  

Tamiya F4U-1  Kenneth Walsh


  • Member since
    January 2015
Posted by BrandonD on Monday, March 28, 2016 4:48 PM

Britt and BrandonK - I can't wait to see your Mustangs.

Modelcrazy - that is looking really nice. I love the dark and shiny look you've got on it.

-BD-

  • Member since
    June 2014
Posted by BrandonK on Monday, March 28, 2016 5:09 PM

bvallot
Brandon, nice to see you in here. =]  What kind of NMF are you looking at doing with that Mustang?

Gonna go with a gloss black enamel base and Aircraft ALuminum Alclad over that. I'm hoping my adhesion problems are due to the base. I guess we'll see.

BK

On the bench:

A lot !! And I mean A LOT!!

2024 Kits on deck / in process / completed   

                         14 / 5 / 2  

                              Tongue Tied

  • Member since
    April 2010
Posted by Theuns on Monday, March 28, 2016 11:39 PM

I usually put some tamiya grey primer over all to see if the detail is still good, than sand with 3600 till smooth and then do the gloss black tamiya enamel....it tends to stick a little better that way I have found.


Theuns

  • Member since
    July 2014
Posted by modelcrazy on Tuesday, March 29, 2016 7:57 AM

Britt,

I have this shot, though not a close up. You can see the difference gloss and flat make.

Steve

Building a kit from your stash is like cutting a head off a Hydra, two more take it's place.


http://www.spamodeler.com/forum/

  • Member since
    April 2010
Posted by Theuns on Tuesday, March 29, 2016 10:04 AM

Very nice :-)


Theuns

  • Member since
    June 2013
Posted by bvallot on Tuesday, March 29, 2016 1:28 PM

Nice. =]  I can't imagine just how much bigger it'd be at 1:48!

On the bench:  

Tamiya F4U-1  Kenneth Walsh


  • Member since
    July 2014
Posted by modelcrazy on Tuesday, March 29, 2016 1:58 PM
It’s a big one alright, but not nearly as big as the 52.
I can't really say I'm super pleased with the way it’s turning out. With raised panel lines and rivets it's hard to get a smooth finish for the Alclad. There are some areas that just doesn’t look like I hopped. If I sand it smooth for the Alclad I lose the detail.
I didn't really expect much from a 30 year old Minicraft kit but I really like the subject and the price on eBay was right (the decals cost way more than the kit). It will probably end up hanging from the celling due to its size. I haven’t had a model hanging from the celling in 45 years....cool.

Steve

Building a kit from your stash is like cutting a head off a Hydra, two more take it's place.


http://www.spamodeler.com/forum/

  • Member since
    June 2014
Posted by BrandonK on Saturday, April 2, 2016 12:04 PM

Finally completed the cockpit. I built it just OOB, no fancy smancy anything. I figure I won't see it hardly ever so why pimp it out. So, basically I just painted and detailed it with what the kit had and called it good. The fuselage is now closed and drying. More to come later.

BK

On the bench:

A lot !! And I mean A LOT!!

2024 Kits on deck / in process / completed   

                         14 / 5 / 2  

                              Tongue Tied

  • Member since
    April 2010
Posted by Theuns on Sunday, April 3, 2016 11:54 AM

Very nice work on the office Brandon :-D

I DO like those belts,dang!


Theuns

  • Member since
    June 2013
Posted by bvallot on Wednesday, April 6, 2016 2:27 PM

Looks like a great start Brandon. That's how you do more with less! Great painting skills at work there. =]

So this will likely be one of the last posts I can make to update my build as I'm about to move into my new home.  It's just about time to start boxing things up. =[

I have my F6-D recon mustang cockpit mostly painted up.  There is an extra piece of equipment that went on the floor to the pilot's left: an intervalometer.  This controlled the sequencing of pictures taken. I haven't scratched that part out yet, but it won't be too difficult. Here's what I have so far...I haven't gotten around to a clear/flat coat yet, but the weathering will be very light considering I've done most of it with the painting already.  This is pretty much how it will remain.
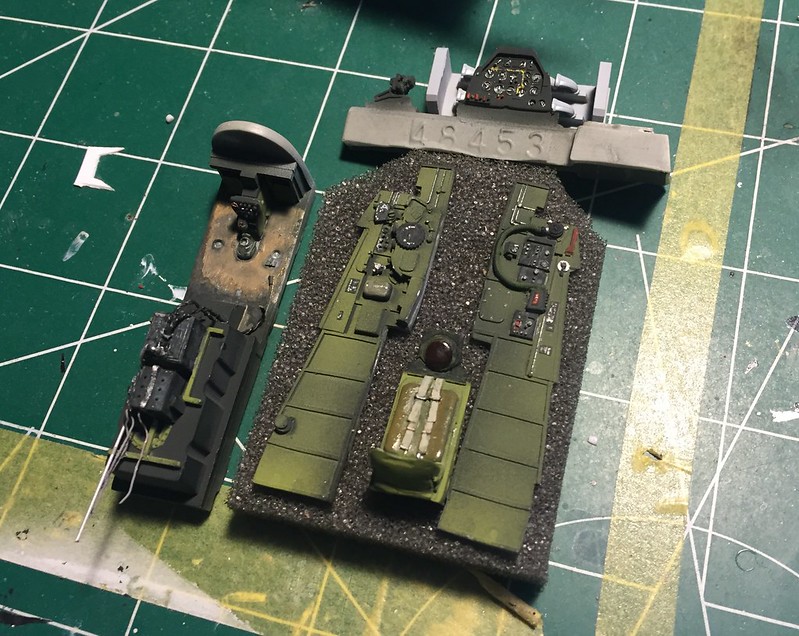
 Untitled by Britt Vallot, on Flickr

 Untitled by Britt Vallot, on Flickr
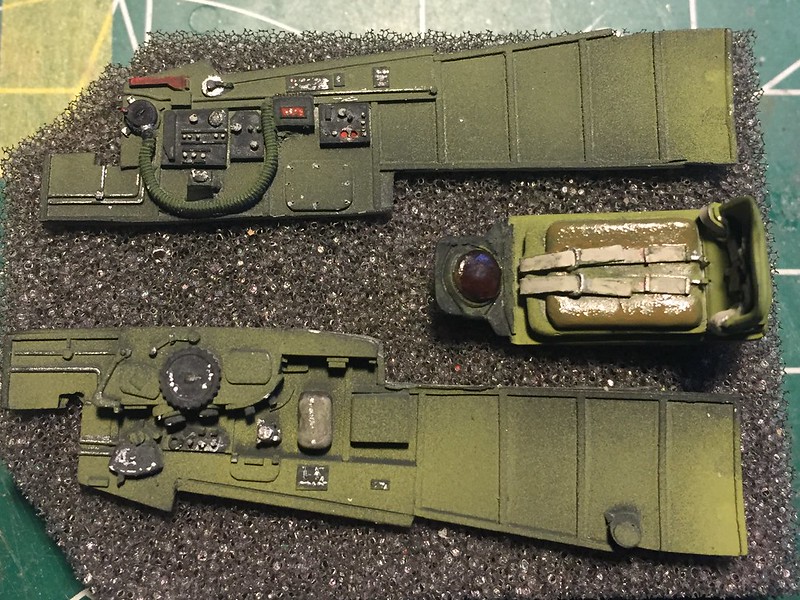
 Untitled by Britt Vallot, on Flickr
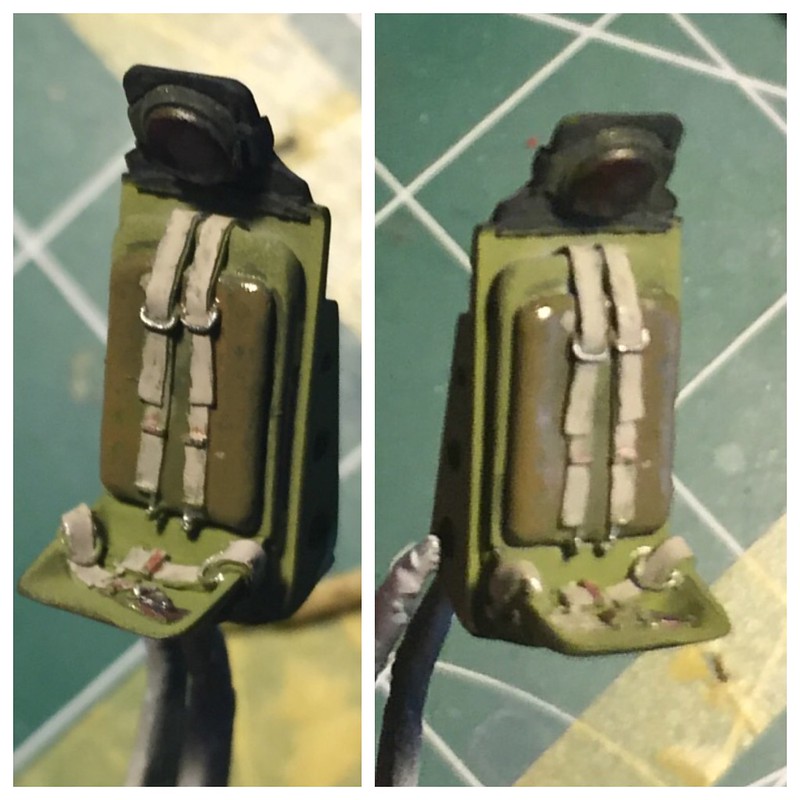
 Untitled by Britt Vallot, on Flickr
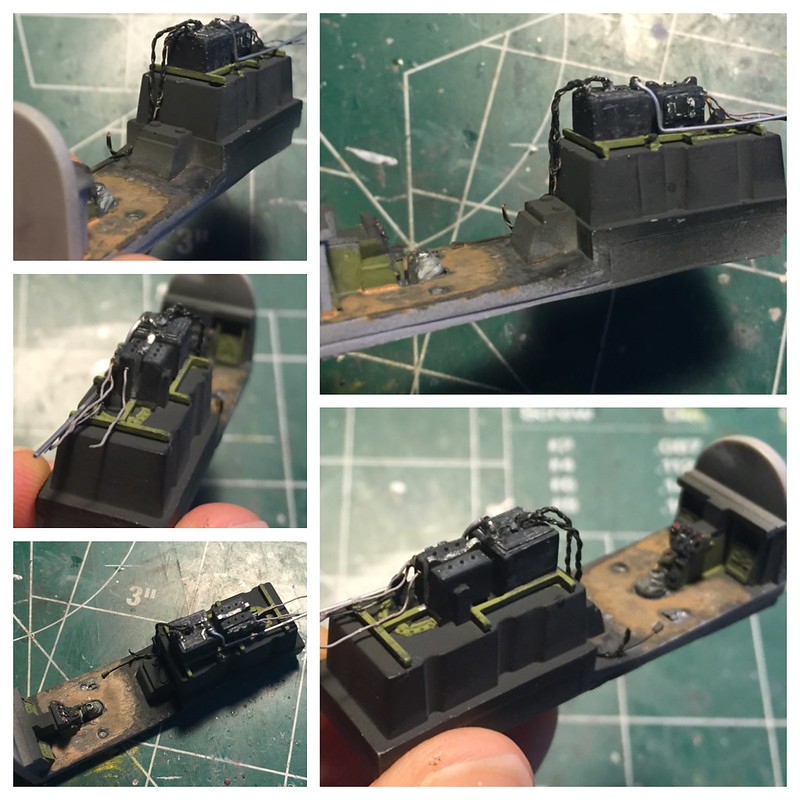
This True Details cockpit was actually a lot of fun to paint.  The transmitter/battery above the fuel tank is a little underdetailed next to the Aires version, but with a little help it comes out just as good if not better.  A bit of copper wire and albion aluminum slide tube makes up the wire and cables here.  For your money...don't count out the TD cockpit for the P-51D.

That's where I'll be for a while. Before I permanently close this up, I have to address the K-24 camera and it's port holes to the left rear of the fuselage.  So some scratchbuilding will be in order. I hope to get back up and running again soon. =]

On the bench:  

Tamiya F4U-1  Kenneth Walsh


  • Member since
    June 2014
Posted by BrandonK on Thursday, April 7, 2016 9:40 AM

bvallot

Looks like a great start Brandon. That's how you do more with less! Great painting skills at work there. =]

So this will likely be one of the last posts I can make to update my build as I'm about to move into my new home.  It's just about time to start boxing things up. =[

I have my F6-D recon mustang cockpit mostly painted up.  There is an extra piece of equipment that went on the floor to the pilot's left: an intervalometer.  This controlled the sequencing of pictures taken. I haven't scratched that part out yet, but it won't be too difficult. Here's what I have so far...I haven't gotten around to a clear/flat coat yet, but the weathering will be very light considering I've done most of it with the painting already.  This is pretty much how it will remain.

 Untitled by Britt Vallot, on Flickr

 Untitled by Britt Vallot, on Flickr

 Untitled by Britt Vallot, on Flickr

 Untitled by Britt Vallot, on Flickr

This True Details cockpit was actually a lot of fun to paint.  The transmitter/battery above the fuel tank is a little underdetailed next to the Aires version, but with a little help it comes out just as good if not better.  A bit of copper wire and albion aluminum slide tube makes up the wire and cables here.  For your money...don't count out the TD cockpit for the P-51D.

That's where I'll be for a while. Before I permanently close this up, I have to address the K-24 camera and it's port holes to the left rear of the fuselage.  So some scratchbuilding will be in order. I hope to get back up and running again soon. =]


I love what you've done with the belts and the wiring and plumbing, it really makes it pop. I thought about that and decided I just didn't feel like doing it. You make me regret not taking the time, doh! She is looking really good.


As far as my kit is concerned I have the seam filled and sanded out and the wings are now attached. I have decided to change direction on the paint. I am going to paint it with Mr Metal Color aluminum and buff it to a shine then seal it in. I have used this paint on small bits in the past and I really love the look. I want to see how it looks on the skin of the plane so that's what I am going to do instead. Wish me luck.

BK

On the bench:

A lot !! And I mean A LOT!!

2024 Kits on deck / in process / completed   

                         14 / 5 / 2  

                              Tongue Tied

  • Member since
    July 2013
Posted by lzdaily@comcast.net on Saturday, April 9, 2016 8:20 PM

Well, I joined this group build and then work went crazy. I've been away from my bench a bit longer than I like. I have, however, snuck in a few minutes here and there. He's the progress on my D.

Larry

  • Member since
    April 2010
Posted by Theuns on Sunday, April 10, 2016 12:26 AM

Lary I am in the same situation with work getting in the way of modling, however being an independent contractor I DO NOT complain to much when there is work.....that mean I can buy more models LOL


Your mustprang's office is looking good 


Theuns

  • Member since
    July 2014
Posted by modelcrazy on Sunday, April 10, 2016 5:33 PM

I calling the B47 done. It was a pretty simple kit for its size. The raised details were difficult to work with and I tried to replace any that were knocked off by seam fulling.

Anyway, here is, not supper happy with it and it will be donated to my 3-year-old and 1-year-old grandson’s ceiling. That should be a sight for them to look at night.

Steve


Steve

Building a kit from your stash is like cutting a head off a Hydra, two more take it's place.


http://www.spamodeler.com/forum/

  • Member since
    June 2013
Posted by bvallot on Sunday, April 10, 2016 7:47 PM

Nice start Larry.  Now the fun part begins! =D

Steve, very nicely acomplished.  You need to finagle a shot of that out in the sunlight. Just be sure to have a pair of sunglasses around. ;)  Decals seem to have set down on it nicely too. Great Job.

Which picture do you want for the front page?  Be sure to grab your badge. =]

On the bench:  

Tamiya F4U-1  Kenneth Walsh


  • Member since
    July 2013
Posted by lzdaily@comcast.net on Sunday, April 10, 2016 8:09 PM

Steve,

Looks great to me. I just hope that I can do half as nice a job as that on my Mustang.

Theuns, Britt, thanks. You're right - now the fun begins.

Larry

  • Member since
    June 2014
Posted by BrandonK on Sunday, April 10, 2016 10:06 PM

Wow Steve, Awesome finish; both in completion and the "finish". It looks pretty darn amazing. 

BK

On the bench:

A lot !! And I mean A LOT!!

2024 Kits on deck / in process / completed   

                         14 / 5 / 2  

                              Tongue Tied

  • Member since
    July 2014
Posted by modelcrazy on Sunday, April 10, 2016 10:20 PM
Thanks guys,
Britt, picture one, two or six, your choice. Did you receive those heat shrink tubes yet?

Steve

Building a kit from your stash is like cutting a head off a Hydra, two more take it's place.


http://www.spamodeler.com/forum/

  • Member since
    April 2010
Posted by Theuns on Sunday, April 10, 2016 11:25 PM

Steve, that looks awsone man!

Well done on such a difficult subject.

I posted a pic that I think shows the different metal tones the best.

Thanx for taking part.


Theuns

JOIN OUR COMMUNITY!

Our community is FREE to join. To participate you must either login or register for an account.

SEARCH FORUMS
FREE NEWSLETTER
By signing up you may also receive reader surveys and occasional special offers. We do not sell, rent or trade our email lists. View our Privacy Policy.