SEARCH FINESCALE.COM

Enter keywords or a search phrase below:

Metal masters GB 2016 (1Feb to 31 July)

12848 views
250 replies
1 rating 2 rating 3 rating 4 rating 5 rating
  • Member since
    June 2013
Posted by bvallot on Wednesday, April 27, 2016 1:09 PM

lzdaily@comcast.net

OK, so here's the result of my latest test. The two wings still attached to the sprue are the old ones. The one on the left is painted with Duraluminum with Airframe Aluminum on the gun bay. The one on the right is Semi Matte Aluminum and Airframe Aluminum. The wing on the far right is the new one. I used Alclad Black Primer with Semi Matte Aluminum and Aluminum on the gun bay covers and aileron. The contrast between the two is about what I’m looking for, but the more that I look at the Semi Matte Aluminum, the less I like it. I think it would require a gloss primer for decals, but then what’s the point of the Semi Matte finish?

Larry


Theuns makes a good point about the doors.  They ordinarily would weather at the same rate. No need to make such a stark difference about them. You did bring up one good item that's worth mentioning. One of the things about painting in flat paints (acrylics specificially) is how the pigment lays down unevenly. We're in the habit of putting down a gloss layer on top of this so as to even out the surface and make it ready to accept decal film. But for Alclad paints this should already be the case. There's so much prep work that typically goes into the surface to make it polished and pristine that the surface is already going to accept decals. There's no need for a gloss coat to meet this end. Alclad paint is a laquer base that bites and bonds with the plastic. It lays down super flat. That's why so much is visible when you didn't prep well enough. There is no build up of a layer of paint on the surface.  So...even though I haven't personally used the Semi-Matte paint in broad surfaces where decaling is present...it shouldn't have any problems holding onto them. But as always, test it out before hand. Since you already have a wing ready to go...place a couple of different decals you won't be needing and see how they do. =]

This is the perfect time to try it! =P

On the bench:  

Tamiya F4U-1  Kenneth Walsh


  • Member since
    July 2014
Posted by modelcrazy on Wednesday, April 27, 2016 1:21 PM

bvallot
Theuns makes a good point about the doors.  They ordinarily would weather at the same rate.

I would think they would look a little more weathered as they were handled more.

Steve

Building a kit from your stash is like cutting a head off a Hydra, two more take it's place.


http://www.spamodeler.com/forum/

  • Member since
    July 2013
Posted by lzdaily@comcast.net on Wednesday, April 27, 2016 4:43 PM

I agree that the contrast between the gun bay doors and the wings is too great when I used Airframe Aluminum. I used it on those tests for two reasons: 1) I've seen in a few places that the gun bay doors weren't painted like the rest of the wing and 2) a lot of people use Airframe Aluminum on the fuselage and I wanted to see what it looked like next to the colors that I was considering for the wings. It's too shiny, though, for anything other than a plane right off the assembly line, so I'll probably use it to paint my 1/48 Apollo capsule.

I'm in the middle of another test. I'll post pics when I get it done. I've got high hopes for the colors I'm trying this time.

- Larry

  • Member since
    June 2013
Posted by bvallot on Thursday, April 28, 2016 9:37 AM

lzdaily@comcast.net

It's too shiny, though, for anything other than a plane right off the assembly line, so I'll probably use it to paint my 1/48 Apollo capsule.


- Larry


Now I'd like to see that. =] I started one back years ago before I knew what I was doing with glues and such and ended up destroying the gold plastic the kit came with. I settled for a rematch down the road when my skillset was better suited.  That day is coming...just as soon as I get some of these others planes off my bench. 

On the bench:  

Tamiya F4U-1  Kenneth Walsh


  • Member since
    July 2013
Posted by lzdaily@comcast.net on Thursday, April 28, 2016 2:09 PM

I think I have a winner. In this shot, the main color on the wing is Model Masters German Metallic Silver. I sprayed Alclad Airframe Aluminum on the aileron and Alclad Aluminum on the flap. It doesn’t show up so well in this photo, but the Airframe Aluminum really contrasts far too much with the German Metallic Silver. However, I think the contrast between the Alclad Aluminum and the German Metallic Silver looks about right. Plus, the Silver looks like paint while the Aluminum looks a bit like bare metal. So, I think I’ll go with Alclad Aluminum on the fuselage and German Metallic Silver on the wings.

What do you all think?

- Larry

  • Member since
    April 2010
Posted by Theuns on Thursday, April 28, 2016 11:11 PM

Looks good from here :-)


Theuns

  • Member since
    June 2013
Posted by bvallot on Friday, April 29, 2016 9:13 PM

Looks like it. =] If you'd like the Aluminum to have a bit more shine behind it...do it in light coats.  Allowing some of that gloss black to come through just enough will help it glow. ;)

Nicely done Larry.

On the bench:  

Tamiya F4U-1  Kenneth Walsh


  • Member since
    February 2010
  • From: New Jersey
Posted by 68GT on Sunday, May 1, 2016 9:36 AM

Got tied up with a bunch of things but here is the progress on the A-37.

On Ed's bench, ???


  • Member since
    April 2010
Posted by Theuns on Sunday, May 1, 2016 10:28 AM

Good looking "Tweet"...almost looks faster in NMF ;-)


Theuns

  • Member since
    June 2013
Posted by bvallot on Monday, May 2, 2016 7:35 AM

Nice to see the before and after primer shots. What color will be going on the wingtip tanks?

On the bench:  

Tamiya F4U-1  Kenneth Walsh


  • Member since
    June 2013
Posted by bvallot on Wednesday, May 4, 2016 12:44 PM

Just sat down last night for the first time in a couple of weeks to reaquaint myself with where I'm at with this conversion. I need to sand down the sidewalls of the TD cockpit set and thin the kit parts so as to keep everything snug. Then, I'll have to do some doctoring around the back end/left side where the camera was mounted before I can close any of this up. It shouldn't be too difficult, but naturally I'll make it harder. =D Soooooon...

O!? How's that shark mouth coming along?

On the bench:  

Tamiya F4U-1  Kenneth Walsh


  • Member since
    June 2013
Posted by bvallot on Friday, May 6, 2016 9:35 PM

Nothing major, but I did want to show the beginning of what is shaping up around the camera bay. Referenced photos of the F-6D and measured twice, cut once, and sanded a lot. I may still refine the thickness of the larger bay. There will be a larger rounder sleeve that acted as some type of cover/fairing. That'll come next. Then, I'll build up the interior of the camera bay since it'll be more visible. =]

 camports by Britt Vallot, on Flickr

 Untitled by Britt Vallot, on Flickr

 Untitled by Britt Vallot, on Flickr


On the bench:  

Tamiya F4U-1  Kenneth Walsh


  • Member since
    April 2010
Posted by Theuns on Saturday, May 7, 2016 12:40 AM

nice !


Theuns

  • Member since
    February 2003
  • From: Between LA and OC, SoCal
Posted by oortiz10 on Monday, May 9, 2016 9:18 AM

bvallot

O!? How's that shark mouth coming along?

 
Aw man!  I just got called out!  
 
Hey bvallot, honestly, all my projects have pretty much stalled.  I'm a teacher and this is a busy time of year for us.  I haven't had much time to do much modeling since Spring Break.  Unfortunately, my shark's mouth continues to sit and collect dust.  I see it sitting on my work bench, but I just can't get to it right now.  I know the end of the GB's right around the corner.  I'm hoping I can spend some time at the bench and get my F-80 done.  
Thanks for asking and keep up the great work with your Mustang!
 
Cheers,
-O

-It's Omar, but they call me "O".

  • Member since
    June 2013
Posted by bvallot on Monday, May 9, 2016 11:48 PM

Not to worry! I totally understand.  From October to May I'm pretty much screwed with work.  And now I just had my first baby boy this past Sunday. So I'm not really sure how I'm going to get much accomplished over the next two weeks my own self. =]

Hang in there.

On the bench:  

Tamiya F4U-1  Kenneth Walsh


  • Member since
    April 2010
Posted by Theuns on Wednesday, May 11, 2016 11:25 PM

As Professor Farnswourth from futurerama would say "Good news everone!"


I received a request to extend the dates to give some guys time to button up their builds.

The end date is now 31 July '16.


Theuns

  • Member since
    July 2013
Posted by lzdaily@comcast.net on Thursday, May 12, 2016 9:24 AM

This is good news, Theuns!

Between work and eye surgery, my model building has been on hold for weeks.

Larry

  • Member since
    February 2003
  • From: Between LA and OC, SoCal
Posted by oortiz10 on Friday, May 13, 2016 10:44 AM


I WILL get my shark-mouthed F-80 completed, but I don't know if I'll get the WIF Jugs done.  I shall try my best.

Thanks Theuns!

-O

-It's Omar, but they call me "O".

  • Member since
    June 2013
Posted by bvallot on Friday, May 13, 2016 1:01 PM

Since we went there...=]

 Untitled by Britt Vallot, on Flickr


On the bench:  

Tamiya F4U-1  Kenneth Walsh


  • Member since
    June 2013
Posted by bvallot on Friday, May 13, 2016 1:22 PM

Okay, short update. It's brief, but I figure brief is still better than silent...keeps the dialogue going. =]

Started making some headway on things I need to tidy up before closing the fuselage halves together. I opened up the vent doors to the carb (somebody help with the terminology here--my brain just fell out) Small pinvise carefully picks out those molded "holes" provided. I removed a scoop that provides ventilation to somewhere I can't remember either at the moment right there on the left, lower cowl panel as it wasn't present on Shomo's particular block mustang. I'll go back to tighten up the sanding here later on.

 Untitled by Britt Vallot, on Flickr

Next, I've been working on trying to get these openings for the K-24 camera that was in use for reconnainsance mustangs in the PTO. There's a bit of scratch building involved and some of which does take a bit more care than in most instances I encounter. I've tightened up the radiator's anterior surface as some of this will be visible through the scoop in the front. Still requires a bit of touch up. The back end has been dressed up a little as well. I still have the actuating rod that opens and closes the door for the radiator.

 Untitled by Britt Vallot, on Flickr

Lastly for now, I began building the lower door that was made for the F-6D. It had a lid that covered the opening to protect it from debris during takeoffs and landings. A small hinge and rod will be added soon. The base is made from a plastic tube that was flattened at one end as seen in reference photos. A cover was made to fit, then the door was cut out and a lid was cut from this opening to "go back in" so as to show the subtle differences in parts. Seemed a more uneccesarily tedious way to do it, but even with a very dull No. 11 blade I made it work on the first try.  Not too bad. It just took cutting enough extra from my marks so that sanding into shape wouldn't remove too much from one side. Not too bad. =]

 Untitled by Britt Vallot, on Flickr

That's that for now. I hope to get some more done today as I get to be home playing daddy!  

On the bench:  

Tamiya F4U-1  Kenneth Walsh


  • Member since
    June 2013
Posted by bvallot on Monday, May 16, 2016 2:18 AM

Here's the last part to this. I managed to finally finish up the exterior conversions for the F-6D. Still needs to be tidied up a bit, but this is the gest of it. I had to be a little tricky trying to navigate this conical nature of this faring over the lense. Even after measuring out a pattern to cut it was still too tiny to work into shape like I needed. So I settled for cutting it into fourths and trimming a little off the end of my last piece as per my pattern. I bent them into a curve and glued them in place with Tamiya Extra Thin Cement. This helps to soften them as well and I can better tease them into shape. Not too bad. The last part is a disc I cut and glued on top with the Tamiya ETC again. This will settle overnight before I fool with it again. I want it to harden before I go over it with putty. 

 Untitled by Britt Vallot, on Flickr

Here is a dry fitting of this section all together.

 Untitled by Britt Vallot, on Flickr

Once this gets cleaned up, I'll be able to throw the interior together. With the exception of the camera, the rest ought to build up quickly and I'll be able to glue the cockpit in and close her up. =]

On the bench:  

Tamiya F4U-1  Kenneth Walsh


  • Member since
    June 2013
Posted by bvallot on Wednesday, May 18, 2016 11:35 PM

I managed a bit more with this camera bay. Now that I've got the bones up, I can move on to stringing up the cables for the elevators and rudder and other misc fiddly bits. Last will come the K-24 camera and "glass" for the camera ports.
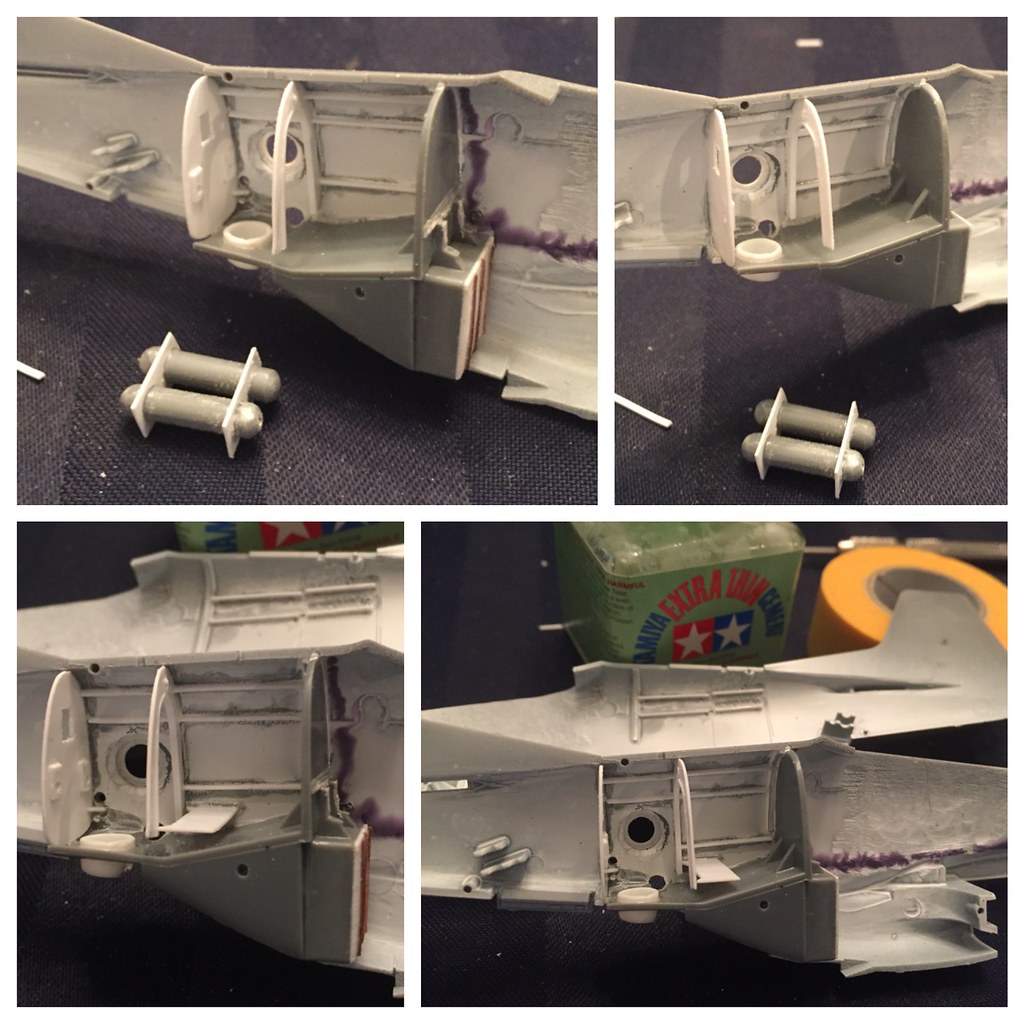
 Untitled by Britt Vallot, on Flickr

 Untitled by Britt Vallot, on Flickr
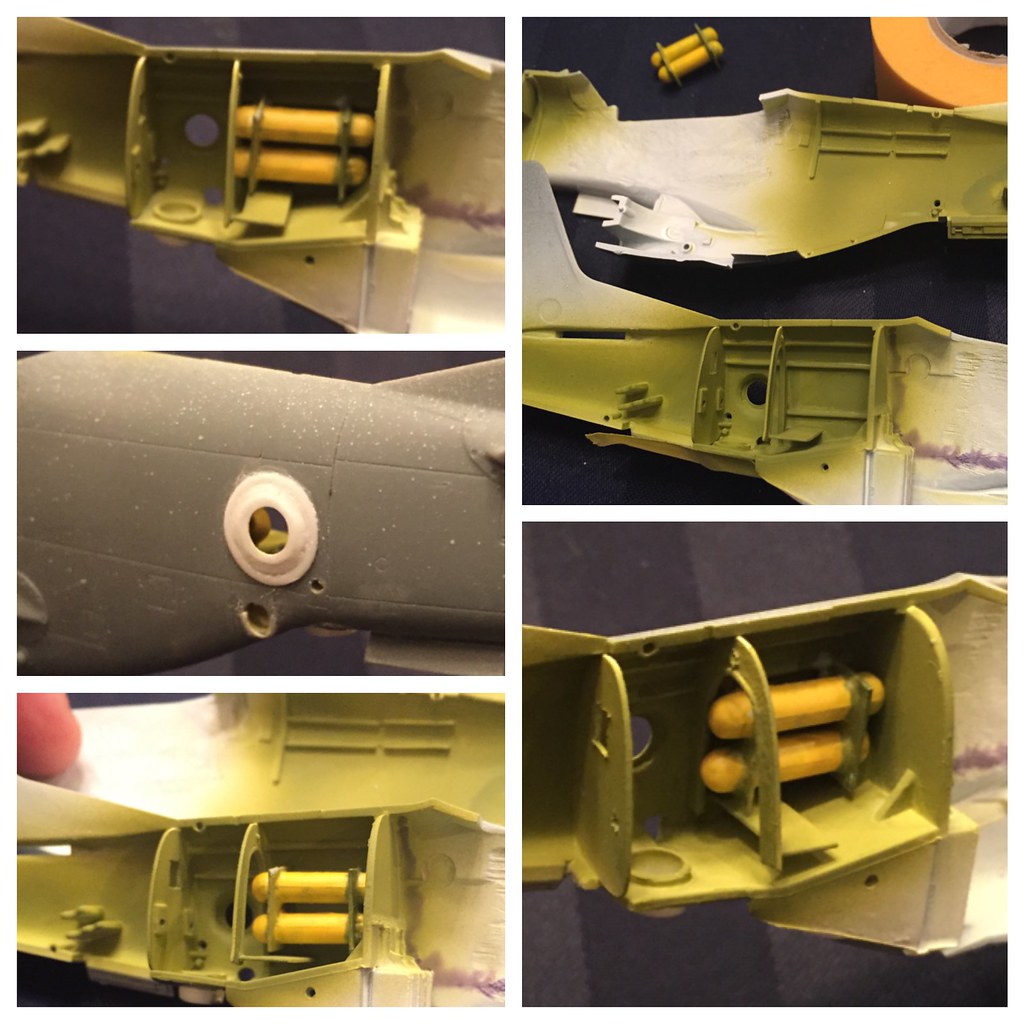
I figured since I drilled a huge hole into the side of my Mustang, I might as well fill this space with everything that would've been seen. =D Glad I did.

On the bench:  

Tamiya F4U-1  Kenneth Walsh


  • Member since
    June 2014
Posted by BrandonK on Thursday, May 19, 2016 10:31 AM

bvallot

I managed a bit more with this camera bay. Now that I've got the bones up, I can move on to stringing up the cables for the elevators and rudder and other misc fiddly bits. Last will come the K-24 camera and "glass" for the camera ports.

 Untitled by Britt Vallot, on Flickr

 Untitled by Britt Vallot, on Flickr

I figured since I drilled a huge hole into the side of my Mustang, I might as well fill this space with everything that would've been seen. =D Glad I did.


Thats an incredible amount of detail youre adding in. I love it. It just looks so good. Really nice work.

BK

On the bench:

A lot !! And I mean A LOT!!

2024 Kits on deck / in process / completed   

                         14 / 5 / 2  

                              Tongue Tied

  • Member since
    June 2014
Posted by BrandonK on Thursday, May 19, 2016 10:35 AM

Sorry, I haven't been on as much as usual; I've had a lot of other things getting in the way. My build had progressed in very little bits and nothing worth taking pictures of do to the snails pace of the build. I am now complete, however. And this is certainly worth taking pictures of. All in all, it turned out pretty well. The kit is very nice and has no issues. Fit is great and details are quite nice. Once again I fought the Alclad, but I am happy with the results. Not perfect but it gets the job done for this one. Thanks for looking guys.

BK

On the bench:

A lot !! And I mean A LOT!!

2024 Kits on deck / in process / completed   

                         14 / 5 / 2  

                              Tongue Tied

  • Member since
    June 2013
Posted by bvallot on Thursday, May 19, 2016 11:42 AM

Nice job Brandon. Good to see a clean one every once in a while. =]

Which picture would you like to see up front? Don't forget your badge.

On the bench:  

Tamiya F4U-1  Kenneth Walsh


  • Member since
    July 2014
Posted by modelcrazy on Thursday, May 19, 2016 11:44 AM
BK,
That is a great looking Stang. Is that the Hasegawa kit?

Steve

Building a kit from your stash is like cutting a head off a Hydra, two more take it's place.


http://www.spamodeler.com/forum/

  • Member since
    April 2010
Posted by Theuns on Thursday, May 19, 2016 11:47 AM

Brandon that is a very slick looking pony you got there, well done! I will update the pix pag, thanx for taking part.


Theuns

  • Member since
    June 2014
Posted by BrandonK on Thursday, May 19, 2016 3:43 PM

The first photo works for me. Thanks

BK

On the bench:

A lot !! And I mean A LOT!!

2024 Kits on deck / in process / completed   

                         14 / 5 / 2  

                              Tongue Tied

  • Member since
    April 2010
Posted by Theuns on Thursday, May 19, 2016 11:15 PM

I replaced the pic with the one you want but now cant get the other one deleted ....


Theuns

  • Member since
    June 2014
Posted by BrandonK on Saturday, May 21, 2016 11:20 AM

modelcrazy
 Is that the Hasegawa kit?
 

No sir, it is the Tamiya kit. Lovely kit to build, fit is excellent and details are quite nice.

BK

On the bench:

A lot !! And I mean A LOT!!

2024 Kits on deck / in process / completed   

                         14 / 5 / 2  

                              Tongue Tied

JOIN OUR COMMUNITY!

Our community is FREE to join. To participate you must either login or register for an account.

SEARCH FORUMS
FREE NEWSLETTER
By signing up you may also receive reader surveys and occasional special offers. We do not sell, rent or trade our email lists. View our Privacy Policy.