SEARCH FINESCALE.COM

Enter keywords or a search phrase below:

Star Trek 50th Anniversary Group Build

15015 views
286 replies
1 rating 2 rating 3 rating 4 rating 5 rating
  • Member since
    March 2010
  • From: Boston
Posted by mach71 on Tuesday, October 4, 2016 11:41 AM

I actually opened the box today!


The shape looks very nice. Much nicer than the old AMT kit.

Hopefully the decals will go on well, with no shattering as R2 decals

can do.


It's a small kit, I would like to add some lights to it. 


I really like the stand mounting at the rear of the ship.

  • Member since
    November 2009
  • From: SW Virginia
Posted by Gamera on Tuesday, October 4, 2016 7:31 AM

Oh, I didn't even think about them being printed parts.  In any case super glue should hold about anything. You can use epoxy too though it takes longer to dry. 

Here's a photo of some resin parts I took last night. Does it look anything like these?


There is a set of instructions around here somewhere on how to post photos. It's in one of the help sections though I don't remember where. I'm not good at explaining things but I'll take a whack at it. This is how I do it from PhotoBucket and my PC.  If you're using something else like ImageShack or an Apple I have no idea...

First you need an online photo hosting site. Open it and the FSM forum in separate windows. Open the posting box on the FSM site and then go to your photo hosting site. On PhotoBucket you'll see boxes under your photos, one says 'Direct'. Right-click and 'copy' the line of text in the box. Then come back over to the FSM site and you'll see an icon like a little mountain with a moon over it. Click on it and an 'Edit Image' box pops up. Right-click on the box labeled 'Source' and hit 'Paste'. Click 'Ok' and the photo should post. 

"I dream in fire but work in clay." -Arthur Machen


  • Member since
    September 2016
Posted by OWOF on Monday, October 3, 2016 6:46 PM

No problem, I'm figuring it out fine. I have the saucer all prepped to attach it, but want to cut out the windows first. I'll be on the road again for a week though and won't get a chance do anything. 

Any help on how to post pictures?

  • Member since
    September 2003
  • From: AandF in the Badger State
Posted by checkmateking02 on Monday, October 3, 2016 6:17 PM

I've worked with resin from time to time, and it doesn't sound from your description that resin is what your dealing with--but who knows what kinds of chemical conglomerations are around?

Sorry not to be of more help.


  • Member since
    September 2016
Posted by OWOF on Monday, October 3, 2016 5:08 PM

checkmateking02
OWOF: is it possible they are 3-D printed? I don't know what that would be made of.
 

i don't think so. They seem a little stout for what I've heard of 3D printers. It sands like hardened putty. Is resin like that?

  • Member since
    September 2003
  • From: AandF in the Badger State
Posted by checkmateking02 on Monday, October 3, 2016 4:19 PM
OWOF: is it possible they are 3-D printed? I don't know what that would be made of.


  • Member since
    September 2016
Posted by OWOF on Monday, October 3, 2016 9:27 AM

It might be resin, I'm not sure. I've never used custom replacement parts before.

I was going to post some pictures, but this thing is a little weird. 

  • Member since
    November 2009
  • From: SW Virginia
Posted by Gamera on Sunday, October 2, 2016 5:37 PM

Hey Mach 71 that sounds cool.

OWOF: Interesting, your replacement parts aren't plastic or resin then? I'd figure super-glue should work, it cements about anything. I like Gator Grip more myself but either should work.


"I dream in fire but work in clay." -Arthur Machen


  • Member since
    September 2016
Posted by OWOF on Sunday, October 2, 2016 4:40 PM

Been on the road working the past few weeks, so haven't had a chance to do much, but able to get a bit done before I head out again.

I'm not too worried about correcting all the inaccuracies in the AMT Enterprise kit, but the bridge and B/C decks are so glaring that I decided to replace them. I was a bit disappointed in the Federation Models' replacement parts. I'm making them work though. I'll post some pictures of how I did it later. 

One question. The replacement parts are not styrene. Not sure what they are made of but it reminds me of the white testors putty. Any recommendations on the best thing to use to glue the new parts into place?

  • Member since
    March 2010
  • From: Boston
Posted by mach71 on Saturday, October 1, 2016 9:04 PM

Sorry it took me so long to decide. I had a bit of the flu last week.


I'm going to go with the Polar Lights 1/1000 Romulan BOP.


If I have time I'll also build the AMT Tholian Web Enterprise.

  • Member since
    June 2010
  • From: Berwyn!
Posted by Beans on Monday, September 26, 2016 9:33 AM

Got some work done over the weekend (i.e. puttying and sanding), not too exciting. I'll post some stuff later when it looks like progress.

  • Member since
    May 2016
Posted by RockyD on Sunday, September 25, 2016 1:45 AM

Lol..the Terran empire had a good thing going for it till Kirk got into alternate Spocks head at the end of "mirror mirror"

  • Member since
    November 2009
  • From: SW Virginia
Posted by Gamera on Friday, September 23, 2016 5:13 PM

CMK02: Thanks for posting those!!! I have a few Heritage fantasy figures but I think they were out of business before I got into gaming.

They are pretty crude, not surprising considering the time period but you did a great job painting them!

And disco Talosians, don't even want to think about it!!! Indifferent

"I dream in fire but work in clay." -Arthur Machen


  • Member since
    June 2010
  • From: Berwyn!
Posted by Beans on Friday, September 23, 2016 5:00 PM

Happy Friday everyone!

Let's have a productive modeling weekend and lotsa pictures to post on Monday.

Captain's orders...

  • Member since
    June 2010
  • From: Berwyn!
Posted by Beans on Friday, September 23, 2016 4:09 PM

Ha! Those are cool. Thanks for bringing them out and sharing. Lotsa nostalgia going on there.

  • Member since
    September 2003
  • From: AandF in the Badger State
Posted by checkmateking02 on Friday, September 23, 2016 3:59 PM

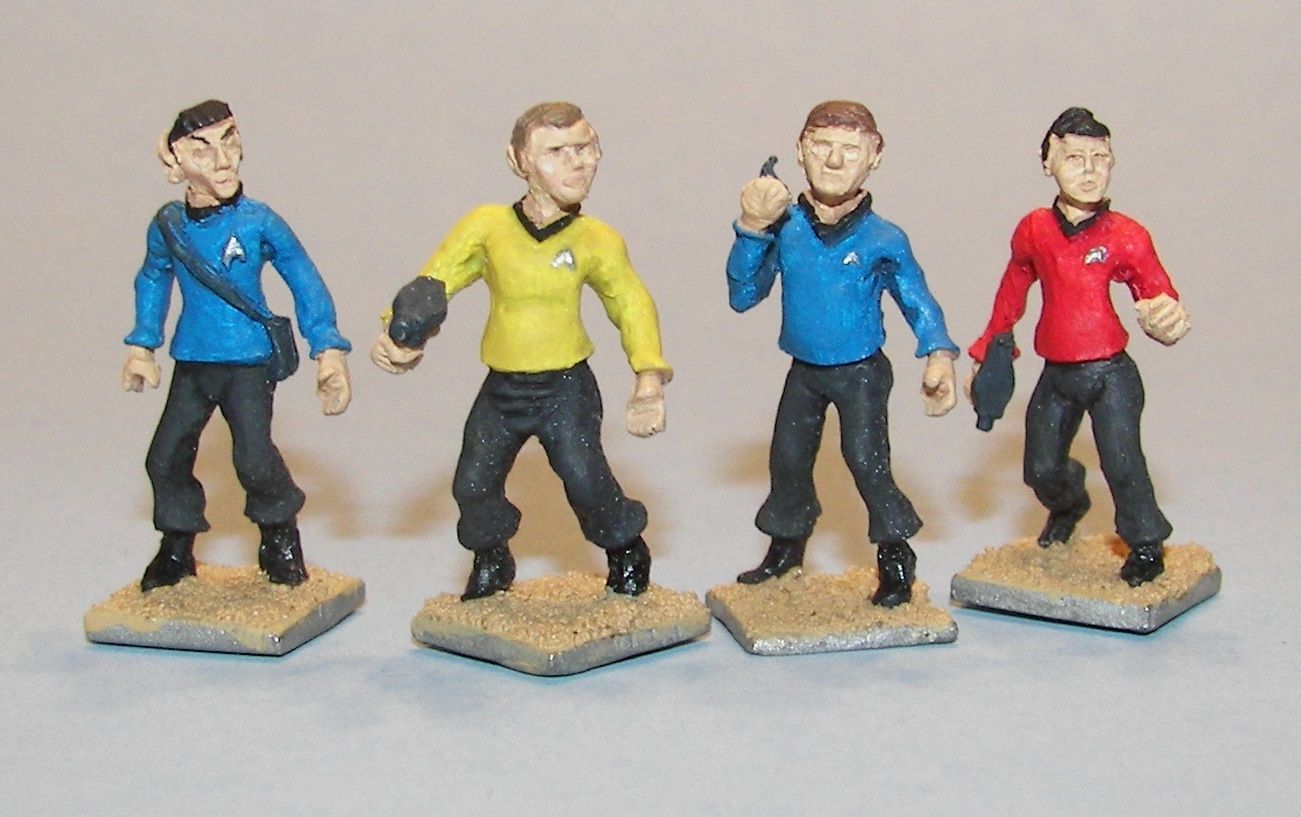
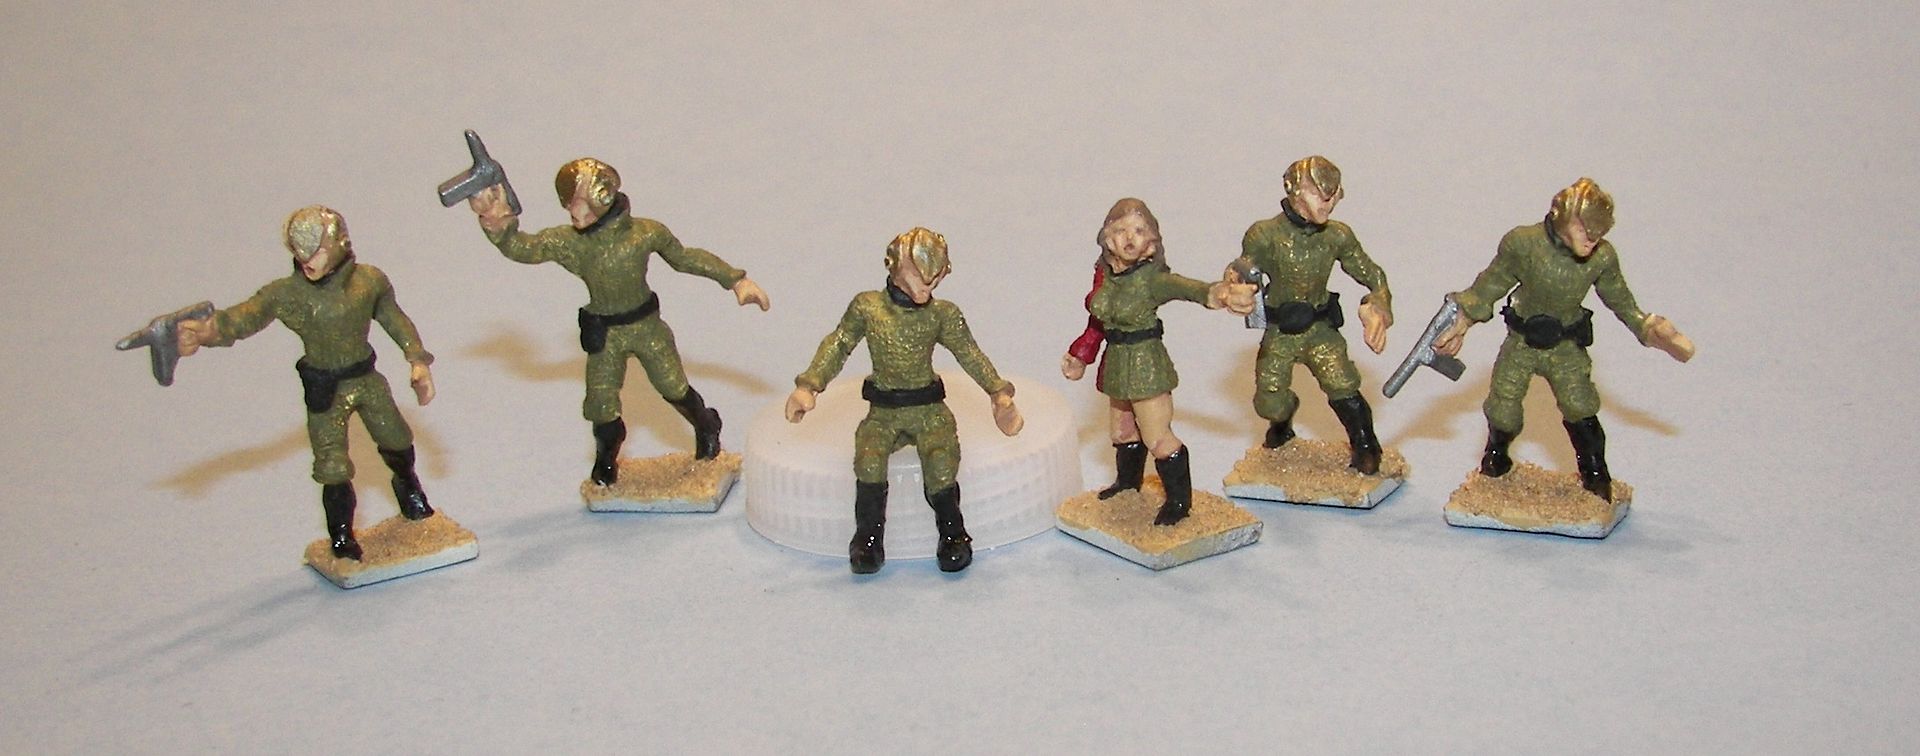
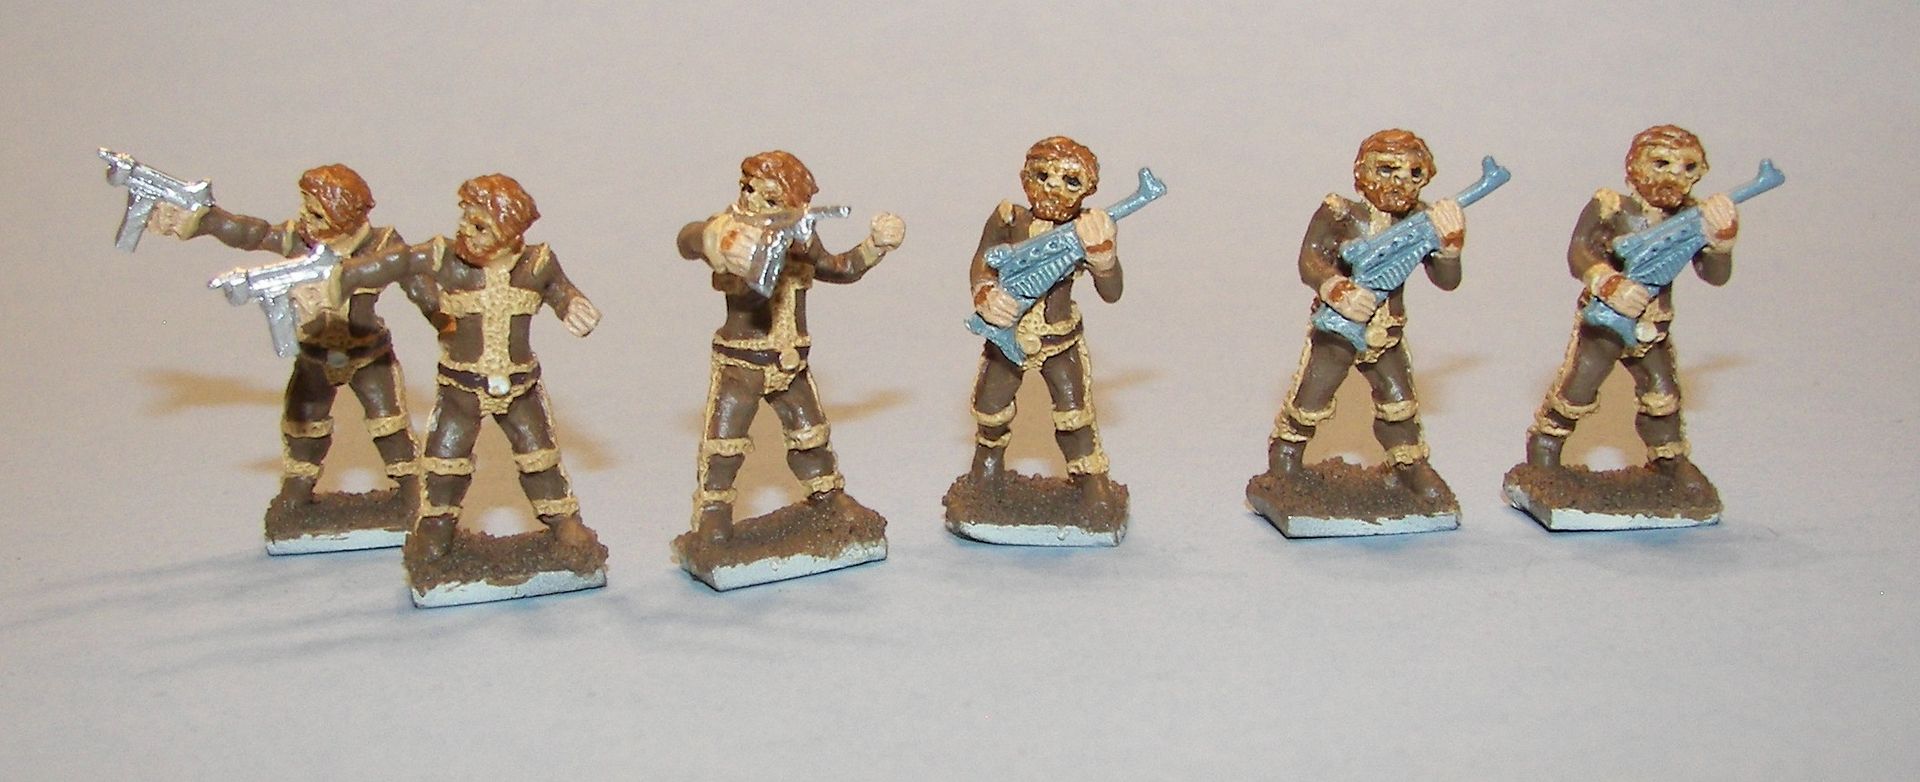
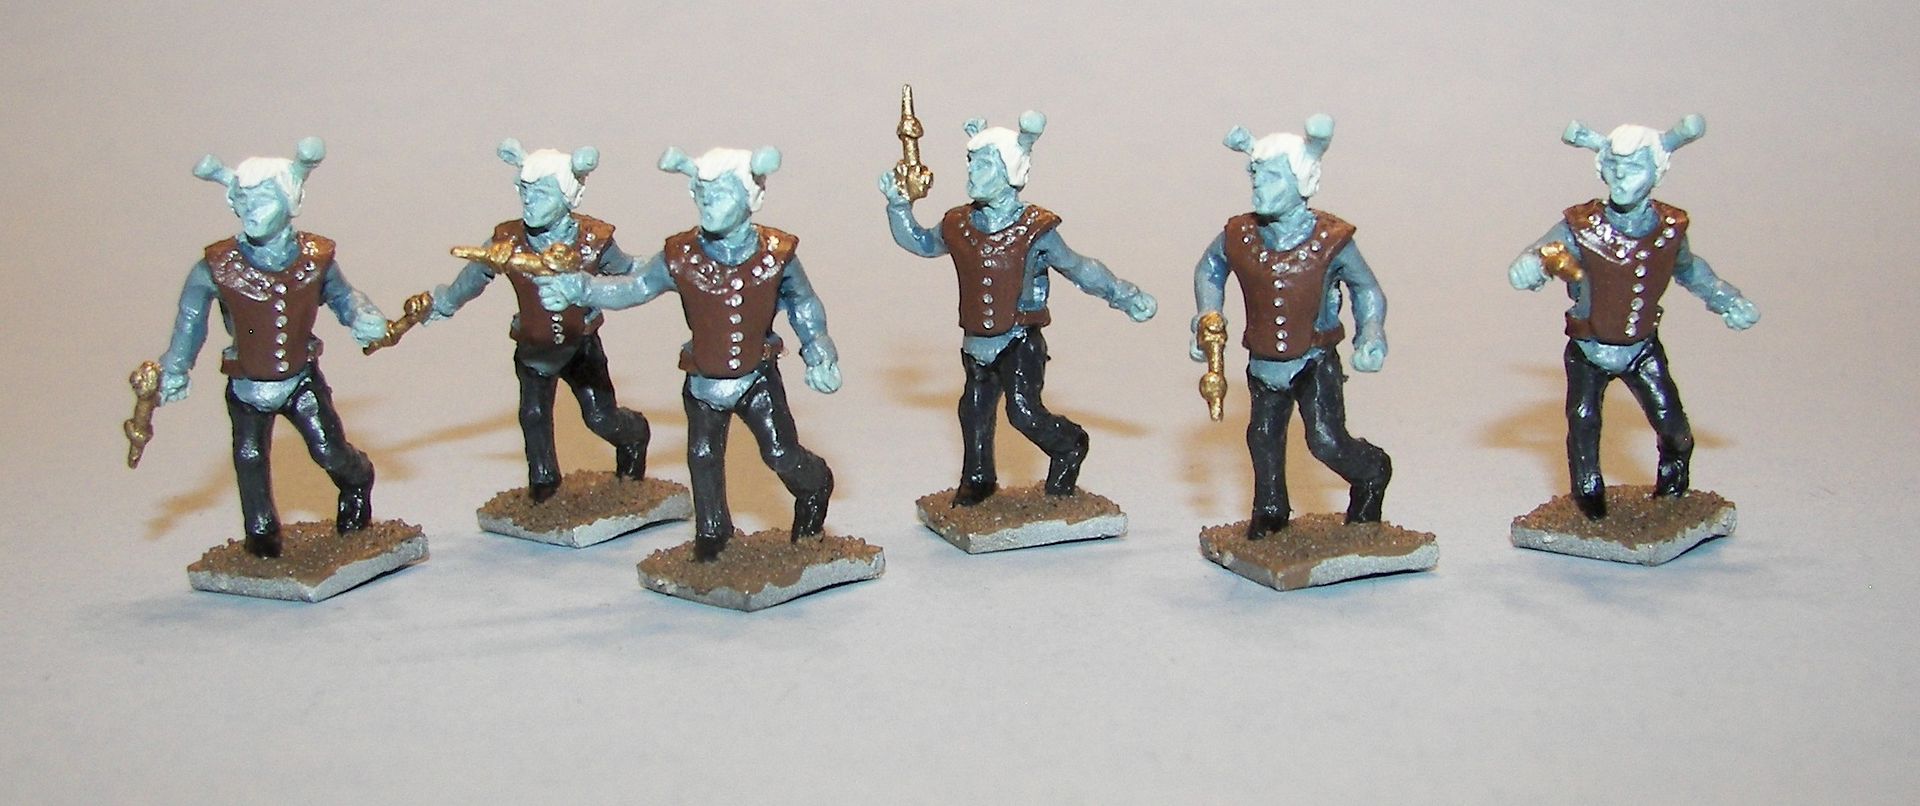
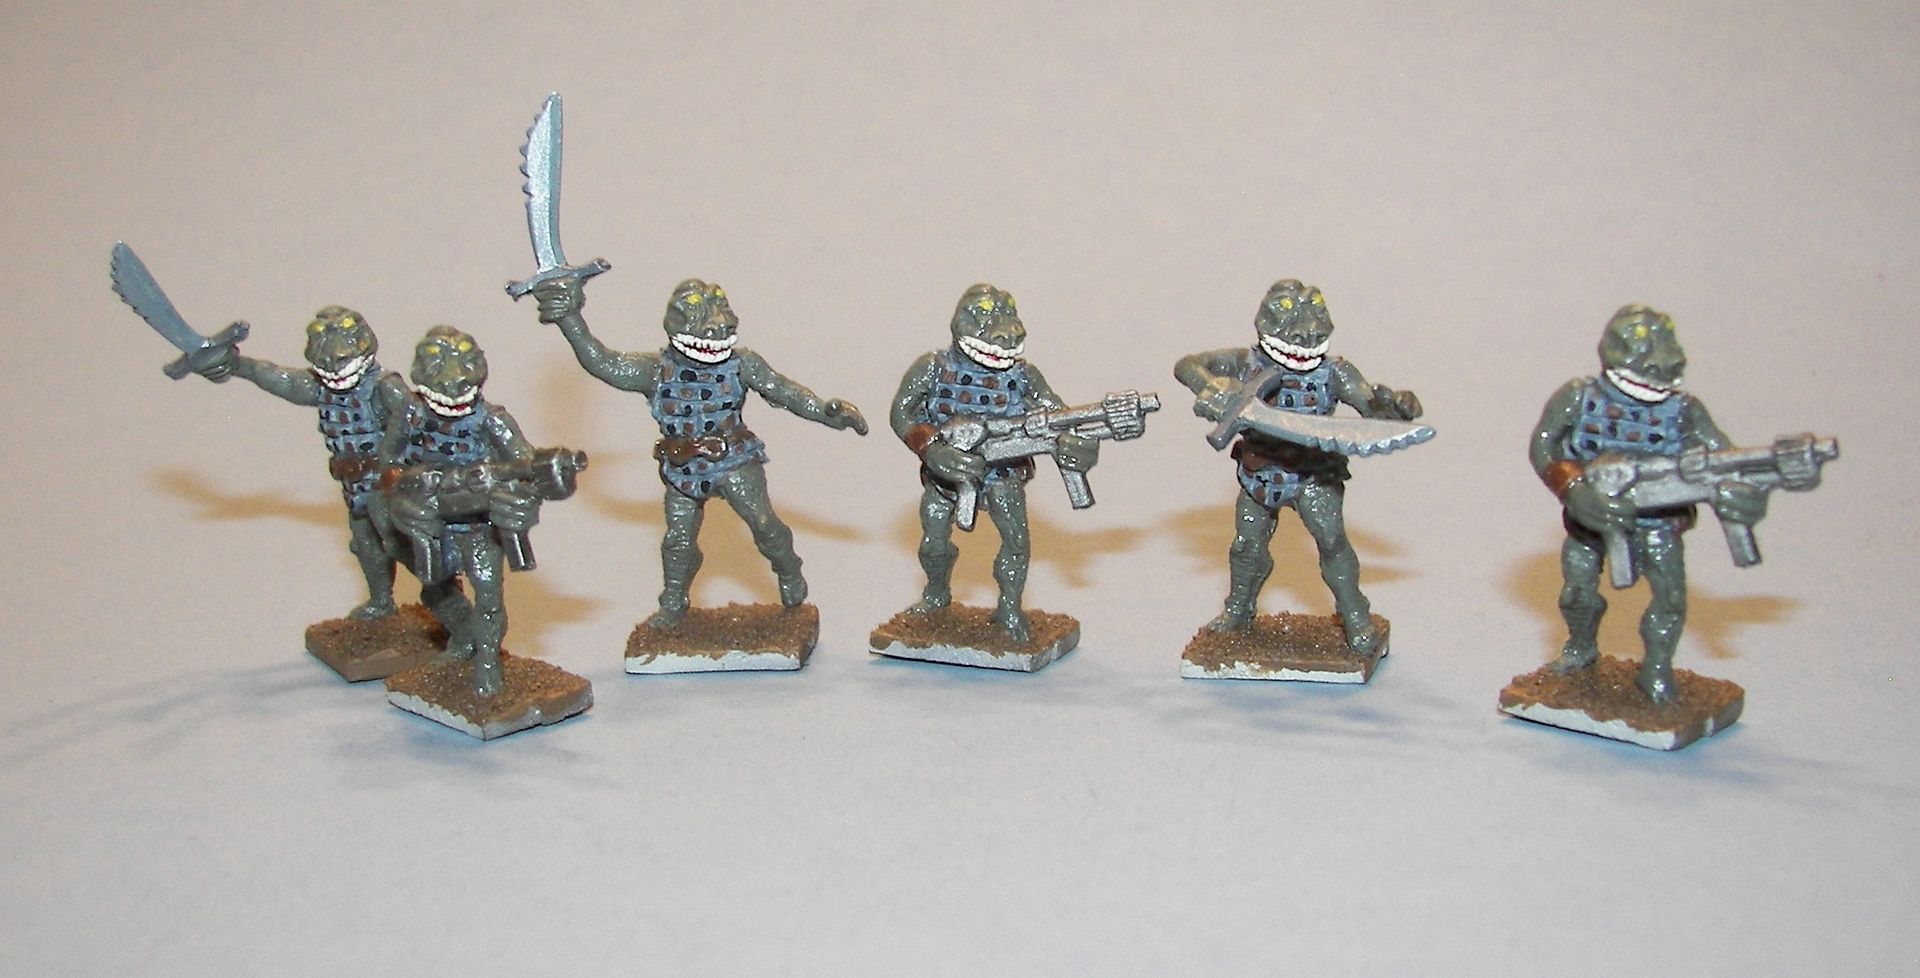
Took some time away from plastic to take photos of the old Heritage Models ST:TOS gaming miniatures.

Up close, the scupts are kind of crude, as was my painting of them!  I cringe!  Didn't have (and didn't think I needed!) a magnifier back then.

The odd shape of Mr. Spock's head bothered me.  The others are Kirk, McCoy, and Scotty.  Don't know why I painted the Starfleet insignia in sliver instead of gold.
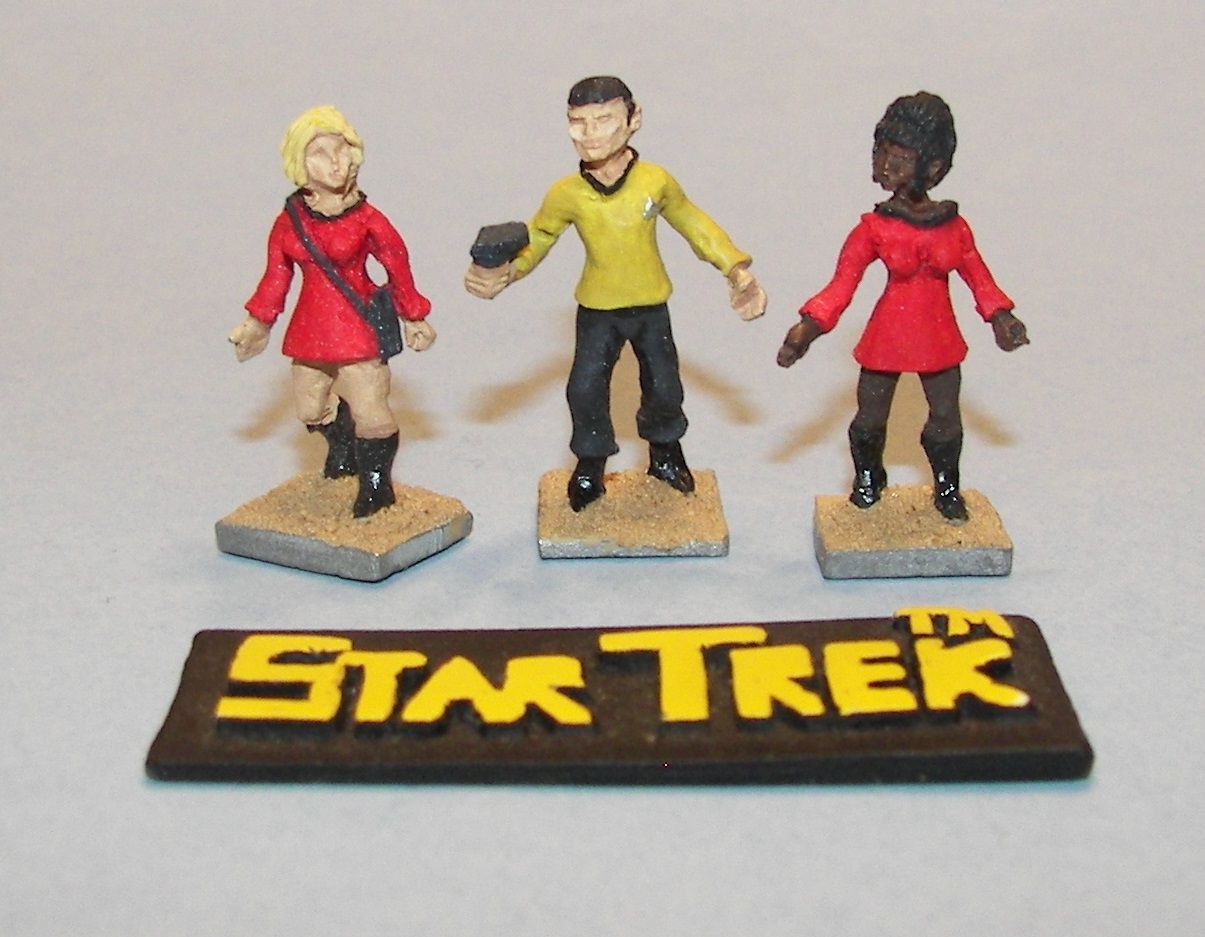
The bridge crew came in two parts, and I don't remember now who they packed with whom; but one of the sets came with the name-plate.  These are supposed to be Rand, Sulu and Uhura.  Strange, they didn't produce a Chekov.
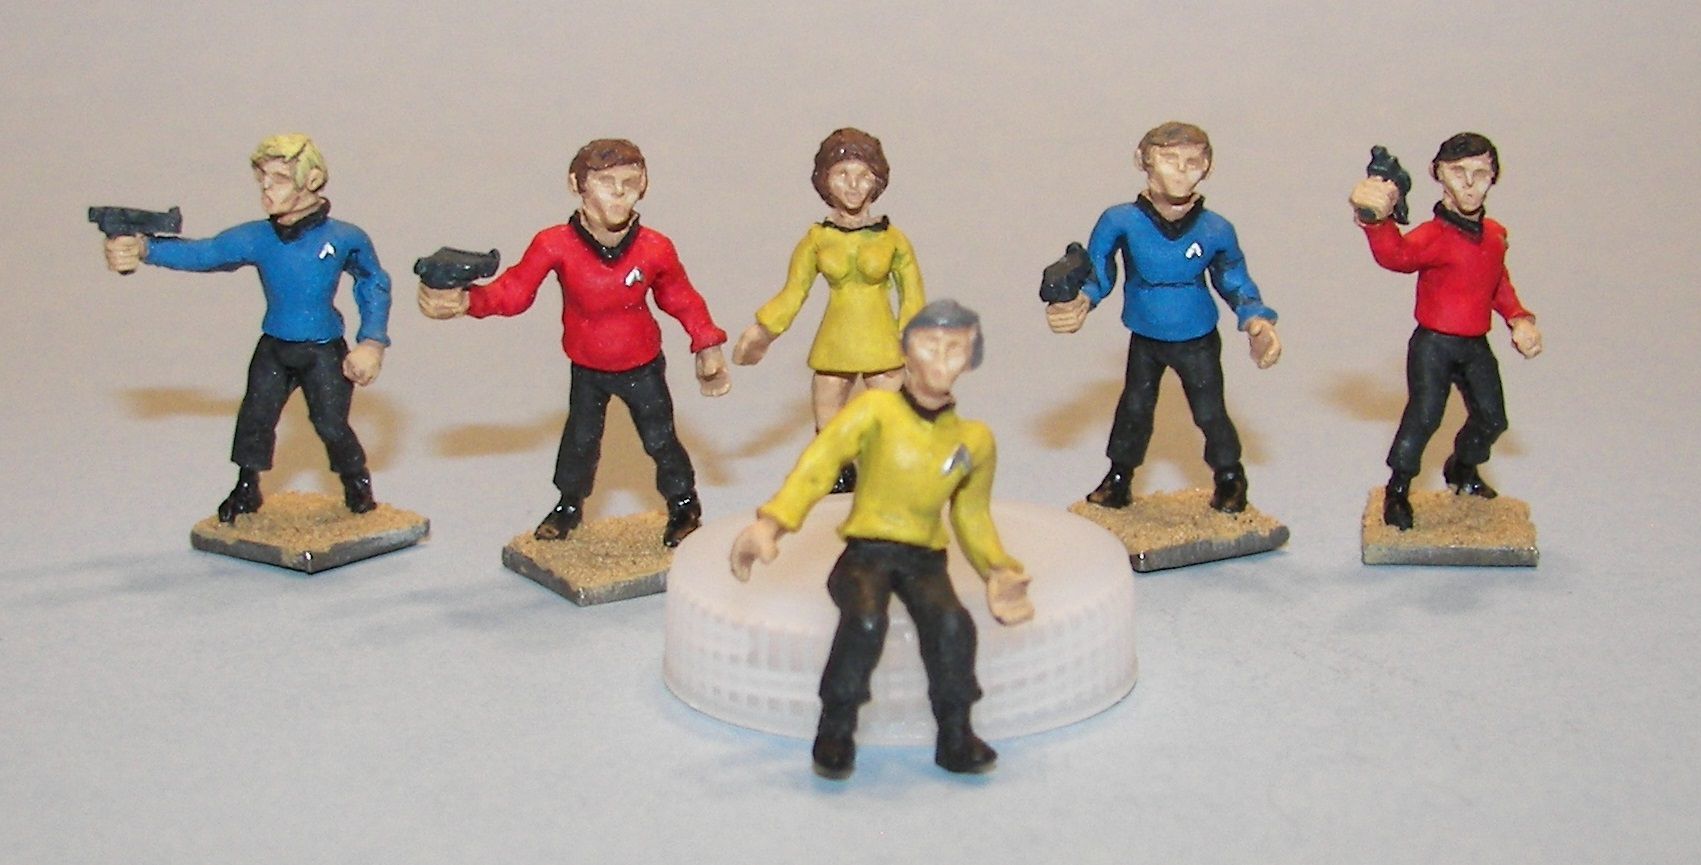
A few of the sets came with an annoying seated figure, which didn't seem to be much good for anything.  This is a set of generic, unspecified Federation types.  I gave the sitting guy gray hair to make him look like some aging admiral.
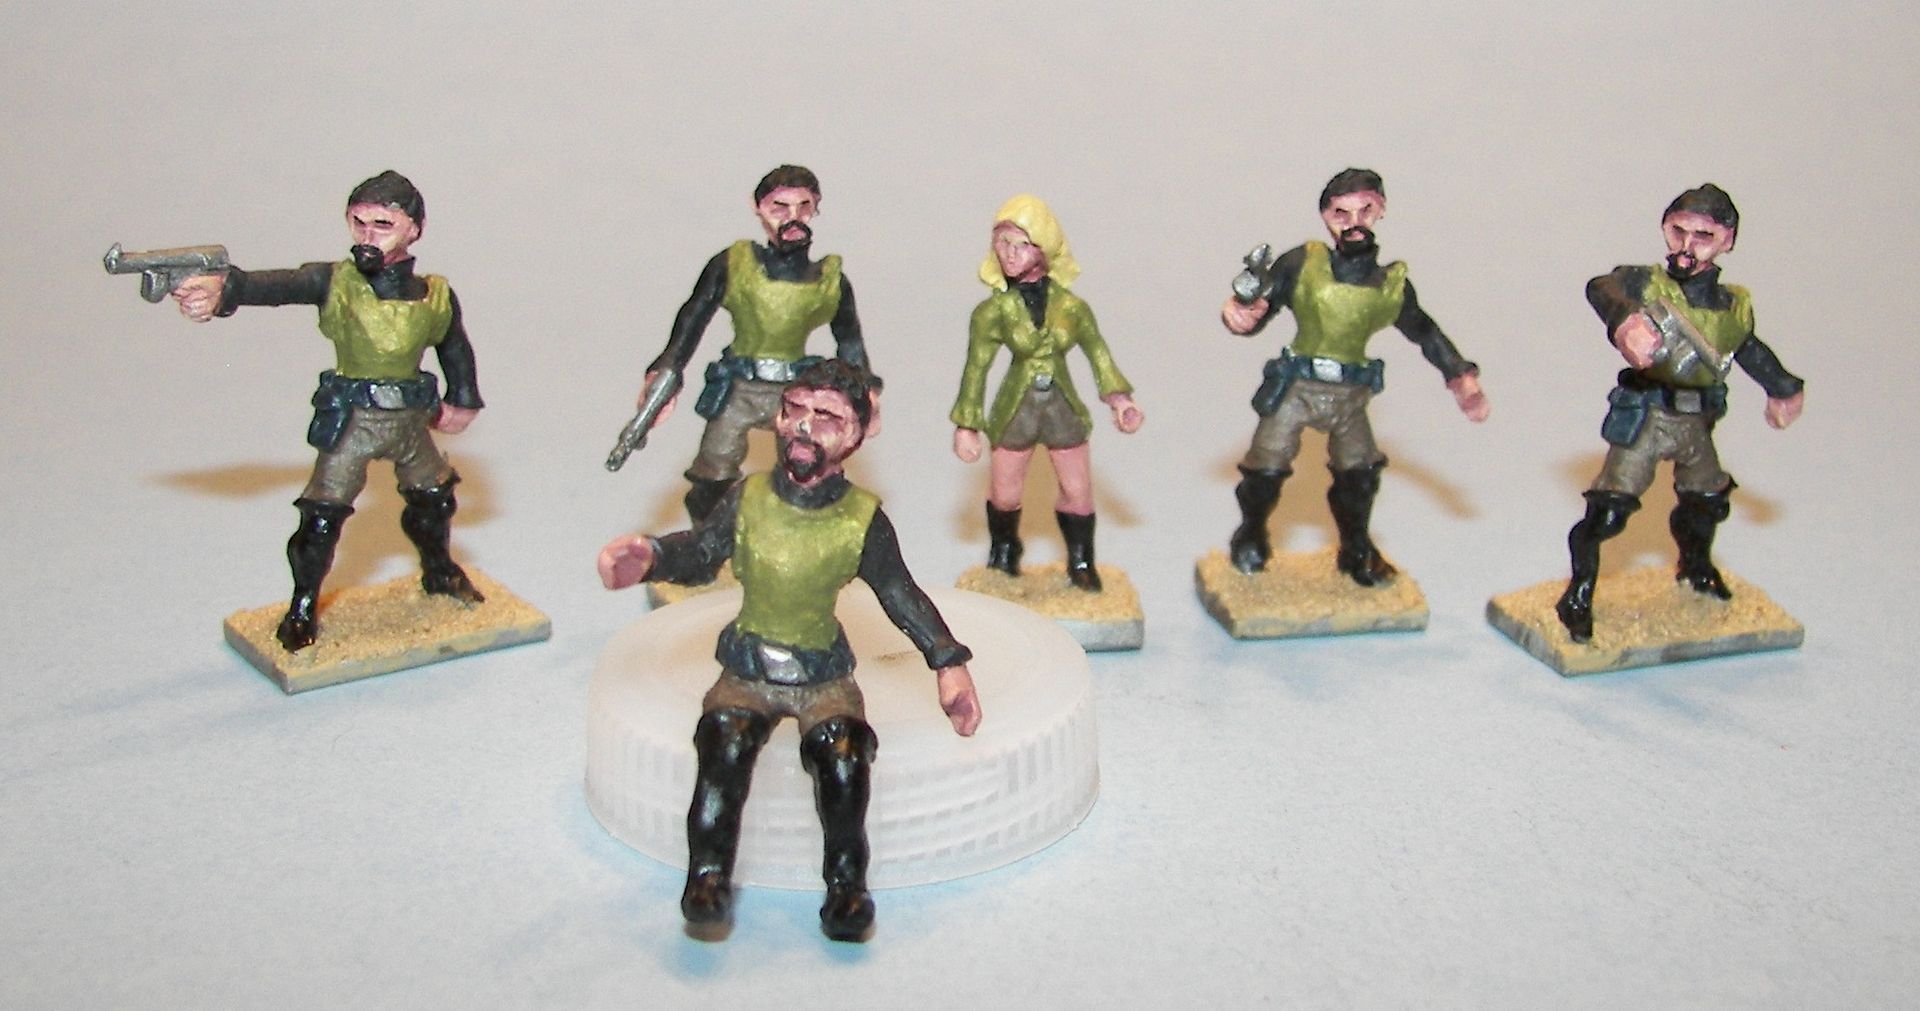
Klingons.  The female must be Kang's wife.
Romulans.  The female must be the Romulan commander.
Tellerites.
Andorians.  They really cheaped out on these.  Looks like there's only one pose.  Most of the packs featured at least two poses.  I bent arms and hands to try to make them look a little different.
Gorns.
Talosians.
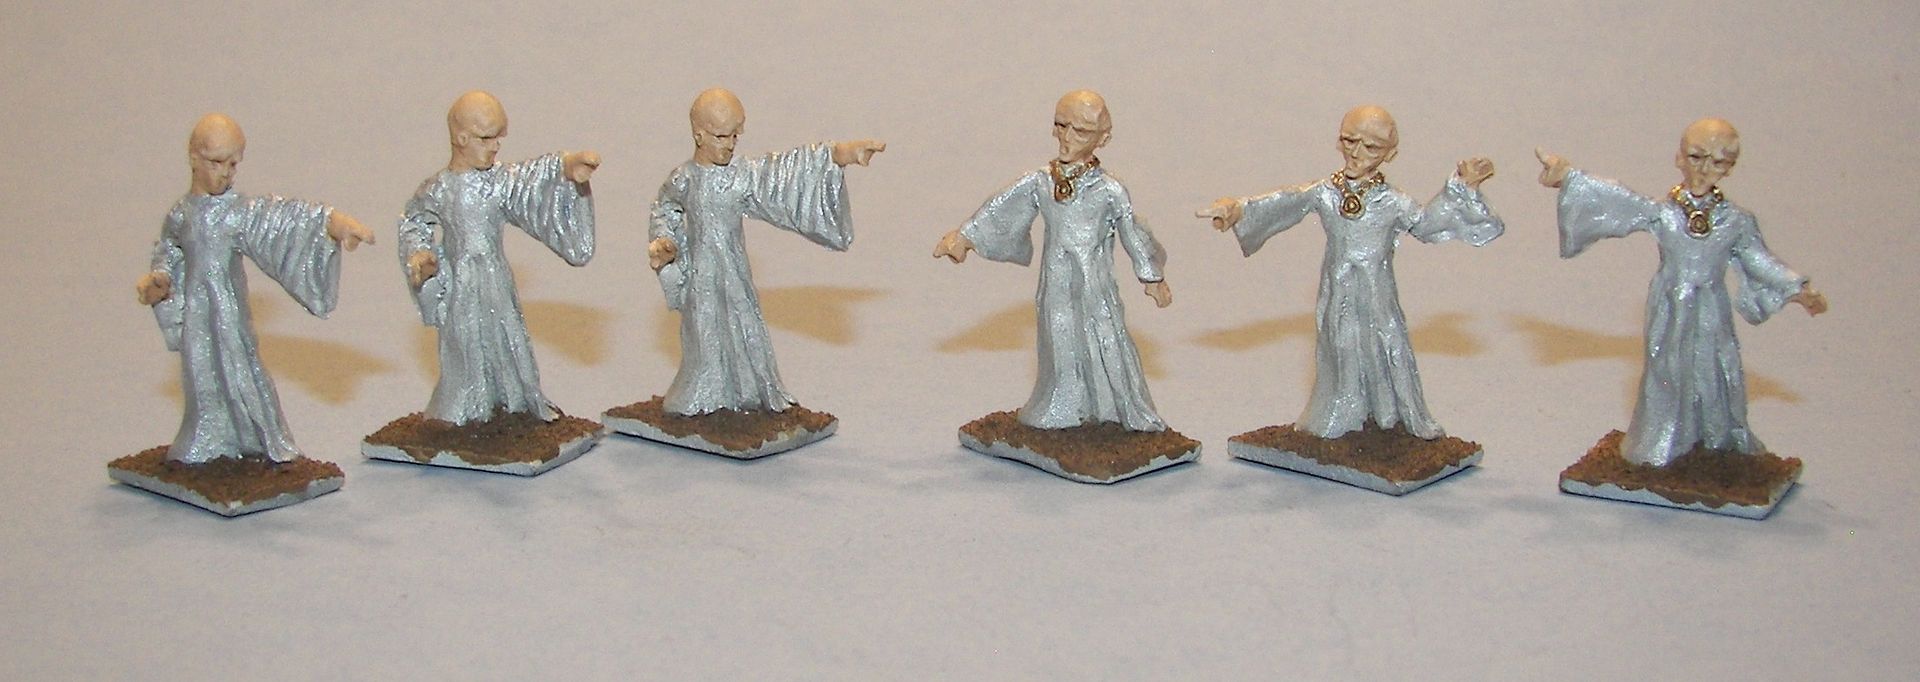
   

I thought the Talosians' poses were strangely familiar, and then I found this.

 

 It was the disco era when these were produced.  ST:TMP hadn't even been released yet.

Memory Alpha has a little more information on these.

http://memory-alpha.wikia.com/wiki/Heritage_Models


  • Member since
    November 2009
  • From: SW Virginia
Posted by Gamera on Friday, September 23, 2016 7:51 AM

Thanks Rocky, that's a good idea- I hadn't thought about using a punch to get a good round hole in the tape. 

You're a good guy despite your dubious alleigence to the Cardassian-Klingon Allience. Stick out tongue

All hail the Terran Empire!!!  

"I dream in fire but work in clay." -Arthur Machen


  • Member since
    May 2016
Posted by RockyD on Friday, September 23, 2016 3:51 AM

I painted the nav lights last, I have a set of small punches that I punched holes in some tamiya tape and put it over the lights and painted them while the model was gloss coated for decals so any tape residue could be easily cleaned up.

hope this helps, Rocky


  • Member since
    June 2010
  • From: Berwyn!
Posted by Beans on Wednesday, September 21, 2016 2:20 PM

iSteve


Beans

Gotta share...

My wife gave me a sheet of Star Trek forever stamps she picked up from the post office yesterday.

Cool huh?


Very cool. Canada Post has a couple of sets available too that I'd like to get. Check out canadapost.ca

I'm tempted to cross the border for a set.

Then, of course, stop by a Tim Horton's for a sack of Canadian Maple's. Oh, and I can't forget to pick up some Red Cap Stubbies too. It's been awhile since I've visited the Great White North.

  • Member since
    November 2009
  • From: SW Virginia
Posted by Gamera on Wednesday, September 21, 2016 7:33 AM

Hey thanks guys. Hope I'll get a little more work done this weekend. 

Beans, I'm with you man- seams are the most hated thing about modeling here as well. Only thing that comes close is making canopies. 

"I dream in fire but work in clay." -Arthur Machen


  • Member since
    September 2003
  • From: AandF in the Badger State
Posted by checkmateking02 on Tuesday, September 20, 2016 10:42 PM

Despite the flaws, you've got it looking good, Gamera.  


  • Member since
    June 2010
  • From: Berwyn!
Posted by Beans on Tuesday, September 20, 2016 2:27 PM

Gamera: That’s coming along nicely.

That’s such a cool looking ship. Every time I see it.

About seams...

Working off seams is the one thing I hate most in modeling. I spend 60% of my time working off seams.

 The deflector shield grid ribs don't line up well either. I'm considering how much time I want to spend sweating over a mediocre kit.

  • Member since
    November 2009
  • From: SW Virginia
Posted by Gamera on Tuesday, September 20, 2016 7:23 AM

If I could find my boatswain's whistle I'd pipe Mach 71 aboard.... Wink

Beans: Yow, that is a bunch of seams. It least there's not much detail to sand off. 


I've gotten most of my kit together. I think the nacelles are mostly straight. Not sure how to mask off the bridge and lower domes and the navigation lights. I'm thinking about using white glue as a liquid mask. 


"I dream in fire but work in clay." -Arthur Machen


  • Member since
    March 2010
  • From: Boston
Posted by mach71 on Monday, September 19, 2016 7:46 PM

Thanks!


Now I have to figure out what to build. I'm leaning towards the Classic AMT Enterprise

Tholian Web edition, or maybe the Polar Lights small Enterprise/ Botney Bay. But I do have a Marco enterprise TOS Tricorder to build...


So many choices. I'll pick by the end of the week.

  • Member since
    September 2003
  • From: AandF in the Badger State
Posted by checkmateking02 on Monday, September 19, 2016 5:40 PM

Nice start, Beans. I remember the AMT Star Trek ships always have lots of heavy seams to deal with.


  • Member since
    June 2010
  • From: Berwyn!
Posted by Beans on Monday, September 19, 2016 11:57 AM

Dry-fitting...

Ugh, seams!

I see lotsa puttying and sanding in my future...

At least the starship gave no heartache...

Sadly, I probably won't see the workbench until Wednesday night. That's all for now.

  • Member since
    June 2010
  • From: Berwyn!
Posted by Beans on Monday, September 19, 2016 11:16 AM

mach71

Can I get in on this? I don't know I missed this.


Not sure what I'll build, I have a very wide collection of trek stuff.

You're in like Flyn, mach71. We were waiting for you. We're just getting started.

  • Member since
    March 2010
  • From: Boston
Posted by mach71 on Sunday, September 18, 2016 9:03 PM

Can I get in on this? I don't know I missed this.


Not sure what I'll build, I have a very wide collection of trek stuff.

  • Member since
    November 2009
  • From: SW Virginia
Posted by Gamera on Friday, September 16, 2016 7:42 AM

Hey Steve, thanks for trying to help. I can use every little bit! 

And Rocky, thanks too. I was really starting to wonder how I'd screwed the kit up. 

"I dream in fire but work in clay." -Arthur Machen


  • Member since
    May 2016
Posted by RockyD on Friday, September 16, 2016 2:27 AM

Your not alone here..I have built this kit and had the exact problem you are describing...and I did the pretty much the same thing you did but with brass rod and 5 min epoxy, I did build a jig out of legos to keep them both straight


JOIN OUR COMMUNITY!

Our community is FREE to join. To participate you must either login or register for an account.

SEARCH FORUMS
FREE NEWSLETTER
By signing up you may also receive reader surveys and occasional special offers. We do not sell, rent or trade our email lists. View our Privacy Policy.