SEARCH FINESCALE.COM

Enter keywords or a search phrase below:

75th Anniversary of 1942 (World at War)

39074 views
860 replies
1 rating 2 rating 3 rating 4 rating 5 rating
  • Member since
    February 2010
  • From: Berkeley CA/St. Paul MN
Posted by EBergerud on Sunday, October 29, 2017 3:12 AM
I haven't got the feel of using paper, although I've seen some really good tarps etc made with it. I really like Aves Apoxie Sculpt for that kind of thing. The stuff isn't cheap but doesn't dry out so it lasts a long time. Very good filler too. Eric


A model boat is much cheaper than a real one and won't sink with you in it.

  • Member since
    September 2016
  • From: Albany, New York
Posted by ManCityFan on Sunday, October 29, 2017 6:59 AM

jgeratic

Hi Dwayne, solid T-34 you have there, looks very good. Yes

regards,

Jack


  Thanks Jack.  I know this has been described as a "beginner kit", but I had fun building it, and got to try out some new techniques.  Came out better than I was expecting.  Big Smile

Dwayne or Dman or just D.  All comments are welcome on my builds. 

  • Member since
    September 2016
  • From: Albany, New York
Posted by ManCityFan on Sunday, October 29, 2017 7:04 AM

modelcrazy

Well done D.

Oils are fun to work with. Try making the bedrolls out of tissue paper. They look realistic and conform perfectly. 


Thank you.  Yes, oils are fun to work with.  I was able to get some of the effects I was looking for.  Based on many posts on the forum, I knew this was something I had to try.  Tissue paper....yes, I remember seeing this somewhere, I think even in one of my ancient how to build armor books.  That is an excellent suggestion.

Dwayne or Dman or just D.  All comments are welcome on my builds. 

  • Member since
    September 2016
  • From: Albany, New York
Posted by ManCityFan on Sunday, October 29, 2017 7:12 AM

EBergerud
I haven't got the feel of using paper, although I've seen some really good tarps etc made with it. I really like Aves Apoxie Sculpt for that kind of thing. The stuff isn't cheap but doesn't dry out so it lasts a long time. Very good filler too. Eric
 

Thanks Eric.  I actually was thinking that the T-34 didn't tend to last very long.  I recently read a book about the battle of Kursk, and throughout the book, the casualties taken by T-34's was pretty shocking.  

I did add some pigment to give it a dusty, dirty look, but that doesn't seem to show up well in the pics.

Thanks for the info on the armor guy.  I am definitely going check that out.  Love to hear armor ubergeeks!  Geeked

Getting positive feedback from this group means a lot to me.  

D

Dwayne or Dman or just D.  All comments are welcome on my builds. 

  • Member since
    September 2016
  • From: Albany, New York
Posted by ManCityFan on Sunday, October 29, 2017 12:42 PM

One last post, and then I will stop.  Here is a close-up that shows the pigment better.

Thanks again to all for encouragement and helpful suggestions. 

Looking forward to more updates from the group!

Dwayne or Dman or just D.  All comments are welcome on my builds. 

  • Member since
    April 2006
  • From: ON, Canada
Posted by jgeratic on Sunday, October 29, 2017 10:15 PM

Oh cool, now with that close up can see the pigment powders - what did you use to suspend them to the tank surface?

regards,

Jack

  • Member since
    December 2002
  • From: Bury St Edmunds, Suffolk, England
Posted by Bish on Monday, October 30, 2017 5:15 AM

Dwayne, great finish on the 34, really nice job with the pigments. I see you went for the black rope, i like the look of that. Will have to get some.

I am a Norfolk man and i glory in being so


On the bench: Airfix 1/72nd Harrier GR.3/Fujimi 1/72nd Ju 87D-3

  • Member since
    December 2002
  • From: Bury St Edmunds, Suffolk, England
Posted by Bish on Monday, October 30, 2017 5:16 AM

Impresive work there Eric, really nice.

I am a Norfolk man and i glory in being so


On the bench: Airfix 1/72nd Harrier GR.3/Fujimi 1/72nd Ju 87D-3

  • Member since
    December 2002
  • From: Bury St Edmunds, Suffolk, England
Posted by Bish on Monday, October 30, 2017 5:19 AM

Great work on the Spit Jack, some nice touches there.

I am a Norfolk man and i glory in being so


On the bench: Airfix 1/72nd Harrier GR.3/Fujimi 1/72nd Ju 87D-3

  • Member since
    September 2014
Posted by rooster513 on Monday, October 30, 2017 6:32 AM

That Spitfire is really coming along Jack!

I was able to get the rest of the camo sprayed over the weekend. RLM mottling on the right side and white on the left and the wings. The white was sprayed with Mission Models and didn't perform as nicely as the RLM 74/75. I may just need to play around with ratio's some though.
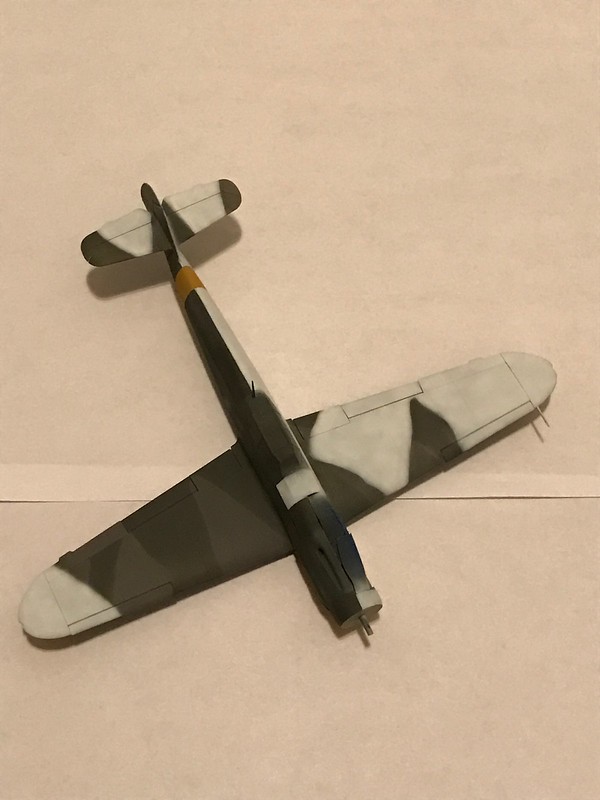
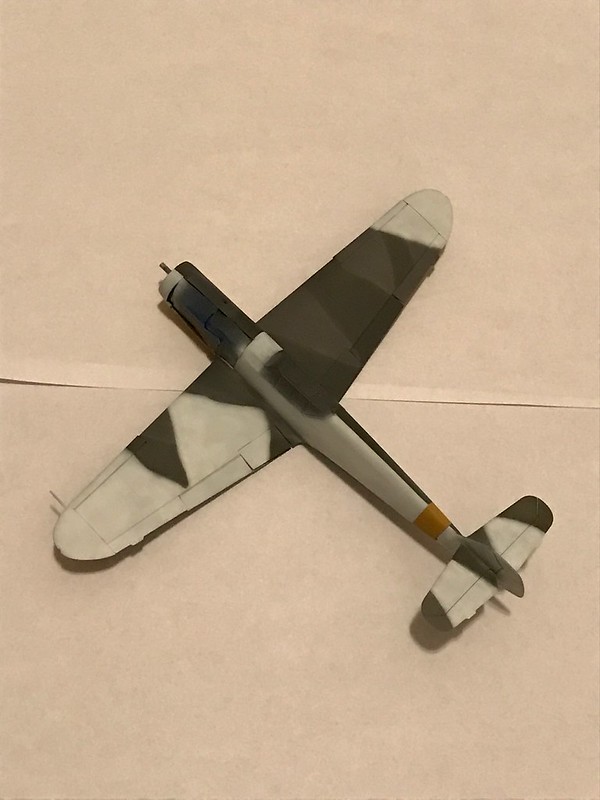
I'll weather this up some with a post shade and then on to decals!

-Andy

  • Member since
    September 2016
  • From: Albany, New York
Posted by ManCityFan on Monday, October 30, 2017 7:56 AM

jgeratic

Oh cool, now with that close up can see the pigment powders - what did you use to suspend them to the tank surface?

regards,

Jack


Thanks Jack.  Actually, I didn't use anything to suspend the powder.  I wanted to see what would happen if I just brushed it on dry.  It looks great now, but too much handling will knock it off.  I am wondering if a coat of Dullcote would help seal it in.  Have not tried it because I think that might change the color/texture.  This will be going into a plastic bin until I can get a display case of some type, so it should be OK the way it is.  I used Russian Earth pigment, but the way.  How could I go wrong with that?  Smile

Dwayne or Dman or just D.  All comments are welcome on my builds. 

  • Member since
    September 2016
  • From: Albany, New York
Posted by ManCityFan on Monday, October 30, 2017 8:01 AM

Bish

Dwayne, great finish on the 34, really nice job with the pigments. I see you went for the black rope, i like the look of that. Will have to get some.


Thanks Bish.  I was advised by GMorrison to get the darker color rope, as new rope looks funny.  Great suggestion, as I can see a weathered tank with new rope not looking right.  Quality product at a reasonable price.  Done by a modeler for modelers.  All good in my book! 

Dwayne or Dman or just D.  All comments are welcome on my builds. 

  • Member since
    December 2002
  • From: Bury St Edmunds, Suffolk, England
Posted by Bish on Monday, October 30, 2017 8:04 AM

Ye, GM is right about that. I did weather mine a little but they still look to clean, i am think about maybe adding a light oil wash next time, dirty it up a bit. But i also like the look of the black rope. At just over a £ a real, whats to lose.

I am a Norfolk man and i glory in being so


On the bench: Airfix 1/72nd Harrier GR.3/Fujimi 1/72nd Ju 87D-3

  • Member since
    September 2016
  • From: Albany, New York
Posted by ManCityFan on Monday, October 30, 2017 8:18 AM

Hey Andy, that is coming along nicely.  I have read that yellow and white can be the hardest colors to spray well, and I can vouch for yellow.  Have not had the (dis)pleasure of spraying white yet.  Looks like you conquered it, though.

Dwayne or Dman or just D.  All comments are welcome on my builds. 

  • Member since
    September 2014
Posted by rooster513 on Monday, October 30, 2017 8:49 AM

Dwayne, love the weathering in your tank! Very nicely done!

-Andy

  • Member since
    April 2006
  • From: ON, Canada
Posted by jgeratic on Monday, October 30, 2017 10:37 AM

Thank you Bish and Andy.

-----------------------------------

I like the look of the white wash.  The slight transparency is an interesting effect, and probably more realistic too.

-----------------------------------

Dwayne, couple thoughts on 'fixing' the pigments to the vehicle.  You can spray a flat coat, but you will likely lose some pigment from the air pressure.  Try holding the airbrush a couple feet away and just let a mist coating fall  onto the surface. 

Another option is Tamiya's acrylic thinner, the one that smells like rubbing alcohol. Apply with a loaded painted brush, but only on the top edge and let it run down the sides via gravity.  Soak the whole area this way and let dry.  If it pools at the lower end, lightly dab the bottom edge with a paper tisssue.


regards,
Jack

  • Member since
    December 2002
  • From: Bury St Edmunds, Suffolk, England
Posted by Bish on Monday, October 30, 2017 10:49 AM

rooster513

That Spitfire is really coming along Jack!

I was able to get the rest of the camo sprayed over the weekend. RLM mottling on the right side and white on the left and the wings. The white was sprayed with Mission Models and didn't perform as nicely as the RLM 74/75. I may just need to play around with ratio's some though.

I'll weather this up some with a post shade and then on to decals!


I like that scheme, i take it thats a partially completed white wash as i did on my Stuka a while back.

I am a Norfolk man and i glory in being so


On the bench: Airfix 1/72nd Harrier GR.3/Fujimi 1/72nd Ju 87D-3

  • Member since
    September 2014
Posted by rooster513 on Monday, October 30, 2017 11:49 AM

Bish


rooster513

That Spitfire is really coming along Jack!

I was able to get the rest of the camo sprayed over the weekend. RLM mottling on the right side and white on the left and the wings. The white was sprayed with Mission Models and didn't perform as nicely as the RLM 74/75. I may just need to play around with ratio's some though.

I'll weather this up some with a post shade and then on to decals!


I like that scheme, i take it thats a partially completed white wash as i did on my Stuka a while back.


Thanks guys! Yes Bish it's a partial white wash but not an "in process" like you did. This is the scheme Ostermann used on his 109. You can see it in the pics below. This was one of the two markings available in the boxing and wanted to give it a try.

-Andy

  • Member since
    September 2003
  • From: AandF in the Badger State
Posted by checkmateking02 on Monday, October 30, 2017 12:57 PM

Eric:  nice work getting a "relic" look to your panzer; quite realistic.

Andy:  clever paint scheme on your 109; I've not seen that one before.  And information about why it was a 1/2 and 1/2 design?

Dwayne:  I've posted your finished T-34 photo, including the shoe!  But I did crop it a bit so that the shoe wouldn't upstage the tank.  Plus, the shoe wasn't nearly so well weathered as the effect you achieved on the T-34.  Very believable!  Good work!

Thanks for being part of the GB.  It's always a pleasure to see your modeling skills at work. 


  • Member since
    September 2016
  • From: Albany, New York
Posted by ManCityFan on Monday, October 30, 2017 1:28 PM

Hey, thanks Check for hosting the GB.  I am very pleased to have my first GB badge.

Dwayne or Dman or just D.  All comments are welcome on my builds. 

  • Member since
    December 2002
  • From: Bury St Edmunds, Suffolk, England
Posted by Bish on Monday, October 30, 2017 3:10 PM

rooster513
 
Bish


rooster513

That Spitfire is really coming along Jack!

I was able to get the rest of the camo sprayed over the weekend. RLM mottling on the right side and white on the left and the wings. The white was sprayed with Mission Models and didn't perform as nicely as the RLM 74/75. I may just need to play around with ratio's some though.

I'll weather this up some with a post shade and then on to decals!


I like that scheme, i take it thats a partially completed white wash as i did on my Stuka a while back.


Thanks guys! Yes Bish it's a partial white wash but not an "in process" like you did. This is the scheme Ostermann used on his 109. You can see it in the pics below. This was one of the two markings available in the boxing and wanted to give it a try.


O blimey, now i have never seen that before. I wounder what the thinking was behind it. Now i have to get a 72nd F-4 and do that. Thank you.

And thanks for posting that first pic. I have never seen a pic of those anti slip mats in use, but i know a company that does 72nd ones and was going to get some. Good to see a pic of it.

I am a Norfolk man and i glory in being so


On the bench: Airfix 1/72nd Harrier GR.3/Fujimi 1/72nd Ju 87D-3

  • Member since
    September 2014
Posted by rooster513 on Monday, October 30, 2017 5:38 PM

Yeah Bish I'd never seen them either. I thought that's what they might be. I may just have to try scratch building some. I'll have to find some more pics of them.

-Andy

  • Member since
    December 2002
  • From: Bury St Edmunds, Suffolk, England
Posted by Bish on Tuesday, October 31, 2017 12:29 AM

Shouldn't be to tricky. The company that sells them is based in Germany and only has them in 72nd, i haven't seen anyone else do anything similar.

I am a Norfolk man and i glory in being so


On the bench: Airfix 1/72nd Harrier GR.3/Fujimi 1/72nd Ju 87D-3

  • Member since
    April 2014
  • From: Australia
Posted by lostagain on Thursday, November 2, 2017 7:37 AM

Dwayne,

Like the T34, that last photo does show the pigments better. It's great to try something new and have it come off so well.

Chelsea need to shape up if we are going to scare anyone, that was a shocker against Roma. Man City vs Napoli, you were on a winner either way!

Jack,

A lot of work on the Sword kit is paying off as ever.

Eric,

Your PzIV is looking suitably ugly there. Watching your snowy finish with interest.

Rooster,

That is a very different scheme on your 109. hard to belive they would do it like that until you see the photo...

The Marder has had its first coats of paint. Did some dark and light panels trying to get a visual separation of panels. Went from Nato black to Dark Sea Grey on to white. First try wasn't enough:

Second try was better:

Then it was pulled together with a light overcoat of German Grey, there is still some of the contrasting panels showing through. Next is to do decals, filters and pinwashes:


  • Member since
    September 2016
  • From: Albany, New York
Posted by ManCityFan on Thursday, November 2, 2017 9:25 AM

Hey Lost, that Marder is looking good.  I have tried the same technique with dark and light panels, but still have trouble with getting light coats.  Tend to be heavy handed with the paint (patience issues yet again).  You nailed it, though.  Excellent job.

Only caught the last 30 minutes of the Napoli vs. Man City game.  From what I saw, the game lived up to the hype.  Both teams really going for it.  Looks like Napoli are going to wash out of the Champion's League, which is too bad. 

D

Dwayne or Dman or just D.  All comments are welcome on my builds. 

  • Member since
    September 2003
  • From: AandF in the Badger State
Posted by checkmateking02 on Friday, November 3, 2017 1:14 PM

Looks really impressive, lost.  Nice paintwork!


  • Member since
    December 2002
  • From: Bury St Edmunds, Suffolk, England
Posted by Bish on Friday, November 3, 2017 2:35 PM

LA, really nice looking Marder, be good to see the paint on.

I am a Norfolk man and i glory in being so


On the bench: Airfix 1/72nd Harrier GR.3/Fujimi 1/72nd Ju 87D-3

  • Member since
    February 2006
  • From: Cincinnati Ohio
Posted by DantheMan85 on Saturday, November 4, 2017 11:04 AM


Great work everyone, my apologies for being away from the group build. Started work on my Trumpeter 1/32 Junkers Ju87B-2/U4 Stuka. The kit so far has been pretty simple to build, no major problems.

 1 by Daniel Smith, on Flickr


Painting the cockpit, the engine is complete. The only down side is it'll be covered over.

 5 by Daniel Smith, on Flickr


The skids.

 6 by Daniel Smith, on Flickr


Dry fit the fuselage to the glued wings, there is a small gap where the fuselage meets the wings.

 7 by Daniel Smith, on Flickr


On my Work Bench: Tamiya Ford GT 1/24

Up Coming: ?


  • Member since
    February 2010
  • From: Berkeley CA/St. Paul MN
Posted by EBergerud on Sunday, November 5, 2017 2:24 AM

Almost there. Thought I'd post these because I think looks reasonably good as it stands. Actually I think that sculptamold (after lightly washed with black Com Art and given a brush here and there with gloss varnish) looks pretty good as once deep snow covering and soon heading for thaw. (I grew up in Minnesota - I know what it looks like.) But in for a penny .... we need a nice dusting of fresh snow. Hope it doesn't do more harm than good.

Eric

 diowoS1 by Eric Bergerud, on Flickr

 diowos2 by Eric Bergerud, on Flickr

 Diows3 by Eric Bergerud, on Flickr


A model boat is much cheaper than a real one and won't sink with you in it.

  • Member since
    July 2014
Posted by modelcrazy on Sunday, November 5, 2017 1:48 PM

That looks great Eric. I love doing destroyed builds. It allows one to really have fun with weathering.

Steve

Building a kit from your stash is like cutting a head off a Hydra, two more take it's place.


http://www.spamodeler.com/forum/

JOIN OUR COMMUNITY!

Our community is FREE to join. To participate you must either login or register for an account.

SEARCH FORUMS
FREE NEWSLETTER
By signing up you may also receive reader surveys and occasional special offers. We do not sell, rent or trade our email lists. View our Privacy Policy.