SEARCH FINESCALE.COM

Enter keywords or a search phrase below:

RAF 100th Anniversay GB

85357 views
3404 replies
1 rating 2 rating 3 rating 4 rating 5 rating
  • Member since
    December 2002
  • From: Bury St Edmunds, Suffolk, England
Posted by Bish on Monday, June 12, 2017 8:59 AM

Looks good there Johnny, wishing you better luck than you had with the Tornado.

I am a Norfolk man and i glory in being so


On the bench: Airfix 1/72nd Harrier GR.3/Fujimi 1/72nd Ju 87D-3

  • Member since
    July 2014
Posted by modelcrazy on Monday, June 12, 2017 9:03 AM

Looking forward to it TJ. I was thinking of a Jag to add to the roster and was looking at that kit, but probably won't at the moment.

Steve

Building a kit from your stash is like cutting a head off a Hydra, two more take it's place.


http://www.spamodeler.com/forum/

  • Member since
    May 2013
  • From: Indiana, USA
Posted by Greg on Monday, June 12, 2017 11:56 AM

Justin, I was waiting to see the dullcoat on your Lancanster, and I'm certainly not disappointed. Looks great! Yes And so does the weathering.

CMK, I have a request if you remember. Could you show how you mask those installed landing gear (and wheel wells) when it's time to paint the wings?

Good to see you underway again, Johnny.


  • Member since
    November 2009
  • From: SW Virginia
Posted by Gamera on Monday, June 12, 2017 12:10 PM

Hey TJ, the Jaguar looks cool! 

"I dream in fire but work in clay." -Arthur Machen


  • Member since
    September 2003
  • From: AandF in the Badger State
Posted by checkmateking02 on Monday, June 12, 2017 9:52 PM

Good looking work, tj!


  • Member since
    September 2003
  • From: AandF in the Badger State
Posted by checkmateking02 on Monday, June 12, 2017 10:25 PM

Greg

CMK, I have a request if you remember. Could you show how you mask those installed landing gear (and wheel wells) when it's time to paint the wings?

Wings installed.

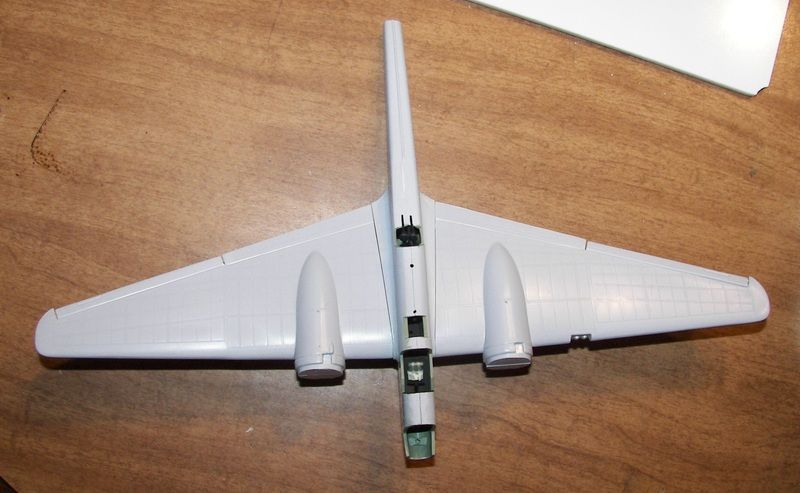
The visible line down the center fuselage is filled with superglue and sanded.  The wing/fuselage joints are gaps that will have to be addressed.

I fixed the gaps in the ailerons by drilling the locating holes larger, so I could "push" them closer to the wings.  

I added the tail section, but forgot to take a photo of it assembled

Greg:  I'm sorry that I didn't take photos of masking the landing gear--or any of the masking.  I didn't think it would be of interest.  

I can describe what I did, if it'll help.

I started out by putting masking tape sticky side outward, inside and all around the perimeter of the landing gear well.  Then I stuffed the wheel well with wet table napkins.

I let the napkins dry out for a day, since tape is notorious for not sticking to wet things.

Then I went back and wrapped masking tape around the gear, sticky side inward--but inside the first application of masking tape, to cover it up to, over and around the wheels.  Sort of like wrapping a mummy.  

When I painted the undersides, I kept the airbrush at a low angle, so as not to direct the spray too far up the gear legs or into the wheel wells.  Since there isn't much for tape to hold onto around the inside perimeter of the well, some of the tape did pull loose, and shooting at a low angle prevented much (if any) paint from sneaking inside. At least, I couldn't spot any overspray.

I did have to go back and touch up the inside perimeter of the landing gear wells with black acrylic paint, with a brush.  I used Colourcoats black for the underside, but the acrylic black blended in fine, since there doesn't seem to be much difference between black paints.

I had to make my own masks by enlarging the painting diagram that came with the kit. Couldn't find any after-market, pre-cut masks.

The type of masking tape I used was "Duck" brand from Walmart.  Seems to have a fairly low tack.

I did finish the painting and applying a gloss coat with Humbrol gloss, but then I had to leave on vacation, and the Hampden is sitting at home waiting for me to return to it.

Again, I'm sorry now I didn't take photos, but I hope the description was somewhat helpful.


  • Member since
    July 2014
Posted by modelcrazy on Monday, June 12, 2017 10:39 PM
Well nuts! I was applying some Silly Putty to the wheel wells, wasn't thinking and pushed the wheel well right out of its glued location. I could fish it out but am going to have a hard time getting it back in correctly. Any ideas without cracking the fuselage open and possibly damaging it beyond repair? I have an idea to drill a hole in the wheel well, put something like a dental tool through the hole, fish it back through the opening, pull it up against its location and re-glue.

Steve

Building a kit from your stash is like cutting a head off a Hydra, two more take it's place.


http://www.spamodeler.com/forum/

  • Member since
    February 2010
  • From: Berkeley CA/St. Paul MN
Posted by EBergerud on Tuesday, June 13, 2017 12:54 AM


Reporting in on black basing. Still in testing stage.


Urge all of you to check Doog's short video “black basing” for a quick introduction. (Since then he has made a series of longer videos on the same subject showing how to use the technique with various camo scheme – including the green and gray I'll be using. There's maybe four hours worth.)


The object is to create a surface that shows tonal variation. Doog has a million photos to show what he's talking about (and some examples of models that he doesn't like). He rightly observes that aircraft and tanks show a wide variation of tone and colors that don't match obvious shadow lines along the panels etc. So preshading is out out out. You prime the model in black – not gray. Then you enter the “mottling” stage. Here you paint “small” - very low psi, very close with the airbrush, with the object small dots, thin lines that kind of blanket an area. You're encouraged to use different shades, but more importantly, different concentration. Also different colors – but in this case I was using neutral gray and stuck variations on it. Most of the mottling is the base coat neutral gray; some is a darker shade and some a lighter. Some areas are more heavily covered than others. You can below that the area on the lower half of the wings near the fuselage is more densely mottled than the tips: the front middle is in between. The result looks pretty crummy but it's supposed to. Think of this as a more complex and I think realistic form of preshading. And Doog's right about one thing – look at photos and real aircraft and you don't see panels lines appearing in perfectly symmetry – if you see them at all, they're part of a fruit salad of tones and colors. Do remember that WWII (or service aircraft today) planes didn't get the kind of baked on paint job you'd find on a modern car, and they were assaulted by about every kind of matter that could imaginably make a plane untidy. Here are two pics – one of the whole plane (only did wings and tailplane) and a closeup of a wing.


URL=http://s971.photobucket.com/user/ebergerud/media/2017/MotTst1_zps8biuyhox.jpg.html] [/URL]


The mottling stage is followed by the “blending coat” which is the desired base color. Doog wants this coat doing very thin – 80% thinner, low psi and done slowly. What you want to avoid of course is wiping out the irregular surface color you want with the mottling. (Ever put too much paint over a preshade and basically made it pointless?) So again you paint small. I don't care about the money, but Doog is sure right in pointing out that the technique uses an incredibly small amount of paint. (High Flow is usually gloss – Airbrush Extender used as thinner is gloss: yet the finish is satin – shows how little paint is employed because the mule's rough surface acts as a matte varnish.) The entire “blend” was done with a level of paint that barely covered the bottom of the color cup and I poured some out. Note that I painted the nose of the mule (my trusty Eduard LA7) with a clean coat of standard Neutral Gray and it almost looks odd. If the finish looks a little rough, the mule has been well worn – I don't think I even sanded the lacquer primer. So here's what I got after blending over my mottling, to the extent that I could capture it with the camera. I think you can see the surface has a wide range of tones which is what we want:


Overall I'm pleased with the test. But I remain humble. I can't really simply copy Doog. First, he's a far better modeler than I am. Second, he recommends paints that are the best for “painting small” and they are the extremely airbrush friendly acrylic/lacquers – Gunze, Tamiya and the new star Mr. Paint. Doog uses Gunze's splendid Lacquer Levelling Thinner. So he's matching the thinner and the paint's solvent suspending agent. (This kind of thing is a perfect example why so many modelers are fans of Tamiya and its fellow type paints – can't beat them for airbrushing, although poor for hand painting.)


But I use water based paints for a lot of reasons. (That's why I used lacquer thinner from a spray can – able to use it outside: I couldn't consider a lacquer paint inside the house. If I didn't die, my wife would kill me.) I haven't tried the new Mission Model air based acrylics that are getting rave reviews. But as noted in my first post, I am using Golden High Flow acrylics. I don't know what they put in the stuff, but it is splendid with an airbrush. It must have levelers and flow aids because you do not get dry-tip problems. (I hand brushed the tip periodically while mottling, but that's to get rid of accumulation of paint, not because it's drying out.) Also means it's a dream to clean – absolutely zero problem cleaning nozzles. (Like any polymer acrylic, you would not want to forget to clean an airbrush with this stuff – if it fully dried, you'd need the toughest solvents on earth to clean out the brush.) If you've ever tried Vallejo Model Air – a great paint but tricky – you know these qualities are unique in the world of water based acrylics.


But will the stuff paint small? High Flow out of the bottle is very thin, surprising when you think how pigment rich all Golden paints are. But lacquer thinner – great for Gunze – is worthless with water based paints in my view. All paints have one thing in common – the agent must maintain chemical coherence or the paint will break down. Lacquer thinner is a first cousin to the solvent agent in Tamiya/Gunze, so feel free to thin the stuff way down – Doog likes 80% thinner for blending, and his paints take it no problem. Golden (like Vallejo Model Color) uses a near 100% liquid polymer for its agent – think of it as a kind of liquid plastic. For thinning you can use water – but only in very small quantities. Too much water and the polymer begins to break apart – poor finish and bad airbrushing invariably results. Golden makes two thin polymer mediums for airbrush work. Normally, you'd want “airbrush medium”. It's thin and white. (Vallejo's “thinner medium” is exactly the same stuff, but probably not as good.) But Golden recommends a close relative for High Flows - “Airbrush Extender.” I'm not sure what the difference of two is. Extender is gloss, Medium is satin and Extender is a little thinner. Anyway, I was using a ratio of about 2.5-1 Extender-Paint for mottling and 4-1 for blending. Both worked very well. I used an Iwata Eclipse with a 3.5mm nozzle. I'm becoming a solid Iwata fan – it's just a great brush. In theory the brush to use was my .2mm nozzle Harder Steenbeck Evolution, but the Evo is very delicate and the needle slightly bent. Anyway, no matter how clean, it still spits just a little (hear it more than see it.) I did try it and it did work, but there was a little splatter, but you can't have much of that to wreck black basing. (When I cleaned it, the needle was covered with gray paint, so I fear either a defective nozzle or perhaps bad rings.) So the Iwata it is. Unless, that is, I can get good results from a Badger 200 single action. I was playing with it yesterday, and it actually works pretty well. What I didn't try was High Flow thinned. Who knows, it may probe ideal for either mottling or blending. (I might add if you ever want to airbrush Vallejo Model Color, Citadel Paints and I think LifeColor, get some Airbrush Medium from Golden or Liquitex. $8 buys a big bottle that will last for years.)


Now even if stuff works, I don't have the foggiest idea of what to do with a black based surface. There's still decals, weathering etc: how much I'll have to alter my stand procedures is a complete mystery.


More later.


Eric


A model boat is much cheaper than a real one and won't sink with you in it.

  • Member since
    December 2002
  • From: Bury St Edmunds, Suffolk, England
Posted by Bish on Tuesday, June 13, 2017 12:56 AM

modelcrazy
Well nuts! I was applying some Silly Putty to the wheel wells, wasn't thinking and pushed the wheel well right out of its glued location. I could fish it out but am going to have a hard time getting it back in correctly. Any ideas without cracking the fuselage open and possibly damaging it beyond repair? I have an idea to drill a hole in the wheel well, put something like a dental tool through the hole, fish it back through the opening, pull it up against its location and re-glue.
 

Nuts indeed. Short of closeing up the landing gear and doing an in flight build, i think that might be your best option.

I am a Norfolk man and i glory in being so


On the bench: Airfix 1/72nd Harrier GR.3/Fujimi 1/72nd Ju 87D-3

  • Member since
    December 2002
  • From: Bury St Edmunds, Suffolk, England
Posted by Bish on Tuesday, June 13, 2017 1:01 AM

Looking good there check.

I am a Norfolk man and i glory in being so


On the bench: Airfix 1/72nd Harrier GR.3/Fujimi 1/72nd Ju 87D-3

  • Member since
    December 2002
  • From: Bury St Edmunds, Suffolk, England
Posted by Bish on Tuesday, June 13, 2017 1:04 AM

Some nice work there Eric and nice write up. I have tried black baseing a few times and while i do get some subtle effect on light colours such as light blue undersides i don't have any luck with darker colours.


I am a Norfolk man and i glory in being so


On the bench: Airfix 1/72nd Harrier GR.3/Fujimi 1/72nd Ju 87D-3

  • Member since
    November 2003
  • From: Naples, FL
Posted by tempestjohnny on Tuesday, June 13, 2017 5:32 AM

Bish


modelcrazy
Well nuts! I was applying some Silly Putty to the wheel wells, wasn't thinking and pushed the wheel well right out of its glued location. I could fish it out but am going to have a hard time getting it back in correctly. Any ideas without cracking the fuselage open and possibly damaging it beyond repair? I have an idea to drill a hole in the wheel well, put something like a dental tool through the hole, fish it back through the opening, pull it up against its location and re-glue.


Nuts indeed. Short of closeing up the landing gear and doing an in flight build, i think that might be your best option.


Steve I think you have the right idea. You could also use a piece of stiff wire as a hook. Might be a little thinner diameter then pick


  • Member since
    November 2009
  • From: SW Virginia
Posted by Gamera on Tuesday, June 13, 2017 7:49 AM

CMK02: Looks good to me! 

Steve: Oh gosh, yeah I've done that a few times including a 1/48th Rafael (either Trumpeteer or Hobbyboss, I don't remember) where I never could get the friggin' well back in place. I ended up just building her in flight, which looks funny since I didn't have a modern French pilot for her... Indifferent

Good luck, crossing my fingers for you. 

Eric: Thanks for the run-down. I haven't visited Doogs site in probably over a year. I'll have to dig out a paint mule and give that a try. 

"I dream in fire but work in clay." -Arthur Machen


  • Member since
    July 2014
Posted by modelcrazy on Tuesday, June 13, 2017 8:13 AM

Thanks guys, I'll get it somehow.

Funny I started experimenting with black basing before I knew it was such a thing. I stink at pre-shading so much that I ended up basing the whole thing black anyway. I just didn't do the mottling part. I'm going to give that a go with the Tornado.

Steve

Building a kit from your stash is like cutting a head off a Hydra, two more take it's place.


http://www.spamodeler.com/forum/

  • Member since
    October 2008
  • From: Georgia
Posted by Rigidrider on Tuesday, June 13, 2017 8:52 AM

MAN!!! EB, Justin, TJ, CMK, MC, Damian, Hope I'm not missing any one... What progress! Such a broad base of builds and such good work!... Bish, you need to be nominated for GB Idea of the year( if it were available) ! lol... Amazing guys! 

Well heres my offering...

Un-clamped and ready to continue!

Sorry. Flickr still being a PAIN IN THE AZZ, and not working properly. When I go back and try to select another picture it goes to "Bad Panda" appology screen picture. And I don't want to replace a smashed computer. I'll try later today... Take care all, Doug

When Life Hands You A Bucket Of Lemons...

Make Lemonade!

Then Sell It Back At $2 Bucks A Glass...

  • Member since
    June 2014
Posted by BrandonK on Tuesday, June 13, 2017 9:20 AM

Well Steve, the pick idea is what I would attempt first. IF that was not reasonable or feasable I would close it up and make a hanger in flight bird instead, like Bish mentioned.

BK

On the bench:

A lot !! And I mean A LOT!!

2024 Kits on deck / in process / completed   

                         14 / 5 / 2  

                              Tongue Tied

  • Member since
    May 2017
Posted by Fredthefoot`s Models on Tuesday, June 13, 2017 10:57 AM

hi some dodgy guy on my thread sugested i enter here , o sorry mate it was you lol  1/72 hawker hurricane :) thanks   ,  started this today Heller Humbrol 1/72 Hawker Hurricane Mk.IIc doing it as a night fighter and going to chop it up a bit to add detail :) well the fun has started cut off door and a panel for the fake engine , still more to add but started fake engine and engine mount frame


  • Member since
    May 2013
  • From: Indiana, USA
Posted by Greg on Tuesday, June 13, 2017 11:05 AM

Fredthefoot`s Models

hi some dodgy guy on my thread sugested i enter here , o sorry mate it was you lol  1/72 hawker hurricane :) thanks


Hey, Fred's here! Welcome!

I'll bet Bish will let you in. Stick out tongue

  • Member since
    May 2017
Posted by Fredthefoot`s Models on Tuesday, June 13, 2017 11:07 AM

lol thanks mate :)


  • Member since
    May 2013
  • From: Indiana, USA
Posted by Greg on Tuesday, June 13, 2017 11:16 AM


checkmateking02
Greg: I'm sorry that I didn't take photos of masking the landing gear--or any of the masking. I didn't think it would be of interest. I can describe what I did, if it'll help.

No need to be sorry, my friend. Your detailed description is most helpful.

I've tried the inside out masking before, and I've tried stuffing with wet tissue (you used napkins). The inside out is too flimsy, the tissue doesn't form the greatest seal.

Doing both is a great idea. The wadded paper should help keep the tape in place. Thanks!

Reason I asked, I've been getting away with installing landing gear as one of the last touches on my 1:48 builds. But on larger models like this one, I'd prefer to have a very good plastic to plastic bond (weld), and it seems best to do it earlier. Same for flimsy gear on smaller models, I'd think.

So that was very helpful, Thanks again. Yes

Incidentally, don't 'ya just hate it when life's little unpleasantries, such as vacations, get in the way of our hobby? Stick out tongue

  • Member since
    December 2002
  • From: Bury St Edmunds, Suffolk, England
Posted by Bish on Tuesday, June 13, 2017 11:21 AM

Greg
 
Fredthefoot`s Models

hi some dodgy guy on my thread sugested i enter here , o sorry mate it was you lol  1/72 hawker hurricane :) thanks


Hey, Fred's here! Welcome!

I'll bet Bish will let you in. Stick out tongue


O, i don't know about that Big Smile

Got you on the roster Fred, glad to have you on board.

I am a Norfolk man and i glory in being so


On the bench: Airfix 1/72nd Harrier GR.3/Fujimi 1/72nd Ju 87D-3

  • Member since
    May 2017
Posted by Fredthefoot`s Models on Tuesday, June 13, 2017 11:22 AM
thank you mate :)


  • Member since
    December 2002
Posted by Bossman on Tuesday, June 13, 2017 11:23 AM

modelcrazy
I have an idea to drill a hole in the wheel well, put something like a dental tool through the hole, fish it back through the opening, pull it up against its location and re-glue.

Steve - Just an idea for a modification to this technique . . . 

Drill the hole, then stretch a piece of sprue so that one end is kindof tapered to a larger diameter than the hole.  (In my experience - this usually happens naturally)  Cut the stretched piece so that you can thread it throught the hole with the fat end on the (hidden) backside of the wheel well.  Pull the sprue tight and glue it to the back of the wheel well.   And there's your handle to manipulate the gear well into position.  Then, after you position and glue the wheel well solidly into the fuselage, just trim the "sticky-outy" part of the handle flush with the surface.  Now your handle has already filled the hole.  It might require some touch-up, but you were gonna hafta do that anyway.

Never done it before - but it seemed like an easy way to kill two birds with one sprue.

For "handleability" you could even make two really small holes and use two smaller diameter pieces of sprue.  Easier cleanup, but then you might need a third hand to do the gluing.

Chris

  • Member since
    December 2002
  • From: Bury St Edmunds, Suffolk, England
Posted by Bish on Tuesday, June 13, 2017 11:25 AM

Rigidrider

MAN!!! EB, Justin, TJ, CMK, MC, Damian, Hope I'm not missing any one... What progress! Such a broad base of builds and such good work!... Bish, you need to be nominated for GB Idea of the year( if it were available) ! lol... Amazing guys! 

Well heres my offering...

Un-clamped and ready to continue!

Sorry. Flickr still being a PAIN IN THE AZZ, and not working properly. When I go back and try to select another picture it goes to "Bad Panda" appology screen picture. And I don't want to replace a smashed computer. I'll try later today... Take care all, Doug


Well thank you Doug. I have had some successful GB's over the years and a few less so. But i never expected this to take off as it has. Guess i had to hit the right spot at some point.

Thats coming along nicely. Shame your having issues with Flickr, i have not had any problems yet. I hope its not going to do a PB on us.

I am a Norfolk man and i glory in being so


On the bench: Airfix 1/72nd Harrier GR.3/Fujimi 1/72nd Ju 87D-3

  • Member since
    May 2013
  • From: Indiana, USA
Posted by Greg on Tuesday, June 13, 2017 11:25 AM

modelcrazy
Well nuts! I was applying some Silly Putty to the wheel wells, wasn't thinking and pushed the wheel well right out of its glued location. I could fish it out but am going to have a hard time getting it back in correctly. Any ideas without cracking the fuselage open and possibly damaging it beyond repair? I have an idea to drill a hole in the wheel well, put something like a dental tool through the hole, fish it back through the opening, pull it up against its location and re-glue.
 

modelcrazy
I have an idea to drill a hole in the wheel well, put something like a dental tool through the hole, fish it back through the opening, pull it up against its location and re-glue.

That was my thought too, then I read you had same idea. As others have mentioned, might be something better to hold "pulling-up" pressure than a dental tool, but I think the concept is spot on.

  • Member since
    May 2013
  • From: Indiana, USA
Posted by Greg on Tuesday, June 13, 2017 11:31 AM

Eric, thanks for the step-by-step on the black-basing. I am interested in learning techniques like this.

Doug, you're moving right along. And oh no, not Flickr trouble.

  • Member since
    December 2002
Posted by Bossman on Tuesday, June 13, 2017 11:48 AM

Board up your windows and get out the sandbags.

    LightningMore Hurricane's comin' in.Lightning

Welcome Fred !

  • Member since
    May 2017
Posted by Fredthefoot`s Models on Tuesday, June 13, 2017 11:54 AM

lol thank you Bossman :)


  • Member since
    November 2009
  • From: SW Virginia
Posted by Gamera on Tuesday, June 13, 2017 1:00 PM

Doug: Looks very good! 

Fred: Welcome aboard!!! 

We can always use another Hurricane. Plus Greg's Typhoon. And hopefully my Tempest if she doesn't blow out before she reachs the coast... 


PS: Great idea there Chris, I'm going to remember that for the next time I get a loose wheel well. 

"I dream in fire but work in clay." -Arthur Machen


  • Member since
    July 2014
Posted by modelcrazy on Tuesday, June 13, 2017 2:57 PM

"Steve - Just an idea for a modification to this technique . . . 

Drill the hole, then stretch a piece of sprue so that one end is kindof tapered to a larger diameter than the hole.  (In my experience - this usually happens naturally)  Cut the stretched piece so that you can thread it throught the hole with the fat end on the (hidden) backside of the wheel well.  Pull the sprue tight and glue it to the back of the wheel well.   And there's your handle to manipulate the gear well into position.  Then, after you position and glue the wheel well solidly into the fuselage, just trim the "sticky-outy" part of the handle flush with the surface.  Now your handle has already filled the hole.  It might require some touch-up, but you were gonna hafta do that anyway.

Never done it before - but it seemed like an easy way to kill two birds with one sprue.

For "handleability" you could even make two really small holes and use two smaller diameter pieces of sprue.  Easier cleanup, but then you might need a third hand to do the gluing.

Chris"


Now THAT my friend is a FANTASTIC idea!!!

If it dosn't work I can fish it out and try again. If all else fails I'll just put it flight which would be just as nice looking.

Thanks Chris

Steve

Building a kit from your stash is like cutting a head off a Hydra, two more take it's place.


http://www.spamodeler.com/forum/

JOIN OUR COMMUNITY!

Our community is FREE to join. To participate you must either login or register for an account.

SEARCH FORUMS
FREE NEWSLETTER
By signing up you may also receive reader surveys and occasional special offers. We do not sell, rent or trade our email lists. View our Privacy Policy.