SEARCH FINESCALE.COM

Enter keywords or a search phrase below:

Pride of the Luftwaffe GB

41771 views
1268 replies
1 rating 2 rating 3 rating 4 rating 5 rating
  • Member since
    April 2005
  • From: Australia
Posted by taxtp on Monday, November 13, 2017 6:16 AM
It's weird they way we get different results. I've never been happy with airbrushed future, always seems to be pebbly, but I brush paint it with no issues, usually with a soft, wide flat brush. Your findings with A-Model are in line with mine, they're quite a lot of work, but they have good subjects. I've made a start on my first 109 for this GB, the Academy 1/72 109E with an Eduard etched detail set that I didn't know I had. Photos tomorrow. Cheers Tony

I'm just taking it one GB at a time.

  • Member since
    November 2008
  • From: Central Florida
Posted by plasticjunkie on Monday, November 13, 2017 7:28 AM

taxtp
It's weird they way we get different results. I've never been happy with airbrushed future, always seems to be pebbly, but I brush paint it with no issues, usually with a soft, wide flat brush. Your findings with A-Model are in line with mine, they're quite a lot of work, but they have good subjects. I've made a start on my first 109 for this GB, the Academy 1/72 109E with an Eduard etched detail set that I didn't know I had. Photos tomorrow. Cheers Tony
 

Same here with the pebbly finish when airbrushed but smooth when I hand brush it.

 GIFMaker.org_jy_Ayj_O


Too many models to build, not enough time in a lifetime!!

  • Member since
    April 2005
  • From: Australia
Posted by taxtp on Monday, November 13, 2017 6:09 PM

Here's my start on the Academy 1/72 109E. I'm building it as an E-3. I've corrected the shape of the rudder pedals and added straps, added harnesses, used the Eduard IP and a few other bits. Trouble is, once you've closed up the fuselage, you just cant see it. Haha !

Cheers

Tony

I'm just taking it one GB at a time.

  • Member since
    December 2002
  • From: Bury St Edmunds, Suffolk, England
Posted by Bish on Tuesday, November 14, 2017 1:47 AM

Nice job on that pit Tony, i know what you mean about not seeing the detail in those little pits.

I am a Norfolk man and i glory in being so


On the bench: Airfix 1/72nd Harrier GR.3/Fujimi 1/72nd Ju 87D-3

  • Member since
    January 2015
  • From: Tumwater, WA.
Posted by M. Brindos on Tuesday, November 14, 2017 8:13 AM

Lol no kidding! With a pilot jammed in there you can't see anything but the IP.

- Mike Brindos "Lost Boy"

  • Member since
    September 2014
Posted by rooster513 on Tuesday, November 14, 2017 10:03 AM

Really nice start Tony, especially for that scale!

-Andy

  • Member since
    April 2005
  • From: Australia
Posted by taxtp on Tuesday, November 14, 2017 5:48 PM

Thanks guys. Every time I build a 109 in 1/72, I think that it really should be in 1/48. Anyway, here's yesterday.s progress. I opened out the spent shell ejection chutes in the wings, as they were molded very shallow. I also cut off the wing cannon, these will be replaced with needles. I added P/E inserts into the wheel wells and radiators from the Eduard set, then joined up the wings and fuselage.

It's interesting to notice that Academy bothered to do a fairly detailed cockpit, but the only detail in the wheel wells is an ejector pin mark !


Cheers

Tony

I'm just taking it one GB at a time.

  • Member since
    June 2010
Posted by 5-high on Wednesday, November 15, 2017 1:38 PM

Tony thats comeing along great ...i know what you mean about 1/72 should look like 1/48 .....but i think 1/32 should be 1/24 ha ha . well just got back to the hobby hanger ..( the bedroom that i have the bench and such) anyhoo after i got back a verey cold stint up north ...tie changeout ..ive finely put the body together on the 190-D. did the black baseing ..now mixing up some RLM 78 for marbeling . then ill mix up RLM81 and RLM83 from tamiya arcyl, paint ....on a other note just wanted to pass on some usefull info on thinning model master,s arcyl paint ..i found that vallejo airbrush thinner works great add one or two drops of there airbrush flow improver and wallaaa. will be useing this on the FW190 revell ..im thinking of a early A-5 or A-8 .

to everyone else great work !!!!  guys Toast

  5 high

  • Member since
    September 2014
Posted by rooster513 on Wednesday, November 15, 2017 2:33 PM

Just a quick update on the 1/72 190. Was able to get the main paint down and some mottling on the tail. 

Unfortuantely the decals that came with this kit (bought at a show) are destroyed so I need to come up with another option. I can steal some decals from a left over eduard sheet but will still be missing all the German crosses. I hate to spend more on the decals then I did on the kit so I may try to mask and paint them but we'll see.

Keep up the great work everyone!!

-Andy

  • Member since
    January 2015
Posted by BrandonD on Wednesday, November 15, 2017 2:55 PM

Tony - with that many clamps, I don't think that thing will ever come apart. Were there warping issues, or just being on the safe side?


Can't wait to see some paint on that bird!

-BD-

  • Member since
    January 2015
Posted by BrandonD on Wednesday, November 15, 2017 2:57 PM

rooster513

Just a quick update on the 1/72 190. Was able to get the main paint down and some mottling on the tail. 

Unfortuantely the decals that came with this kit (bought at a show) are destroyed so I need to come up with another option. I can steal some decals from a left over eduard sheet but will still be missing all the German crosses. I hate to spend more on the decals then I did on the kit so I may try to mask and paint them but we'll see.

Keep up the great work everyone!!


Rooster - great job on the paint. Mottling in 1/72 is trying at best.

As for decals, I have a sheet from a Tamiya A3 I can send you...IF I can find it. I know I robbed one type of the tail emblem for my 1/72 Airfix A8, but I never did finish the Tamiya A3 and just canned it at some point, though I should have the decals. I'll try to dig them up this evening and let you know.

-BD-

  • Member since
    January 2015
  • From: Tumwater, WA.
Posted by M. Brindos on Wednesday, November 15, 2017 4:18 PM

Looks fantastic, Rooster! Those crosses will be easier to mask than you think. ;)

- Mike Brindos "Lost Boy"

  • Member since
    April 2005
  • From: Australia
Posted by taxtp on Thursday, November 16, 2017 6:12 AM

BrandonD

Tony - with that many clamps, I don't think that thing will ever come apart. Were there warping issues, or just being on the safe side?


Can't wait to see some paint on that bird!

-BD-

 I just didnt want any gaps Brandon , there were a couple that were threatening to open up a bit. They didn't :)
Cheers
Tony

I'm just taking it one GB at a time.

  • Member since
    April 2005
  • From: Australia
Posted by taxtp on Thursday, November 16, 2017 6:18 AM

Your 190 is looking the business Rooster. I hope you get those decals sorted. 

I can probably help out if you get stuck, but I'm in Australia so it might delay you. Nonetheless, happy to.

Cheers

Tony

I'm just taking it one GB at a time.

  • Member since
    September 2014
Posted by rooster513 on Thursday, November 16, 2017 8:34 AM

BrandonD


rooster513

Just a quick update on the 1/72 190. Was able to get the main paint down and some mottling on the tail. 

Unfortuantely the decals that came with this kit (bought at a show) are destroyed so I need to come up with another option. I can steal some decals from a left over eduard sheet but will still be missing all the German crosses. I hate to spend more on the decals then I did on the kit so I may try to mask and paint them but we'll see.

Keep up the great work everyone!!


Rooster - great job on the paint. Mottling in 1/72 is trying at best.

As for decals, I have a sheet from a Tamiya A3 I can send you...IF I can find it. I know I robbed one type of the tail emblem for my 1/72 Airfix A8, but I never did finish the Tamiya A3 and just canned it at some point, though I should have the decals. I'll try to dig them up this evening and let you know.

-BD-


Thanks BD! I've recently been using some Mission Model paints for my RLM 74/75 and I've had really good luck with mottling. They are very forgiving, which is good for me! 

If you have decals you wouldn't mind parting with I'd be very appreciative! Let me know if you're able to find them, if not no biggie, I still appreciate the thought buddy!

-Andy

  • Member since
    September 2014
Posted by rooster513 on Thursday, November 16, 2017 8:36 AM

Thanks Mike and Tony, I appreciate the kind words!

-Andy

  • Member since
    January 2015
Posted by BrandonD on Thursday, November 16, 2017 11:36 AM

rooster513


BrandonD


rooster513

Just a quick update on the 1/72 190. Was able to get the main paint down and some mottling on the tail. 

Unfortuantely the decals that came with this kit (bought at a show) are destroyed so I need to come up with another option. I can steal some decals from a left over eduard sheet but will still be missing all the German crosses. I hate to spend more on the decals then I did on the kit so I may try to mask and paint them but we'll see.

Keep up the great work everyone!!


Rooster - great job on the paint. Mottling in 1/72 is trying at best.

As for decals, I have a sheet from a Tamiya A3 I can send you...IF I can find it. I know I robbed one type of the tail emblem for my 1/72 Airfix A8, but I never did finish the Tamiya A3 and just canned it at some point, though I should have the decals. I'll try to dig them up this evening and let you know.

-BD-


Thanks BD! I've recently been using some Mission Model paints for my RLM 74/75 and I've had really good luck with mottling. They are very forgiving, which is good for me! 

If you have decals you wouldn't mind parting with I'd be very appreciative! Let me know if you're able to find them, if not no biggie, I still appreciate the thought buddy!


Sure thing, Rooster. I found them this morning. It's the sheet on this page: https://www.ebay.com/itm/1-72-TAMIYA-FOCKE-WULF-Fw-190A-3-DECAL-SHEET/272883546370?hash=item3f89207902:g:SAQAAOSwIUNXFWhP

(Ignore the fact that it's ebay - just the only place I could find the image, and that guy is high if he thinks he is getting $9 for that decal sheet lol).

I used the instrument panel and other interior decals, as well as the two swastikas on the left. Everything else is there. PM me your address, and I'll send them out today or tomorrow. After that, I'll be out of town until the 30th, but can send when I get back as well.

-BD-

  • Member since
    January 2015
Posted by BrandonD on Thursday, November 16, 2017 11:37 AM

taxtp


BrandonD

Tony - with that many clamps, I don't think that thing will ever come apart. Were there warping issues, or just being on the safe side?


Can't wait to see some paint on that bird!

-BD-

 I just didnt want any gaps Brandon , there were a couple that were threatening to open up a bit. They didn't :)
Cheers
Tony


Nice, I get that. Nothing worse than thinking a part is together only to find a big gap in the seam.

-BD-

  • Member since
    September 2014
Posted by rooster513 on Thursday, November 16, 2017 12:46 PM


BrandonD


rooster513


BrandonD


rooster513

Just a quick update on the 1/72 190. Was able to get the main paint down and some mottling on the tail. 

Unfortuantely the decals that came with this kit (bought at a show) are destroyed so I need to come up with another option. I can steal some decals from a left over eduard sheet but will still be missing all the German crosses. I hate to spend more on the decals then I did on the kit so I may try to mask and paint them but we'll see.

Keep up the great work everyone!!


Rooster - great job on the paint. Mottling in 1/72 is trying at best.

As for decals, I have a sheet from a Tamiya A3 I can send you...IF I can find it. I know I robbed one type of the tail emblem for my 1/72 Airfix A8, but I never did finish the Tamiya A3 and just canned it at some point, though I should have the decals. I'll try to dig them up this evening and let you know.

-BD-


Thanks BD! I've recently been using some Mission Model paints for my RLM 74/75 and I've had really good luck with mottling. They are very forgiving, which is good for me! 

If you have decals you wouldn't mind parting with I'd be very appreciative! Let me know if you're able to find them, if not no biggie, I still appreciate the thought buddy!


Sure thing, Rooster. I found them this morning. It's the sheet on this page: https://www.ebay.com/itm/1-72-TAMIYA-FOCKE-WULF-Fw-190A-3-DECAL-SHEET/272883546370?hash=item3f89207902:g:SAQAAOSwIUNXFWhP

(Ignore the fact that it's ebay - just the only place I could find the image, and that guy is high if he thinks he is getting $9 for that decal sheet lol).

I used the instrument panel and other interior decals, as well as the two swastikas on the left. Everything else is there. PM me your address, and I'll send them out today or tomorrow. After that, I'll be out of town until the 30th, but can send when I get back as well.

-BD-


Looks like those aren't the same crosses that I need Brandon. This is the scheme I'm going with...

Fw 190F-8 1/72 - 5./SG 77, Cottbus, Germany, early 1945

It has the simple black cross on the fuselage and underwing. Between RLM colors and different cross styles these German aircraft will make your head spin! LOL. The only one's I could use are the top white crosses and I'd hate to take the whole sheet just for those. Sorry to put you through the trouble of digging them up. I really appreciate the offer though! 


-Andy

  • Member since
    January 2016
  • From: A Galaxy Far, Far Away
Posted by Hunter on Thursday, November 16, 2017 12:52 PM

Tony,

Great work on the pit...looks fantastic. Looking forward to the paint.

Rooster,

The paint work looks amazing. Sorry to hear about the decals. If you deceide to mask off please post photos of that...would love too see the process. 

Hunter 


  • Member since
    April 2005
  • From: Australia
Posted by taxtp on Thursday, November 16, 2017 5:33 PM

I've fixed up all the seams on the 109E, still need to reinstate some scribing. As I picked it up I could hear a rattle, but as the canopy was fixed I couldn't identify what had come loose, grrrrrr.

After a while I happen to turn it over, and saw it immediately. One of the photoetched wheel well insert had come loose and was rattling around inside the wing, out of site. The Ca I'd used to fix it left a horribly lumpy residue visible inside the wheel well, and would be almost impossible to sand. I decided to shake it, to see if I could bring it back within reach and reattach it without pulling the wing apart. No luck, as I shook it, it became lodged somewhere up inside the wing, the rattle stopped and I couldn't dislodge it. Thinking this could be a model wrecker, I stayed up last night and cut some thin plastic card just big enough and flexible enough to work in through the wheel well, then liquid cement in place. Then adding some strips to reinstate the detail as per the other wheel well. Total time lost, about 30 minutes. I don't think anyone will pick it once its painted. Phew :)

Cheers

Tony

Progress so far...

uh oh...

all better now :)

I'm just taking it one GB at a time.

  • Member since
    June 2010
Posted by 5-high on Thursday, November 16, 2017 8:11 PM

Glad it worked out for ya tax ...i had the same thing happened to me on a mustang. 

Well I think I've got the picks on Google photo worked out ..but it only shows the url address..just click on that and the pick will show up ....i think . If I post some tonight..ill appreciate if one of you guys tell me that you can see them ..thanks 

5-high 

  • Member since
    December 2002
  • From: Bury St Edmunds, Suffolk, England
Posted by Bish on Friday, November 17, 2017 1:51 AM

Andy, lovely job on the mottling. Thats come out really well.

I am a Norfolk man and i glory in being so


On the bench: Airfix 1/72nd Harrier GR.3/Fujimi 1/72nd Ju 87D-3

  • Member since
    December 2002
  • From: Bury St Edmunds, Suffolk, England
Posted by Bish on Friday, November 17, 2017 1:52 AM

Looks nice Tony. I wasn't sure what the uh oh was for for a second lol. Was that one of those forgetful moments.

I am a Norfolk man and i glory in being so


On the bench: Airfix 1/72nd Harrier GR.3/Fujimi 1/72nd Ju 87D-3

  • Member since
    October 2009
  • From: Worcester, England.
Posted by aeroplanegripper on Friday, November 17, 2017 11:27 AM

Hi everyone,

Well I have now finally got the time and have finally started on this GB, and here is my entry, the Tamiya FW 190-D9 in 1/72. There isnt an over abundance of parts on this kit but I am well pleased with the detail of what there is in it. And to help me make sure Ive got the detail right I recentley bought at SMW 2017 this fantastic book by Richard A Franks.

Ive also finally decided to build and display the D9 as the last aircraft of the famous fighter ace Major Gunther Rall of JG300, as discovered abandoned in 1945. I am intending to build the kit OOB as much as possible but only with the addition of resin exhausts and a canopy mask to help me.

So far, the cockpit is completed, with use of the kit decals for the IP and seat harness. Paints used so far have been Alclad RLM 66 and minor switches picked out with Humbrol Red and Yellow, though I really dont think anyone will ever see them!


Heres one more

Thanks for looking and ill update as I move along.

Best Regards

Mark

"bis vivit qui bene vivit"


  • Member since
    September 2014
Posted by rooster513 on Friday, November 17, 2017 11:39 AM

Thanks Bish.

Nice start Mark, looking good.

-Andy

  • Member since
    January 2015
Posted by BrandonD on Friday, November 17, 2017 1:10 PM

Sure thing, Rooster. And no worries - finding them took only about 30 seconds, and it actually made me find my other reverse-action tweezers I was looking all over for! So it was a real win.

Those crosses, as someone else mentioned, should be easy to mask at least, if you have to go that route.

-BD-

  • Member since
    January 2015
Posted by BrandonD on Friday, November 17, 2017 1:17 PM

I have my 109 in its base paint scheme finally. Still need some touching up where I missed masking on the black parts, but that's pretty easy.

I used Model Master RLM 63 Lichtgrau for the topside, and while it looks a little light to my eye, some weathering will hopefully sort it out. The black around the exhaust and wing roots is just the primer, since I was being lazy. I used my Tamiya RLM 65 mix on the underside, and just straight Tamiya white sprayed thin over gray primer on the wingtips. 

Untitled
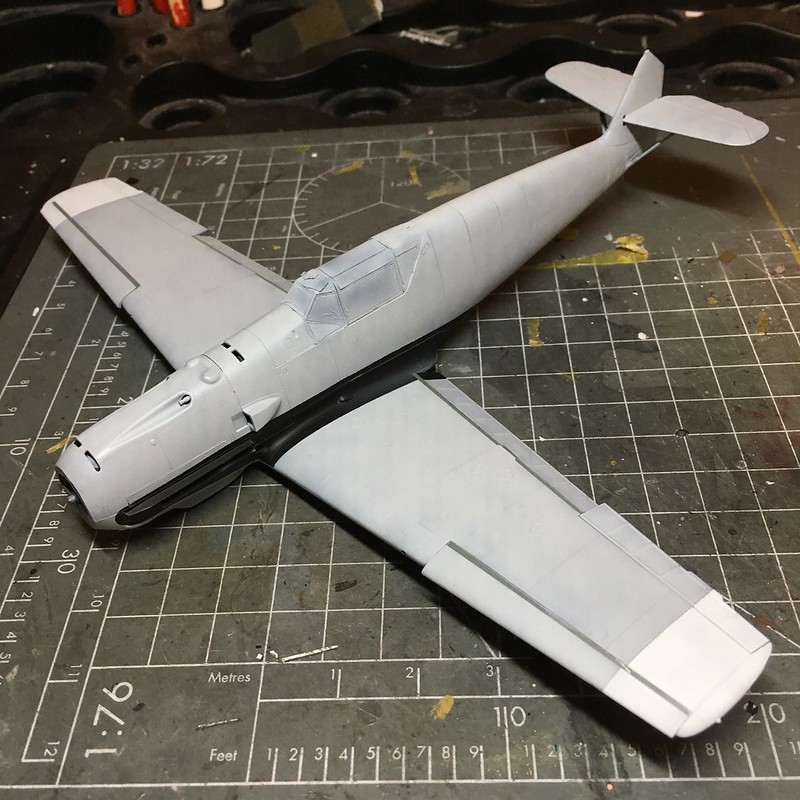
I'm going to see if I can't hit the top of the engine with some black, as it's visibl through the vents. I'll try with a brush, but may have to mask and shoot it in there with the airbrush.

I also need to touch up some of the RLM 02 with my Mr. Paint under the slats (not yet glued down).

I was planning on masking the wing insignia, but then though, "Nah, Eduard decals are so good that I just don't want to deal with it." I am, however, masking and painting the rudder insignia.

I was happy to get the enamel top coat on before I head out of town. It'll be fully cured when I get back.

Unfortunately, I did break off the tail wheel strut, just like I did last time I built an Eduard -E, so I'll need to get some tubing or wire out, as well as add the tail antenna point thingy back since I managed to break that.

Thanks for looking!

-BD-


  • Member since
    September 2014
Posted by rooster513 on Friday, November 17, 2017 2:32 PM

Those looks great Brandon! The paint looks awesome so far!

-Andy

  • Member since
    April 2005
  • From: Australia
Posted by taxtp on Friday, November 17, 2017 10:02 PM

Bish

Looks nice Tony. I wasn't sure what the uh oh was for for a second lol. Was that one of those forgetful moments.


That shows the wheel well insert that disappeared up into the wing cavity somewhere. 

Cheers

Tony

I'm just taking it one GB at a time.

JOIN OUR COMMUNITY!

Our community is FREE to join. To participate you must either login or register for an account.

SEARCH FORUMS
FREE NEWSLETTER
By signing up you may also receive reader surveys and occasional special offers. We do not sell, rent or trade our email lists. View our Privacy Policy.