SEARCH FINESCALE.COM

Enter keywords or a search phrase below:

Japanese Group Build VIII

23707 views
479 replies
1 rating 2 rating 3 rating 4 rating 5 rating
  • Member since
    April 2014
  • From: Australia
Posted by lostagain on Saturday, November 2, 2019 2:47 AM

Gary, the Zero is looking great. Very clean, just the look you are after. The aotake looks good, be good to see this complete.
The van was painted, but there is some crud caught up in the paint job. So, sand it back and paint it again.
And this gives you some idea of the moulding quality of the extra detail parts – plenty of clean up work to be done cleaning it up


  • Member since
    November 2009
  • From: SW Virginia
Posted by Gamera on Thursday, October 17, 2019 5:48 PM

She looks good to me Gary. Very nice smooth even paint and the blue aotoki would be right for a new aircraft without much weathering.

"I dream in fire but work in clay." -Arthur Machen


GAF
  • Member since
    June 2012
  • From: Anniston, AL
Posted by GAF on Thursday, October 17, 2019 3:46 PM

Piers,

That's an interesting subject!  Only the Japanese make food-truck models.  Big Smile

As for my Zero, it's coming along.  The landing gear and prop are done and I'm starting to attach the small bits to the fuselage and wings.  I don't think I'll knock them off unless I suffer a total failure of digital control and drop it!  I'm keeping my fingers crossed... which makes working on the model a bit more difficult.  Wink

I've suffered no major problems with assembly.  Everything fits very well, and sanding and filling have been minimal.  The only noteworthy item about construction might be that I only painted the wheel-wells in what could be described as "blue aotake".  This was a wash of Testor's Metallic Blue.  I think it got fairly close.  Note that the greenish-gray is rather splotchy, and I think I will keep that.  I also plan to do a minimal weathering on the aircraft as they were pretty much kept up before the attack on Pearl Harbor (which this one represents).  Fuchida, in an interview, even states his aircraft was painted on the voyage to attack Pearl, so I expect most of the aircraft were primed and made as presentable as they could be.  This would go along with Japanese tradition.

I'm about ready to give her a gloss coat and started applying decals, though I have a few more things to attach and paint.  I'll be saving the canopy for last.  I'm wondering if I should hold off finishing her until December 7th? Smile

Thanks for looking!

Gary


  • Member since
    November 2009
  • From: SW Virginia
Posted by Gamera on Thursday, October 17, 2019 9:06 AM

modelcrazy

Hey Clif,

You can scratch that Betty from the roster, I won't get to it, maybe next year. However, I will be starting and finishing the Zero in Nov or Dec depnding on when I can get 48 hours to work on it for Lewbud's Weekend GB.


No problem, just removed it. Would love to see you get to her in JGB IX. Looking forward to the Zero. 

"I dream in fire but work in clay." -Arthur Machen


  • Member since
    July 2014
Posted by modelcrazy on Wednesday, October 16, 2019 11:19 AM

Hey Clif,

You can scratch that Betty from the roster, I won't get to it, maybe next year. However, I will be starting and finishing the Zero in Nov or Dec depnding on when I can get 48 hours to work on it for Lewbud's Weekend GB.

Steve

Building a kit from your stash is like cutting a head off a Hydra, two more take it's place.


http://www.spamodeler.com/forum/

  • Member since
    November 2009
  • From: SW Virginia
Posted by Gamera on Tuesday, October 15, 2019 11:25 AM

Eric: Honestly I'm not a big cockpit buff either. I don't tend to add anything beyond what's there. I did go with Eduard ZOOM sets for awhile but haven't even used them for the few more recent aircraft I've done. Still guess I'm just in the habit of posing the cockpit open now. 

Piers: I really like that! Does it come with an interior of the kitchen etc? One of the guys in our club bought a kit like that, I'm not sure it's the same as yours but since he mentioned buying it I haven't seen it or know if he's done any work on it. There's a couple of trucks that serve Mexican food in the nearby city and one Korean one but I haven't eaten from one yet. Seem like a cool thing to model esp if it has the interior too.  

"I dream in fire but work in clay." -Arthur Machen


  • Member since
    April 2014
  • From: Australia
Posted by lostagain on Tuesday, October 15, 2019 5:29 AM

Eric, I think you absolutely nailed the Tony, that finish is superb, so much like the very matt and mottled appearance of the late war Japanese planes. Do you reckon that was due to the quality of the aluminium or just general wear and tear?'

And I know what you nean about cockpit detail - you can do a lot of work that is not noticed after the fuselage is closed up. How much I do varies with my attachment to each project!

Waikong thanks for the prompt - it was all down to the share settings in my album, must have changed something accidentally.

The model is part of an Aoshima series of delivery/catering vans which include takoyaki, udon, sushi, fish and this version. When I saw it, knew I had to get one of them. The  van body is well moulded, but the special details are going to need a bit of cleaning up.

  • Member since
    February 2010
  • From: Berkeley CA/St. Paul MN
Posted by EBergerud on Monday, October 14, 2019 6:04 PM
Cockpits are not an issue for me when it comes to posing the canopy open/closed. We are all heretics on some issue. Mine is cockpits. I don't care much about them because I never look at them. (There was an option to build the Ki-61 with one half of the fuselage a clear part - that would have shown the cockpit and the engine also.) There's a very thoughtful review of the new Tamiya Spitfire I on YouTube by a Brit named Spencer Pollard. He points out that the cockpit for the kit is outstanding - and even comes with PE like an Eduard Profi Pack. I've got that kit and my reaction to Spencer's remark was that I'll build the Spit anyway - and skip the PE. (And think shame on you for comparing an Eduard kit to a new tool Tamiya. I'll grant Eduard has come up with some neat subjects - I've got their new FW190 and am thinking about the new tool Tempest. But I've never built an Eduard kit without some unwelcome surprise. Tamiya simply makes better models. But Eduard would be in competition for #2 if you exclude WingNut Wings. BTW: Pollard had some pics of the WNW 1/32 scale Lancaster - astounding detail on the surface texture and riveting. Also going to push 1,000 parts and cost maybe $400. I'll pass.) Eric


A model boat is much cheaper than a real one and won't sink with you in it.

  • Member since
    December 2002
  • From: NYC, USA
Posted by waikong on Monday, October 14, 2019 8:39 AM
Now there's a kit you don't see everyday! :)
  • Member since
    November 2009
  • From: SW Virginia
Posted by Gamera on Monday, October 14, 2019 8:27 AM

lostagain

John, the Claude is looking great, the decals look okay, maybe not so up close?
Eric, great NMF finish – I use the Vallejo metal colour and like it too. Nice work knocking down the checkerboard effect, and it has reduced the shine a bit. Chipping is looking good too.
Theuns, the Kate is falling together nicely, good interior painting. And that is a super shaded NMF finish there too.
Gary, nice finish on the Zero, colour looks good to me too!
I am entering the fray with a very much ground based Japanese subject which should be a bit of fun:
It is an Aoshima 1/24  delivery van, brand unknown. I started putting windows in the back - looks crappy but fear not it will all be covered over.
 

Oh wow I can see your old photos now too! And that van, gee friggin' whiz love that! Really looking forward to seeing how you dress her up! 

"I dream in fire but work in clay." -Arthur Machen


  • Member since
    November 2009
  • From: SW Virginia
Posted by Gamera on Monday, October 14, 2019 8:25 AM

Well, I leave canopies open most of the time to show off the cockpit interior. I guess on the other hand if the kit has a really poor cockpit and you don't want to upgrade it closing it would be a good option. 

Also I suppose it gives a more 'in-action' look that the pilot and ground crew might run out to the plane any minute to start her up and take off.  

"I dream in fire but work in clay." -Arthur Machen


  • Member since
    February 2010
  • From: Berkeley CA/St. Paul MN
Posted by EBergerud on Monday, October 14, 2019 1:02 AM
I think I've positioned the canopy open on every plane I've built. Now that I look at more pics it really would not be necessary. One problem is that photographers were more interested in snapping pics of planes in flight or taking off than just sitting static. But, there are certainly examples of planes on the ground buttoned up - think of how much rain there was in the South Pacific - or England for that matter. The Ki-61 is a new generation Tamiya kit - very high tech. So the canopy parts open did fit perfectly. (As noted, you must decide open/closed very early because major parts differ for either choice.) But I think in most kits a closed canopy would fit better - it's always been something of a problem to get the open canopy pieces to fit just right. Might simply be easier to leave the canopy shut - might look better too. I've got the new Tamiya BF-109G too - the open canopy looks kind of neat - but on most of the pics I see of it on the ground, the canopy is closed. Figure. Eric


A model boat is much cheaper than a real one and won't sink with you in it.

  • Member since
    December 2002
  • From: NYC, USA
Posted by waikong on Sunday, October 13, 2019 5:39 PM
Very nice dirty NMF - I feel like I need to take a shower :)
  • Member since
    November 2009
  • From: SW Virginia
Posted by Gamera on Sunday, October 13, 2019 5:10 PM

Eric: She came out great! Really nice work on the weathering! Going to put you down on the front page. Weird thing about the canopy.

Would love to have you with one of the two Oscars in JGB IX...

"I dream in fire but work in clay." -Arthur Machen


  • Member since
    December 2002
  • From: Northern California
Posted by jeaton01 on Saturday, October 12, 2019 4:47 PM

Very nice, Eric.

John

To see build logs for my models:  http://goldeneramodel.com/mymodels/mymodels.html


GAF
  • Member since
    June 2012
  • From: Anniston, AL
Posted by GAF on Saturday, October 12, 2019 1:02 PM

Eric,

You certainly nailed the weathering on that NMF!  Nicely done.  You're right about the lighting and the different results you obtain.  You might try taking it out on a sunny day for some real light photos.  :-)

Gary

  • Member since
    February 2010
  • From: Berkeley CA/St. Paul MN
Posted by EBergerud on Saturday, October 12, 2019 2:52 AM


Tamiya 1/48 Ki-61-1d

Paints: Vallejo Metal Colors, Golden High Flow Acrylics


Weathering: Oil Wash, Iwata Com.Art Acrylics


Let's call the Tamiya Ki-61 a wrap.


 ki-61met by Eric Bergerud, on Flickr


 rt-iphone by Eric Bergerud, on Flickr


 tonyprofileview by Eric Bergerud, on Flickr


 lft-ft3 by Eric Bergerud, on Flickr


In sum, there's no problem with this kit - it was a delight from start to finish. The fit is amazing, the instructions tops and it includes canopy masks and a full scale diagram of the model to help you mask the kit (not needed here, but invaluable in other new Tamiya kits.) Tamiya makes better models than anyone else - the only argument is who is runner up. (Their Christmas kit is a new 1/48 P-38G - there are no tolerable P-38 kits on the market, and this one is supposed to be a stunner.) It doesn't hurt that the Japanese, for the most part, built very handsome planes - and the Ki-61 is a good example.


I was also very impressed with the Vallejo Metal Color Paints. They were very easy to apply and to my eyes are a pigment so fine that it equals the best Gunze metallics. I can't compare it to Alclad or other new lacquers because I can't use lacquers - I'd be looking at a divorce, and I hate the smell of true lacquers also. The Vallejo line are all true water based acrylics and easily worked with. In any case, this means I'll be able to do basically any plane in NMF - a real plus. Might add that the Ki-61 has basically no seams on top or bottom (the plane was derived from the BF-109E - and that aircraft - as Tamiya points out - carries an open seam on top and bottom). The Ki-61 carries a piece over the top rear seam, and the top front seam is supposed to be there. The fit was so good that getting rid of the bottom seams was done almost perfectly. I made one mistake in the build. If you want the cockpit open, you use different parts. When open, the two rear portions pile on top of each other, and that's on top of a well weathered rear cockpit. A closed canopy would have shown the fine clear parts better. (Actually, why do I always build open canopies? There was lots of rain in most WWII theaters, and I'd guess keeping the canopy shut would have been a good idea. Where would a Ki-61 been stationed in 1944? Somewhere near Clark Field in the Philippines would be a good guess - and it rains there a lot.)


The pic below shows the model after plane was painted and the panels muted with different shades of Metal Colors sprayed carefully. It also shows the orange leading edge and a blue/black anti-glare panel. (I put both over salt and which gives them a pretty good chipping to my eyes. Both were Golden High Flow mixes and worked perfectly.) As you can see, I decided to simplify the model's markings. I decided not to employ a black/green mottle and dispensed with the elaborate markings. Actually most photos I found of NMF Ki-61s were pretty bare - large numbers, however, were painted IJAAF green - which closely resembles olive drab. Anyway, I'm sure all of the elaborate decals provided by Tamiya would have looked neat, but I really wanted a clean platform to try out the Metal Colors - this is the first serious NMF plane I've done. (I've got two Oscars in the stash - we'll give one of those a proper green mottle over NMF - that's a lovely aircraft.)
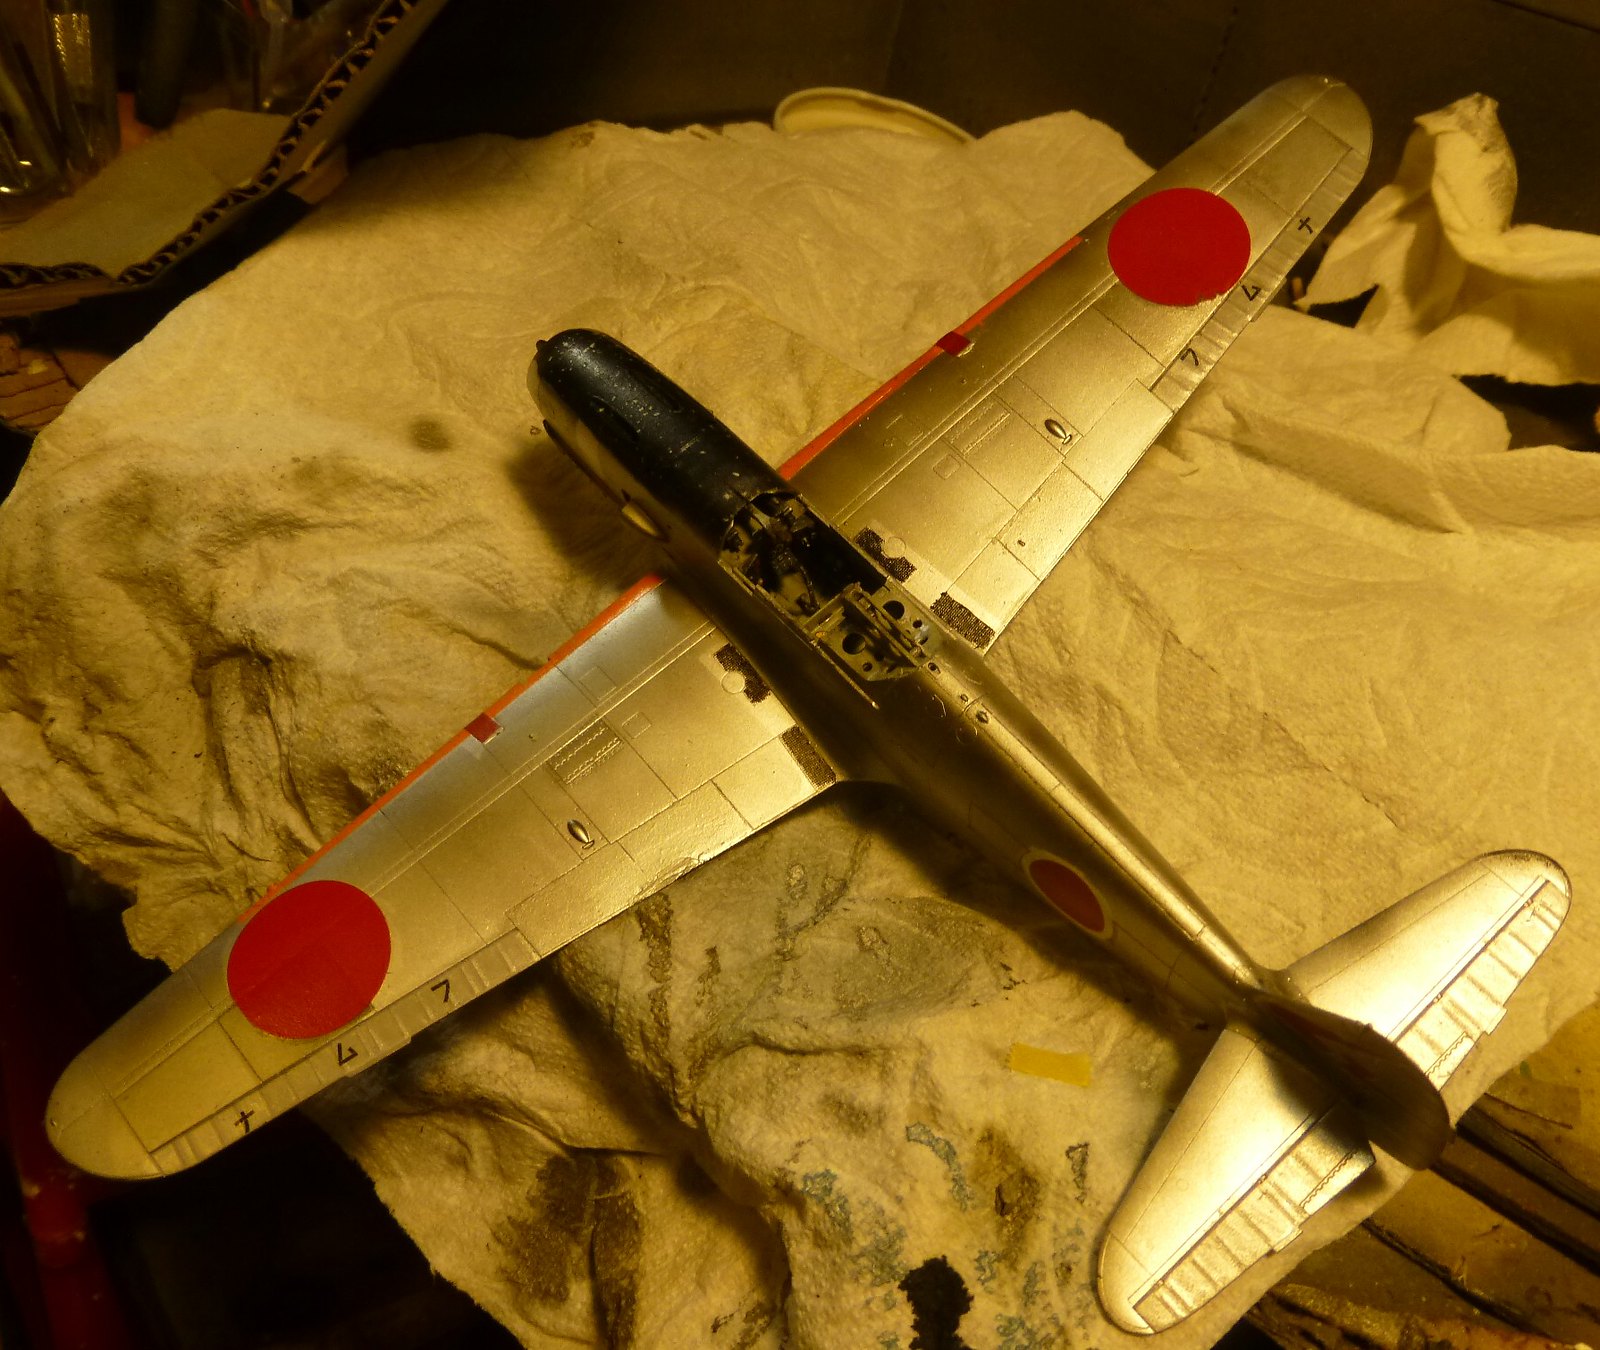
 

 irregular2 by Eric Bergerud, on Flickr


Weathering went pretty well I think. I knew I didn't want a F-86 type super shine - surely no Japanese combat aircraft ever looked like that, and I doubt many allied did either. That meant I didn't need a super gloss primer. I had some trouble with Stynelrez I used it once thinned and it worked great - this one I tried straight at high PSI as recommended so a little too much got down. When I tried to adjust with sanding, the primer peeled. Fortunately I had my "go to" Duplicolor "Hot Rod Black" automotive "sandable/fillable" primer and fixed it up perfectly well. After giving that a light sand, the effect was a kind of satin black - about perfect for what I wanted. (Note to self- use Duplicolor for all aircraft - I have to go outside to use it, but it's terrific stuff.) Anyway, the first step was to give the plane a light panel line wash using Gamblin and Windsor Newton oils - figure 50/50 black/burnt umber. That's a great wash. I use an extremely mild spirit from Gamblin called Gamsol, and it's terrific. Unfortunately I didn't take a pic. (Should add that I did put some of Vallejo Metal Color Varnish over the model before the weathering. On my paint mule, I found it superior to AK Gauzy. The aim here is to not be visible - that would mess up the metallic effect. I put Vallejo varnish on one wing before the other and couldn't tell the difference. On general principal I did want something between oils and the acrylics.) The last step was a pretty liberal dabbing using Com.Art transparent paints - most smoke (black really), some blue/black smoke and some "old oil." I can't really describe Com.Art to someone who hasn't used it. The paint's really designed for working on paper - hence large numbers of transparent and opaque colors. (I'm sure the opaque colors would stick to Duplicolor - it's almost tempting to try doing a model with them. They're made for airbrushing and do come out splendidly. But my Golden High Flow are so good, that there's no reason to go elsewhere.) For weathering I use a paint brush. Com.Art smoke makes a very good panel wash - faint the way I like it - but the oils worked so well that wasn't necessary. What Com.Art does like no other paint I know is create a grime. If you could see it in person, you can see the kind of sticky texture - reminds one of exhaust or dirt ground into oil. So I sort of dab it on - and try to keep the cover very irregular. I did want a lot more grime from the cockpit forward. Ki-61s were famous for burning oil. I can only assume the wings would have shown that too. Com.Art is also well suited to emulate scuffing from aircrew. (The Japanese never really got its engine to work reliably, even though they had full plans and a working example from Mercedes - Japanese engineers were excellent, but their skills were squandered on an industrial base that couldn't match the quality control found in allied or German planes. That's why both Zeros and Oscars were in production in 1945 - all of the second generation IJ aircraft were "hangar queens" for much of their life. The best Ki-61 was a model mated with a decent radial engine becoming the very fast Ki-100.) I think the photos of wartime Ki-61s above show the extremely untidy finish - especially in the front half of the plane. Below is a detail shot of the front and one of the rear - both show grime, but the second has less.


 det1 by Eric Bergerud, on Flickr


 det3 by Eric Bergerud, on Flickr


Below are some more pics of the complete bird. I used different lighting on the pictures. An interesting characteristic of NMF is that the plane changes color dramatically depending upon where light and shadow appear. There are very good color photos of US late war P-47 squadrons on YouTube and the planes appearance varies on every change of angle. And none of the Jugs looks clean and shinny either.


Eric


 lft-ft2 by Eric Bergerud, on Flickr


 lft-r2 by Eric Bergerud, on Flickr


 lft-ft3 by Eric Bergerud, on Flickr


 rear by Eric Bergerud, on Flickr


 r-rear by Eric Bergerud, on Flickr
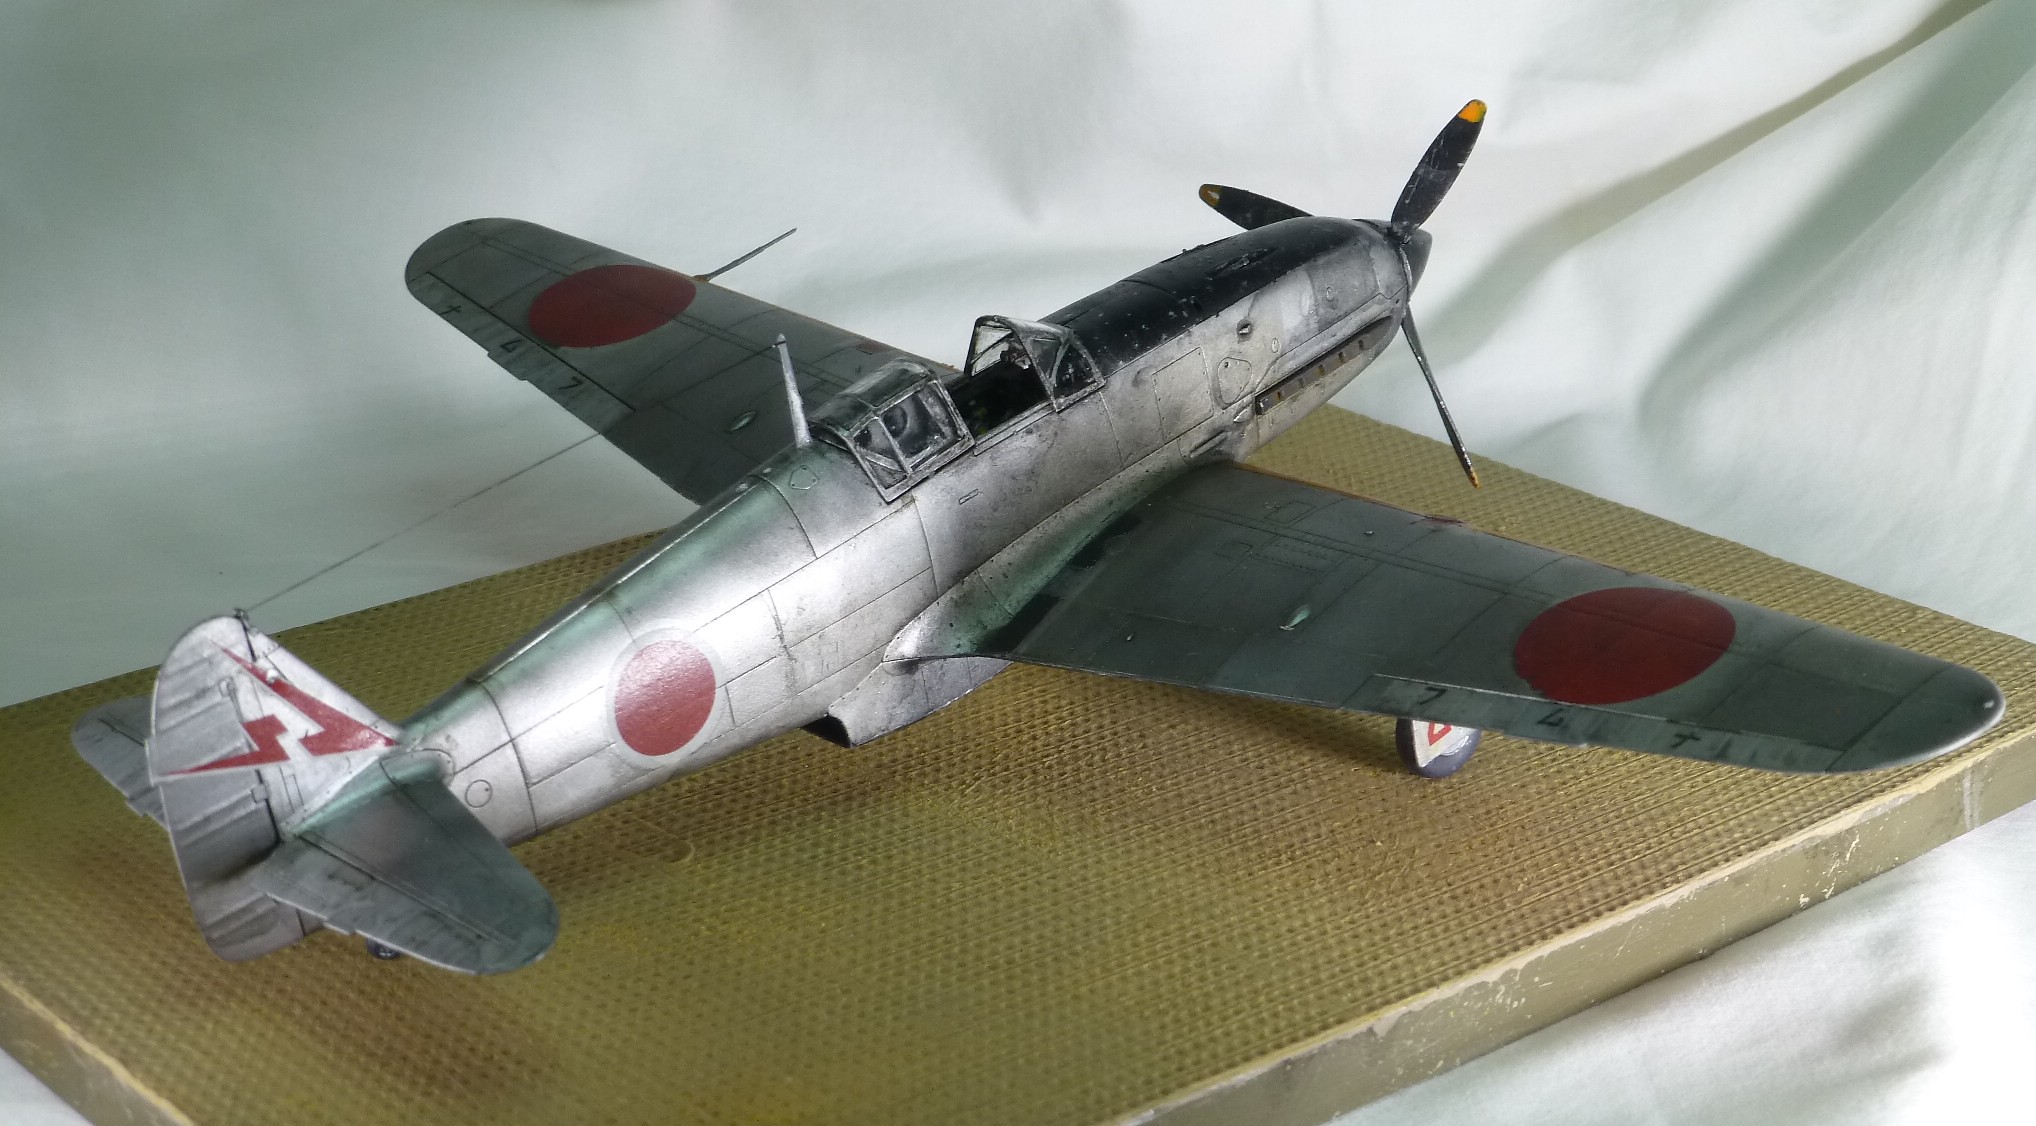
 

 rt-r by Eric Bergerud, on Flickr


 rt-ft (2) by Eric Bergerud, on Flickr


 rt-ft by Eric Bergerud, on Flickr


A model boat is much cheaper than a real one and won't sink with you in it.

  • Member since
    November 2009
  • From: SW Virginia
Posted by Gamera on Friday, October 11, 2019 11:37 AM

Piers: I hope you get things straightened out soon. I really want to see your van and the Bushmaster too. 

"I dream in fire but work in clay." -Arthur Machen


  • Member since
    April 2014
  • From: Australia
Posted by lostagain on Thursday, October 10, 2019 10:09 PM

Thanks Cliff, 

I have no trouble seeing the pictures, but of course I am signed into my Google account where the photos are stored.

Looked at work, I couldn't see any photos of mine from any GB.

Waikong, 

Thanks I had been copying a link direct from Google Photos, which as Cliff says, worked until a week or so ago. Not sure why it stopped all of a sudden, and reading up, it shouldn't have worked at all in the past either.

Sorry for high jacking the thread, I will work on sorting it out off line.

Cheers

Piers

  • Member since
    November 2009
  • From: SW Virginia
Posted by Gamera on Wednesday, October 9, 2019 11:23 AM

Piers: I didn't have any problem with any of your photos till about a week ago. 

Here's what I'm getting on my end:

And when I click on the photo link I get this: 

Wish I knew more about computers and could help more here... Dunce

"I dream in fire but work in clay." -Arthur Machen


  • Member since
    December 2002
  • From: NYC, USA
Posted by waikong on Wednesday, October 9, 2019 9:01 AM
Lostagain, looks like you are trying show a photo from google drive ? Unless you made the directory where you stored the file public, we will not be able to see it.
  • Member since
    April 2010
Posted by Theuns on Tuesday, October 8, 2019 11:41 PM

I cant see the pix either


Theuns

GAF
  • Member since
    June 2012
  • From: Anniston, AL
Posted by GAF on Tuesday, October 8, 2019 10:31 PM

Lostagain,

Thanks on the Zero color!  I think it's good enough for me, though it may not be what others think is correct.  You just have to go with your own interpretation sometimes!

As for the photos, I'm unable to see anything, even a broken link.  Sorry!

Wow! The weather is beautiful!  Time to get some painting done!

Gary

  • Member since
    April 2014
  • From: Australia
Posted by lostagain on Tuesday, October 8, 2019 6:54 PM

That's annoying Cliff, I have attached a couple more photos below, can you see either ?

They are two old JGB photos tht have displayed before, added two different ways.

  • Member since
    November 2009
  • From: SW Virginia
Posted by Gamera on Tuesday, October 8, 2019 7:32 AM

Piers: Again I can't see you photos! The delivery van sounds awesome though, I don't think anyone else here has built an auto in all eight builds! 

Can anyone else see them? Is it something going on with my end??? 

"I dream in fire but work in clay." -Arthur Machen


  • Member since
    April 2014
  • From: Australia
Posted by lostagain on Tuesday, October 8, 2019 12:28 AM

John, the Claude is looking great, the decals look okay, maybe not so up close?
Eric, great NMF finish – I use the Vallejo metal colour and like it too. Nice work knocking down the checkerboard effect, and it has reduced the shine a bit. Chipping is looking good too.
Theuns, the Kate is falling together nicely, good interior painting. And that is a super shaded NMF finish there too.
Gary, nice finish on the Zero, colour looks good to me too!
I am entering the fray with a very much ground based Japanese subject which should be a bit of fun:
It is an Aoshima 1/24  delivery van, brand unknown. I started putting windows in the back - looks crappy but fear not it will all be covered over.

  • Member since
    November 2009
  • From: SW Virginia
Posted by Gamera on Sunday, October 6, 2019 4:06 PM

Theuns: That looks fantastic! Great job on the NM. The masking on the tail came out great.

GAF is right, Mitsubishi and Nakajima colours were different. Kawanishi and Kawasaki were as well. I'm afraid I don't have any numbers for them, I have a bunch of White Ensign paints that I used to compare shades to. And I've been doing armour for so long I haven't done an aircraft for years.

"I dream in fire but work in clay." -Arthur Machen


  • Member since
    April 2010
Posted by Theuns on Sunday, October 6, 2019 6:31 AM

Thanx for the info, I however went for the  bare metal to see if I can weather it with oil paints.

I painted the tail and fuselage band red

 IMG_20191006_071505 by Theunis van Vuuren, on Flickr

Then gloss alclad black as a base

 IMG_20191006_091601 by Theunis van Vuuren, on Flickr

Then alclad airframe alluminium untill I had a nice dark allu look. After this I used the standard black basing to give shading and modulation to the final alclad.

 IMG_20191006_095244 by Theunis van Vuuren, on Flickr

 IMG_20191006_095258 by Theunis van Vuuren, on Flickr

Most painting now done, will seal it with a clearcoat and start weathering

 IMG_20191006_124246 by Theunis van Vuuren, on Flickr


Theuns

GAF
  • Member since
    June 2012
  • From: Anniston, AL
Posted by GAF on Saturday, October 5, 2019 4:47 PM

Don't know what the standard FS codes are.  I think Aviation of Japan will probably have them somewhere.  http://www.aviationofjapan.com/

Is this the scheme you're thinking of?

https://modelingmadness.com/scott/axis/j/kate.htm

If so, yes it's the same IJN grey/green color, though what that is is subject to debate.  Smile

Someone will probably be along with a more definite answer.

Gary

PS> On the subject of colors, I understand that Nakajima and Mitsubishi had different cockpit colors for their aircraft.  This is what I've heard is the color for Nakajima aircraft:

https://www.dersockelshop.de/farben-/ijn-cockpit-color-nakajima-seidenmatt-mr.color-solvent-based-10ml_mr.-hobby_gsc127.html

But as I said, it's subject to debate.


  • Member since
    April 2010
Posted by Theuns on Saturday, October 5, 2019 12:18 PM

what is the standard FS codes for the Green top and grey bottom scheme of the Kate?


Is the bottom the same IJN grey with the green tint to it like ontop of zeros ect?


Theuns

JOIN OUR COMMUNITY!

Our community is FREE to join. To participate you must either login or register for an account.

SEARCH FORUMS
FREE NEWSLETTER
By signing up you may also receive reader surveys and occasional special offers. We do not sell, rent or trade our email lists. View our Privacy Policy.