SEARCH FINESCALE.COM

Enter keywords or a search phrase below:

Japanese Group Build VIII

23709 views
479 replies
1 rating 2 rating 3 rating 4 rating 5 rating
  • Member since
    November 2009
  • From: SW Virginia
Posted by Gamera on Friday, March 29, 2019 11:18 AM

Whoops my apologies Nick, somehow I missed your last post. 

She's looking fine, great job on the yellow edge stripes. And the decals went down perfectly! 


"I dream in fire but work in clay." -Arthur Machen


  • Member since
    November 2009
  • From: SW Virginia
Posted by Gamera on Saturday, March 30, 2019 11:15 AM

Nick: It's a Mechagodzilla kit from Aoshima. I got mine from HobbyLink Japan, not sure they still have them in stock though.

"I dream in fire but work in clay." -Arthur Machen


  • Member since
    August 2015
  • From: the redlands Fl
Posted by crown r n7 on Saturday, March 30, 2019 1:24 PM

gamera thankyou. I like that mechagodzilla .

I weathered the raiden with oil paint and chalks. then gave a thin coat of tamiya flat clear to give it a semigloss look and the canopy is done.


 Nick.

  • Member since
    July 2014
Posted by modelcrazy on Saturday, March 30, 2019 3:33 PM

Oh wow, outstanding job Crown.

Steve

Building a kit from your stash is like cutting a head off a Hydra, two more take it's place.


http://www.spamodeler.com/forum/

  • Member since
    November 2009
  • From: SW Virginia
Posted by Gamera on Saturday, March 30, 2019 7:38 PM

Yeah, that's some sharp work Nick!

"I dream in fire but work in clay." -Arthur Machen


  • Member since
    December 2002
  • From: Northern California
Posted by jeaton01 on Saturday, March 30, 2019 11:19 PM

Nice work on the Raiden.

John

To see build logs for my models:  http://goldeneramodel.com/mymodels/mymodels.html


  • Member since
    August 2015
  • From: the redlands Fl
Posted by crown r n7 on Monday, April 1, 2019 3:30 AM

Many thanks guy’s I’m painting the figures for a change but no pics yet the plane is near completion 


 Nick.

  • Member since
    August 2015
  • From: the redlands Fl
Posted by crown r n7 on Monday, April 1, 2019 3:02 PM

here are the figure pics . the raiden is finished but the pics I took are way too dark will try again this evening.


 Nick.

  • Member since
    August 2015
  • From: the redlands Fl
Posted by crown r n7 on Monday, April 1, 2019 4:46 PM

The Mitsubishi Raiden is complete, painted with tamiya acrylics,weathering with oil paints and chalks. Thank you for all your comments and for watching this wip.


 Nick.

  • Member since
    November 2009
  • From: SW Virginia
Posted by Gamera on Monday, April 1, 2019 7:47 PM

Nick: Beautiful job there!!! And congrads on being the first non-rollover finished model!

I went ahead and posted you, were you going to build a base with the figures? If so please do so and I'll replace the photo with your new one.

Yes

"I dream in fire but work in clay." -Arthur Machen


  • Member since
    August 2015
  • From: the redlands Fl
Posted by crown r n7 on Monday, April 1, 2019 8:03 PM

Thank you my friend .I ordered a resin tarmac but it’s on back order. I do like the pic that you selected. This kit was intertaning for being a classic kit out of the box and I really enjoyed this GB.


 Nick.

  • Member since
    November 2009
  • From: SW Virginia
Posted by Gamera on Monday, April 1, 2019 9:25 PM

Sure, I'll leave that photo up and if you when you get the tarmac and everything set up I can replace it.

The older Tamiya kits might not be as good as the newer ones but many of them still have really good fit and are fun to build.

"I dream in fire but work in clay." -Arthur Machen


  • Member since
    April 2006
  • From: ON, Canada
Posted by jgeratic on Monday, April 1, 2019 10:33 PM

Nick, your Raiden looks impeccable, smartly done! Yes


regards,

Jack

  • Member since
    December 2002
  • From: NYC, USA
Posted by waikong on Tuesday, April 2, 2019 10:42 AM
Nice Raiden! Good to see it done.
  • Member since
    March 2005
  • From: Lancaster, South Carolina
Posted by Devil Dawg on Sunday, April 7, 2019 9:39 PM

crown r n7

decals and some more clear.


Dang, Nick!! That is one nice-lookin' Raiden!

Gary Mason


Devil Dawg

On The Bench: Tamiya 1/32nd Mitsubishi A6M5 Model 52 Zeke For Japanese Group Build

Build one at a time? Hah! That'll be the day!!

  • Member since
    March 2005
  • From: Lancaster, South Carolina
Posted by Devil Dawg on Sunday, April 7, 2019 9:40 PM

Oops!! Didn't see the finished pictures of your Raiden, Nick. Great job!!

Gary Mason


Devil Dawg

On The Bench: Tamiya 1/32nd Mitsubishi A6M5 Model 52 Zeke For Japanese Group Build

Build one at a time? Hah! That'll be the day!!

  • Member since
    March 2005
  • From: Lancaster, South Carolina
Posted by Devil Dawg on Sunday, April 7, 2019 10:38 PM

07 April 2019 – Wow!! It’s amazing how fast two weeks goes by. Still making progress on the cockpit area, but work has started taking up more of my time the past two weeks, so not a lot of progress on it, but some, nonetheless. Anyways, the pictures below show my latest progress on the cockpit. It’s coming along pretty well, especially considering how much I shake when I attempt hand-painting on such a small scale. I'm actually pleased with how it’s looking. Painting the bezels around the instruments has been the biggest challenge so far, but, I ain’t building her for no contest! Let me know whatcha think!!
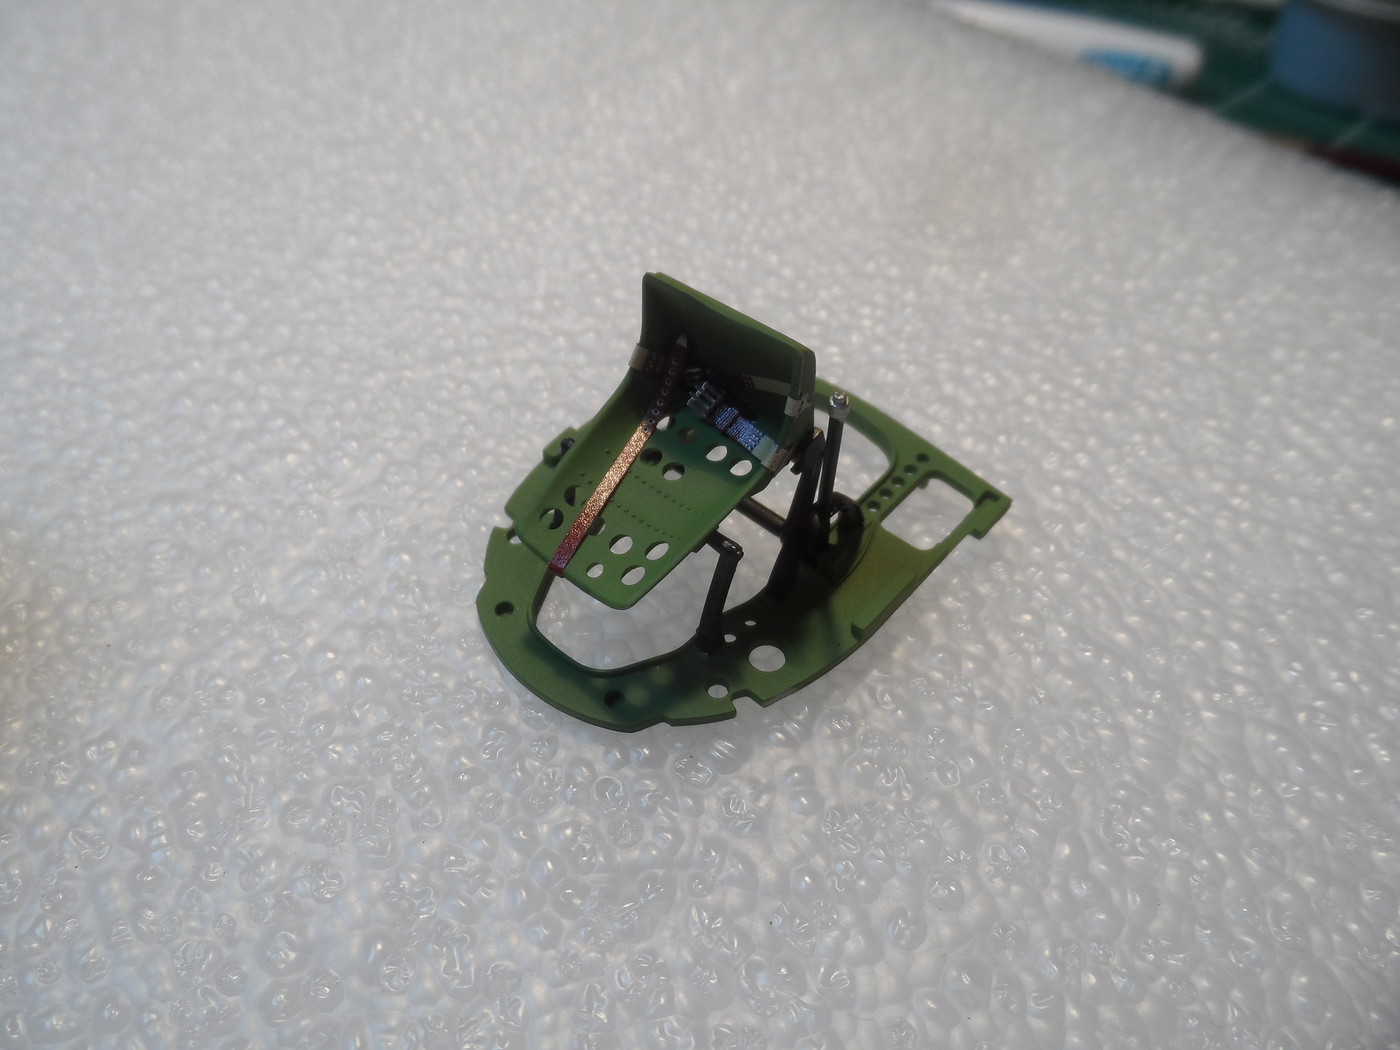
The seat and rear bulkhead. This is probably the only place that I’ll use photo-etch parts on this kit. The seat belts that came with the kit were paper ones that you had to cut out, then wrap around the provided unpainted brass photo-etch pieces. They just didn’t look real. But, I had a set of Eduard pre-painted photo-etch seat belts (for my 1/32nd Hasegawa A6M5c), so I used those. Luckily/happily, the Eduard set comes with two sets of belts on one sprue, so I still have a set for my Hasegawa kit. Woo Hoo!!


Side walls and floor in place. Not too shabby……..


The main instrument panel. Don’t look too closely, or you’ll see the crappy job job I did on the instrument bezels.


The secondary instrument panel – this holds the artificial horizon (left) and turn & bank indicator (right) up top, and the radio & a couple of instruments on the bottom. There is a decal for the two vertically-stacked instruments on the lower left. They will be applied before it all goes in the fuselage.


These are oxygen bottles (all three) that mount behind the pilot’s seat on the rear of the rear bulkhead. These will be very hard to see once everything is together, so I didn’t do my best painting on them. But, they’ll suffice for my needs.

Devil Dawg

On The Bench: Tamiya 1/32nd Mitsubishi A6M5 Model 52 Zeke For Japanese Group Build

Build one at a time? Hah! That'll be the day!!

  • Member since
    November 2009
  • From: SW Virginia
Posted by Gamera on Monday, April 8, 2019 11:40 AM

Looks great Gary! The kit comes with a fantastic cockpit, the only issue with it is the Zero's cockpit is so closed up it's hard to see all the detail when it's fitting down in there. 

"I dream in fire but work in clay." -Arthur Machen


  • Member since
    March 2005
  • From: Lancaster, South Carolina
Posted by Devil Dawg on Monday, April 8, 2019 9:21 PM

Thanks a bunch, Gamera!

Devil Dawg

On The Bench: Tamiya 1/32nd Mitsubishi A6M5 Model 52 Zeke For Japanese Group Build

Build one at a time? Hah! That'll be the day!!

  • Member since
    August 2015
  • From: the redlands Fl
Posted by crown r n7 on Monday, April 8, 2019 9:35 PM

Gary thankyou for your kind words.

that zero has a lot of fine detail and your work is amazing with the large scale it gets a little complex. I’ll keep tabs on it.Yes  


 Nick.

  • Member since
    March 2005
  • From: Lancaster, South Carolina
Posted by Devil Dawg on Monday, April 29, 2019 8:05 PM

Wow!!! Twenty days since the last post of any kind here. Glad I'm not the only one with no time on his hands!!!


Anyways, here's the latest update of my Zero:

29 April 2019 – Well, shoot! Didn’t think it would take me this long to get another update posted, but I wuz wrong! Almost a whole month has passed since my last update, and little has been done. I got the instrument panel together, with the decals applied for the instrument faces (which came out lookin’ pretty good), and the oxygen tanks glued in place on the rear of the cockpit assembly. And that’s all. Hoping to get a lot more done in the next few weeks. Let me know whatcha think, folks!

Devil Dawg

On The Bench: Tamiya 1/32nd Mitsubishi A6M5 Model 52 Zeke For Japanese Group Build

Build one at a time? Hah! That'll be the day!!

  • Member since
    November 2009
  • From: SW Virginia
Posted by Gamera on Monday, April 29, 2019 9:10 PM

Looks sharp! Glad to see you moving ahead!

I've been a bit distracted by a couple of other GBs and stuff I need to get done before this one. And of course the usual spring stuff like mowing.

"I dream in fire but work in clay." -Arthur Machen


  • Member since
    March 2005
  • From: Lancaster, South Carolina
Posted by Devil Dawg on Tuesday, April 30, 2019 9:07 PM

Thanks, Gamera!

Devil Dawg

On The Bench: Tamiya 1/32nd Mitsubishi A6M5 Model 52 Zeke For Japanese Group Build

Build one at a time? Hah! That'll be the day!!

  • Member since
    August 2015
  • From: the redlands Fl
Posted by crown r n7 on Tuesday, April 30, 2019 10:19 PM

nice detailing on that cockpit impressive instrument cluster


 Nick.

  • Member since
    November 2009
  • From: SW Virginia
Posted by Gamera on Tuesday, May 7, 2019 8:48 PM

Just a head's up here I'm on vacation/holiday and I'm supposed to have Wi-Fi here at the motel but it's been up and down so far. So if I'm not around much in the next two weeks I'm here but just can't log on.

Sorry... Huh?

"I dream in fire but work in clay." -Arthur Machen


  • Member since
    January 2019
Posted by Edwin on Tuesday, May 7, 2019 10:21 PM

Gamera

Just a head's up here I'm on vacation/holiday and I'm supposed to have Wi-Fi here at the motel but it's been up and down so far. So if I'm not around much in the next two weeks I'm here but just can't log on.

Sorry... Huh?


No worries! Enjoy your vacation!

  • Member since
    October 2008
  • From: italy
Posted by bsyamato on Friday, May 10, 2019 10:30 AM

crown r n7

The Mitsubishi Raiden is complete, painted with tamiya acrylics,weathering with oil paints and chalks. Thank you for all your comments and for watching this wip.


Excellent result Crown Yes 


Sorry for delay , the little Jpa cayuse is near finish and forget to take intermediate pictures:

After grey humbrol primer , painted the yellow and orange , then masked and green on


And decals after glossy coat and colored upper windows


Unfortunately i destroyed one of rotor basement serial number decal (obliviously white color..) so i need to leave it withouth till i found a good replacement.


No updates on the other two subjects but i started also the same nanzan kit that Zvezda 1980  and no reason to double here :)


Heres the link to the gallery if someone intrested

https://postimg.cc/gallery/2ycke2css/


At the next!

  • Member since
    November 2009
  • From: SW Virginia
Posted by Gamera on Friday, May 10, 2019 6:39 PM

Nice work there Bsyamato on both of them!

"I dream in fire but work in clay." -Arthur Machen


  • Member since
    August 2015
  • From: the redlands Fl
Posted by crown r n7 on Tuesday, May 14, 2019 5:25 AM

yes, I to agree moving long nicely 


 Nick.

  • Member since
    July 2014
Posted by modelcrazy on Friday, May 24, 2019 5:16 PM

Gam, I decided not to go with the Betty. It's an old kit and I didn't want to mess with it, however, I do have 4 kits I'm intrested in right now and wanted to run a poll which one to build.

1. 1/350 Atago

2. 1/48 A6M5 Type 52 model Zero

3. one of the 1/72 Ki 84 type 4 Franks

4. 1/72 Ki 43I Oscar

Everyone, let me know which one you want to see by June 1 and I'll get-r-done.

Steve

Building a kit from your stash is like cutting a head off a Hydra, two more take it's place.


http://www.spamodeler.com/forum/

JOIN OUR COMMUNITY!

Our community is FREE to join. To participate you must either login or register for an account.

SEARCH FORUMS
FREE NEWSLETTER
By signing up you may also receive reader surveys and occasional special offers. We do not sell, rent or trade our email lists. View our Privacy Policy.