SEARCH FINESCALE.COM

Enter keywords or a search phrase below:

Resurrection GB

12131 views
133 replies
1 rating 2 rating 3 rating 4 rating 5 rating
  • Member since
    May 2019
Posted by Galatians 2:16 on Tuesday, July 30, 2019 9:33 PM

                 Resurrection GB Roster:

Galatians 2:16 - 1/48 Revell F/A18E   Super Hornet

Before:

Greysnake - 1/35 Tamiya King Tiger 

Before:

After:

mustang1989 - 1/25 Jo-Han Pro Stock Maverick 

Before:

BrandonK - 1970 Revell Mustang (Boss 429) 

Before:


After:

Crown r n7 - TBD

plasticjunkie - 1/9 Esci BMW 

Before:

After:

Rob Gronovius - Revell (former Renwal) M50 Ontos

Before:


GMorrison - Hasegawa Pkw.K1 Kubelwagen Type 82 “Otto” with Marseille

Before:

jeaton01 - Monogram Bf-109

Before:

After:


Checkmateking02 - 1/700 scale Fujimi USS Lexington, Saratoga, and Wisconsin (originally Fujimi's MissourI) and 1/700 scale Hasegawa USS Alabama.

Before:

After:     USS Lexington

             USS Saratoga

               USS Wisconsin

               USS Alabama

********************************2022 Line Up

GreySnake - Takom 1/35 St. Chamond

Before:

Galatians 2:16 - 1/48 Revell F/A18E   Super Hornet (continued from above)

Before:

 Snail

  • Member since
    March 2012
  • From: Corpus Christi, Tx
Posted by mustang1989 on Wednesday, July 31, 2019 4:58 AM

Thanks for starting this group build. Great idea!

Body removed:

Image


 Forum | Modelers Social Club Forum (proboards.com) 

  • Member since
    May 2019
Posted by Galatians 2:16 on Wednesday, July 31, 2019 10:10 AM

Your welcome, but really thanks for your interest! I can’t wait, and I’ll have to get around to posting an update of my jet. I think I bought the wrong Purple Power though. Mine says deck and fencing.....Oh well. Snail

Oh, and by the way, do you remember the kit manufacturer and type of car, mustang and GreySnake? If not that’s ok. Thanks!Wink   

 Snail

  • Member since
    March 2012
  • From: Corpus Christi, Tx
Posted by mustang1989 on Wednesday, July 31, 2019 9:11 PM

Oh shoot! Sorry bout dat. It's the 1/25 Jo-Han Pro Stock Maverick.


 Forum | Modelers Social Club Forum (proboards.com) 

  • Member since
    August 2015
  • From: the redlands Fl
Posted by crown r n7 on Thursday, August 1, 2019 4:59 AM

I'm looking.... I'll get back to you .


 Nick.

  • Member since
    November 2008
  • From: Central Florida
Posted by plasticjunkie on Thursday, August 1, 2019 6:51 AM

I just recently resurrected an old Esci 1/9 BMW that I stripped and broke down to be repainted. It was completed but I still have the step by step pictures so can I enter it here?

 GIFMaker.org_jy_Ayj_O


Too many models to build, not enough time in a lifetime!!

  • Member since
    December 2002
  • From: Fort Knox
Posted by Rob Gronovius on Thursday, August 1, 2019 12:01 PM


I have a circa 1983 Revell (former Renwal) M50 Ontos that I have stripped down and started to rebuild nearly twenty years ago when a friend gave me a partially built original Renwal kit in 2001.

I originally wanted to bring this kit up to modern standards by replacing the recoilless rifles with metal tubing, adding some new, more modern parts, etc. But then Academy did an updated kit so I decided to get that kit instead.

So now I have this old kit that I just need to reassemble and refinish. These photos were taken 9 years ago and the kit is just stuffed into an old box.

If you notice the road wheels, the kit uses solid inner road wheels. I converted some of the outer road wheels from the extra kit so the inner road wheels would look like they are supposed to.

With any luck, I can truly finish up this kit. When I was a child, my friend's big brother had one on a shelf and I thought it was the coolest looking thing ever. It was a holy grail until I got the reissued kit in 1983.

 Here's a link to my original thread I started nine years ago.

http://cs.finescale.com/fsm/modeling_subjects/f/3/t/128149.aspx?sort=ASC&pi240=1

  • Member since
    February 2011
Posted by GreySnake on Thursday, August 1, 2019 3:28 PM
This is the Tamiya 1/35 King Tiger Production Turret. This was the first armor model I built after returning to the hobby after a few years absence. Also the first model I used my then new airbrush and compressor on.
 
The first step was to remove the tracks, side skirts and tools. Everything came off pretty easy with no damage.
When I originally built this kit I did a poor job gluing the tracks together as can be seen here. Not much of a problem I’ll just stable the tracks it will be hidden by the side skirts.
The turret number decals came up with some scotch tape. There really wasn’t anything to remove from the turret. I would have liked to get the commanders machine gun removed but it’s really glued in and don’t care to mangle it.
 
Thankfully the gun barrel didn’t have a strong join and came off with some gentle pulling. This is going to make it much easier to sand versus being attached to the turret.
Next I turned my attention to the upper hull and was in for a surprise. I always wash my models before painting; just to remove the sanding dust. Well I was in a rush to paint that morning and used the misses’ hair dryer and applied too much heat. You can see where the hull has some warping. The engine deck was also sunk in some preventing the turret from sitting correctly. No idea why I never noticed it till now. With some work the upper and lower hull came free.
Luckily I have a spare King Tiger upper hull that I was using to practice zimmerit (anti-magnetic mine paste.) So I went ahead and cleaned up the putty and it’s good to go. 
On the old hull there were a handful of pieces I couldn’t remove. I just cut the hull apart till I got to said parts and used a blade to free them. With a little sanding and trimming to remove the extra plastic and the parts will fit like new.  
 
I've gone ahead and glue the upper and lower hull together and letting the parts dry.
 
My next steps are to make replacement grab handles for the drivers and machine gunners hatches. There’s also a few lifting hooks on the engine deck that will need replacement. Luckily I have a couple Dragon King Tigers that have extra hooks I can use.
  • Member since
    May 2019
Posted by Galatians 2:16 on Thursday, August 1, 2019 6:30 PM

Mustang: Thanks! Your info has been added to the roster.

Plasticjunkie: Welcome we all will be grateful for your advice and input!

Rob Gronovis: You are cleared for entry! I can’t wait to see your upgrades. If perchance you end up scratch building parts, I will be very very interested in watching your progress. SmileSnail   

 Snail

  • Member since
    May 2019
Posted by Galatians 2:16 on Thursday, August 1, 2019 6:36 PM

GreySnake: sorry about the hair dryer! The same issue happened to a friend of mine who was actually trying to use heat to un-warp a wing. It melted. Tongue Tied Excellent description of your work so far! How will you make your handles? Keep us posted please! Snail

 Snail

  • Member since
    November 2008
  • From: Central Florida
Posted by plasticjunkie on Thursday, August 1, 2019 8:28 PM

This is the old Esci 1/9 scale BMW with side car that my brother bought for me in the early 1970's. He passed many years ago and have always kept this as a VERY special model.

I accidenrally deleted the 2 pictures showing how the model was before the rework . Here is the bike partially apart.

   The color I used back then was called Afrika Korps Yellow made by Humbrol back in the early 1970's. It had a pinkish tone and brushed beautifully without leaving any brush marks. 

The side car taken apart.

and the frame

Parts were sorted and separated into small plastic tubs

The side car gets an airbrushed coat of Model German Yellow Enamel. I stippled some steel paint on spots thenused liquid mask to create paint chips when peeled off.

Shot the headlight unit with the clear lens in place which was covered with liquid mask.

Liquid mask removed after the paint dried.


 GIFMaker.org_jy_Ayj_O


Too many models to build, not enough time in a lifetime!!

  • Member since
    November 2008
  • From: Central Florida
Posted by plasticjunkie on Thursday, August 1, 2019 8:38 PM

The rubber tires were separated from their rims to have the dust colored paint removed that I applied 47 years ago.  

I used a variety of Alclad metallic shades to give life  the old tired parts .

A couple of broken/missing parts on the MG-34 mount were made from stretched sprue

The MG34 was repainted

The bike is all together now but still needs new markings.

more to come..................

 GIFMaker.org_jy_Ayj_O


Too many models to build, not enough time in a lifetime!!

  • Member since
    July 2014
Posted by modelcrazy on Thursday, August 1, 2019 9:32 PM

I don't have anything to resurrect or redo but I'll be watching.

Great looking bike PJ.

Steve

Building a kit from your stash is like cutting a head off a Hydra, two more take it's place.


http://www.spamodeler.com/forum/

  • Member since
    November 2008
  • From: Central Florida
Posted by plasticjunkie on Thursday, August 1, 2019 9:54 PM

modelcrazy

I don't have anything to resurrect or redo but I'll be watching.

Great looking bike PJ.


Thanks Steve. 

 GIFMaker.org_jy_Ayj_O


Too many models to build, not enough time in a lifetime!!

  • Member since
    March 2012
  • From: Corpus Christi, Tx
Posted by mustang1989 on Friday, August 2, 2019 4:55 AM

Jeeeeeeeeeeeeeeeeeez!!! That's one helluva bike you've got there Ernie! Ahem.....forty seven years ago?? Here I thought you were probably in your 40's all along.Indifferent


 Forum | Modelers Social Club Forum (proboards.com) 

  • Member since
    February 2011
Posted by GreySnake on Friday, August 2, 2019 10:08 AM

Galatians 2:16

GreySnake: sorry about the hair dryer! The same issue happened to a friend of mine who was actually trying to use heat to un-warp a wing. It melted. Tongue Tied Excellent description of your work so far! How will you make your handles? Keep us posted please! Snail


Not a big deal with the hair dryer. Just teaches me not to rush stuff like I used to.  The handles were going to be made with stretched sprue. Normally I’d use 0.05mm copper wire but don’t have any on hand. This did not happen as you will see.
 
 
PJ that is excellent work on the BMW!
 
 
Got more work done on the King Tiger yesterday evening. Put on a few podcasts and got into the zone.  I got so caught up working that I forgot to take in progress photos. So the finished work will have to do.
 
 
Completed work on the turret and gun barrel. The seams have been removed from the barrel and look much better. The only other thing the turret needed was a handle for the loaders hatch. The original plan was to make the handle with stretched sprue. But then I realized my other Tamiya King Tiger that’s still in the box had an extra handle, so that was replaced.
 
The engine deck parts from the now junked hull were glued onto the replacement. You’ll notice the little grey lifting hooks taken from a Dragon King Tiger as it comes with four extra. Yes the engine deck should have photoetch grills but I really don't care to throw extra money at this kit.
 
Front of the hull was next. The hatches, vision ports and guards from the old hull were glued on. My other Tamiya King Tiger also had extra handles for the hatches so those were glued on.
 
And here’s the cat ready for a bath and primer. I thought about removing the paint on the turret but I think the primer should even everything out. From here on out I can treat the model like any other model.
The only thing I’m not happy with is having the road wheels glued on. I always paint those separately. The good thing is the road wheels were all steel so I don’t have to paint the rubber rims like on most tanks.
 
 
I’m also trying to decide on what camouflage to paint the tank. I’m thinking about going with a late war ambush scheme much like on this Panther.

  • Member since
    December 2002
  • From: Fort Knox
Posted by Rob Gronovius on Friday, August 2, 2019 12:20 PM

GreySnake
When I originally built this kit I did a poor job gluing the tracks together as can be seen here. Not much of a problem I’ll just stable the tracks it will be hidden by the side skirts.

 
If the tracks fit too tightly, you can look to see if you can relocated the idler or sprocket mounts inward in order to loosen the stretching. Many Tamiya kits are designed with tight track runs because they have motorized options.
  • Member since
    November 2008
  • From: Central Florida
Posted by plasticjunkie on Friday, August 2, 2019 8:54 PM

mustang1989

Jeeeeeeeeeeeeeeeeeez!!! That's one helluva bike you've got there Ernie! Ahem.....forty seven years ago?? Here I thought you were probably in your 40's all along.Indifferent


LOL Joe, I wish I was in my 40s again! I will hit 64 later on this year.  Yes this bike is pretty awesome specially for its age. 

 GIFMaker.org_jy_Ayj_O


Too many models to build, not enough time in a lifetime!!

  • Member since
    November 2008
  • From: Central Florida
Posted by plasticjunkie on Friday, August 2, 2019 8:56 PM

Hey thanks snake. Have you seen the octupus scheme on the King Tiger? It looks super cool.

 GIFMaker.org_jy_Ayj_O


Too many models to build, not enough time in a lifetime!!

  • Member since
    November 2008
  • From: Central Florida
Posted by plasticjunkie on Friday, August 2, 2019 9:13 PM

I found more pictures of the bike. I went with my own stencils for the Panzer Lehr Div. that had heavy casualties during the Normandy Invasion.

I freehanded the unit badge on masking tape then used an Xacto to cut it out. Then it was applied to the front of the side car and hand brushed on.

Tape removed

same for the back

tape removed

I used spare tag decals from another bike I have and the BMW was done.

I will eventually use a wood base with terrain material to display it. Click on the pictures for closeups.

 GIFMaker.org_jy_Ayj_O


Too many models to build, not enough time in a lifetime!!

  • Member since
    July 2014
Posted by modelcrazy on Friday, August 2, 2019 11:53 PM

That's awesome PJ.

Steve

Building a kit from your stash is like cutting a head off a Hydra, two more take it's place.


http://www.spamodeler.com/forum/

  • Member since
    February 2011
Posted by GreySnake on Saturday, August 3, 2019 6:12 PM
Rob,
 
This was the newer version of the King Tiger that came out around 1993 as I recall. It doesn’t have motorization holes. The problem I believe with the tracks not staying together is how they glue together. There’s just not a lot of surface area to glue the tracks together. Here’s a picture comparing the tracks from the Jagdtiger on the left and my other King Tiger on the right.
 
I did look into trying to the idler and sprocket mounts free but it’s a no go. I’m going to go ahead and staple them as the side skirts will hide the tracks pretty well. Much like not adding PE grills to the engine deck I don’t care to throw money for AM tracks at this kit.
 
PJ, the BMW came out really well. The brush painted Panzer Lehr marking looks very nice.
 
I have seen the octopus camo. It’s a little more work then I want to do right now. Want to keep this restoration quick and easy. I have a couple builds that I’m bogged down in right now so this is a nice distraction.
 
The tank was primed this morning with Tamiya’s spray can primer. Was pleased to see the barrel has no seams. The sides of the hull needed a little more sanding to even out the failed zimmerit job. My cats also seemed to have donated some hair to the tank so those got sanded out as well.
I might try doing some pre-shading before the base color. It may be a few days before I can airbrush. Right now it’s hot and humid, which isn’t a good mix for painting. My paint setup is in the garage so I’m at the weathers mercy till the monsoon season clears up.
  • Member since
    November 2008
  • From: Central Florida
Posted by plasticjunkie on Sunday, August 4, 2019 6:09 AM

Thanks Steve!

 GIFMaker.org_jy_Ayj_O


Too many models to build, not enough time in a lifetime!!

  • Member since
    November 2008
  • From: Central Florida
Posted by plasticjunkie on Sunday, August 4, 2019 6:14 AM

 Thanks Snake. I live in Central Florida and man it gets hot here too. My painting is also done in the garage where in the afternoon it can feel like an oven so I do my painting before noon time.

 GIFMaker.org_jy_Ayj_O


Too many models to build, not enough time in a lifetime!!

  • Member since
    December 2002
  • From: Fort Knox
Posted by Rob Gronovius on Sunday, August 4, 2019 10:37 AM

GreySnake
Rob,
 
This was the newer version of the King Tiger that came out around 1993 as I recall. It doesn’t have motorization holes. The problem I believe with the tracks not staying together is how they glue together. There’s just not a lot of surface area to glue the tracks together. Here’s a picture comparing the tracks from the Jagdtiger on the left and my other King Tiger on the right.


Tamiya did do a single link set of tracks for their newish King Tiger.

This set is expensive on eBay, but you should be able to find it for much less.

https://www.ebay.com/itm/Tamiya-German-King-Tiger-Separate-Track-Links-in-1-35-35165-ST/153454378687?epid=1300233582&hash=item23ba97febf:g:GjIAAOSwjUxbNb0f

  • Member since
    February 2011
Posted by GreySnake on Thursday, August 8, 2019 2:40 PM

plasticjunkie

 Thanks Snake. I live in Central Florida and man it gets hot here too. My painting is also done in the garage where in the afternoon it can feel like an oven so I do my painting before noon time.


Right now my cut off time for airbrushing is around 9AM or so. I wake up around 4AM everyday so sometimes I’ll go out and paint before the sun comes up.

Rob Gronovius

 Tamiya did do a single link set of tracks for their newish King Tiger.

This set is expensive on eBay, but you should be able to find it for much less.

https://www.ebay.com/itm/Tamiya-German-King-Tiger-Separate-Track-Links-in-1-35-35165-ST/153454378687?epid=1300233582&hash=item23ba97febf:g:GjIAAOSwjUxbNb0f


I’ve searched around for the Tamiya set but have come up short at least available in the US. There’s a few available from Japanese and Chinese sellers that I might consider. Again just not thrilled to throw at least $20 at this kit.   
 
The weather has been nice so I was able to work on the King Tiger just a little. Figured I might as well try out pre-shading for a change. I used Tamiya’s NATO black and this was my first time attempting pre-shading. Think it looks okay.
 
 
Next up will be a base coat of Tamiya XF-88 Dark Yellow 2. 


  • Member since
    November 2008
  • From: Central Florida
Posted by plasticjunkie on Tuesday, August 13, 2019 8:27 PM

Looks good snake. The preshading will give it some depth.

Have been sidelined with home things but finally found the wood base at HL and used the 40% disc. coupon. I stained the areas that will not get covered up with terrain.

I think the chipping came out good.

More to come....

 GIFMaker.org_jy_Ayj_O


Too many models to build, not enough time in a lifetime!!

  • Member since
    May 2019
Posted by Galatians 2:16 on Wednesday, August 14, 2019 11:42 AM

Awesome work everyone! Sorry I haven’t been around lately. I fell off the edge of the earth and it took a while climbing back up.   Stick out tongue  As for my poor model.....Ugh the “Deck and Fencing“ Purple Power was not a substitute for the real Purple Power. One of my parts now has crystallized stuff all over it. (I’m sure it will wash off). Next step for me.....AutoZone for the real stuff. Be back with photos. If I should fail to return, know that I am in 

Space, the final frontier

These are the voyages of the Starship Galatians, 

My five years mission (about right for my projects)

To explore strange new worlds
To seek out new modeling methods
And new models (duh) 
To boldly go where no man has gone before (with detailing, and amount of money spent)..................Snail   

 Snail

  • Member since
    February 2011
Posted by GreySnake on Wednesday, August 14, 2019 5:28 PM
Thanks PJ and the motorcycle is looking good. The chipping looks very nice.
 
Galatians: Sorry to hear the paint is fighting you.
 
Got some paint on the King Tiger finally. It’s been really hot so I only have a narrow window to paint. Good thing I usually wake up around 0400 every morning. I might have gone over a little heavy and covered more of the black then I would have liked.
 
 
I’ve temporarily attached the side skirts to make lining up the camouflage easier. Next up will be the dark green and red brown camouflage. 
  • Member since
    December 2002
  • From: Fort Knox
Posted by Rob Gronovius on Wednesday, August 14, 2019 11:10 PM

Galatians 2:16

To explore strange new worlds
To seek out new modeling methods
And new models (duh) 
To boldly go where no man has gone before (with detailing, and amount of money spent)..................Snail   


Shame on you for using a split infinitive, especially since you got the first two correct; To explore, To seek, the third one should be To go boldly... Geeked

jk!

  • Member since
    September 2012
Posted by GMorrison on Sunday, August 18, 2019 1:42 AM

I never quite completed this model but I've taken it apart again.

I don't like Luftwaffe subjects but I liked the car, and it was actually given to Marseille by the Regia. Is this acceptable?


Bill

 Modeling is an excuse to buy books.


  • Member since
    May 2019
Posted by Galatians 2:16 on Tuesday, August 20, 2019 9:57 PM

Hey Bill! You may enter in with this model. But I do think I should restate to all that this group build is for finished or just nearly finished models that need a new life (if y’all know what I meanWink). Welcome! Big SmileSnail. P.S. What scale is your model? 

 Snail

  • Member since
    February 2011
Posted by GreySnake on Monday, August 26, 2019 2:40 PM
It’s been a busy couple weeks but I’ve been working on the King Tiger as I have time.
 
Got the dark green and red brown camouflage sprayed on. There is a little overspray but its miles ahead of my first attempt.
 
 
After that the tracks were put on, tfor the fun part doing the dark yellow and red brown dots. Originally I was going to airbrush the dots but went ahead with using a brush. Happy with how it turned out. Also gave the tank a glosscote after this was done.
 
Decaling was up next. Still had the leftover decals from when I first built the kit and used those. Not going for 100% accuracy so I just used the 1st SS Panzer Division insignia and the blue turret numbers. Probably not correct but I like the color blue!
 
 
Next up was moving on to the weathering. Used Ammo by Mig’s brown was on some of the dark yellow sections of the tank. Very happy with how it works and turned out. I’ve used Tamiya’s wash and AK and they usually give me trouble for some reason. The Ammo went on without a fuss and cleaned up nicely with enamel thinner. Also added some scratching to any of the surfaces that would show wear.
 
Work was also done on the tools. I’ve gotten into the habit of painting the metal areas Tamiya’s XF-69 NATO black and then dry brushing with some metallic grey. The wood sections are painted with a Tamiya’s XF-59 Desert Yellow or XF-57 Buff depending on what finish I want. After that is dry I go over Tamiya’s Brown panel liner. Think it gives the tools a nice finish. Sorry the second picture came out a little too dark.
 
Hopefully I’ll have this completed sometime this week.
  • Member since
    February 2011
Posted by GreySnake on Tuesday, August 27, 2019 3:04 PM
Just a quick update, got the tools added. There’s a little touch up work that needs done. Might do some more weathering with pastels haven’t decided yet.

  • Member since
    March 2012
  • From: Corpus Christi, Tx
Posted by mustang1989 on Tuesday, August 27, 2019 9:36 PM

Ernie: Very good finish up to that old bike! Fantastic detailing!!

Greysnake: Progress is lookin' good on that Tiger. I've often wanted to dabble in armor subjects but I've already stepped out from aircraft models into automotive subjects and am just now getting comfortable with that. Stuff like this makes me give armor a second look though.

Rob: Looking forward to seeing you work your magic!

Bill: I don't like Luftwaffe subjects either. .......Stick out tongue . Will be watchin' in on this beaut.

Gotta make it to mine gents. Still got a General Lee Charger build in front of this one but it should be fairly soon for the re-start. I've thought of starting a thread on the GL Charger but don't know if I should or not. We'll see.


 Forum | Modelers Social Club Forum (proboards.com) 

  • Member since
    February 2011
Posted by GreySnake on Sunday, September 1, 2019 1:36 PM
Thanks mustang!
 
 
Finished up the King Tiger Thursday and just now got around to posting the photos. So here it is.


Very happy with how it’s turned out and it looks much better than my first attempt. The King Tiger has always been one of my favorite tanks and never managed to build one I was happy with till now. After my kind of long break from the hobby for a few years think I’m finally shaking off all the rust, as this is probably my best work since 2008-2009. 
 
 
I’m planning to add a commander figure to this at a later date. I’ve just finished up three models last week and right now I’m pretty sick of painting.
  • Member since
    December 2002
  • From: Northern California
Posted by jeaton01 on Thursday, September 5, 2019 5:28 PM

This little Methuselah is a survivor from 1966, I think.  It may have been built in 1965.  I propose to give it a little love.  I'll use parts from another Monogram kit to replace the missing rudder and propeller blade, and hopefully an original decal set from Monogram.

 Edit:

I was looking at Scalemates, and I couldn't find the decals on this one.  As it turns out in those days I had a habit of swapping markings and even parts around to personalize my models (who wants a model exactly the same as the guy next door, right?  Authenticity?  We knew nothing.  Nothinggg!)  I still have a Monogram FW-190 from the same time and lo and behold it has the markings on it from the 109 kit, and the 109 markings are clearly from the 190 kit, as I have a set of those.  Problem Solved!

John

To see build logs for my models:  http://goldeneramodel.com/mymodels/mymodels.html


  • Member since
    November 2008
  • From: Central Florida
Posted by plasticjunkie on Friday, September 6, 2019 9:11 PM

Thanks Joe, glad you like how the bike came out.

Snake

The KT looks very good, clean neat build and just a tad of weathering. Quite refreshing not to see a rusted beaten up tank as many modelers tend to do. Less is more.

 GIFMaker.org_jy_Ayj_O


Too many models to build, not enough time in a lifetime!!

  • Member since
    May 2019
Posted by Galatians 2:16 on Saturday, September 7, 2019 3:59 PM

GreySnake: excellent work with your tank! It’s a real beauty to behold! I love the weathering on its edges. Which photo would you like posted as the finished photo?

plasticjunkie: your bike is excellent! Personally, my favorite part is your engine and its parts. I added an after photo to the roster for you, but I can update it after your display base is done.Smile  

jeaton01:Welcome Sign it will be fun to see you revive Methuselah! Wink Can I ask what was its scale for the roster please? 

Snail


 Snail

  • Member since
    December 2002
  • From: Northern California
Posted by jeaton01 on Monday, September 9, 2019 12:45 AM

Thanks for letting me join in.  Methuselah is 1/48.

John

To see build logs for my models:  http://goldeneramodel.com/mymodels/mymodels.html


  • Member since
    February 2011
Posted by GreySnake on Wednesday, September 18, 2019 5:15 PM

PJ thanks! Never was a big fan of doing heavy weathering on armor and just like to suggest some light wear. 

Galatians thank you! You can go ahead and use this photo. 

  • Member since
    December 2002
  • From: Fort Knox
Posted by Rob Gronovius on Wednesday, October 2, 2019 12:57 AM

I am determined to finally finish the Renwal Ontos. I did locate another incomplete kit on eBay. The seller had it listed with a few photos, "looks complete, but not an expert" disclaimer and some shots of the contents.

It looked complete, but a few items I could not see in the photos, so I offered him less than his starting bid. He countered with an amount one penny over his opening price.

I then offered a little more and he accepted the offer. When I got the kit, it was missing just a couple small pieces, nothing that I couldn't replace from my builder's kit and old orginal one.

To be continued.

  • Member since
    May 2019
Posted by Galatians 2:16 on Saturday, October 12, 2019 8:38 PM

Hello everyone! I'm sorry that I have been off the radar for so long. I've been back to college and strapped for time. When I get the chance hopefully later this weekend, I'll update everything. For now, you all are doing awesome work! In the words of my favorite general: "I shall return."  Snail

 Snail

  • Member since
    September 2003
  • From: AandF in the Badger State
Posted by checkmateking02 on Saturday, July 18, 2020 8:26 PM

Although the GB hasn't been active in nine months, I see that it's supposed to run through August this year.  I thought it would be a good place to raise some ships that ran afoul.

I had them in storage in some plastic boxes, and somehow they all collided together and knocked themselves to pieces.

They are all 1/700 scale, and include Fujimi's USS Lexington, Saratoga and Wisconsin (which started out as Fujimi's Missouri) and Hasegawa's USS Alabama.

Here's the pile of detritus that collected in the corner of the box.  The two battleships lost all their floatplanes, and the floatplanes lost all their wing floats.  All the ships lost a lot of their 20mm AA guns, and a couple lost some of their larger calibre weapons.

Wisconsin lost part of her superstructure and the rigging that went with it.

Part of the plan for resurrecting these ships is to set each one on a sea base, so they can't sail so close to each other in the future.

Information from this website is helpful for the bases:

https://modelshipwrights.kitmaker.net/modules.php?op=modload&name=Sections&file=index&req=viewarticle&artid=2527

I hope Galatians will eventually be back with us, and that he's safe and healthy--merely taking a temporary break.


  • Member since
    June 2014
Posted by BrandonK on Sunday, July 19, 2020 11:41 AM

4 ships in less than a month. That seems like a lot of work for a short period of time. Looks like the GB founder bounced. I haven't seen him around. The last post was last October. Oooff. Well, I'll watch this anyway.

BK

On the bench:

A lot !! And I mean A LOT!!

2024 Kits on deck / in process / completed   

                         14 / 5 / 2  

                              Tongue Tied

  • Member since
    September 2003
  • From: AandF in the Badger State
Posted by checkmateking02 on Sunday, July 19, 2020 7:10 PM

BK:  none of them need to be completely dis-assembled, just repaired so I don't think they'll be too labor-intensive.  The most work will be creating the bases for them.

And they start out like this.  I placed each ship on a piece of cardboard, then measured out 4 cms from port and starboard, fore and aft.  I squared this off and cut out each base.

Next step is to wad up some aluminum foil.  The stuff tears easily, even though I used "heavy duty."  This will form the base of the waves.  You can scrunch it up and unravel it multiple times, until you get the waves the way you want them.

Next, you smear white glue on the cardboard, then flip it over and push it down on the foil.

Then you flip the assembly over and tuck the foil around the edges and press it flat on the bottom of the base.  I glued the edges down and sealed them up with clear packaging tape.

The result is a base with ready-made waves.

The ship will rest on this, but with a wake pattern I'll also construct from foil.  That's a difference from the tutorial (which I posted the link to).  The fellow on the tutorial used some kind of liquid gel-like medium to create the wake, but I didn't want to mess with that, so I'm using foil for the whole thing.

So this is only one base.  I've still got three more to do.  Thanks for looking.


  • Member since
    June 2014
Posted by BrandonK on Sunday, July 19, 2020 7:24 PM

This is a technique I have not seen before. I'm definately watching this for more ideas.

BK

On the bench:

A lot !! And I mean A LOT!!

2024 Kits on deck / in process / completed   

                         14 / 5 / 2  

                              Tongue Tied

  • Member since
    September 2003
  • From: AandF in the Badger State
Posted by checkmateking02 on Monday, July 20, 2020 2:21 PM

Brandon:  it doesn't seem to be very widely used.  There are some tutorials on youtube, but they seem more complicated than the link I posted.


  • Member since
    September 2003
  • From: AandF in the Badger State
Posted by checkmateking02 on Tuesday, July 21, 2020 4:35 PM

Usually when I've constructed sea-bases, I use the hull before adding any superstructure.  That way, there's nothing to knock off or break.  With these four resurrecting vessels, there's still enough stuff remaining on deck to do damage to.

Anyway, I start out with a new piece of foil, cut to vaguely conform to the outline of the hull.  This is Lexington.

Then, I just pushed and shoved at it and wrinkled it and generally beat up on it, until it formed a wake pattern for the vessel.

This is Lexington with the finished wake.

This is Alabama with the finished wake.

I should mention that after the wake is formed, you should remove the ship, lift up the foil and glue it down to the base.  White glue works for this, because everything is going to be pretty securely sealed in once it's painted and covered with a gloss clear coat.

Also, throughout the painting process, the ship should be tested again periodically, so that it still fits within the wake.  You don't want to finish up with the painting and everything, and discover that you accidentally moved/shifted/distorted the wake--and now the ship won't fit in!


  • Member since
    May 2019
Posted by Galatians 2:16 on Saturday, July 25, 2020 12:47 PM

Hello Checkmateking02! Thank you for "resurrecting" my group build! I have wished for a way to do so for quite a while now. 

Thank you too, for your concerns over my health and whereabouts. I have to admit it has not been easy since I last spoke here, though that is no excuse for leaving you all hanging. I am sorry very much to you all for not carrying on and updating this thread. That was my fault and I do apologize.

Life, since I last spoke, has involved college (online transition at this point), illness (we are better now), housing issues, and an accident with my dog; and, honestly, it all sounds worse than it really was. Well, the dog one was aweful. She has made a remarkable recovery now though.

The truth is there were still plenty of good days between the bad, and I still ought to at least have found the time to update your successes to the top of the list. For this I am sorry.

As for my Blue Angel, I have been rather disappointe. I cannot seem to get the paint off! It is really perhaps the largest issue to overcom. If anyone has suggestion, I'd be grateful! The canopy is off and I want to look into cockpit improvements or at least finding a decent cockpit walk-a-round tutoria in order to paint it right. I will have to post photos so you know what I am dealing with. 

Great job on your projects Checkmateking! I love what you have done with the bases! I have a ship myself, and if you don't mind I may borrow your idea! ;) Great job everyone and I can't wait to post your photos! Thank you Checkmate for not giving up! Thank you all for your participation in this now truly Resurrection Group Build.       Snail

 Snail

  • Member since
    June 2014
Posted by BrandonK on Saturday, July 25, 2020 3:51 PM

If you are trying to strip paint you have a few options. First, Purple Power and Easy Off are great at stripping paint off of kits. If those don't work due to stubburn paint you can also use automotive brake fluid and that will pull just about any paint. Then just wash it up and prime and paint. If you have the patience and time you can also sand it down to a good finish, reprime and repaint. But, that is a ton of work. Brake fluid is my go to for the tough jobs. Let us know how it goes.

We are all glad to see you are all doing well now. Thanks for returning.

Bk

On the bench:

A lot !! And I mean A LOT!!

2024 Kits on deck / in process / completed   

                         14 / 5 / 2  

                              Tongue Tied

  • Member since
    September 2003
  • From: AandF in the Badger State
Posted by checkmateking02 on Sunday, July 26, 2020 11:43 AM

It's very good to have you back among us again, Galatians.  I've had this GB in mind for quite a while--ever since I opened the storage box and found my ships in bad shape.  I appreciate you starting it up.  I had some other projects to finish, so I was late starting out here.

I was sorry to hear about the struggles you've been facing.  It's been hard going for you; more than enough reasons to take a break from the forums and from modeling.  Still, the whole concept of your GB is about rising again, as it says:  "though he were dead, yet shall he live."

Thanks for your kind words.  And:  I do hope your dog is doing better, too!

Peace to you!

Now, as for progress in the GB:

I see that I didn't take any photos of the priming; either that, or I lost/deleted them somehow.  Not that it's too important--but after getting the waves and wakes in shape and fitted to the hull, I spray everything on the base top-side and bottom-side with a white acrylic primer.  I paint the underside and the sides of the sea-base black. 

Priming helps as a base for the paint, but it doesn't really stick to the foil that well--even though i asked the salesperson at Walmart for an acrylic metal primer.  I found that out when I taped the base to a small box so it was raised up off the table top for painting.  When I took the base off the tape, it pulled paint and primer with it, down to the bare aluminum.  Fortunately, it was on the underside of the base.

The photo above shows the basic blue paint finished.  The original tutorial only uses two shades of blue.  The original tutor used Testor's "Blue Angel" blue from a spray can for the basic color, then an "offset" color of lighter blue.

I used acrylic craft paints from Michael's:  Navy Blue and then several other shades to blend in--Mediterranean Blue, Dark Blue, Hyacinth and Turquoise.  Things look a little rough in the photo, but it will all blend together acceptably before things are done.

I found that things work best when you paint the base (Navy Blue in this case), then when the final coat is dry, apply another thinned coat of it--then add the "offset" colors while this thin coat is still really wet.  It seems to help the "offset" colors diffuse and blend together better.

Thanks for looking, and--again--good to see you, Galatians!


  • Member since
    May 2019
Posted by Galatians 2:16 on Sunday, July 26, 2020 4:24 PM

Excellent work Checkmate! Will you be considering a large-scale diorama incorporating each of your stands? I think that with the uniformity of color and texture you'd have a real shot at that! 

Also thank you for your understanding and compassion. Thank you too BrandonK. It means a lot to me!

And my pup is doing much better, though we have to work with her for some trauma issues. Today she let us get closer than before with nail clippers. Small steps! Snail

 Snail

  • Member since
    September 2003
  • From: AandF in the Badger State
Posted by checkmateking02 on Sunday, July 26, 2020 8:53 PM

Small steps--Yes.  Hope she does well!

For the sea bases, I've tried to keep the paint and techniques similar so they could be displayed together.  About 11 years ago, my wife and I toured USS Alabama in Mobile, and they had a diorama set up with the task force she sailed with--all these little ship models sailing in formation!  I thought it was impressive.  I hadn't built a ship model in years, but I started soon after that.

Thanks for your comments.  What's left now is to dry-brush some white for the wakes, then get the ships put back together.    


  • Member since
    December 2002
  • From: Northern California
Posted by jeaton01 on Sunday, July 26, 2020 10:10 PM

Galatians, sorry to hear of your troubles, may everything be on the upswing for you and yours.

I actually did some work on my Monogram 109E today.  I took it apart which went well, that glue I put on in 65 or 67 was still holding OK but it wasn't the equal of a good #11 blade.  I am putting in an Airies cockpit I had laying around I have a vacform Squadron canopy here as well, the original canopy is very thick and has poor optics.  The dremel tool was started up and the fuselage lost a lot of weight.  This model is great for kids as there aren't very many parts and the thickness of the fuselage seems to prevent warps and gives plenty of glue area.  My granddaughter put one together when she was 10 or so and I helped with the paint.  Makes a nice model.  Here's a photo of that one with the survivor.


The parts:


Starting to put in the resin interior.  Seems like the fit is pretty good after the grinding.

John

To see build logs for my models:  http://goldeneramodel.com/mymodels/mymodels.html


  • Member since
    September 2003
  • From: AandF in the Badger State
Posted by checkmateking02 on Monday, July 27, 2020 4:55 PM

Nice work, John.  Is that the 1/48 Monogram 109?  The one that had retractable landing gear?  


  • Member since
    December 2002
  • From: Northern California
Posted by jeaton01 on Monday, July 27, 2020 7:54 PM

That it is.  And the gear would rather fold than stand most of the time.  I'm gluing these in the down position.

John

To see build logs for my models:  http://goldeneramodel.com/mymodels/mymodels.html


GAF
  • Member since
    June 2012
  • From: Anniston, AL
Posted by GAF on Monday, July 27, 2020 10:56 PM

John,

Hope to see what you do with the Monogram 109.  I have the same one in the stash awaiting "restoration" (though mine's only from around '68-'69).  At the moment, the Monogram Hawker Hurricane from the same time frame is in the queue.

Gary

  • Member since
    September 2003
  • From: AandF in the Badger State
Posted by checkmateking02 on Tuesday, July 28, 2020 6:14 PM

Thanks, John.  I used to get these way back when at the local WT Grant department store.  Monogram's "quarter-inch" scale was the preferred kit type for planes.  I had a lot of them back in the day, and they almost always came with cool moving parts.

I especially liked the Dauntless that dropped a bomb and the Avenger that launced its torpedo.


  • Member since
    November 2008
  • From: Central Florida
Posted by plasticjunkie on Tuesday, July 28, 2020 9:35 PM

checkmateking02

 I used to get these way back when at the local WT Grant department store. 


My Lord, I haven't heard of WT Grant in eons. Did you have Masters or Gold Triangle stores up there?

 GIFMaker.org_jy_Ayj_O


Too many models to build, not enough time in a lifetime!!

  • Member since
    May 2019
Posted by Galatians 2:16 on Tuesday, July 28, 2020 10:14 PM

Thanks guys for your care over my pup! Checkmate, I find it really cool that you keep finding old Wishbone memes. I used to love that show! Also, the moving parts models are throwbacis! I had that Dauntless too, I believe. Dropping bomb was so fun! I painted one of the bombs with the stereo typical "shark face look".

Great job, Jeaton01! I love the fact that you are putting in a resin cockpit. I wish to do the same on my Angel, but price at this moment may prevent that.....bummer ;) Will you be keeping the same paint scheme and type of decals or trying something new? 

 Snail

 Snail

  • Member since
    May 2019
Posted by Galatians 2:16 on Tuesday, July 28, 2020 10:50 PM

Ok, so here she is. Obviously not much has changed. Thank you BrandonK for the brake fluid idea. I plan on trying that since my purple power plan failed. The cockpit needs help. On the bright side, the pre-shading is done there! Any suggestions for a flawless interior? Thanks guys!


Also, I believe I have updated all the photos that needed to be loaded to the finished roster at the beginning of this group build. Checkmate, your ships have been added. If anyone has been missed, (though I've checked twice) please, please let me know! Thank you! I noticed a few other guys never showed back up, too. I hope those guys are well.  Snail

 Snail

  • Member since
    December 2002
  • From: Northern California
Posted by jeaton01 on Wednesday, July 29, 2020 12:52 AM

Galatians 2:16

Great job, Jeaton01! I love the fact that you are putting in a resin cockpit. I wish to do the same on my Angel, but price at this moment may prevent that.....bummer ;) Will you be keeping the same paint scheme and type of decals or trying something new? 


Thanks, G2:16.  My first thought was to put the markings that came with the kit on, but I'm on the fence about that at the moment.

John

To see build logs for my models:  http://goldeneramodel.com/mymodels/mymodels.html


  • Member since
    June 2014
Posted by BrandonK on Wednesday, July 29, 2020 10:41 AM

I have a 69 Boss 429 that I stripped and it's sitting in a bag atm. I plan to repaint and assemble that before too long. Just what color it will be, no idea. I'll have to look at what I have on the shelf.

On your F-16 pit, oooff. Painting with it all closed up will be a chore. Slow patient work I guess.

BK

On the bench:

A lot !! And I mean A LOT!!

2024 Kits on deck / in process / completed   

                         14 / 5 / 2  

                              Tongue Tied

  • Member since
    September 2003
  • From: AandF in the Badger State
Posted by checkmateking02 on Wednesday, July 29, 2020 6:29 PM

Nope, Steve.  Just Grants in Creston Park, then downtown had JC Penney, Sears, and--best of all for model kits--Woolworth's!


  • Member since
    September 2003
  • From: AandF in the Badger State
Posted by checkmateking02 on Wednesday, July 29, 2020 6:41 PM

Galatians 2:16

Thanks guys for your care over my pup! Checkmate, I find it really cool that you keep finding old Wishbone memes. I used to love that show! Also, the moving parts models are throwbacis! I had that Dauntless too, I believe. Dropping bomb was so fun! I painted one of the bombs with the stereo typical "shark face look".

Great job, Jeaton01! I love the fact that you are putting in a resin cockpit. I wish to do the same on my Angel, but price at this moment may prevent that.....bummer ;) Will you be keeping the same paint scheme and type of decals or trying something new? 

 Snail

 
Thanks, Galatians.  My kids and I watched "Wishbone" together back in the '90's.  We were all real fans.  I minored in English in college, and not one class had any of the classic novels "Wishbone" covered, except a specialty class in Mark Twain.  So I bought all the books the show did and finally read them.
 
We're on our second Jack Russell.  He's named "Sergeant Saunders."  Predictably, the first one was named "Wishbone."
 
And, back to the GB--I've finished up the four sea bases.  The tutorial suggests dry-brushing the whole base lightly with white; then dry-brushing the ship's wake with white.  When that was done, I sprayed the whole thing with Floquil's Crystal Coat, which of course is discontinued now.  Ick!  It gives a nice glossy finish, and dries very hard.  Here's what you get.
 
 
Next up will be restoring the missing parts to the ships.


  • Member since
    May 2019
Posted by Galatians 2:16 on Thursday, July 30, 2020 10:09 PM

You're welcome Checkmate! Wishbone is definitely the perfect name for a Jack Russel and Sergeant sounds like a cool name, too! Thanks to Wishbone, that used to be my favorite breed. Now I have this baby:

She's a bear. And that's pretty much her name (in English). With Stupid She's fun to pick on....Wink


As for classics....Have you read Jane Eyre? I always thought classics would be kind of boring, but that one convinced me otherwise! Another good one was the Hidden Hand by E.D.E.N. Southworth. 

Ok, back to our current hobby..... I'm really amazed at the outcome of your sea bases. Too bad Floquil's discontinued that line. Good job remembering the wake!
Brandon, I have to sing your praises! The brake fluid is working. I know I've only just begun, but still I wanted to share a photo. Hopefully soon Angel will be ready for her new look.  Snail


 Snail

  • Member since
    September 2003
  • From: AandF in the Badger State
Posted by checkmateking02 on Friday, July 31, 2020 10:30 AM

Nice work getting the paint off, Galatians!  I haven't tried to do it for years, and it wasn't much of a success.  Looks like you are going to pull it off!

Is your dog a Rottweiler?  I knew people years ago that had two, and they were just big babies.  My kids were small, around nine or ten--and the dogs had no trouble playing with them.

As for the classics, no, I never read Jane Eyre.  Wishbone never did a TV show on that book.  But I did read Jane Austen's Pride and Prejudice and Northanger Abbey.  I enjoyed both of them.

Do you remember the episode where Wishbone played David, as in David and Goliath?  I found it on youtube yesterday and watched it again.  It's titled "Little Big Dog."  I've seen worse versions with human actors.  

The book that gave me most trouble was Don Quixote.  That was a bit much to plow through!  Wishbone's version was much, much easier.

I was cleaning out a closet just two days ago, and found the box where I stored all of the books, so when I get some time, I going to start reading through them again.

Anyway, back to the plastic. 

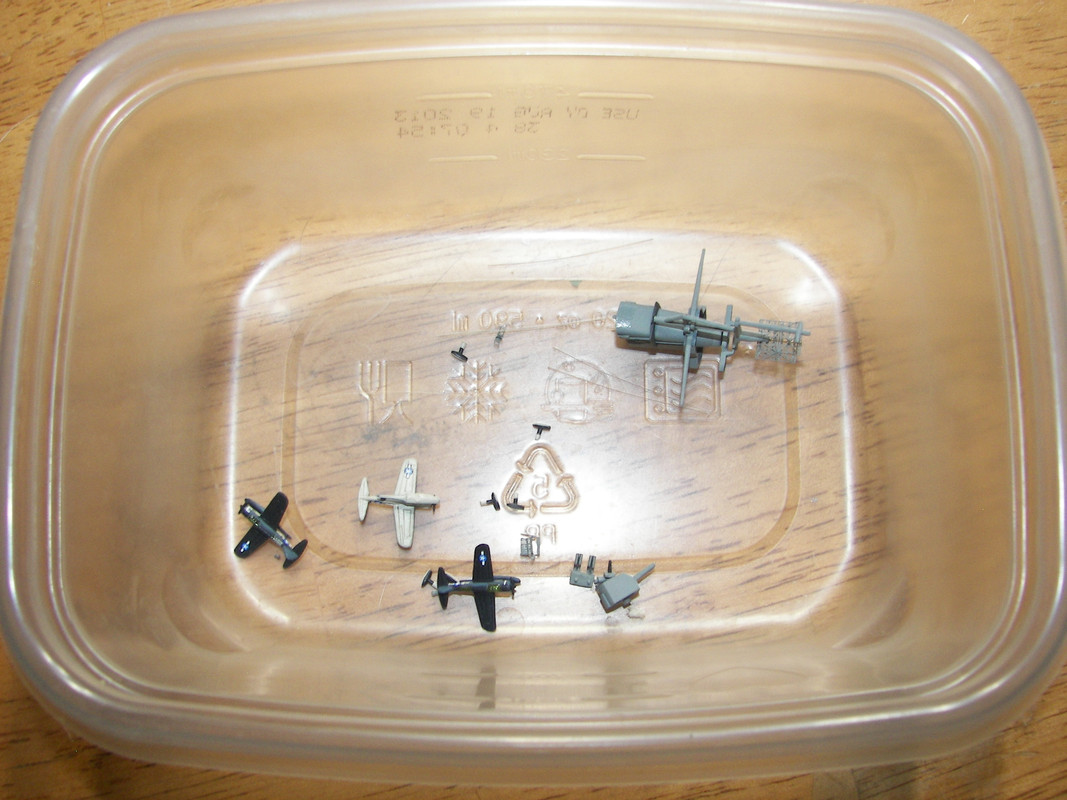
I went through all the pieces that were lying in heaps in the storage box, and separated them for each individual ship.  I was surprised that a couple of them weren't as badly damaged as I first thought.

Lexington only had the flag staff knocked loose.  Unfortunately, when I tried to re-seat it, I broke the whole thing off, so I made matters worse.  I managed to fix it without further damage, so that's one done.

Alabama lost her flag, both her float planes, and a few of her 20mm guns, so that's not going to be too difficult.

Wisconsin had more damage, including part of the forward superstructure, a 5inch gun, a number of the 20mm's and her flag.  All three of her Kingfishers fell off and fell apart.  The pieces are shown below.  Worst is the photo-etch Mk 37 gun-directing radar, visible just above the Kingfisher on the right, with the base over to the left of the superstructure.  It not only got knocked off, but it was smushed all out of shape.  I hope to be able to straighten it out and replace it, instead of having to build a new one.  It will have to be repainted since some of the paint chipped.

Hardest hit was Saratoga.  She has a lot of gun platforms protruding from around the flight deck, and a number of them were knocked off completely; one had only come loose, but kind of flops around.  Photo shows a few of the gun decks below.

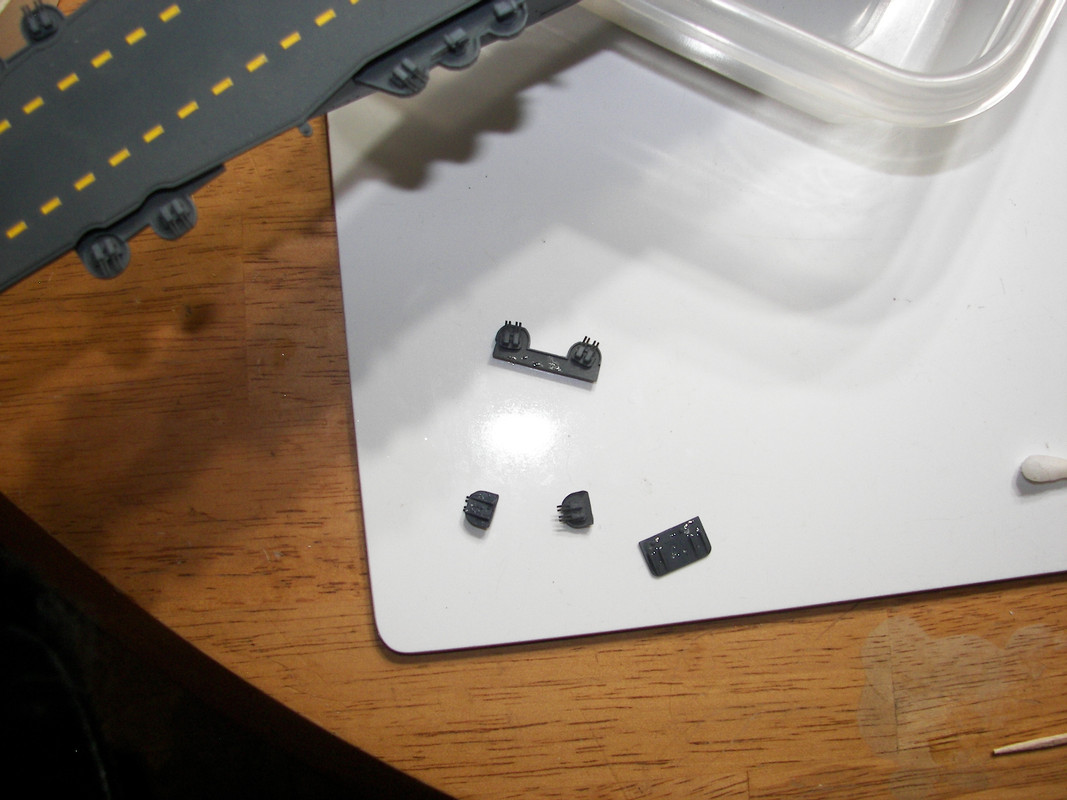
A couple of her 40mm's came off, along with about a dozen of the 20mm's.

One thing I learned after building my first ship (which was the Lexington) is that white glue holds these kinds of parts as well (or better in certain circumstances) than super-glue, so all these pieces were attached originally with white glue of some kind--either Elmer's or craft glue; so it shouldn't be too difficult to soak off the old glue with water and replace the parts with fresh glue.

Maybe I'm being too optimistic, but I'm hoping to finish them over this weekend, and set them out to sea.  I've got each ship glued to it's base already, so I don't have to touch the ship while I work on repairs.

And that's the story, Wishbone!  


  • Member since
    February 2011
Posted by GreySnake on Sunday, August 2, 2020 8:00 AM
Glad to have you back Galatians! I’m glad things have improved for you and hope all is well with the dog. Glad to see the Hornet is starting to come along for you.
 
 
Jeaton01, looking forward to seeing how the 109 comes along. My father gave me the one he built he built when the kit first came out to play with after it got smashed in a move. It was pretty much the wings and fuselage at the point but I still had fun with it.
 
 
Checkmate, excellent work on the ships and bases!
  • Member since
    September 2003
  • From: AandF in the Badger State
Posted by checkmateking02 on Sunday, August 2, 2020 7:14 PM

Thanks, GreySnake!

So here they are, at sea.  I thought about taking a group shot of all four together, but that made the ships too small to see much.  I apologize in advance for taking up so much space.

1/700 Fujimi USS Lexington

1/700 Fujimi USS Saratoga 1944

1/700 Fujimi USS Wisconsin

1/700 Hasegawa USS Alabama

Thanks for running the GB, Galatians.  I appreciate the opportunity to re-fit the ships after their disastrous sortie in the storage box.  I should have put them on bases in the first place, so I won't make that mistake again!

I look forward to seeing how everyone's projects come out during the rest of the GB.  Fair winds and following seas.


  • Member since
    June 2014
Posted by BrandonK on Sunday, August 2, 2020 8:17 PM

Those turned out great!! That is an amazing way to display all those ships. Well done!!

BK

On the bench:

A lot !! And I mean A LOT!!

2024 Kits on deck / in process / completed   

                         14 / 5 / 2  

                              Tongue Tied

  • Member since
    December 2002
  • From: Northern California
Posted by jeaton01 on Sunday, August 2, 2020 9:12 PM

Neat displays, CM.  I'm seasick already.

John

To see build logs for my models:  http://goldeneramodel.com/mymodels/mymodels.html


  • Member since
    September 2003
  • From: AandF in the Badger State
Posted by checkmateking02 on Monday, August 3, 2020 4:55 PM

Thanks, Brandon and John.  I don't think I'll every build another ship without first putting it on a base--for it's own good.


  • Member since
    February 2011
Posted by GreySnake on Monday, August 3, 2020 5:28 PM
Those came out great checkmate! I’m impressed with how the bases turned out as well.  
  • Member since
    September 2003
  • From: AandF in the Badger State
Posted by checkmateking02 on Tuesday, August 4, 2020 9:00 AM

Thanks, GreySnake.  I appreciate it!  Compared to other techniques with various liquid media, aluminum foil oceans are fairly simple and less messy.


  • Member since
    May 2019
Posted by Galatians 2:16 on Thursday, August 6, 2020 6:40 PM

Awesome work Checkmate! They all turned out beautiful! I like the parting water on your last ship. No worries over the space, I can work with that. 

You are completely welcome to join again with another modelWink. And thank you for being here!

Thank you Greysnake for your care! I'm happy to have you back too!

As for me, here's the slow progress of my Angel. I have used brake fluid, and so far the enamel paint has come off pretty well. The acrylic paint on the underside actually has been coming off easily too. Unfortunately, removal of the paint has revealed some blemishe.... Apparently, while I was removing some parts from under the wing, I carved some lines into the wing. Oh well. I'll just have to sand it. Snail


(photos to come)

 Snail

  • Member since
    September 2003
  • From: AandF in the Badger State
Posted by checkmateking02 on Thursday, August 6, 2020 10:25 PM

Thanks for the kind words, Galatians.  I appreciate the GB for motivating me to fix up the ships!  Plus--I really liked the badge you produced.  Christus vivit!

Regarding the parting water, it's pretty easy to get the wakes in the shape you want them with the foil.  I didn't think I'd have that much control over gels and stuff like that, but with foil, it can be shaped and re-shaped until you get the effect you're looking for.


  • Member since
    May 2019
Posted by Galatians 2:16 on Thursday, August 6, 2020 11:44 PM

Checkmate, you’re welcome!! I find that detail particularly important, and I’m thinking of perhaps incorporating it into a diorama for the Arizona I started. By the way, no I couldn’t remember that particular Wishbone Show, but now I really want to pull it up on YouTube.....;) Also, you really should read Jane Eyre! Great novel! I have to say, the classics like that and Pride and Predjudice, Treasure Island, etc. have a definite right to be “classics”. Thanks for your complement regarding my group picture! I don’t think there ever could be a more relevant picture. He is risen! Hoorah for that!  Snail

 Snail

  • Member since
    September 2003
  • From: AandF in the Badger State
Posted by checkmateking02 on Saturday, August 8, 2020 9:06 AM

Yes


  • Member since
    May 2019
Posted by Galatians 2:16 on Sunday, August 9, 2020 3:14 PM

Alright Checkmate! I have uploaded your finished resulted to the completed model photo list! They look great there. 

Here's the photos of the progress on Angel:

Bear says hi. Snail

 Snail

  • Member since
    February 2011
Posted by GreySnake on Monday, August 10, 2020 12:43 PM

Looks like that paint is starting to come off. Hi, Bear! 

  • Member since
    September 2003
  • From: AandF in the Badger State
Posted by checkmateking02 on Monday, August 10, 2020 2:40 PM

Thanks, Galatians!

How are you applying the paint remover to the model?  Do you use a brush or what?

And:  hi to Bear.  Looks like she is pretty interested.


  • Member since
    May 2019
Posted by Galatians 2:16 on Monday, August 10, 2020 4:38 PM


How are you applying the paint remover to the model?  Do you use a brush or what?


[/quote]


Big Smile I've been using mostly paper towel, but I also have found and used an old toothbrush. Surprisingly, the paper towels work better. What I did was bought a bottle of brake fluid and pierced a few holes into half the seal. Then pouring some onto the towel, I'll then wipe that over the surface of the paint repeatedly until I see some coming off. Then I use a dry part of the towel to really wipe off the paint.


As for Bear, she really was interested. Indifferent All the world is a toy or a treat (if it's not scary). She's hanging out on my front porch as I speak. 

Snail

 Snail

  • Member since
    September 2003
  • From: AandF in the Badger State
Posted by checkmateking02 on Tuesday, August 11, 2020 3:57 PM

Thanks for the information.  I wondered if you spread it on, then let it sit to work for a while.  It sounds like a fairly labor intensive operation.

My dog isn't ever much interested; but the cats get intrusive sometimes.


  • Member since
    May 2019
Posted by Galatians 2:16 on Monday, August 17, 2020 8:33 PM

Well actually, spreading it on sounds like that may work better. I'm going to have to try that method. 

For now though, I have to really begin researching the cockpit.


Snail

 Snail

  • Member since
    May 2019
Posted by Galatians 2:16 on Wednesday, August 26, 2020 12:31 PM

Well in an effort to keep this group from going awol again, I just start out by saying that college has once again started up and Angel has been on the back burner. However, I have looked up the cockpit for her and am realizing what a challenge I shall have. The cockpits I have seen look pretty awesome! I am both excited and intimidated by the job ahead of me. I think I shall also extend this group build into another year (yes yes for me) and for for others who still would like to join. This will hopefully help eliminate some pressure? I hope you all will like this. Snail


 Snail

  • Member since
    June 2014
Posted by BrandonK on Wednesday, August 26, 2020 2:28 PM

If I could make up my mind on a color for the Boss mustang, I would get it done. Ugh

BK

On the bench:

A lot !! And I mean A LOT!!

2024 Kits on deck / in process / completed   

                         14 / 5 / 2  

                              Tongue Tied

  • Member since
    September 2003
  • From: AandF in the Badger State
Posted by checkmateking02 on Wednesday, August 26, 2020 5:01 PM

BrandonK

If I could make up my mind on a color for the Boss mustang, I would get it done. Ugh

BK

 
Red?  My '69 Mustang was "candy apple red," my 2000 Mustang was "laser-red topcoat."
 
Helps when you blast past the slower vehicles.  They can still see the car through the dust cloud.


  • Member since
    May 2019
Posted by Galatians 2:16 on Wednesday, August 26, 2020 6:44 PM

BrandonK

If I could make up my mind on a color for the Boss mustang, I would get it done. Ugh

BK


Haha! That may be a problem, but picking a color at least can be a fun problem. Boy I can't wait to be past paintin. Smile

Snail


 Snail

  • Member since
    May 2019
Posted by Galatians 2:16 on Wednesday, August 26, 2020 6:46 PM

checkmateking02


BrandonK

If I could make up my mind on a color for the Boss mustang, I would get it done. Ugh

BK


Red?  My '69 Mustang was "candy apple red," my 2000 Mustang was "laser-red topcoat."
 
Helps when you blast past the slower vehicles.  They can still see the car through the dust cloud.


Make sure they don't catch a license plate through that dust! Cool

Snail

 Snail

  • Member since
    June 2014
Posted by BrandonK on Wednesday, August 26, 2020 8:32 PM

I was originally medium metallic red, it looked pretty good. But this time I'm going for something more OEM. Thinking maybe blue. We'll see. 

It used to look like this..

But I'm thinking this..

or this..

On the bench:

A lot !! And I mean A LOT!!

2024 Kits on deck / in process / completed   

                         14 / 5 / 2  

                              Tongue Tied

  • Member since
    September 2003
  • From: AandF in the Badger State
Posted by checkmateking02 on Thursday, August 27, 2020 8:46 AM

Galatians 2:16


checkmateking02


BrandonK

If I could make up my mind on a color for the Boss mustang, I would get it done. Ugh

BK


Red?  My '69 Mustang was "candy apple red," my 2000 Mustang was "laser-red topcoat."
 
Helps when you blast past the slower vehicles.  They can still see the car through the dust cloud.


Make sure they don't catch a license plate through that dust! Cool

Snail


Unfortunately they did once, Galatians; cost me $172.  Sad

The other two times, I only got a warning. Smile

Beautiful Mustangs, Brandon!


  • Member since
    May 2019
Posted by Galatians 2:16 on Wednesday, September 2, 2020 2:50 PM

Oh ouch speeding tickets! That hurts. I could tell some funny stories about those...... 

How's your pup? I hope well! 


Brandon: Those are some good choices! Personally I favor the darker blue, but that's just me. Go with whatever one you feel you'll never get tired of looking at. Something that has tickled your fancy for a long time. I can't wait to see it!    Snail

 Snail

  • Member since
    September 2003
  • From: AandF in the Badger State
Posted by checkmateking02 on Wednesday, September 2, 2020 4:55 PM

Galatians 2:16

Oh ouch speeding tickets! That hurts. I could tell some funny stories about those...... 

How's your pup? I hope well!   Snail

 
At twenty years old, I had to scrap the Mustang last January.  Driving a Chevy Equinox now; much less temptation to speed.
 
Sergeant Saunders, our JRT is doing well; chasing cats.  Hope yours is also enjoying the dog's life.


  • Member since
    May 2019
Posted by Galatians 2:16 on Thursday, September 10, 2020 12:09 PM

checkmateking02


Galatians 2:16

Oh ouch speeding tickets! That hurts. I could tell some funny stories about those...... 

How's your pup? I hope well!   Snail


At twenty years old, I had to scrap the Mustang last January.  Driving a Chevy Equinox now; much less temptation to speed.
 
Sergeant Saunders, our JRT is doing well; chasing cats.  Hope yours is also enjoying the dog's life.


Thanks Checkmate! Bear is doing swell! At the moment she's playing tug-of-war with a miniature tire with her sis. 

I'm sorry to hear you lost your car. Hey, at least you be able to carry around more people! And I wouldn't underestimate the speed on those newer cars Wink Not that I'm suggesting anything Indifferent 

I found a sheet of decals for various Blue Angels online. They seemed nice except that I failed to see the standard aircraft markings alongside the specialty markings. I may have to use some old decals I have. I still haven't decided on the proper blue paint...Hobby Lobby doesn't really have the best selection at the momens. Oh well, I may eventually settle on mixing paint. I have done that once before on a Vought Corsair I was working on years ago. Here's to adventure! Geeked

Snail

 Snail

  • Member since
    September 2003
  • From: AandF in the Badger State
Posted by checkmateking02 on Thursday, September 10, 2020 5:39 PM

Bear has a sister?  Should keep life in the home interesting!

One of the advantages of having the Mustang was not having enough room to haul around too many people! Big Smile

Testors Model Master used to make a Blue Angels paint.  Amazon is still selling it, but it's awful pricey:  over $8 for the bottle!  Ick!

But here's the link:  https://www.amazon.com/Testor-Corp-Enamel-bottle-FS15050/dp/B008IUD9YS

They have it in acrylic, too:  https://www.amazon.com/Angel-Testors-Acrylic-Plastic-Model/dp/B0035LOWEQ

Also outrageously priced at over $16 for the little bottle!  Super Angry

Hobby Lobby online claims still to have the spray cans:  https://www.hobbylobby.com/Crafts-Hobbies/Model-Kits/Paint-Brushes/1972-Blue-Angel-Blue-Model-Master-Custom-Enamel-Spray-Paint/p/961

There's an interesting write-up about Blue Angels blue here:  http://tailspintopics.blogspot.com/2011/04/blue-angel-blue-and-gold-draft.html

It might be helpful.

Even our beloved FSM forums had a question about the blue way back when:  http://cs.finescale.com/fsm/modeling_subjects/f/2/t/27025.aspx

Hopefully you'll find something to work.  I'll be looking forward to seeing what you come up with.


  • Member since
    May 2019
Posted by Galatians 2:16 on Saturday, September 26, 2020 1:32 PM

Checkmate I absolutely love what you have found for me!!! Thank you!!! Specifically the Amazon enamel blue! 

I apologize for the very late response. It has been my first round of tests and they were a doozy. Chemistry has a way of humbling you when you are up against a time line. Praise Jesus for His rescue with that mess! I do mean that.


Yes Bear does have a sister! Bear is happy go lucky. Noble is melancholy. Bear inherited bronze. Noble inherited brains. Bear (though very loving herself) has an independent streak. Noble freaks out if Bear is missing and is more than happy to quietly sit with you to absorb your affections. They are great girls. 


 Snail

  • Member since
    September 2003
  • From: AandF in the Badger State
Posted by checkmateking02 on Saturday, September 26, 2020 3:47 PM

I hope you find some workable blue among them.

I avoided chemistry (and physics!) like the plague when I was in school.  

Bear and Noble!  They sound like a great pair of siblings.  It's a wonder you have time for any else, besides taking care of them and entertaining them!


  • Member since
    February 2010
  • From: New Jersey
Posted by 68GT on Sunday, September 27, 2020 7:55 PM

On Ed's bench, ???


  • Member since
    May 2019
Posted by Galatians 2:16 on Wednesday, October 14, 2020 8:06 PM

Hi 68 GT! No I haven't yet. Thank you though for the idea! I'm going to check that out today. 

Checkmate I can not tell you how busy! Wowzers they can keep you hyper if you let them! Lol! Mostly they just want to play and absorb love. 

Ah chemistry...... God's little reminder we are not know it alls! Haha! Snail

 Snail

  • Member since
    May 2019
Posted by Galatians 2:16 on Thursday, October 15, 2020 1:12 AM

I just looked up the Scale Hobbiest paints 68GT. I love them! I'm going to pull up my shopping list and see what all I can knock out with one trip. Thanks again!  Snail

 Snail

  • Member since
    December 2002
  • From: Northern California
Posted by jeaton01 on Thursday, October 29, 2020 6:19 PM

Whoa, this thread needs a resurrection! 

I found some time to work on my Monogram Me-109E.  I'm rather frustrated with how the resin and PE interior has worked out.  The fuselage is too narrow and some of the PE like the trim wheels just wouldn't fit.  Had to remove them to get the sides together.  The cockpit opening is too small to see much anyway.  I did some rework to fit a vacform canopy, that required some serious gnawing on plastic but I think it's going to work out.  I'm going to leave it closed.

My objective is get get the model back together with the raised surface detail as intact as possible and so far that's working OK.  The decals came off using Walther's Solvaset and a sharpened wood tool.  I never painted the top side except the yellow on the nose and the bottom had only a thin coat sprayed from an aerosol can.


John

To see build logs for my models:  http://goldeneramodel.com/mymodels/mymodels.html


  • Member since
    May 2019
Posted by Galatians 2:16 on Wednesday, November 11, 2020 8:51 PM

Yeah I know! Thanks for helping to keep it going! Your plane is looking good jeaton! I wouldn't worry too much about the parts you had to remove. Especially since you said they were small. I am very intrigued by the stuff you used to remove the old decals. I need to try that out. 

As for plane, I have found that I am going to do more work on the cockpit than I'd hoped. The whole thing was set in wrong from the beginning and it has a large gap between the panel and "dash". I actually found some of the original decals unused and am thinking of salvaging some of those. Hoorah things have inches forward for both of us!   Snail

 Snail

  • Member since
    May 2019
Posted by Galatians 2:16 on Wednesday, November 11, 2020 10:21 PM

Yeah I know! Thanks for helping to keep it going! Your plane is looking good jeaton! I wouldn't worry too much about the parts you had to remove. Especially since you said they were small. I am very intrigued by the stuff you used to remove the old decals. I need to try that out. 

As for plane, I have found that I am going to do more work on the cockpit than I'd hoped. The whole thing was set in wrong from the beginning and it has a large gap between the panel and "dash". I actually found some of the original decals unused and am thinking of salvaging some of those. Hoorah things have inches forward for both of us!   Snail

 Snail

  • Member since
    May 2019
Posted by Galatians 2:16 on Sunday, November 22, 2020 11:33 AM

Well Hobby Lobby was a nightmare yesterday! Oh the lines! And the paint was picked over. I hope you all are having a better time securing supplies.   Huh?Snail

 Snail

  • Member since
    September 2003
  • From: AandF in the Badger State
Posted by checkmateking02 on Sunday, November 22, 2020 11:46 AM

John:  Nice going; sounds like a lot of work, but it's coming along!

Galatians:  sounds like a pre-Black Friday mess you were in.  As for the picked-over paint, we've lost a lot of options and choice with the disontinuation of Model Master.  I like enamels, so will probably be going with Humbrol.  I wonder if it will get wider distribution now.


  • Member since
    May 2019
Posted by Galatians 2:16 on Sunday, November 22, 2020 12:17 PM

Hey Checkmate! Yeah it looks like I'm going to go online now.....I am old school. I have preferred in store for years, but now that seems to be getting problematic. Oh well. 

I want to get the paint stripping finished on my Angel. Maybe I'll finally get it done over Thanksgiving break. Every other week there seems to have been one exam or another. This week is chemistry again. I think to switch things up, I'll work on filling in the wheel wells. I intend to do an in flight version. I actually am considering adding the smoke trail..... That would be fun! 

Hows modeling going for you? Snail

 Snail

  • Member since
    September 2003
  • From: AandF in the Badger State
Posted by checkmateking02 on Monday, November 23, 2020 8:29 PM

Galatians 2:16

Hey Checkmate! Yeah it looks like I'm going to go online now.....I am old school. I have preferred in store for years, but now that seems to be getting problematic. Oh well. 

I want to get the paint stripping finished on my Angel. Maybe I'll finally get it done over Thanksgiving break. Every other week there seems to have been one exam or another. This week is chemistry again. I think to switch things up, I'll work on filling in the wheel wells. I intend to do an in flight version. I actually am considering adding the smoke trail..... That would be fun! 

Hows modeling going for you? Snail

 
I always bought paint from a store, like you, until the shops started going out of business.  Several have failed over the years (in Madison, WI) that I used to patronize.  Even then, it was an hour and a half drive to get there--and they were often out of stock on the paint I needed.
 
Funny you should mention paint stripping and how modeling is going.  Not too well, currently.  I used to paint 54mm miniatures, and used Imrie-Risley paint.  That went out of production years ago, so I thought I'd try 28mm figures using Vallejo acrylics.  I'm finding it a steep learning curve, so mostly lately I've been painting; making a mess of things; then stripping the paint for another try.  
 
Fortunately, these are metal miniatures, so I don't have to worry about melting plastic, but the paint strippers aren't particularly potent, so it's taken repeated soakings.  I've got about a dozen soaking in jars right now.  
 
There's a couple of group builds that interest me for 2021--one for Supermarine and one for Messerschmitt.
 
I hope you make progress with your Blue Angel project.  I remember the days of college, and those exams only interrupt the stuff you really want to do.  
 
Have a safe, happy, relaxing and blessed Thanksgiving!


  • Member since
    December 2002
  • From: Northern California
Posted by jeaton01 on Sunday, November 29, 2020 2:49 PM

The Monogram 109E is a wrap.  I am glad I have rescued it because it was a lot the worse for wear since I built it in 1965, but there are mixed feelings.  The resin interior was difficult to fit and changed the character of the build, in retrospect it might have been better to go back with the original interior.  The vac canopy is a big improvement over the thick kit part, but once again it separates it from the old days.  I'll have to let my thoughts settle on all that. 

The 1965 Monogram instructions called for a solid green finish and I went with RLM 71 for that, and the decals are part original and part aftermarket where the kit decals from my decal stash were too far gone.  They are the markings the kit artwork called for.  I have read there is some small support for a few 109E's painted solid green, but I'm sure the Experten will excoriate me for such a statement.  In an effort at originality, I had swapped the decals with a Monogram FW-190 I was building at the same time in 1965 but chose to go with the original kit markings this time.    I added Uschi fine thread for the antenna and replaced the lost antenna masts with wire and plastic card.

Here's the original box art. from the Monogram Classics reissue.


Here's the kit before rework, with another I built with my granddaughter Yasemin a few years ago.


And here is the restored/refinished model.


John

To see build logs for my models:  http://goldeneramodel.com/mymodels/mymodels.html


  • Member since
    September 2003
  • From: AandF in the Badger State
Posted by checkmateking02 on Monday, November 30, 2020 9:11 PM

Great improvement, John.  Really nice work!


  • Member since
    December 2002
  • From: Northern California
Posted by jeaton01 on Tuesday, December 1, 2020 12:23 AM

Thanks, CM.

John

To see build logs for my models:  http://goldeneramodel.com/mymodels/mymodels.html


  • Member since
    February 2011
Posted by GreySnake on Sunday, December 6, 2020 8:43 AM
Very nice work on the old 109!
  • Member since
    June 2014
Posted by BrandonK on Saturday, February 27, 2021 11:25 AM

I just bought some glue bombs off Evilbay. They will go great in this GB. Not likely to get to them before late this year though.

BK

On the bench:

A lot !! And I mean A LOT!!

2024 Kits on deck / in process / completed   

                         14 / 5 / 2  

                              Tongue Tied

  • Member since
    May 2019
Posted by Galatians 2:16 on Tuesday, December 27, 2022 1:27 PM

Hello guys! I'm back from the dead so-to-speak. I know it's been long. I'm sorry. Life does things. If you need a photo posted to this build please let me know. 

I'm actually going to attempt editing the title of this build to be ongoing so people like me can always come back to it. I honestly figure this can become more of a build about resurrecting my participation in the hobby at this point (on my part anyway). Let me know if you'd be interested. Thanks! Snail

 Snail

  • Member since
    February 2011
Posted by GreySnake on Tuesday, December 27, 2022 2:20 PM

Interesting I was thinking about this group build this morning. 

You can put me down for a Takom 1/35 St. Chamond. It was one of the first models I finished after getting back into the hobby and I have never been happy with it. I'll post a picture of it a little later. 

  • Member since
    May 2019
Posted by Galatians 2:16 on Tuesday, December 27, 2022 2:38 PM

You've got it! Thanks for joining me!

 Snail

  • Member since
    February 2011
Posted by GreySnake on Tuesday, December 27, 2022 3:32 PM

Here is the St. Chamond. 

This was my first attempt at doing weathering use enamel washes and I ruined the paint work in some places. 

Here is the model broken down. 


I need to get some Simple Green tomorrow and start stripping the paint. Need to decide if I want to use the left over decals from when I first built this kit or get a replacement sheet off of eBay. I’ll probably get another set of decals because I like the rooster.

  • Member since
    May 2019
Posted by Galatians 2:16 on Tuesday, December 27, 2022 4:24 PM

That's a cool vehicle GraySnake! Can't wait to see what you do with it! Snail 

 Snail

  • Member since
    May 2019
Posted by Galatians 2:16 on Tuesday, December 27, 2022 7:11 PM

Today I decided to forget about stripping  paint the conventional way and ended up sanding much of the underside with the finest sander I could find. I will need to add back some of the details but I'm feeling satisfied. 


 Snail

  • Member since
    May 2019
Posted by Galatians 2:16 on Tuesday, January 3, 2023 9:31 PM

Ok. After a little searching, I have found a replacement cockpit. Hopefully, I'll be able to get it ordered and shipped quickly. Sadly, the weather around here may delay things on that front for a bit though.... Oh well. There's still plenty of detailing to do. The sanding stripped away some recessed panel lines and riveting. Not a bad fix, just tedious. Back to work rivet counting...Headphones

Snail

 Snail

  • Member since
    May 2019
Posted by Galatians 2:16 on Tuesday, January 3, 2023 10:14 PM

Also, would you have any advice on where I might find a replacement clear plastic canopy? I tried EBay and the internet, but I'm not finding 1/48 scale FA-18E canopies anywhere. There was a 1/32 scale one Tongue Tied

Snail

 Snail

  • Member since
    May 2019
Posted by Galatians 2:16 on Thursday, January 12, 2023 4:56 PM

My cockpit parts finally arrived! Still working on getting the canopy though.

Snail

 Snail

  • Member since
    February 2011
Posted by GreySnake on Friday, January 13, 2023 6:57 AM

You might want to ask over on the aircraft forum )if you haven't already) if anyone has a canopy or any idea. I took a look on scale mates and didn't see anything listed. 


Stripped the paint off the St. Chamond last week. Haven't had a chance to take pictures yet. Hurt my lower back almost four weeks ago and I'm now almost back to normal. Should start back to working on models this Sunday. 

  • Member since
    June 2014
Posted by BrandonK on Friday, January 13, 2023 10:24 AM

I completely forgot to post my rebuild pics of my Mustang last year when I redid it. Dangit!! I have others, I'll see what I can whip up.

BK

On the bench:

A lot !! And I mean A LOT!!

2024 Kits on deck / in process / completed   

                         14 / 5 / 2  

                              Tongue Tied

  • Member since
    May 2019
Posted by Galatians 2:16 on Friday, January 13, 2023 1:14 PM

Thanks GreySnake! I'll check that out. Sorry to hear about your back! I'm glad you're feeling better now though. 


BrandonK: No worries! Hey, I fell off the edge of the earth for a while myself...Huh?Smile Feel free to send a photo of the mustang still; I'll post it .... and get to see it in all its glory! 

 Snail

  • Member since
    June 2014
Posted by BrandonK on Friday, January 13, 2023 1:42 PM

The 70 Revell Boss 429 started out life as Tamiya Mica red with black interior and stock magnum 500's and hand painted bright work. I stripped it down and blew it appart. It is now Grabber Blue with 2K clear, bare metal foil, white interior and 20 inch Magnum 500s. I also wired the engine. I can't find my pic of it before I started and I didn't take any during the overhaul. Here are some pics of it now.

BK

On the bench:

A lot !! And I mean A LOT!!

2024 Kits on deck / in process / completed   

                         14 / 5 / 2  

                              Tongue Tied

  • Member since
    May 2019
Posted by Galatians 2:16 on Saturday, January 14, 2023 3:02 PM

Man that's sweet! I love the dash board work, and the wiring turned out awesome! Great choice of color too. Which photo would you like in the completed section? 


Guys check out the detail on these resin parts! Man look at that seatbelt detail. This is way better than what Revell originally offered... Crud, now that I've seen it can I ever go back? Confused Future apologies to my wallet... Obviously, I've never really worked with resin too seriously before - never had the tools growing up. Time for an adventure! 


Snail

 Snail

  • Member since
    June 2014
Posted by BrandonK on Saturday, January 14, 2023 5:03 PM

Galatians 2:16

Man that's sweet! I love the dash board work, and the wiring turned out awesome! Great choice of color too. Which photo would you like in the completed section? 


Guys check out the detail on these resin parts! Man look at that seatbelt detail. This is way better than what Revell originally offered... Crud, now that I've seen it can I ever go back? Confused Future apologies to my wallet... Obviously, I've never really worked with resin too seriously before - never had the tools growing up. Time for an adventure! 


Snail


Use the first pic. And yes, the resin world is very addictive. Modeling crack.

BK

On the bench:

A lot !! And I mean A LOT!!

2024 Kits on deck / in process / completed   

                         14 / 5 / 2  

                              Tongue Tied

  • Member since
    May 2019
Posted by Galatians 2:16 on Saturday, January 14, 2023 7:04 PM

I've got your photo placed :)

 Snail

  • Member since
    June 2014
Posted by BrandonK on Tuesday, January 17, 2023 10:40 PM

I found the before pictures of the Mustang. I built it 9 years ago. 

BK

On the bench:

A lot !! And I mean A LOT!!

2024 Kits on deck / in process / completed   

                         14 / 5 / 2  

                              Tongue Tied

  • Member since
    May 2019
Posted by Galatians 2:16 on Wednesday, January 18, 2023 11:28 AM

Thanks for the photos Brandon! I've posted them now above your completed build.


Snail

 Snail

  • Member since
    February 2011
Posted by GreySnake on Wednesday, January 18, 2023 6:13 PM
Be careful on the resin parts like BK said its addictive!
BK, very nice work on the Boss 429!
 
I’m finally able to back to working at my desk even if I need to take frequent breaks. Here is what the St-Chamond looks like right now. Looking it over I don’t think there’s anything left to remove other then the decals.
  
 
The suspension on the model is very fragile and I was surprised to find only one park came cleanly off so that’s a relief. My only concern right now is the tracks as I think they are starting to fall apart. I’m going to try to save them.
  • Member since
    May 2019
Posted by Galatians 2:16 on Thursday, January 19, 2023 9:39 PM

Lookin nice GreySnake!

 Snail

JOIN OUR COMMUNITY!

Our community is FREE to join. To participate you must either login or register for an account.

SEARCH FORUMS
FREE NEWSLETTER
By signing up you may also receive reader surveys and occasional special offers. We do not sell, rent or trade our email lists. View our Privacy Policy.