SEARCH FINESCALE.COM

Enter keywords or a search phrase below:

Resurrection GB

12111 views
133 replies
1 rating 2 rating 3 rating 4 rating 5 rating
  • Member since
    December 2002
  • From: Fort Knox
Posted by Rob Gronovius on Wednesday, August 14, 2019 11:10 PM

Galatians 2:16

To explore strange new worlds
To seek out new modeling methods
And new models (duh) 
To boldly go where no man has gone before (with detailing, and amount of money spent)..................Snail   


Shame on you for using a split infinitive, especially since you got the first two correct; To explore, To seek, the third one should be To go boldly... Geeked

jk!

  • Member since
    September 2012
Posted by GMorrison on Sunday, August 18, 2019 1:42 AM

I never quite completed this model but I've taken it apart again.

I don't like Luftwaffe subjects but I liked the car, and it was actually given to Marseille by the Regia. Is this acceptable?


Bill

 Modeling is an excuse to buy books.


  • Member since
    May 2019
Posted by Galatians 2:16 on Tuesday, August 20, 2019 9:57 PM

Hey Bill! You may enter in with this model. But I do think I should restate to all that this group build is for finished or just nearly finished models that need a new life (if y’all know what I meanWink). Welcome! Big SmileSnail. P.S. What scale is your model? 

 Snail

  • Member since
    February 2011
Posted by GreySnake on Monday, August 26, 2019 2:40 PM
It’s been a busy couple weeks but I’ve been working on the King Tiger as I have time.
 
Got the dark green and red brown camouflage sprayed on. There is a little overspray but its miles ahead of my first attempt.
 
 
After that the tracks were put on, tfor the fun part doing the dark yellow and red brown dots. Originally I was going to airbrush the dots but went ahead with using a brush. Happy with how it turned out. Also gave the tank a glosscote after this was done.
 
Decaling was up next. Still had the leftover decals from when I first built the kit and used those. Not going for 100% accuracy so I just used the 1st SS Panzer Division insignia and the blue turret numbers. Probably not correct but I like the color blue!
 
 
Next up was moving on to the weathering. Used Ammo by Mig’s brown was on some of the dark yellow sections of the tank. Very happy with how it works and turned out. I’ve used Tamiya’s wash and AK and they usually give me trouble for some reason. The Ammo went on without a fuss and cleaned up nicely with enamel thinner. Also added some scratching to any of the surfaces that would show wear.
 
Work was also done on the tools. I’ve gotten into the habit of painting the metal areas Tamiya’s XF-69 NATO black and then dry brushing with some metallic grey. The wood sections are painted with a Tamiya’s XF-59 Desert Yellow or XF-57 Buff depending on what finish I want. After that is dry I go over Tamiya’s Brown panel liner. Think it gives the tools a nice finish. Sorry the second picture came out a little too dark.
 
Hopefully I’ll have this completed sometime this week.
  • Member since
    February 2011
Posted by GreySnake on Tuesday, August 27, 2019 3:04 PM
Just a quick update, got the tools added. There’s a little touch up work that needs done. Might do some more weathering with pastels haven’t decided yet.

  • Member since
    March 2012
  • From: Corpus Christi, Tx
Posted by mustang1989 on Tuesday, August 27, 2019 9:36 PM

Ernie: Very good finish up to that old bike! Fantastic detailing!!

Greysnake: Progress is lookin' good on that Tiger. I've often wanted to dabble in armor subjects but I've already stepped out from aircraft models into automotive subjects and am just now getting comfortable with that. Stuff like this makes me give armor a second look though.

Rob: Looking forward to seeing you work your magic!

Bill: I don't like Luftwaffe subjects either. .......Stick out tongue . Will be watchin' in on this beaut.

Gotta make it to mine gents. Still got a General Lee Charger build in front of this one but it should be fairly soon for the re-start. I've thought of starting a thread on the GL Charger but don't know if I should or not. We'll see.


 Forum | Modelers Social Club Forum (proboards.com) 

  • Member since
    February 2011
Posted by GreySnake on Sunday, September 1, 2019 1:36 PM
Thanks mustang!
 
 
Finished up the King Tiger Thursday and just now got around to posting the photos. So here it is.


Very happy with how it’s turned out and it looks much better than my first attempt. The King Tiger has always been one of my favorite tanks and never managed to build one I was happy with till now. After my kind of long break from the hobby for a few years think I’m finally shaking off all the rust, as this is probably my best work since 2008-2009. 
 
 
I’m planning to add a commander figure to this at a later date. I’ve just finished up three models last week and right now I’m pretty sick of painting.
  • Member since
    December 2002
  • From: Northern California
Posted by jeaton01 on Thursday, September 5, 2019 5:28 PM

This little Methuselah is a survivor from 1966, I think.  It may have been built in 1965.  I propose to give it a little love.  I'll use parts from another Monogram kit to replace the missing rudder and propeller blade, and hopefully an original decal set from Monogram.

 Edit:

I was looking at Scalemates, and I couldn't find the decals on this one.  As it turns out in those days I had a habit of swapping markings and even parts around to personalize my models (who wants a model exactly the same as the guy next door, right?  Authenticity?  We knew nothing.  Nothinggg!)  I still have a Monogram FW-190 from the same time and lo and behold it has the markings on it from the 109 kit, and the 109 markings are clearly from the 190 kit, as I have a set of those.  Problem Solved!

John

To see build logs for my models:  http://goldeneramodel.com/mymodels/mymodels.html


  • Member since
    November 2008
  • From: Central Florida
Posted by plasticjunkie on Friday, September 6, 2019 9:11 PM

Thanks Joe, glad you like how the bike came out.

Snake

The KT looks very good, clean neat build and just a tad of weathering. Quite refreshing not to see a rusted beaten up tank as many modelers tend to do. Less is more.

 GIFMaker.org_jy_Ayj_O


Too many models to build, not enough time in a lifetime!!

  • Member since
    May 2019
Posted by Galatians 2:16 on Saturday, September 7, 2019 3:59 PM

GreySnake: excellent work with your tank! It’s a real beauty to behold! I love the weathering on its edges. Which photo would you like posted as the finished photo?

plasticjunkie: your bike is excellent! Personally, my favorite part is your engine and its parts. I added an after photo to the roster for you, but I can update it after your display base is done.Smile  

jeaton01:Welcome Sign it will be fun to see you revive Methuselah! Wink Can I ask what was its scale for the roster please? 

Snail


 Snail

  • Member since
    December 2002
  • From: Northern California
Posted by jeaton01 on Monday, September 9, 2019 12:45 AM

Thanks for letting me join in.  Methuselah is 1/48.

John

To see build logs for my models:  http://goldeneramodel.com/mymodels/mymodels.html


  • Member since
    February 2011
Posted by GreySnake on Wednesday, September 18, 2019 5:15 PM

PJ thanks! Never was a big fan of doing heavy weathering on armor and just like to suggest some light wear. 

Galatians thank you! You can go ahead and use this photo. 

  • Member since
    December 2002
  • From: Fort Knox
Posted by Rob Gronovius on Wednesday, October 2, 2019 12:57 AM

I am determined to finally finish the Renwal Ontos. I did locate another incomplete kit on eBay. The seller had it listed with a few photos, "looks complete, but not an expert" disclaimer and some shots of the contents.

It looked complete, but a few items I could not see in the photos, so I offered him less than his starting bid. He countered with an amount one penny over his opening price.

I then offered a little more and he accepted the offer. When I got the kit, it was missing just a couple small pieces, nothing that I couldn't replace from my builder's kit and old orginal one.

To be continued.

  • Member since
    May 2019
Posted by Galatians 2:16 on Saturday, October 12, 2019 8:38 PM

Hello everyone! I'm sorry that I have been off the radar for so long. I've been back to college and strapped for time. When I get the chance hopefully later this weekend, I'll update everything. For now, you all are doing awesome work! In the words of my favorite general: "I shall return."  Snail

 Snail

  • Member since
    September 2003
  • From: AandF in the Badger State
Posted by checkmateking02 on Saturday, July 18, 2020 8:26 PM

Although the GB hasn't been active in nine months, I see that it's supposed to run through August this year.  I thought it would be a good place to raise some ships that ran afoul.

I had them in storage in some plastic boxes, and somehow they all collided together and knocked themselves to pieces.

They are all 1/700 scale, and include Fujimi's USS Lexington, Saratoga and Wisconsin (which started out as Fujimi's Missouri) and Hasegawa's USS Alabama.

Here's the pile of detritus that collected in the corner of the box.  The two battleships lost all their floatplanes, and the floatplanes lost all their wing floats.  All the ships lost a lot of their 20mm AA guns, and a couple lost some of their larger calibre weapons.

Wisconsin lost part of her superstructure and the rigging that went with it.

Part of the plan for resurrecting these ships is to set each one on a sea base, so they can't sail so close to each other in the future.

Information from this website is helpful for the bases:

https://modelshipwrights.kitmaker.net/modules.php?op=modload&name=Sections&file=index&req=viewarticle&artid=2527

I hope Galatians will eventually be back with us, and that he's safe and healthy--merely taking a temporary break.


  • Member since
    June 2014
Posted by BrandonK on Sunday, July 19, 2020 11:41 AM

4 ships in less than a month. That seems like a lot of work for a short period of time. Looks like the GB founder bounced. I haven't seen him around. The last post was last October. Oooff. Well, I'll watch this anyway.

BK

On the bench:

A lot !! And I mean A LOT!!

2024 Kits on deck / in process / completed   

                         14 / 5 / 2  

                              Tongue Tied

  • Member since
    September 2003
  • From: AandF in the Badger State
Posted by checkmateking02 on Sunday, July 19, 2020 7:10 PM

BK:  none of them need to be completely dis-assembled, just repaired so I don't think they'll be too labor-intensive.  The most work will be creating the bases for them.

And they start out like this.  I placed each ship on a piece of cardboard, then measured out 4 cms from port and starboard, fore and aft.  I squared this off and cut out each base.

Next step is to wad up some aluminum foil.  The stuff tears easily, even though I used "heavy duty."  This will form the base of the waves.  You can scrunch it up and unravel it multiple times, until you get the waves the way you want them.

Next, you smear white glue on the cardboard, then flip it over and push it down on the foil.

Then you flip the assembly over and tuck the foil around the edges and press it flat on the bottom of the base.  I glued the edges down and sealed them up with clear packaging tape.

The result is a base with ready-made waves.

The ship will rest on this, but with a wake pattern I'll also construct from foil.  That's a difference from the tutorial (which I posted the link to).  The fellow on the tutorial used some kind of liquid gel-like medium to create the wake, but I didn't want to mess with that, so I'm using foil for the whole thing.

So this is only one base.  I've still got three more to do.  Thanks for looking.


  • Member since
    June 2014
Posted by BrandonK on Sunday, July 19, 2020 7:24 PM

This is a technique I have not seen before. I'm definately watching this for more ideas.

BK

On the bench:

A lot !! And I mean A LOT!!

2024 Kits on deck / in process / completed   

                         14 / 5 / 2  

                              Tongue Tied

  • Member since
    September 2003
  • From: AandF in the Badger State
Posted by checkmateking02 on Monday, July 20, 2020 2:21 PM

Brandon:  it doesn't seem to be very widely used.  There are some tutorials on youtube, but they seem more complicated than the link I posted.


  • Member since
    September 2003
  • From: AandF in the Badger State
Posted by checkmateking02 on Tuesday, July 21, 2020 4:35 PM

Usually when I've constructed sea-bases, I use the hull before adding any superstructure.  That way, there's nothing to knock off or break.  With these four resurrecting vessels, there's still enough stuff remaining on deck to do damage to.

Anyway, I start out with a new piece of foil, cut to vaguely conform to the outline of the hull.  This is Lexington.

Then, I just pushed and shoved at it and wrinkled it and generally beat up on it, until it formed a wake pattern for the vessel.

This is Lexington with the finished wake.

This is Alabama with the finished wake.

I should mention that after the wake is formed, you should remove the ship, lift up the foil and glue it down to the base.  White glue works for this, because everything is going to be pretty securely sealed in once it's painted and covered with a gloss clear coat.

Also, throughout the painting process, the ship should be tested again periodically, so that it still fits within the wake.  You don't want to finish up with the painting and everything, and discover that you accidentally moved/shifted/distorted the wake--and now the ship won't fit in!


  • Member since
    May 2019
Posted by Galatians 2:16 on Saturday, July 25, 2020 12:47 PM

Hello Checkmateking02! Thank you for "resurrecting" my group build! I have wished for a way to do so for quite a while now. 

Thank you too, for your concerns over my health and whereabouts. I have to admit it has not been easy since I last spoke here, though that is no excuse for leaving you all hanging. I am sorry very much to you all for not carrying on and updating this thread. That was my fault and I do apologize.

Life, since I last spoke, has involved college (online transition at this point), illness (we are better now), housing issues, and an accident with my dog; and, honestly, it all sounds worse than it really was. Well, the dog one was aweful. She has made a remarkable recovery now though.

The truth is there were still plenty of good days between the bad, and I still ought to at least have found the time to update your successes to the top of the list. For this I am sorry.

As for my Blue Angel, I have been rather disappointe. I cannot seem to get the paint off! It is really perhaps the largest issue to overcom. If anyone has suggestion, I'd be grateful! The canopy is off and I want to look into cockpit improvements or at least finding a decent cockpit walk-a-round tutoria in order to paint it right. I will have to post photos so you know what I am dealing with. 

Great job on your projects Checkmateking! I love what you have done with the bases! I have a ship myself, and if you don't mind I may borrow your idea! ;) Great job everyone and I can't wait to post your photos! Thank you Checkmate for not giving up! Thank you all for your participation in this now truly Resurrection Group Build.       Snail

 Snail

  • Member since
    June 2014
Posted by BrandonK on Saturday, July 25, 2020 3:51 PM

If you are trying to strip paint you have a few options. First, Purple Power and Easy Off are great at stripping paint off of kits. If those don't work due to stubburn paint you can also use automotive brake fluid and that will pull just about any paint. Then just wash it up and prime and paint. If you have the patience and time you can also sand it down to a good finish, reprime and repaint. But, that is a ton of work. Brake fluid is my go to for the tough jobs. Let us know how it goes.

We are all glad to see you are all doing well now. Thanks for returning.

Bk

On the bench:

A lot !! And I mean A LOT!!

2024 Kits on deck / in process / completed   

                         14 / 5 / 2  

                              Tongue Tied

  • Member since
    September 2003
  • From: AandF in the Badger State
Posted by checkmateking02 on Sunday, July 26, 2020 11:43 AM

It's very good to have you back among us again, Galatians.  I've had this GB in mind for quite a while--ever since I opened the storage box and found my ships in bad shape.  I appreciate you starting it up.  I had some other projects to finish, so I was late starting out here.

I was sorry to hear about the struggles you've been facing.  It's been hard going for you; more than enough reasons to take a break from the forums and from modeling.  Still, the whole concept of your GB is about rising again, as it says:  "though he were dead, yet shall he live."

Thanks for your kind words.  And:  I do hope your dog is doing better, too!

Peace to you!

Now, as for progress in the GB:

I see that I didn't take any photos of the priming; either that, or I lost/deleted them somehow.  Not that it's too important--but after getting the waves and wakes in shape and fitted to the hull, I spray everything on the base top-side and bottom-side with a white acrylic primer.  I paint the underside and the sides of the sea-base black. 

Priming helps as a base for the paint, but it doesn't really stick to the foil that well--even though i asked the salesperson at Walmart for an acrylic metal primer.  I found that out when I taped the base to a small box so it was raised up off the table top for painting.  When I took the base off the tape, it pulled paint and primer with it, down to the bare aluminum.  Fortunately, it was on the underside of the base.

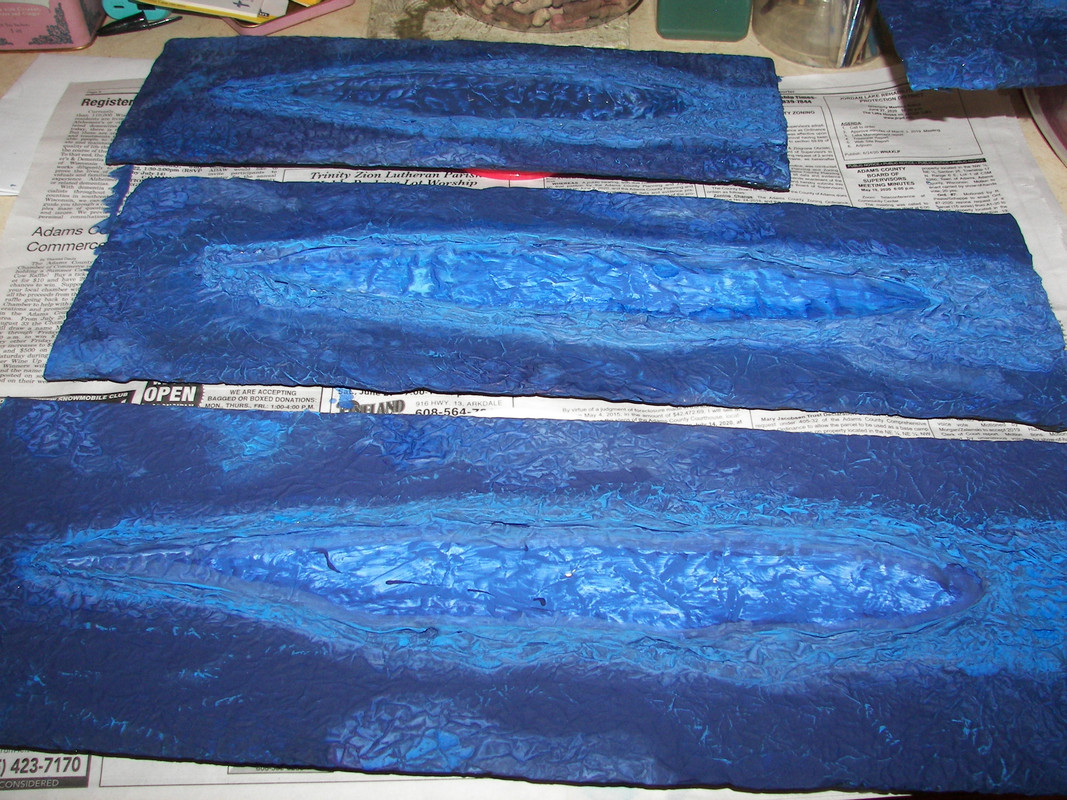
The photo above shows the basic blue paint finished.  The original tutorial only uses two shades of blue.  The original tutor used Testor's "Blue Angel" blue from a spray can for the basic color, then an "offset" color of lighter blue.

I used acrylic craft paints from Michael's:  Navy Blue and then several other shades to blend in--Mediterranean Blue, Dark Blue, Hyacinth and Turquoise.  Things look a little rough in the photo, but it will all blend together acceptably before things are done.

I found that things work best when you paint the base (Navy Blue in this case), then when the final coat is dry, apply another thinned coat of it--then add the "offset" colors while this thin coat is still really wet.  It seems to help the "offset" colors diffuse and blend together better.

Thanks for looking, and--again--good to see you, Galatians!


  • Member since
    May 2019
Posted by Galatians 2:16 on Sunday, July 26, 2020 4:24 PM

Excellent work Checkmate! Will you be considering a large-scale diorama incorporating each of your stands? I think that with the uniformity of color and texture you'd have a real shot at that! 

Also thank you for your understanding and compassion. Thank you too BrandonK. It means a lot to me!

And my pup is doing much better, though we have to work with her for some trauma issues. Today she let us get closer than before with nail clippers. Small steps! Snail

 Snail

  • Member since
    September 2003
  • From: AandF in the Badger State
Posted by checkmateking02 on Sunday, July 26, 2020 8:53 PM

Small steps--Yes.  Hope she does well!

For the sea bases, I've tried to keep the paint and techniques similar so they could be displayed together.  About 11 years ago, my wife and I toured USS Alabama in Mobile, and they had a diorama set up with the task force she sailed with--all these little ship models sailing in formation!  I thought it was impressive.  I hadn't built a ship model in years, but I started soon after that.

Thanks for your comments.  What's left now is to dry-brush some white for the wakes, then get the ships put back together.    


  • Member since
    December 2002
  • From: Northern California
Posted by jeaton01 on Sunday, July 26, 2020 10:10 PM

Galatians, sorry to hear of your troubles, may everything be on the upswing for you and yours.

I actually did some work on my Monogram 109E today.  I took it apart which went well, that glue I put on in 65 or 67 was still holding OK but it wasn't the equal of a good #11 blade.  I am putting in an Airies cockpit I had laying around I have a vacform Squadron canopy here as well, the original canopy is very thick and has poor optics.  The dremel tool was started up and the fuselage lost a lot of weight.  This model is great for kids as there aren't very many parts and the thickness of the fuselage seems to prevent warps and gives plenty of glue area.  My granddaughter put one together when she was 10 or so and I helped with the paint.  Makes a nice model.  Here's a photo of that one with the survivor.


The parts:


Starting to put in the resin interior.  Seems like the fit is pretty good after the grinding.

John

To see build logs for my models:  http://goldeneramodel.com/mymodels/mymodels.html


  • Member since
    September 2003
  • From: AandF in the Badger State
Posted by checkmateking02 on Monday, July 27, 2020 4:55 PM

Nice work, John.  Is that the 1/48 Monogram 109?  The one that had retractable landing gear?  


  • Member since
    December 2002
  • From: Northern California
Posted by jeaton01 on Monday, July 27, 2020 7:54 PM

That it is.  And the gear would rather fold than stand most of the time.  I'm gluing these in the down position.

John

To see build logs for my models:  http://goldeneramodel.com/mymodels/mymodels.html


GAF
  • Member since
    June 2012
  • From: Anniston, AL
Posted by GAF on Monday, July 27, 2020 10:56 PM

John,

Hope to see what you do with the Monogram 109.  I have the same one in the stash awaiting "restoration" (though mine's only from around '68-'69).  At the moment, the Monogram Hawker Hurricane from the same time frame is in the queue.

Gary

  • Member since
    September 2003
  • From: AandF in the Badger State
Posted by checkmateking02 on Tuesday, July 28, 2020 6:14 PM

Thanks, John.  I used to get these way back when at the local WT Grant department store.  Monogram's "quarter-inch" scale was the preferred kit type for planes.  I had a lot of them back in the day, and they almost always came with cool moving parts.

I especially liked the Dauntless that dropped a bomb and the Avenger that launced its torpedo.


JOIN OUR COMMUNITY!

Our community is FREE to join. To participate you must either login or register for an account.

SEARCH FORUMS
FREE NEWSLETTER
By signing up you may also receive reader surveys and occasional special offers. We do not sell, rent or trade our email lists. View our Privacy Policy.