SEARCH FINESCALE.COM

Enter keywords or a search phrase below:

Mirage GB (September 2006 to April 2007)

11023 views
110 replies
1 rating 2 rating 3 rating 4 rating 5 rating
  • Member since
    June 2006
  • From: Queensland Australia
Posted by Mark T Gold Coast on Monday, October 30, 2006 2:26 AM

Osher

Sounds like solid, if not frustrating, progress.

Can you post some pics? I'm keen to see what the kits look like and how they're progressing.

Hope things run a little smoother for you.

I've had a set back with the Australian version of future and am in the process of masking up to fix some of the issues I've had.

I can see the light at the end of the tunnel and am resisting the temptation to rush.

I'll post some pics of the finished model later this week.

Mark

  • Member since
    April 2003
  • From: Edgware, London
Posted by osher on Wednesday, November 1, 2006 7:40 AM
No problem, I'll get something up shortly!  Just want to finish my Airfix and First Jets aircraft first, before switching back.
  • Member since
    June 2006
  • From: Queensland Australia
Posted by Mark T Gold Coast on Sunday, November 5, 2006 4:48 AM

Hi Guys,

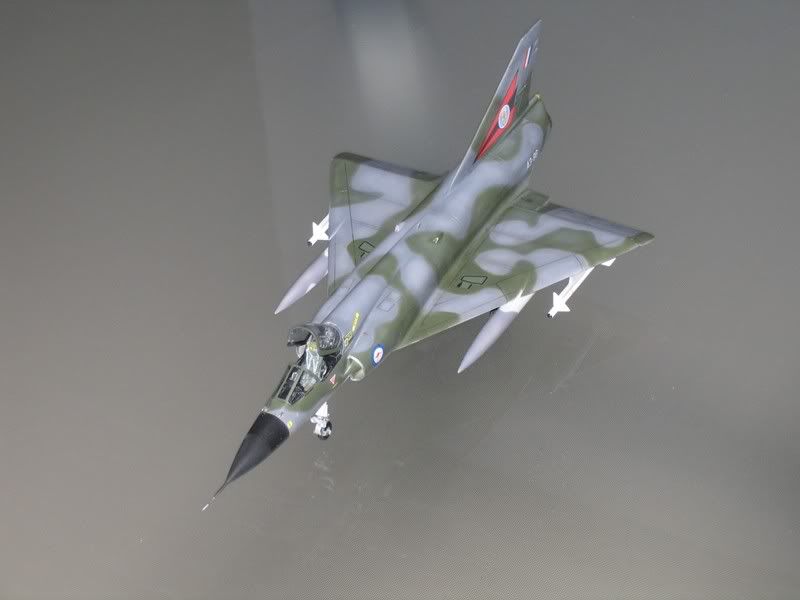
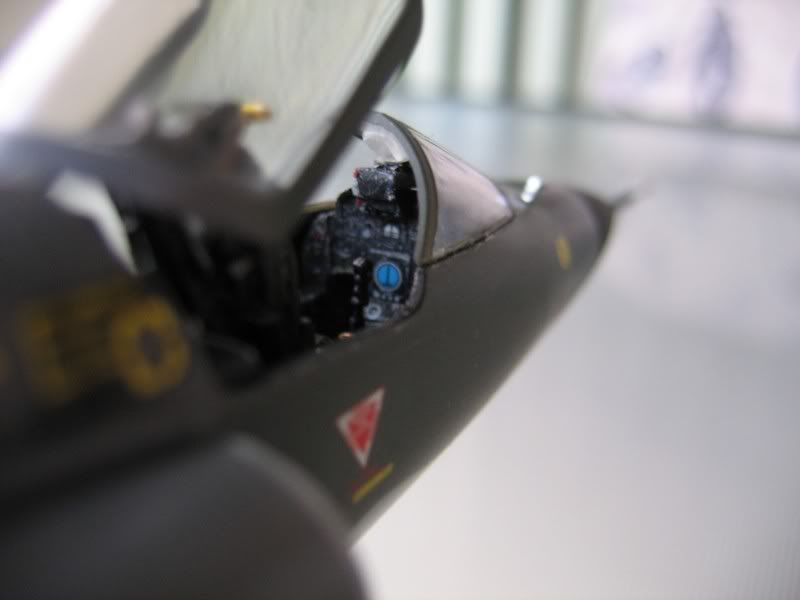
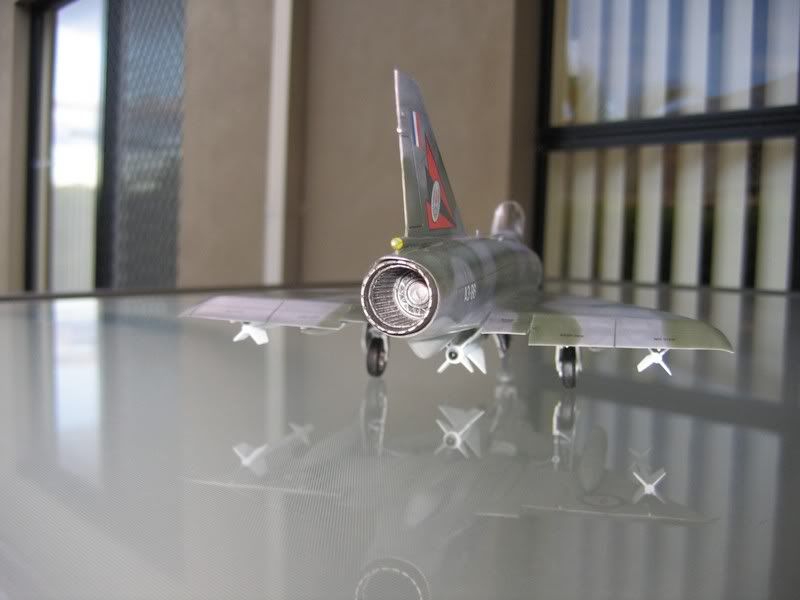
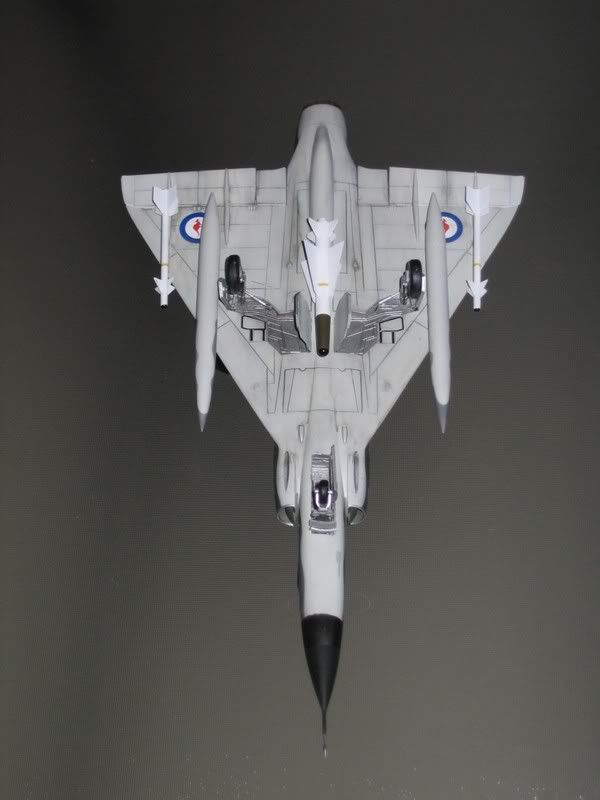
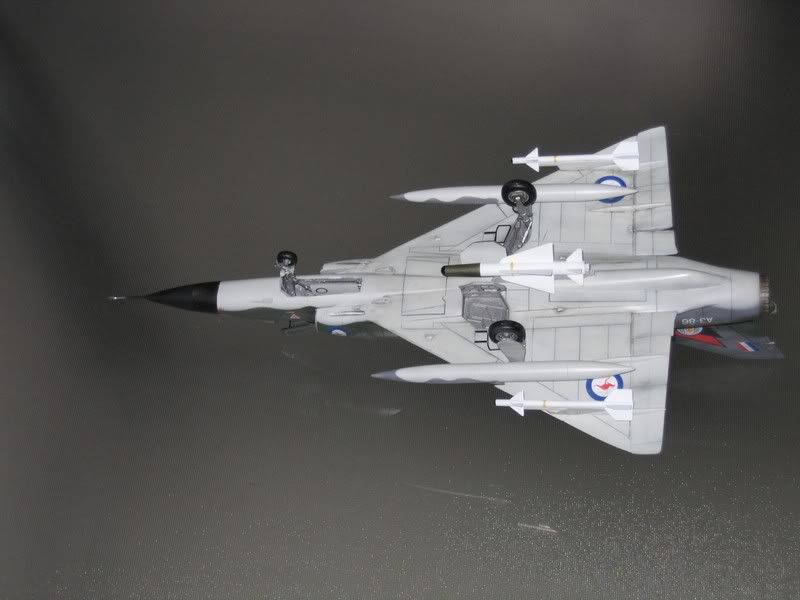
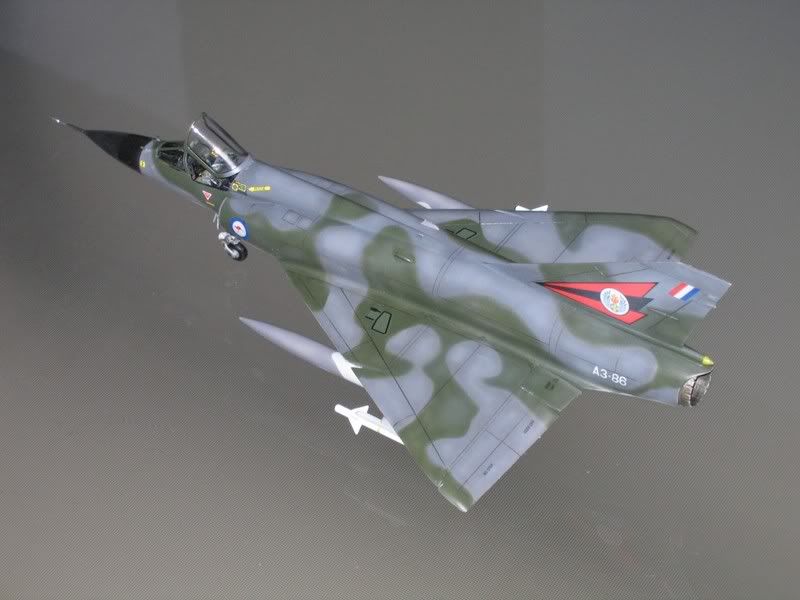
After a busy weekend I've finally got the mirage finished

I have no real complaints about the kit as any of the problems I had were all the result of me! I have to learn to be more patient.

My grandfather used to tell me 'The longest way to get a job done is to take a short cut.' On this build I've proved him right more than once.

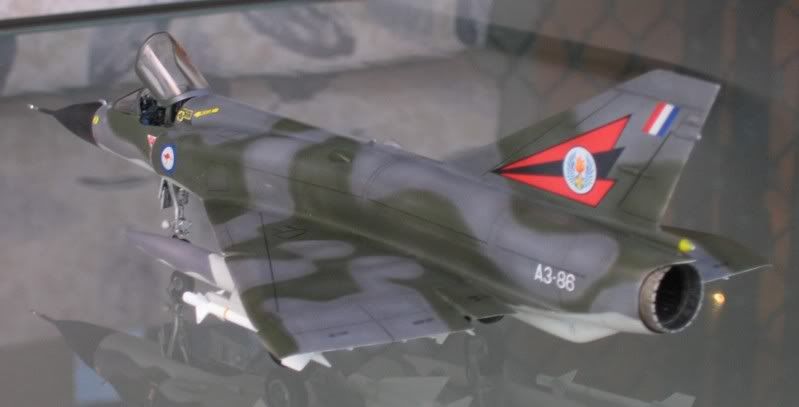
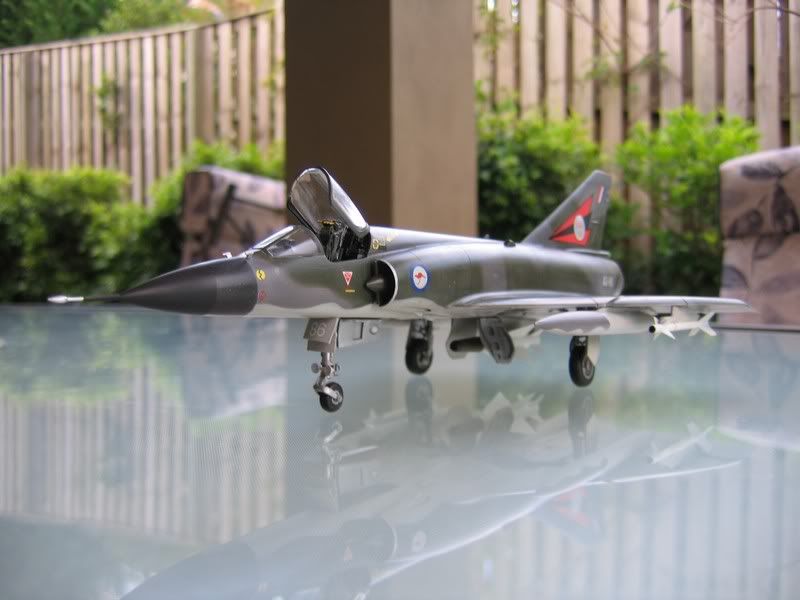
This was the Italeri 1/48 mirage IIIE converted to a RAAF IIIO. The basic kit was ok, but, as this is a model of the aircraft, A3-86, that my Dad had as his own I decided some upgrades were in order. 

As Italeri supply this with raised panel lines I decided now was as good a time as any to learn the art of re-scribing.

I cut the flaps and elevons off and set them as they sit when the ac has shut down and the hydraulic pressure has bled off.

I scratch built the exhaust can using some parts from the one supplied, some corrugated plastic card and some thin styrene sheet. I cut the afterburner ring from the exhaust petals and used the IIIC part supplied with the kit as a tube to set it back further. I then sleeved this with the corrugated card and made the inner petals with the thin styrene sheet.

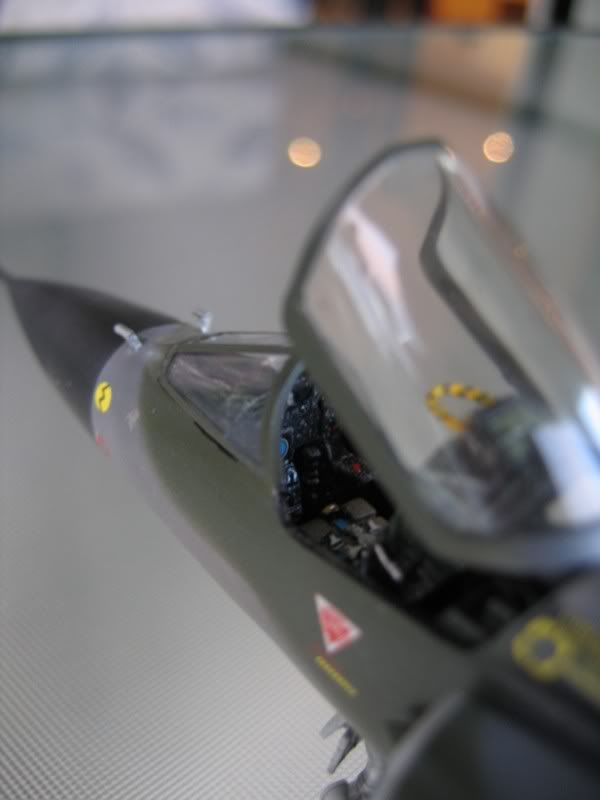
The cockpit tub and seat are fom High Planes. They were not too bad but weren't for this kit and required a lot of work to make them fit. The instrument decals were cut from the kit decal sheet as the resin detail was a little too fine to distinguish the instruments.


The paint is Gunze acrylic and the decals are from High Planes as well. This is the first time I've used post shading and am very happy with the results. The decals needed toning down as they were a little too bright on the weathered aircraft.

This Aircraft was the one and only ac that my dad had his name on during his 20 years in the RAAF. He flew this during the 70's whilst he was flying with 3 Squadron based at Butterworth in Malaya.

As an interesting note, this ac is still flying with the Pakistani Air Force.
 

  • Member since
    April 2003
  • From: Edgware, London
Posted by osher on Sunday, November 5, 2006 7:43 AM
That's a truely brilliant build, especially considering the kit you based it on.  You must be very proud!  I'll update the front page.
  • Member since
    June 2006
  • From: Queensland Australia
Posted by Mark T Gold Coast on Monday, November 6, 2006 1:33 AM

Thanks Osher,

I'm really happy with it, I can't wait to show my dad.

I didn't realise the Italeri kit was too bad.Take the raised panel lines, poor cockpit detail and the fact some of the plastic was way too thick in places and I'd rate it as one of the better kit's I've buit.

I have no real experience though as I've only ever built cheap kits, old revell and monogram. Never any Tamyia or Hasegawa kits so I suppose I don't know how good life can be!

My last kit was a Zhengdefu FB-111 so after that pile of *^ap, anything is great.

Can't wait to see how the other mirages turn out!

Good luck everyone.

MArk

  • Member since
    September 2006
Posted by Jacob Russell on Tuesday, November 14, 2006 2:55 PM

Hi All,


How is everyone else getting on with their group build projects? We are set to close on our 1st house in less than 2 weeks, so I am through with any modeling until the move is over. I did, however, decide to go with the High Planes Mirage IIIO as my subject. I also purchased High Planes' recent Mirage decal sheet, as I didn't find any of the kit decal options too appealing.

I will check the site from time to time, but I probably won't post any in-progress pictures until after the holidays.


Keep up the good work!

  • Member since
    April 2003
  • From: Edgware, London
Posted by osher on Sunday, November 19, 2006 5:28 PM

Sorry pictures (next week, I promise), but my Mirage has the fuselage,wings, and most of the undercarriage assembled.  Had a problem when the paint for the interior wrinkled, for some unknown reason (wrong thinner?).  Also, the locators for the interior bits are slightly out, which was a hassle.  Entirely of my own error the forward section of the fuselage has a slight step.  Not sure where it went wrong, but, not too bad, so can be sanded out.  Truthfully, the kit's lovely, if lacking any interior detail.  I guess it shows up my limitations as a modeller.  The undercarriage looks weird though (and it was assembled correctly!).

One things weird.  A lot of holes in the front, with no glass bits, or bits behind them.  Strange...  Will use liquid glass to fill them in.  Also, you can see from nose cameras through the jet outlets.  Oh yes, and the instructions don't say what colours to use (just generic callouts), and as for guessing where all the decals go... well, it's a whole new game curtasy of Academy.  I still can't work them all out!!!

  • Member since
    November 2004
  • From: Salisbury Massachucetts USA
Posted by PanzerWulff on Tuesday, November 21, 2006 12:43 PM

whoops it looks like I forgot to mention kit and scale my F.1 is the Hasegawa 1/72 Mirage F.1C so far I have been too busy of late to build much of anything more info to comeWink [;)] TTFN

ACE??? you were NEVER an ace AN ace HOLE maybe! (Lister to Rimmer on BBC's RED DWARF) Chris"Hey GRAVITY still works"Gray
  • Member since
    June 2006
  • From: Queensland Australia
Posted by Mark T Gold Coast on Thursday, December 14, 2006 6:21 AM

Looks a little quiet over here.

How is everyone going with their mirages?


  • Member since
    October 2004
  • From: Northern Virginia
Posted by ygmodeler4 on Saturday, December 16, 2006 5:04 PM
I still need to purchase one finsh other builds but i dislocated my shoulder playing LAX so itll be a couple of weeks.

-Josiah

  • Member since
    September 2006
Posted by Jacob Russell on Monday, December 18, 2006 1:07 PM

We closed on our new house 3 weeks ago, and got flooded in the storm last week. The garage and my new workshop were inundated, and we got water in the basement and laundry room as well. We are even unpacked yet!

I will be building the 1/72nd High Planes Mirage IIIO with one of the new Flying High decal sheets reviewed over on Hyperscale.

Have you guys seen these decals yet?Sad [:(]

  • Member since
    August 2006
  • From: South Coast NSW, Australia
Posted by Simon L on Wednesday, January 31, 2007 1:58 AM

Hi Guys

Finally got going on the Eduard MIrage III. I am going 'out of the box', although with Eduard that does include etched belts etc.

 My example  ( I think ) had a warped starboard fuselage side, I had a devil of a job fitting the nose wheel bay, intakes and wings and getting it all to fit together more or less gap free. I have another Eduard Mirage I'll have to get down from the loft to check.

Anyway - it's at 'airframe stage' awaiting fitting of the elevons, and then seam elimination in prep for a Alclad natural metal finish. It will be in French markings this one, I have the Heller IIIC and the conversion for the Aussie Mirage as previously mentioned, but this will not make in time for this GB sadly.


WIll post a couple of pics when I have doctored some seams and got the Alclad on !


Regards


Simon

Simon


  • Member since
    August 2006
  • From: South Coast NSW, Australia
Posted by Simon L on Wednesday, January 31, 2007 5:10 AM
Great job Mark by the way , hope my 75 Sqn effort is half as good.

Simon


  • Member since
    June 2006
  • From: Queensland Australia
Posted by Mark T Gold Coast on Sunday, February 4, 2007 5:58 AM

 Simon L wrote:
Great job Mark by the way , hope my 75 Sqn effort is half as good.

Thanks Mate.

Good luck with your Mirage.

Can't have too many Aussie III's around.

I'm keen to see how it turns out with the alclad.

Keep posting

Mark

  • Member since
    August 2006
  • From: South Coast NSW, Australia
Posted by Simon L on Tuesday, February 6, 2007 5:05 PM

Hey Mark - How do I get the Group Build badge into my signature ?


Cheers


Simon

Simon


  • Member since
    June 2006
  • From: Queensland Australia
Posted by Mark T Gold Coast on Wednesday, February 7, 2007 12:03 AM

Hi Simon.

You need to go to the first page of this forum and in the first post osher has included the group build badge.

1 You need to right click on this and 'save as' to your desktop for easy access.

2 you need to set up a 'photobucket account' Go to http://photobucket.com/

and do what they want you to do to set one up. It's free by the way.

3 After you've up-loaded your image to photobucket, you'll see it displayed as a thumbnail with these options under it 

                           URL Link
                           HTML Tag
                           IMG Code

The IMG code is what you want.

4) LEFT click on the IMG code box abd the code will be copied to your clip board.

(If you were posting pictures here then you would just right click on this page and paste the IMG link where you want to insert your photo and it'll display it, you'll se it in the preview not as you type)

5) go to the top of your page and where it says (when you're loged in) Welcome Back Simon L,

Click on your name and it'll take you to your title page.

6) Scroll down till it says 'signature' and paste the link in there.

7) make sure you save changes at the bottom of the screen.

I hope this is easy enough to follow. Sorry if you knew half of this, it's just that I see you've not had a lot of posts so I thought it better not to assume.

Good luck

Mark

  • Member since
    November 2004
  • From: Salisbury Massachucetts USA
Posted by PanzerWulff on Wednesday, February 7, 2007 8:34 AM
Hey guys I just got around to starting my Heller Mirage F-1C and reailized I'm the only guy on the list building in 1/72 lol
ACE??? you were NEVER an ace AN ace HOLE maybe! (Lister to Rimmer on BBC's RED DWARF) Chris"Hey GRAVITY still works"Gray
  • Member since
    August 2006
  • From: South Coast NSW, Australia
Posted by Simon L on Wednesday, February 7, 2007 5:07 PM

Thanks Mark ,


You're a champion.


Simon

Simon


  • Member since
    June 2006
  • From: Queensland Australia
Posted by Mark T Gold Coast on Wednesday, February 7, 2007 11:51 PM
 Simon L wrote:

Thanks Mark ,


You're a champion.


Simon


No worries Mate.

Need any RAAF refrence photo's?

I can email you what I have if It'll help

Mark
  • Member since
    August 2006
  • From: South Coast NSW, Australia
Posted by Simon L on Thursday, February 8, 2007 2:19 AM
 Mark T Gold Coast wrote:
 Simon L wrote:

Thanks Mark ,


You're a champion.


Simon


No worries Mate.

Need any RAAF refrence photo's?

I can email you what I have if It'll help

Mark


Thanks Mark


I'm okay for reference photos thanks, got a good mate who's a Sqn Ldr in the RAAF reserve, so I've got quite a few !

Simon

Simon


  • Member since
    August 2006
  • From: South Coast NSW, Australia
Posted by Simon L on Thursday, February 8, 2007 2:23 AM

Mark - and any other interested parties, the below is a quote from an email from another RAAF Sqn Ldr regarding the interesting Mirage 'Fanta Can' colour scheme.


The Mirage went from a bare metal finish to the definitive dark
 green/dark grey camouflage scheme in the early 70s, and this scheme
 endured until the withdrawal from service. From about 1983 or 84, some
 aircraft were painted in low-visibility light grey schemes; I recall
 that these varied slightly, and that they were officially "trial" schemes.

 The ARDU bird, A3-2, was painted dark green and gold until it was
 repainted after a depot level servicing by the Govt Aircraft Factories
 in 1983 (maybe early 84) ... when I was at EDN, anyway. The old "scheme"
 included numerous datum points for easy reference in photographs.

 Rumour has it that GAF asked the CO of Flight Test Squadron (who shall
 remain nameless but you may have seen him on TV as a retired AVM during
 the invasion of Iraq) what colour he wanted it painted. He jokingly said
 to paint it like the Macchi (ie the high-visibility Fanta Can scheme)
 ... and they did. There was considerable angst at ARDU over losing the
 laboriously plotted datum points.

 The ARDU dual was later painted in the Fanta Can scheme also. That must
 have been late in the Mirage's life, as ARDU's only permanent Mirage was
 A3-2. A dual and other singles were changed out with a 77SQN aircraft
 when servicings were due.


Nice story !

 Cheers

 Simon

Simon


JOIN OUR COMMUNITY!

Our community is FREE to join. To participate you must either login or register for an account.

SEARCH FORUMS
FREE NEWSLETTER
By signing up you may also receive reader surveys and occasional special offers. We do not sell, rent or trade our email lists. View our Privacy Policy.