SEARCH FINESCALE.COM

Enter keywords or a search phrase below:

Fleet Air Arm Group Build

728658 views
11139 replies
1 rating 2 rating 3 rating 4 rating 5 rating
  • Member since
    December 2016
Posted by dwsrazor on Saturday, January 7, 2017 4:35 PM

Thanks for the welcome back Admiral and for not making me walk the plank for me abcence.  I just finished a pair of RAF types so will pull out something FAA next.  Either a Helcat with the British Pacific fleet or a String bag.  One of the two.


  • Member since
    March 2007
  • From: Michigan
Posted by tonka on Tuesday, January 17, 2017 5:07 PM

How about with this one? Right roundels?

Its the OLD airfix kit, simple but first one I came to in stash from 'across the pond'

Its so old it has a Sears price tag on it for 99 cents!


]

  • Member since
    December 2002
  • From: Northern California
Posted by jeaton01 on Wednesday, January 18, 2017 12:26 AM

Well, Tonka, looks like you won't have to be keelhauled after all, Laddie!  Welcome aboard, and don't forget my weekly rum rations, outside the door of my cabin Friday even'n will be fine.

John

To see build logs for my models:  http://goldeneramodel.com/mymodels/mymodels.html


  • Member since
    March 2007
  • From: Michigan
Posted by tonka on Thursday, January 19, 2017 11:53 AM

jeaton01

Well, Tonka, looks like you won't have to be keelhauled after all, Laddie!  Welcome aboard, and don't forget my weekly rum rations, outside the door of my cabin Friday even'n will be fine.


Good thing no keelhauling! Those dang barnacles hurt!! Rum on the way!

Started on the lil critter.

Lots of rivets, Pics to come.


]

  • Member since
    December 2002
  • From: Northern California
Posted by jeaton01 on Friday, January 20, 2017 6:38 PM

All rrrigghhttt! It's Friday, and I'm sure all you laddies are runnin' fer the Admiral's hatch with all that Rum.  Funny, ain't heard any a yer yetSurprise

This was built for the FSM New Years Resolution group build, but it can certainly fit here.  Airfix 1/48 Meteor F.8.  Then two Tamiya Meteors, an F.1 and an F.3, both done in December 2016.

Any you laddies got somethin' built recently, FAA or RAF, they won't be no serious repecussions if yer put some up here.


John

To see build logs for my models:  http://goldeneramodel.com/mymodels/mymodels.html


  • Member since
    December 2016
Posted by dwsrazor on Friday, January 20, 2017 10:49 PM

Aye Aye Admiral!  These have just been completed in the last month or so.

Airfix 1/72 Typhoon with Aviology decals

Hasegawa 1/72 Mosquito Mk. IV


Now you said something about rations... Propeller

  • Member since
    December 2002
  • From: Northern California
Posted by jeaton01 on Tuesday, January 24, 2017 12:10 AM

Well wrought, Davey boy, well wrought.

Rations, yeah rations.  Mayhap they all got lost on the way, cause nuthin showed up.  Or did it all go yer way!??  I'm sure you would never allow that!  Yes, be'in Admiral can sumtimes add a touch a paranoya.  Most sure the sots drank it all up and lost there way amid a bottle and a melon.

Since there was no grog, the admiralness bethought to begin progress on the new Admiral's barge, so Here be it with the intended glorious scheme.


John

To see build logs for my models:  http://goldeneramodel.com/mymodels/mymodels.html


  • Member since
    November 2003
  • From: Naples, FL
Posted by tempestjohnny on Tuesday, January 24, 2017 7:02 PM
Aye Admiral. That sure is weathered and beaten


  • Member since
    December 2016
Posted by dwsrazor on Tuesday, January 24, 2017 11:11 PM

Great looking subject.  I'll be watching.

Which kit is it?

  • Member since
    December 2002
  • From: Northern California
Posted by jeaton01 on Wednesday, January 25, 2017 1:38 PM

Dave, it's the Tamiya 1/48 kit, first edition.

John, this airplane only lasted about a year so I guess they dirtied up pretty fast.  It was first laid down as a Manchester but was completed as a Lancaster.  It was the particular Lancaster used to publicly announce the type and supposedly is the most photographed Lanc. 

John

To see build logs for my models:  http://goldeneramodel.com/mymodels/mymodels.html


  • Member since
    December 2002
  • From: Northern California
Posted by jeaton01 on Wednesday, February 1, 2017 4:24 PM

Admiral's Barge progress:

This is kit No. 61020, probably an original release.  61021 was an early Dambusters release.  The latest releases are in grey plastic and have both the early and later bombardier's perspex, the earlier kits have only the shallower early model type.  The early kit has one style of propeller, the later kit has two styles.  There were also some changes to the engine nacelles in the later kits.  61105 is a later B Mk I/III kit.  If you want to see all the kit parts they are here on my website:

http://www.yolo.net/%7Ejeaton/mymodels/lanc/1lanc/1lanc.html


I know, I already posted this picture, but given the average attention span and volume of grog around here, who's to know?  This is the airplane the model will be built as, an early B Mk. I, some say it was the most  photographed Lancaster.  It was the aircraft used to make the airplane known to the British public in WW II.    It was originally laid down as one of 200 Manchesters but was completed as a Lancaster instead.  R5689 went to 50 Squadron on 22 June 1942.  It took part in many key operations, bombing Saarbrucken, Dussldorf, Le Havre, Essen and Wilhelmshaven.  On its last run, it left Swinderby, England, at 19h15 on 18 September 1942 on a mine-laying operation.  It crash landed at Thurlby, Lincolnshire, after a double engine failure on short approach.  The pilot, Gp Capt Hugh Everitt, not only survived the war but lived to be 94 and was highly decorated, DSO, DFC and Bar, CBE, OBE.  Sadly, one crewmember did not survive the crash, Sgt J R Gibbons, RCAF, from Brantford Ontario.


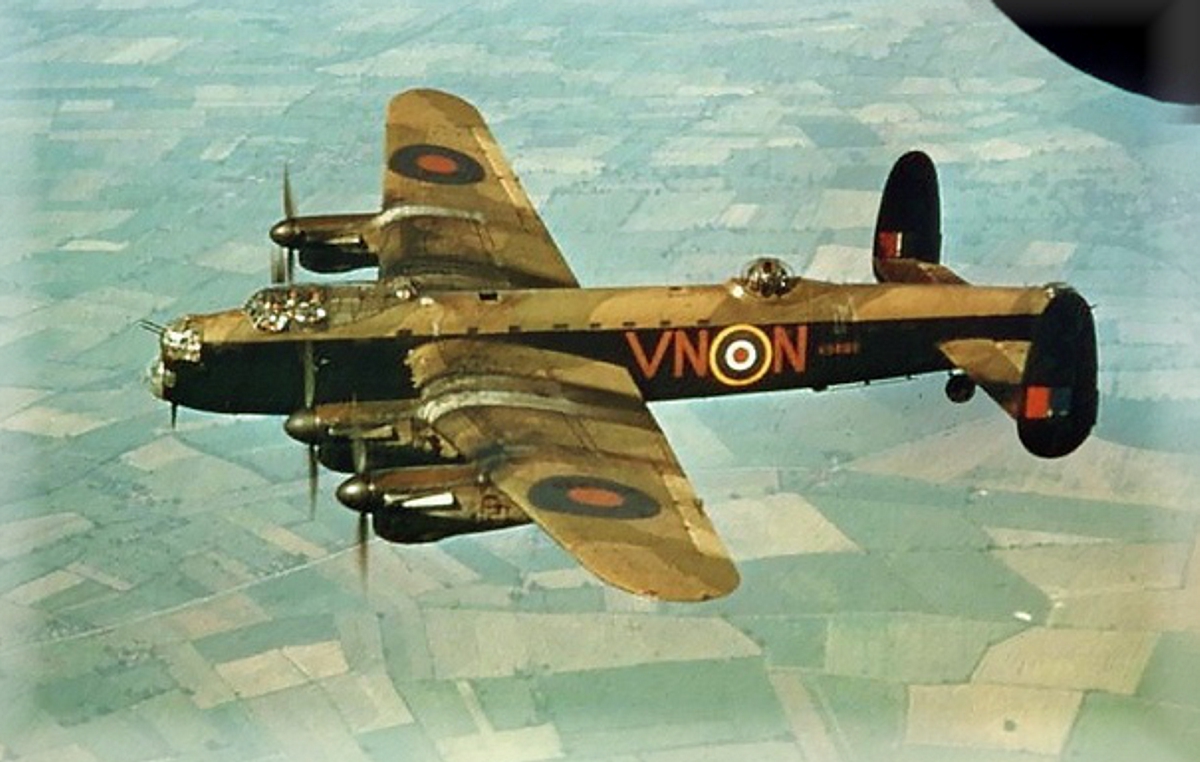
Windows will be unpainted on this early example.  The strips fit well and were attached using  Testors tube glue in the square bottle, and  white glue.  The windows were coated on the inside with Future.  On the  outside they were also coated, but also the gaps left between the windows and the fuselage molding were filled with Future.  The navigator's station is in the foreground.  The Montex mask set only supplied masks for one side of the windows so I cut more with a Silhouette Cameo vinyl cutter to mask the inside face of the windows.  Lancasters had windows because the original Manchester design called for a secondary transport role.


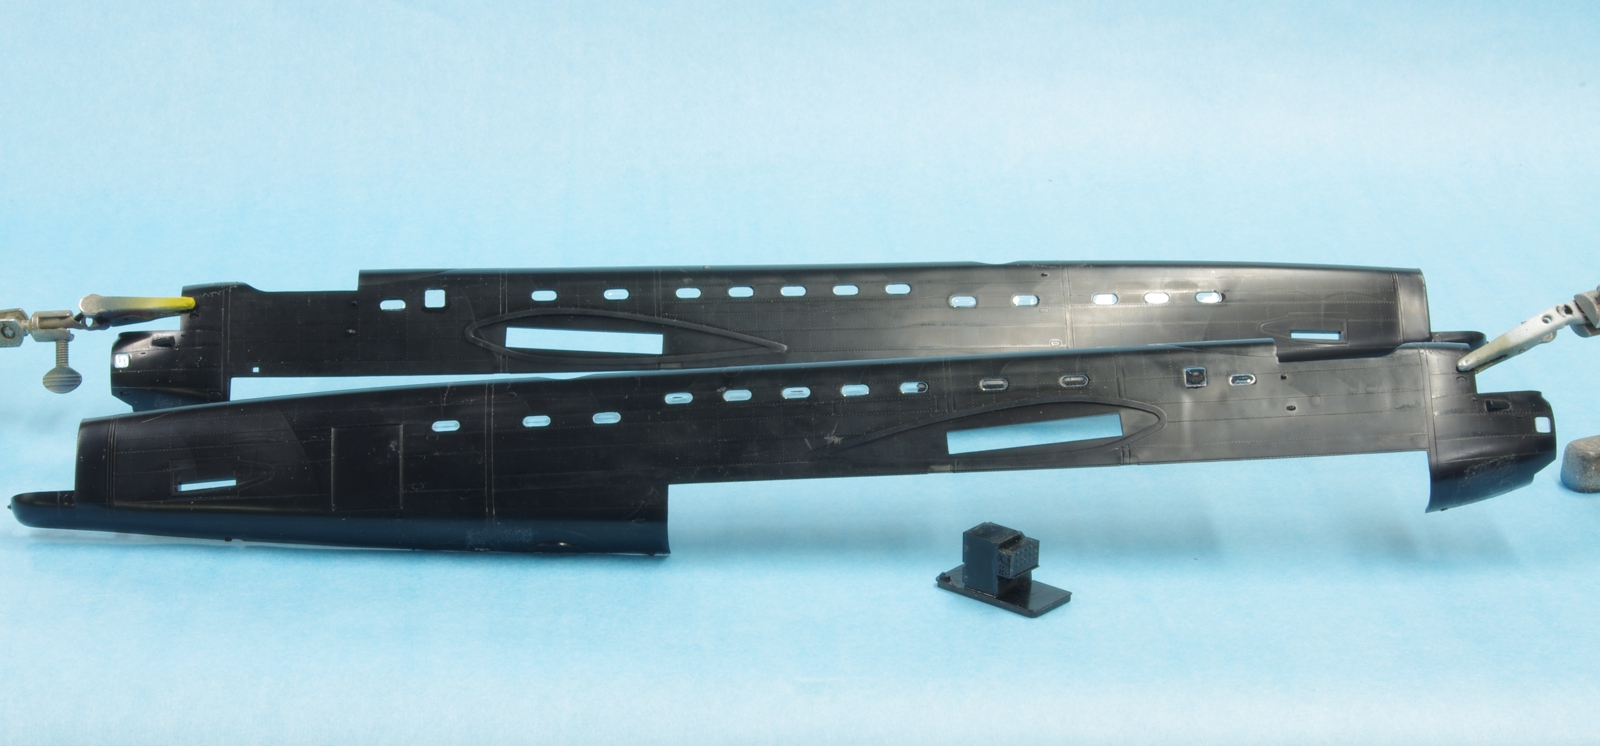
The decision was taken to  paint the interior  up to the bombardier's station RAF Interior Green, as was the case with early Lancasters built by Avro at Manchester.  It seems unclear exactly when the changeover to black back to the main spar cover  happened.  It is said that  black was applied in that area during the service life of many Lancasters. 


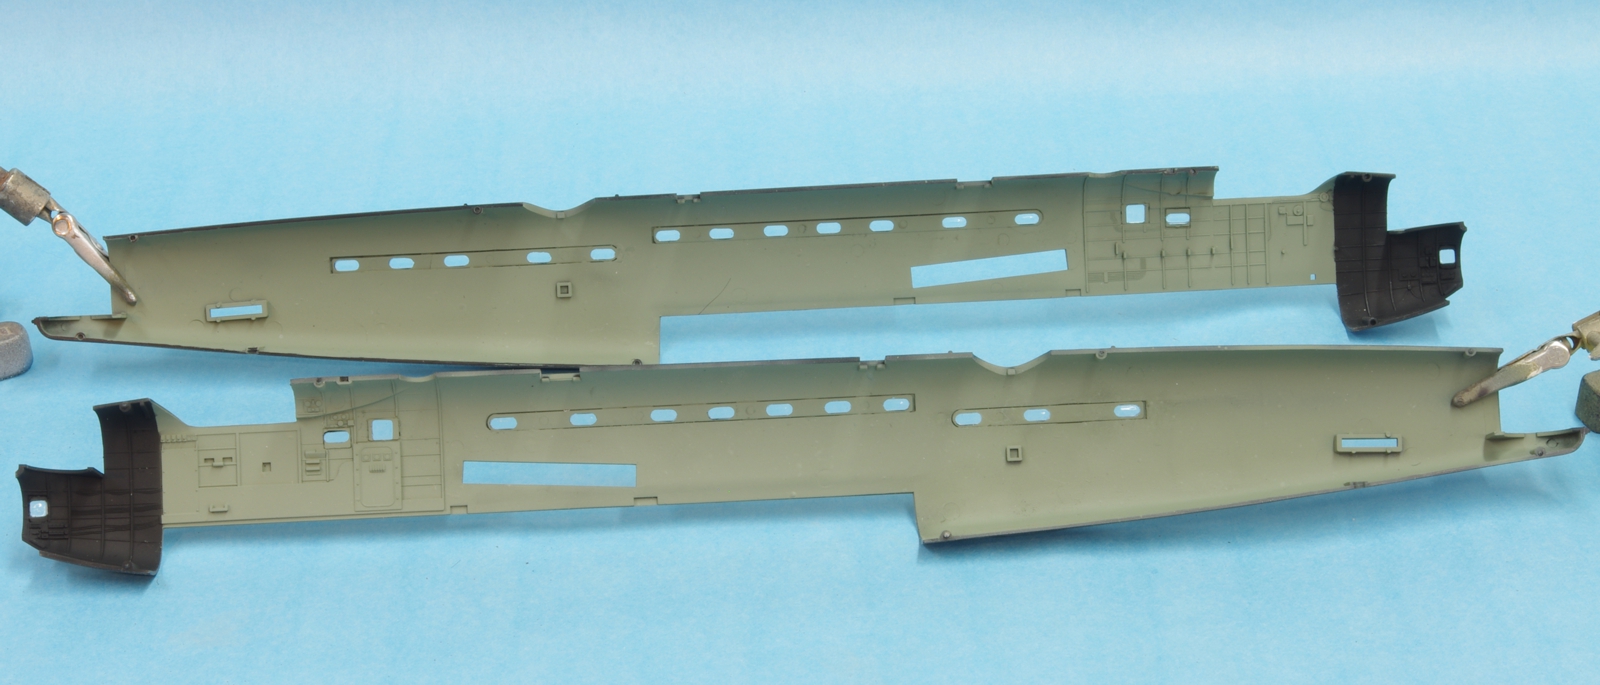
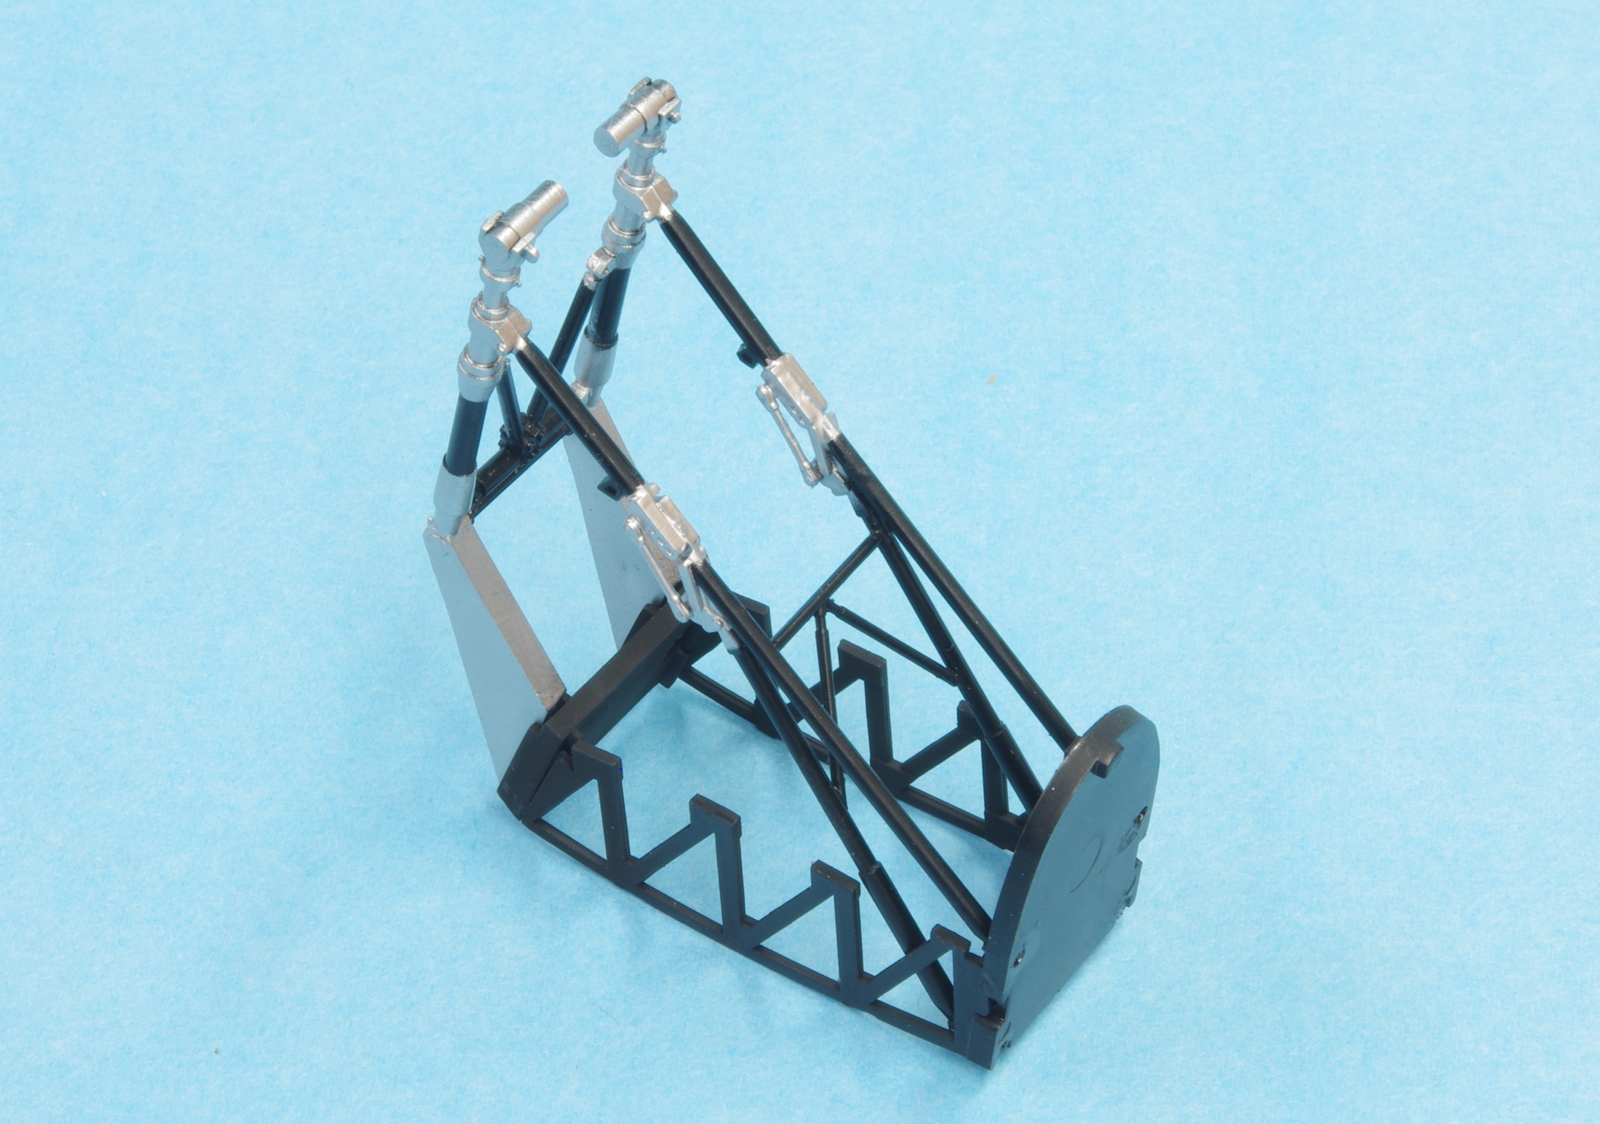
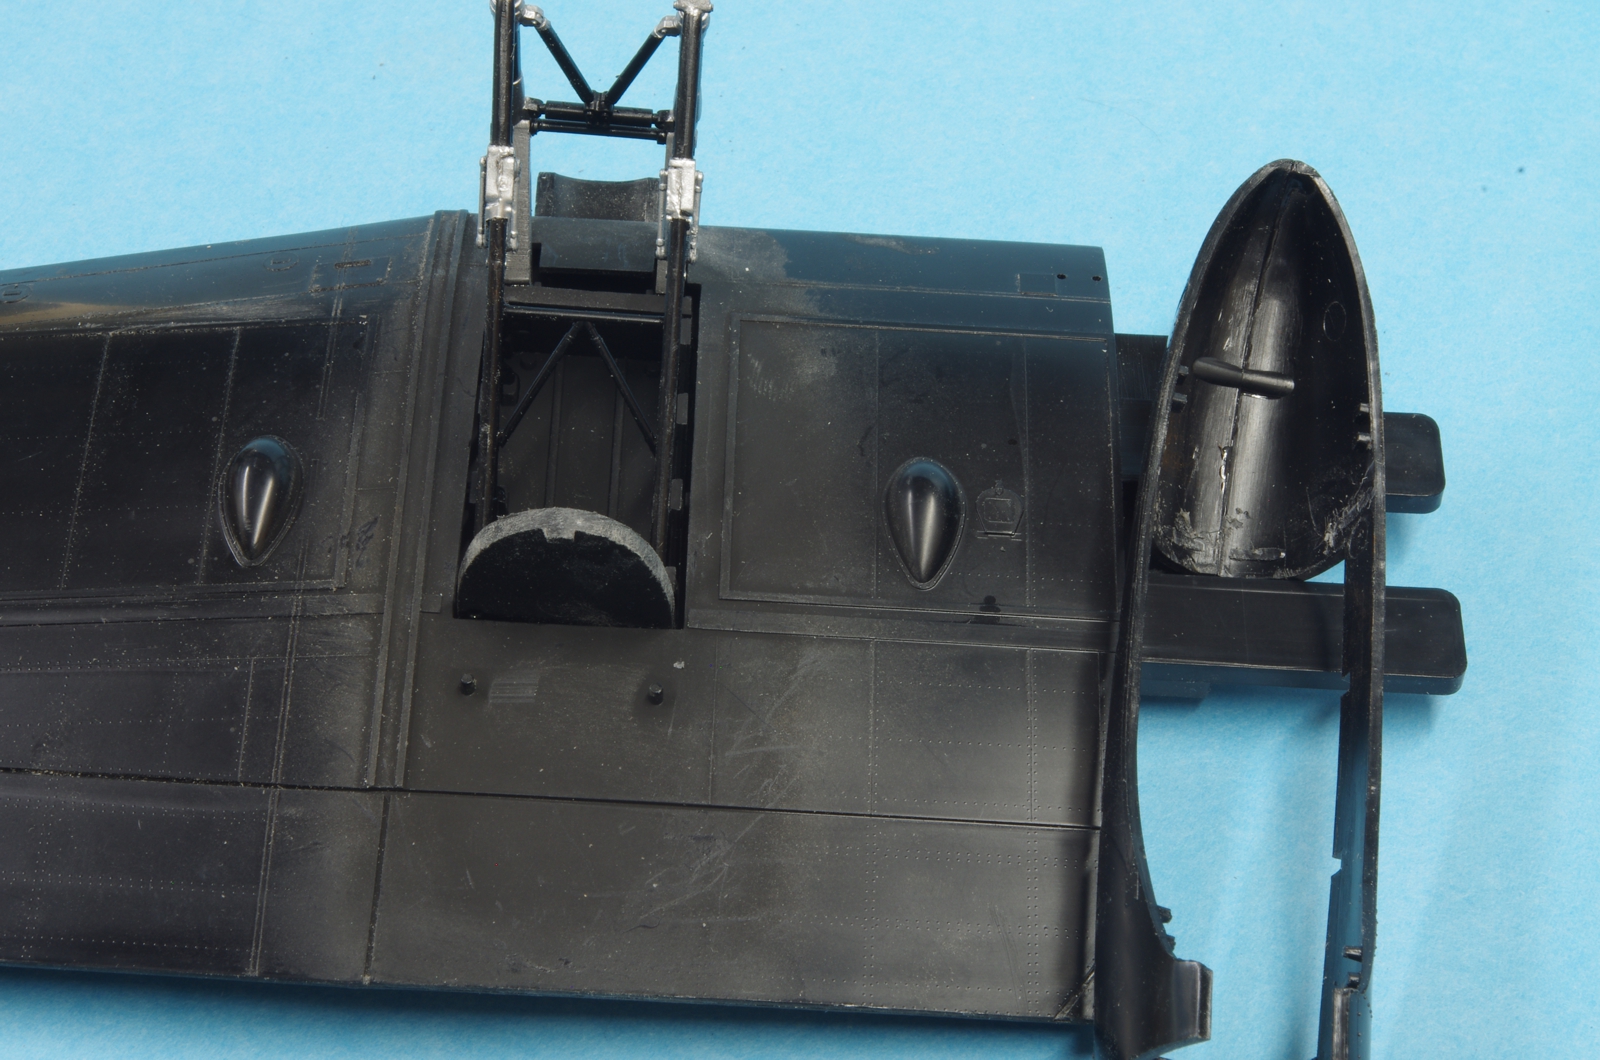
There are 11 parts in each main landing gear strut.   Since it would be easier to paint with the parts to be flat black separate from the silver and semigloss black parts, the struts were not glued to the upper bulkhead parts until after painting.  The upper parts were used as jigs while assembling the struts.  The front mounting bulkhead had to be taped in place, but the rear fit snug enough to stay in place.


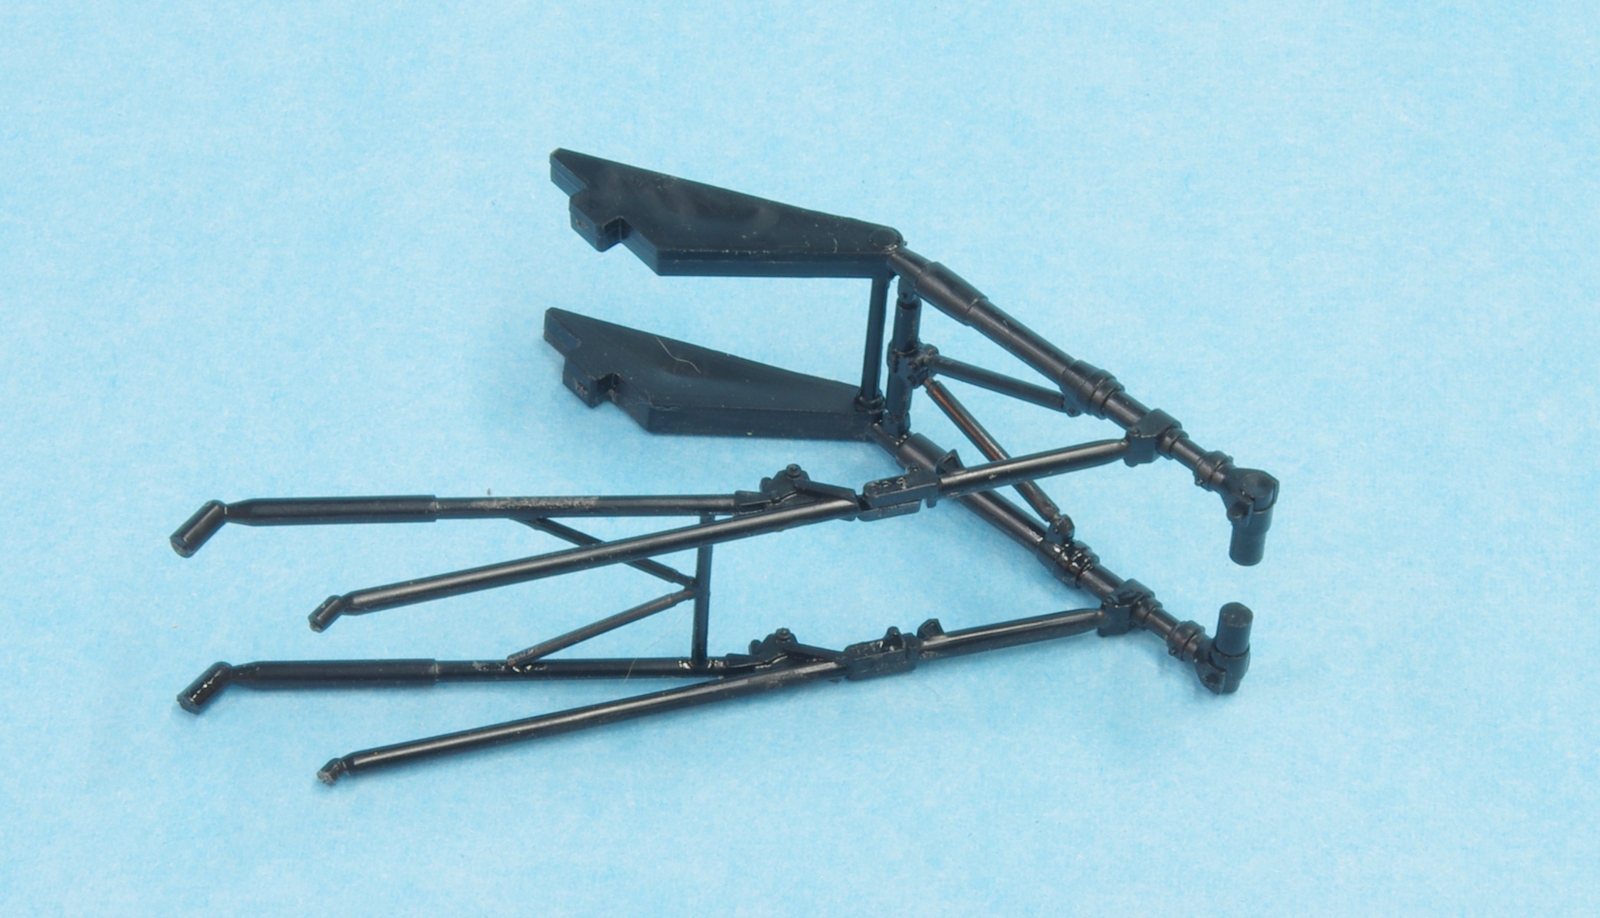
The second step, the two parts of the strut assembly glued together.  The strut closest in the photo must be assembled exactly straight.  The key and slot in that area is a little loose so care must be taken.


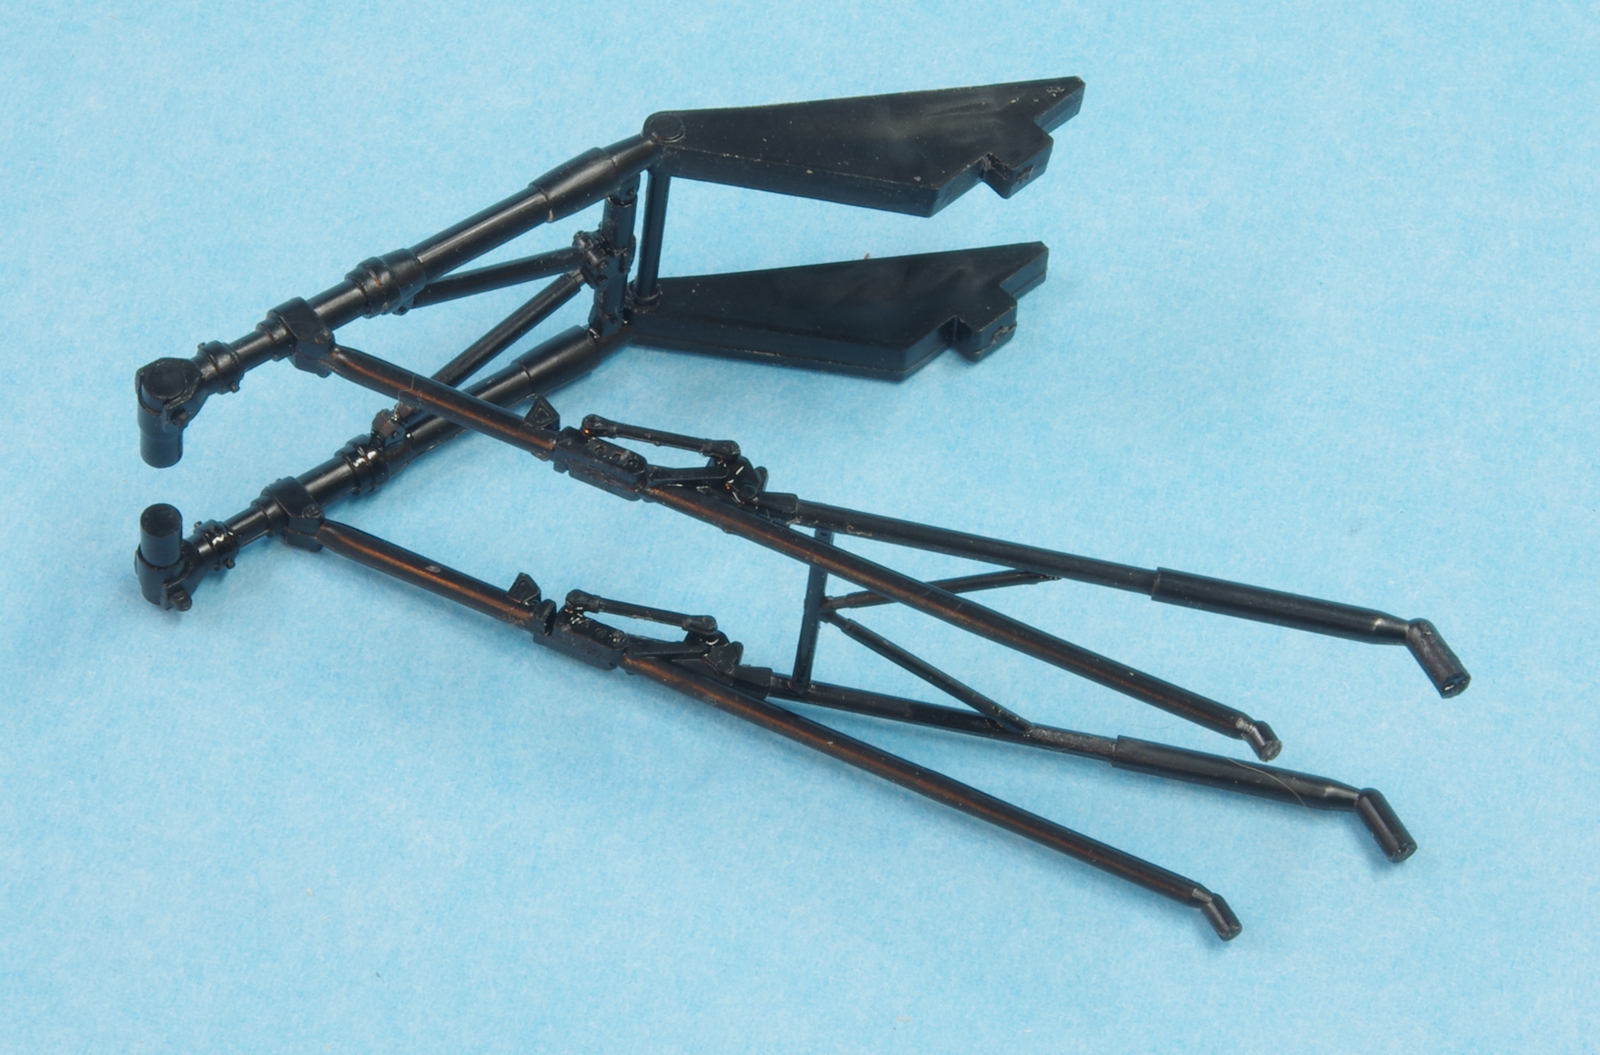
Lastly, the four links across the strut break point are installed.  This may be the first kit in black plastic I have done, and the color does not lend itself to seeing details.


 Another view of the four links across the strut break point.  These are overcenter springs.


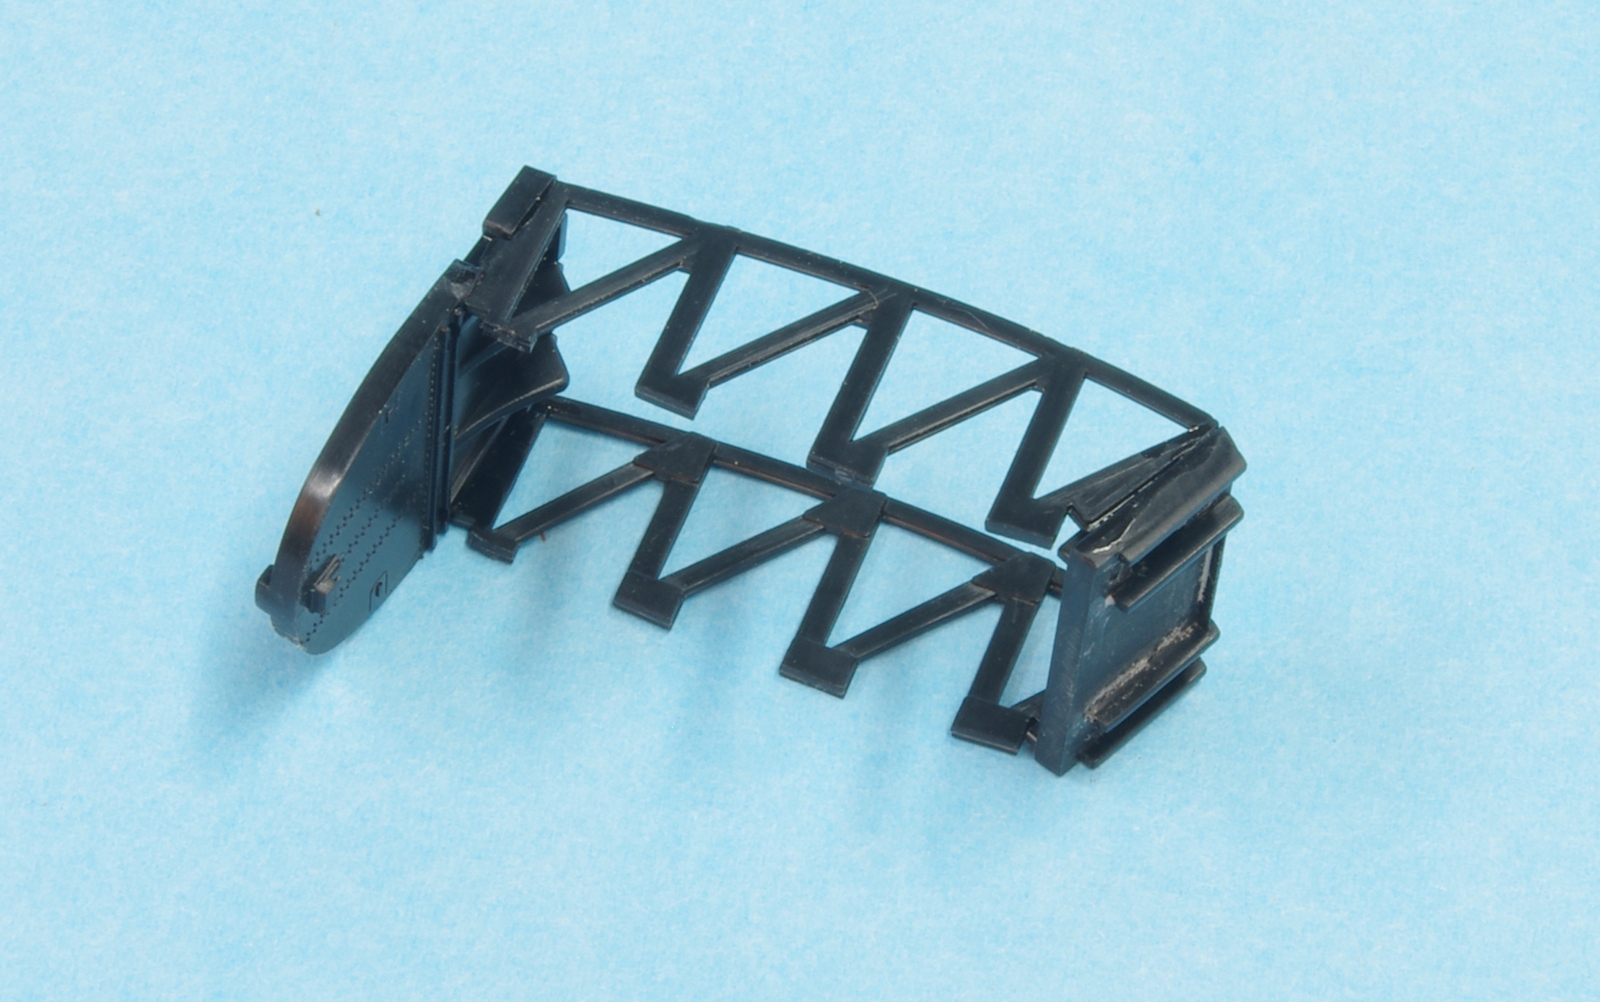
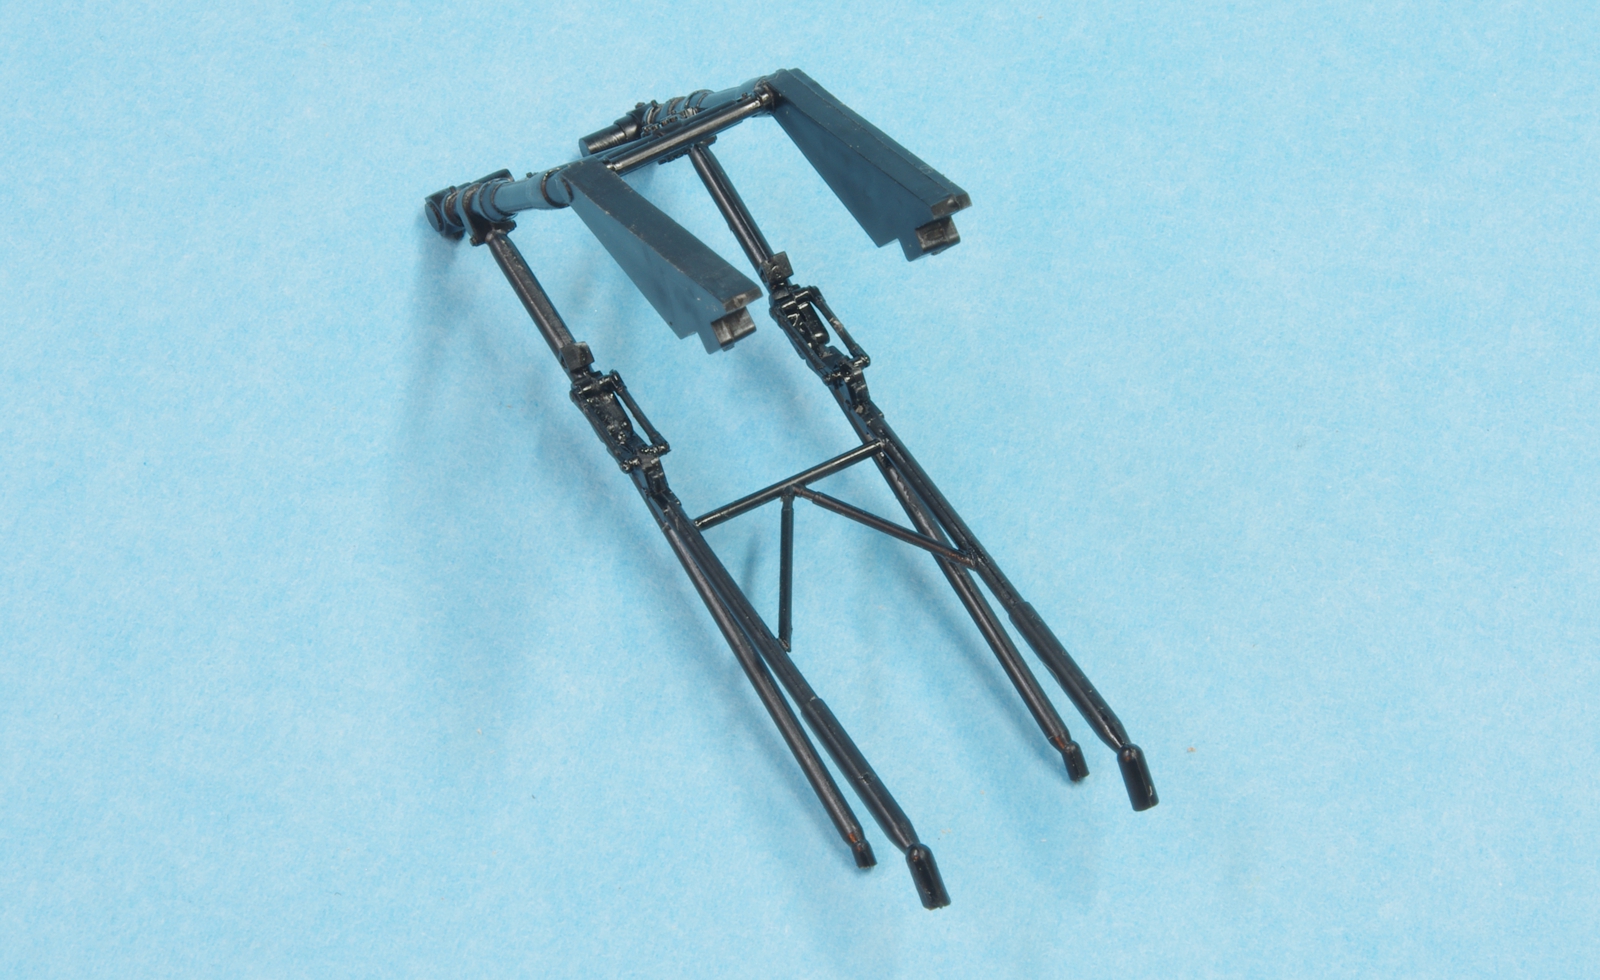
 The bulkheads assembled to the ribs.


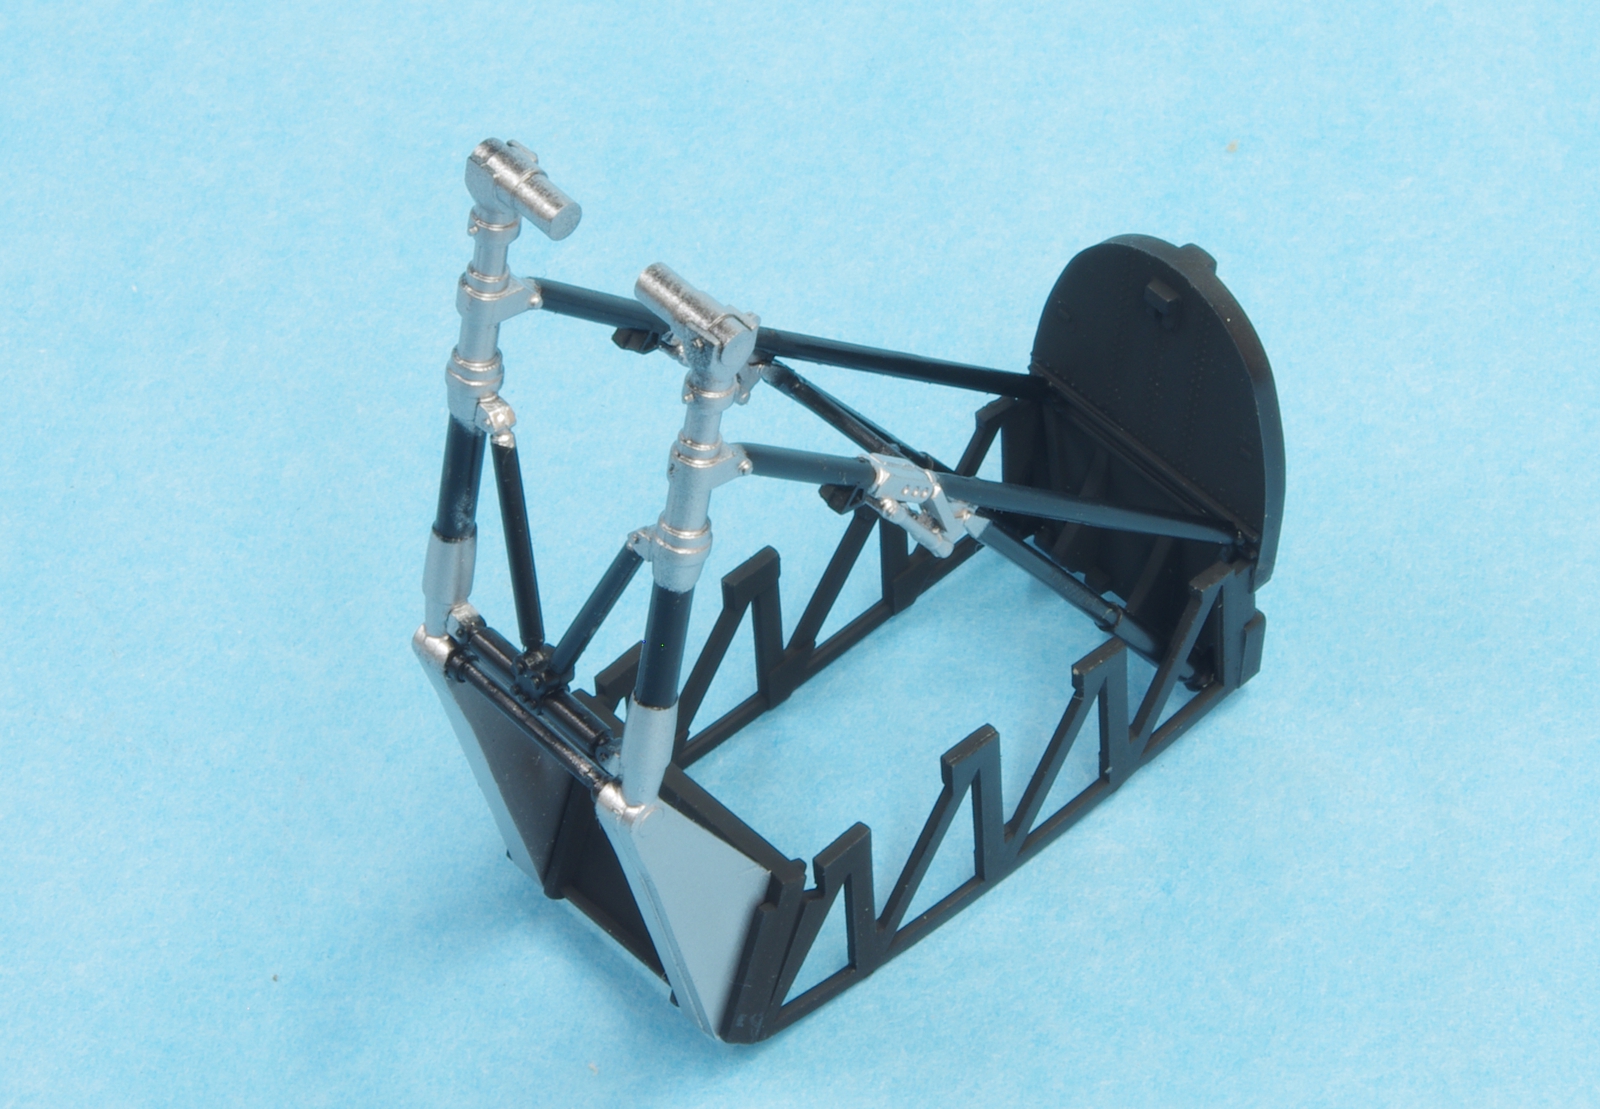
Alclad 101 Aluminum and Tamiya X-18 semi-gloss black on the strut assembly, Testors enamel flat black on the bulkhead assembly.  Some masking involved here on the struts.


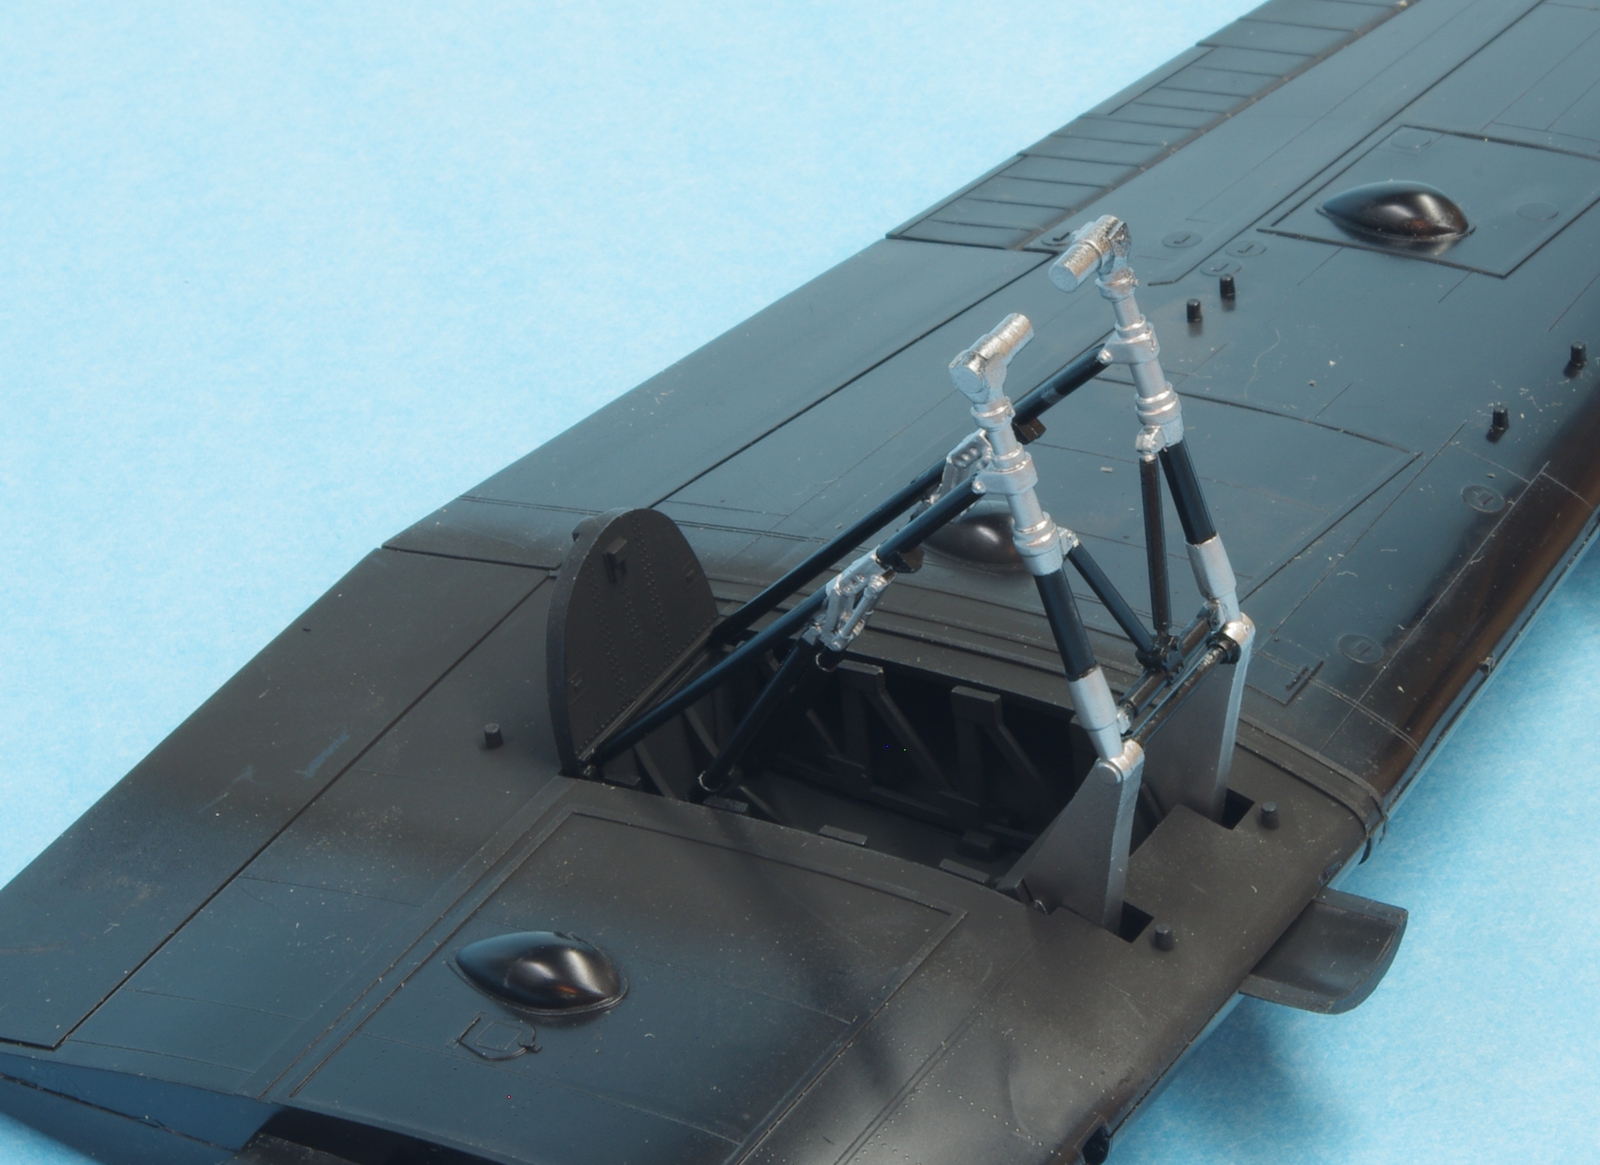
 Unfortunately it is necessary to install the landing gear in the wing before the nacelles can be fit.  The wing fit to the fuselage is nice, so the plan is to build and paint the fuselage and wings as separate units and do the wing join last.  The wings halves were not trouble free to join.  While the trailing edges joined up well, the leading edges of both wings had a pronounced step that had to be sanded to fair in.  It took several attempts to get the seam to disappear using thin CA after the first sanding. This work was done before the landing gear was installed.  A gentle reminder that this is a mid-70's kit.


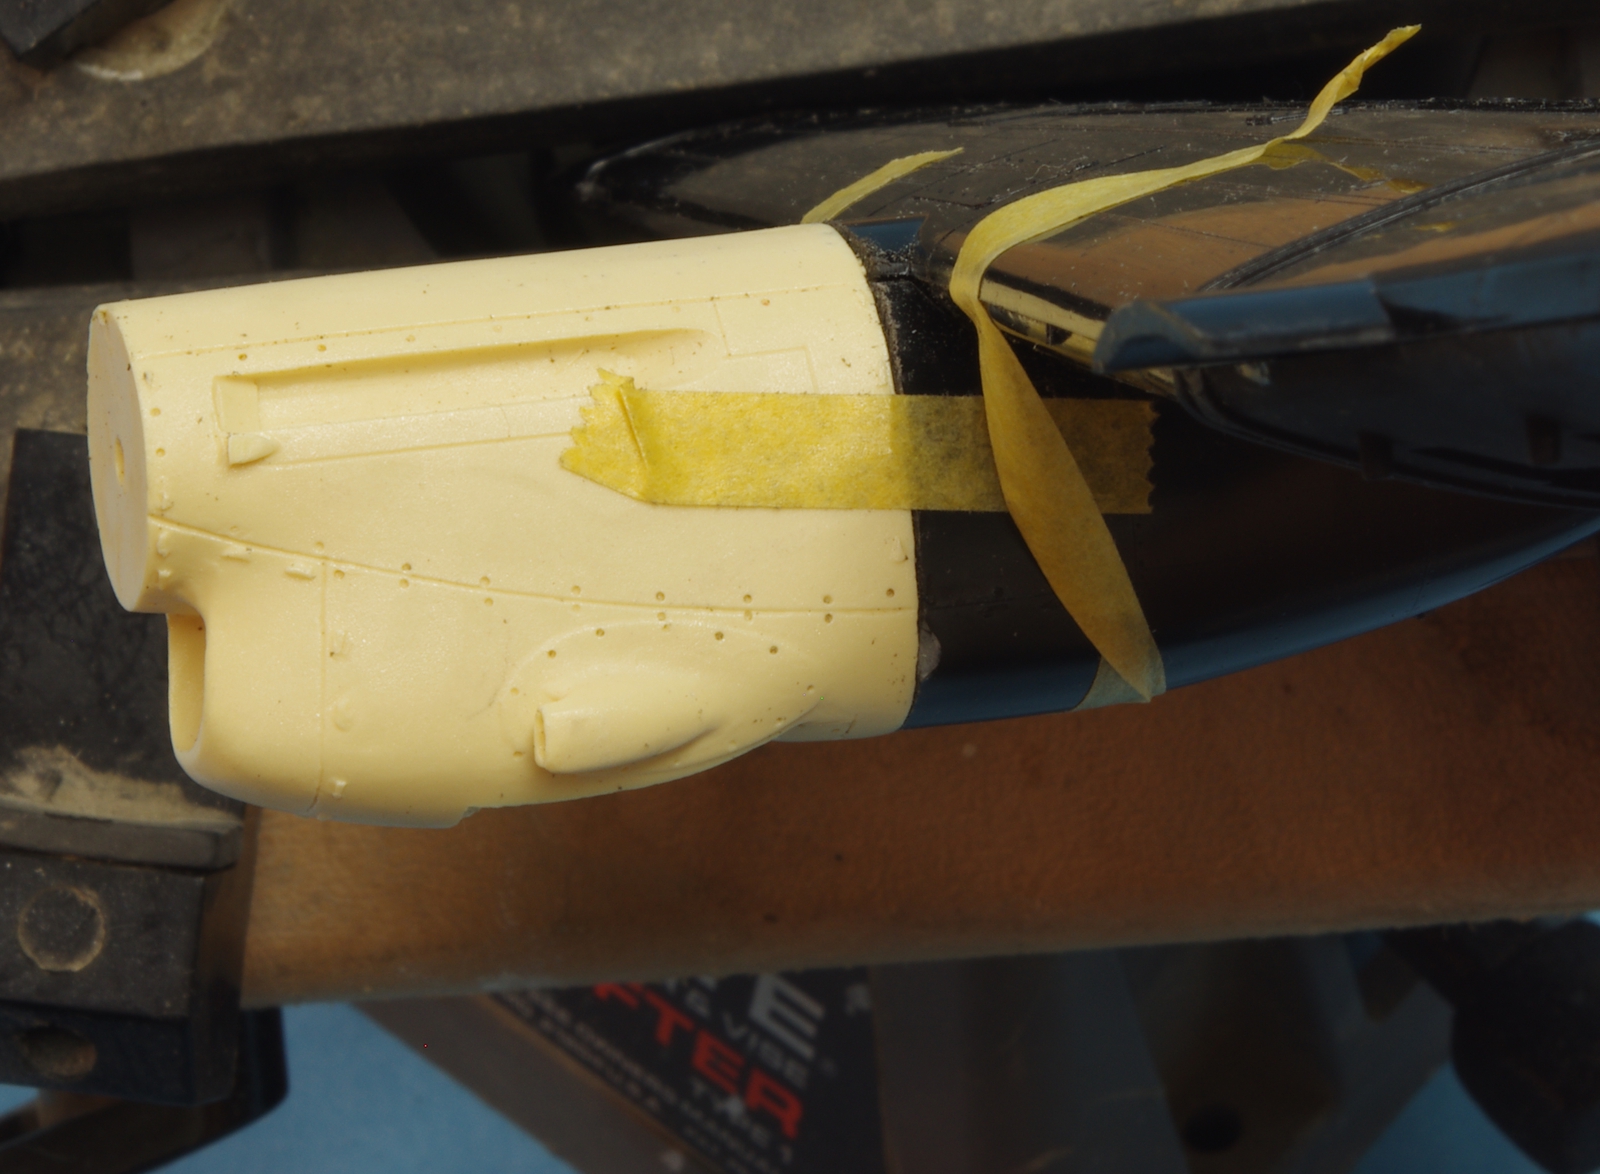
An outer nacelle from the Belcher bits set.  A band saw was used to remove the pour plug (sorry, Mike, but it worked well if a bit scary), leaving the remaining stepped down area that fits snugly in the modified nacelles (thanks, Mike Belcher!)


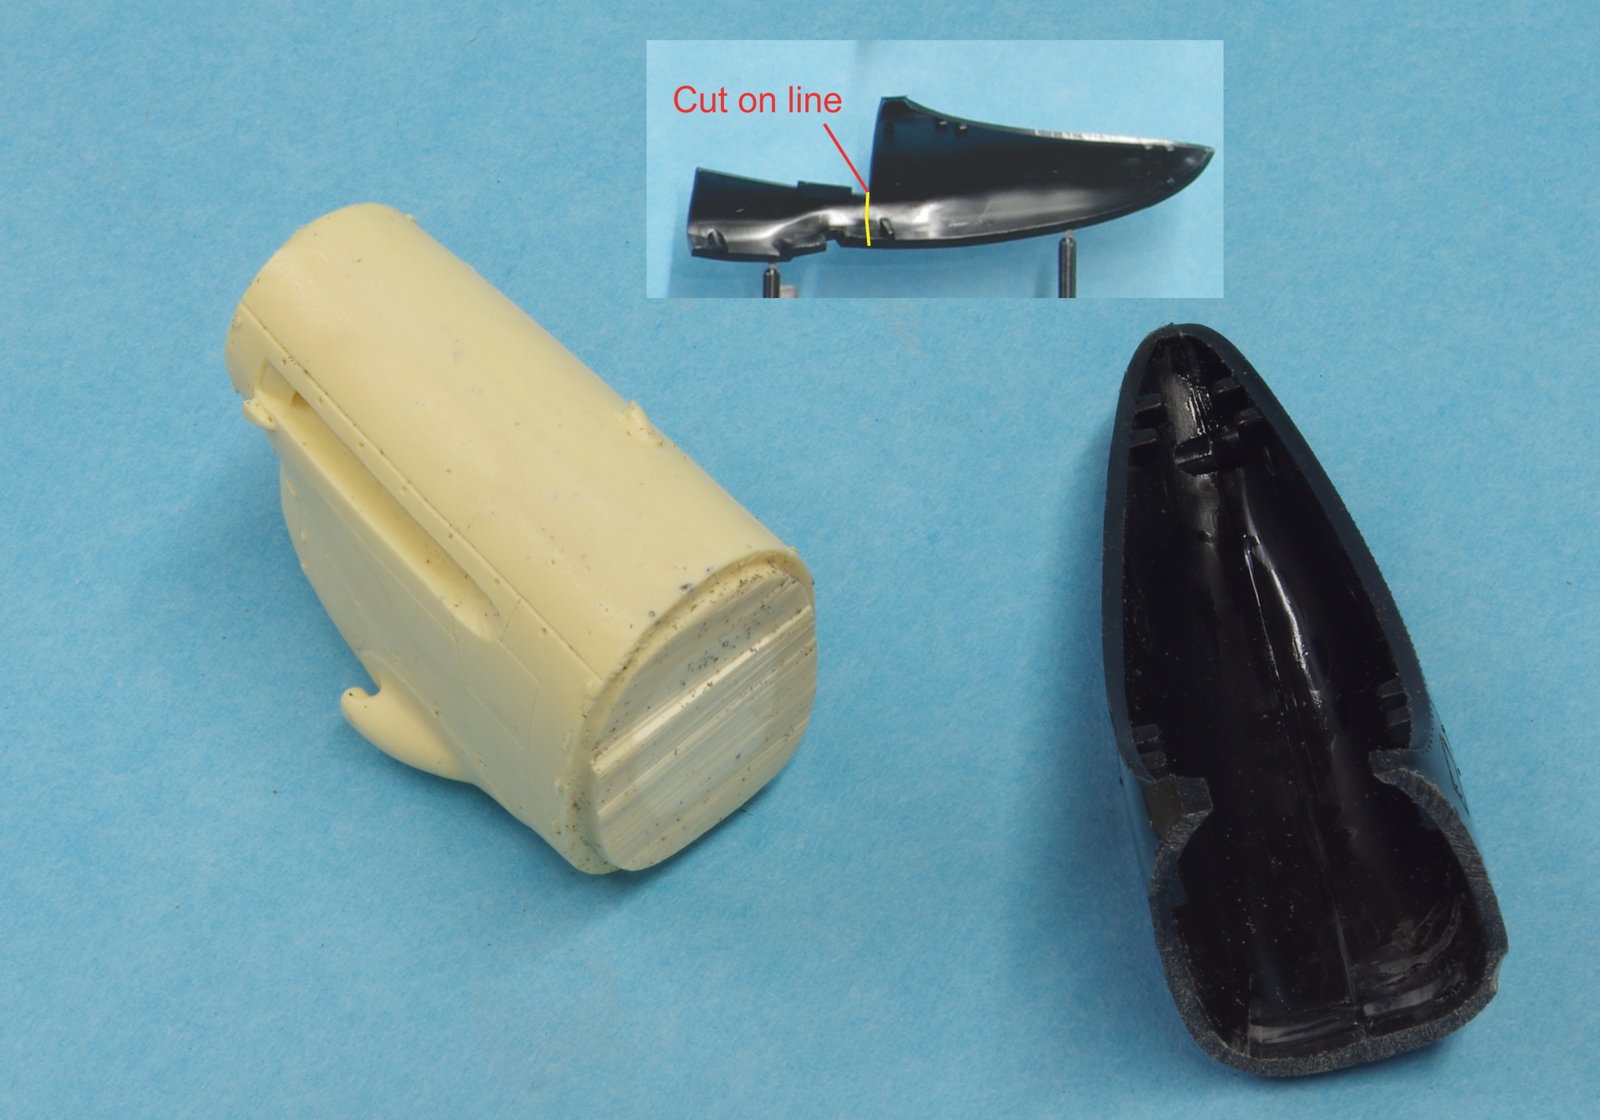
The modification of the nacelles is not difficult.  The cut is aligned with the existing straight surface that would join the engine cowl side panels of the kit parts. The cut was made a little ahead of where it should be using sprue nippers, and sanded to final shape, test fitting as the fit got close.


The test fit of an inner nacelle and engine prior to landing gear installation.  An outer engine with the smaller side air intake is shown here, the fit to the nacelle is the same.  Hopefully an inner engine will be used for this position in the final assembly.


With the landing gear installed, a test fit showed that  the rear gear bulkhead interfered with the aft end of the nacelle, not allowing the nacelle to rest far enough forward or to be close enough to the wing at the aft end.  The gear bulkhead was sanded down a bit and the alignment dogs on the inside of the aft end of the nacelle were removed.  This allowed the nacelle to fit properly.  The same correction was needed on both wings.


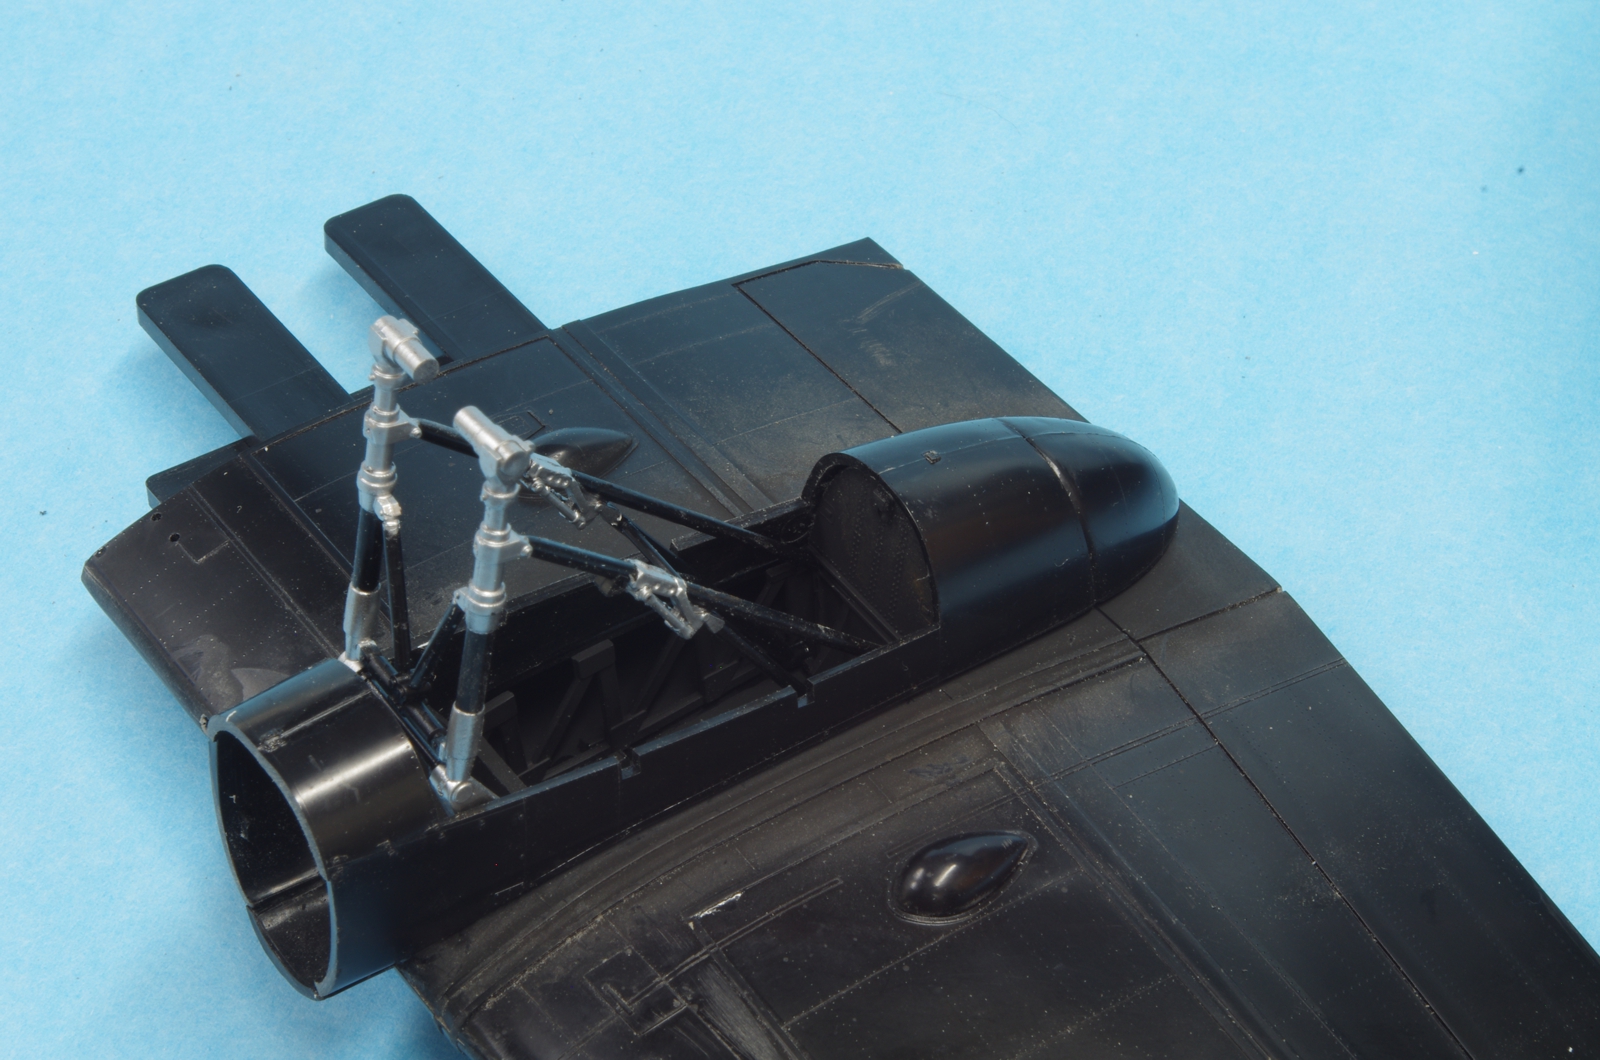
The final fit looks good.


John

To see build logs for my models:  http://goldeneramodel.com/mymodels/mymodels.html


  • Member since
    November 2003
  • From: Naples, FL
Posted by tempestjohnny on Thursday, February 2, 2017 10:14 AM
Excellent start John


  • Member since
    December 2016
Posted by dwsrazor on Thursday, February 2, 2017 11:00 AM

Very thorough presentation Admiral!   Propeller


  • Member since
    December 2002
  • From: Northern California
Posted by jeaton01 on Thursday, February 2, 2017 9:32 PM

Thanks!

John

To see build logs for my models:  http://goldeneramodel.com/mymodels/mymodels.html


  • Member since
    December 2002
  • From: Northern California
Posted by jeaton01 on Wednesday, February 8, 2017 4:37 PM

More work on the Lancaster.


The upper join on the tamiya parts required filler and a little sanding behind the resin engine.


The inner nacelles did not conform exactly to the wing contour so Perfect Plastic Putty and Tamiya grey putty were both used.  The parts were masked up close to the gap to reduce cleanup to a minimum.
 
 
Aves Epoxysculpt was used to contour the Tamiya inner nacelle to the Belcher Bits engine on the bottom.  The sides of the Tamiya nacelles in all four positions had to be scraped down slightly and sanded smooth to match the nacelles. It wasn't much but there was a slight step.
 
 
Another view.  The fit of the outer nacelles to the wing and to the Belcher Bits engines was good, just requiring the scraping and sanding on the sides.
 
 
The Eduard interior set for the Lancaster.
 
 
Two views of the seat.  The little basket on the back is an oxygen bottle holder.  There was also a frame that rested around the bottom of the seat.  I have no idea where it went.
 
 
Some of the added parts around the pilot station.  The larger box on the lower front later had to have the lower outside corner trimmed back to clear the fuselage.
 
 
The instrument panel, navigator's station, and wireless operator station.
 
 
There is a PE frame for the wireless operator's seat, in the foreground.  There was a second one for the navigator's seat but Eduard made them both the same size so the navigator's seat got no PE, it is much narrower.
 
 
Eduard intended that the bomb aimer's computer would rest on the bottom of the fuselage, on the little tabs below it.  No fit there so it was instead installed using hot glue so it could be spaced out and aligned well.
 
 
Another view.
 
 
The right side, with the engineer's panel. The seat for the engineer later was trimmed back some to clear the pe parts added to the right of the pilot's seat.
 
 
The relationship of the pilot seat, yoke, and instrument panel is a bit off.  The yoke would be better off moved back 3/16 or so, and the panel 1/16.  However, it does fit as designed.


John

To see build logs for my models:  http://goldeneramodel.com/mymodels/mymodels.html


  • Member since
    August 2016
  • From: Eufaula, Alabama
Posted by WannabeFarmboy on Thursday, February 9, 2017 1:11 AM

That's a really great looking Lancaster. Hope y'all don't mind if I come along for the ride. I know next to nothing about British war planes other than the tempest, and that's only because I'm currently building one. Lol. I don't have a contribution to add to the GB right now.  I'd like to at least discover that other British aircraft exist though. 

  • Member since
    December 2016
Posted by dwsrazor on Thursday, February 9, 2017 1:15 AM

Looking mighty fine John!  Bow Down

I won't get to my Swordfish until March.  You might be done your Lancaster by then at the rate you are going.

  • Member since
    August 2016
  • From: Eufaula, Alabama
Posted by WannabeFarmboy on Thursday, February 9, 2017 3:36 AM

Actually, I do have a 1/32 Beaufighter in my stash.. That's crazy though, right? I've got 2 WIPs going right now and two other GBs I've signed up for.

I think I may have an addiction...

If y'all are willing help enable my addiction though, I will try to add a third build to my GB schedule. Lol. 

  • Member since
    March 2007
  • From: Michigan
Posted by tonka on Thursday, February 9, 2017 1:56 PM

the Lancaster is really looking great!

WannabeFarmboy -- Break out the Beaufighter,,, can never have too many builds going!

]

  • Member since
    December 2002
  • From: Northern California
Posted by jeaton01 on Thursday, February 9, 2017 6:38 PM

WannabeFarmboy

Actually, I do have a 1/32 Beaufighter in my stash.. That's crazy though, right? I've got 2 WIPs going right now and two other GBs I've signed up for.

I think I may have an addiction...

If y'all are willing help enable my addiction though, I will try to add a third build to my GB schedule. Lol. 


Consider Yerself conscripted, Laddie!  I'll add yer name and yer poison to the roster thread for this year.  Here's the link to that thread:

http://cs.finescale.com/fsm/modeling_subjects/f/29/t/167518.aspx

John

To see build logs for my models:  http://goldeneramodel.com/mymodels/mymodels.html


  • Member since
    December 2002
  • From: Northern California
Posted by jeaton01 on Thursday, February 9, 2017 6:52 PM

dwsrazor

Looking mighty fine John!  Bow Down

I won't get to my Swordfish until March.  You might be done your Lancaster by then at the rate you are going.


Thanks, Dave.  Done by March?  I hope to take this Lanc and decimate Scweinfurt by then!  An if that irritates the Chermans they are free to start a Luftwaffe GB to oppose us!

John

To see build logs for my models:  http://goldeneramodel.com/mymodels/mymodels.html


  • Member since
    March 2007
  • From: Michigan
Posted by tonka on Friday, February 10, 2017 2:25 PM

After a vacation to sunnier climes, I started on the little RAF .

It actually fit pretty well, one coat of primer and of course still need some filler and sanding. But its getting there!

The pilot on the right will be used in here with an empty rear seat...Since I used the 2nd pilot in my RAF Spitfire Floatplane in Floats and Boats GB.


]

  • Member since
    December 2002
  • From: Northern California
Posted by jeaton01 on Friday, February 10, 2017 4:27 PM

Aye, good progress there is!  Perhaps a first solo for the chap on the right?  No rum for the like's a him!

John

To see build logs for my models:  http://goldeneramodel.com/mymodels/mymodels.html


  • Member since
    December 2002
  • From: Northern California
Posted by jeaton01 on Sunday, February 12, 2017 12:57 AM

I was not happy with the location of many of the cockpit parts so I relocated the instrument panel, pilot's control column, navigator's seat, and the two posts that support the table with the wireless and navigator stations.   I removed all of the locating moldings on the floor as they don't reflect how the real thing looks, but I had to make a new base for the navigator's seat because it needed to be raised up to match the table,  I could have left it where it was but then it would block the view of the engineer's panels.  Apparently the seat had some method of moving around so crew could get by, I have seen photos where it was even behind the pilot's seat.  I didn't do anything with the wireless operator's seat, although I may still fashion some kind of spar cover there.   Never to be seen again and all that.  The posts should reach to the ceiling but that will not be visible. 
The best luck I had in figuring out how all this stuff fit was a BBC documentary about a pilot named Jack Currie, who also wrote a book titled "Lancaster Target"  which of course I had to order, as it is said to be one of the best best memoirs of Lancaster pilots.  In any event, a lot of the BBC video was a tour of the Lancaster interior by Jack Currie himself.   Here is a link to this video on youtube:
 
 
Here's another veteran's Lancaster walk through.
 
 
It appeared to me that the control yoke was both low and too far from the pilot for comfort, so the old base was removed and a new one was made by laminating plastic card to a height that looked better to me.  The instrument panel was moved back slightly to allow for the two instruments that sit atop the panel.  Now I think I can fly this thing, if I can just slim down to 1/48 scale and find the checklist.
Here is the best photo I have showing the old locations.
 
 
And two of the present setup.


John

To see build logs for my models:  http://goldeneramodel.com/mymodels/mymodels.html


  • Member since
    June 2008
Posted by lewbud on Sunday, February 12, 2017 1:16 AM

That is some fine work there John!  Begging the Admiral's pardon, you wouldn't happen to be related to Delmo Kitslap or know where the Deluxe Reduction Gizmo is?

Buddy- Those who say there are no stupid questions have never worked in customer service.

  • Member since
    December 2002
  • From: Northern California
Posted by jeaton01 on Sunday, February 12, 2017 11:59 AM

Been look'in fer that barmy bloke more'n 70 turns o'the golden orb!

John

To see build logs for my models:  http://goldeneramodel.com/mymodels/mymodels.html


  • Member since
    July 2004
  • From: Sonora Desert
Posted by stikpusher on Sunday, February 12, 2017 12:34 PM

Delmo Kitslap??!! Now there is a name that I've not heard in a long time. I think that he was last seen with that n'er do well, Monty Graham.


F is for FIRE, That burns down the whole town!

U is for URANIUM... BOMBS!

N is for NO SURVIVORS...

       - Plankton

LSM


  • Member since
    August 2016
  • From: Eufaula, Alabama
Posted by WannabeFarmboy on Monday, February 13, 2017 12:25 AM

I've come to somewhat of a standstill on my 1/48 Tempest and V-1 (waiting for things to dry and cure). So, I decided to start on my Beaufighter this evening. There has been some serious self control going on. I wanted to start it last night, but I held out for a whole 24 hours. Anyway, not much happening with it. Just got it out of the box and started on the engines as Revell seems to want me to start there. I know that this picture is going to be impressive, but please try to contain your excitement. 

*Note* This post can be translated to pirate should it be deemed necessary. Stick out tongue

  • Member since
    December 2016
Posted by dwsrazor on Tuesday, February 14, 2017 12:16 AM

I go away for a few days and there is all kinds of action going on here.  Excellent work mates. 

  • Member since
    March 2007
  • From: Michigan
Posted by tonka on Tuesday, February 14, 2017 12:24 PM

Farmboy, excellent work on using the engines as gappers for clothes pins! Very good initiative!Big Smile

Seriously great start, all models begin with 2 pieces and some glue!!

]

JOIN OUR COMMUNITY!

Our community is FREE to join. To participate you must either login or register for an account.

SEARCH FORUMS
FREE NEWSLETTER
By signing up you may also receive reader surveys and occasional special offers. We do not sell, rent or trade our email lists. View our Privacy Policy.