SEARCH FINESCALE.COM

Enter keywords or a search phrase below:

Knights of the Sky WWI GB The End

111747 views
1882 replies
1 rating 2 rating 3 rating 4 rating 5 rating
  • Member since
    October 2004
  • From: Colorado
Posted by StephenLawson on Monday, April 14, 2008 4:06 AM

 ps1scw wrote:
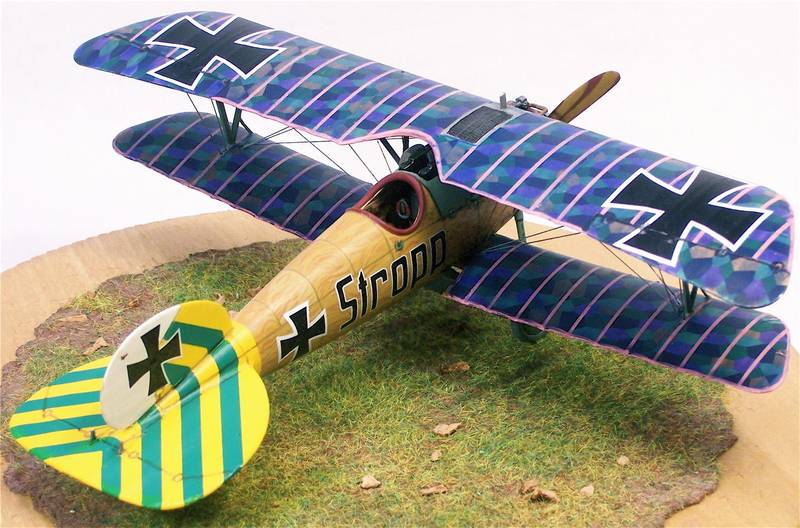
Hello, can anyone direct me to a source for 1/48 scale decals to reproduce:  Thank you 

For Stropp D.7161/17 kit decals see;

Kit Decals for #8110 has markings for: A .D.7161/17 'Stropp' of Jasta 46 **'post capture version', late 1918-1919 with lozenge wings recommend by kit instructions. The complicated tail unit markings are impressively simplified for application.

Also Scale Master Decals: Did the IPMS Spruce Goose set for D.7161/17 'Stropp' Of the 4 sets that I have only one was slightly off register. SCALE-MASTER GERMAN MARKINGS
SG-03
- Albatross Dva "Stropp" 1/48. $4.95This is a great set to have and can be found at:
http://pacificaeropress.com/

And Propagteam Decals. #48101 have some useful pieces but the Crosses are all too large for their designated placements. In general several of the personal markings are too large or are undernourished in appearance.

The FCM of Brazil sheets # 16 & 17 with 7 aircraft profiles each, were previewed in about March 2003. Look to be very interesting profile wise. It should be noted that the ‘angled layout' of the lozenge camouflage was not used on the production Albatros fighters.


Stachel...unconfirmed by Armee means unconfirmed!!!!

  • Member since
    October 2004
  • From: Colorado
Posted by StephenLawson on Thursday, April 17, 2008 11:44 PM
Here is a bit of fun for May 2008.  Look what Eduard have lined up for a release!  Though I am pretty sure Roter should only hve one "t". 

Model On!


Stachel...unconfirmed by Armee means unconfirmed!!!!

  • Member since
    September 2003
  • From: South Central Wisconsin
Posted by Daywalker on Thursday, April 17, 2008 11:55 PM
Great news Stephen!  I gotta get me a Dr.I, do you know if it's a new tooling or an old one with upgrades?

Frank 


  • Member since
    October 2004
  • From: Colorado
Posted by StephenLawson on Friday, April 18, 2008 2:15 AM

 Daywalker wrote:
Great news Stephen!  I gotta get me a Dr.I, do you know if it's a new tooling or an old one with upgrades?

The Fokker Dr.I  is a brand new tooling.


Stachel...unconfirmed by Armee means unconfirmed!!!!

  • Member since
    October 2004
  • From: Colorado
Posted by StephenLawson on Friday, April 18, 2008 2:18 AM

As with any modification the modeler can expect to make small compromises to make the whole affair fit. The Part of Poland PE is very close to being exact but the thickness of the plastic can  get exaggerated when you fine tune the kit parts to fit well with the PE.  I have a need to work on the kit radiator shell (PP 4 F).  As it is a bit wide by aboyt .040 thou.  This may be due to my work and should not be seen as a kit problem.  

Also I recommend only using the PE parts  when it comes to the engine compartment structures. If you use the additional plastic parts as well there is a great deal of time lost on modifying these items.

The placement of the engine is a bit of a compromise as  I wanted the red magneto caps to be visible as on the original but the engine is aboiut 1/8 of an inch too long.


Stachel...unconfirmed by Armee means unconfirmed!!!!

  • Member since
    October 2004
  • From: Colorado
Posted by StephenLawson on Friday, April 18, 2008 2:19 AM

Plotting the lay of the PE and getting the engine thrust line correct the unknown factor was the depth of the engine that seems to be about 1/8 an inch too large  from side to side and from top to bottom.   This is not really a problem  but the attachment of the PE sides should be dropped 1/8 of and inch as well.  In other worrds the top edge of the PE should be 1/8 an inch from the top of the kit fuselage inside face.  My original concern was the clearance at the bottom for the lower wing attachment and the reason I set the PE flush with the top edge of the kit fuselage side.


Stachel...unconfirmed by Armee means unconfirmed!!!!

  • Member since
    October 2004
  • From: Colorado
Posted by StephenLawson on Friday, April 18, 2008 2:23 AM

The first hint I had that the PE should be dropped was the PE lower faming / wire bracing harness did not clear the  lowest portion of the engine.


Stachel...unconfirmed by Armee means unconfirmed!!!!

  • Member since
    September 2003
  • From: South Central Wisconsin
Posted by Daywalker on Friday, April 18, 2008 10:53 PM

Thanks for that info, and nice work there Stephen!  The PE bracing really adds a "busy" feeling to the fuselage area.

Does anyone know where I might be able to acquire a sheet of 1/48 Eagle Strike decals 4-color upper lozenge?  Mike (ruddratt) was gracious enough last year to send me some, but I don't think I have quite enough to finish the job.  I have already used some on the inside of the cockpit, so I really need to find a sheet of theirs to match what I have already done.  Any help would be GREATLY appreciated!

Frank 


  • Member since
    September 2003
  • From: South Central Wisconsin
Posted by Daywalker on Saturday, April 19, 2008 3:41 PM

Just a little update on the DVIII.  I have finished hinging the tail pieces, and the machine guns.  The kit-supplied PE cooling jackets crumpled and tore when I tried to bend them, so I ended up using some replacements from an Eduard PE gun kit.  The barrels are brass wire, with the kit-supplied flash suppressors glued onto the ends.  The cowl piece has been fitted, and the next task is to start bending and fitting the PE struts.  When that is finished, she will be just about ready to paint!  Here she is:

Frank 


  • Member since
    February 2006
  • From: Smithers, BC, Canada
Posted by ruddratt on Saturday, April 19, 2008 8:32 PM

Looks good so far, buddy! I know what you mean about DML's (Dragon's) PE. It can be a dog to work with. I have to anneal the crap out of it to get it to cooporate. Nice job rolling the Eduard ones (they are indeed much easier to work with).

I'll check my stash and see if I have any more of that lozenge I sent you. If I do, then just tell me how much you need, my friend. Was it the 4 color or the 5 color?

Mike

 "We have our own ammunition. It's filled with paint. When we fire it, it makes pretty pictures....scares the hell outta people."


  • Member since
    February 2006
  • From: Smithers, BC, Canada
Posted by ruddratt on Saturday, April 19, 2008 8:35 PM

Stephen, simply amazing work! You are indeed the master when it comes to WWI aircraft, sir!

...and that Tri-plane looks like something I could easily add 3 or 4 of to my stash! Wink [;)]

Mike

 "We have our own ammunition. It's filled with paint. When we fire it, it makes pretty pictures....scares the hell outta people."


  • Member since
    September 2003
  • From: South Central Wisconsin
Posted by Daywalker on Saturday, April 19, 2008 8:41 PM
Thanks Mike!  Yes, that DML PE can be a PITA!  Thank you for looking to see if you have any more of that lozenge.  I feel bad that after your previous generosity, I have to find more.  I can't believe how much of that decal one needs to cover a single plane!  I figured that the amount you sent me last time would be enough for a couple planes! But, the marking option I am doing needs lozenge on the tail parts, which takes up a lot of it.  The stuff you sent me before was the 1/48 Eagle Strike 48011 (4 color top) and 48012 (4 color bottom).  If you have one row of each from the sheet, that would be plenty.  I think 1/2 of a row might do it, but not 100% certain.  Thanks for looking Mike! Big Smile [:D]

Frank 


  • Member since
    February 2006
  • From: Smithers, BC, Canada
Posted by ruddratt on Saturday, April 19, 2008 9:21 PM
Frank, don't worry about it buddy. What's a bud for, right. I have about 2/3's of a row of the top lozenge left and plenty of the bottom lozenge. You are more than welcome to it. My Fokker kits come with lozenge anyway, and my Albatros is being build sans lozenge, so I'm covered. Just pm me your snail mail addy and I'll get 'em into the mail for you on Monday.

Mike

 "We have our own ammunition. It's filled with paint. When we fire it, it makes pretty pictures....scares the hell outta people."


  • Member since
    September 2003
  • From: South Central Wisconsin
Posted by Daywalker on Saturday, April 19, 2008 9:42 PM

Mike,

YOUDAMAN!!!!!!!!!!

PM inbound! Big Smile [:D]

Frank 


  • Member since
    October 2004
  • From: Colorado
Posted by StephenLawson on Sunday, April 20, 2008 4:33 AM
Zang baby!  I am feeling the love here!  Gadzooks and hot marimba!  She's coming along well Frank!


Stachel...unconfirmed by Armee means unconfirmed!!!!

  • Member since
    September 2003
  • From: South Central Wisconsin
Posted by Daywalker on Sunday, April 20, 2008 6:13 AM

Thanks Stephen!  Feels good to be making some progress.  Right now, I am deciding whether or not to add some "meat" to the PE struts to give them more of an airfoil shape or leave them be. 

My plan is to do a factory fresh scheme as I like the idea of a dark look.  Could you verify that my planned scheme would be correct?  I am looking at an Olive green turtle deck, cowl, and main wing with lozenge on the fuselage, tail, and LG "wing".  The rudder will be white with the white line extending down over across part of the vertical tail.  Does this sound right?  Thanks! Smile [:)]

Frank 


  • Member since
    February 2006
  • From: Smithers, BC, Canada
Posted by ruddratt on Sunday, April 20, 2008 6:29 AM
PM received and replied to, my friend! Thumbs Up [tup]

Mike

 "We have our own ammunition. It's filled with paint. When we fire it, it makes pretty pictures....scares the hell outta people."


  • Member since
    October 2004
  • From: Colorado
Posted by StephenLawson on Sunday, April 20, 2008 3:44 PM

Greetings all;
I received this recently.

"Hello Stephen;  Our 78FG webmaster just sent me a tag to a trailer for the
new RED BARON film.  Go to - www.pixomondo.com.  Looks like a great film.  I
really enjoyed your article in OTF-V22-N4-W07 and the other fellows on 141AS  and 64W.  We're getting our Ducks in a row to visit Maxwell AFB AFHRA next  month.  Thanks again for your work on the OTF article - great stuff.  Later and greater; Garry Fry aka FM"

Lots of How they did it info there. Enjoy!

http://www.pixomondo.com/


Stachel...unconfirmed by Armee means unconfirmed!!!!

  • Member since
    October 2004
  • From: Colorado
Posted by StephenLawson on Sunday, April 20, 2008 4:00 PM

Greetings Frank,

 Since your into the Dark look here is a bit of fun I did years ago. You have seen my more recent effort with the new research on the top wing. 4 Colours involved there. 


Stachel...unconfirmed by Armee means unconfirmed!!!!

  • Member since
    September 2003
  • From: South Central Wisconsin
Posted by Daywalker on Sunday, April 20, 2008 5:14 PM
Well done Stephen!  I remember the aircraft and the discussion on the 4-color wing, but I don't remember the details.  COuld you refresh my memory please? Big Smile [:D]

Frank 


  • Member since
    February 2007
  • From: Lubbock, TX
Posted by MrDrummy on Sunday, April 20, 2008 7:52 PM

Hey Frank!

Nice to see that Fokker coming along.  How'd you end up hinging the tail?  It looks great!!

Those gun barrels look awesome too!!  Can't wait to see some more progress, man.

-Justin
On the Bench: 1:48 Dragon Dr. 1 1:48 Trumpeter MiG-15 Fagot B Photo Sharing and Video Hosting at Photobucket
  • Member since
    September 2003
  • From: South Central Wisconsin
Posted by Daywalker on Sunday, April 20, 2008 7:58 PM
Thanks Justin!  For the tail, I ended up drilling tiny holes and inserting pieces of wire bent to the appropriate angle.  Not 100% scale, but a detail that tiny should be overlooked by all but the most observant viewer.  Thanks for the compliments, glad you stopped by! Big Smile [:D]

Frank 


  • Member since
    October 2004
  • From: Colorado
Posted by StephenLawson on Monday, April 21, 2008 12:17 AM

 Daywalker wrote:
Well done Stephen!  I remember the aircraft and the discussion on the 4-color wing, but I don't remember the details.  COuld you refresh my memory please? Big Smile [:D]

Here is a bit of fun on the subject!

Click Here

And for a bit more here are some detailed images with the overall review.

Click Here too!


Stachel...unconfirmed by Armee means unconfirmed!!!!

  • Member since
    September 2003
  • From: South Central Wisconsin
Posted by Daywalker on Monday, April 21, 2008 3:10 PM
Ah, yes...now I remember!  Thanks Stephen.  I really like the look of the dark green streaked camo (like that commonly seen on the Dr.I).  Would that be reasonably accurate, and what is a good way to represent that look?  I have never tried anything like that, so I don't really know how to go about it.  Any help would be greatly appreciated! Big Smile [:D]

Frank 


  • Member since
    October 2004
  • From: Colorado
Posted by StephenLawson on Monday, April 21, 2008 8:35 PM

 Daywalker wrote:
Ah, yes...now I remember!  Thanks Stephen.  I really like the look of the dark green streaked camo (like that commonly seen on the Dr.I).  Would that be reasonably accurate, and what is a good way to represent that look?  I have never tried anything like that, so I don't really know how to go about it.  Any help would be greatly appreciated! Big Smile [:D]

Well it just so happens that I have written up a bit that I offered over on Aeroscale concerning the methods I use for reproducing the Fokker type streaking camouflage.  So here is a bit of fun on the subject. 

Click Here. 


Stachel...unconfirmed by Armee means unconfirmed!!!!

  • Member since
    November 2005
  • From: that state up North
Posted by More Power Scotty on Tuesday, April 22, 2008 12:04 AM

Stephen and Daywalker,

Your in-progress photos look great! Thumbs Up [tup]  I also want to thnk Stephen for the links.  Those are some really neat photos, and good information on the painting.  I have built two of the DML Dr. I kits (Kempf's markings out of the box, and Manfred von Richtofen's partial red plane from the kit that included his resin bust).  I must have come across some bad references when I built mine as the undercoat appeared to be light blue.  For the green streaks, I used olive drab paint from the Model Master acrylic line (the one before the Acryl line) that I thinned and applied using a 1/16 inch wide brush.  The information that I read stated that the Germans used a three inch brush to paint the streaks, so I scaled that to 1/48.  Of course, when those kits were being released by DML, the internet was not quite what it is today, and I used mostly books.  Oh well, we live and we learn right?


Scott
  • Member since
    October 2004
  • From: Colorado
Posted by StephenLawson on Tuesday, April 22, 2008 2:56 AM

Greetings Scotty;

No need to thank me. I enjoy helping people that appreciate it.  Take for instance your reference to the lt. blue base to the Fok. Dr.I streaking.  Years ago this was considered the normal application for the preproduction Fokker triplanes.  You know F.I 102/17 (that went to MvR) & 103/17 (that went to Voss.)  Incoherent  salvage reports and colour blind personnel and heat of the moment combat reports all contributed to the bad information that was regurged for years  from one would-be author to another.

Modern research of higher quality images (from private archives) tells us more likely that they were covered in bleached linen (almost white in appearance)  then streaked on their upper surfaces and painted light blue on their undersurfaces.  Production triplanes were covered in unbleached linen with the same process.  For so long we knew so little.  Then Came Cross & Cockade USA, Great Britain then Over the Front and then the internet.  It takes awhile to get to the real story but if you know where to look it all makes sense. 


Stachel...unconfirmed by Armee means unconfirmed!!!!

  • Member since
    September 2003
  • From: South Central Wisconsin
Posted by Daywalker on Tuesday, April 22, 2008 7:49 PM

Scott-

Thanks, much appreciated!  These lil' WWI birds are a challenge, but they sure do stretch your skills! Thumbs Up [tup]


Frank 


  • Member since
    February 2006
  • From: Smithers, BC, Canada
Posted by ruddratt on Tuesday, April 22, 2008 10:52 PM

OK guys, I just received my Roden 1/48 S.E.5a (Wolseley Viper) in the mail, and my first impression is simply WOW!!!! This is going to be a fun build. My first Roden kit and surely not my last! I was able to hunt down a nice rigging diagram as this issue did not include one (but it's needed....there's a LOT of rigging on this bird!). The markings for Billy Bishop's mount look sweet, so that's the one I'm doing.

Now, I've been doing a little research on this kit, and there seem to be issues with the decals (stubbord & brittle) on early releases with the lower price tag. Mine is seemingly a later release (per the higher price tag) and supposedly has better quality markings, so I'm keeping my fingers crossed that they respond to my stash of setting solutions.

Mike

 "We have our own ammunition. It's filled with paint. When we fire it, it makes pretty pictures....scares the hell outta people."


  • Member since
    September 2003
  • From: South Central Wisconsin
Posted by Daywalker on Tuesday, April 22, 2008 11:02 PM

I am really looking forward to seeing how this one comes along!  I thought about an SE.5 for this GB, but the rigging really scared me.  That's why I went with the DVIII- no rigging! Big Smile [:D]

Based on your previous builds, I know this one will be a stunner! Bow [bow]

Frank 


JOIN OUR COMMUNITY!

Our community is FREE to join. To participate you must either login or register for an account.

SEARCH FORUMS
FREE NEWSLETTER
By signing up you may also receive reader surveys and occasional special offers. We do not sell, rent or trade our email lists. View our Privacy Policy.