SEARCH FINESCALE.COM

Enter keywords or a search phrase below:

IT'S BACK! Secret Santa 2: Rudolph Strikes Back

67691 views
1230 replies
1 rating 2 rating 3 rating 4 rating 5 rating
  • Member since
    August 2005
  • From: Long Island, New York, USA
More Progress on SB2U-3....
Posted by fjs3 on Sunday, January 6, 2008 10:39 PM

Hey Folks,

Well, for one thing I got the wings on and the lower fuselage panel glued and sanded.  Fit is pretty good, a little wiggling , but still went OK.  It all lines up!

Next.  I wanted to build her OOB but I had a problen to deal with.  Marine SB2U's only carried one .50 cal MG in the STBD WING.  The plane was equipped to carry four but in practice, to save weight, they operated with one.  AM puts the shell eject chute under the PORT wing, not the STBD.  I had to fill and sand the wrong one and rescribe the chute and it's panels onto the correct wing.  Also, I filled the gunports for the three remaining MG's as they weren't needed.

And finally, here are some more cockpit shots.  I guess I like the way it is coming out. 

Thanks for reading this post.  I hope to get a lot more done over the next few days.


Regards,

Freddie from LI

"I'm gonna build all these models one kit at a time!

  • Member since
    December 2002
Posted by Bossman on Sunday, January 6, 2008 8:47 PM

Looking great Drew.  Nice smooth finish.

I closed up the fuselages (fuselagi ? sounds like a pastaChef [C=:-)]!) on the P-51C and the F-16B on Friday.  Saturday I decided to cut the clear canopy for the F-16 off the tree and test fit it.  The top of the rear seat contacted the inside of the canopy so that there was about a 1/4 " gap where the canopy was supposed to meet the fuselage in back - OUCH ! - That's a scale foot and a half !  This is gonna take more than a few minutes.  I was able to break the floor of the cockpit from where it was glued and push it down a little without any damage.  That got me a little more than halfway to my goal.  Time to break the rear seat off the cockpit floor (fortunately was able to do that without any damage too - Whew !)  Sanded down the underside of the seat and voila !  I can close it now, with just the tiniest bit of contact.  It'll do.

Next step - a trip to the cosmetics aisle for a new 4-way sanding stick.  Lotsa seam cleanup.

Chris

  • Member since
    May 2003
  • From: Abbotsford, B.C. Canada
Posted by DrewH on Sunday, January 6, 2008 8:12 PM

 PaPa-John wrote:
Drew -- Looking good.  Is that a piece of coat hanger that the corsair is (no pun intended) hanging on for painting.

 Yup. *he he he* That coat hanger has seen it's share of Corsairs. Wink [;)] It's a Z base soldered to a piece bent to fit in the tail wheel and the nose. I have another one for other builds. It's cheap, simple and reuseable. Usually one or two bends and it's good for the next project. I never use the Corsair one on anything else.Whistling [:-^]

Take this plastic and model it!
  • Member since
    January 2007
  • From: Regina, Saskatchewan Canada
Posted by PaPa-John on Sunday, January 6, 2008 7:05 PM
 DrewH wrote:

Nice catch John Big Smile [:D] Especially for that price. Wink [;)]

 I've been a busy big fat santa-ee this weekend. The corsair is blue. I now am back to work (no more holidays for me) so progress will slow considerably. Anyway....


Drew -- Looking good.  Is that a piece of coat hanger that the corsair is (no pun intended) hanging on for painting.

Well, I had to look at the F-14, its huge.  Takes up the whole box.  Oh, well with its size, when I get to it, going to try dry brushing on the cockpit. 

The decals for this F-14A depicts the aircraft based on the USS America.

For that price, I thought it would be cheap enough to help my stash grow without putting out a lot of bucks.  Big Smile [:D]

PaPa-John


John

On the bench: 1:72 Hobbycraft CF-105 Avro Arrow.   1:24 Revell Dodge Superbee 2n1.

  • Member since
    May 2003
  • From: Abbotsford, B.C. Canada
Posted by DrewH on Sunday, January 6, 2008 6:37 PM

Nice catch John Big Smile [:D] Especially for that price. Wink [;)]

 I've been a busy big fat santa-ee this weekend. The corsair is blue. I now am back to work (no more holidays for me) so progress will slow considerably. Anyway....


Take this plastic and model it!
  • Member since
    January 2007
  • From: Regina, Saskatchewan Canada
Posted by PaPa-John on Sunday, January 6, 2008 1:03 PM

Just got me a Revell 1/48 F-14A Tomcat for  $14.00, to throw in my little stash.

PaPa-John

John

On the bench: 1:72 Hobbycraft CF-105 Avro Arrow.   1:24 Revell Dodge Superbee 2n1.

  • Member since
    December 2003
  • From: Los Angeles
Posted by dostacos on Sunday, January 6, 2008 2:51 AM
Bossman, it will be OD, I figure I can set a couple of tanks nearby and do them with the OVERSPRAY when I hit the B 17 Smile [:)]
Dan support your 2nd amendment rights to keep and arm bears!
  • Member since
    May 2003
  • From: Abbotsford, B.C. Canada
Posted by DrewH on Saturday, January 5, 2008 12:16 PM
 PaPa-John wrote:

 DrewH wrote:
Let me know what you need help with Azgaron. I have tonnes of Corsair referances and know what you are experiencing.

DrewH

Papa-John here.  Just above your post, I put up a website.  Since I am also going to do the Corsair, I was wondering, from you experience with corsairs, if these are accurate cockpit colour schemes.

Thanks.


Sorry PaPa-John, I didn't see your post. My appoligiesBlush [:I] It's excellent!

PaPa-John, those are very, very good pics of the cockpit. It is a restored War Bird, Some of the items in the cockpit are not original, but had to be added for saftey in the air today. The colors are accurate. Cockpit green is where it is supposed to be and black is where it is supposed to be. The details in there are so close, only a few know the diffrence.

Excellent referances John!Thumbs Up [tup]Thumbs Up [tup]

Take this plastic and model it!
  • Member since
    January 2007
  • From: Regina, Saskatchewan Canada
Posted by PaPa-John on Saturday, January 5, 2008 11:03 AM

 DrewH wrote:
Let me know what you need help with Azgaron. I have tonnes of Corsair referances and know what you are experiencing.

DrewH

Papa-John here.  Just above your post, I put up a website.  Since I am also going to do the Corsair, I was wondering, from you experience with corsairs, if these are accurate cockpit colour schemes.

Thanks.


John

On the bench: 1:72 Hobbycraft CF-105 Avro Arrow.   1:24 Revell Dodge Superbee 2n1.

  • Member since
    May 2003
  • From: Abbotsford, B.C. Canada
Posted by DrewH on Saturday, January 5, 2008 10:49 AM
Let me know what you need help with Azgaron. I have tonnes of Corsair referances and know what you are experiencing.
Take this plastic and model it!
  • Member since
    January 2007
  • From: Regina, Saskatchewan Canada
Posted by PaPa-John on Saturday, January 5, 2008 10:48 AM

For anyone doing a Vought F4U-1A Corsair, here is a website with some cockpit (colour) photos, if you are interested

http://www.kiwiaircraftimages.com/corsair.html

PaPa-John 


John

On the bench: 1:72 Hobbycraft CF-105 Avro Arrow.   1:24 Revell Dodge Superbee 2n1.

  • Member since
    July 2007
  • From: Sweden
Posted by Azgaron on Saturday, January 5, 2008 1:02 AM

I agree, looks good TLP!

I'm still trying to figure which version I'll do, and been doing some research on interior colors for the Corsair. It seems it's not as easy as plain interior green as I first thought. Smile [:)]

Azgaron


jwb
  • Member since
    February 2006
  • From: Parkton, NC
Posted by jwb on Friday, January 4, 2008 6:22 PM
Looks good TLP!

Jon Bius

AgapeModels.com- Modeling with a Higher purpose

"For I know the plans I have for you," declares the Lord, "plans to prosper you and not to harm you, plans to give you hope and a future." ~ Jeremiah 29:11

  • Member since
    May 2003
  • From: Abbotsford, B.C. Canada
Posted by DrewH on Friday, January 4, 2008 10:42 AM
Looking good TLP. Thumbs Up [tup] It is progress and you have started. Well done.
Take this plastic and model it!
  • Member since
    November 2006
  • From: Castro Valley.CA
Posted by TheLastPriest on Friday, January 4, 2008 2:31 AM

Cant say I have gotten too much done on the P-61 just yet, still wrestling with my F-14. Great test of my skills to tackle two complex kits at once. Figured I would post some of the progress I have made so far. Still a long way to go before I can consider this kit started. But its turning out ok. Tough to drybrush these old revell kits, even the raised detail isnt all that raised, end up getting paint all around the details as well. Luckily I really am only detailing this much for my own amusement because a lot of it wont be visable once closed anyway. I will take some better pictures tomorrow when the allure of a nice warm bed next to that pretty lady I call a wife isnt so strong.


It is only the intellect that keeps me sane; perhaps this makes me overvalue intellect against feeling

  • Member since
    March 2006
  • From: Boyertown, PA, USA
Posted by Dubau on Thursday, January 3, 2008 3:13 PM

Well at lest I can say I have started.....................

Hay, getting my desk cleaned off and ready was a lot of work....Whistling [:-^] A years worth of dust and junk was on it.

Have a GREAT Day

Bud

" You've experienced a set back, and without set backs and learning how to fix them you'll never make the leap from kit builder to modeler "
  • Member since
    December 2003
  • From: Los Angeles
Posted by dostacos on Thursday, January 3, 2008 12:59 AM
 espins1 wrote:

Nice to see that some of you are off to a running start!  Smile [:)]

I ah...don't run anywhere Smile [:)] I was sitting in front of the idiot box and decided to crack the box and got my BIGGEST brush and started flowing the paint {probably could have saved alot of paint if I had used an airbrush but it has been so windy that I could not even get outside to do a rattle can prime on other stuffGrumpy [|(]


Dan support your 2nd amendment rights to keep and arm bears!
  • Member since
    July 2007
  • From: Sweden
Posted by Azgaron on Thursday, January 3, 2008 12:28 AM

Nice progress pics Chris! Nice scratchbuilding on the F-16 seats!

Azgaron


  • Member since
    December 2002
Posted by Bossman on Wednesday, January 2, 2008 5:38 PM

Dos - I can sympathize with your Zinc Chromate consumption.  I went through a ton of olive drab on a 1/48 B-24 a few years back.  All I can say is - wait till you get to the wings.  A B-17 has a huge wing area.  Is it gonna be OD - or natural metal finish ?

Freddie - nice work on that very busy interior.

Here's some more progress on my pits...

I finished the interior of the Mustang, but when dry fitting I noticed some interference - so I had to file down some of equipment behind the pilot's seat and the sidewalls of the cockpit interior.  I don't know if I'll bother repainting the filed spots.  They don't show when she's closed up.  I heard somewhere that the mustang's wood floors were sometimes painted black.  So with this one I was trying for the worn, painted wood surface look.

The cockpit of the F-16 looked like it could use some added detail.  I tried some pretty easy scratchbuilding.  I scribed some texture in the seats with an exacto blade to look like the ribbed cushions that I saw in a photo of the F-16's seat, added some compressed gas cylinders to the port side of each seat.  (Just medium width stretched sprue, cut to length, sanded the ends round, and painted green), and  made seat belts out of foil, then painted them.  I'm pretty psyched about the way it turned out.  The cockpit looks more busy now.  I'll probably add the same kind of seatbelts to the mustang soon.

I'll probably slow down for a while now.  Other life stuff has been piling up while I've been enjoying a good part of my vacay time working on these kits.  Thanks again to Zip - If you haven't figured it out yet - These kits have been a blast.

Chris

  • Member since
    March 2007
  • From: Carmel, CA
Posted by bondoman on Wednesday, January 2, 2008 11:21 AM

Excellent work, and hats off to you and yours Freddie for protecting us. As a parent I'm very respectful of how this is a WHOLE family commitment. Thanks again.

I'm planning to get a few other GBs finished before I build the F-84, so I'll enjoy watching you guys, and gal, for awhile. Nice USN subjects too!

  • Member since
    December 2002
  • From: Reno, NV
IT'S BACK! Secret Santa 2: Rudolph Strikes Back
Posted by espins1 on Wednesday, January 2, 2008 10:25 AM

Nice to see that some of you are off to a running start!  Smile [:)]

Scott Espin - IPMS Reno High Rollers  Geeked My Reviews 

  • Member since
    August 2005
  • From: Long Island, New York, USA
Posted by fjs3 on Wednesday, January 2, 2008 8:10 AM

Hey Dos

I painted my turrets light gray.  Both the ball and the chin turret that is.  My uncle who was a pilot in the 349th BS, 100th BG said that he thought they were painted, even though the aircraft he flew was NMF.  The interior of the top turret, at least the part you can see, was Int Green. 

I know that Verlinden makes a set to detail the model that has frames in it and I toyed with using it.  I didn't.  The cheek windows are a bit rough with the fit.  They might be a good fit to use there.  I have heard good and bad points regarding fit with the verlinden stuff, but don't take my word for that as I haven't used any of it.  Others may know more. 

I have a 1:48 B-17G sitting here unfinished, as i have lost the drive to finish it.  It's about 75% done and full of dust.  There is a lot of seam work to touch up and that is a real PIA!  Post pics of your build here and maybe it'll get me moving on mine!  LOL!

It's a great model though, even if a bit challenging.

Regards,

Freddie from LI   

"I'm gonna build all these models one kit at a time!

  • Member since
    December 2003
  • From: Los Angeles
Posted by dostacos on Wednesday, January 2, 2008 1:30 AM

ok I have a question or 3. I opened my Secret Santa B17 kit tonight and used 4 gallons of the zinc chromate on the interior Smile,Wink, & Grin [swg] but as I look at the various glass areas {some are no problem} I really don't want to screw them up. I know from watching various movies that the lower ball turret has a metal hatch and actually looks more metal than glass, but the upper ball, and the nose need to be painted. Has anyone used photo etched frames for this plane, and if so, how did you like them?

there is a nice hook above my desk from a hanging lamp that the previous owners had and I do believe THAT will be the location of this beast.

have I said this thing is HUGE? I just finished a 1/35 German bike/sidecar and a 1/48 jeep so my concept is just a tad off right nowCool [8D]

Dan support your 2nd amendment rights to keep and arm bears!
  • Member since
    July 2007
  • From: Sweden
Posted by Azgaron on Wednesday, January 2, 2008 12:42 AM

Nice work Freddie! And fast too it seems!

Woke up two hours ago so I still have a full day to go before it's time for bed Smile [:)] Hopefully I get something done too! Smile [:)]

Azgaron


  • Member since
    August 2005
  • From: Long Island, New York, USA
Here's a few more
Posted by fjs3 on Wednesday, January 2, 2008 12:25 AM

Hey Again to all,

 I got to get more work done and I closed up the fuselage, attached the tail planes, engine and did some cleaning up on the landing gear, prop, wings and canopy.  Pretty productive night if I do say so myself.  Here are some of the pictures, they are pretty much self explanitory so I won't go into any long diatribe.

As always, comments welcome.  Have a great night

Regards,

Freddie from LI

"I'm gonna build all these models one kit at a time!

  • Member since
    July 2007
  • From: Sweden
Posted by Azgaron on Wednesday, January 2, 2008 12:22 AM

Nice work Pink! Real nice start so keep it up!

Freddie, that pit sure looks nice!

Looking forward to seeing progress pics! That goes for you two and everyone else here! Smile [:)]

Azgaron


  • Member since
    August 2005
  • From: Long Island, New York, USA
Posted by fjs3 on Tuesday, January 1, 2008 4:39 PM

Hey Folks

First of all, a Happy New Year to everyone here.  I hope everyone had a lot of fun, not TOO much fun but maybe enough fun to last until next year when it'll be time to do it allover again!

Since everyone has been showing off "mugg" shots, I might as well join in.  This is myself with a gift my son sent me from Afghanistan, where he is serving in the USAF.  It is a flag, flown over his base for nine hours and eleven minutes, honoring the victims of the Sept 11th attacks, and the reason he is there right now.  He will coming home from the warzone in seventeen days and we are all very happy anticipating his return.


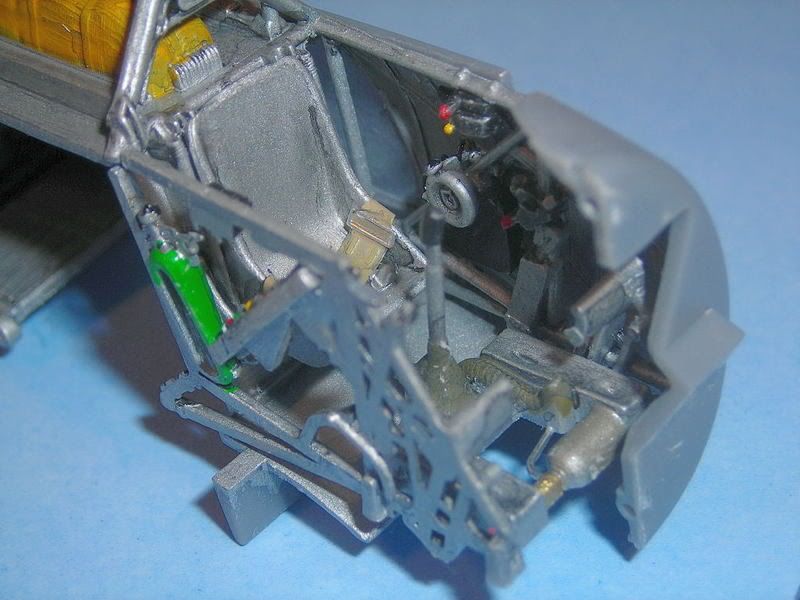
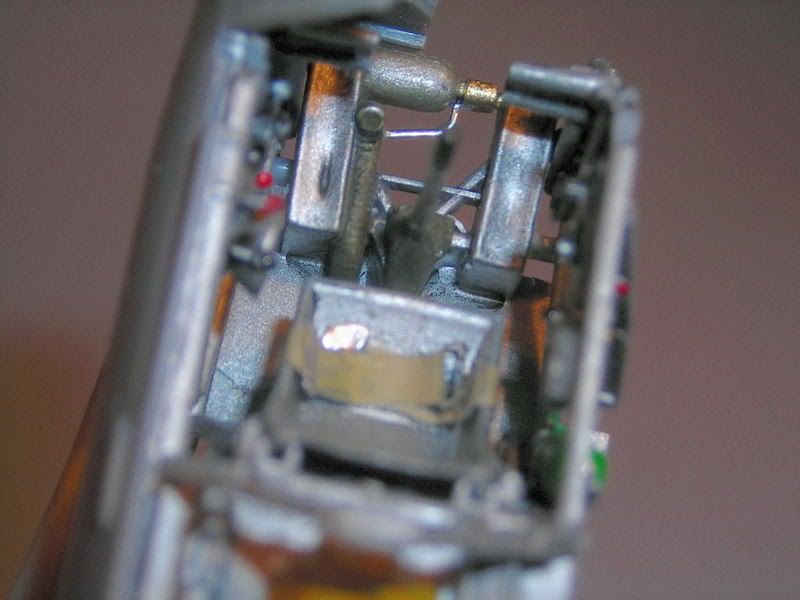
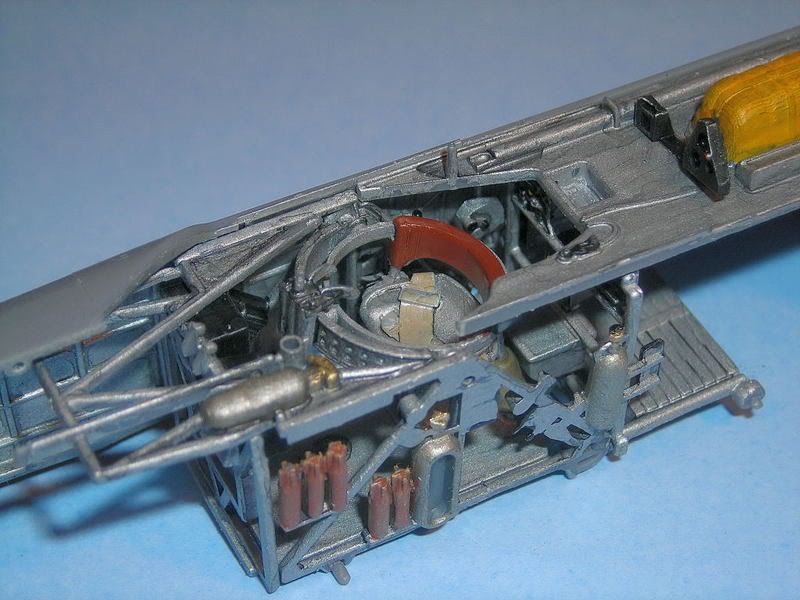
I got busy on the S/S gift I received from Circuitrider.  It's the AM 1:48 SB2U-3 "Vindicator", and because of Dave, I'll get a second crack at this challenging model.  The first one went down in pieces.  While it probably is fixable, I kind of lost heart with it and never got back to it.  Maybe now I'll get my head out of my butt and finish her up too. 

First, the cockpit shots.  It sure is a busy place there in that little 1:48 scale office.  Lots of painting and drybrushing, re painting and re drybrushing again.  Looks great sitting in one side of the fuselage.....untill you try to join the other side.  Woah baby am I glad I have a lot of clamps.  This kit isn't a shake and bake by any means.  As I write this, the fuselage is drying right now.  Here are some early pics before the fuselage join up. 

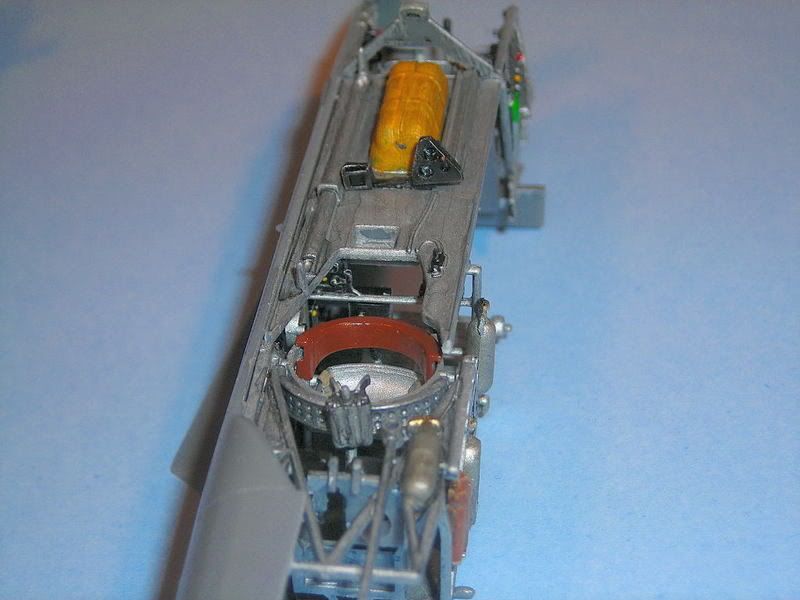
I hope these come out well, maybe more later when the glue is dry.  So far though, even if the fit isn't absolute, it goes toghter nicely and looks pretty good,....once all the clothes pins are out of the way!  Ha hahahaha

As always, comments welcome


Have a Happy New Year and God Bless you all

Freddie 


"I'm gonna build all these models one kit at a time!

  • Member since
    March 2006
  • From: Boyertown, PA, USA
Posted by Dubau on Tuesday, January 1, 2008 12:11 PM

Hay Pink HOPE you know I was ONLY Teazzzzzzing you about the digital camera. hehehehe

Ed's worse then you Whistling [:-^]

Bud

" You've experienced a set back, and without set backs and learning how to fix them you'll never make the leap from kit builder to modeler "
  • Member since
    November 2004
  • From: Columbia Gorge
Posted by brain44 on Tuesday, January 1, 2008 11:31 AM
 PinkChevelle wrote:
Ok, here is my very first attempt at dry brushing, on my very first attempt at a plane.
Be gentle boys!  
 
We are still getting used to our new digital camera, so the pictures are not very good quality. So it would be best if you didnt click them for a close up! 


Pink, you are gonna be givin' Priest a run for his money with quality work like that!  You are both extremely talented, so little Aidan outta be really outstanding when he starts building in six months or so Smile,Wink, & Grin [swg] !  Seriously, that is darned fine work on the 'pit, beats my first attempt by a mile!  Happy New Year and thanks for sharing!

Brian  Cowboy [C):-)]

"I won't be wronged, I won't be insulted, and I won't be laid a hand on. I don't do these things to other people and I expect the same from them." John Bernard Books (The Shootist)
  • Member since
    November 2006
  • From: Castro Valley.CA
Posted by TheLastPriest on Tuesday, January 1, 2008 11:02 AM
I am up, I am up.  She did an excellent job on the dry brushing, Only thing I did was give her the run down on how to do it. She picked colors and controlled all the brushes, I think it has turned out was cleaner than any drybrushing I have put out there. A good wife, mother and drybrusher hmmmm I dont think I can keep up.

It is only the intellect that keeps me sane; perhaps this makes me overvalue intellect against feeling

JOIN OUR COMMUNITY!

Our community is FREE to join. To participate you must either login or register for an account.

SEARCH FORUMS
FREE NEWSLETTER
By signing up you may also receive reader surveys and occasional special offers. We do not sell, rent or trade our email lists. View our Privacy Policy.