SEARCH FINESCALE.COM

Enter keywords or a search phrase below:

Mud Movers GB - July 1st - Dec 31st 2008

41775 views
507 replies
1 rating 2 rating 3 rating 4 rating 5 rating
  • Member since
    February 2004
  • From: Second City
Posted by arki30 on Sunday, October 26, 2008 8:31 PM

Next aircraft profile is the epitome of the ground attack role, the Fairchild A-10 Thunderbolt.  When I was a young pup I lived near Grissom Air Force base, so these were frequent in the skies around my home.  Because of that, the A-10 will always be at the top of my favorite aircraft list.

Length: 53'-6"

Height: 14'-8"

Wingspan: 57'-8"

Weight: 50,000 lbs maximum takeoff

Powerplant: (2) GE TF34-GE-100 turbofans @ 9,065 lbs thrust each

Speed: 380 knots

Range: 540 nm combat radius

Armament:

(1) GAU-8/A 30mm cannon w/1350 rounds

Up to 16,000 lbs of various ordnance on 11 external stores

Nickname: Warthog


Given that I started this GB primarily because a forum member *cough* firesmacker *cough* was disappointed the A-10 GB had died, and the fact that the A-10 is the poster child for this GB (see the badge!), I will be sorely disappointed if one of the 4 different GB members signed up with an A-10 doesn't complete an A-10 by the end date. Angry [:(!]

Paul has progress on an A-10, but he's also building 3 others for this GB, so one of others had better step up! Evil [}:)]Big Smile [:D]

Building Now:

1/48 Academy Bf-109G6 - 100%

1/48 Tamiya F4U-1A - 5%

Upcoming:

1/48 Revell F-14D

  • Member since
    February 2004
  • From: Second City
Posted by arki30 on Friday, October 24, 2008 10:30 PM

Managed to paint all the ordnance, and shoot Reefer White on the landing gear, wheel bays, and the interior of the exhausts to begin creating the ceramic look.  

Still plugging away.

Building Now:

1/48 Academy Bf-109G6 - 100%

1/48 Tamiya F4U-1A - 5%

Upcoming:

1/48 Revell F-14D

  • Member since
    February 2004
  • From: Second City
Posted by arki30 on Monday, October 20, 2008 4:30 PM
Yikes.  That's the other reason I don't buy 1/32! Mischief [:-,]

Building Now:

1/48 Academy Bf-109G6 - 100%

1/48 Tamiya F4U-1A - 5%

Upcoming:

1/48 Revell F-14D

  • Member since
    June 2008
Posted by lewbud on Monday, October 20, 2008 2:40 PM

 arki30 wrote:
Ack, this thing is large enough at 1/48th.  I can't imagine what the heck I would do with 1/32, besides go broke. Wink [;)]

I'd run out of display space, which is why mine is still in the box!  Here's a pic showing the size difference.

http://public.fotki.com/lewbud/miscellaneous/


Buddy- Those who say there are no stupid questions have never worked in customer service.

  • Member since
    February 2004
  • From: Second City
Posted by arki30 on Monday, October 20, 2008 1:14 PM
Ack, this thing is large enough at 1/48th.  I can't imagine what the heck I would do with 1/32, besides go broke. Wink [;)]

Building Now:

1/48 Academy Bf-109G6 - 100%

1/48 Tamiya F4U-1A - 5%

Upcoming:

1/48 Revell F-14D

  • Member since
    November 2006
  • From: Coastal Maine
Posted by dupes on Monday, October 20, 2008 9:32 AM
Looking good, Arki. Man, there was an awfully sweet (and HUGE) 1/32 F-15E this weekend at Granitecon in NH - haven't had a chance to look at all my pics yet, but if I got a good one of it I'll throw it down at some point. Thumbs Up [tup]
  • Member since
    February 2004
  • From: Second City
Posted by arki30 on Sunday, October 19, 2008 7:38 PM

Hallelujah!  Finally reached the point where I felt ready to put primer down, so I did.  The hours of seam work mostly paid off, still have a few spots to go back and touch up. 

While I tidy up the rough areas, next are the exhausts with the 6,000 actuators.  Yuck [yuck]  This will be fun.  

It's progress, albeit slow as molasses. 

Anyone still working, besides me and Paul?

Building Now:

1/48 Academy Bf-109G6 - 100%

1/48 Tamiya F4U-1A - 5%

Upcoming:

1/48 Revell F-14D

  • Member since
    February 2004
  • From: Second City
Posted by arki30 on Tuesday, October 14, 2008 7:44 PM

Hey, you have putty and Mr. Surfacer 500 in the same places I do!  Whew!  I feel better about that now.  I was beginning to wonder just how bad I had screwed mine up.  But it looks like the kit has some typical fit issues. 

Thanks for the progress update. Thumbs Up [tup]

Building Now:

1/48 Academy Bf-109G6 - 100%

1/48 Tamiya F4U-1A - 5%

Upcoming:

1/48 Revell F-14D

  • Member since
    October 2007
  • From: Bothell, WA
Posted by btp2k2 on Tuesday, October 14, 2008 12:07 AM

Been awhile since my last post....my wife is getting ready for some surgery tomorrow, and a couple sister in laws are coming to visit and help out....so I had to get some work today or the week would have been a bust.


I finished getting all the seams filled, and them gave them a final coat of Surfacer 500. I also attached the bomb racks and pods.

Not pictured is the engine nozzles...finally got all the actuator rods attached and all weathered up.

All that is left to do is future dip the canopy and attach it to the frame, then mask it and get out the airbrush

The A-7 is coming along.....I am getting ready to attach the wing section to the fuselage, I am debating whether I want to fold the wings or not.

Still waiting on a replacement part from MRC for the A-10

And the A-4 is ready for paint....just need to get some time to airbrush.

Paul I Like Tomcats!
  • Member since
    May 2008
  • From: Ypsilanti, MI
Posted by MIflyer on Monday, October 13, 2008 12:46 PM
 bobbaily wrote:

Regarding Kevin's question-while I was researching P-47's, I came upon a photo of a squad on D-Day on the runway-two bombs and a belly tank.  The pics on my work pc, so I can post it Monday, if needed.

edit-Scroll down to the bottom of this link for the P-47 pics.

http://daveg4otu.tripod.com/airfields/xch405.html

Thanks for the link, those are some very neat photos. Thumbs Up [tup]

Still thinkin' about what to do. I'm definitely not a stickler for accuracy, I just like knowing how things were done during combat flight ops. Once I know the answer, I may use it or ignore it... A lot of my modeling decisions are based on the "does it look cool?" test. I'd drive the armor guys nuts. Big Smile [:D]

Hmm... tank on, looks cool. Tank off, less work. Decisions, decisions....

Kevin

Kevin Johnson    Ypsilanti, Michigan USA

On the bench: 1/72 Fujimi Ki-36 J-BAAR

  • Member since
    November 2003
  • From: Nashville, TN area
Posted by bobbaily on Saturday, October 11, 2008 8:43 AM

Regarding Kevin's question-while I was researching P-47's, I came upon a photo of a squad on D-Day on the runway-two bombs and a belly tank.  The pics on my work pc, so I can post it Monday, if needed.

edit-Scroll down to the bottom of this link for the P-47 pics.

http://daveg4otu.tripod.com/airfields/xch405.html


Bob


  • Member since
    February 2004
  • From: Second City
Posted by arki30 on Saturday, October 11, 2008 8:42 AM

Perhaps a little below the belt... Wink [;)]

Pics of the F-15E, yep.  Once I get it primed I'll post some pics.

Of the F/A-18F?  Hmm, that one isn't for a GB, so I wasn't planning on taking any pics but perhaps I could.  If it turns out well I will certainly throw final pics up in the aircraft forum.

Building Now:

1/48 Academy Bf-109G6 - 100%

1/48 Tamiya F4U-1A - 5%

Upcoming:

1/48 Revell F-14D

  • Member since
    November 2006
  • From: Coastal Maine
Posted by dupes on Saturday, October 11, 2008 7:44 AM

Ooooh, an Armor forum jab...bravo. Laugh [(-D]

Pics of either of your birds coming soon? 

  • Member since
    February 2004
  • From: Second City
Posted by arki30 on Friday, October 10, 2008 4:34 PM

Kevin, I haven't had a chance to do any research on your question.  I don't know the answer off the top of my head, and it's a valid point.

Frankly, though, I'm not sure I'd worry about it too much.  This isn't the armor forum Big Smile [:D] so I don't believe any of us will take issue with whatever direction you take with the fuel tank.  Perhaps they were ranging up and down the front and needed the extra fuel until opportunity arose.

On my end, still filling and sanding although the end is in sight.  I hope to have the CFT's and ordnance pylons on within the next couple of days which would allow me to start painting. 

Building Now:

1/48 Academy Bf-109G6 - 100%

1/48 Tamiya F4U-1A - 5%

Upcoming:

1/48 Revell F-14D

  • Member since
    May 2008
  • From: Ypsilanti, MI
Posted by MIflyer on Wednesday, October 8, 2008 2:45 PM

 dupes wrote:
Looking good Kevin...what sort of scheme are you going with on this guy?

Glad you asked, Dupes! The decals for this build just arrived in the mail yesterday. I caught a very nice Eagle Cals set on sale at Greatmodels. The decals are thin, in perfect register, and include a full set of stencils. They came with comprehensive instructions, reference drawings, and photographs - six full-size pages in this case. I chose this set for two reasons. First, this particular aircraft and its pilot flew - and were eventually lost - in the ground-attack role. Secondly, the markings struck me as a bit unusual:


The thing that immediately grabbed me was that the squadron codes are enlarged quite a bit and moved to the nose, whereas the "nose art" is much further back on the fuselage than is common. The squadron codes are applied to both sides of the nose - the instructions include a photograph of the right side. I also liked that this aircraft is a "bubbletop" and doesn't sport the usual natural metal finish. NMF looks great when done well, but I have yet to try it and wasn't too keen to start on this build. You may also note that the canopy framing is left as bare metal, which struck me as unusual on an OD-painted plane.

Not much progress last night, I only got in about fifteen minutes. Wing parts clipped off the sprues and test-fitted. Fit looks to be quite good. I drilled out holes in the bottom of the wing for all the ordnance this bird is going to carry. It's going to get a pair of 500-pounders and bazooka tubes. The Eduard PE set I'm using has provided some bomb fins that look fantastic on the frets.

Haven't decided if this plane will carry a centerline drop tank. I know that P-47s on escort missions really needed the extra fuel, but how about planes in the close air support role in, say, Italy? I wouldn't think that they would need the extra fuel to reach the front lines and loiter there for a bit, and I also considered that ground fire could suddenly turn a drop tank into an incendiary bomb - I don't think the external tanks were self-sealing. This is leading me towards not fitting this plane with a tank. Any thoughts or info in this area, guys?

Kevin

Kevin Johnson    Ypsilanti, Michigan USA

On the bench: 1/72 Fujimi Ki-36 J-BAAR

  • Member since
    November 2006
  • From: Coastal Maine
Posted by dupes on Wednesday, October 8, 2008 7:16 AM
Looking good Kevin...what sort of scheme are you going with on this guy?
  • Member since
    February 2004
  • From: Second City
Posted by arki30 on Tuesday, October 7, 2008 7:00 PM
You are in fact on a roll.  Keep going!

Building Now:

1/48 Academy Bf-109G6 - 100%

1/48 Tamiya F4U-1A - 5%

Upcoming:

1/48 Revell F-14D

  • Member since
    May 2008
  • From: Ypsilanti, MI
Posted by MIflyer on Tuesday, October 7, 2008 12:59 PM
Wow, I seem to be on a roll with this build in the past few days. A few more odds and ends to report.

I reamed out the trailing edges of the now-separated horizontal stablilizers. The elevators are going to receive a new rounded leading edge for them to snuggle up with. Smile [:)]

This turned out to be a little more difficult than I had anticipated. I ended up using a combination of round and half-round files, along with a micro-chisel with a 1mm round tip. It took nearly an hour of very slow, gentle scraping to get this:


In the end, I'm happy with how it came out. The second piece that I worked on looks much better than the first. This doesn't show up in the photo, but in the process I managed to nick and scuff up the edges of the stabilizers pretty badly. I'm at a loss thus far as to how I'm going to fix it. For now, moving along....

I also needed to remove some molded details on the fuselage exterior that will be replaced with PE. I'm trying to get all the fuselage details nearly complete before I paint the cockpit and seal it up - I have a much easier time working with the fuse in halves. The oil cooler flaps and deflectors just forward of the exhausts had to come off. I masked off the surrounding areas to prevent damage before going to work on them, but in the end I still had to partially rescribe the panel line just forward of the area...


The other bit that needed removal was the canopy rail behind the cockpit. Eduard's PE parts for this area are delicate and look great. You can see also that I've added a few bits of plastic strip along the cockpit sides, so that the provided PE canopy side rails will have something to sit on:


The rear canopy rails were sliced off with a knife, and then the fuselage halves were taped together and the surrounding area masked off. Then I went at the remaining raised detail with a Flex-I-File, which is a wonderful tool for sanding a curved area like this. I wet sanded, and used successively finer grades of film on the Flex-I-File.


Once the raised detail was gone, I removed the tape and cleaned things up with a buffing stick:


Next on the agenda: mounting the new intercooler ducting and adding the PE oil cooler flaps. Party [party]

Kevin

Kevin Johnson    Ypsilanti, Michigan USA

On the bench: 1/72 Fujimi Ki-36 J-BAAR

  • Member since
    November 2006
  • From: Coastal Maine
Posted by dupes on Tuesday, October 7, 2008 10:20 AM

Oooh, nifty. Just added one of those to my IMS3 : Threepeat voting list. Whistling [:-^]

Kevin - I hear you about the Elixirs...I use them all the time, both on my acoustic and electrics. They may cost more (a lot more), but they last forever and sound great. Headphones [{(-_-)}]

  • Member since
    February 2004
  • From: Second City
Posted by arki30 on Monday, October 6, 2008 7:21 PM

Next profile - IL-2 Sturmovik

Length: 38'-1"

Height: 13'-9"

Wingspan: 47'-11"

Powerplant: Mikulin AM-38F liquid-cooled V12 @ 1720 hp

Weight: 13,580 lbs max takeoff

Speed: 275 mph

Range: 450 miles

Armament:

(2) 7.62 mm ShKas machine guns w/750 r/g

(2) 23mm VYA-23 cannons w/150 r/g

(1) 12.7 mm Berezin machine gun w/150 r/g in rear cockpit

Up to 1320 lbs of ordnance

Building Now:

1/48 Academy Bf-109G6 - 100%

1/48 Tamiya F4U-1A - 5%

Upcoming:

1/48 Revell F-14D

  • Member since
    May 2008
  • From: Ypsilanti, MI
Posted by MIflyer on Monday, October 6, 2008 4:06 PM
 dupes wrote:

Kevin - thanks man! If only I could have found one in 1/48...Grumpy [|(]

Nice work inside that fuselage. Ernie Balls are the best, eh? Don't know that I've ever tried those. Next restringing I'll give them a shot. Big Smile [:D]

Thanks Dupes!

"Balls are best" is actually one of their marketing slogans. They really are my favorite electric guitar strings, though. They aren't the longest-lasting strings out there, but they play very well and are inexpensive - about four dollars. Thumbs Up [tup]

For my acoustic, I shell out the big bucks and string it with Elixers. With no amplification or distortion to hide behind, its gotta sound good.

More progress to report today. I had trouble getting to sleep last night, so I hunched over the workbench for a while in my PJs - a benefit of living the single life, I guess. Big Smile [:D]

I've never posed the control surfaces on an aircraft model before, but I got inspired to try it by reading through Chuck Wojtkiewicz's truly excellent Helldiver build on the the aircraft boards.

The way the wings and fuselage are molded in this kit would've made it difficult to separate the ailerons and rudder, so I decided to start small and just try posing the elevators on this kit. I used blue painter's tape as a visual cutting guide, and started by lightly scoring the parts with a knife. Then I secured the horizontal stabilizer in a vise and went to work on it with a JLC razor saw. I scored the parts further with the very fine side of the blade, and then completed the separation with the coarser side. All told, it took about fifteen minutes - I worked slow.


The great advantage to the JLC tool in particular is the ability to mount multiple blades, with a spacer (or combination of spacers) in between. This enables very precise, perfectly parallel cuts. It was a perfect method for removing the hinges from the elevators. The third side of the cut was made using a tiny flathead screwdriver like a chisel. Clean it all up with a file, and you get this:


You'll note that the inboard hinges are slightly wider than the outboard ones. I'm not separating and posing the trim tabs - they have a little actuator that I don't think I could recreate once my cutting destroyed the molded one. Tryin' to keep at least a little simplicity here... Whistling [:-^]

Kevin 

Kevin Johnson    Ypsilanti, Michigan USA

On the bench: 1/72 Fujimi Ki-36 J-BAAR

  • Member since
    February 2004
  • From: Second City
Posted by arki30 on Sunday, October 5, 2008 3:47 PM
Nice scratchbuilding progress, Kevin.  Thumbs Up [tup]  You have 3 months still to finish, so you have some time left.

Building Now:

1/48 Academy Bf-109G6 - 100%

1/48 Tamiya F4U-1A - 5%

Upcoming:

1/48 Revell F-14D

  • Member since
    November 2006
  • From: Coastal Maine
Posted by dupes on Sunday, October 5, 2008 3:37 PM

Kevin - thanks man! If only I could have found one in 1/48...Grumpy [|(]

Nice work inside that fuselage. Ernie Balls are the best, eh? Don't know that I've ever tried those. Next restringing I'll give them a shot. Big Smile [:D]

  • Member since
    May 2008
  • From: Ypsilanti, MI
Posted by MIflyer on Sunday, October 5, 2008 12:03 AM

Great looking Frogfoot, Dupes! Sure is a mean-lookin' sucker packing all that ordnance. Awesome!


The only major addition to the interior since my last update is an O2 regulator and hose. The regulator is simply four punched styrene disks sandwiched together. The hose is an Ernie Ball guitar string - Balls are best! - annealed over a gas flame and bent to shape with pliers.


The interior is now ready for it's initial coat of paint. The remaining details are colored PE and will go on over the green base coat.

On the exterior, I've been correcting a couple of molding goofs that Academy slipped onto this kit. The most visible one is the intercooler doors on the rear fuselage. Academy molded the forward door open and the rearward door closed. This isn't a position they would've ever been in - the rearward door is fully open long before the forward door moves much.

I cut out the rearward intercooler doors, sanded the surgical scars smooth with a square-sided file, and then framed the opening with .010" styrene. That doesn't sound like much, but it took some careful work. New scratchbuilt doors are in the works.
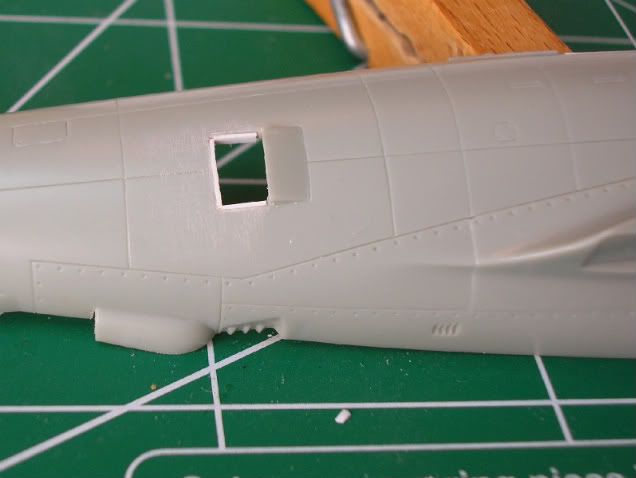


The Eduard PE set I'm using provides intercooler ducting that goes inside the fuselage. I built the ducts, not so much because they'll be highly visible - they won't - but because they provided some valuable practice at putting smooth bends in tiny PE parts. Once again, no specialized PE tools were used. In the end, the fact that you won't see much of them may be a good thing. Wink [;)]


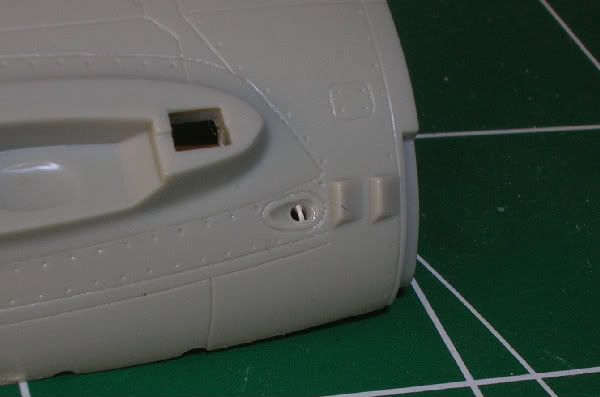
The exhaust wastegates are also molded a little goofy. I realize that such a small detail may be difficult to mold, but instead of simply molding a small depression where the wastegate should be, Academy molded a sharp-edged plug of plastic sticking out of there - as though someone had tried unsuccessfully to jam a coffee can up the exhaust pipe. Confused [%-)]

It looked cruddy, so I drilled out the exhausts with a #61 bit. Now, however, I was faced with a gaping hole on each side where the wastegates should be, and that didn't look right either. So, I scratchbuilt some wastegates.

The problem with that idea isn't that the wastegate is a difficult detail to build - it isn't. It's simply a round flapper plugging the end of the exhaust pipe. The issue is size. In 1/72 scale, that wastegate is tiny. I used the smallest punch in my Waldron set to make a pair of disks from .010" styrene, but even those disks were still a little too big for the holes. A few careful swipes with a sanding stick got a workable shape. It took a few minutes of wrangling the tiny part around under a magnifier with a pair of fine tweenzers until I was happy with the alignment. I tried to position the wastegates about halfway open, but they ended up looking almost completely open.


This kit is officially going in the books as my first-ever AMS build. I may not get it done by the GB deadline, but I'm having a lot of fun learning to scratchbuild, work with PE, and dress up an eight-dollar kit into something I can be proud of. Now if I could just teach my airbrush to obey.... Laugh [(-D]

Kevin

Kevin Johnson    Ypsilanti, Michigan USA

On the bench: 1/72 Fujimi Ki-36 J-BAAR

  • Member since
    November 2006
  • From: Coastal Maine
Posted by dupes on Friday, October 3, 2008 8:00 PM

 arki30 wrote:
I noticed your updated Personal Tally list.  While not up to your eyeballs any longer, you're still waist deep! Blindfold [X-)]Whistling [:-^]

Hehehhe...I actually think there's a few more that I haven't added to the bottom of the list yet...hooooo boy. Banged Head [banghead]

Thanks Bob! Big Smile [:D]

  • Member since
    November 2003
  • From: Nashville, TN area
Posted by bobbaily on Friday, October 3, 2008 5:49 PM

Very nice job Dupes.  Great paint work.

Well done.

Bob


  • Member since
    February 2004
  • From: Second City
Posted by arki30 on Friday, October 3, 2008 4:42 PM
I noticed your updated Personal Tally list.  While not up to your eyeballs any longer, you're still waist deep! Blindfold [X-)]Whistling [:-^]

Building Now:

1/48 Academy Bf-109G6 - 100%

1/48 Tamiya F4U-1A - 5%

Upcoming:

1/48 Revell F-14D

  • Member since
    November 2006
  • From: Coastal Maine
Posted by dupes on Friday, October 3, 2008 3:34 PM

The pleasure is all mine, Arki. Thanks to you for hosting a well-run and thought out GB. If only there weren't soooo many more calling my name...I'd crank out something else! Make a Toast [#toast]

Looking forward to continued progress on the rest of you guys' builds. Wink [;)]

  • Member since
    February 2004
  • From: Second City
Posted by arki30 on Friday, October 3, 2008 2:18 PM

Gorgeous Frogfoot dupes!  I concur on the panel lines, nicely washed for that right amount of contrast.  And the ordnance loadout is great with that loaded for bear look.  Bow [bow]

Mucho thanks for participating and contributing to this GB. Thumbs Up [tup]

Building Now:

1/48 Academy Bf-109G6 - 100%

1/48 Tamiya F4U-1A - 5%

Upcoming:

1/48 Revell F-14D

  • Member since
    November 2003
  • From: Nashville, TN area
Posted by bobbaily on Friday, October 3, 2008 1:43 PM
 btp2k2 wrote:

 lewbud wrote:
Unfortunately it's probably easier to make your money back selling 1/32 kits at 100-200 bucks a pop than 1/48 at $30-$50 and 1/72 at $20-$30. 


God.....I remember buying my first 32nd scale Tomcat for 25 bucks!

Yep...and gas was 29 cents a gallon when I started driving. AMT car models (1/25th) were less than $2.00.....  Let's don't go there....makes me feel old....ok, I am old....makes me feel older....there.....

Bob


JOIN OUR COMMUNITY!

Our community is FREE to join. To participate you must either login or register for an account.

SEARCH FORUMS
FREE NEWSLETTER
By signing up you may also receive reader surveys and occasional special offers. We do not sell, rent or trade our email lists. View our Privacy Policy.