SEARCH FINESCALE.COM

Enter keywords or a search phrase below:

251 Halftracks GB 1 October '08 - 8 June '09

129718 views
1459 replies
1 rating 2 rating 3 rating 4 rating 5 rating
  • Member since
    April 2003
  • From: 41 Degrees 52.4 minutes North; 72 Degrees 7.3 minutes West
Posted by bbrowniii on Monday, May 18, 2009 10:12 PM

SMJ

You got some really nice work going together there, man.  I love it!  I forget, is this pretty much OOB, or did you get some AM stuff to spruce it up??

'All that is necessary for the triumph of evil is for good men to do nothing' - Edmund Burke (1770 ??)


  • Member since
    October 2007
  • From: N.H.
Posted by panzerguy on Monday, May 18, 2009 10:26 PM


     I guess my paint job has left everybody speechlessWhistling [:-^]Wink [;)]

"Happiness is a belt fed weapon"

  • Member since
    June 2008
Posted by lewbud on Tuesday, May 19, 2009 12:47 AM

PanzerGuy-nice job on the paint.  Are the leaves on your scheme from a template or did you have to cut out each leaf?

Posted a few more WIP pics  http://public.fotki.com/lewbud/fine-scale-group-builds/251-group-build/   Gonna have some fun with those gaps at the rear bulkhead.Yuck [yuck]  Mocked up the hull with the top on and it gets even uglier.Grumpy [|(]  Looks like I may have to use some strip styrene to fill some of those gaps.  Will let it sit tonight and break out the putty and MEK in the morning.

Buddy- Those who say there are no stupid questions have never worked in customer service.

  • Member since
    April 2005
  • From: Piscataway, NJ!
Posted by wing_nut on Tuesday, May 19, 2009 7:36 AM

All the great work in this GB is making me considier doing something I  don't like to do... work on 2 modles at the same time.  the 38M I am working on won out over the 1/72 251 by a very sm,all margin.  Now I want ot get started on that too.Tongue [:P]


Yup Steve, I was speechless for a few minutes.Big Smile [:D]  And yeah... how did you do the leaves?


Marc  

  • Member since
    November 2006
  • From: Coastal Maine
Posted by dupes on Tuesday, May 19, 2009 9:18 AM

Steve and Steve - nice pics! Both of you appear to be well on your way to finishing before next month's deadline. Thumbs Up [tup]

Ran into a bit of a snag with the home-made tarp, wondering if any of you have some suggestions. Made the glue-and-water mix, applied it to the faux canvas, and laid it into place, pressing it into shape. This morning when I went to check on it, there was zero adhesion going on. Am I just not using enough Elmers? Or will the glue-and-water mix not serve as the official bond between tissue and styrene? 

  • Member since
    April 2007
  • From: Schroon Lake, NY
Posted by SMJmodeler on Wednesday, May 20, 2009 9:20 AM

 Thanks for the comments guys! 

espins1: That is indeed a Dark Yellow basecoat

panzerguy: Nice camo!  I just finished mine...it was my first three color free-hand effort...I have a new appreciation for how tough it is...and I now know the limitations of my "beginner" type airbrush.  Thanks for the info on the extinguisher...that was a mistake on my partBlack Eye [B)].  As far as the chains, the directions were unclear and I had no idea of their function.  Both items will have to be "chalked up" to experience...it's too late to fix them now.

bbrowniii: This is NOT OOB, I bought the PE set and I have some EZ tracks. I also want to add some stowage and stuff...

dupes: I know it's not 64 road wheelsWhistling [:-^]...feels like it when you have to keep cleaning the excess paint off the circle template though. 

  • Member since
    November 2006
  • From: Coastal Maine
Posted by dupes on Wednesday, May 20, 2009 10:24 AM

SMJ - you did end up going with the 3-color camo? Let's see a pic! Big Smile [:D]

Got a shot of the /8 - ready to go into the paint booth tonight. Think I solved the issues with the tissues - just used a much heavier glue to water ratio.
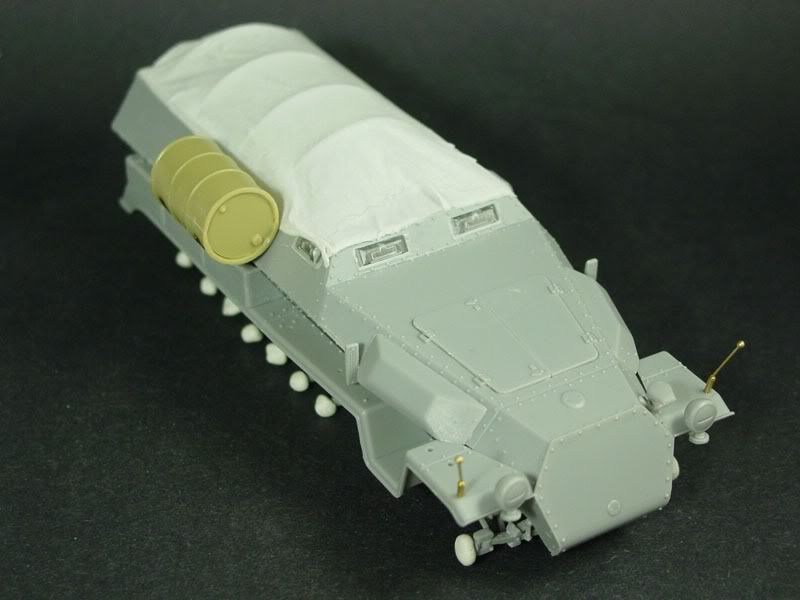
The /2 isn't that far behind - however that one has an actual interior to work on. Heh. 

  • Member since
    April 2003
  • From: 41 Degrees 52.4 minutes North; 72 Degrees 7.3 minutes West
Posted by bbrowniii on Wednesday, May 20, 2009 1:55 PM
 panzerguy wrote:


     I guess my paint job has left everybody speechlessWhistling [:-^]Wink [;)]

Yup... Wink [;)]Evil [}:)]


What I would have said, if my tongue was not rolling around on the floor was:

'Holy crap!  That is a sweet paint job...  Nice work!'

That work for ya? Tongue [:P]

'All that is necessary for the triumph of evil is for good men to do nothing' - Edmund Burke (1770 ??)


  • Member since
    April 2003
  • From: 41 Degrees 52.4 minutes North; 72 Degrees 7.3 minutes West
Posted by bbrowniii on Wednesday, May 20, 2009 1:59 PM
 dupes wrote:

Got a shot of the /8 - ready to go into the paint booth tonight. Think I solved the issues with the tissues - just used a much heavier glue to water ratio.

The /2 isn't that far behind - however that one has an actual interior to work on. Heh. 

dupes,

I am likin' the /8.  I think you nailed the tarp - did the heavier glue to water ratio provide the adhesion or did you end up using something else?

One question - the barrel on the side?  What is the story with that?  Also, how is it attached to the hull?

PS - your stowage set should be here tomorrow!


As for the /4 - the interior is done, but I am a little suspicious about the ammo bins that AFV club provides.  They look... odd somehow.  I just don't think they accurately rendered the racks that are supposed to mount to the seat boxes. 

The last thing I have to do is run a wire for some headphones for the radio.

Tomorrow, I'll tackle the running gear - I've got one run of tracks completed, so I'll do the other.  After a quick basecoat on the hull, I'll attach all the roadwheels and see how bad of a gap I have under my front wheels Banged Head [banghead]

I'd post pics, but the wife took the camera to work (gotta show off the kids, who are pretty stinkin' cute, if I do say so myself).  I'll try to have pics up tomorrow.

By tomorrow night, I may be ready to tackle that infamously warped left fender!!! Shock [:O]

PPS  Wingnut do the 251 in 1/72!!!  DO IT, MAN!!!


'All that is necessary for the triumph of evil is for good men to do nothing' - Edmund Burke (1770 ??)


  • Member since
    December 2002
  • From: Reno, NV
Posted by espins1 on Wednesday, May 20, 2009 2:14 PM
Question for our 251 experts.... was the interior of the drivers area off white or dark yellow?

Scott Espin - IPMS Reno High Rollers  Geeked My Reviews 

  • Member since
    June 2008
Posted by lewbud on Wednesday, May 20, 2009 2:37 PM
I think I may be well and truly screwed.  Primered the exterior of the lower hull, no problems.Party [party]  Went to primer the interior and the dadgum stuffed fuzzed up on me.  I have never had a primer do this to me.  I'm thinking the overspray may be the cause.  I'm going to wait 'til it's good and dry and hit it with an old toothbrush, hopefully that will knock the fuzz off.  If not, it's off to the purple lake for a swim.  If that's the case, I may not make the deadline.

Buddy- Those who say there are no stupid questions have never worked in customer service.

  • Member since
    June 2008
Posted by lewbud on Wednesday, May 20, 2009 2:42 PM

 espins1 wrote:
Question for our 251 experts.... was the interior of the drivers area off white or dark yellow?

I think the answer is yes.  I think the early war compartments were buff and the rest of the interior panzer grey.  Once they went with the dark yellow, it was all one color.  But then again, I could be wrong.

Buddy- Those who say there are no stupid questions have never worked in customer service.

  • Member since
    April 2003
  • From: 41 Degrees 52.4 minutes North; 72 Degrees 7.3 minutes West
Posted by bbrowniii on Wednesday, May 20, 2009 7:25 PM
 lewbud wrote:

 espins1 wrote:
Question for our 251 experts.... was the interior of the drivers area off white or dark yellow?

I think the answer is yes.  I think the early war compartments were buff and the rest of the interior panzer grey.  Once they went with the dark yellow, it was all one color.  But then again, I could be wrong.

Scott,

I'll echo what lewbud said - but not for the same reason.

I rely on the web for most of my research and I found some stuff on-line (and also in a post by WBill, commenting on Panzerguys 251/10 Africa Korps build up in the armor section) that indicated that the driver's compartment, forward of the L-Braces is ivory.  That is how I painted mine (well, I cheated and simply used white).  At the same time, I have seen other sites (with pics) that seem to indicate they were all yellow. 

Truth be told, I don't think you can go wrong either way.  Seems the most common approach is to go mono-color, so if you want to break from the crowd and join me out on the fringe, go two tone!! Cool [8D]Alien [alien]

'All that is necessary for the triumph of evil is for good men to do nothing' - Edmund Burke (1770 ??)


  • Member since
    August 2007
  • From: n/w indiana
Posted by some assembly required on Friday, May 22, 2009 2:09 PM


heres a couple of quick pics of my /7. i will have more soon as well as more progress!!

  • Member since
    December 2002
  • From: Reno, NV
Posted by espins1 on Friday, May 22, 2009 6:19 PM
I've seen a photo or two of and Ausf. C which appears to have a lighter colored cab interior, with the troop carrier interior portion gray like they exterior. Anyone have any good photos that show an Ausf. D interior with a view of the cab?

Scott Espin - IPMS Reno High Rollers  Geeked My Reviews 

  • Member since
    October 2007
  • From: N.H.
Posted by panzerguy on Friday, May 22, 2009 9:33 PM

  Scott here's a color interior shot of a late model that should help you out.

  Dupes the /8 is looking goodThumbs Up [tup] glad you got that tarp figured out.

 Almost done with my /22 I should have the pics up this weekend.

"Happiness is a belt fed weapon"

  • Member since
    December 2002
  • From: Bury St Edmunds, Suffolk, England
Posted by Bish on Saturday, May 23, 2009 2:09 AM

Some great work here guys.

panzerguy that paint scheme is great. I've been wanting to do an ambush scheme like that ofr ages but always been put off. How did you do the leaves. Can't wait to see the end result.

dupes like the tarp, that seems like a nice easy way to do a conversion.

I am a Norfolk man and i glory in being so


On the bench: Airfix 1/72nd Harrier GR.3/Fujimi 1/72nd Ju 87D-3

  • Member since
    April 2003
  • From: 41 Degrees 52.4 minutes North; 72 Degrees 7.3 minutes West
Posted by bbrowniii on Saturday, May 23, 2009 11:34 AM
 some assembly required wrote:


heres a couple of quick pics of my /7. i will have more soon as well as more progress!!

SAR,

Lookin' good.  That is the AFV kit, right?  I recognize a it...

By the way, I hate to be the bearer of bad news, but did you attach that front suspension with glue or just stick it in place?  If you glued it (like I did) be prepared to have your front wheels float when you put the tracks on...

'All that is necessary for the triumph of evil is for good men to do nothing' - Edmund Burke (1770 ??)


  • Member since
    April 2007
  • From: Schroon Lake, NY
Posted by SMJmodeler on Saturday, May 23, 2009 12:21 PM

Guys: Here's the three color camo' and the painted rockets!:

I'll document how I dry brush and weather this scheme. Don't expect too much now due to the time constraints of this GB but I'll take plenty of pic's and maybe even do a separate thread later. I will use this angle and show my progression of work:

I have felt kinda' like a "fish-out-of-water" up to this point because of my lack of PE and open- top armor experience...but now I'm in familiar territoryParty [party]...time to weather this bad-boy and "get 'er done!"


  • Member since
    December 2002
  • From: Reno, NV
Posted by espins1 on Saturday, May 23, 2009 1:33 PM
 panzerguy wrote:

  Scott here's a color interior shot of a late model that should help you out.

  Dupes the /8 is looking goodThumbs Up [tup] glad you got that tarp figured out.

 Almost done with my /22 I should have the pics up this weekend.


Perfect!!! Thank you!!! :D

Scott Espin - IPMS Reno High Rollers  Geeked My Reviews 

  • Member since
    December 2002
  • From: Reno, NV
Posted by espins1 on Saturday, May 23, 2009 1:35 PM
Beautiful paint job SMJ! Can't wait until I get to that stage. I'm still working on the interior, making a lot of progress. I have to stop now for a while, my lovely wife wants me to spend the weekend refinishing the front steps and back deck... sigh.

Scott Espin - IPMS Reno High Rollers  Geeked My Reviews 

  • Member since
    July 2006
  • From: San Francisco Bay Area
Posted by bufflehead on Saturday, May 23, 2009 3:07 PM

Hey everyone, just wanted to let you know I'm still here and hope to get working on the Uhu soon.  I had a medical emergency on Mother's Day that put me in the hospital for a few days and now I've been resting and recuperating at home.  Unfortunatey until a couple of days ago I just haven't been in the mood to do any modeling.  But recently I've been able to do a little work on the JS-2 for Scott's RSotR GB....as soon as that one hits the paint booth I'll start back up on the Uhu.  dupes, there's a possibility I may not finish by the end date, but I'll keep at it.  And I haven't forgotten about the 1000 Roadwheels GB!

BTW, the medications I'm on make me disoriented and make reading the forums a little difficult.  As soon as I get used them (I hope!) I'll try to go back and see what I've been missing!

Ernest

Last Armor Build - 1/35 Dragon M-26A1, 1/35 Emhar Mk.IV Female


Last Aircraft Builds - Hobby Boss 1/72 F4F Wildcat & FW-190A8


  • Member since
    November 2006
  • From: Coastal Maine
Posted by dupes on Saturday, May 23, 2009 4:21 PM

SMJ - looks sweet, man! Glad you decided to go with the 3-color scheme. Thumbs Up [tup]

Steve - can't wait for the finished product! Dinner [dinner]

Ernest - sorry to hear about your mishap...keep plugging away, my friend. Hope you get better. Approve [^]

As for me, work continues on both of the 251's on the bench. Will throw up a post of some sort after the weekend. Big Smile [:D]

  • Member since
    October 2007
  • From: N.H.
Posted by panzerguy on Sunday, May 24, 2009 2:34 PM


     Okay everybody my second ever half-track is done, well at least till it gets its base then I'll add some more weathering to the running gear.


   Oh and for those that asked how I did the leaves here's a pic of the stencils I made.


  There were some spots were I couldnt use the stencil and had to resort to a OO brush. Even though I had a completely different idea on the paint job when I started this I'm pretty happy with the way this one turned out. Ran into a couple of problems during this build, the biggest was the gun shield, but everything worked it self out.

      I'm glad that I let you talk me into this GB DupesWhistling [:-^] hope I did ya proud. Thanks my friend.   PS I'll have more pics over in Armor

"Happiness is a belt fed weapon"

  • Member since
    December 2002
  • From: Bury St Edmunds, Suffolk, England
Posted by Bish on Sunday, May 24, 2009 2:54 PM
Proud isn't the word, i love it.Thumbs Up [tup]Thumbs Up [tup]

I am a Norfolk man and i glory in being so


On the bench: Airfix 1/72nd Harrier GR.3/Fujimi 1/72nd Ju 87D-3

  • Member since
    July 2006
  • From: San Francisco Bay Area
Posted by bufflehead on Monday, May 25, 2009 3:14 PM
panzerguy, that is just beautiful!!Wow!! [wow]  Fantastic job on that halftrack!  I totally luv the ambush camo scheme!  Great, great, great build!Thumbs Up [tup]Thumbs Up [tup]  What a wicked AT gun on that 251!!

Ernest

Last Armor Build - 1/35 Dragon M-26A1, 1/35 Emhar Mk.IV Female


Last Aircraft Builds - Hobby Boss 1/72 F4F Wildcat & FW-190A8


  • Member since
    November 2006
  • From: Coastal Maine
Posted by dupes on Tuesday, May 26, 2009 8:02 AM

Did me proud??? Ho hoooo! You better believe it! Big Smile [:D]

Please tell me you're working on the base soon? Can't wait to see this thing in all of it's finished glory. Even more can't wait to see it at AMPS East and Granitecon this fall. Thumbs Up [tup]Thumbs Up [tup]

Badge will be on the way once I can find time to load up photobucket.

Awesome, man. Make a Toast [#toast]

  • Member since
    April 2007
  • From: Schroon Lake, NY
Posted by SMJmodeler on Tuesday, May 26, 2009 9:41 AM

Another fantastic build panzerguy!  That paint scheme is unique and masterfully executed!...Bow [bow] The open doors on the back was a good idea...any chance the dio'/base will have a figure entering or exiting them?  Food for thought...Burger [BG]  I really like the gear and jerry can hanging on the sides too, I saw a lot of photos like that...it sure adds a lot of realism AND they are superbly painted especially that camo' on the helmutThumbs Up [tup]Thumbs Up [tup].

I like the amount of dirt on the tracks and front wheels...I have a similar look in mind for my build...can you brief me on your technique please...Big Smile [:D]?  I planned to try wbill's technique I saw from his "Grille" build but would like to hear your method too...thanks in advance!

My only two constructive criticisms on this build are #1: the paint job on the rear machine gun looks thick..maybe it's just the photo, but you may want to re-check that and #2 The antenna appears too bulky, IMO  Was that kit supplied?...

Minor stuff Steve...She's a real looker Shy [8)]...I can't wait to see her in September!

  • Member since
    October 2007
  • From: N.H.
Posted by panzerguy on Tuesday, May 26, 2009 8:54 PM

     Thanks everybody for the kind words.

   Dupes I'm still going over in my head what the base will be for this guy but it will have one by AMPS.

    Steve you caught the one thing I'm not totally happy with, the MG. Difinatly going to do something with that. The antenna is the kit one. I usually use piano wire but this one looked pretty nice so I went with it.

   As far as the dirt on the undercarriage goes that's my own mixture of craft acrylic paint, white glue and real dirt.

  Looking forward to seeing some more builds on here soon.

"Happiness is a belt fed weapon"

  • Member since
    August 2007
  • From: n/w indiana
Posted by some assembly required on Tuesday, May 26, 2009 10:01 PM

yep boyd, i glued that front end good!Dunce [D)] i ah, reallly hope its not off. i remember reading  about that issue with this kit here. man talking about not heeding the wisdom of those that know!

JOIN OUR COMMUNITY!

Our community is FREE to join. To participate you must either login or register for an account.

SEARCH FORUMS
FREE NEWSLETTER
By signing up you may also receive reader surveys and occasional special offers. We do not sell, rent or trade our email lists. View our Privacy Policy.