SEARCH FINESCALE.COM

Enter keywords or a search phrase below:

251 Halftracks GB 1 October '08 - 8 June '09

129716 views
1459 replies
1 rating 2 rating 3 rating 4 rating 5 rating
  • Member since
    December 2002
  • From: Bury St Edmunds, Suffolk, England
Posted by Bish on Monday, October 13, 2008 2:32 PM
Not sure if this applies to the version you are building, but i did read on the perth site that the standard /1 ausf B kit is not very accurate on the interior. Mainly it says that the kit has the interior for the Ausf C which is different to the B. Is this causeing you a problem at all.

I am a Norfolk man and i glory in being so


On the bench: Airfix 1/72nd Harrier GR.3/Fujimi 1/72nd Ju 87D-3

  • Member since
    October 2007
Posted by White_R34 on Monday, October 13, 2008 2:09 PM

An for you guys here a look at the sheet from the kit. Like I said there's a lot of parts!

I must say this is a realy good kit to have and at the low sales price you can get the Tamiya version of the Ausf.C and try to scratch build it in to the Ausf.A/B versions and that would be up to any of you but I think this new kit is the best I have seen yet out of the 251 versions.

Links to both kits:[Sd.Kfz.251/3 Ausf.B Mittlerer Funkpanzerwagen]

http://www.squadron.com/ItemDetails.asp?item=ZV3604

[Sd.Kfz. 251/1/Ausf. B Mittlerer Schutzenpanzerwagen]*

http://www.squadron.com/ItemDetails.asp?item=ZV3572


Building the Impossible Is my main goal!!
  • Member since
    October 2007
Posted by White_R34 on Monday, October 13, 2008 1:46 PM
 dupes wrote:

White_R34 - very interested to hear how you like this kit, I'm leaning heavily toward the new Zvezda release of the /3 to fill that slot in my own personal lineup. Also, glad to see someone hitting a B model! Thumbs Up [tup]

What changes are you planning on making to portray the /5? I had guessed that you would start with a /7 and work from there. 

Ok the only reson I jumped for buying the /7 was the price. (My kit was on sale) I realy wanted the /7 for the radio and bars to put on an Ausf. C version, but that will have to wate. To do the /5 its going to be realy easy as this kit comes with most of the item you see on the Combat Engineers Vehicles Extra as I reed up on this version, I only see that they droped members of the crew or the crew size to have space on the interior for equipment.

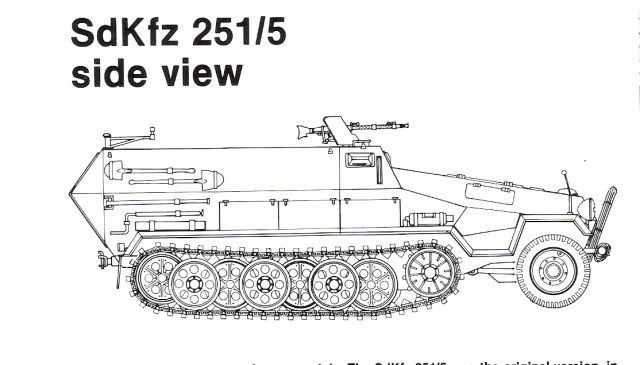
[Quote from Squadron booklets]: The Sd.Kfz. 251/5 was desinged to carry combat engineers and their equipment. It carried only eight men and room thus made available was used for special equipment. This version was later suppianted by the Sd.Kfz. 251/7

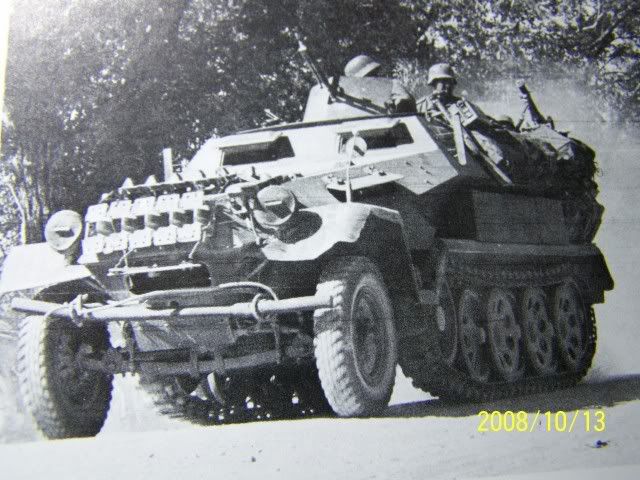
The Engineers Vehicles came in two models. the /5 was the original version, introduced in 1939. It carried less troops and the space vacated was used for carrying the various equipment used by the engineers. These Ausf. Bs of the 9th Panzer Division carry cabies, jacks and spare track links on the front plates and extra equipment under the tarpaulins in the back.

Ok if any of you like dups wants this kit at the low price I got her at go here:(PE set also in link)

http://www.squadron.com/ItemDetails.asp?item=ZV3572&Submit3=Go

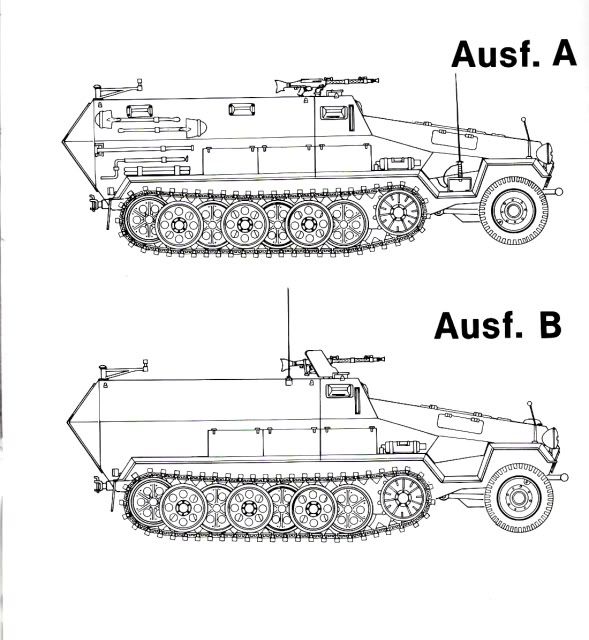
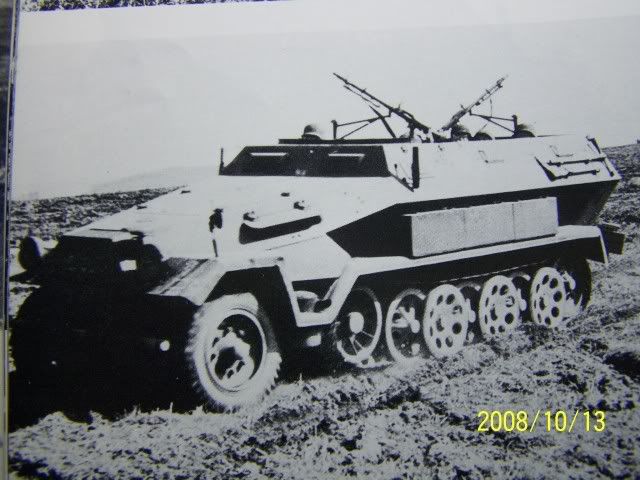
Ok some more info for you Ausf. A or B fans, you can make the A or B verison from this model. as I read up on it the A version being the first it only had two things that the B version didn't have two more side view ports. Here's some Diogram images of what the two look like.
Now I must point out that on the early version of the B types the front MG didn't have a gun sheld like the late A versions. and like the A versions the B also had extra equipment. See here:
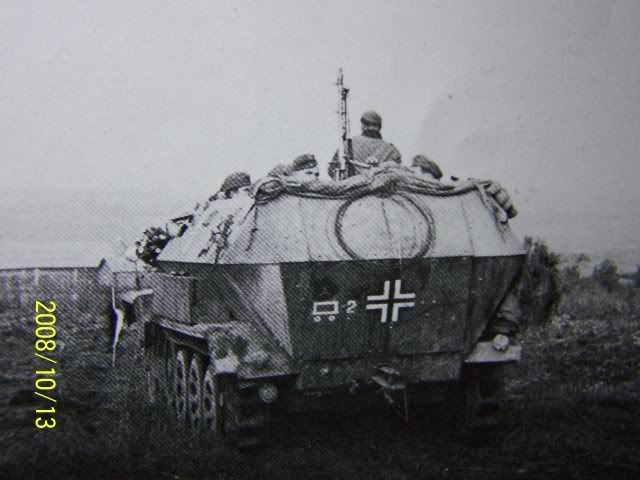
On the early B versions mini of the solders would go for the two swing arms and not the front mounted MG with the shield. They would find off off air stricks by using the dubble swing arms to defined the carrier. This was true on both the A and Bs.

Photos of the A version:
Here's some photos of the B version on the move.
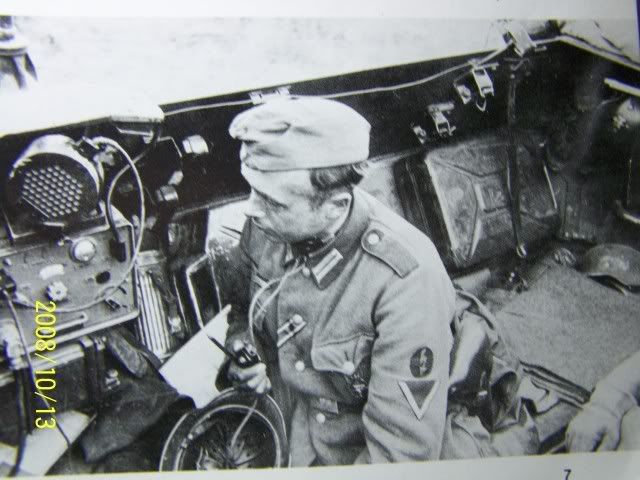
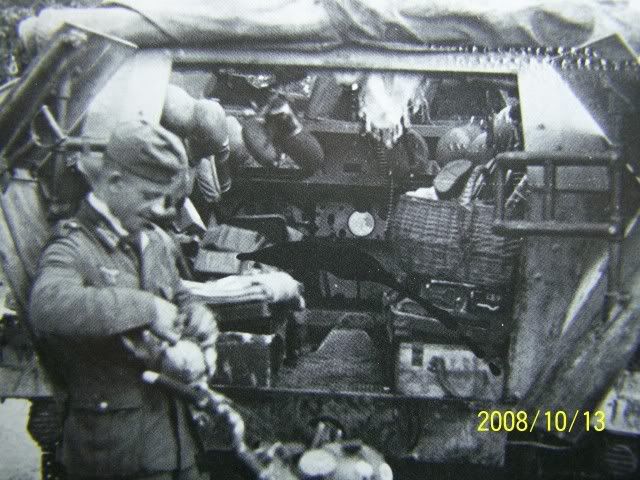
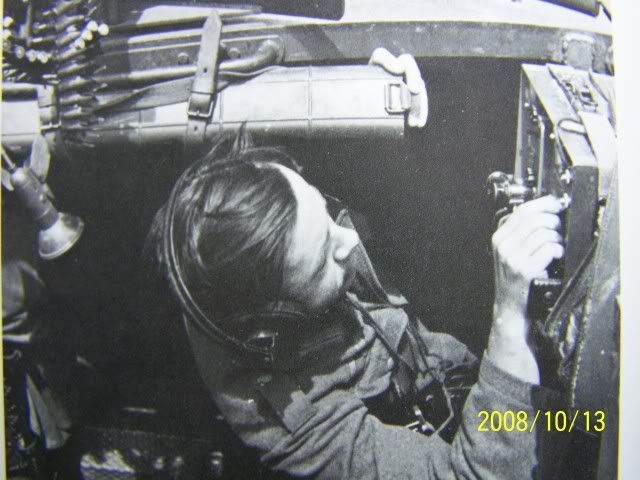
Now once I start on this build mini of you will see that the side walls of my halftrack will not have some of the wall racks. An I know some will say thay al have wall racks that I goof up but you couldn't be more rong I have photo and as you have read my upper post that some items had been removed for space. [Photos] Also the radio was on the dash of the first As and late A versions and moved to the side wall in the B versions.


Building the Impossible Is my main goal!!
  • Member since
    April 2003
  • From: 41 Degrees 52.4 minutes North; 72 Degrees 7.3 minutes West
Posted by bbrowniii on Monday, October 13, 2008 12:14 PM

Lufty

That is one sweet build you got going.  The radios are great!  I really like how you picked up the detail in them.  They really stand out!

'All that is necessary for the triumph of evil is for good men to do nothing' - Edmund Burke (1770 ??)


  • Member since
    January 2008
  • From: Bournemouth UK
Posted by Bodge on Monday, October 13, 2008 12:13 PM
I would like to join with a 251/with pak in 72 scale if poss?
  • Member since
    April 2003
  • From: 41 Degrees 52.4 minutes North; 72 Degrees 7.3 minutes West
Posted by bbrowniii on Monday, October 13, 2008 12:11 PM
 wing_nut wrote:

Finally some progress.  Whole family is sick... or was I should say... so by the end of the day was dog (butt) tired.

Some PE stuff for the driver's area and I scratched the gear shifts and the brake levers.  the instruments are printed on paper But I wanted a glass face.  I took some thin clear sheet styrene and coated it with Future.  Then I put the instruments face down into the Future and then coated the back so it was impregnated with Future.  The white parts looks gray and wet but it dry all nice and white.

And big shout out to lewbud  THANKS DUDE Big Smile [:D] for the timely warning about the front suspension.  A test fit showed he was dead on.  Setting it all in place, the locating pin is just visible in the hole that is in that raised rectacle over the suspension.  I just let it rest in place and put a few drops of Tenax in the hole and let it cure in place.  It kinda sealed the hole so it is hard to see in the pic.

Wing nut

That is some seriously nice work!

What is the deal with the suspension again?

'All that is necessary for the triumph of evil is for good men to do nothing' - Edmund Burke (1770 ??)


  • Member since
    April 2005
  • From: Piscataway, NJ!
Posted by wing_nut on Monday, October 13, 2008 7:44 AM
There was a discussion recently about tool hndles and gun stocks somewhere inthe forums.  What I got from it was the cable cutters were bakelite so they should be a red/brown and an even color... no wood grain.  This was also the case for the gun stocks excepot the were could be black or red brown bakelite.

Marc  

  • Member since
    March 2008
  • From: Cheney, WA
Posted by FastasEF on Sunday, October 12, 2008 7:40 PM

Wood brown for the gun stocks and tool handles.

I was just thinking about it and it seems like the easiest way to paint everything would be paint everything gray and then paint all the other colors afterwords. Assembling when needed.

Josh

  • Member since
    December 2002
  • From: Bury St Edmunds, Suffolk, England
Posted by Bish on Sunday, October 12, 2008 7:34 PM
On the vehicle you are building, yes, its mostly going to be grey. If you look at the pics of mine you will see its mostly yellow. I am not sure what they are saying is wood brown, but the seats for this period should be padded leather. I did the backrests on mine flat black then weathered with brown oils. On my vehicle i painted the interior top and bottom halfs seperatly and any items that weren't yellow i painted before fitting and fitted them last.

I am a Norfolk man and i glory in being so


On the bench: Airfix 1/72nd Harrier GR.3/Fujimi 1/72nd Ju 87D-3

  • Member since
    March 2008
  • From: Cheney, WA
Posted by FastasEF on Sunday, October 12, 2008 7:23 PM

Aye, that is what it seems. I have only built one armor model previously to this and it was a tiny 1/72 kit.

The only colors it shows through-out the instructions are tire black, steel and wood brown. Maybe it's just the mass of the parts that are going to be the same color.

I guess the only other thing i'll look forward to, or request some posting of is how people are going about painting with the huge opening in the back. On airplanes it's just cover the canopies, bubbles etc and start painting! But this seems tough ... maybe i'm just worrying myself.

Thanks for the info Bish!

Josh

  • Member since
    December 2002
  • From: Bury St Edmunds, Suffolk, England
Posted by Bish on Sunday, October 12, 2008 7:16 PM

Then the bulk of the interior should be the same. I believe the face of radios should be RLM 2 with mostly black features.

I have the AFV 17c gun version and its details on the colours is quite good. Seems they have slipped up on this one.

I am a Norfolk man and i glory in being so


On the bench: Airfix 1/72nd Harrier GR.3/Fujimi 1/72nd Ju 87D-3

  • Member since
    March 2008
  • From: Cheney, WA
Posted by FastasEF on Sunday, October 12, 2008 7:00 PM

I am doing the AFV Club /17 Ausf.C Command Variant Division Hermann Goering, Autumn 1942.

Exterior Color is going to be "Dark Gray" according to these crappy instructions ...

Josh

  • Member since
    December 2002
  • From: Bury St Edmunds, Suffolk, England
Posted by Bish on Sunday, October 12, 2008 6:28 PM
 Luftwoller wrote:

On re-checking the battery looking item (Prt K) im goin with it being a battery. So now everyone, I need to know what the other gizmo is. (Prt M ).

...Guy

It looks like it has some sort of filler cap on the top. This is only a guess, but is it possible its some sort of colant tank for all that extra equipment.

I am a Norfolk man and i glory in being so


On the bench: Airfix 1/72nd Harrier GR.3/Fujimi 1/72nd Ju 87D-3

  • Member since
    December 2002
  • From: Bury St Edmunds, Suffolk, England
Posted by Bish on Sunday, October 12, 2008 6:25 PM
 dupes wrote:
 Bish wrote:

Dupes, i do believe that when they switched from grey to yellow, older vehicles only had the outside re-painted but not the inside. So i think all the /17c's should be grey inside.

Bish - I believe that you're correct about older vehicles. However, unless Josh's scheme indicates that his vehicle was produced prior to the changeover date, a dk yellow exterior would be matched by a dk yellow interior. Still waiting to see which kit/scheme he's got, so I can check my own kits/refs. Thumbs Up [tup]

There were only 2 /17 command vehicles and 10 /17c gun vehicles built, and i believe they were all issued to the HG Div in France in 1942.

I am a Norfolk man and i glory in being so


On the bench: Airfix 1/72nd Harrier GR.3/Fujimi 1/72nd Ju 87D-3

  • Member since
    February 2007
  • From: Bournemouth UK
Posted by Luftwoller on Sunday, October 12, 2008 6:24 PM

On re-checking the battery looking item (Prt K) im goin with it being a battery. So now everyone, I need to know what the other gizmo is. (Prt M ).

...Guy

..'Your an embarrassment to the human genus, makes me ashamed to call myself Homo'.
  • Member since
    November 2006
  • From: Coastal Maine
Posted by dupes on Sunday, October 12, 2008 5:13 PM
 Bish wrote:

Dupes, i do believe that when they switched from grey to yellow, older vehicles only had the outside re-painted but not the inside. So i think all the /17c's should be grey inside.

Bish - I believe that you're correct about older vehicles. However, unless Josh's scheme indicates that his vehicle was produced prior to the changeover date, a dk yellow exterior would be matched by a dk yellow interior. Still waiting to see which kit/scheme he's got, so I can check my own kits/refs. Thumbs Up [tup]

  • Member since
    October 2007
  • From: Louisville, KY
Posted by pordoi on Sunday, October 12, 2008 4:16 PM

Well, I got some free time this weekend and started on the 251/18, using the Dragon /6 kit as the foundation.  Got through the first 3 or 4 steps and strangely, it looks alot like Lufty's build... Whistling [:-^]   Wink [;)]

So I thought additional pics would be redundant.  But I'll certainly post a few shots in the near future when the radios get assembled as I'm planning to do some rearrangements of the kits radios, and later when I attempt to scratch build the map table.  We'll see how that goes.

Guy, your guess is as good as mine regarding kit parts K amd M.  I'll have a look through the references that I dug up on the /18 to see if there is any mention of battery placement.  But Dupes had the better idea to appeal to others who have more general reference sources on the 251 variants since there is very little detailed info on the /18.

 Don


  • Member since
    December 2002
  • From: Bury St Edmunds, Suffolk, England
Posted by Bish on Sunday, October 12, 2008 1:06 PM
 dupes wrote:

Josh - who's boxing of the /17 Command are you going with (I seem to remember Cyber Hobby, but I could be wrong)?

Depending on what exterior scheme you're going to use will alter the interior. Generally, 251's that were painted Panzer Gray exterior had a Panzer Gray interior, and those with a Dark Yellow exterior (base color) had the DY interior. 

For individual items I'm sure someone could give you a hand...just list what you need here. Wink [;)]

Dupes, i do believe that when they switched from grey to yellow, older vehicles only had the outside re-painted but not the inside. So i think all the /17c's should be grey inside.

I am a Norfolk man and i glory in being so


On the bench: Airfix 1/72nd Harrier GR.3/Fujimi 1/72nd Ju 87D-3

  • Member since
    November 2006
  • From: Coastal Maine
Posted by dupes on Sunday, October 12, 2008 11:30 AM

 wing_nut wrote:
Good looking progress Bish.  Maybe dupes will back off lufty and me with all the speedtser commentsWhistling [:-^]Big Smile [:D]Wink [;)]

Haaahahahha....no pressure, fellas. I'm just so used to the both of you flying through your builds I figured there would be some neat WIPs to look at. Take your time! Big Smile [:D]

Lufty - your guess is as good as mine on those parts. Perhaps somebody with one of the Panzer Tracts books can ID those parts? Eight Ball [8]

  • Member since
    November 2006
  • From: Coastal Maine
Posted by dupes on Sunday, October 12, 2008 11:26 AM

Josh - who's boxing of the /17 Command are you going with (I seem to remember Cyber Hobby, but I could be wrong)?

Depending on what exterior scheme you're going to use will alter the interior. Generally, 251's that were painted Panzer Gray exterior had a Panzer Gray interior, and those with a Dark Yellow exterior (base color) had the DY interior. 

For individual items I'm sure someone could give you a hand...just list what you need here. Wink [;)]

  • Member since
    November 2006
  • From: Coastal Maine
Posted by dupes on Sunday, October 12, 2008 11:22 AM

White_R34 - very interested to hear how you like this kit, I'm leaning heavily toward the new Zvezda release of the /3 to fill that slot in my own personal lineup. Also, glad to see someone hitting a B model! Thumbs Up [tup]

What changes are you planning on making to portray the /5? I had guessed that you would start with a /7 and work from there. 

  • Member since
    February 2007
  • From: Bournemouth UK
Posted by Luftwoller on Sunday, October 12, 2008 8:49 AM

Cheers Winger, im with you. Anyhoos i have a questionette for all of ya. There are a couple of pieces on my build that i dont know what they are. I have an idea but your help would be great.

This 1st one, i was convincing myself that it was fuel tank.(Prt M) Then i noticed that it had a PE insert in one end and the end piece could be positioned open? It seems that its some sort of electrical device. God knows.

This second one im fairly convinced is a battery.(Prt K) The moldings appear to look battery like with 2 large terminals on it. Its probably the battery for all the radio equiptment.

Any ideas would be great.

...Guy

..'Your an embarrassment to the human genus, makes me ashamed to call myself Homo'.
  • Member since
    April 2005
  • From: Piscataway, NJ!
Posted by wing_nut on Sunday, October 12, 2008 7:32 AM
Good looking progress Bish.  Maybe dupes will back off lufty and me with all the speedtser commentsWhistling [:-^]Big Smile [:D]Wink [;)]

Marc  

  • Member since
    December 2002
  • From: Bury St Edmunds, Suffolk, England
Posted by Bish on Sunday, October 12, 2008 5:52 AM

Are you building the AFV kit of this. Which items in particular do you mean. The main interior i believe should be Panzer Grey, even if your doing yours as one of the comoflaged versions. The seats are leather so either black of brown will do.

I am a Norfolk man and i glory in being so


On the bench: Airfix 1/72nd Harrier GR.3/Fujimi 1/72nd Ju 87D-3

  • Member since
    March 2008
  • From: Cheney, WA
Posted by FastasEF on Saturday, October 11, 2008 11:36 PM

Alright, I have no idea what i've gotten into. Lol. So, I guess somewhere in AFV land, someone, once upon a time, decided that it would be funny to not put what colors everything is supposed to be painted. Which leaves me in a pickle because just as fast as I could glue everything together without painting it, I do not want to do that.

I am building the /17 Ausf.C if anyone wants to throw some pictures this way, specifically the interior ... Whistling [:-^]

Thanks!
Josh


  • Member since
    October 2007
Posted by White_R34 on Saturday, October 11, 2008 5:53 PM

Hello all I got my ZVEZAD kit and I must say this kit had a lot of parts much more that the Tamiya kits of the 251 type.

I like the workable track links. Now I will not have to use my othere set of hobby boss track.

Front view:

Rear view:

I see there's a full engine bay and that adds to to over all detailed look of this kit and it only cost me 17.99 down from 23 something. I will be using some PE on it but not much. I see that I have 3 ways to do here and I'll pick wich version from one of the two books I'm looking at. Book names Squadrons Signal publications: SdKfz 251 in action and Schiffers Military History books: Schutzenpanzerwagen War Horse of the Panzer Grenadiers.

I'll have new build up photos coming soon, now I'm not going to show every thing I do step by step as that take a lot of time and a lot of photos to loadup.

Building the Impossible Is my main goal!!
  • Member since
    December 2002
  • From: Bury St Edmunds, Suffolk, England
Posted by Bish on Saturday, October 11, 2008 3:18 PM

 dupes wrote:
Ho ho! Looking good, Bish. Glad there was that one large-sized pic (can't believe I'm saying that) to get a good look at the detail in the driver's station. What scheme have you decided on for this guy?

I'm going with the 3 tone sceme of the 16th Pz Div in 1945. So i am thikning of masking of with our version of silly put as i believe these late schemes are hard edged.

It was hard to get some decent views of the detail that weren't blured. Think i need a decent camera, a proper set up and maybe some good soft wear. The hull is now finished and ready for paint. The tracks are built but i don't fit them till the end. The gun just needs a touch more weathering.

Luftwoller the first two weeks i was on camp so i was able to spend all my spare time building, including a whole weekend, without any distractions. But now i am back home so not sure how mutch will get done. But i have a few days back at work before i go away to really hammer it and leave me as little as possible to do when i get home in Jan.

I am a Norfolk man and i glory in being so


On the bench: Airfix 1/72nd Harrier GR.3/Fujimi 1/72nd Ju 87D-3

  • Member since
    February 2007
  • From: Bournemouth UK
Posted by Luftwoller on Saturday, October 11, 2008 3:07 PM

Sure is looking good Bish, Dupes thought i was cracking through the build. Your almost finished. Now thats fast.

...Guy

..'Your an embarrassment to the human genus, makes me ashamed to call myself Homo'.
  • Member since
    November 2006
  • From: Coastal Maine
Posted by dupes on Saturday, October 11, 2008 2:11 PM
Ho ho! Looking good, Bish. Glad there was that one large-sized pic (can't believe I'm saying that) to get a good look at the detail in the driver's station. What scheme have you decided on for this guy?
  • Member since
    December 2002
  • From: Bury St Edmunds, Suffolk, England
Posted by Bish on Saturday, October 11, 2008 1:13 PM

Heres a few pics i ahve taken over the last couple of weeks. The quality isn't brilliant, my photography is something i need to work. Think i might get my self a new camera next year.

 The dragon kit with Eduard PE and Armoscale barrel.

The completed lower interior. The gun will be fitted once the exterior is completed.

I put the power cable for the radio going under and behind it. Just about ready to start painting the exterior.

Afraid the pics of the gun ain't very clear. I found this to be the most fiddly part to build, but with the Eduard PE sights and armo barrel, it looks very nice.

I am a Norfolk man and i glory in being so


On the bench: Airfix 1/72nd Harrier GR.3/Fujimi 1/72nd Ju 87D-3

JOIN OUR COMMUNITY!

Our community is FREE to join. To participate you must either login or register for an account.

SEARCH FORUMS
FREE NEWSLETTER
By signing up you may also receive reader surveys and occasional special offers. We do not sell, rent or trade our email lists. View our Privacy Policy.