SEARCH FINESCALE.COM

Enter keywords or a search phrase below:

251 Halftracks GB 1 October '08 - 8 June '09

129716 views
1459 replies
1 rating 2 rating 3 rating 4 rating 5 rating
  • Member since
    November 2006
  • From: Coastal Maine
Posted by dupes on Monday, October 20, 2008 8:13 AM
 FastasEF wrote:

This is what i'm shooting for when it's finished:

Haaaaaahahaha...too funny! Laugh [(-D] I'm sure you'll do just fine, Josh. If you have any questions, just throw them out there, I'm sure someone will be able to help you out. Smile [:)]

Boyd - I will most definitely be at AMPS East next year - if your couch is still available, I'm sure I'd take you up on it. Wink [;)]Thumbs Up [tup]


  • Member since
    March 2008
  • From: Cheney, WA
Posted by FastasEF on Sunday, October 19, 2008 10:24 PM

Started on this thing! Finally picked up the gray I needed and started gluing random parts together ... let's hope it looks like a 251 when i'm done!

(Managed to already break some things too, lol).

I'll have pictures when I feel they are worthy.

This is what i'm shooting for when it's finished:

Josh

  • Member since
    April 2003
  • From: 41 Degrees 52.4 minutes North; 72 Degrees 7.3 minutes West
Posted by bbrowniii on Sunday, October 19, 2008 9:06 PM
 wing_nut wrote:

THAT'S THE ONE!!!!

I've been looking for that very article for ages.  I ran across it by accidnect once (it was in my blind spot.... sorry couldn't resistDisapprove [V]) and could not remember where the heck it was.

Next Amps east you get to use some of my chipotle form my keychain stash on your burgerBig Smile [:D]

youdamanThumbs Up [tup]

Alright, so cool, dupes HAS to go to the next AMPSEast...  I'll have the couch ready for ya, Marc... bring some cheese, OK? Wink [;)]

'All that is necessary for the triumph of evil is for good men to do nothing' - Edmund Burke (1770 ??)


  • Member since
    February 2007
  • From: Bournemouth UK
Posted by Luftwoller on Friday, October 17, 2008 11:40 AM

The headphones were from a PE set i have for Tank Radio's. Unfortunately it doesnt have the radio for the 251/6 but i think the kit ones will suffice. I was on a roll tday with the build. Came to a blinding halt at the wheels. I think i need to be in the right frame of mind before attacking them LOL.

...Guy

..'Your an embarrassment to the human genus, makes me ashamed to call myself Homo'.
  • Member since
    November 2006
  • From: Coastal Maine
Posted by dupes on Friday, October 17, 2008 10:07 AM

Lufty, great technique! I'm sure a lot of people will be able to make use of that for this build. Also, SUPER PE headphones! Wow, those look good. What set are they from?

*Yes she did. Mischief [:-,]

  • Member since
    February 2007
  • From: Bournemouth UK
Posted by Luftwoller on Friday, October 17, 2008 9:42 AM

Did Keeley arrive safely too Dupes? Just wondered LOL.

Heres something else for you and anyone else whos interested. Its my 'How to' leather look seats. I like the effect and you's do too.

1st up, get your plastic seats and run a course sanding stick over the lot. Not too hard, just enough to scratch them up a little. Make them look slightly less plasticy.
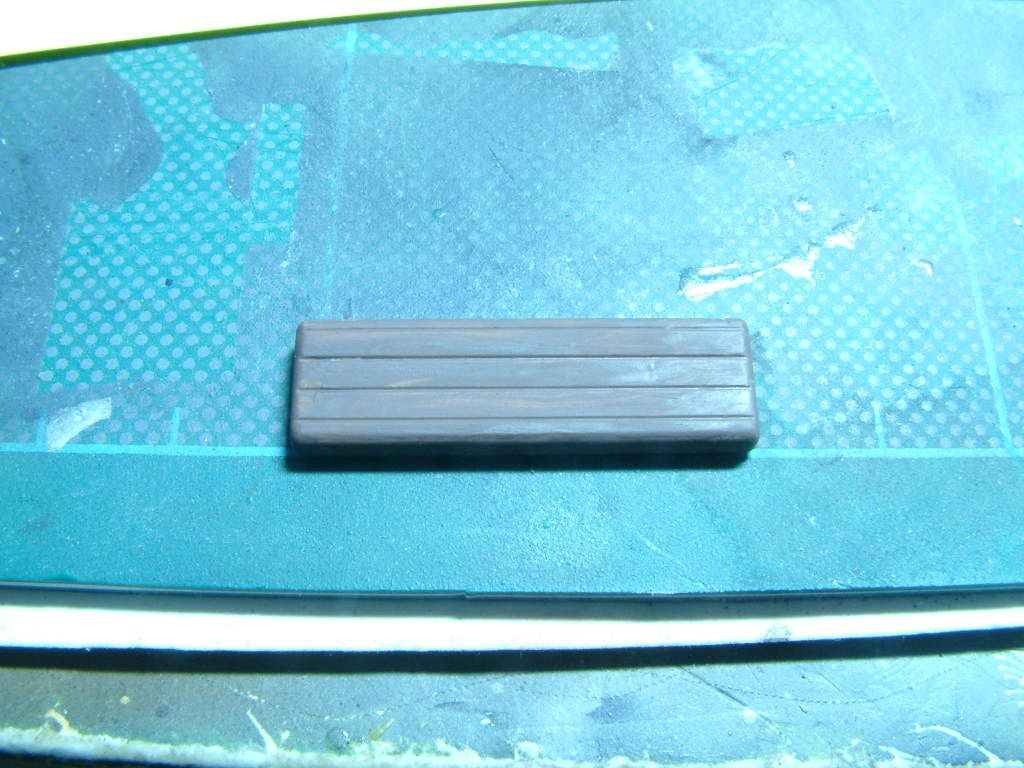
Next, I use Tamiya XF-64 Red brown and hand paint the seat to give it its base colour. I hand paint to make sure the look isnt too uniform. It doesnt matter if its thin in places as this will aid the wash later.
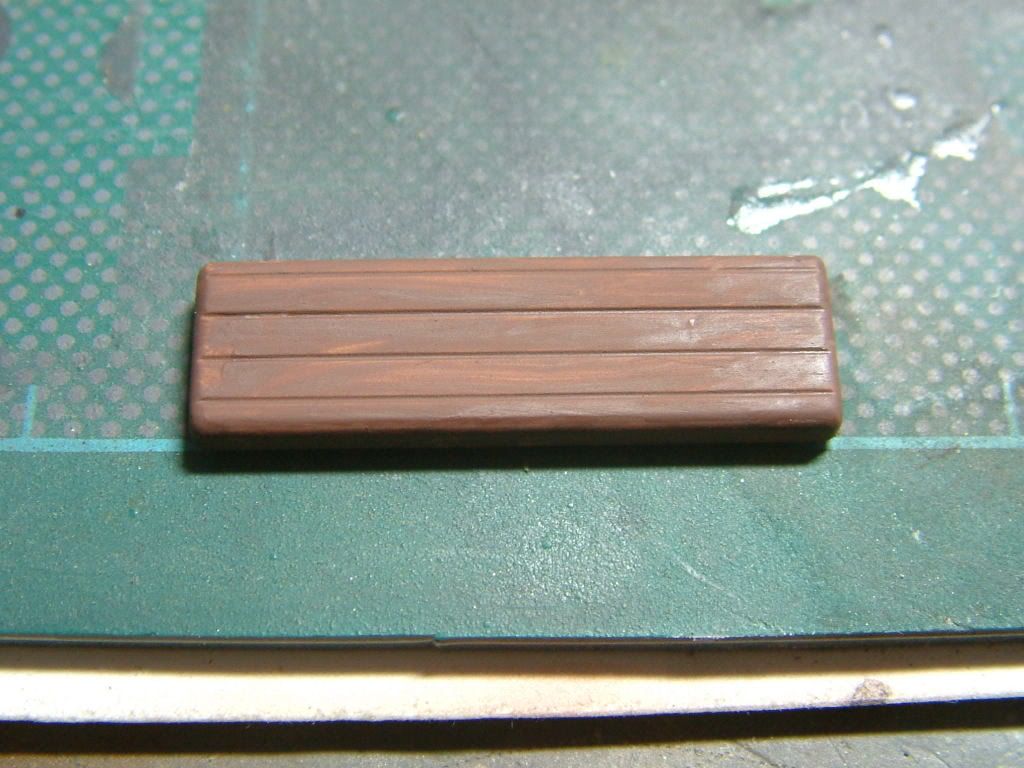
After that has dried, I then mix up some Burnt umber oil paint as a wash. About 80-20 thinner to paint. Then i dab it on liberally. Try to get it to pool up in spots. As it dries I swish it around a bit more to give some depth here and there. With the base coat thin in places the wash will look better still.
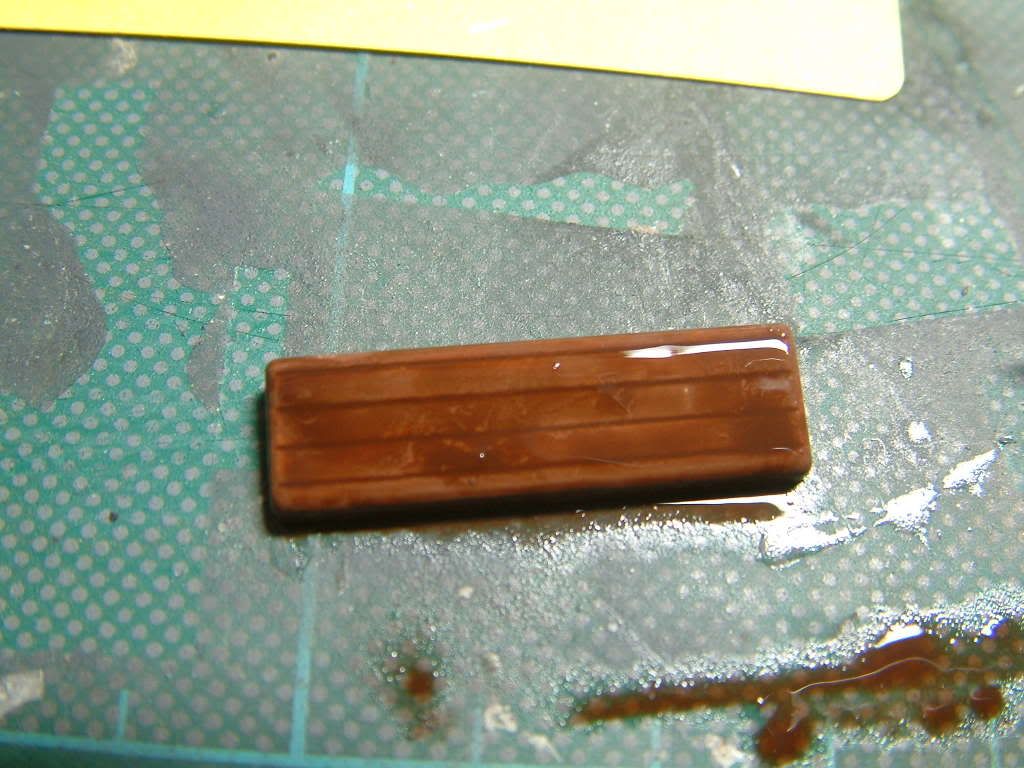
I then went downstairs and made myself an enormous breakfast and stuffed my fat face with glee (Whoever Glee is) giving the wash a good while to go off completely. About an hour later i came to the last step. A little drybrushing of the edges of the seats with some more XF-64 cut with a little XF-60 to lighten it up. Voila!
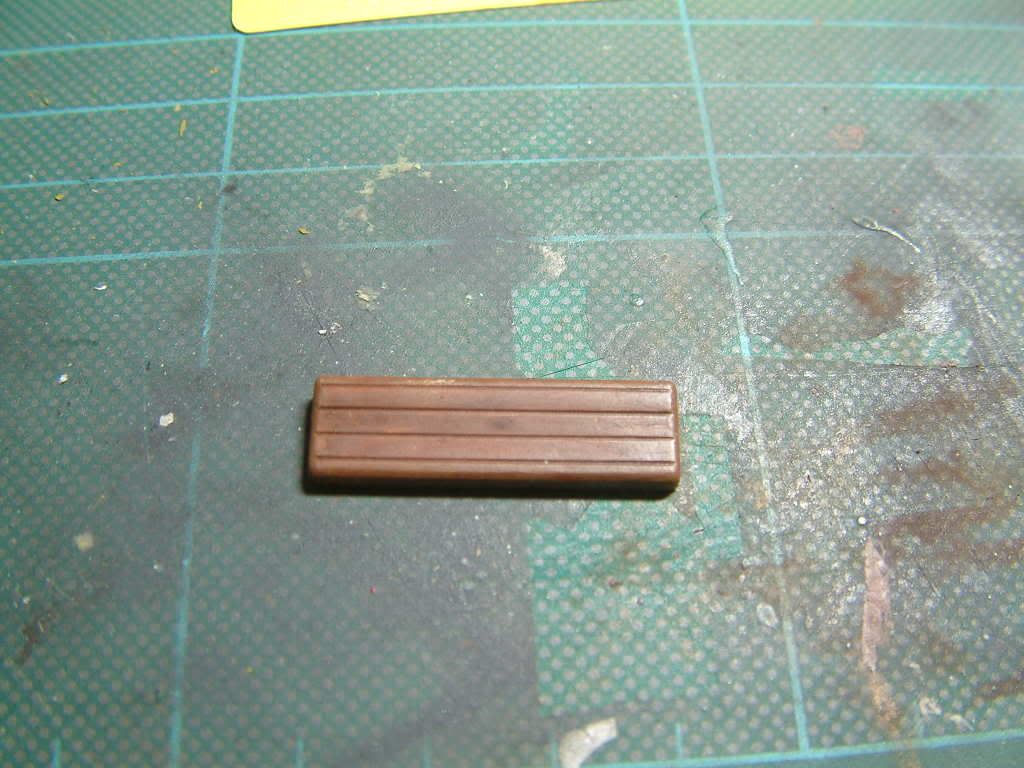
Hope that helped. While i was waiting between stages (While not stuffing my fat face) I made these fantastic PE headphones and speaker.
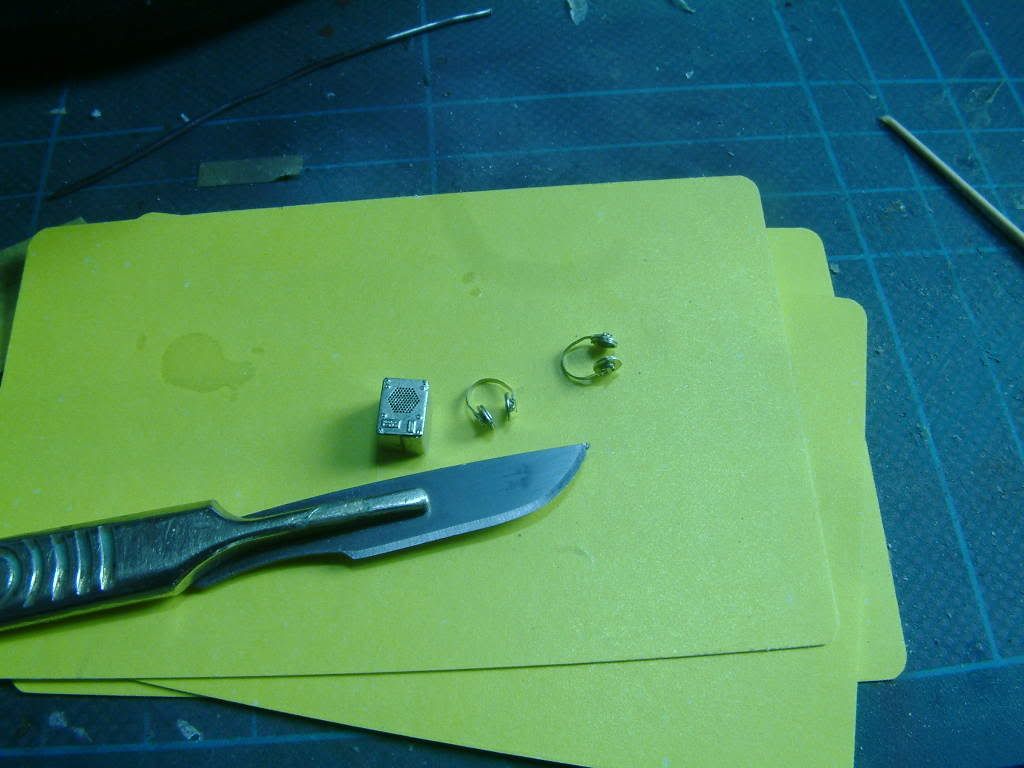
More soon kiddywinks.

...Guy


..'Your an embarrassment to the human genus, makes me ashamed to call myself Homo'.
  • Member since
    November 2006
  • From: Coastal Maine
Posted by dupes on Thursday, October 16, 2008 7:45 AM

Ahhh, excellent! I was hoping that would help. Wink [;)]

AAAAND I earned me some chipotle from the stash...what could be better? Burger [BG]

  • Member since
    April 2005
  • From: Piscataway, NJ!
Posted by wing_nut on Thursday, October 16, 2008 7:26 AM

THAT'S THE ONE!!!!

I've been looking for that very article for ages.  I ran across it by accidnect once (it was in my blind spot.... sorry couldn't resistDisapprove [V]) and could not remember where the heck it was.

Next Amps east you get to use some of my chipotle form my keychain stash on your burgerBig Smile [:D]

youdamanThumbs Up [tup]

Marc  

  • Member since
    November 2006
  • From: Coastal Maine
Posted by dupes on Thursday, October 16, 2008 6:16 AM
 wing_nut wrote:

Oh so that's how it is.  The mod has to be showered with rare gifts to become the pet of the group.  Well I won't do it I tell ya!!! 

But if it makes you really look for that article about the metal pitting.... we can talkWhistling [:-^]

Haaaahahhaha...no bribery needed. Wink [;)]

I found it - nothing terribly extensive, but it looks like it gets the job done:

http://ausfwerks.com//techniques/texture/main.html

Jeff's shop is pretty darn cool, too. Cool [8D]

  • Member since
    October 2007
  • From: Louisville, KY
Posted by pordoi on Wednesday, October 15, 2008 5:50 PM
 dupes wrote:

Once I finish digesting all of it's juicy contents, I hope I can aid all of you in your builds with it. Thumbs Up [tup]Thumbs Up [tup]


Dupes,

Photos of a real /18 are few and far between, especially interior shots showing radio configuration and mounting of the scissors scope.  If you find any in your new tome of knowledge, please pass them on.  They would be greatly appreciated.

Also, I'm out of town and away from the work bench for the next week or so, but I'll try to check in once or twice to see everyone's progress.  Guy, I'll post some pics when I return... promise.  Right now I'm happy just to follow you and Wingnut through the minefield of building a Dragon 251 and dodging the craters that you leave behind...

 Don


  • Member since
    April 2005
  • From: Piscataway, NJ!
Posted by wing_nut on Wednesday, October 15, 2008 5:46 PM

Oh so that's how it is.  The mod has to be showered with rare gifts to become the pet of the group.  Well I won't do it I tell ya!!! 

But if it makes you really look for that article about the metal pitting.... we can talkWhistling [:-^]

Marc  

  • Member since
    November 2006
  • From: Coastal Maine
Posted by dupes on Wednesday, October 15, 2008 4:13 PM

Ahhh, yes sir, it most certainly is. I owe you big time! Make a Toast [#toast]

You guys should know that Luftwoller is my new favorite guy, found a book for me that apparently isn't readily available here in the states, and had it in my hands about a week later. Once I finish digesting all of it's juicy contents, I hope I can aid all of you in your builds with it. Thumbs Up [tup]Thumbs Up [tup]

I don't have the tome on me right now, but I'll be sure to get a scan for you tomorrow morning - I think I know which pic you mean. 

Hey, I still want to know your seat technique! Mischief [:-,]

  • Member since
    February 2007
  • From: Bournemouth UK
Posted by Luftwoller on Wednesday, October 15, 2008 3:17 PM

Is that 'Font of all Knowlegde' the book that i may have seen Dupes? If so could you scan a  pic for me. Its the one of a /6 from the right hand side showing the aerial attachment to big scaffold type aerial.

Cheers bud.

...Guy

..'Your an embarrassment to the human genus, makes me ashamed to call myself Homo'.
  • Member since
    November 2006
  • From: Coastal Maine
Posted by dupes on Wednesday, October 15, 2008 8:18 AM

Lufty - looking VERY good! What technique did you use to "leatherize" your seats? Going to need to try to replicate that look. Thumbs Up [tup]Thumbs Up [tup]

"Mithril Silver"??? I prefer "Boltgun Metal" myself. Wink [;)]

Wing_nut - I was reading about a technique similar to what you're trying to do with the Dremel - but I can't remember where it was. Let me see if I can come up with a link for you. Anyhoo, it involved doing just what you did with the pitting/skipping etc, but followed it up with running some epoxy putty back over whatever panel you're trying to damage partially filling in some of the holes, making them much less pronounced, followed by a sanding to get the main face back to level.

White_R34 - let me see what I've got about the 251 engine. Just happened to get a Tome Of Great Knowledge (otherwise known as Tank Power Vol. 57 - Sd.Kfz.251 ) in the mail (Royal Post, even!) yesterday that I believe has some shots of the engine compartment. I'll poke around in it shortly.

  • Member since
    February 2007
  • From: Bournemouth UK
Posted by Luftwoller on Wednesday, October 15, 2008 5:12 AM

Hey ho, me again. Ive just about finished the interior of the beast so ive hit it with a coat of German grey all round. After this had gone off, I lightened the mix with drop of buff and then went round the centres and high points on the panels to give the plain coat a touch of contrast. This was then completed with a light drybrush of GW mithril silver. The pics dont show it too well but it looks good from where im sitting.

My tip for getting the sides on nice and neat is to glue the front first and give that a minute to go off. So its still a little flexible. Then press the rear sides in.

Oh, on the underside of the top structure, there are 2 head pads for the driver and radio operator to stop banging thier heads when looking through the vision ports. These are badly represented by Dragon. (They just show the bases and no pad) so i made mine out of milliput.

Simple, just like me Big Smile [:D]

Come on everyone, start posting. Its easy to say your at the same stage as whoever....Prove it!!! LOL.

...Guy


..'Your an embarrassment to the human genus, makes me ashamed to call myself Homo'.
  • Member since
    February 2007
  • From: Bournemouth UK
Posted by Luftwoller on Wednesday, October 15, 2008 3:24 AM

Oh yeah, watch the rear door panel as well. Ive just had to remove about 1mm of the floor in order to get the sucker to fit.

The order of the day with Dragon seems to be DRY FIT, DRY FIT, DRY FIT. And dont take anything for granted.

...Guy

..'Your an embarrassment to the human genus, makes me ashamed to call myself Homo'.
  • Member since
    October 2007
Posted by White_R34 on Tuesday, October 14, 2008 8:20 PM
 dupes wrote:

Whoah, tons of stuff today! Big Smile [:D]

White - looks good. Definitely keep me abreast of any errors you see in the B variant stuff.

I will keep you up on any thing that comes up. Oh can I ask if you or any of the othere modelers has a lay out for wiring this type of motor? I have looked all over and if any one has a Diogram that they feel that they can post it, would you it will help out a lot. I'll have some photos up soon (In 2 days) From to day the 14th.

Building the Impossible Is my main goal!!
  • Member since
    April 2005
  • From: Piscataway, NJ!
Posted by wing_nut on Tuesday, October 14, 2008 5:21 PM

Ditto what Guy said.  Lots of play in that postioning. 

And after checking that I have the right parts inthe rightpalce... there is no way that radio fits under that ledge above the dash on the right side.... no way at all.

Marc  

  • Member since
    October 2004
  • From: League City, Texas
Posted by sfcmac on Tuesday, October 14, 2008 4:38 PM
 Thanks Guy I am almost there. Probably saved me some serious foul language there!
  • Member since
    February 2007
  • From: Bournemouth UK
Posted by Luftwoller on Tuesday, October 14, 2008 3:25 PM

Hey all, Im building the Dragon kit and ive come accross a couple of cautions that anyone else building a dragon kit should look out for.

No.1 the floor pan needs to be centred on the chassis. It sounds obvious but whern i dry fitted the sides, the right hand side wouldnt go in. Luckily i managed to pull the floor pan up and re-position it. I was sure it was right initially and it seemed to fit right on the location lugs but wasnt as it showed.

No.2 The Hinge plates for the rear doors (Pts D17-D18)  are very similar in size but are definately different!! If you cut all 4 pices off in one, dont be suprised if the rear hinging piece doesnt fit squarely.

...Guy

..'Your an embarrassment to the human genus, makes me ashamed to call myself Homo'.
  • Member since
    October 2004
  • From: League City, Texas
Posted by sfcmac on Tuesday, October 14, 2008 2:57 PM

 wing_nut wrote:
It really was so bad.  I wanted to try make sone dents/pits onthe front plate.  I was practicing with the Dremel on every inside surface that would not be seen. I finally got it down, ot at least I thought so, then when I did the front of course it looked like crap.

Sometimes I get that effect by making small scraps and gouging with a hobby knife then with some liquid cement painted over it tones them down to look like old dents and pits.  If it isn't bad try painting it with liquid thin cement and letting it dry? I know you got it replaced now but what an experimental project!

Still piddling with mine. Still looking like everyone elses ( I wish)

  • Member since
    April 2005
  • From: Piscataway, NJ!
Posted by wing_nut on Tuesday, October 14, 2008 2:14 PM
It really was so bad.  I wanted to try make sone dents/pits onthe front plate.  I was practicing with the Dremel on every inside surface that would not be seen. I finally got it down, ot at least I thought so, then when I did the front of course it looked like crap.

Marc  

  • Member since
    November 2006
  • From: Coastal Maine
Posted by dupes on Tuesday, October 14, 2008 8:10 AM

Whoah, tons of stuff today! Big Smile [:D]

White - looks good. Definitely keep me abreast of any errors you see in the B variant stuff.

Bodge - would love to get you in on the build. However, I'm going to need you to read the first page over - this one's running a bit differently. I would prefer that you do a 1/35 build, but if you're able to fill one of the remaining variants with a 1/72 then I may allow it. Look over the list of available models (I believe the ones left are the 12-15 and 19, unless I'm unable to get a hold of MPKev31B...then the /3 may open up as well) and get back to me.

Wingy - keep it coming, man! What exactly did you do with the front hull...? Whistling [:-^]

  • Member since
    November 2007
  • From: Wisconsin Rapids, WI
Posted by moose421 on Monday, October 13, 2008 7:19 PM
Great start to your builds guys. Heck, mine is still in the box waiting for another GB to finish.
  • Member since
    December 2002
  • From: Bury St Edmunds, Suffolk, England
Posted by Bish on Monday, October 13, 2008 6:50 PM
White_R34 looking at your pics of the instructions, it doesn't look like it would take mutch to make that kit into an accurate Ausf B. Mainly its moving the radio and leaving out the back rests. And maybe a bit of kit re-aranging. As this seems to be the only B on the market so far i think it might be worth the effort.

I am a Norfolk man and i glory in being so


On the bench: Airfix 1/72nd Harrier GR.3/Fujimi 1/72nd Ju 87D-3

  • Member since
    April 2005
  • From: Piscataway, NJ!
Posted by wing_nut on Monday, October 13, 2008 6:36 PM

Thansk Boyd.  The suspensionissue is that if you seat the front suspension all the way down in the slot, when the back end is up on the tracks, the front tires won't be on the ground.


Got around to to some dry fitting.  I noted a couple of open space that I figured needed to be closed up. And now that I have done it someone is gonna say they are supposed to be there.  I amdit I have not seen any mention of it in any of the kit reviews or build articles I've seen.  But they sure don't look like they should be there. Also the GIGUNDO holes for the fender alignment tabs need to be filled. I had some square stryene that was almost a perfect fit. And oh yeah... I had to make a new piece of front end armor.   Don't askDisapprove [V]

Marc  

  • Member since
    October 2007
Posted by White_R34 on Monday, October 13, 2008 4:33 PM
Hay solder "Bodge" the sarg will issue you your building orders so go to the first Tent "first page" on the wall there are all the Solder orders, "read the rules there"..
Building the Impossible Is my main goal!!
  • Member since
    February 2007
  • From: Bournemouth UK
Posted by Luftwoller on Monday, October 13, 2008 4:26 PM

Thx Don, that sort of makes sense it being a command wagon an all. Im going to keep it though and might add a couple of shoulder straps. Might not be correct but it will add a little more interest to melee.

Cheers again Don and any more info you can find will be eagrely lapped up.

...Guy

..'Your an embarrassment to the human genus, makes me ashamed to call myself Homo'.
  • Member since
    October 2007
Posted by White_R34 on Monday, October 13, 2008 4:22 PM
Bish the parts that should not be there will be left out to keep my build right. I'll be goint a lot by the photos I posted and some othere's I didn't post. An yes here's rith the radion was mover to the front dash on the C and on some Cs and Ds the radio was mounted on the roof of the Stuka on call versions. German:"Stuka Zu Fuzz". An this info I posted has a lot to do with my build from the interior to the exterior items. As I pointed out some of the things I'm going to place on my halftrack wich if now one had ever seen any of my photos would not think my build was right so I put all this up to point out just what I'm going to do to my Ausf.B. The rest of the info what if any one wanted to build the Ausf.A out of this kit they could. I some times like to give info if it helps some one like "dupes". As for the kit having goofs that's ok if your a good modeler that stuff like that is no problem to fix. I still say get this kit as it's cheap right now and the sale ends on the 30 of Oct.
Building the Impossible Is my main goal!!
  • Member since
    October 2007
  • From: Louisville, KY
Posted by pordoi on Monday, October 13, 2008 3:01 PM

 Bish wrote:
Mainly it says that the kit has the interior for the Ausf C which is different to the B. Is this causeing you a problem at all.


The instructions seem to bear this out since the radio was mounted on the right side of the co-driver seat in the A and B.  It was moved to the front for the C.


Lufty, I found a cyberhobby review of the Dragon 251/6 kit that suggests that assembly M is a backpack radio.  In an earlier 251/1 kit, Dragon supplied a water canister for this position.  It was then determined that only the /8 carried the water cannister so the kit was corrected by the addition of the pack radio.   If so, assembly M could easily be left out if you desire.

 Don


JOIN OUR COMMUNITY!

Our community is FREE to join. To participate you must either login or register for an account.

SEARCH FORUMS
FREE NEWSLETTER
By signing up you may also receive reader surveys and occasional special offers. We do not sell, rent or trade our email lists. View our Privacy Policy.