SEARCH FINESCALE.COM

Enter keywords or a search phrase below:

251 Halftracks GB 1 October '08 - 8 June '09

129670 views
1459 replies
1 rating 2 rating 3 rating 4 rating 5 rating
  • Member since
    October 2007
Posted by White_R34 on Saturday, June 6, 2009 10:28 AM

That's cool, at least that's something you can see.  Don't know why Dragon gives you the transmission and fuel tank and then has you cover them up with the floor.Confused [%-)]  Other than because they can. 

My Reply:

Here's the dill Lewbud with the use of the tranny and fuel tank. Now I don't know if any of you otheres out there have thought of this but here go's. For those of you that want to show off those two items, you would have to cut open the floor in some sections to show parts of "tha" tranny or fuel tank; like as if the vehicle was under repair or it's maintenance time. Do you see those small upraised door looking plates on the floor. Well those are access panels, that you could be cut open. Like if you only wanted to show a solder fueling up you would cut open the rear most access panels above the fuel tank.(Using Tamiya's Military Miniatures: German Fuel Drum set)-(For one or more Jerry cans)-(This set has the best looking and the most real looking J-cans) Now if your using a PE set like me this would work out realy well as you would not re-use the plastic part you just cut off. I would place the PE access panels in an open position. Any way I always say if you don't realy need them and no one will see them don't bother using them. (The Tranny & Fuel tank) Now as for the item your showing it's full of detail and "ME" Likes Make a Toast [#toast]

Building the Impossible Is my main goal!!
  • Member since
    November 2006
  • From: Coastal Maine
Posted by dupes on Saturday, June 6, 2009 4:15 PM

Ho hooo! Only a couple of days to go! Can't wait for a (hopeful) plethora of pics next week. We can discuss when the GB ends where people who miss the deadline are in there builds...perhaps some finished badges can be earned if we have pics in a short time.

Photo day tomorrow for me. Wink [;)]Thumbs Up [tup]

  • Member since
    December 2002
  • From: Reno, NV
Posted by espins1 on Saturday, June 6, 2009 4:34 PM
sigh, I'm less concerned about the badge and more concerned about letting you down Dupes. I'm working on it now, still have a fair amount left to do.

Scott Espin - IPMS Reno High Rollers  Geeked My Reviews 

  • Member since
    November 2006
  • From: Coastal Maine
Posted by dupes on Saturday, June 6, 2009 4:37 PM
How long do you think you have left, Scott?
  • Member since
    December 2002
  • From: Reno, NV
Posted by espins1 on Saturday, June 6, 2009 4:41 PM
 dupes wrote:
How long do you think you have left, Scott?


Minimum of a week, max 2 weeks. I'm hoping to start laying down paint tomorrow.

I'll post some progress pics a little later this afternoon. Time to give Pepe (one of our dogs) a bath. lol

Scott Espin - IPMS Reno High Rollers  Geeked My Reviews 

  • Member since
    December 2002
  • From: Reno, NV
Posted by espins1 on Saturday, June 6, 2009 7:17 PM
Need some help from the experts here. Can anyone tell me what the following parts are please?

TA15
U33
TA8


I'm guessing TA15 and TA8 are ammo boxes? Are those thin pieces on the outside of them handles or brackets for holding them in place in the halftrack?

Thanks!

Scott Espin - IPMS Reno High Rollers  Geeked My Reviews 

  • Member since
    December 2002
  • From: Bury St Edmunds, Suffolk, England
Posted by Bish on Saturday, June 6, 2009 8:06 PM
TA 15 is a map pouch, its similar to what German Officers carried on their belt kit. Not 100% certain, but TA 8 could be spare sight blocks. No idea on U33.

I am a Norfolk man and i glory in being so


On the bench: Airfix 1/72nd Harrier GR.3/Fujimi 1/72nd Ju 87D-3

  • Member since
    October 2007
  • From: N.H.
Posted by panzerguy on Saturday, June 6, 2009 8:11 PM

   Scott TA15 are mag pouches for the mp 40's and U33 & TA8 are spare armored glass for the vision ports of the driver and radio operator. Looking forward to see this guy all finished.


"Happiness is a belt fed weapon"

  • Member since
    December 2002
  • From: Reno, NV
Posted by espins1 on Saturday, June 6, 2009 8:43 PM
Thanks Bish and Panzerguy, that helps a lot! I showed the directions to my wife and she guessed map pouch for TA15, turns out she was right! :D

Scott Espin - IPMS Reno High Rollers  Geeked My Reviews 

  • Member since
    December 2002
  • From: Reno, NV
Posted by espins1 on Sunday, June 7, 2009 3:37 PM

Making great headway. The odds are fairly good that I'll be able to get the interior sprayed before our BBQ at 4pm

Scott Espin - IPMS Reno High Rollers  Geeked My Reviews 

  • Member since
    October 2004
  • From: League City, Texas
Posted by sfcmac on Sunday, June 7, 2009 3:48 PM

 Well for the life of me I can't find where I put my  figures I was working on. Put them in a safe place and they must be plenty safe. As I am out of time I thought I had better post some pics to let Dupes ( Fupes) know I tried my best to give him a detailed and unique 251/10 for his GB.

 A few highlights. Fom the build are this is a 251/10 just before the Battle f El Alamein.  At first I thought it was a modified /7 but the bins on the sides are unique and an obvious modification made by the crew.  My best guess is this vehicle served as a laison between the ground forces and the Luftwaffe given it's unique markings and extra radio equipment. Reading up on the DAK tactics show they did in fact use 251's for this purpose.

 Using photographs of personal belongings, newspapers and manuals taken from DAK prisoners after the battle, I scanned and shrank them to scale giving very detailed acccessories to give my vehicle a lived in look. I even included a meal of rations, bread and drink available to them including the captured tea kettle.  Scratched built items like the opener and even toilet paper with research help provided by the forum members. Bow [bow]

 So using all the time I had and I started right off at the begining This is what I have accomplished. I added a few of the old Tamiya DAK figures I practiced painting on just to give some intrest until I figure out where I stuck my crew. Dunce [D)]

 Well I do plan on adding the figs when I find them and another vehicle with a Signal Magazine photographer taking the picture. I'll post that soon as I get it all done someday.

A big thanks to Dupes for an excellent GB! I learned way much about the 251 and it's many varients. Thank You Again Dupes and to all those who have built such great models here! Bow [bow]Thumbs Up [tup]Bow [bow]

  • Member since
    July 2006
  • From: San Francisco Bay Area
Posted by bufflehead on Sunday, June 7, 2009 5:11 PM

AAAGGHH!!! I totally forgot this GB ended on the 8th!Shock [:O] For some reason I thought we had til the end of the month....I even put in an order last week for some cool replacement wheels (I didn't like the kit wheels) and they'll be here tomorrow or Tues.  Well, there's no hope for me....I haven't even resumed work on the Uhu.  Even if I work on it every night (which I can't) I don't think I can have it done in less than a week. Sigh [sigh]

Sorry dupes looks like I let you down again .Disapprove [V]  I'd really like to have something for your GB wrap-up post so that as many of the variants can be shown.  Let me know if you still want me to work on it...if so, I'll put aside the JS-2 and try to bang out the Uhu in record time.

Ernest

Last Armor Build - 1/35 Dragon M-26A1, 1/35 Emhar Mk.IV Female


Last Aircraft Builds - Hobby Boss 1/72 F4F Wildcat & FW-190A8


  • Member since
    November 2006
  • From: Coastal Maine
Posted by dupes on Monday, June 8, 2009 8:48 AM

Aaron - looks great! All of your stowage is pretty darn sweet. Also looks like you knocked down the "shine" really well. Good stuff! Thumbs Up [tup]Thumbs Up [tup]

Ernest - while I'd love to have you get your Uhu into the wrapup, I don't want you to blow through it just for the sake of blowing through it. How far in are you so far? I'm willing to hold off the wrapup until the end of the month or so in order to get finished pics together of everyone's builds, but probably not much past that. Let me know what you'd like to do.

As for me, I have some /8 pics here I need to upload to Photobucket, hopefully to get a bit of a review to see what I've missed (if anything) or what can be improved upon (if anything). I'll do the final photoshoot tonight after any corrections have been made. Will try to get those up ASAP! 

  • Member since
    April 2007
  • From: Schroon Lake, NY
Posted by SMJmodeler on Monday, June 8, 2009 10:12 AM

dupes/Guys: Here she is the 251/1 Stuka Zu Fuss.  This is my "badgeworthy"effort for this GB.  I plan to trick-it-out with additional rockets/crates, stowage, figures, base, etc...before AMPS EAST but I'm real happy with this! 

This was my 2nd open-top armor build, 2nd half-track, 1st extensive use of PE, 1st use of indi-links (that didn't go so well), 1st three-color camo' scheme, 1st scratchbuild effort using some tubing and wire for various details.

Anyway, without further ado......:

  • Member since
    June 2008
Posted by lewbud on Monday, June 8, 2009 10:14 AM

Dupes,

I could use some more time.  Would be finished before Fathers Day as that's when I go on vacation.  Sorry.

Buddy- Those who say there are no stupid questions have never worked in customer service.

  • Member since
    November 2006
  • From: Coastal Maine
Posted by dupes on Monday, June 8, 2009 10:50 AM

SMJ - Wow, man. That is totally hot! Evil [}:)] I can't wait to see this three-color drybrushing tutorial you're coming up with - I like this effect A LOT. Your PE work all seems to be very solid as well...coulda fooled me that it was your first time.

One question/comment - why are the drive wheel surfaces so shiny? Not sure what you have planned for your base, but they seem out of place compared to the rest of the vehicle.

Turns out that all of the pics I brought to work with me today ended up out of focus...aaack. Here's the best one of the bunch, hopefully it at least gives you an idea of what the /8 looks like:

Will make adjustments and re-shoot tonight. 

  • Member since
    June 2008
Posted by lewbud on Monday, June 8, 2009 11:05 AM

SMJ,

That is totally cool.  Look forward to seeing what else you do to it.

Dupes,

Your /8 is looking good.  How did they keep the tarp over the compartment on while moving?  Were there snaps like you see on old cars with tounneau covers?

Aaron,

PM inbound.

Buddy- Those who say there are no stupid questions have never worked in customer service.

  • Member since
    July 2006
  • From: San Francisco Bay Area
Posted by bufflehead on Monday, June 8, 2009 11:22 AM

dupes, I REALLY want to finish my Uhu for this GB.  I feel so stoopid that I didn't notice the "8 June '09" date in the subject line. I could have set aside the JS-2 and finished this in time if I wasn't such a bonehead! Black Eye [B)] 

The build is pretty much where it was before.  Suspension done, held off on the interior so I could add in all the Blast Models resin upgrade parts.  Its not the assembly that will slow me down its the painting/weathering, but I know a few tricks now that should allow me to speed things up.  The one thing that I may have to do is use either the kit vinyl tracks or the all metal tracks that I mistakenly built instead of making another set of rubber tracks will take me two full nights!

I'm looking at finishing in 7 days starting tomorrow...how's June 16?

Ernest

Last Armor Build - 1/35 Dragon M-26A1, 1/35 Emhar Mk.IV Female


Last Aircraft Builds - Hobby Boss 1/72 F4F Wildcat & FW-190A8


  • Member since
    November 2006
  • From: Coastal Maine
Posted by dupes on Monday, June 8, 2009 11:41 AM

Buddy - I've actually seen a few different methods that they were attached - snaps, clamps, or tiedowns all appear to have been used. Mine has snaps. Wink [;)]

Aaron - was just thinking about your /10 - do you have a pic of just the 251 (or just the 251 on the base) that can be used for the final roundup? It may not happen for a few weeks, so hopefully you can find your "official" crew.  

  • Member since
    November 2006
  • From: Coastal Maine
Posted by dupes on Monday, June 8, 2009 11:45 AM
Ernest - I'd certainly hold off for you if you think you can bang it out in a week. Looks like you'll have a bit of company with the late finish - Scott and Buddy are definitely in the same boat, and I'm sure there will be some more. Heck, I may even have enough time to tackle the rest of my /2 in the same span. Thumbs Up [tup]
  • Member since
    July 2006
  • From: San Francisco Bay Area
Posted by bufflehead on Monday, June 8, 2009 3:24 PM

Alright!  I'm on it!  Can't work on it tonight because I have to work late, but starting tomorrow night I'll jump all over that interior! 

BTW dupes, nice looking /8!  I like the camo and the red cross scheme on the sides!

SMJ, whoa that's a tough looking build with all those brackets, braces, racks n'stuff!!  You pulled it off nicely and it sure looks the part!  You are definitely a weathering master!

Ernest

Last Armor Build - 1/35 Dragon M-26A1, 1/35 Emhar Mk.IV Female


Last Aircraft Builds - Hobby Boss 1/72 F4F Wildcat & FW-190A8


  • Member since
    October 2007
Posted by White_R34 on Monday, June 8, 2009 5:10 PM

Sorry you all and "Dupes" for not getting my project done on time but I felt a bit burnt out on halftrack projects after doing this one.

An now that I have my BM-Katusha truck done, I can get that halftrack done if it's cool with you Dupes???

Building the Impossible Is my main goal!!
  • Member since
    December 2002
  • From: Reno, NV
Posted by espins1 on Monday, June 8, 2009 7:41 PM
Victory!!! All the sub-assemblies are complete, I'm off to the spray booth! I put this thing together in sub-assemblies to facilitate quick spraying of all the like colored parts, broken down by:

Lower hull, upper hull, rear panel w/doors, instrument panel. The wooden benches and black leather components will all be sprayed at one time, then attached where they belong in the interior. My build is really going to move along quickly now.

Scott Espin - IPMS Reno High Rollers  Geeked My Reviews 

  • Member since
    December 2002
  • From: Reno, NV
Posted by espins1 on Tuesday, June 9, 2009 12:25 AM

Here she is all primered.

Scott Espin - IPMS Reno High Rollers  Geeked My Reviews 

  • Member since
    December 2002
  • From: Bury St Edmunds, Suffolk, England
Posted by Bish on Tuesday, June 9, 2009 12:29 PM

Some great work here guys, dupes love the /8, i might have to pinch that idea for an easy conversion.

smj i didn't realise you were new to 3 tone schemes, and there was me trying to find out how you weathered them. Deffinatly the sought of finish i like the chipping alot.

Aaron also a great finish, look forward to seeing the rest of the figures added.

Dupes, given that so many are close to finishing, maybe you could extend the GB by a month.

I am a Norfolk man and i glory in being so


On the bench: Airfix 1/72nd Harrier GR.3/Fujimi 1/72nd Ju 87D-3

  • Member since
    April 2003
  • From: 41 Degrees 52.4 minutes North; 72 Degrees 7.3 minutes West
Posted by bbrowniii on Tuesday, June 9, 2009 12:35 PM

Scott

Lookin' good!  Now that I have finished my AFV kit, I can look at yours and.... remember, fondly... Blush [:I]

By the way, does that kit have the indy link tracks or the rubber bands ones?  (Have I asked you that question before?)  The indy links are a... chore, so if you've got 'em, proceed with caution.

Let me know if I can offer any suggestions or help!


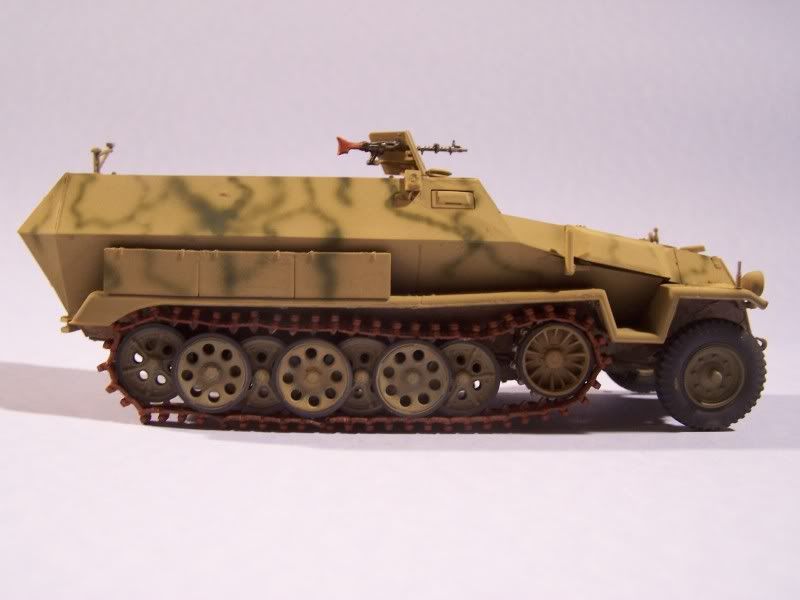
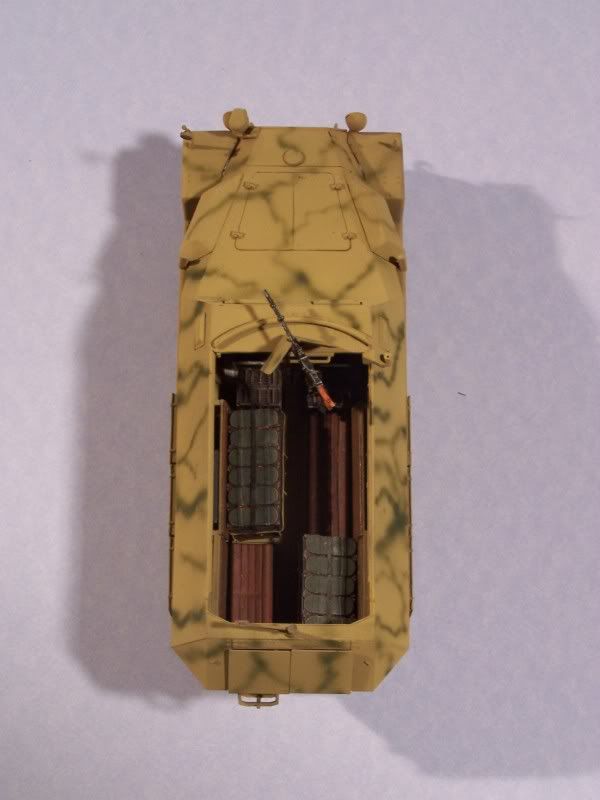
OK, everyone...  I talked to dupes the other day to let him know of my recent (and ongoing Banged Head [banghead], but hopefully almost resolved) computer issues.  I sent him a phone pic this AM to demonstrate I was done, but here (hopefully) are some better pics of the 'completed' /4.  It is not supposed to represent any particular vehicle, though the paint scheme (according to the instructions) represents a vehicle that served in Greece in '43:

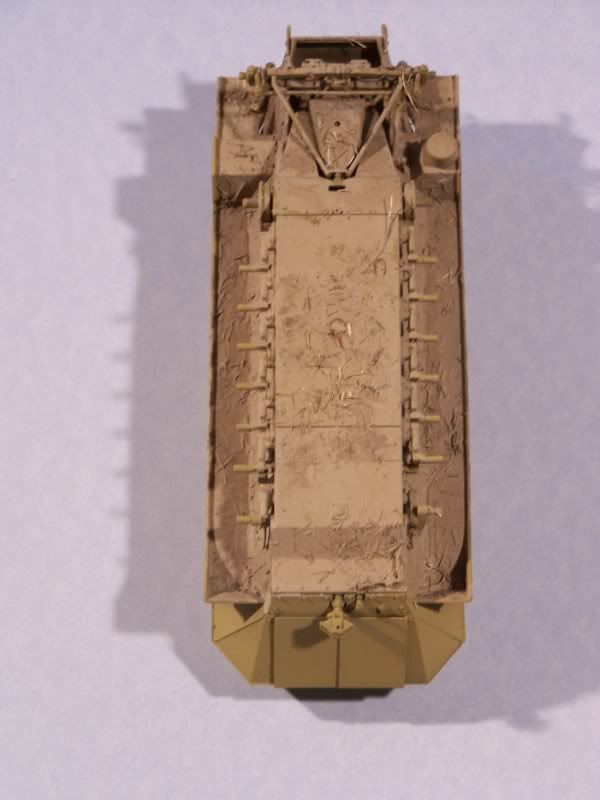
I tried a few new things on this build, including adding some dried mud and grass to the undercarriage.  I used a method I found in the Osprey book on building the 251, except I did not have any static grass, so I cut some pieces of rope into various lenghts.  The diameter of the resulting grass is not to scale, but I don't think it looks too terrible:

Like SMJ, I've got some final tweaks to make before AMPSEast (including building the leFh 18/40 that this thing should be towing).  I'll be doing some more intense weathering too (there is only a light wash now - mostly washed out by the light in the pics...

There are not too many markings - the AFV kit this came from comes with a pretty sad set of decals and the instructions indicate the /4s did not have a whole lot of marking on them anyways.  The decals that did come are pretty nasty so I am going to have to scrounge a DML kit for some better ones.

In addition to trying some new stuff, I also made a bunch of mistakes on this build - some rookie, others just out of sheer oversight or carelessness.  The result is that the build did not come together as well as I had hoped, but I am still pretty pleased.  I give it a C+....

As always, feel free to offer up comments and observations.


'All that is necessary for the triumph of evil is for good men to do nothing' - Edmund Burke (1770 ??)


  • Member since
    November 2006
  • From: Coastal Maine
Posted by dupes on Wednesday, June 10, 2009 10:27 AM
Boyd - looking good! Question for you - did this vehicle come with any markings? I.E., balkankreuz's, license plates, etc?
  • Member since
    April 2007
  • From: Schroon Lake, NY
Posted by SMJmodeler on Wednesday, June 10, 2009 10:48 AM

dupes: Thanks for the comments on my SZF, I hope I did you proud!Big Smile [:D]  BTW-I want to work on my front wheelesand I like yours, what did you use?

I like your 8, overall especially the white work and the red cross, well done!  She looks like she needs a little more TLC though.  I know you were pressed for time at the end but you may want to add a wash or two and blend the whole thing together some.  The colors are a bit vibrant, especially the tarp. 

lewbud: Thanks man!

bufflehead: Sheesh, you're telling me this was a tough build, I'd say TWICE the normal assembly time.  It was worth it though.  "Weathermaster"....ooooShock [:O]...I like that, can I change from SMJmodeler to thatWink [;)]?!.  Thanks for that oneThumbs Up [tup].

white_R34: Sweet Stuka there!...Got a link to more pic's I'd like to study them closer?  Is that the finished product that you documented all that detail earlier?  I used a couple of your tips and techniques...thanksMake a Toast [#toast]

Bish: Yeah, I decided to go three-color instead.  I took several pics and documented it closely.  I'll try to get a "how-to" posted soon, I know you were one of the ones who was interested in that.

bbrowniii: Real solid build there!  I like the road wheels an especially that interior work...well done...Thumbs Up [tup]  It looks like we both struggled with the tracks bit, were those indies?  In your final version you may want to get the stripes a little more consistent.  They add a lot to the look but they are a bit sparse and they vary in width too much, IMO.  I'm looking forward too the "final" version!

QUESTION:  My instructions say the machine guns are to be ALL metal, no wood.  I see most models with wood depicted at the shoulder piece (what's that called)  Can someone please confirm?


  • Member since
    April 2003
  • From: 41 Degrees 52.4 minutes North; 72 Degrees 7.3 minutes West
Posted by bbrowniii on Wednesday, June 10, 2009 10:58 AM

 dupes wrote:
Boyd - looking good! Question for you - did this vehicle come with any markings? I.E., balkankreuz's, license plates, etc?

dupes,

It came with a couple balkankreuz, a license plate, and a couple of placards.  Also some division markings.  Problem is, when I went to use them, they turn out to be pretty lousy - thick, tough to work with, etc.  That is why I left it nekid until I can grab some out of one of my DML kits.  Probably do that tonight, along with a few touch ups to the camo.

Using the decals as yet another example of an issue with this kit, it is interesting to compare the quality of molding between the 251 and the lefH 18/40.  That gun is obviously a much newer molding with significantly higher quality - still some issues, but nothing to compare with the 251... 

'All that is necessary for the triumph of evil is for good men to do nothing' - Edmund Burke (1770 ??)


  • Member since
    April 2003
  • From: 41 Degrees 52.4 minutes North; 72 Degrees 7.3 minutes West
Posted by bbrowniii on Wednesday, June 10, 2009 11:04 AM
 SMJmodeler wrote:

bbrowniii: Real solid build there!  I like the road wheels an especially that interior work...well done...Thumbs Up [tup]  It looks like we both struggled with the tracks bit, were those indies?  In your final version you may want to get the stripes a little more consistent.  They add a lot to the look but they are a bit sparse and they vary in width too much, IMO.  I'm looking forward too the "final" version!

QUESTION:  My instructions say the machine guns are to be ALL metal, no wood.  I see most models with wood depicted at the shoulder piece (what's that called)  Can someone please confirm?


SMJ,

Thanks for you comments.

First to your question: a while back someone posted a few pics (somewhere, can't recall where) of both the MG39 and the MG42, some with wooden buttstocks (the shoulder piece) and some with that 'bakelite' Question [?] stuff, so I tend to go with wood just 'cause I think it spices things up a bit.

Now to your comments:  You really think the width varies too much?  That surprises me a little - the scheme that I was roughly mimicing was pretty varied.  I do think that one spot on the side is a little too heavy - going to retouch that tonight, but I thought that overall the width variation would be realistic... interesting that you'd see it otherwise...  I'll have to do a little more research and thinkin' on it as I do my final wrap ups...

Oh, and by the way, yes they are indy links and YES I did struggle with them!!! Tongue [:P]  That is one of the things on this build I am least pleased with - not only did I have trouble building them, but then I tried to weather them a bit differently than I typically do - I used pastels for the first time.  I only have a cheap set of chalks from Wal-Mart and the 'dark brown' color dried to a more rust color than I was looking for...  Ah well, I should have mixed it up a bit, I guess...  Live and learn (and buy better pastels!!!)

By the way, did I mention that yours came out unbelievable?  Really, REALLY sweet build!

'All that is necessary for the triumph of evil is for good men to do nothing' - Edmund Burke (1770 ??)


JOIN OUR COMMUNITY!

Our community is FREE to join. To participate you must either login or register for an account.

SEARCH FORUMS
FREE NEWSLETTER
By signing up you may also receive reader surveys and occasional special offers. We do not sell, rent or trade our email lists. View our Privacy Policy.