SEARCH FINESCALE.COM

Enter keywords or a search phrase below:

251 Halftracks GB 1 October '08 - 8 June '09

129670 views
1459 replies
1 rating 2 rating 3 rating 4 rating 5 rating
  • Member since
    August 2007
  • From: n/w indiana
Posted by some assembly required on Friday, June 19, 2009 2:48 PM
lewbud, i understand about building for different audiences.at this time my level of workmanship wouldnt even cut it in the juniors at the nats! i will have to say its good of you not to want to be the weakest link Laugh [(-D]

  • Member since
    April 2003
  • From: 41 Degrees 52.4 minutes North; 72 Degrees 7.3 minutes West
Posted by bbrowniii on Friday, June 19, 2009 2:57 PM

Hey guys,

Wanted to get your opinion on something:

I am finishing up (hopefully!) the lefH18/40 to go with my /4.  The track is painted in a pretty simple dunklegelb base with green camo, representing (loosely) a vehicle in Greece in '43.  I was planning to do the same scheme on the arty piece, but then I got to thinkin... (and that is always trouble!).  I was looking through a copy of MMiR (the only one I have) and there are a couple articles in there about 88's.  In one, the builder painted it in a simple panzer grey finish.  I really like the looks of it, so I was considering doing the same for my gun.  Do you think it will look 'off' to have the track in one scheme and the gun in another?  Anyone know if these guns were ever even in panzer grey?

Thanks!

'All that is necessary for the triumph of evil is for good men to do nothing' - Edmund Burke (1770 ??)


  • Member since
    December 2002
  • From: Reno, NV
Posted by espins1 on Friday, June 19, 2009 3:28 PM
Hey guys, I've been really sick since last Friday so I haven't done anything on my 251 since last week.... lost 13lbs in 5 days! I'm getting better now and plan on spending some time on the workbench this weekend. Looking forward to seeing everyone's final results! :)

Scott Espin - IPMS Reno High Rollers  Geeked My Reviews 

  • Member since
    December 2002
  • From: Bury St Edmunds, Suffolk, England
Posted by Bish on Friday, June 19, 2009 4:14 PM
 bbrowniii wrote:

Hey guys,

Wanted to get your opinion on something:

I am finishing up (hopefully!) the lefH18/40 to go with my /4.  The track is painted in a pretty simple dunklegelb base with green camo, representing (loosely) a vehicle in Greece in '43.  I was planning to do the same scheme on the arty piece, but then I got to thinkin... (and that is always trouble!).  I was looking through a copy of MMiR (the only one I have) and there are a couple articles in there about 88's.  In one, the builder painted it in a simple panzer grey finish.  I really like the looks of it, so I was considering doing the same for my gun.  Do you think it will look 'off' to have the track in one scheme and the gun in another?  Anyone know if these guns were ever even in panzer grey?

Thanks!

Artillery like armour was painted in Panzer Grey prior to the change over. I guess its not unthinkable to have an older gun pulled by a newer vehicle.

I am a Norfolk man and i glory in being so


On the bench: Airfix 1/72nd Harrier GR.3/Fujimi 1/72nd Ju 87D-3

  • Member since
    December 2002
  • From: Reno, NV
Posted by espins1 on Saturday, June 20, 2009 2:09 PM
back to work on the 251/1. I can't for the life of me understand why AFV Club included spare vision blocks that are to be mounted to the interior sides.... molded in green plastic?!? Shouldn't they be "clear" with the molded on bracket painted in the interior color? Any ideas on how I can paint them to remotely look like vision blocks?

Scott Espin - IPMS Reno High Rollers  Geeked My Reviews 

  • Member since
    April 2003
  • From: 41 Degrees 52.4 minutes North; 72 Degrees 7.3 minutes West
Posted by bbrowniii on Saturday, June 20, 2009 8:02 PM

 espins1 wrote:
back to work on the 251/1. I can't for the life of me understand why AFV Club included spare vision blocks that are to be mounted to the interior sides.... molded in green plastic?!? Shouldn't they be "clear" with the molded on bracket painted in the interior color? Any ideas on how I can paint them to remotely look like vision blocks?

Hey Scott,

I had the same issue.  I ended up using Micromask - painted it on the interior surface of the glass and on the exterior (where the two pins mate it to the armored cover, which I painted white), then I painted the frame and removed the mask (actually, I removed it on three out of four - couldn't get it off that darn fourth one...)

'All that is necessary for the triumph of evil is for good men to do nothing' - Edmund Burke (1770 ??)


  • Member since
    December 2002
  • From: Reno, NV
Posted by espins1 on Saturday, June 20, 2009 8:35 PM

Thanks for the tip browniii, that would solve my problem if the vision blocks were clear plastic, but they're opaque green plastic. Sad [:(]

Here are a couple of quickie shots from just a little bit ago, got some faded black on all the rubber parts, sprayed the dunkelgelb on the interior and some of the exterior. As I wait for everything to dry and cure I'm going to work on the weapons, tools and the radio. 


Scott Espin - IPMS Reno High Rollers  Geeked My Reviews 

  • Member since
    June 2008
Posted by lewbud on Saturday, June 20, 2009 8:52 PM

Scott,

How bout masking them off and hitting them with some gloss black?  Give the effect of the shutters being down, yet give a somewhat glassy reflection.  You could always drill them out and fill the hole with clear plastic.  Probably trying not to do that though.

Buddy- Those who say there are no stupid questions have never worked in customer service.

  • Member since
    December 2002
  • From: Reno, NV
Posted by espins1 on Sunday, June 21, 2009 10:36 AM
Great suggestion lewbud however I'm referring to the spare vision blocks that hang in racks in the back. They should appear as just big blocks of clear glass....

Scott Espin - IPMS Reno High Rollers  Geeked My Reviews 

  • Member since
    April 2007
  • From: Schroon Lake, NY
Posted by SMJmodeler on Monday, June 22, 2009 8:05 AM
 espins1 wrote:

Scott: I like the look you acheived on these...how'd you do that? Is it a light gray wash or what?

  • Member since
    December 2002
  • From: Reno, NV
Posted by espins1 on Monday, June 22, 2009 12:25 PM
SMJ - that is kinda cool, I see some possibilities with what I did. Unfortunately, that's the just look with some faded black sprayed on the rubber parts with the white primer showing in the areas that didn't get overspray on them. The centers are all going to get sprayed with dunkelgelb tonight using a circle template. I may go super light with the dunkelgelp to have some of the contrast show through the paint for a "weathered" effect.

I may experiment with a future build putting the dunkelgelb on first, then carefully spraying the black/gray from a more oblique angle to see if I can't leverage the effect somehow.

Scott Espin - IPMS Reno High Rollers  Geeked My Reviews 

  • Member since
    April 2007
  • From: Schroon Lake, NY
Posted by SMJmodeler on Tuesday, June 23, 2009 9:57 AM

 espins1 wrote:
SMJ - that is kinda cool, I see some possibilities with what I did. Unfortunately, that's the just look with some faded black sprayed on the rubber parts with the white primer showing in the areas that didn't get overspray on them. The centers are all going to get sprayed with dunkelgelb tonight using a circle template. I may go super light with the dunkelgelp to have some of the contrast show through the paint for a "weathered" effect.

I may experiment with a future build putting the dunkelgelb on first, then carefully spraying the black/gray from a more oblique angle to see if I can't leverage the effect somehow.

Scott: It's kinda' funny how we stumble onto new ideas huh?!...the effect is like dried dirt/dust.  It may not be as effective for the dunkelgelb application but it would work well with panzer gray.  In fact, why not force the dust application issue and spray/prime the wheels buff first....hmmm...note-to-self on that one...

I'll watch to see how you try to work it with the dunkelgelb, I hope it comes out good!...

  • Member since
    October 2007
Posted by White_R34 on Tuesday, June 23, 2009 11:29 PM

Hello all I need to get some things off my chest about this build. First I'm back to work on it and I didn't see an answer to my question. So I'm going to go on an get my 251 done for this GB any way. Now from time to time I feel that I may now have any relevant info to post with my progress photos. So I'm going to just post photos an if I feel like adding any info I will. I would realy like to get this project done well and looking good so I will post some of my progress to night or early this morning so I can keep on working. Now if any one wants to ask any thing ask away.

Progress Photo,Pics or Pix:

Building the Impossible Is my main goal!!
  • Member since
    October 2004
  • From: League City, Texas
Posted by sfcmac on Wednesday, June 24, 2009 12:07 AM

 Sorry White R34 musta missed the question. I have been following along as best I can with everyone working so well. Boyd, SAR and Fupes really got some beauties posted,  I like Boyd's paint job looks right on!  Fupes made a great Ambulance. Looks like tight out of a ref book and SAR's /7 is cool I aleays like that unit marking with the sword welding skeleton. On the Dark gray the details are really atanding out better that I thought they would.

 Buddy and Scott got killer in progress pics going on and I dunno what you ask but since I can ask anything ? Do you have the phone numbers of any fallen women who like wearing fishnet stockings and make good coffee? Laugh [(-D]Make a Toast [#toast] Hey it's midinght and thats the first question that popped to mind! Propeller [8-]

  • Member since
    October 2007
Posted by White_R34 on Wednesday, June 24, 2009 4:16 AM
You so silly "Sfcmac Wink [;)] but I'll keep an eye out for just such a woman for "yah". In see-ing that it seams to be ok for me to get my project done. I'm cool with that man and I'm still working things out my way. I'll have some new painted photos up soon.
Building the Impossible Is my main goal!!
  • Member since
    December 2002
  • From: Reno, NV
Posted by espins1 on Wednesday, June 24, 2009 9:32 AM

 White_R34 wrote:
First I'm back to work on it and I didn't see an answer to my question. So I'm going to go on an get my 251 done for this GB any way.

Dupes extended the GB to the end of the month, you can see his response to your question here.   Smile [:)]

/forums/68/961565/ShowPost.aspx#961565  

Scott Espin - IPMS Reno High Rollers  Geeked My Reviews 

  • Member since
    August 2007
  • From: n/w indiana
Posted by some assembly required on Wednesday, June 24, 2009 5:00 PM
thanks sfcmack for the kind words. i was gonin for a relatively clean afv that has been kickin up dust instrad of mud. white 34 is that an afv kit? if it is i would recomend usuing epoxy on the track joins cause they're small.other than that it looks better than mine did at that stageWhistling [:-^]

  • Member since
    November 2006
  • From: Coastal Maine
Posted by dupes on Saturday, June 27, 2009 2:01 PM

*Sigh*. First time I've been logged into the forum in 10 days. Work is certainly getting the best of me! Sigh [sigh]

Keep up the good work guys, can't wait for the finished products. Big Smile [:D]

Will be sure to get the final pics of my /8 up sometime soon, as well as all of the badges that I still owe people. They're all right here, just have to find some time to get them up on Photobucket.

Back soon!

  • Member since
    December 2002
  • From: Reno, NV
Posted by espins1 on Saturday, June 27, 2009 2:14 PM

Here are a couple of quicky shots of the interior.  I just need to install the seatbacks, rifles and brackets then attach the upper hull to the lower.  The camouflage spraying will commence this afternoon!  Smile [:)]

Scott Espin - IPMS Reno High Rollers  Geeked My Reviews 

  • Member since
    December 2002
  • From: Reno, NV
Posted by espins1 on Saturday, June 27, 2009 2:47 PM
This is the scheme I'm going to try to replicate on my 251

Scott Espin - IPMS Reno High Rollers  Geeked My Reviews 

  • Member since
    December 2002
  • From: Reno, NV
Posted by espins1 on Saturday, June 27, 2009 4:02 PM

The interior is finished (will weather it after the camo has been painted, don't want to get oils on the exterior before paint).  Next I'm attaching the upper hull to the lower, and adding the rear panel with doors, the fenders and the front plates of the halftrack. 


Scott Espin - IPMS Reno High Rollers  Geeked My Reviews 

  • Member since
    August 2007
  • From: n/w indiana
Posted by some assembly required on Saturday, June 27, 2009 5:20 PM
nicely done scott, im diggin the color of your wood seats.this for me is the hardest to get "right". lookin foward to more!

  • Member since
    October 2007
Posted by White_R34 on Saturday, June 27, 2009 11:59 PM
espins1 : The wood look on those bench seats looks "Amazing"Bow [bow]Bow [bow]Bow [bow]
Building the Impossible Is my main goal!!
  • Member since
    December 2002
  • From: Reno, NV
Posted by espins1 on Sunday, June 28, 2009 12:07 PM
Thanks guys, I appreciate the comments and the interest!

The bench seats were pretty easy to do and I'm thrilled with the results. I just simply primered them with Tamiya white primer then sprayed a coat of Tamiya XF-59 Desert Yellow thinned to a 50% ratio with Tamiya X-20A thinner. After the paint had cured I simply did a series of 3 or 4 washes over them using Burnt Umber artist oils mixed with Turpenoid. I liberaly applied the wash then just touched the end of the benches to wick away any excess and allows the effect to build up gradually.

Scott Espin - IPMS Reno High Rollers  Geeked My Reviews 

  • Member since
    December 2002
  • From: Reno, NV
Posted by espins1 on Sunday, June 28, 2009 4:51 PM
Here are a few shots right after I sprayed the final base coat of Dunkelgelb. I used a bit of material my wife gave me to protect the interior from any over spray. Next up, the wide brown wavy stripes.


Scott Espin - IPMS Reno High Rollers  Geeked My Reviews 

  • Member since
    October 2007
  • From: N.H.
Posted by panzerguy on Sunday, June 28, 2009 5:07 PM
 

   Scott it's nice to see that you're able to get some time in on this guy. The interior looks great. I've found that once you get past that the rest is usually all down hill.

   By the way I like the tablecloth tarpSmile,Wink, & Grin [swg].


"Happiness is a belt fed weapon"

  • Member since
    December 2002
  • From: Reno, NV
Posted by espins1 on Sunday, June 28, 2009 6:48 PM
Thanks Panzerguy, man it's sooooo good to be back on the bench again! I'm having a great time with my build. Thanks Dupes for extending the GB a few weeks so we could finish up our builds, much appreciated!


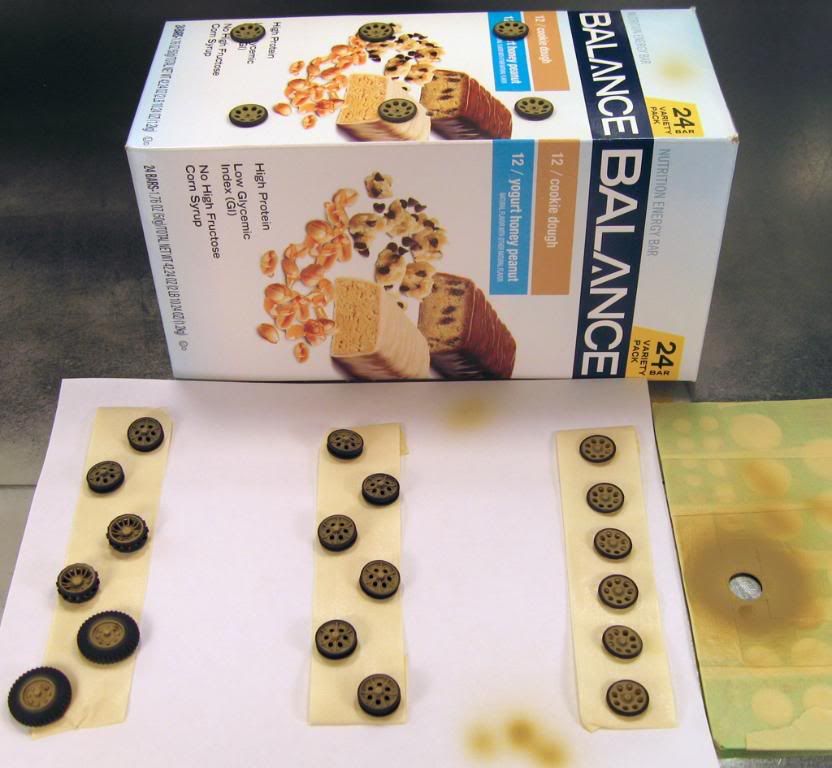
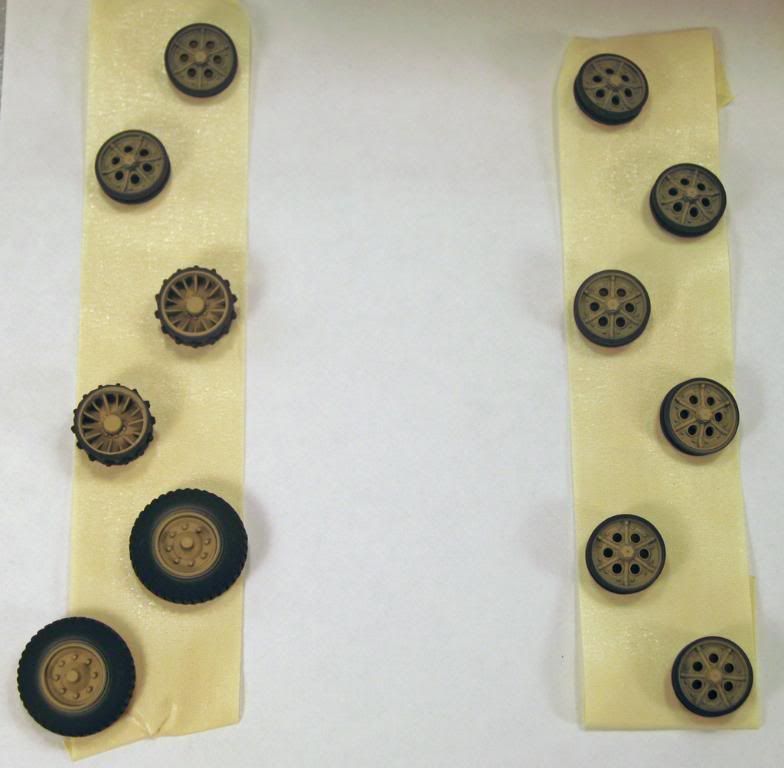
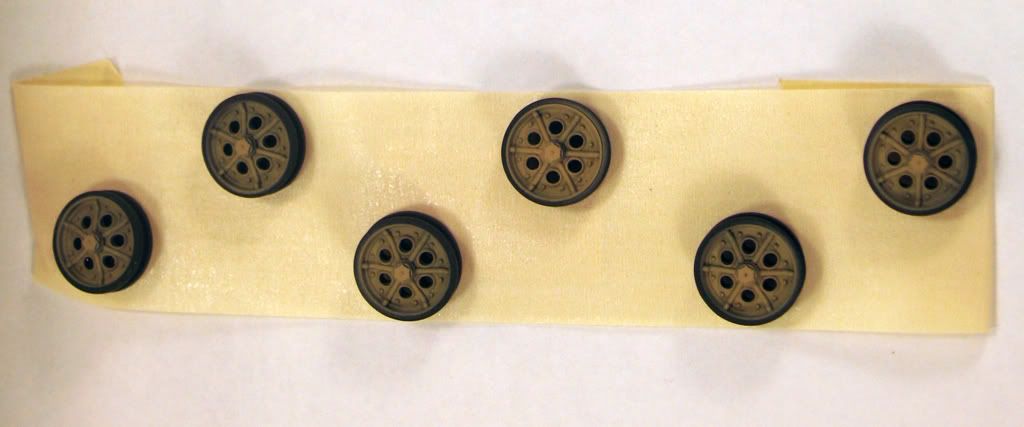
I just sprayed the wheel centers using a circular artist template. I had sprayed the wheels the rubber color (Flat Black mixed with a touch of gray to lighten it) a while back. I stuck the wheels down on strips of masking tape, although 6 of the wheels had to be stuck into little holes in a box as the shafts were too long and skinny to stick them to the masking tape. Using the 17/32 inch hole I simply held the template over each wheel then did a quick spray in the whole being sure to go at it from several angles to ensure good coverage.... took all of 10 minutes, piece of cake!

Now off to paint the soft edged wavy brown stripes.


Scott Espin - IPMS Reno High Rollers  Geeked My Reviews 

  • Member since
    December 2002
  • From: Reno, NV
Posted by espins1 on Sunday, June 28, 2009 7:46 PM
Just got done spraying the red-brown stripes. Next up, green stripes up the middle of the brown striping.


Scott Espin - IPMS Reno High Rollers  Geeked My Reviews 

  • Member since
    December 2002
  • From: Reno, NV
Posted by espins1 on Sunday, June 28, 2009 8:23 PM
And here it is after the green stripes were sprayed in the middle of the brown. Time for a beer and some relaxation with my lovely wife. :)


Scott Espin - IPMS Reno High Rollers  Geeked My Reviews 

  • Member since
    December 2002
  • From: Bury St Edmunds, Suffolk, England
Posted by Bish on Monday, June 29, 2009 12:12 PM
espins1 I do like that camo scheme, she is looking really nice, think you will be done in time.

I am a Norfolk man and i glory in being so


On the bench: Airfix 1/72nd Harrier GR.3/Fujimi 1/72nd Ju 87D-3

JOIN OUR COMMUNITY!

Our community is FREE to join. To participate you must either login or register for an account.

SEARCH FORUMS
FREE NEWSLETTER
By signing up you may also receive reader surveys and occasional special offers. We do not sell, rent or trade our email lists. View our Privacy Policy.