SEARCH FINESCALE.COM

Enter keywords or a search phrase below:

PAGE 5--FINISHED PICS!!!--- Revell Jagdpanzer Kanone

36523 views
147 replies
1 rating 2 rating 3 rating 4 rating 5 rating
  • Member since
    January 2007
Posted by the doog on Saturday, September 20, 2008 9:28 AM
 lexesbenz wrote:

Gonna bring this one to Syrcon eh? Looks great!! I'm looking forward to seeing this in person.

-Tony

I don't think I'll be bringing this one to SYRCON this year, Tony; I already have too many that I want to show off!

Quite a few of them are actually models I have built for Jenn--really eclectic stuff, plus some "surprises"! 

  • Member since
    January 2007
Posted by the doog on Saturday, September 20, 2008 9:25 AM
 redleg12 wrote:
 the doog wrote:

Mike--not too often that I get "out of WWII", but I might be for a while; I plan on a Leopard after this one!

....you better be looking for a "Doog" & "Jenn" figures for that Leopard.

Rounds Complete!!

LOL! I WISH!!!


  • Member since
    July 2006
  • From: New Jersey
Posted by redleg12 on Saturday, September 20, 2008 6:26 AM
 the doog wrote:

Mike--not too often that I get "out of WWII", but I might be for a while; I plan on a Leopard after this one!

We interrupt this WIP for an improtant message.... 

OK...so just a quick note....you better be looking for a "Doog" & "Jenn" figures for that Leopard. If not, we the masses may protest that build. Manny...if you have any ideas, let him know...

We now rejoin this WIP....

Rounds Complete!!

"The Moral High Ground....A Great Place to Emplace Artillery."

  • Member since
    December 2005
  • From: Syracuse, NY
Posted by lexesbenz on Saturday, September 20, 2008 12:06 AM

Gonna bring this one to Syrcon eh? Looks great!! I'm looking forward to seeing this in person.

-Tony

The flying hamster of doom rains coconuts on your pitiful city!!!!
  • Member since
    January 2007
Posted by the doog on Friday, September 19, 2008 11:00 PM

Manny, Mike, and Buddho--Thanks for weighing in and for your comments!

MAnny, I know what you mean about the decals "sticking" to the brush, but I've found that they tend to do that only if you wait too long to seat them, and if you don't wet the brush with water to dilute some of the decal setting liquid. 

Mike--not too often that I get "out of WWII", but I might be for a while; I plan on a Leopard after this one!

jwb---nice to see you around here so often, Jon! Glad to have imparted something useful to ya! Big Smile [:D]

stick man--thanks for your comments and compliments! 

I think the difference between what you're talking about there is that in this case, I've actually dissolved the paint and smeared the paint, so I don't think that it will "clean up" any time soon; besides, I've since added some layers of oil shading to the parts where I used it.

Thanks guys! 'Nother update very soon!!! Smile [:)]

  • Member since
    February 2008
  • From: ladner BC Canada
Posted by stick man on Friday, September 19, 2008 10:26 PM

WoW Doog! I realy like how this build is turning out it's superbe!

But one thing about your new tequnique... I've used Testors cement (the stuff that comes from the red tube) to make oil stains on veicalys and to make gasy efects on gas caps but I noticed that after my model had been siting for a couple of moths the glue dried out and I lost the efect. But I was'nt useing the same glue as you so hopefully nothing will happen to yours.

Great job!

Smile [:)]

I'm 15 and I model I sk8board and I drum what could be better.
jwb
  • Member since
    February 2006
  • From: Parkton, NC
Posted by jwb on Friday, September 19, 2008 8:11 PM
Awesome! I'd wondered how to get that washed mud look.

Jon Bius

AgapeModels.com- Modeling with a Higher purpose

"For I know the plans I have for you," declares the Lord, "plans to prosper you and not to harm you, plans to give you hope and a future." ~ Jeremiah 29:11

  • Member since
    March 2003
  • From: Newport News VA
Posted by Buddho on Friday, September 19, 2008 5:30 PM
Excellent work, Doog...Shy [8)]

  • Member since
    July 2006
  • From: New Jersey
Posted by redleg12 on Friday, September 19, 2008 5:09 PM

Looookingggggg Gooooood. I wonder what the base of the Testors is as opposed to some of the other liquid cements. Most of those a chlorinated solvent based (as a chemical engineer....I'll go no further).

Will have to pick up some Testors, just for this if nothing else. The only other thought is grit. If there was a way to put some fine grit into the paint....it would raise those areas slightly and give a little "chunk" to it. Metal blasting grit might work, but I would used an airbrush with a wider opening.

Just some thoughts for future experiments. I'll keep an eye for where to get small quantities of blasting grit....could be and interesting experiment for the spray booth cow!!

I love that you left WWII for a while....even if it is GermanSmile,Wink, & Grin [swg]

Nice idea....looks great.

Rounds Complete!!

"The Moral High Ground....A Great Place to Emplace Artillery."

  • Member since
    November 2005
Posted by Anonymous on Friday, September 19, 2008 4:18 PM

Wow...nice save on the tracks---improvise, improvise, improvise !!!  Cool stuff...you'll be able to later say: "See all those guide horns? I scratched 'em...".  Round guide horns?---weird...but cool. 

In regards to your decal method...I apply most decals in a very similar fashion except I don't flatten the wrinkled decal out with a brush---as it drys it naturally will flatten out...in fact, a big mistake many make is messing w/ the decal while it is still in its softened/wet state and end up tearing it...but it seems to work for you and you can't argue w/ results!  Thumbs Up [tup]

  • Member since
    January 2007
Posted by the doog on Friday, September 19, 2008 2:12 PM

 Panther F wrote:
Where is that picture/plate/drawing/painting of the Jagdpanzer from?  Big Smile [:D]
From Concord Publications' "Modern German Panzergrenadiers" #1018 isbn # 962-361-018-1

You might be able to find it on Amazon, or Half.com?

  • Member since
    June 2005
  • From: Indiana U.S.A.
Posted by Panther F on Friday, September 19, 2008 2:08 PM
Where is that picture/plate/drawing/painting of the Jagdpanzer from?  Big Smile [:D]
  • Member since
    August 2008
  • From: S.W. Missouri
Posted by Pvt Mutt on Friday, September 19, 2008 1:31 PM

Blush [:I]AAAAAAhhhhhhhhh SSSSSoooooooooo

......Tony......

Shoot Low Boys They're Ridin Ponys

  • Member since
    January 2007
Posted by the doog on Friday, September 19, 2008 1:20 PM
 Pvt Mutt wrote:

Cool [8D]

    Hey Doog:  Did the cement cut through to the gloss coat or just the acrylic mud?                         From the pictures it looks like oil has leaked out all over everything but being new at all these painting techiques I really don't know how it should look. I'm from Missouri and you'll just have to show me.Big Smile [:D]I'm sure when you've got all the weathering done it will have a completely different look to it. Do your magic Froggy,i'm watching.

    ....Tony the Mutt.... 

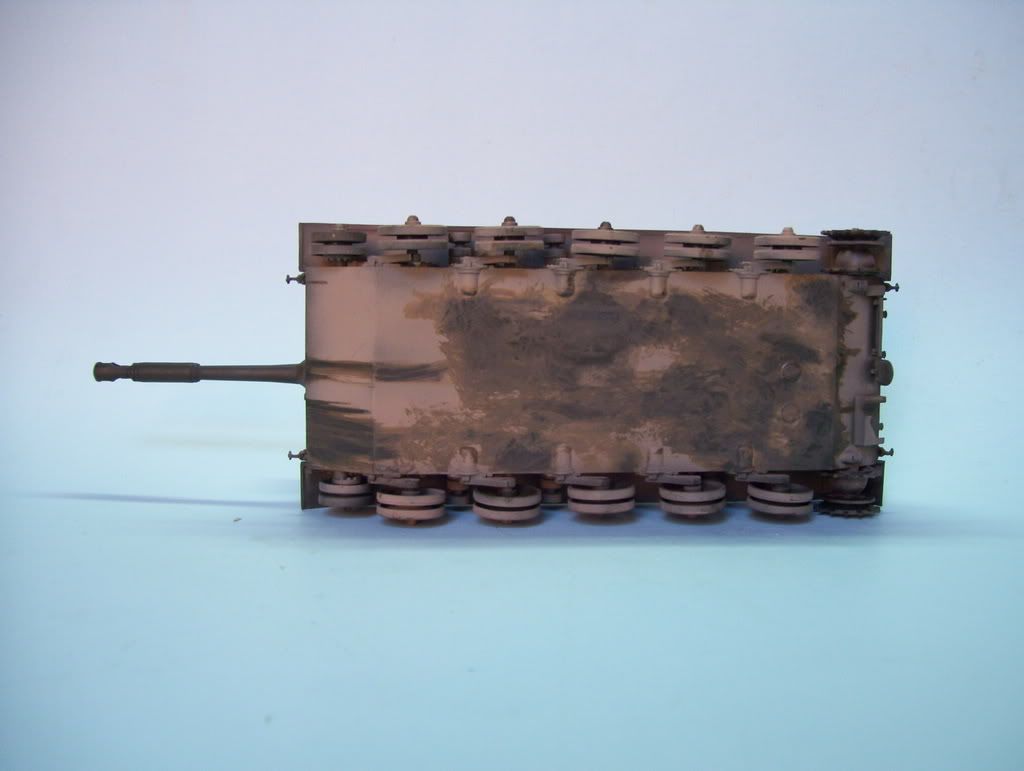
Tony, the gloss coat is acrylic also, and the glue seems to have somewhat attacked that as well--but that;s ok; it looks fine in person. I think it looks a little darker in the front there just because it's under the light source--it doesn't look that dark if you look at the "underside" picture. Here's kinda what I was going for--look at how dark the "base" looks under the accumulated mud on these vehicles. (Actually, that JaPaKa wears a camo scheme of mud as well--I seriously thought about applying that, but knew nobody would believe it without a reference pic!)

Thanks for commenting! You too, Jeff!! Big Smile [:D]


  • Member since
    June 2005
  • From: Indiana U.S.A.
Posted by Panther F on Friday, September 19, 2008 12:57 PM
WOW!!  I'm sending ya mine!  Big Smile [:D]
  • Member since
    August 2008
  • From: S.W. Missouri
Posted by Pvt Mutt on Friday, September 19, 2008 12:31 PM

Cool [8D]

    Hey Doog:  Did the cement cut through to the gloss coat or just the acrylic mud?                         From the pictures it looks like oil has leaked out all over everything but being new at all these painting techiques I really don't know how it should look. I'm from Missouri and you'll just have to show me.Big Smile [:D]I'm sure when you've got all the weathering done it will have a completely different look to it. Do your magic Froggy,i'm watching.

    ....Tony the Mutt.... 

Shoot Low Boys They're Ridin Ponys

  • Member since
    January 2007
Posted by the doog on Friday, September 19, 2008 10:11 AM

Hi again!

Here's the Friday, Sept 19th update! (WOW! Is it that late in the year already?! Shock [:O])

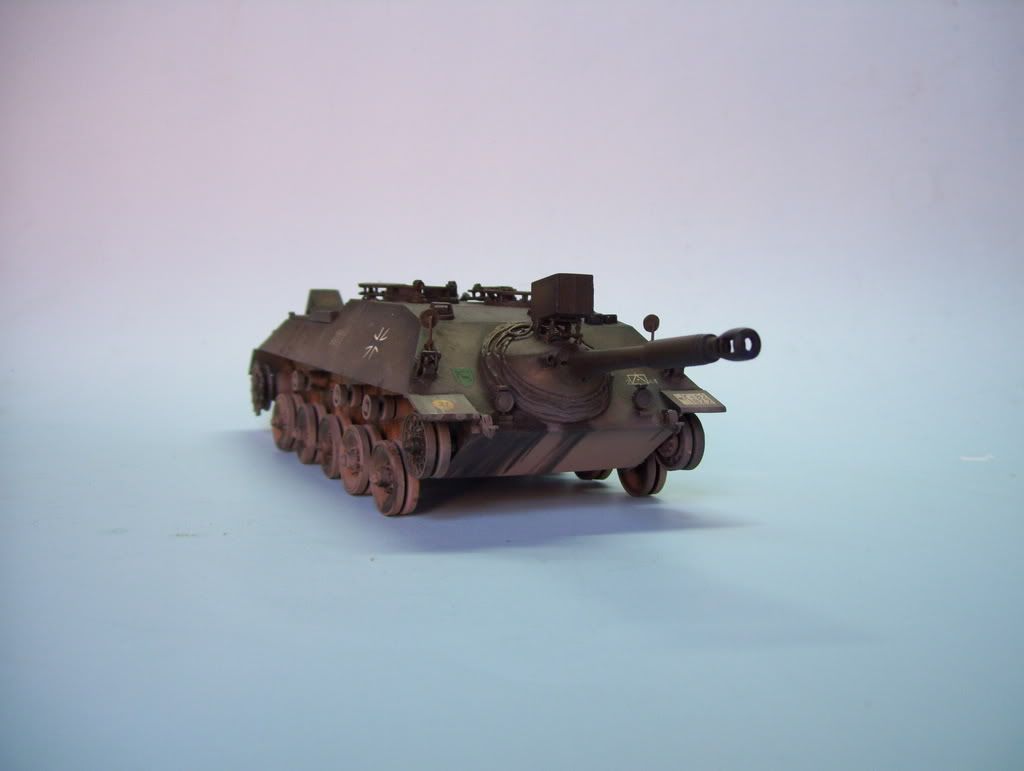
I applied a simple black/Van Dyke Brown oil wash to the model. It has toned down the paint scheme somewhat:
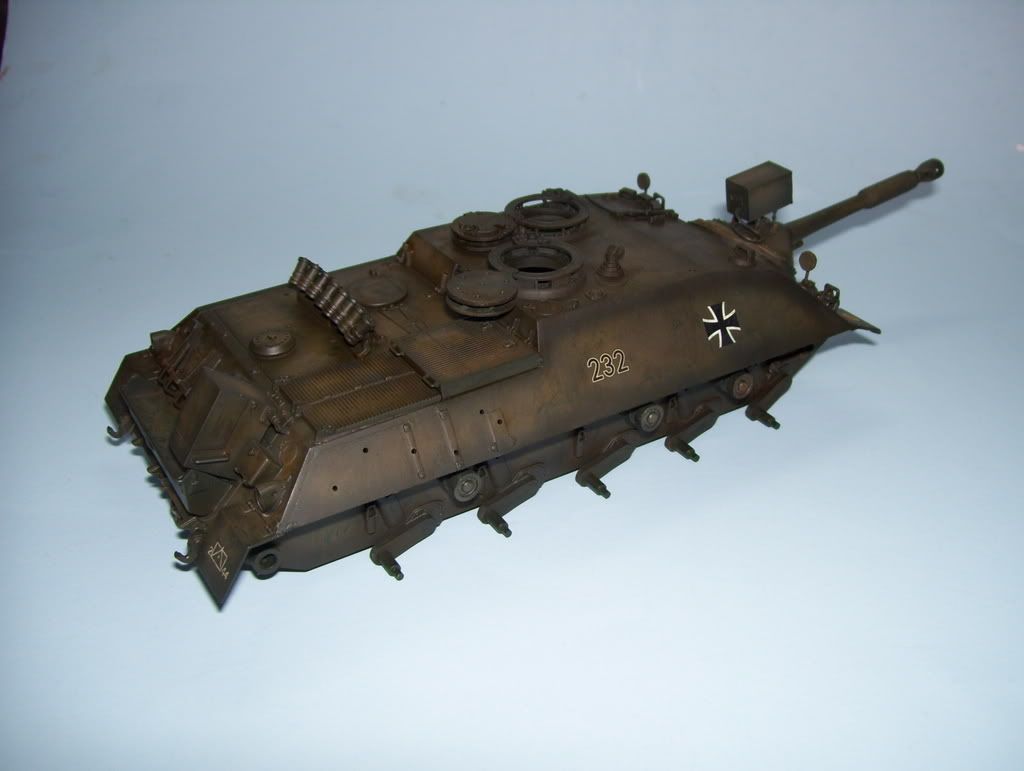
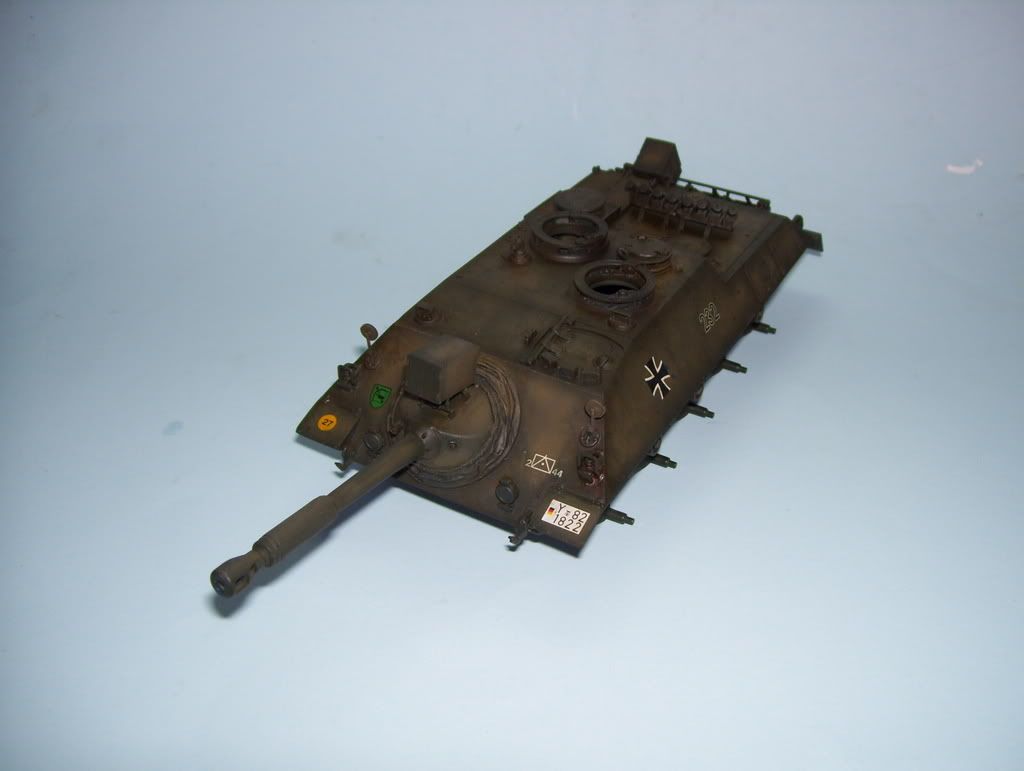
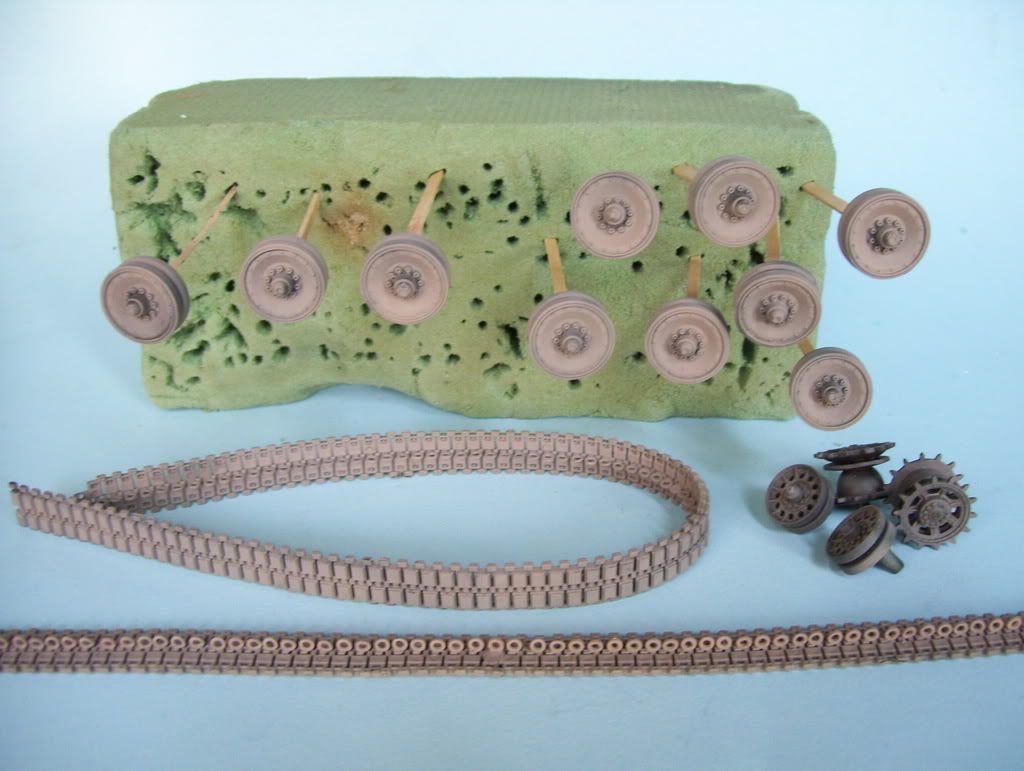
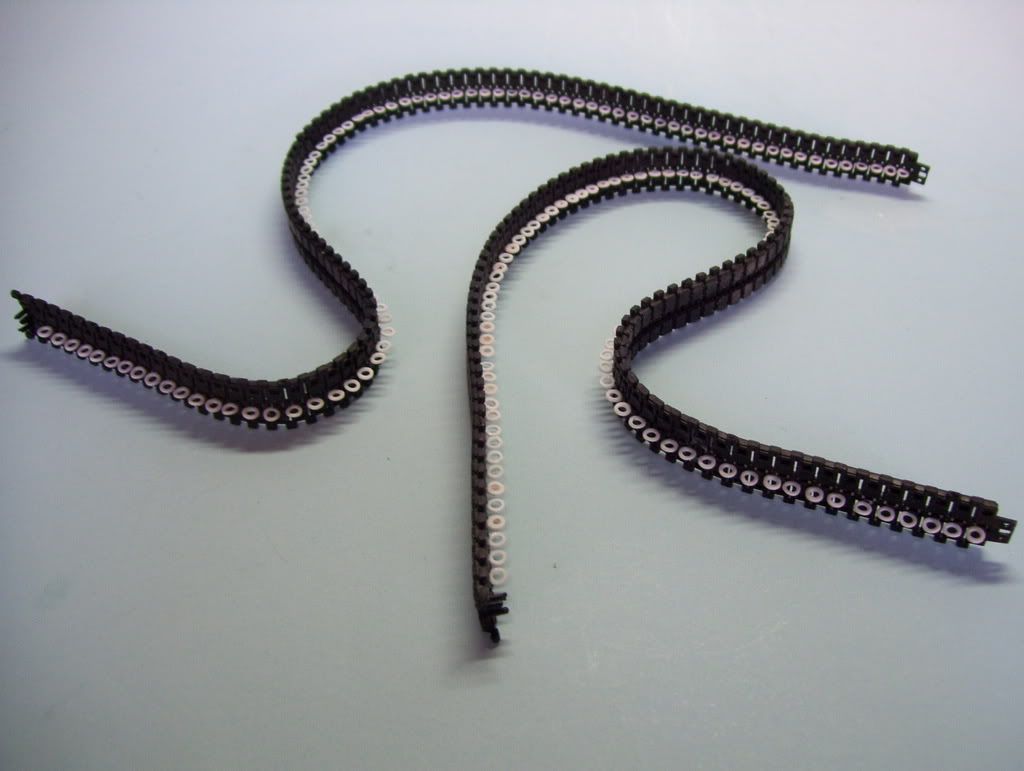
The tracks have been finished; they look like some "Giant Squid" tentacles! LOL!
Now, I asked myself, "Hmmm...how to weather this modern vehicle?" I didn't have the "luxury" of having the "comfort zone" of Dark Yellow, and I didn't want to just work within the pardaigms of what I normally use for weathering on German WWII vehicles. I also don't want to "overdo it".

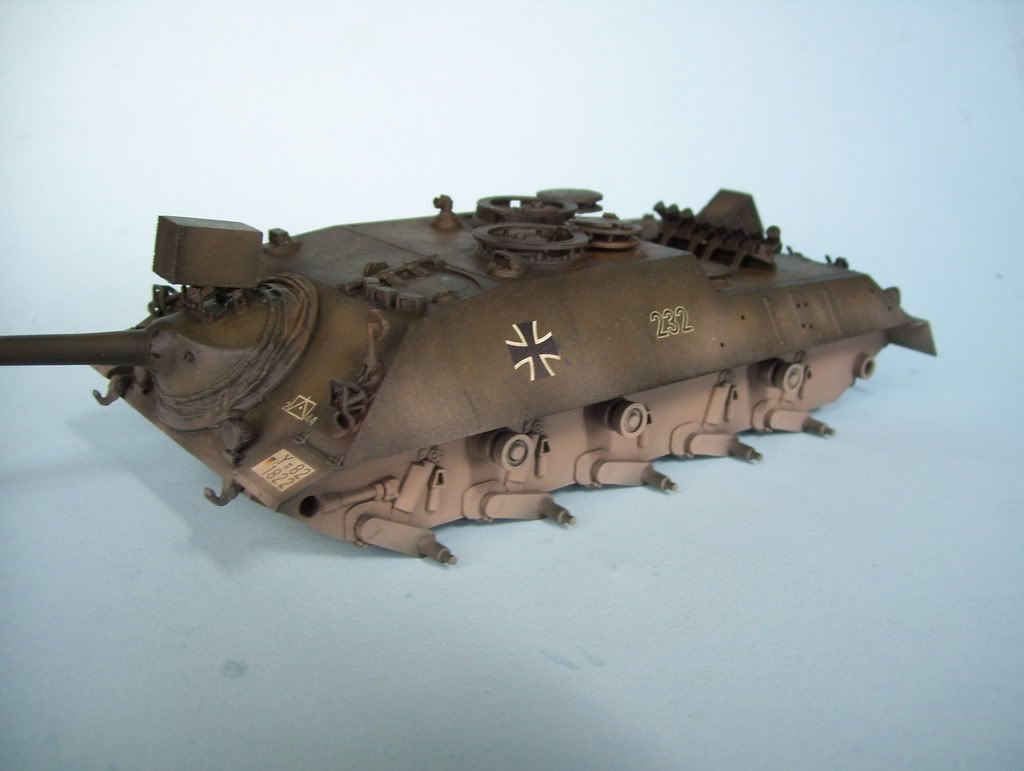
Looking at the reference photos of Bundewehr vehicles in this color scheme, I was struck by the fact that they always seem to be covered with dried mud on the lower hull. To simulate this, I mixed up some Tamiya Dark Yellow, White, a touch of Black, Gray, and a speck of Red Brown til it looked right, and gave the hull and wheels/tracks a liberal covering of it....
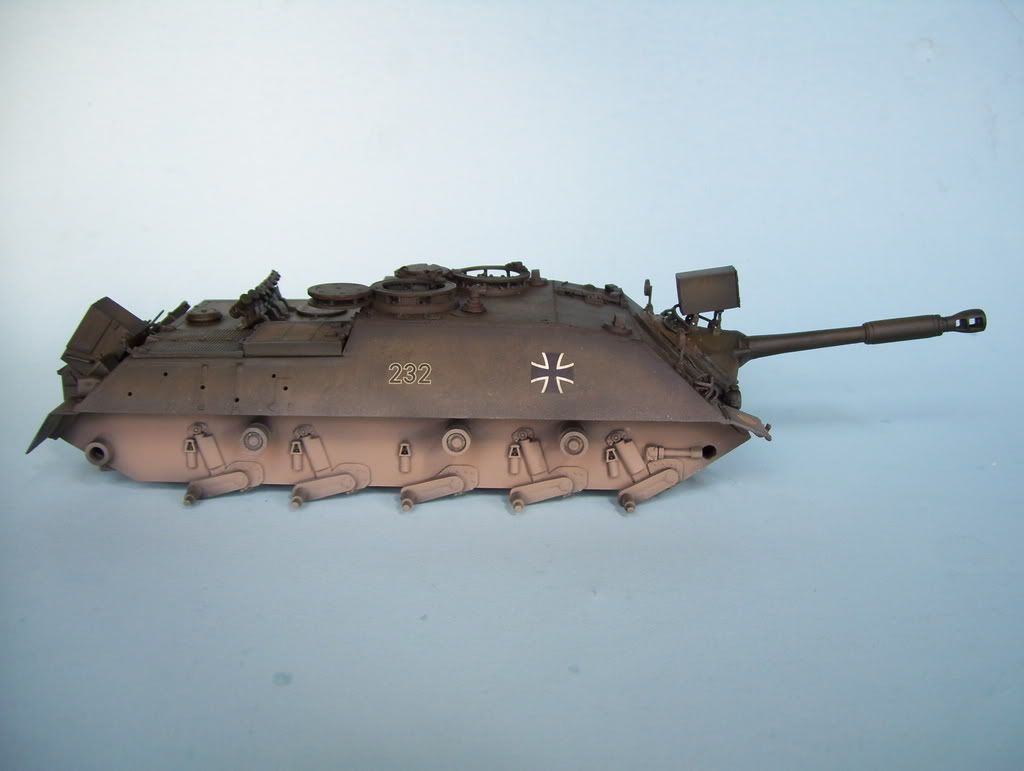
Now I was left with trying to get the look of where the vehicle had brapped through wet areas or encountered mud. How would I get the look of the mud being washed away in select areas? I know that standard technique says to use base coior, and streak that on...hmmm....could there be a better way? A more "literal" way?

I thoght about how I use Testor's Liquid cement to clean my airbrush parts--it completely strips away acrylic residue in seconds. Why couldn't it work to strip away some paint in a weathering process?

So I went in with the brush. I would simply dip in the brush, dab the excess off on a paper towel, and attack the paint. Working quickly, I would pull it down, clean it quickly by dabbing it off on the paper towel, and re-wetting/dabbing/attacking again... Here's the technique "in action"...
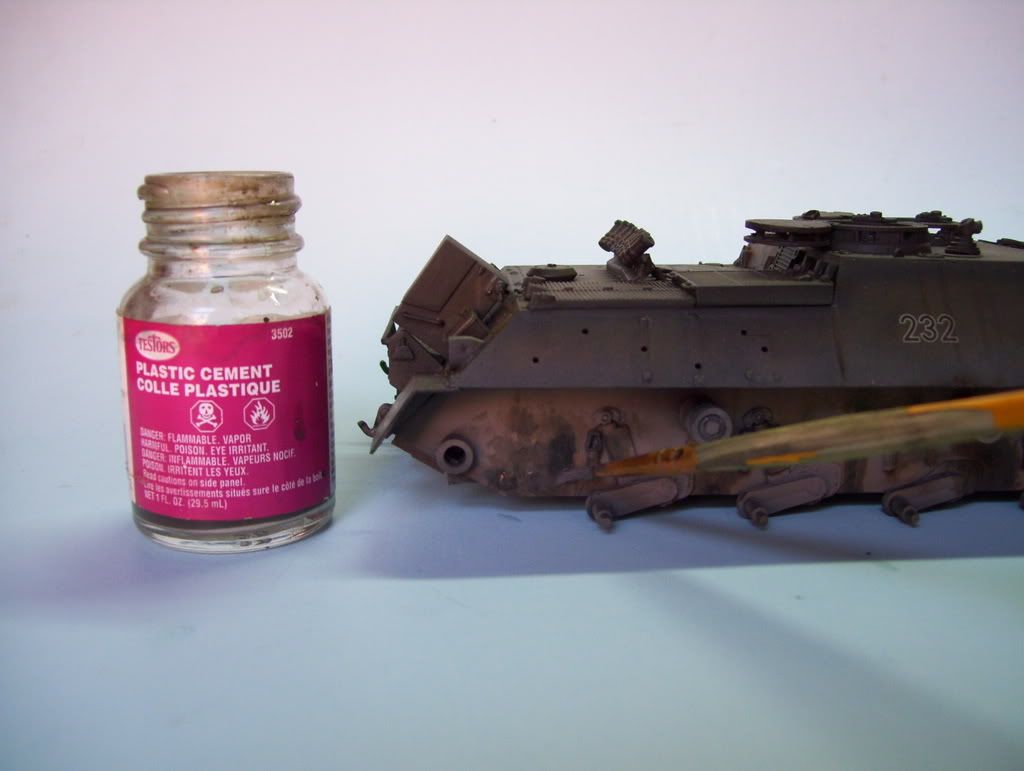
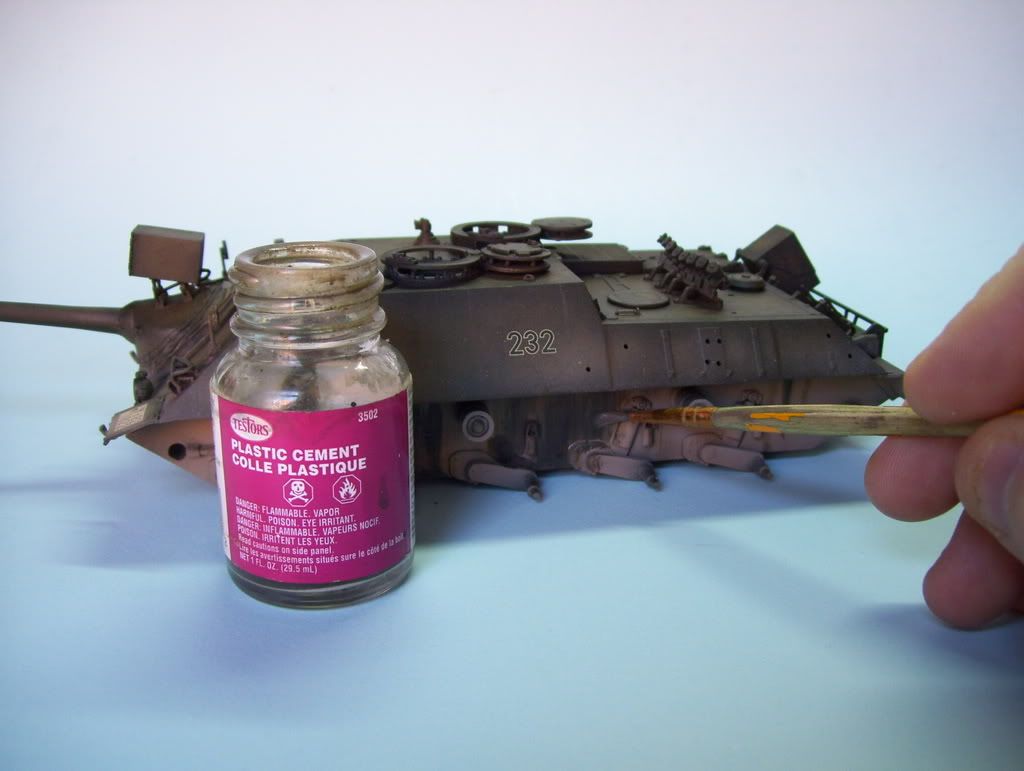
The wheels got the same treatment...
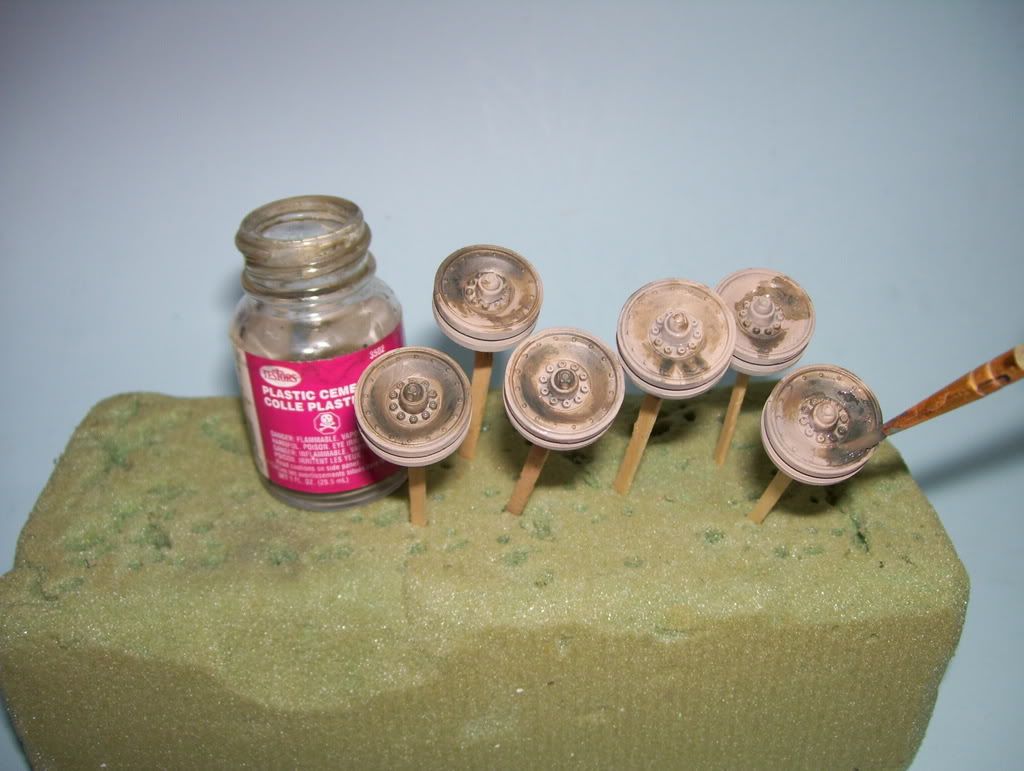
 

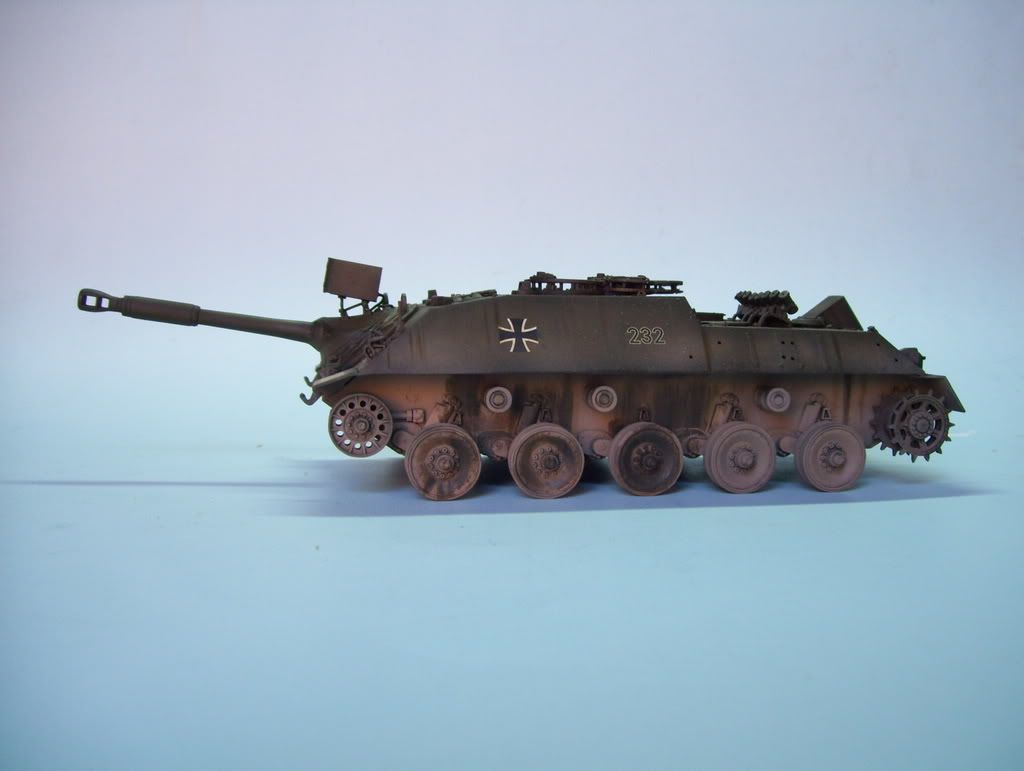
....and here's where I am so far...
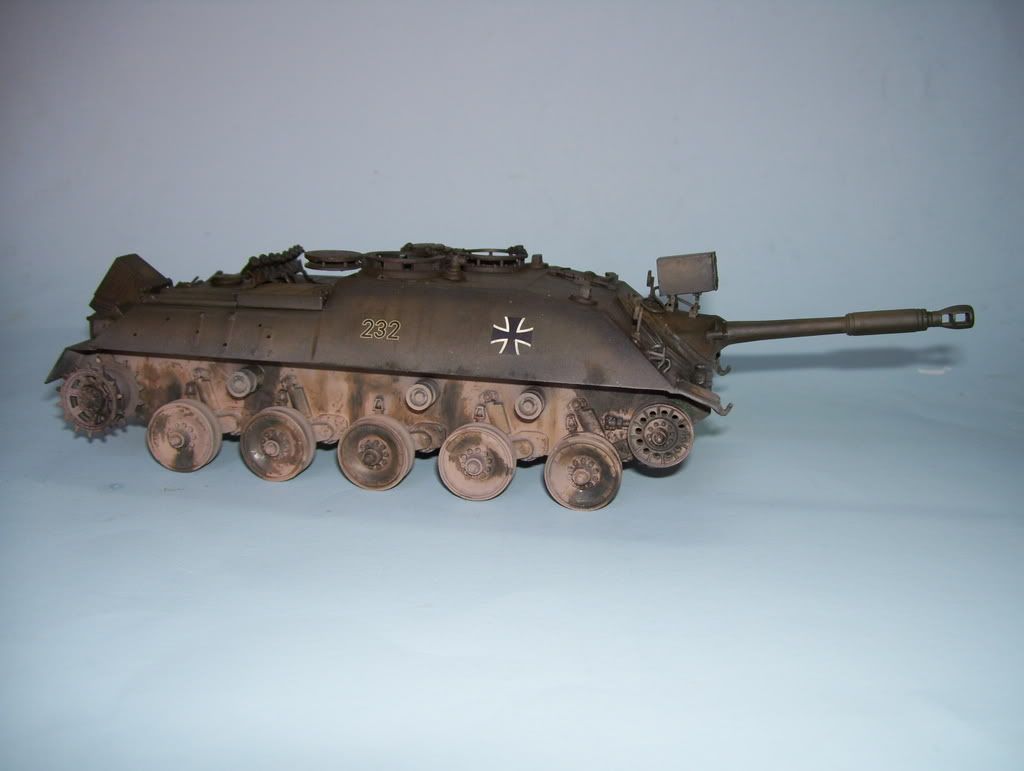
All, in all, what do you guys think? Too much? Just right? I'm pretty relieved tha it seems to have NOT really ruined the look of the base coat, and has achieved the look I was after. What do you think?

Comments welcomed!!!

  • Member since
    January 2007
Posted by the doog on Friday, September 19, 2008 9:37 AM

 wing_nut wrote:
Just caught up onthis thread.   Way cool paint job.  And the little circles.... I started to get a little queasy just thinking about that.  I hope you didn't have a nightmare after that of you running along the top of a giant tube and a massive shuny blade chopping just behind you as you ranShock [:O]
LOL! Now that's funny! Laugh [(-D]

Thanks too, doc! I'm keeping an eye out of my door for the van to pull up soon! Propeller [8-]

UPDATE COMING IN ABOUT 10 MINUTES!!!! Cool [8D]

  • Member since
    August 2007
  • From: The Plains of Kansas
Posted by doc-hm3 on Friday, September 19, 2008 7:33 AM

  doog! This is one brave and outrageous build, your paint/finish is superb! Those guidehorns are genius, have the whitejackets showed up at your door yet? LOLLaugh [(-D] I am impressed!!!Thumbs Up [tup]Thumbs Up [tup]Thumbs Up [tup]

All gave some and some gave all.

  • Member since
    April 2005
  • From: Piscataway, NJ!
Posted by wing_nut on Friday, September 19, 2008 6:23 AM
Just caught up onthis thread.   Way cool paint job.  And the little circles.... I started to get a little queasy just thinking about that.  I hope you didn't have a nightmare after that of you running along the top of a giant tube and a massive shuny blade chopping just behind you as you ranShock [:O]

Marc  

  • Member since
    January 2007
Posted by the doog on Thursday, September 18, 2008 10:24 PM

Thanks, moose!

Update coming soon!!

Big Smile [:D]

  • Member since
    November 2007
  • From: Wisconsin Rapids, WI
Posted by moose421 on Thursday, September 18, 2008 7:28 PM

hey doog still watching your build.  Love your paint job.  Looking forward to the weathering that you will accomplish.  WOW on the tracks.  Those would drove me to making the vehicle a bench queen.  Cutting 180 pieces, matching no less is way beyond my paitence level.  and desire.  But your save over the resin tracks is amazing.

Keep up the awsome work.

  • Member since
    January 2007
Posted by the doog on Thursday, September 18, 2008 10:20 AM

Mike, Erik, Ron--thanks for looking in and commenting, guys!

Jenn helped me out taking some pictures there, Mike; she's a great little helper. In return, I help her sort the colors of the threads in the bundles that come with her Cross-stitch kits that she likes to do! Blush [:I]

I'm strating in on the weathering now; should have an update in a day or two. Big Smile [:D]

  • Member since
    January 2005
  • From: in the tank factory in my basement
Posted by biffa on Wednesday, September 17, 2008 9:43 PM
Great build so far Doog i enjoyed catching up on this one this vehicle definatly looks like it belongs in WWII to me heh great save on the tracks too Smile [:)] i look forward to seeing the weathering of this beast.
Ron g.
  • Member since
    December 2006
  • From: N. Georgia
Posted by Jester75 on Wednesday, September 17, 2008 7:29 PM
Wow, awesome doog! You have the patience of a saint replacing those guide horns like that!

Eric


  • Member since
    July 2006
  • From: New Jersey
Posted by redleg12 on Wednesday, September 17, 2008 7:04 PM

And I thought I was anal....do you also like knitting!!!.....nice save....sometimes when the going gets tough....the tough cut little circles Banged Head [banghead]

On the decals I do the same, but sometimes have the old big hands problem with the eyes arent what they were problem....thanks for showing everyone.

Now....with both hands on the decal....who is taking the picture....or are you that good!!!Wink [;)]

Nice details. Detailing always requires improvisation. That's the fun partWhistling [:-^]

Rounds Complete!!

"The Moral High Ground....A Great Place to Emplace Artillery."

  • Member since
    January 2007
Posted by the doog on Wednesday, September 17, 2008 11:57 AM

 wbill76 wrote:
I recall someone, who shall remain nameless, implying I'd lost some sanity along the way for hand-drilling out guidehorn teeth on a Pz III build a while back... Whistling [:-^] Laugh [(-D] Nice save on the tracks Doog, they will look the part for sure once mounted. I wondered about how the fit around the sprockets was going to go if there wasn't any way to connect them up, at least temporarily, until the glue set...I guess that one will remain a head-scratcher.
HA HA! Point taken--you're absolutely correct about that, Bill! I guess I'm in the looneybin with ya on this one! Propeller [8-] LOL!

I actually did get a run around a sprocket, and glued it carefully so as to try to not connect it to the plastic, but it was murder to pry it out of the teeth, and I just couldn't see it matching up correctly if I didn't sit the teeth exactly as before when testing the fit of the subsequent links/section. As you know, a matter of a simple millimeter's difference would have given me the dreaded "gap", and I just didn't want to risk that!

  • Member since
    June 2005
  • From: Indiana U.S.A.
Posted by Panther F on Wednesday, September 17, 2008 11:38 AM

 wbill76 wrote:
I recall someone, who shall remain nameless, implying I'd lost some sanity along the way for hand-drilling out guidehorn teeth on a Pz III build a while back... Whistling [:-^] Laugh [(-D] Nice save on the tracks Doog, they will look the part for sure once mounted. I wondered about how the fit around the sprockets was going to go if there wasn't any way to connect them up, at least temporarily, until the glue set...I guess that one will remain a head-scratcher.

I never did imply you were insane Bill, just thought it was a hardcore on your part.  Big Smile [:D]  But, after watching all of your builds over the years I shouldn't have let it surprise me.  You always go the extra mile.

  • Member since
    July 2004
  • From: Texas
Posted by wbill76 on Wednesday, September 17, 2008 11:31 AM
I recall someone, who shall remain nameless, implying I'd lost some sanity along the way for hand-drilling out guidehorn teeth on a Pz III build a while back... Whistling [:-^] Laugh [(-D] Nice save on the tracks Doog, they will look the part for sure once mounted. I wondered about how the fit around the sprockets was going to go if there wasn't any way to connect them up, at least temporarily, until the glue set...I guess that one will remain a head-scratcher.
  • Member since
    January 2007
Posted by the doog on Wednesday, September 17, 2008 10:36 AM

Thanks, guys! I have to say that the resin track problem almost caused me to put this kit aside--for about half a minute. I've wanted tgis kit for so long though, that I'm thrilled that I've figured a way to slavage the tracks in a way that at least looks accurate. Luckily, they are nearly identical on the outsides, having big square track shoes, and being of identical width.

RRbaer, MECHTECH, and panzerguy--thanks for the kind compliments! Smile [:)] I'm glad to hear that the improvised fix on the tracks seems to have met with approval!

ted nichols--wow, I never thought of trying that with a hair dryer! I might have tried it too, were it not for discovering that the spacing of the links around the sprockets might be a real problem; this was one issue I was having with trying to make them fit. But I will keep that in mind if I ever attempt a second pair!

Panther F--thanks, Jeff!; great call on the mirrors! I agree; they do look better than the huge kit mirrors!A good call on the semogloss coat as well!

dupes--I actually do trim my decals down as close to the decal as I can. I just forgot to report that...however, the way I do the decals, I very rarely ever see any silvering. As you know, I don't like to use sealants or gloss coats underneath. I only ever sometimes have a problem with really old, thick decals--but then, I WILL use a "spot" gloss coat to be safe.

jwb--You know, I actually thought about sticking every single link to a piece of scrap with tape somehow, and painting every single link and then weathering every single link so that I could then just assemble them without having to worry about removing them...and then I actually did hit myself in the head with a large hammer and say "Snap out of it man!!" LOL! I would have used the un-modified kit tracks before doing that! 

I agree that it might have been possible to do it in short link sections, but like I said--the real problem was going around the sprockets; also, I have seen tracks done in that menner---the "short link" section--and somehow they look a little "cobbled together", where the links sometimes on't mate imperceptibly. Some 1/72 tracks go together like that, and they're tough to make them look contiguous.

Thanks all for commenting!! I do appreciate you all taking the time! Big Smile [:D]

JOIN OUR COMMUNITY!

Our community is FREE to join. To participate you must either login or register for an account.

SEARCH FORUMS
FREE NEWSLETTER
By signing up you may also receive reader surveys and occasional special offers. We do not sell, rent or trade our email lists. View our Privacy Policy.