SEARCH FINESCALE.COM

Enter keywords or a search phrase below:

1/16th Trumpeter T34/76 Update Pg3. Dec 2

20367 views
65 replies
1 rating 2 rating 3 rating 4 rating 5 rating
  • Member since
    September 2005
  • From: beacon falls , Ct.
Posted by treadwell on Saturday, November 15, 2008 9:44 PM


heya TerryBig Smile [:D]

the new photos are just great!---It is nice to see you breathing new life into this build----your style of work reminds me of the way Disaster Master does his builds-- I hope both of you guys view that as a compliment to each other,as it is meant to be--upon review, I sometimes find my work to be stark and clinical---but variation in style and composition is what makes this hobby cool--I look forward to the day you may be posting 'finished' pictures, although I realize that is many months to come-- keep it up, I am posting a couple of pics that you just put up with a couple of mine, just to see the interesting styles of interpretation--I hope to some time rerpresent my builds with all the wear and tear that you guys are able to do-( but then I my lose my own little niche--lolLaugh [(-D])--and to you folks viewing, you will see some technical differences as Terry's is a T-34/76, while mine is a T-34/85--the interior is actually quite different. yer pal tread


  • Member since
    April 2008
  • From: Kristiansund, Norway
Posted by Huxy on Sunday, November 16, 2008 9:08 AM

Games Workshop and Vallejo, just what I'm using! Dinner [dinner]


And the tank looks awsome! and please, let's have some scale comparison shots! :D

"Every War Starts And Ends With An Invasion".

  • Member since
    April 2005
  • From: Piscataway, NJ!
Posted by wing_nut on Sunday, November 16, 2008 9:36 AM

JEEZ LOUISE that is sweet.


Marc  

  • Member since
    July 2003
  • From: On my kitchen counter top somewhere in central North Carolina.
Posted by disastermaster on Sunday, November 16, 2008 10:38 AM
 treadwell wrote:


heya TerryBig Smile [:D]

----- I hope both of you guys view that as a compliment to each other, as it is meant to be--upon review,    --I hope to some time rerpresent my builds with all the wear and tear that you guys are able to do-

Well, speaking for myself, (thanks) I take that as a REAL compliment. I'm pretty sure Terry will see it the same way too.

Think of it this way. Here's a new T34.... 

 ....and here's a used T34

At some point in time, I'm sure they all looked one way or the other.  

The image “http://www.thelastsuperman.com/disastermaster/%23t1-4.jpg” cannot be displayed, because it contains errors.

 https://i.imgur.com/LjRRaV1.png


  • Member since
    May 2004
  • From: NC
Posted by dante on Sunday, November 16, 2008 2:24 PM
You da man!
  • Member since
    February 2006
  • From: VIRGINIA - USA
Posted by Firecaptain on Sunday, November 16, 2008 8:27 PM
 terry35 wrote:

With regards to the M16 1/16th halftrack, I'm seriously considering starting a thread where all problems and progress can be posted.

That would be absolutely GREAT, can't wait!

Your work and the T-34 build are stupendous! 


Joe
  • Member since
    May 2005
  • From: Dublin Rep Of Ireland
Posted by terry35 on Monday, November 17, 2008 2:33 PM

Thaanks every body. Tread your right about the Disastermaster, I've been following his excellent post and, well .... stunning... Ive saved all his pics and will be calling them a huge influence on the way my 34 gets its outer finish.

Good idea on comparing the two builds, maybe alot of people don't realise that these two models are practically brothers concieved at the same time, mine is just a late bloomer.

Treads pics were used to help me placing a lot of fighting compartment pipes. thats about where the similarities between an 85 and 76 end. Ammo  is different. side walls, floor layout, I think Tread will agree that they are two different beasts and to do  a 76 right from the Trumpeter kit involves a lot more cutting. Both our engine compartments are about the same, treads is cleaner, but both were built in unison.

Again thank you to every body for all your support.


I will keep this thread for posting progress.


Terry.

  • Member since
    July 2004
  • From: Texas
Posted by wbill76 on Monday, November 17, 2008 7:54 PM

Nice to see you still slugging away on this one Terry, it's already a showstopper now and it's not anywhere near completion! Thumbs Up [tup]

  • Member since
    July 2007
Posted by Moon Puppy on Monday, November 17, 2008 8:43 PM

You're getting some great reference picts but when do you start on the build??Clown [:o)]


Needless to say, outstanding work.

Remember, we are told Post Counts don't matter! (unless it's really high)

Modelers' Alliance

  • Member since
    October 2004
  • From: League City, Texas
Posted by sfcmac on Monday, November 17, 2008 8:54 PM

 Hope I am not being too critical but it is all too apparent that your oil stains are from a modern 5-40 Weight oil when they should be a russian 30 wt oil. The heavier weight oils were a no no in that they would make the engines more difficult to start in extreme cold. Probably need to work on that. Other than that it looks ok, I guess................

Geeze I am going out to the back yard and bury myself now! How do you compete with that?

  • Member since
    May 2005
  • From: Dublin Rep Of Ireland
Posted by terry35 on Tuesday, November 18, 2008 2:48 PM
 sfcmac wrote:

 Hope I am not being too critical but it is all too apparent that your oil stains are from a modern 5-40 Weight oil when they should be a russian 30 wt oil. The heavier weight oils were a no no in that they would make the engines more difficult to start in extreme cold. Probably need to work on that. Other than that it looks ok, I guess................


Thanks,  what exactly do you mean about the stains. I'm  intrigued, I have the ones that will be visible placed under the radiator, but would they be lighter or heavier. Please clarify and I will try to correct. Honestly I do appreciate this input.

Thank You "sfcmac".

Reagrds,

Terry Burke.

  • Member since
    October 2004
  • From: League City, Texas
Posted by sfcmac on Tuesday, November 18, 2008 3:01 PM

 Uh that was kinda not a serious reply Banged Head [banghead]  You know all too well I am crazy about your work...... You know we Irish fellows gotta stick together!  I mean eyeballing oil weight at any scale? Im just a little nuts thats all. Pirate [oX)]Make a Toast [#toast]

I will say though in our deisal engines the bottom of the engine compartments were pretty nasty. Especially after a rain fall where the sludge would float on the trapped rain water. Unscrewing the drain plug was always one of those moments I will treasure.

  • Member since
    May 2005
  • From: Dublin Rep Of Ireland
Posted by terry35 on Tuesday, November 18, 2008 3:13 PM

Cheers, Thanks, you got me there, Ya see I am in the engineering trades, fitter to be exact, I worked in the Glass industry for 17 years, and am all too aware of the consequences of the wrong lubrications being used. But I did notice that a new machine will look the same as a 30 year old machine after about 6 months in service.

I used the "ARTY FARTY" method of doing the stains but do know that a machine in service for 3 to 4 years will be in a state after the kind of running these got, and not to put too fine a point on it but the T34 was never built with engineering excellence in mind. I think the Q.C. guys only got a Crayon drawing of the shape of what a T34 was meant to look like.

I do remember Hilary Doyle telling me at one time that at the panther assembly plant 20 or so hulls were rejected because the red primer did not exactly match the swatch book.

I believe him because heis in posession of original paint cards.

Thanks again.

Must  go and do some painting on my tank. I'm gonna watch Blade2 as well.

Terry Burke.

  • Member since
    October 2004
  • From: League City, Texas
Posted by sfcmac on Tuesday, November 18, 2008 3:29 PM

Sign - Oops [#oops] Sorry about that the only part I meant to be taken seriously was the part where I am going to bury myself in the back yard as I cannot hope to compete with such fine work. I guess that part is even more justified now.

 BTW  your rust and corrosin are clearly from steel made from Iron ore from Norway as oppossed to From the Russian Urals. You can tell by the color of the oxidation. Work on it.

Shock [:O]Make a Toast [#toast]

  • Member since
    May 2004
  • From: NC
Posted by dante on Tuesday, November 18, 2008 3:38 PM

Hi Terry

Pardon my stupidity, what is a fitter.

Dan

  • Member since
    May 2005
  • From: Dublin Rep Of Ireland
Posted by terry35 on Wednesday, November 19, 2008 6:54 AM

Hi, Dante, I forgot that in America the trade of fitter is probably known differently, I think in the states its known as a MILLWRIGHT. Basically its a qualification in the engineering trades for a person who will be able to make precision parts from scratch, from supplied drawings.

It involves turning, Milling, welding, grinding, pipe work and a couple of other things. I done that and plant maintenance. It is an engineering qualification.

I hope that clears it up a bit.

Hows the haalf track comming along?

Hope your keeping well.

Terry.

  • Member since
    August 2007
  • From: The Plains of Kansas
Posted by doc-hm3 on Wednesday, November 19, 2008 7:22 AM

 Terry, This truly an engineering marvel of multimedia in modeling, speaking of engineering what firm are you the owner of, or are you just the head engineer? Your skills take modeling to the level of museum quality scratchbuilding. Lookout, if the "Smithsonian" sees this you may be asked to build one in 1/16th scale or is it 1/8th? Beautiful work Terry.

 I now consider myself an assembler of plastic parts, Disastermaster, move over I need some space under that rock you guys are under.

All gave some and some gave all.

  • Member since
    May 2004
  • From: NC
Posted by dante on Wednesday, November 19, 2008 9:32 AM

Hi Terry

The half track is on hold, there's severable builds going on now and I have to solve some problems with the build. I'll wait until they catch up.

Go to your other message /forums/1032822/ShowPost.aspx I'm not sure if I gave you this other site.

  • Member since
    September 2006
  • From: Dripping Springs, TX, USA
Posted by RBaer on Wednesday, November 19, 2008 12:03 PM

Wow. Like's been said, makes me feel like I should hang up my tools.......

Awesome work.Thumbs Up [tup]

Apprentice rivet counter.

  • Member since
    August 2006
  • From: Arkansas
Posted by K-dawg on Wednesday, November 19, 2008 1:03 PM

Awesome work for sure.. Can't wait to see more man..


KC

Kenneth Childres, Central Arkansas Scale Modelers

  • Member since
    September 2004
  • From: Colorado Springs, Co
Posted by steveoccc on Thursday, November 27, 2008 7:34 PM

Hey Terry,

   A fantastic build, both amazing and depressing to me, amazing in it's quality and depressing to know that my build will never compare favorably to it!

   I've just started working on this and my build will be straight OOB except for an aftermarket metal barrel. I've been having minor problems with painting. I use Tamiya primer and spray cans  and the plastic doesnt seem to agree with the tamiya acrylics, I'm having to use very light coats, anything heavier just causes bubbles on the surface of the part. I tried washing all the sprues in warm water and that helped somewhat but I'm debating on switching paint.


Cheers,

Steve

"First, they came for the socialists, and I did not speak out because I was not a socialist. Then they came for the trade unionists, and I did not speak out because I was not a trade unionist. Then they came for the Jews, and I did not speak out because I was not a Jew. Then they came for me, and there was no one left to speak for me." Martin Niemöller: The Resistance (1892-1984)
  • Member since
    May 2005
  • From: Dublin Rep Of Ireland
Posted by terry35 on Tuesday, December 2, 2008 4:46 PM

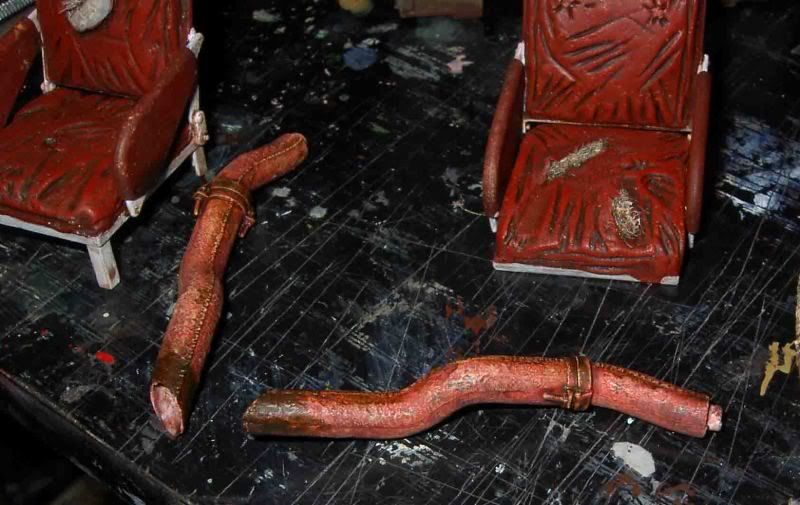
Tues. Got home and was too tired to do any work, so I thought I'd post some progress.

Some weathering on a side panel. More to be done.

One of the scratchbuilt gate valves painted.

Exhausts almost done.

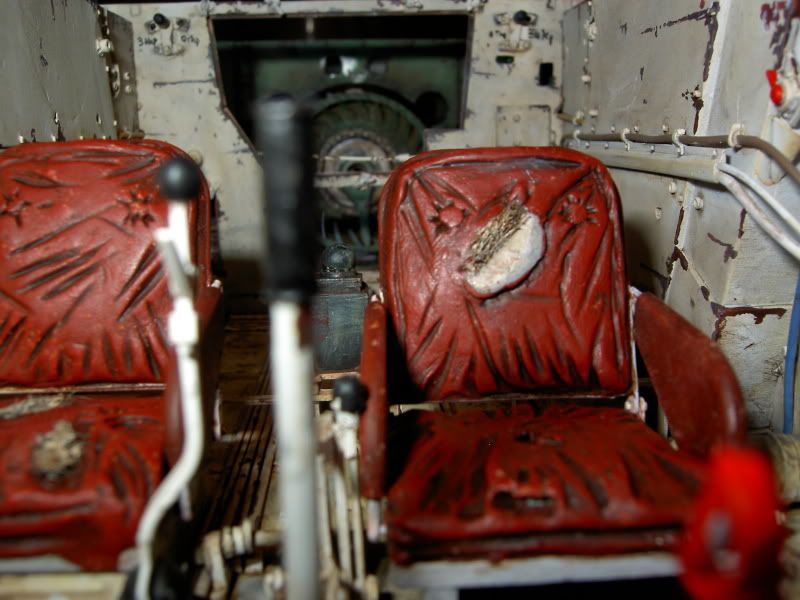
One of the chairs Bulked out with Gamesworkshop Putty.

Painted, I decided to add some tears and simulate some of the stuffing sticking out. Now I need  to see a shrink.
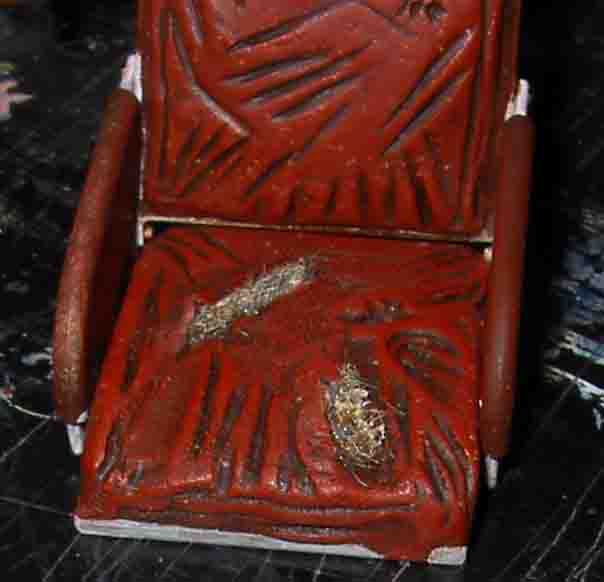
Oh, I used wire wool, stuffed into the gaps then trimmed.

Some more.

I know the seats look a bit red at the moment but I must now work out how they will look when installed, I mean from the point of view of how they will be seen through the hatch.


I will be doing a lot more on these but I just feel a bit tired at the moment. I'm going upstairs to watch "Family Guy".

Thanks for Looking.

Regards,

Terry.

  • Member since
    December 2005
  • From: Syracuse, NY
Posted by lexesbenz on Friday, January 2, 2009 11:58 PM
Terry sweet build man!!!! any new updates? by the way do you have a link to a detailed T-34/76 walkaround??
The flying hamster of doom rains coconuts on your pitiful city!!!!
  • Member since
    January 2007
Posted by the doog on Saturday, January 3, 2009 12:00 AM
WOW, terry--that's looking pretty serious! Nice work on those seats and that valve thing!
  • Member since
    May 2005
  • From: Dublin Rep Of Ireland
Posted by terry35 on Saturday, January 3, 2009 10:49 AM

Thanks Karl, Happy New Year to you my friend and all your family.I never got back to you with a 1/35th beside it for comparsion, I'm sorry for that but I put the kit away for a few weeks/months as ploughing into this and rushing would be criminal at this stage.

Lexesbenz, I was using an actual manual for a T34 which was published on the internet but can't find it. The book I'm using is the same as treadwell , T34 mythical weapon from airconnection in Canada, its about $130 Canadian, but worth every penny.

Happy New Year to all.

Terry.

  • Member since
    December 2005
  • From: Syracuse, NY
Posted by lexesbenz on Saturday, January 3, 2009 1:46 PM
Thanks!!
The flying hamster of doom rains coconuts on your pitiful city!!!!
  • Member since
    December 2005
  • From: Syracuse, NY
Posted by lexesbenz on Monday, January 5, 2009 12:10 AM

Terry, I decided to give my love to the T-34 I'm going to build it right. So I am going to scratch build as much of the interior as I can, I was wondering though, How did you make the pattern on the fuel cells? do you have any reference photos or dimensions for the batteries you have made? and lastly, you told me I had to make a PTO for the turret, I'm not very familiar with tank terminology yet, could you explain what that is? I can't thank you enough.

Tony

The flying hamster of doom rains coconuts on your pitiful city!!!!
  • Member since
    May 2005
  • From: Dublin Rep Of Ireland
Posted by terry35 on Wednesday, January 7, 2009 5:11 PM

Hi, Toni, to start the unit in the center of the floor is the PTO  (power-take-off) that scratchbuilt part is pretty accurate. Youu will have to copy an ammo bin for the floor. 

Now as for the batteries look at the with between the two suspensoin units, you will have to scratch those as well, and do them from tube, the swing arm for the suspension sit into them.

So that is the lenght of the batteries for a 76, through research we have come to the conclusion that theh batteries were "wet", each cell wrapped and joined in series. The height of the batteries should be below the radiator bracket, drop that a couple of mm so your radiators will fit.

The fuel cells are based on stuff from the now defunct tanxheaven, but have since been confirmed to be correct in T34 Mythical weapon. They were drawn in a cad programme and cut into laminates of plastic card on an engraving machine. Its been a few years since that programme was created.

I highly recommend you get intouch with treadwell, he has done a fantastic job on an engine mount and has done a drawing with measurements.

I trawled for a while and got you some links that might be of use to you,

http://images.google.ie/imgres?imgurl=http://farm2.static.flickr.com/1095/1005123281_2d706f2772.jpg%3Fv%3D0&imgrefurl=http://flickr.com/photos/dahlin/1005123281/&usg=__Ujc0OcQyJY_1pWaz9vHsJ5bPSDA=&h=500&w=335&sz=136&hl=en&start=7&sig2=g8MtPkisSP2pHEWuQNHZHw&tbnid=3sf6LO1Q0YwZJM:&tbnh=130&tbnw=87&ei=LillSc67Mom0jAeCuPnUCQ&prev=/images%3Fq%3DT34%2Binterior%26gbv%3D2%26hl%3Den%26sa%3DG

http://images.google.ie/imgres?imgurl=http://photos.kitmaker.net/data/12349/thumbs/daz.jpg&imgrefurl=http://www.armorama.com/modules.php%3Fop%3Dmodload%26name%3DSquawkBox%26file%3Dindex%26req%3Dviewtopic%26topic_id%3D128852%26page%3D1&usg=__pS543oIMO-BAZb0KVQSCR3uDHYY=&h=150&w=150&sz=5&hl=en&start=135&sig2=Qnjfb8K0049yNSO4Wrr1SQ&tbnid=Noi8DZ2zW4lNvM:&tbnh=96&tbnw=96&ei=eSplSfufGo-vjAeP-fnWCQ&prev=/images%3Fq%3DT34%2Binterior%26start%3D126%26gbv%3D2%26ndsp%3D18%26hl%3Den%26sa%3DN

http://images.google.ie/imgres?imgurl=http://upload.wikimedia.org/wikipedia/commons/b/b4/T-34-85_interior_Parola_Tank_Museum.jpg&imgrefurl=http://commons.wikimedia.org/wiki/File:T-34-85_interior_Parola_Tank_Museum.jpg&usg=__11bVb39o-yYj9KpHE8f0T4fksJ0=&h=768&w=1024&sz=295&hl=en&start=4&sig2=7erRtdW1vmqFkb857EhEPQ&tbnid=EhV2SPmx-rNmXM:&tbnh=113&tbnw=150&ei=LillSc67Mom0jAeCuPnUCQ&prev=/images%3Fq%3DT34%2Binterior%26gbv%3D2%26hl%3Den%26sa%3DG

With this kit, you need to scratch most of the missing parts, so the cost is minimal, so I cannot recommend T34 Mythical Weapon to you enough, its expensive but boy OH boy by the time you finish you will not regret the cost.

Terry.

  • Member since
    December 2005
  • From: Syracuse, NY
Posted by lexesbenz on Wednesday, January 7, 2009 9:46 PM
Wow, Terry thanks, I borrowed the T-34 mythical weapon book from a friend, he said I can keep it until I'm done with the build, what page does the book show the PTO and suspension units? I looked but then again I tend too miss the important details. I cant thank you enough for the reference photos an explanations, thanks!!!
The flying hamster of doom rains coconuts on your pitiful city!!!!
  • Member since
    May 2005
  • From: Dublin Rep Of Ireland
Posted by terry35 on Thursday, January 8, 2009 7:11 AM

Hi Toni, I will be back on at the weekend, I use two broadband connections at home a 1mb, and a 3mb.

I do have about 100 or more photos that may be of use to you. I will either upload them in batches to you or create a new photo bucket account for you and let you work at them at your own leisure.

I will PM you saturday afternoon.

Terry.

JOIN OUR COMMUNITY!

Our community is FREE to join. To participate you must either login or register for an account.

SEARCH FORUMS
FREE NEWSLETTER
By signing up you may also receive reader surveys and occasional special offers. We do not sell, rent or trade our email lists. View our Privacy Policy.