SEARCH FINESCALE.COM

Enter keywords or a search phrase below:

AFV M1128 MGS Stryker *WIP*Pg 5, 01-19-09 Finished w Figs

50196 views
109 replies
1 rating 2 rating 3 rating 4 rating 5 rating
  • Member since
    January 2007
Posted by the doog on Sunday, December 14, 2008 6:15 PM

Cool beans, Mike!

For some reason, this model just makes me want to "brap!"--it looks fffast! 

Looking good--can't wait to see that big gun topping it off!

  • Member since
    July 2006
  • From: New Jersey
Posted by redleg12 on Sunday, December 14, 2008 6:28 PM

Karl - Thanks for looking and your comments. Yep....looks fast and I can't wait for the gun myself

PS....You always ask so this time I have some Verlinden figs for the driver and TC. I'm going to give them a go. But first have to finish the vehicle.

Thanks again

Rounds Complete!!

"The Moral High Ground....A Great Place to Emplace Artillery."

  • Member since
    October 2008
  • From: SE Pennsylvania
Posted by padakr on Tuesday, December 16, 2008 6:28 AM

My kit, the M1130, calls for the rings on all wheels.  What are they for?


  • Member since
    July 2006
  • From: New Jersey
Posted by redleg12 on Monday, December 22, 2008 4:06 PM

Well not to be outdone by all the holiday building, here is what I have completed.

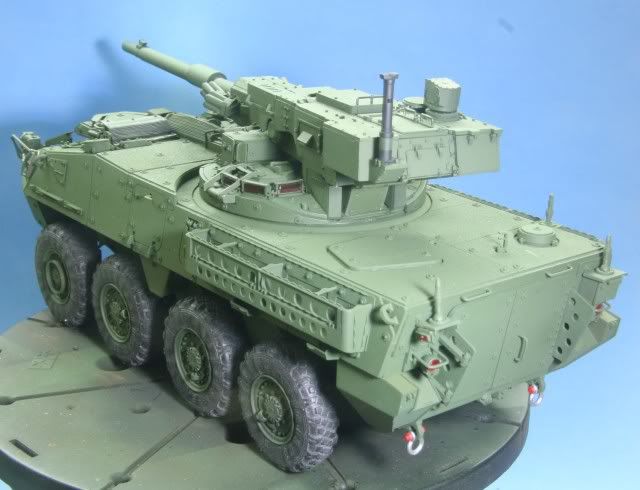
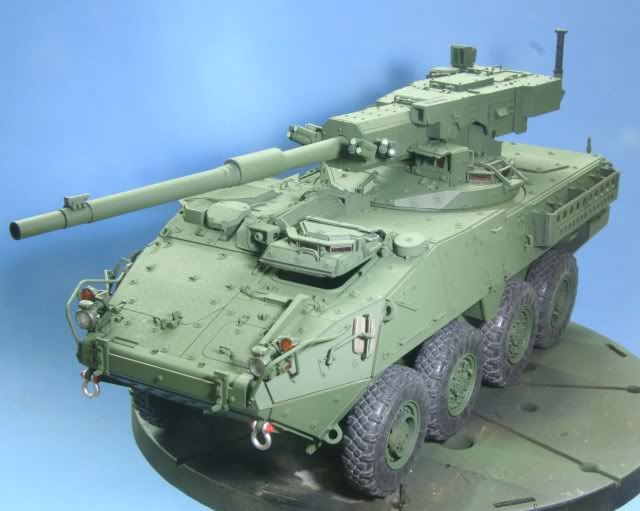
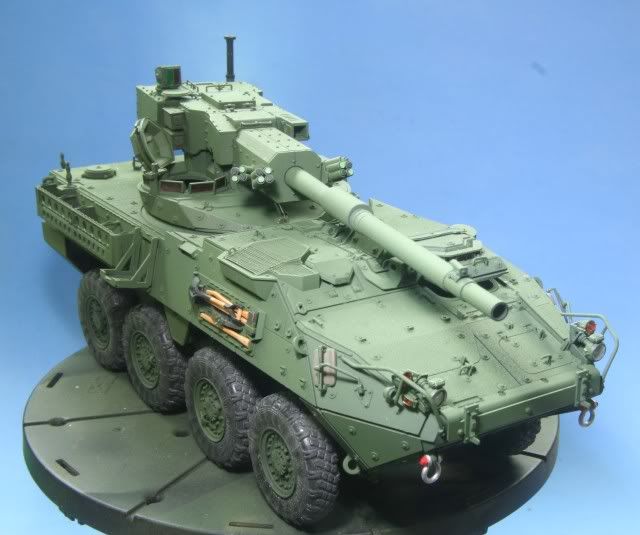
First was the complete assembly of the major components. After assembly I finished up all the minor grab handles everywhere. For the most part the assembly was smooth except the fit of the gun to the turret. The mounting was tight and some work with the sanding stick and #11 blade was required to get everything to fit  Here is the overall views of the current state of the build
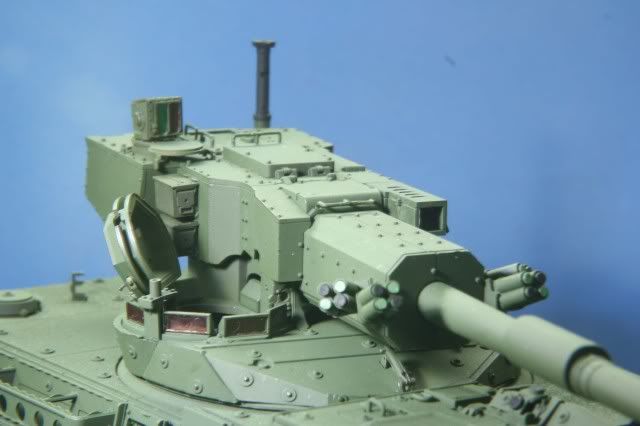
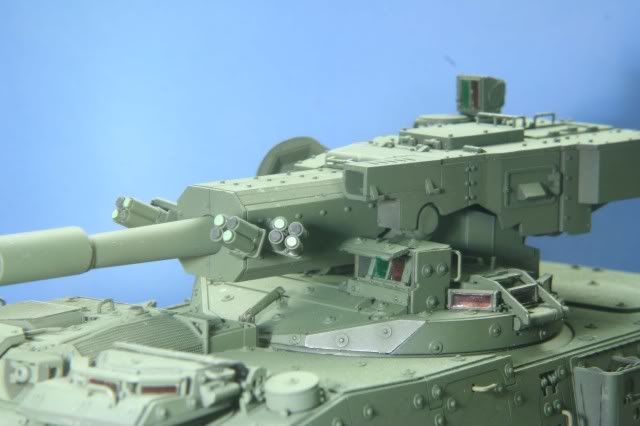
After assembly I began assembly and mounting of details. Here you can see the smoke launches painted for smoke (Tamiya NATO Black) and WP (Model Master Pale Green FS34227) mix. Ammo cans mounted on the gun side for the M2 50cal (Model Master Dark Green FS34049). Also shown is the gun revolving sight in the rear, with the optics glass done using the same decal method as the armor glass.
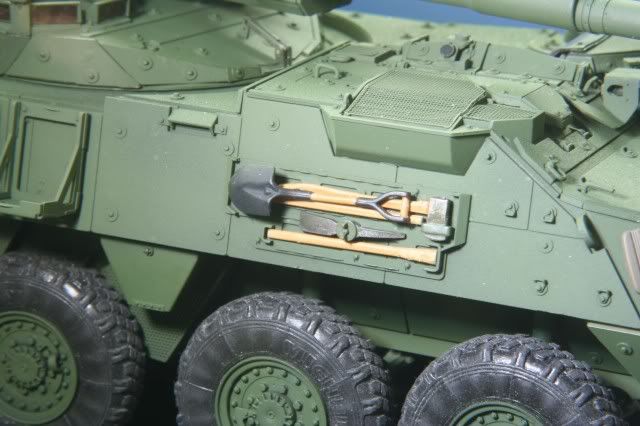
Here is the tool rack (I know the picture stinks). These tools are done similar to what Bill described in his WIP. The steel heads are painted with Alclad Steel then are dry brushed weathered with Humbrol Gunmetal, the shovel is Tamiya Flat Black with graphite for scratches. The wood is painted with Model Master Wood then washed with Burnt Sienna oil to give the reddish wood grain.
Here is a view of the drivers hatch. You can see the armor glass under the top cover.
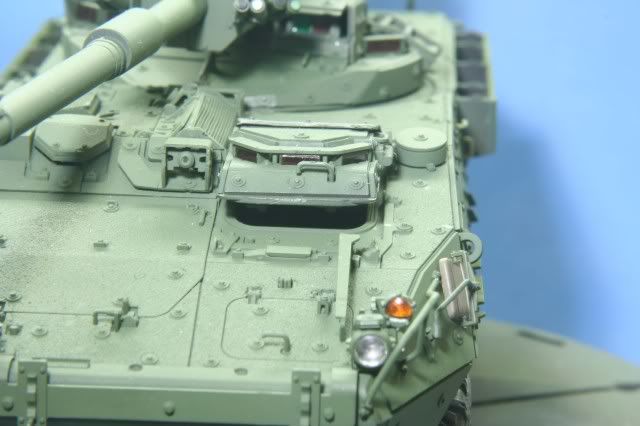
Here is a view of the gunner's sight again done with the same decal method for the glass. Also you can see the gunner's armor glass and another view of the smoke launchers.
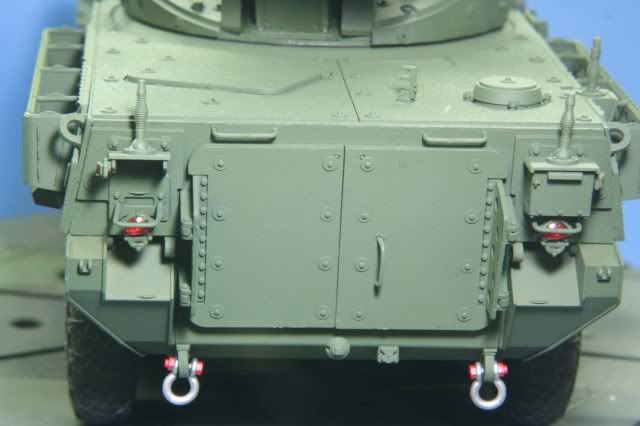
This is a view of the rear. The tail lights were painted inside the lens with Alclad Chrome and the lens with Tamiya Clear Red. The BO markers are Alclad Jet Exhaust. The tow hooks are Alclad Aluminum and the bolts Tamiya Flat Red.
This front view shows the front light with Alclad Chrome inside, turn and side signal Tamiya Clear Orange. The folded in mirror was painted with Poly Scale OD Green 505370
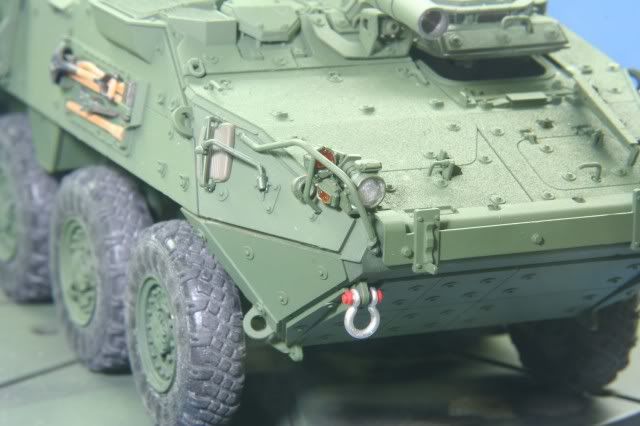
Well that is the current state. The remaining kit items are the M2 50 cal and about 12 PE straps. I will also have to add some other straps such as the tools and some for the rear. I'll give you a quick update then and prior to decals and weathering. With the long holiday and time off, I looking to finish this up before the new year.

All comments are welcome, thanks for looking.

Rounds Complete!!


"The Moral High Ground....A Great Place to Emplace Artillery."

  • Member since
    November 2007
  • From: Wisconsin Rapids, WI
Posted by moose421 on Monday, December 22, 2008 4:12 PM

Redleg, Your MGS is looking great.  It is really coming together.  Makes me want to buy one even more.  I will book mark this just for the nonskid info alone.  I have a build in the future that will require it.

Keep up the awsome work.

  • Member since
    July 2004
  • From: Texas
Posted by wbill76 on Monday, December 22, 2008 4:58 PM

Everytime I see this beast it looks mean! You're doing a great job with it Mike, glad to see the holidays are allowing for lots of bench time. Wink [;)]

  • Member since
    January 2007
Posted by the doog on Monday, December 22, 2008 5:10 PM

Mike, this is an outstanding looking build! What a cool vehicle!
Nice detail work, and the way you did that anti-slip coating is clever--and it looks great!

Hmm...when I get around to building an Abrams for my collection, I might need one of these to keep it company! Very cool, Mike!

  • Member since
    January 2006
  • From: Grand Bay, New Brunswick ,Canada
Posted by MECHTECH on Monday, December 22, 2008 8:06 PM

Redleg, when you used the terracotta paint, did you first spray it in a airbrush bottle or straight from the can?

I have a MGS ordered for Christmas and am following your build.

  • Member since
    July 2006
  • From: New Jersey
Posted by redleg12 on Monday, December 22, 2008 8:46 PM

Moose - Thanks for looking and for your comments. Glad you like the anti-slip. Good luck with yours.

Bill - It has that look Pirate [oX)] Thanks for the peek.

Karl - You could get rid of the bike and strap on of these on.Wink [;)] Thanks for looking and your comments.

Mechtech - Sprayed straight from the can. I suggest if you have a spray cow, try it on that first. Nice even stroke. If you are normally using a AB you have to readjust your stroke and speed when you use a rattle can.

The paint take seconds...the masking is hours. Ventalate well as it is kind of stinky.

Thanks for looking and your comments

Rounds Complete!!

"The Moral High Ground....A Great Place to Emplace Artillery."

  • Member since
    June 2003
  • From: East of Cleveland, along the Amish Frontier
Posted by cameraflage on Monday, December 22, 2008 9:56 PM

Looking good, redleg. Your lenses, optics, tools and smoke grenades really stand out.

Ranger Joe, Defender of Bunnies

Ranger Joe, Defender of Bunnies "Feed the rangers, not the bears" www.nls.net/mp/cameraflage

  • Member since
    April 2005
  • From: I am at play in the fields of the Lord. (Texas)
Posted by m60a3 on Monday, December 22, 2008 10:08 PM
 cameraflage wrote:

Looking good, redleg. Your lenses, optics, tools and smoke grenades really stand out.

Ranger Joe, Defender of Bunnies

 DITTO!!!! (excepting the "Defender of bunnies" thing LOL!!)  Awesome work!

                                                            60

"I lay like a small idea in a vacant mind" - Wm. Least Heat Moon "I am at the center of the earth." - Black Elk My FSM friends are the best.
  • Member since
    July 2006
  • From: New Jersey
Posted by redleg12 on Tuesday, December 23, 2008 5:50 AM

Cameraflage & M60 - Thanks for looking and you comments. It's nice to hear the details are "poping"!!

Rounds Complete!!

"The Moral High Ground....A Great Place to Emplace Artillery."

  • Member since
    October 2008
  • From: SE Pennsylvania
Posted by padakr on Thursday, December 25, 2008 6:12 PM

Redleg, it is awesome (and I am from a generation that doesn't use that word a lot). The detail is amazing. 

Are the tow hooks PE?  Mine are palstic and snap onto the posts.  The move but do not have the same look as yours of actually having a bolt all the way through.

  • Member since
    May 2005
  • From: Dublin Rep Of Ireland
Posted by terry35 on Thursday, December 25, 2008 6:25 PM

excellent finish and a really cool looking vehicle.

Terry.

  • Member since
    July 2006
  • From: New Jersey
Posted by redleg12 on Thursday, December 25, 2008 7:06 PM

Padakr - The tow hooks are the kit tow hooks. This is an AFV kit. I don't know what Trumpter did. The kit hooks have the bolt detail molded in. The hooks are off a common sprue which AFV uses in all the Stryker kits.

These also snap onto the posts. Part of the look is painting the bolt red. I makes it much more noticable.

Thanks for looking and thanks for your comments.

Terry - I thank you for looking and for your comments.

Will have an update hopefully by Saturday.

Rounds Complete!!

"The Moral High Ground....A Great Place to Emplace Artillery."

  • Member since
    May 2005
  • From: Dublin Rep Of Ireland
Posted by terry35 on Thursday, December 25, 2008 7:21 PM

No, thank you , Im after saving your pic's and am going to read this a lot closer during the week. I will be starting a trumpy Centauro and need to replicate the anti-slip coating on the upper surfaces, yours look stunning. Again thanks for sharing those really wonderful shots, I'm thinking of going close to your colours as well.

Thanks again.

Terry.


  • Member since
    September 2005
  • From: beacon falls , Ct.
Posted by treadwell on Thursday, December 25, 2008 7:53 PM

Hi Mike Big Smile [:D]

man let me tell ya, you are doing a beauty of a job on this kit!Thumbs Up [tup]Thumbs Up [tup]--I have been reading alot about the AFV stryker kit --nothing but huge praise for it--- beautifully detailed, adaptable to different varients, BEAUTIFUL P.E available, great fit, accurate, etc,etc, etc---not only that, but it is a cool vehichle and of historical importance!---I think if I ever do a 1/35 scale vehicle again, this might very well be my choice.  your rendition is excellent-------------------treadCool [8D]


  • Member since
    July 2006
  • From: New Jersey
Posted by redleg12 on Thursday, December 25, 2008 8:22 PM

Terry - You are more than welcome. This site is for sharing, learning and teaching. I am always glad when I can help someone. I you have any questions feel free to ask or PM.

Tread - My man you are just way tooooooo kind. As always I thank you for looking in and for your comments.

Rounds Complete!!

"The Moral High Ground....A Great Place to Emplace Artillery."

  • Member since
    July 2006
  • From: New Jersey
Posted by redleg12 on Saturday, December 27, 2008 3:38 PM

Post Xmas update, with the holiday it was difficult to get bench time. Once I did I worked on the dozen or so PE handles for the rear. These are EXCEPTIONALY a pain. As you can see by their size

The two holes at either end have to be lined up and pressed onto pins on the model. It was fun playing PE tidily winks. After a few times on the floor searching for the handle that just flew off and a period of #%*&)+, I finally finished the handles.

Lastly, I work on the M2. I added some rounds from the Academy MG kit to give it the locked and loaded look. You see it above from one side and below from the other after a black pin wash.

That completes the OOB portion of the build. I still will be adding some stowage, antennas, straps and attempt figs. First up will be a few minor touch ups and then the decals. There are loads of little warning decals all over to be put on. Here is what we look like at this point

All comments are welcome, thanks for looking.

Rounds Complete!!

"The Moral High Ground....A Great Place to Emplace Artillery."

  • Member since
    July 2004
  • From: Texas
Posted by wbill76 on Saturday, December 27, 2008 3:47 PM
Looking good at this stage Mike! I sympathize with you about handling small PE parts...I definitely have to be in a certain frame of mind to work on that element of a build, looks like you've whipped these into shape...now you just have to avoid knocking any of them loose in the finishing process. Wink [;)]
  • Member since
    July 2006
  • From: New Jersey
Posted by redleg12 on Saturday, December 27, 2008 3:51 PM

Bill - Shhhhhh.....I'm praying to the great god of PE Bow [bow]

Thanks for the peek.

Rounds Complete!!

"The Moral High Ground....A Great Place to Emplace Artillery."

  • Member since
    December 2007
  • From: Louisville, KY.
Posted by Cosmic J on Saturday, December 27, 2008 9:31 PM

Very, very nice. I'm grateful for the tip on how to do the anti-skid surfacing. Lenses look very good too. An excellent W.I.P. all around.


  • Member since
    December 2003
  • From: Colorado
Posted by psstoff995 on Sunday, December 28, 2008 1:07 AM

Hey! Sorry to come in on this one late but WOW! I'm glad I caught it! It's really looking nice. I think you made the right choice steering clear from the slat armor, this can definitly hold it's own with that huge cannon on top, great job on that anitslip too Smile [:)] Looking forward to seeing your finishing phases for sure.

-Chris

US Army Infantryman

  • Member since
    April 2005
  • From: I am at play in the fields of the Lord. (Texas)
Posted by m60a3 on Sunday, December 28, 2008 1:52 AM


 Your Stryker is too sexy for words.

                                       60

"I lay like a small idea in a vacant mind" - Wm. Least Heat Moon "I am at the center of the earth." - Black Elk My FSM friends are the best.
  • Member since
    July 2006
  • From: New Jersey
Posted by redleg12 on Sunday, December 28, 2008 8:04 AM

Cosmic J - Glad to have been of help. Thanks for the comments.

Psstoff995 - Different people have ask about the slat armor and the M1128. It is configured different than the slat armor on the M1126/1130. The slat armor which is out from Eduard and others match those models and not the 1128. Also they are improving the slat armor with protection for the wheels

Original M1128 slat armor

New type

Either way there is not a correct AM of slat to match the M1128. Also not the ballistic sheild for the M2 on the slat versions.

Lastly, like you I thought this Stryker with the "big gun" could hold it's own. Thanks for looking and the comments.

M60 - Have I got a bore evacuator for you!!! Smile,Wink, & Grin [swg] Thanks for looking and thanks for the comments.

Rounds Complete!!

"The Moral High Ground....A Great Place to Emplace Artillery."

  • Member since
    January 2008
  • From: Hickory, NC
Posted by Bushi on Sunday, December 28, 2008 8:44 AM

Looks  Awesome!!!!Make a Toast [#toast]

Jeff

  • Member since
    April 2005
  • From: Piscataway, NJ!
Posted by wing_nut on Sunday, December 28, 2008 9:41 AM
 redleg12 wrote:

Bill - Shhhhhh.....I'm praying to the great god of PE Bow [bow]

Thanks for the peek.

Rounds Complete!!

You need to build a small altar and and make an obsidian blade about 1/4 " long and sacrifice all the plastic parts that were repalced.


Great looking Stryker. I can already hear the jingle of medals from CTWhistling [:-^]

Marc  

  • Member since
    November 2005
Posted by Anonymous on Sunday, December 28, 2008 10:52 AM
Wow...extremely nice build....a lot of Strykers being built but this is the first finished one I've seen, and I think it is one of your best efforts...love the detail that went into this, especially the anti-skid...Is this a US vehicle (with the 155)?
  • Member since
    July 2006
  • From: New Jersey
Posted by redleg12 on Sunday, December 28, 2008 12:52 PM

Marc - Thanks....it will be in CT if I don't go to Aberdeen in April. Otherwise it may just be there for viewing.

Manny - Thanks for your comments. It is the newest in the Stryker series for the US Army. It was deployed in 2006. The gun is a 105 mm. The "same" gun as on the original M1 Abrams tank. When the Army upgunned the Abrams to 120 mm the had all these 105 mm guns and ammo left. Good use of leftovers.

The vehicle gives some punch to light scout units they did not have before.

Rounds Complete!!

"The Moral High Ground....A Great Place to Emplace Artillery."

  • Member since
    October 2008
  • From: SE Pennsylvania
Posted by padakr on Sunday, December 28, 2008 4:30 PM
 redleg12 wrote:

When the Army upgunned the Abrams to 120 mm the had all these 105 mm guns and ammo left. Good use of leftovers.

The vehicle gives some punch to light scout units they did not have before.

Is it utilized as a direct or an in-direct fire system?


JOIN OUR COMMUNITY!

Our community is FREE to join. To participate you must either login or register for an account.

SEARCH FORUMS
FREE NEWSLETTER
By signing up you may also receive reader surveys and occasional special offers. We do not sell, rent or trade our email lists. View our Privacy Policy.