SEARCH FINESCALE.COM

Enter keywords or a search phrase below:

FINISHED! Page 7-the doog's BEST? Sdkfz 251/17 Ausf. D w/2cm Schwebelafette

98643 views
181 replies
1 rating 2 rating 3 rating 4 rating 5 rating
  • Member since
    March 2006
Posted by TD4438 on Monday, January 26, 2009 1:32 AM
I woulda just mashed it into the wall like a grapefruit.

  • Member since
    April 2008
  • From: Kristiansund, Norway
Posted by Huxy on Monday, January 26, 2009 2:39 AM
Awsome.. Stunning.. great... I want a DML 251 as well.. need to build my Tamiya one... geez... wow... you da man! Big Smile [:D]

"Every War Starts And Ends With An Invasion".

  • Member since
    December 2002
  • From: Bury St Edmunds, Suffolk, England
Posted by Bish on Monday, January 26, 2009 4:39 AM

I'm doing this kit for the 251 halftarck GB. Was almost finished before i left for the desert. I didn't have a problem with the running gear, but i did have when it came to fitting the hull sides and rear. Not sure if it was just me, but i found they didn't fit correctly. I ended up removing the little bits that stick out of each side of the rear hull plate. Other than that i have had no issues so far. All i have left to do when i get hoime is the third colour, i am doing the one from 16th Pz DIv, then weather and add the tracks and wheels.


As for the tracks, it doesn't matter, Infact, most 251's had rubber pads. They only tried for a short while with ure metal tarcks but was not succesful. Also,  there are are two different syles, soemtiems called early and late. But again, both were used at same time, especially later in the war. And both those tracks in the kit have rubber pads.

I am a Norfolk man and i glory in being so


On the bench: Airfix 1/72nd Harrier GR.3/Fujimi 1/72nd Ju 87D-3

  • Member since
    July 2006
  • From: New Jersey
Posted by redleg12 on Monday, January 26, 2009 6:10 AM

OK.....maybe we have multiple aliens on theis kit....it would appear the person who packed the tracks also cam from planet STUPIDITER!!!

Well 4 hours down the crapper but you have fixed a mess. That's what real modeling is about!!

Rounds Complete!! 

"The Moral High Ground....A Great Place to Emplace Artillery."

  • Member since
    July 2004
  • From: Texas
Posted by wbill76 on Monday, January 26, 2009 9:08 AM

Karl,

Even though it took quite a bit of time, looks like you were able to salvage it in the end! Thumbs Up [tup]

  • Member since
    May 2006
  • From: Queensbury,NY
Posted by panzer88 on Monday, January 26, 2009 9:43 AM

Nice save Doog. I'm finishing up a 251 Ausf. D Falke and like Bish said attaching the hull sides and rear plate can be tricky. Test fit and test fit again. I was actually able to get all the hull pieces attached and glued together without any filler or surgery. A trick that I used to avoid the dreaded wheel float was to assemble and leave the front wheel assembly off until I attached and finished the tracks, then I was able to atach the front wheel assembly and adjust the height of them to make sure the wheels touched. And as mentioned before watch the track lengths, in some of my previous DML halftracks I had to adjust the rear idler wheel (either the tracks were too short or too long) by cutting it off and moving to compensate for the length of the tracks. I've been wanting this kit for awhile so I'll be watching with great interest. Beautiful Nashorn by the way. 


  • Member since
    November 2005
Posted by Anonymous on Monday, January 26, 2009 10:19 AM

Awesome work---you are becoming more prolific than Biffa !!!  I did mine a few years ago and it was a beast to build...pre-SMART kit years:

What scheme 'ya gonna do....???

  • Member since
    January 2007
Posted by the doog on Monday, January 26, 2009 11:13 AM

Thanks, guy--good info there, Bish--hope you're home safely soon. I want to see what you do with this kit!

panzer88, thanks for that info tooo; luckily, I think I'm cool with the track length; I just got them linked up and they're pretty dead-on. I'm letting 'em dry as I check my posts here.

Manny--beautiful job on that one! I like the careful finish! I'm not sure what I'm going to do for a finish yet; I'm thinking possibly of a tiny brushed-on "dapple" scheme? I've never done one of them before.

I may be wrong on this, but did you add the rear wheels a little low on your /17 there? I think that the last wheel should not be on an even plane with the rest, but elevated by about 3mm or so?

  • Member since
    October 2007
  • From: Louisville, KY
Posted by pordoi on Monday, January 26, 2009 11:49 AM

Thumbs Up [tup]  Nice save Doog.  Hopefully, the remainder of the build will be uneventful.  But the advice from the 251 Group Build for these Dragon kits was dry fit, dry fit, dry fit.  It was good advice for me when it came to mating the upper and lower hulls.

 the doog wrote:

I permanently glued the first 6 inner wheels on--they'll be easy to paint attached. Then, I added a tiny drop of glue to the attachment points of the other wheels, and glued them on. I will later twist them off, after I assemble the tracks around them completely. I willl then add them after the tracks and wheels are painted, same as I do tank tracks.


I'm curious.  Why use glue instead of temporarily mounting the wheels with a small dab of blue tack, for example?

 Don


  • Member since
    November 2005
Posted by Anonymous on Monday, January 26, 2009 12:39 PM
 the doog wrote:

Manny--beautiful job on that one! I like the careful finish! I'm not sure what I'm going to do for a finish yet; I'm thinking possibly of a tiny brushed-on "dapple" scheme? I've never done one of them before.

I may be wrong on this, but did you add the read wheels a little but low on your /17 there? I think that the last wheel should not be on an even plane with the rest, but elevated by about 3mm or so?

Thanks, doog...I tried to duplicate the whitewashed one (w/ brushes) on the box-art--an elite unit from the Fuhrer Escort Brigade of the Army at Bastogne...their insignia was a blue helmet; they were a sister unit to the Grossdeutchland Korps...   

As far as the roadwheel, I had never heard of the first one being higher, so I went back and checked several ref pics and plates of 251's and 250's sitting on level ground and they looked to be all on the horizontal plane to me...but I'm no expert on the sdkfz 250 either...???

  • Member since
    July 2004
  • From: Texas
Posted by wbill76 on Monday, January 26, 2009 12:46 PM

MR,

Doog's talking about the rearmost wheel (I think) which is the idler. This should be elevated slightly in relation to the actual road wheels contacting the ground and the way DML calls for the installation of its mount virtually insures this should be the case. Wink [;)]

  • Member since
    January 2007
Posted by the doog on Monday, January 26, 2009 1:10 PM
 Mansteins revenge wrote:


As far as the roadwheel, I had never heard of the first one being higher, so I went back and checked several ref pics and plates of 251's and 250's sitting on level ground and they looked to be all on the horizontal plane to me...but I'm no expert on the sdkfz 250 either...???

Sorry Manny--I just looked at my horrible typing there, and it's no wonder I confused you! Confused [%-)]

What Bill said--the last roadwheel--I got nervous, because on my build, the rearmost wheel definitely sits higher, and I was nervous about having to do more corrective surgery again! But Bill is correct--I triple-checked the directions, and the way you mount that idler mounting, it definitely rides higher. Now I'm curious as to how you managed to have your kit's wheels lower? This kit I have is NOT a "Smart Kit", by the way, so I don't think any retooling would have been done yet?

In any case, it's something to look out for in future 251 builds. Smile [:)]


  • Member since
    January 2007
Posted by the doog on Monday, January 26, 2009 1:13 PM
 pordoi wrote:

I'm curious.  Why use glue instead of temporarily mounting the wheels with a small dab of blue tack, for example?

 Don


Well, Don, I don't have any of that stuff around, but I wanted to be able to really "Sit" the suspension with some pressure, so I needed a firm wheelbase to take some weight. Also, there's not a lot of room to add some kind of agent like that; the mounts, if you remember, are really tiny!
  • Member since
    November 2005
Posted by Anonymous on Monday, January 26, 2009 1:15 PM
 the doog wrote:
 Mansteins revenge wrote:


As far as the roadwheel, I had never heard of the first one being higher, so I went back and checked several ref pics and plates of 251's and 250's sitting on level ground and they looked to be all on the horizontal plane to me...but I'm no expert on the sdkfz 250 either...???

Sorry Manny--I just looked at my horrible typing there, and it's no wonder I confused you! Confused [%-)]

What Bill said--the last roadwheel--I got nervous, because on my build, the rearmost wheel definitely sits higher, and I was nervous about having to do more corrective surgery again! But Bill is correct--I triple-checked the directions, and the way you mount that idler mounting, it definitely rides higher. Now I'm curious as to how you managed to have your kit's wheels lower? This kit I have is NOT a "Smart Kit", by the way, so I don't think any retooling would have been done yet?

In any case, it's something to look out for in future 251 builds. Smile [:)]


ahhhhhhh.....I understand now---and that is correct it should sit slightly higher and mine does look a little low, although that photo-box bottom I used for pics is a bit deceiving because the paper is so wrinkled...no telling; I probably flubbed it...chalk it up to a few German rookie recruits in the field not properly adjusting the idler on a cold day...Wink [;)]...
  • Member since
    February 2008
  • From: ladner BC Canada
Posted by stick man on Monday, January 26, 2009 8:50 PM

Nice work Doog!! I'm building one of these now and this tread is realy giveing me inspiraiton to work more on it!!

Nice job!!

Smile [:)]

I'm 15 and I model I sk8board and I drum what could be better.
  • Member since
    January 2007
Posted by the doog on Thursday, January 29, 2009 12:08 PM

Hey Manny--it's still a kick-***-looking kit! If it wasn;t for this thread and the advice I got while buiding it, I would've missed that track float issue until it was too late, too.

stick man--thanks for looking in! 

Well, just a quick update--I've finally got all the building done for me to paint the interior. Here's where I am so far--I still have to build the outer details. I can do that while the interior is drying.

I have to say that this build is definitely the most challenging kit I've ever worked on--that little "schwebelafette" is a BEAR to build. Tons of tiny parts and a very intricate assembly! 

I'll be painting the interior this afternoon, and should have some pics later...


  • Member since
    January 2012
Posted by I make stuff on Thursday, January 29, 2009 12:58 PM

Oh, MAN, I like to see your paint pics.  I feel like a kid on Christmas eve, well, not really, I can look but not touch, but still--looking forward to see this one get Dooged.

Bill  

  • Member since
    January 2008
  • From: Bournemouth UK
Posted by Bodge on Thursday, January 29, 2009 2:34 PM
Lookin sweet Karl, no doubt the paintjob will be outstanding. lookin forward to seeing more.
  • Member since
    July 2004
  • From: Texas
Posted by wbill76 on Friday, January 30, 2009 1:30 AM

Nice work on the gun and interior Karl, looking forward to seeing it painted. Wink [;)]

  • Member since
    December 2005
  • From: Syracuse, NY
Posted by lexesbenz on Friday, January 30, 2009 7:14 AM
.....Spiffy!!!
The flying hamster of doom rains coconuts on your pitiful city!!!!
  • Member since
    January 2007
Posted by the doog on Saturday, January 31, 2009 9:05 PM

Hey doods!

Thanks, guys, for looking in yet again! Here's an update! Big Smile [:D]

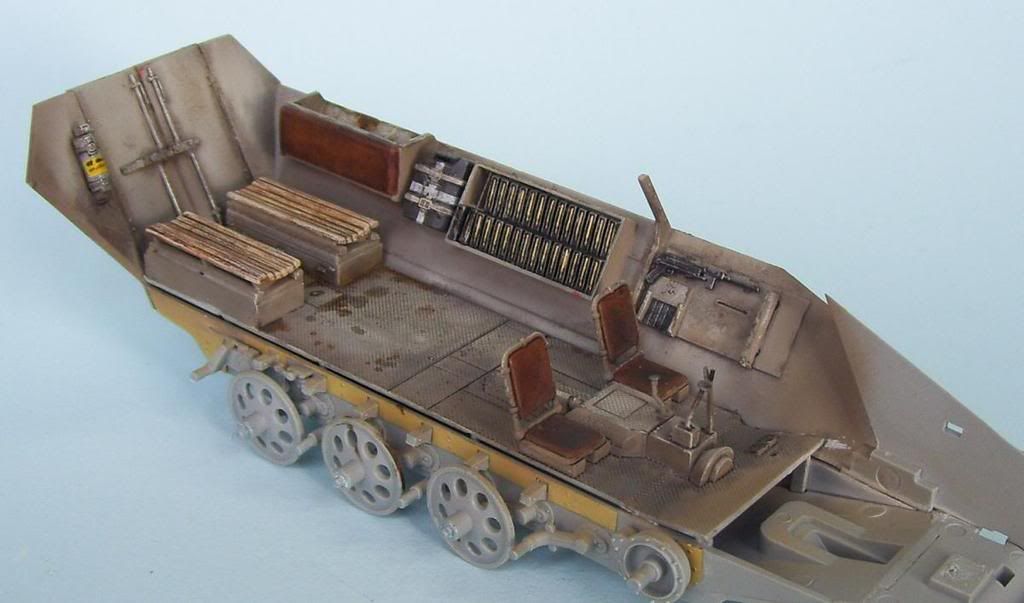
All paints called out are Tamiya acrylics. I started painting by first undecoating with a dark brown mixture, followed by straight Dark Yellow. I then added some Black to it, and added some shading.
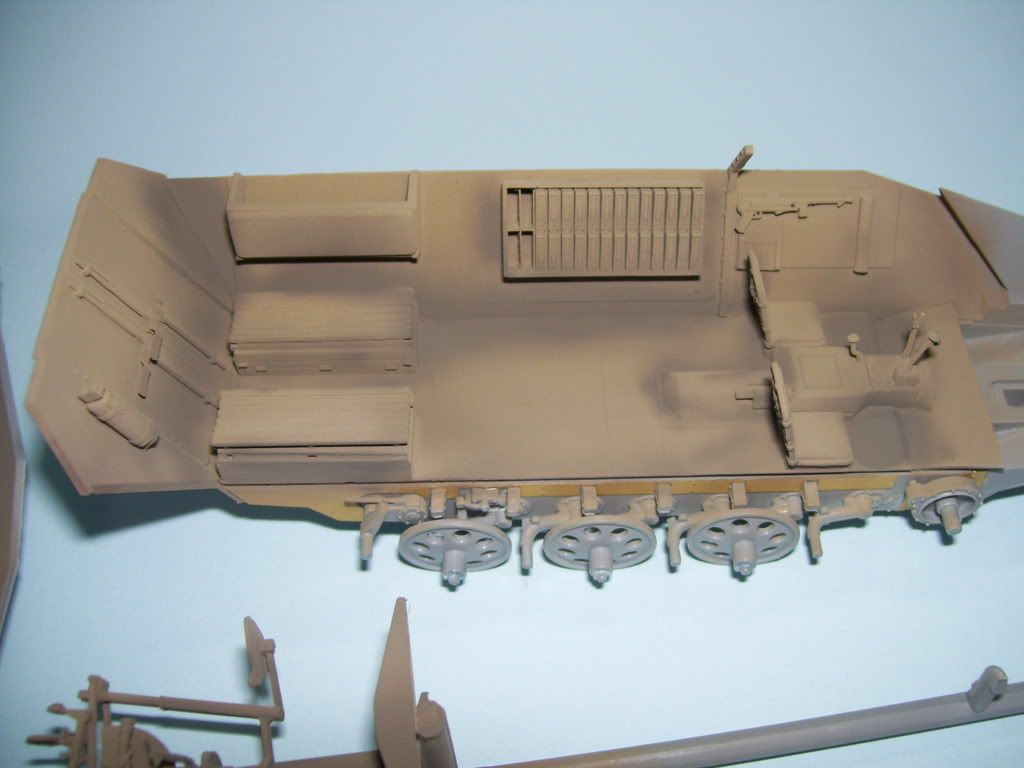
I then added about 20% Dark Yellow to 80% White, and added highlights. This flash picture shows the rich contrast.
I added a wash of MIG premxed filter "Gray", and then some pin washes of "Dark Wash", followed by some chipping in layers. I used some Primer Red from 502 Abteilung on some bigger chips, and mixed a black/brown steel mixture to chip inside that. I did some drybrushing in light tan, and then in the steel mixture.

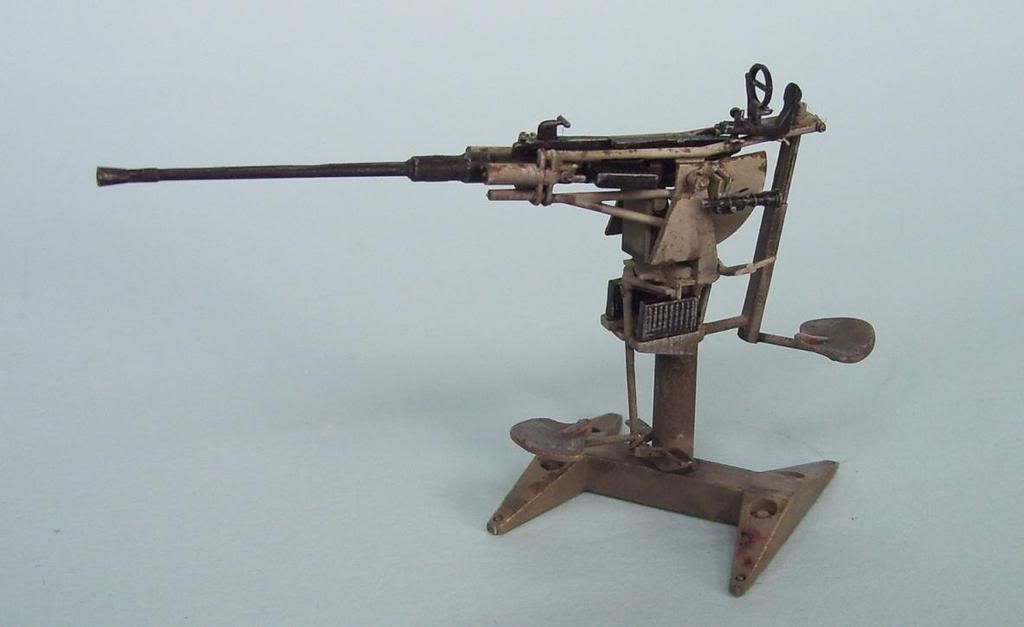
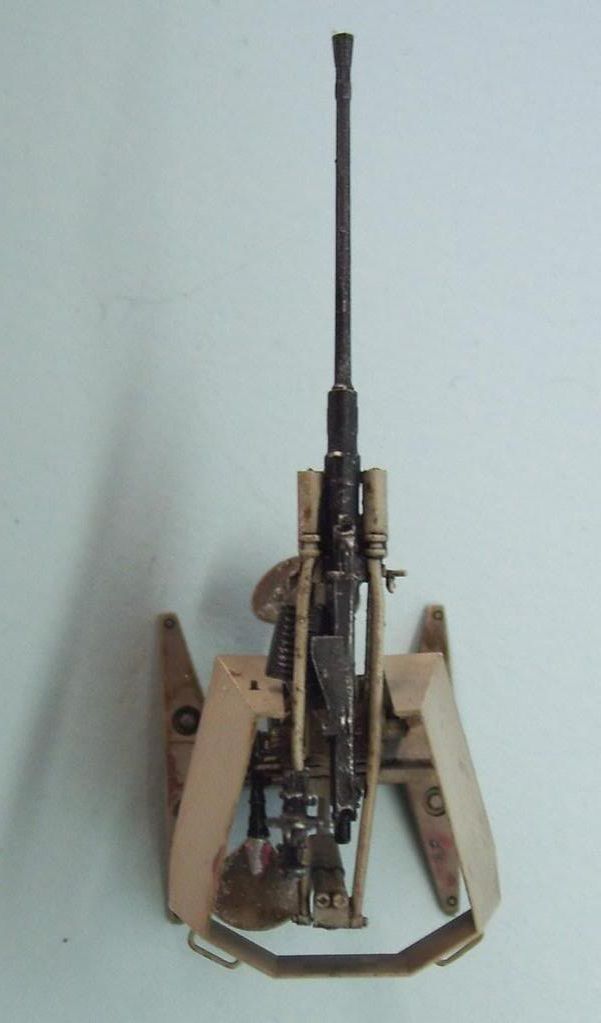
Here's the little bugger that almost did me in--the Censored [censored] scwebelafette! I don't know if it's just me, but this little snot was one of the most complex things I've ever built! Sheesh! Here it is, NAKED! (I hope this pic doesn't get deleted! LOL!)...Tamiya instructions has a weird painting recommendation--only the barrel is gunmetal, but I didnt like the way it looked---didn't seem realistic, and looking at the second picture below, not accurate--so I painted it the way I think it looks?
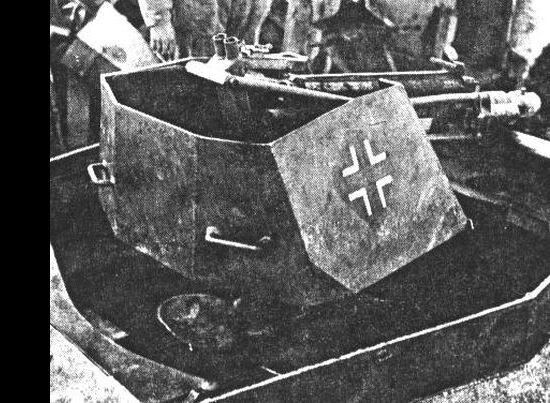
 

Here's how it looks with the skirt on. If you notice something here; see the gunner's seat? The way it attaches in the kit parts, it sits directly under the skirt when you apply it. I noticed this after putting the skirt on. Compare it to the top picture.
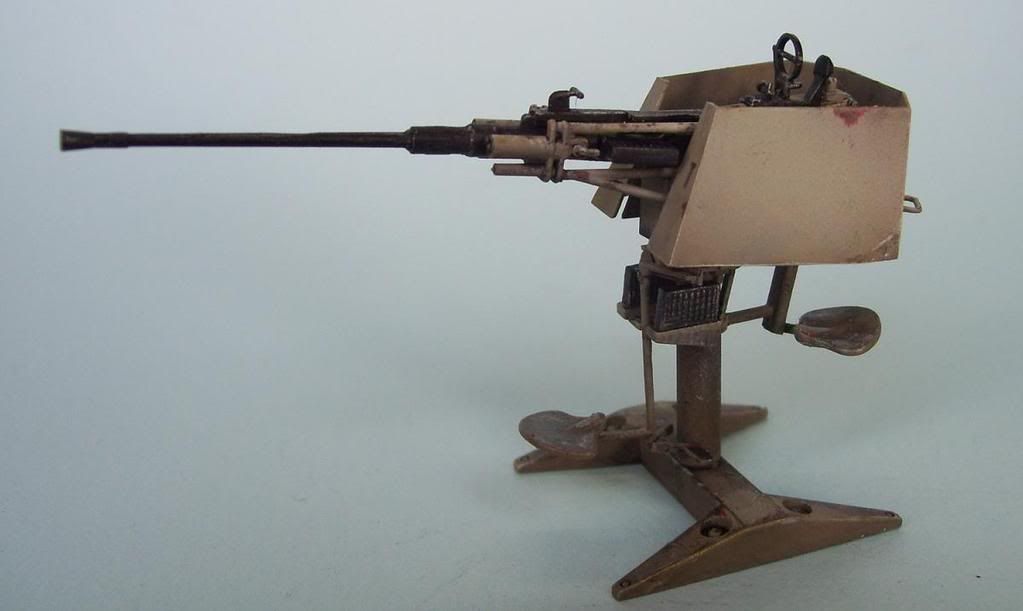
So I cut the post that the seat sits on, and moved it closer to the inside, so that the gunner would conceivably sit inside the skirt--where he would, normally.
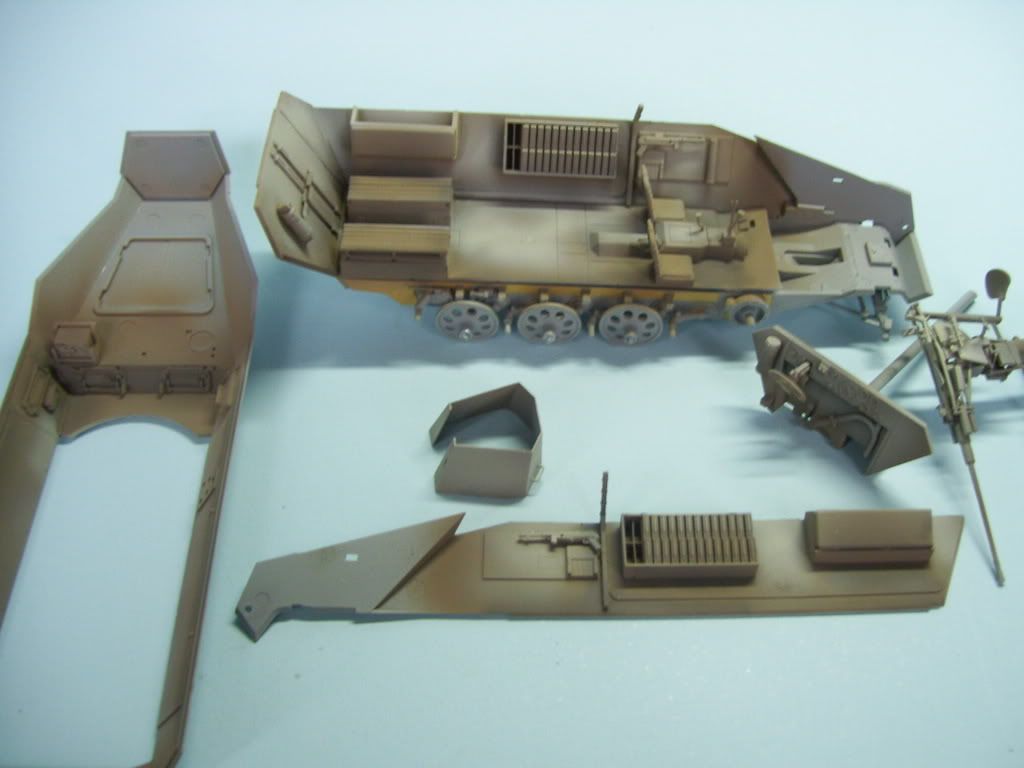
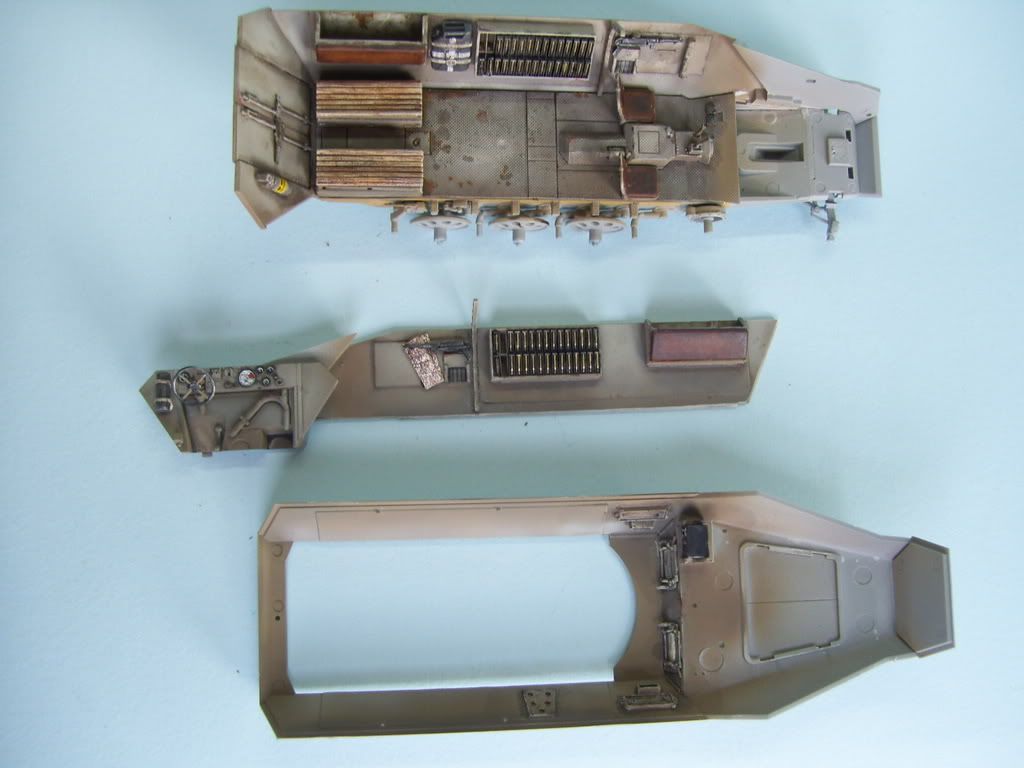
So anyway, here's the pieces--notice that I painted this interior in subassemblies as well, like the Hornisse. The floor is actually separate as well; it's just put in place for the photo...
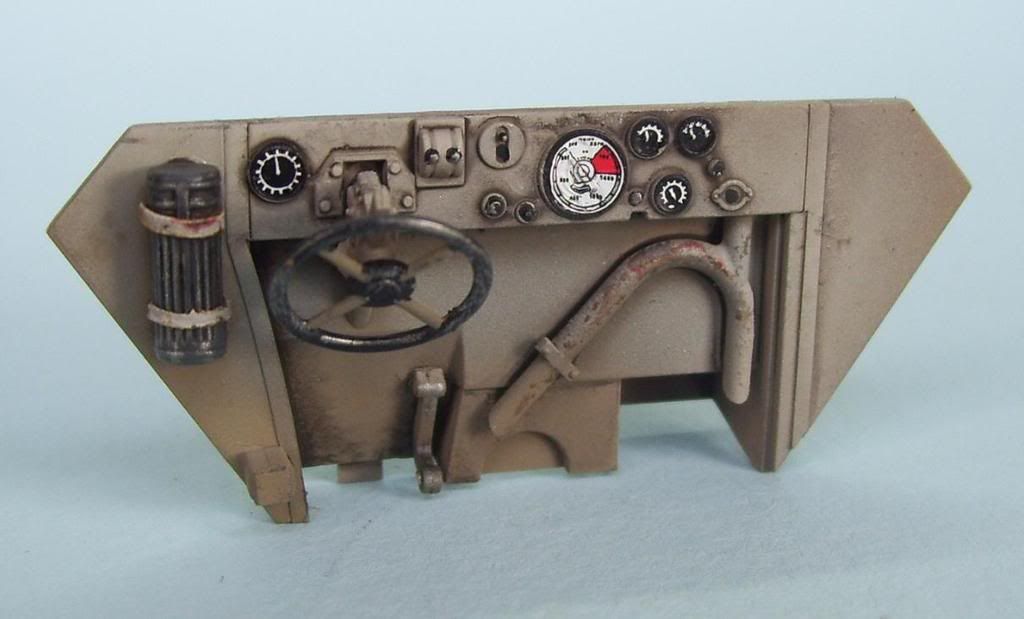
The dash---gotta love those decals!
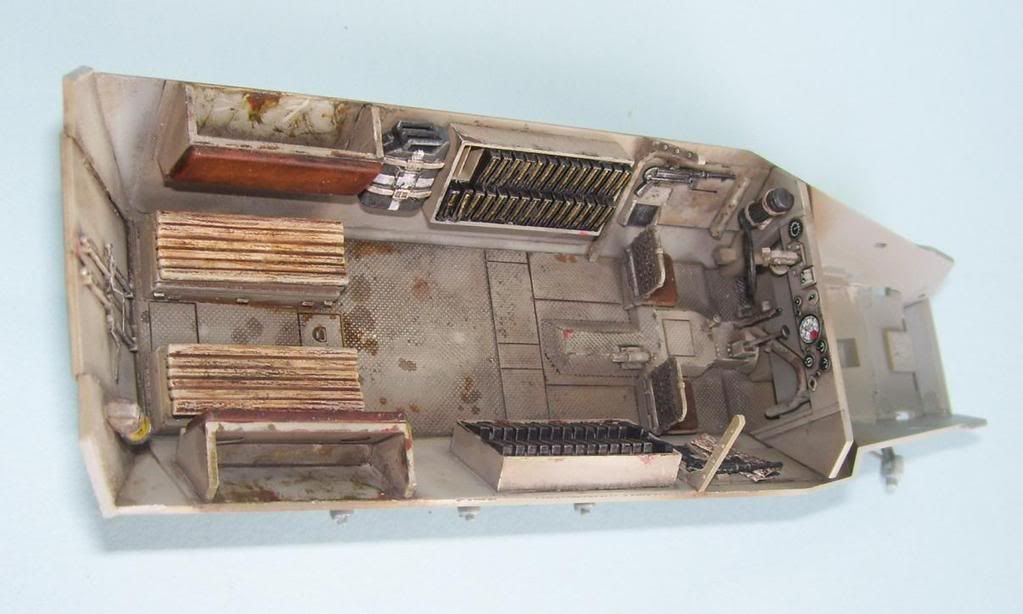
And the interior so far....the leather seat backs were first painted "Nutmeg" craft store paint, and then finished with oils. The floor was weathered with MIG washes and oils--there will also be some pigments added, but I didn't want them to get in the glue when I glue the pieces together...I added a strapped-in water jerry can there in the space between the magazine storage and the side bins.
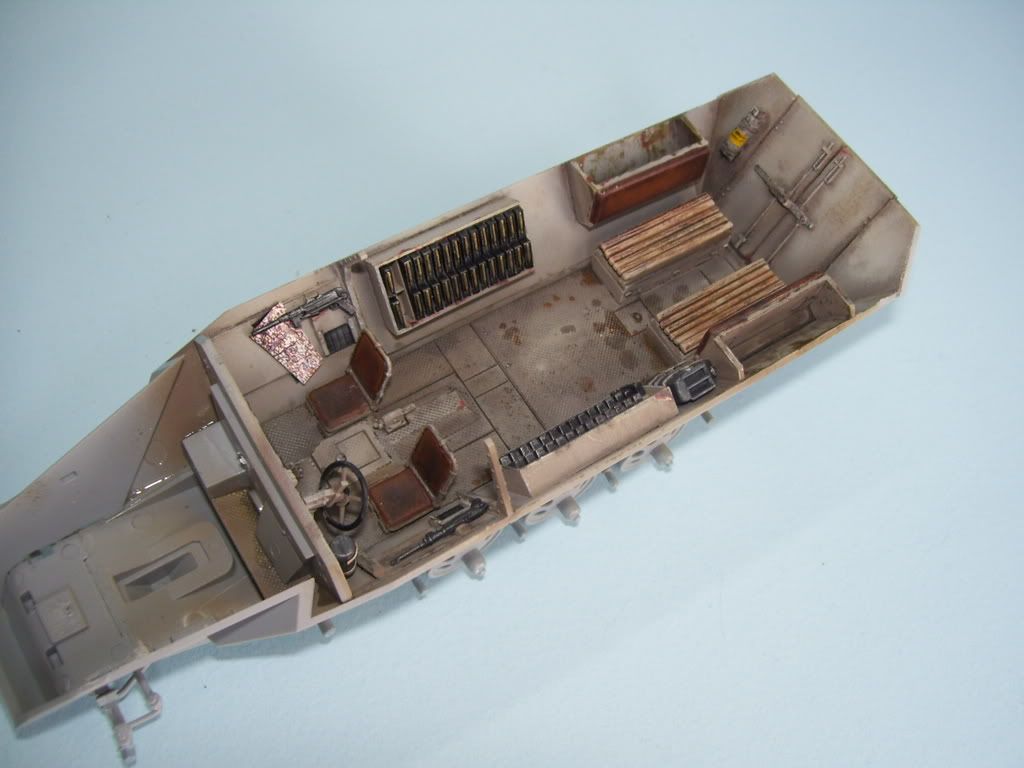
 

And the side. floor, and dash glued in, and the gun, stood in place, temporarily....
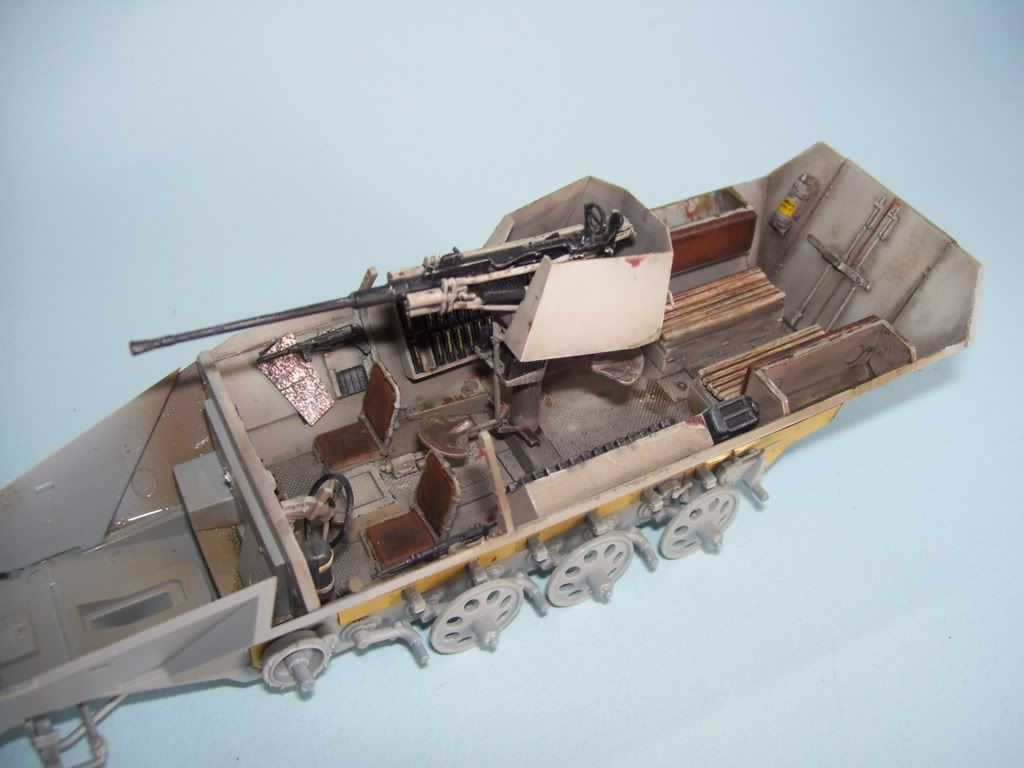
Now I'll add some pigments to the floor, build the rest of the outside details, and then it's on to the exterior painting! 

Thanks for looking in, guys! Comments welcomed! Big Smile [:D]


  • Member since
    August 2007
  • From: Southeast Wisconsin
Posted by MaxSheridan on Saturday, January 31, 2009 9:31 PM

Your painting and weathering skills are amazing! Top notch work as usual, Doog!Thumbs Up [tup] 


-Mark

  • Member since
    October 2007
  • From: Louisville, KY
Posted by pordoi on Saturday, January 31, 2009 9:33 PM

Doog,

Great work.  I really like your attention to detail.  A case in point; the stains on the floor.  You should really think about a more detailed description for the paragraph like this one:


 the doog wrote:

I added a wash of MIG premxed filter "Gray", and then some pin washes of "Dark Wash", followed by some chipping in layers. I used some Primer Red from 502 Abteilung on some bigger chips, and mixed a black/brown steel mixture to chip inside that. I did some drybrushing in light tan, and then in the steel mixture.


I'm sure that I'm not the only one that would like to see a play-by-play of this process.  Also the gun looks great!  Good call on painting by intuition.  Sometimes its easy to think the instructions are "correct"  (yeah, right Whistling [:-^]).  Maybe scwebelafette  translates to:  it's a Censored [censored] to assemble. 

Not to say that there are not challenges ahead.  Assembling all of those sub-assenblies can be a real joy.....

 Don

  • Member since
    November 2008
  • From: Saskatchewan
Posted by PanzerRich on Saturday, January 31, 2009 9:55 PM
Great work Doog.  That tin can definately has that 'lived in' look to it.  The map tucked in behind the Schmeiser is a nice touch.
I never met a tank I didn't like.
  • Member since
    July 2004
  • From: Texas
Posted by wbill76 on Saturday, January 31, 2009 10:56 PM
Up to your usual standards Karl, going to look great when the top's on. Thumbs Up [tup]
  • Member since
    December 2005
  • From: Syracuse, NY
Posted by lexesbenz on Sunday, February 1, 2009 1:25 AM
Karl, it amazes me how fast you can put a kit together, I have all the free time in the world right now, and it still takes me forever...
The flying hamster of doom rains coconuts on your pitiful city!!!!
  • Member since
    December 2003
  • From: Colorado
Posted by psstoff995 on Sunday, February 1, 2009 3:18 AM

Censored [censored] fell asleep and missed another one! You're cranking them out Karl!

I don't even know what to comment on so I'll go ahead and point out the fact that Hans spilled one too many cokes in the back seat- he should tell Franz to ease up on the throttle when they go over the war torn countryside Wink [;)]

And that's one awkward looking girl, maybe she should just keep that skirt on... I wonder if Manny wants to marry her too?

All kidding aside this is definitly a very unique piece... as far as I can tell anyway- I've never seen one! I'd ask you about what you're going to do with figures or base posibilites but seeing as how I kinda skipped ahead to get to the good stuff I'm sure when I wake up tomorrow I'll have a few minutes before the Super Bowl to read up on the thread and find out for myself. I really like the lived in look as usual- maps tucked in, guns oiled up and ready to be deployed- looks great! You got enough room to keep all of em? 

-Chris

US Army Infantryman

  • Member since
    April 2005
  • From: Piscataway, NJ!
Posted by wing_nut on Sunday, February 1, 2009 6:51 AM
Great job on the interior.  The floor looks terrific, the leather looks like ...well... leather. And the map adds a nice touch

Marc  

  • Member since
    January 2007
Posted by the doog on Sunday, February 1, 2009 12:08 PM
 pordoi wrote:


 the doog wrote:

I added a wash of MIG premxed filter "Gray", and then some pin washes of "Dark Wash", followed by some chipping in layers. I used some Primer Red from 502 Abteilung on some bigger chips, and mixed a black/brown steel mixture to chip inside that. I did some drybrushing in light tan, and then in the steel mixture.


I'm sure that I'm not the only one that would like to see a play-by-play of this process.  Also the gun looks great!  Good call on painting by intuition.  Sometimes its easy to think the instructions are "correct"  (yeah, right Whistling [:-^]).  Maybe scwebelafette  translates to:  it's a Censored [censored] to assemble. 

..

 Don

Thanks, Don--Yeah, I know, I should go into more detail there, but when I'm doing that phase of it, for some reason I just kinda "zone out" and forget to photgraph it, LOL! Thanks for your comments, and I'll try to remmeber that when I weather the exterior!

Thanks everyone else who's looked in and commented!Your comments are always appreciated! 

Enjoy the Superbowl, y'all! Big Smile [:D]

  • Member since
    February 2008
  • From: ladner BC Canada
Posted by stick man on Sunday, February 1, 2009 12:20 PM

WOW Doog the intirior looks incredable!!!! I can't wait to see the extirior!!!!

Smile [:)]

I'm 15 and I model I sk8board and I drum what could be better.
JOIN OUR COMMUNITY!

Our community is FREE to join. To participate you must either login or register for an account.

SEARCH FORUMS
FREE NEWSLETTER
By signing up you may also receive reader surveys and occasional special offers. We do not sell, rent or trade our email lists. View our Privacy Policy.