SEARCH FINESCALE.COM

Enter keywords or a search phrase below:

AMPS East Theme WIP; Zvezda BA3 Armored Car /update 7/21 Tracks on

18731 views
72 replies
1 rating 2 rating 3 rating 4 rating 5 rating
  • Member since
    October 2007
  • From: N.H.
AMPS East Theme WIP; Zvezda BA3 Armored Car /update 7/21 Tracks on
Posted by panzerguy on Friday, June 12, 2009 5:51 PM
    (After three days of fighting with this Censored [censored] computer I'm finaly able to post this)

   This is going to be one of two build's for the amps east prelude to war theme for this years show in Danbury.

   First off the box art is very misleading.
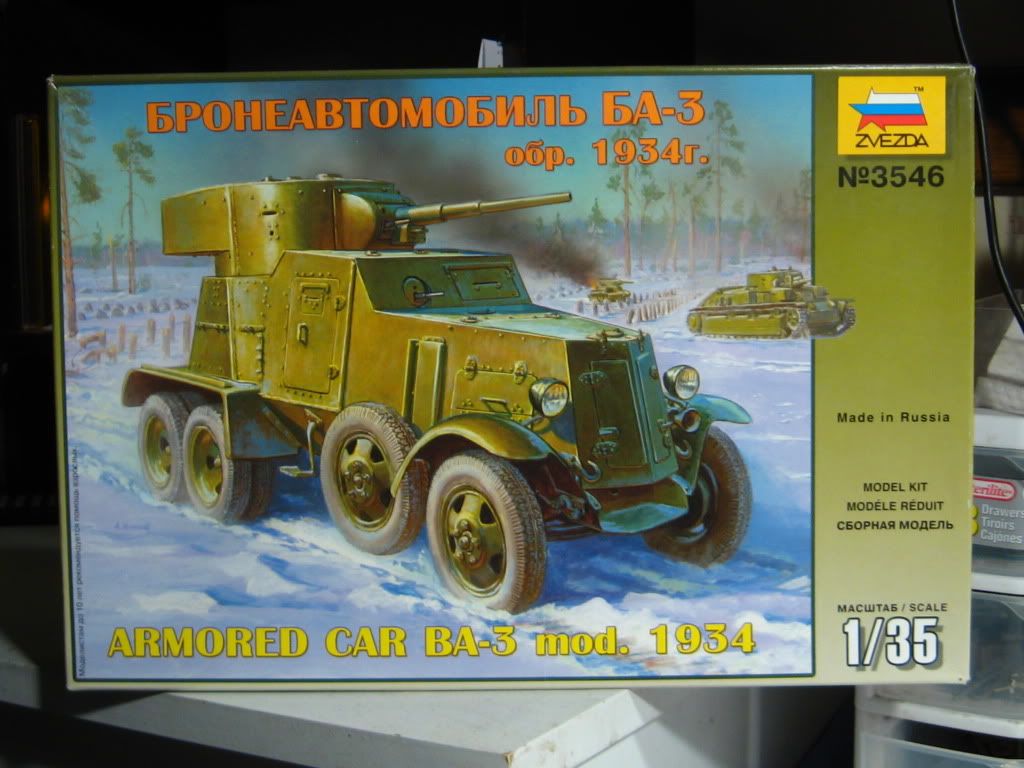
   It shows the car with all these rivets on it, which was one of the reasons that I wanted this kit. But when I opened the box and looked inside guess what? All the rivets on the sides and turret roof were missing! I had already planed on adding some extra detail to the kit so there was no way I was going to build it with out the rivets.

   The first thing I did was find drawings of the vehicle. The ones I found  are of the one on display at the Kubinka tank museum.
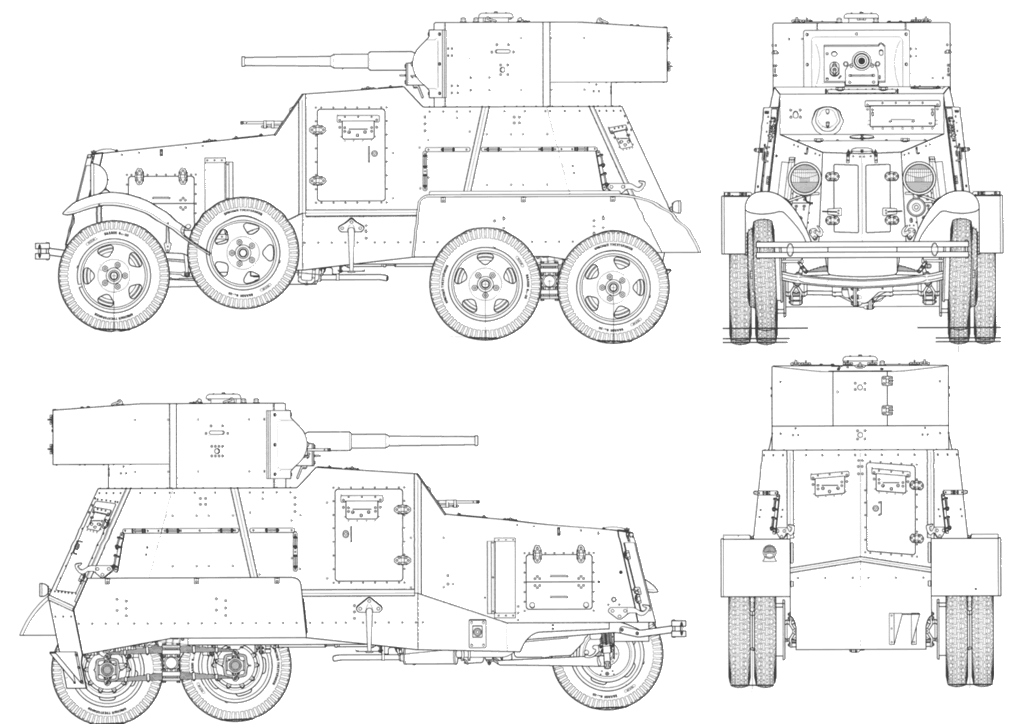
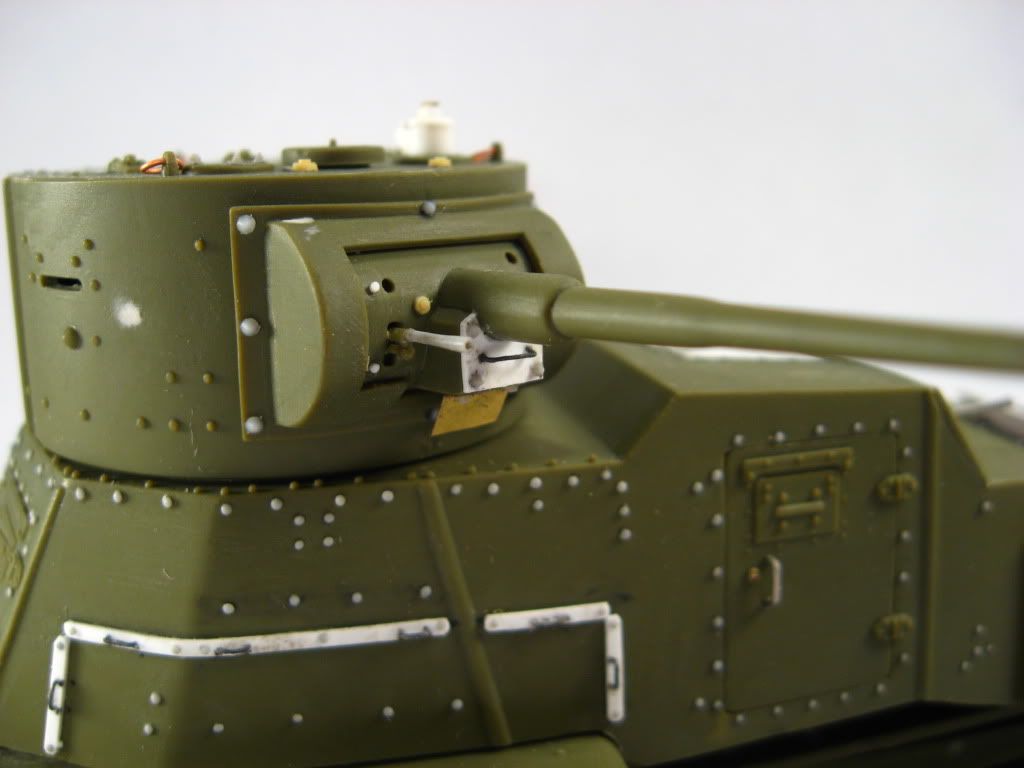
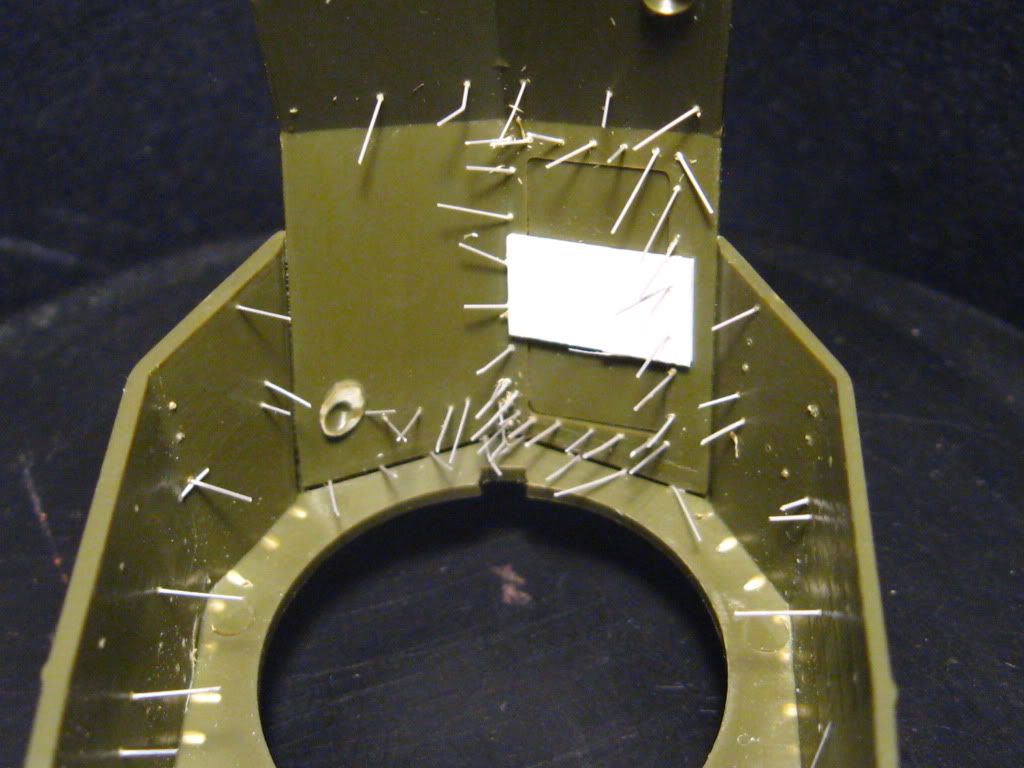
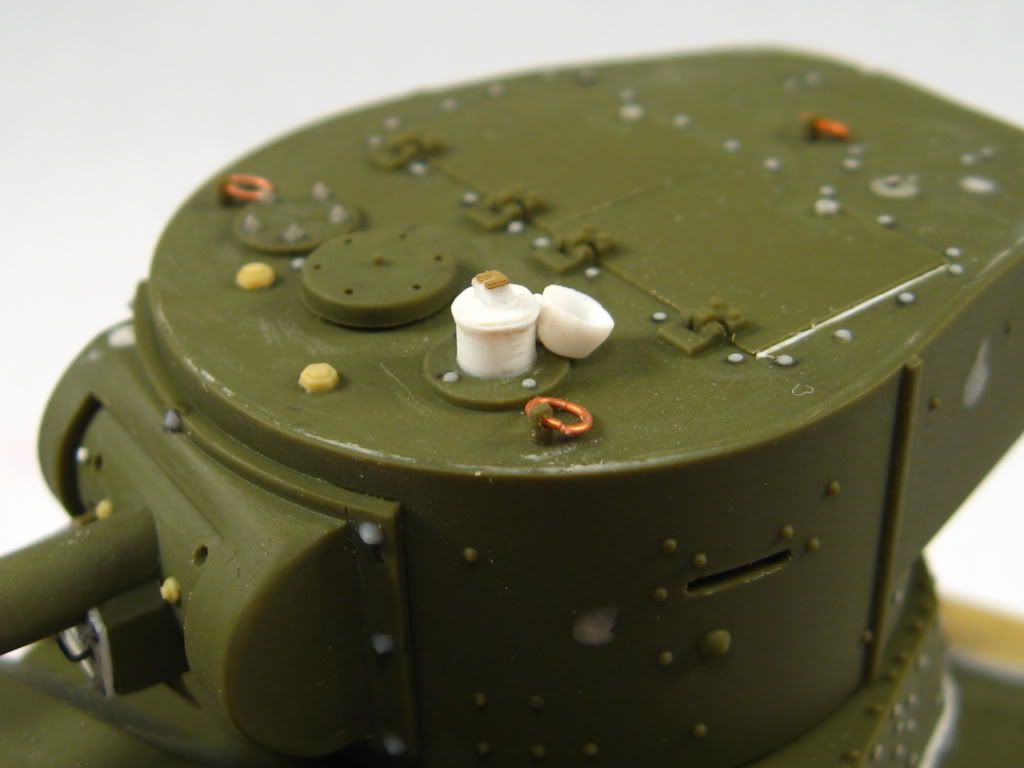
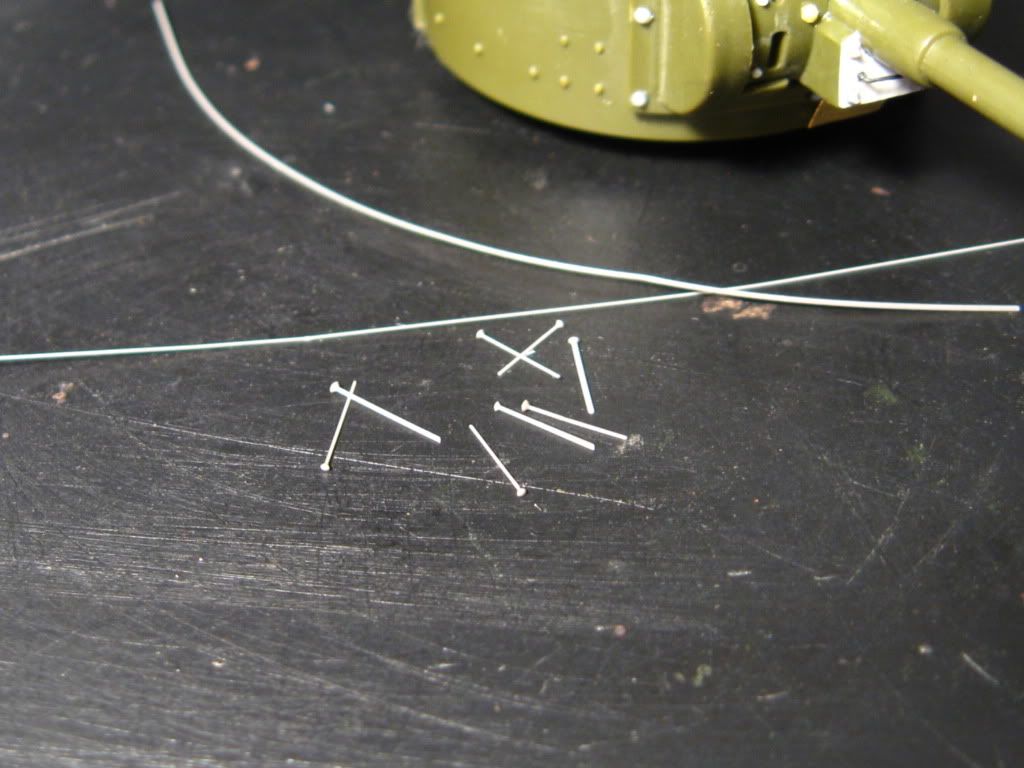
   Now that I had the drawings I first marked all the rivet points using a fine tipped sharpie and drilled them out using a .47 micro drill. Once that was done it was on to the rivets themselves. These were made using sprue that was stretched out to about the thickness of 6lb test fishing line. Then cut into pieces about 1/2in. long the ends were very carefully mushroomed. I ended up making about three times more than I needed and separated out the ones that were close to the same size.
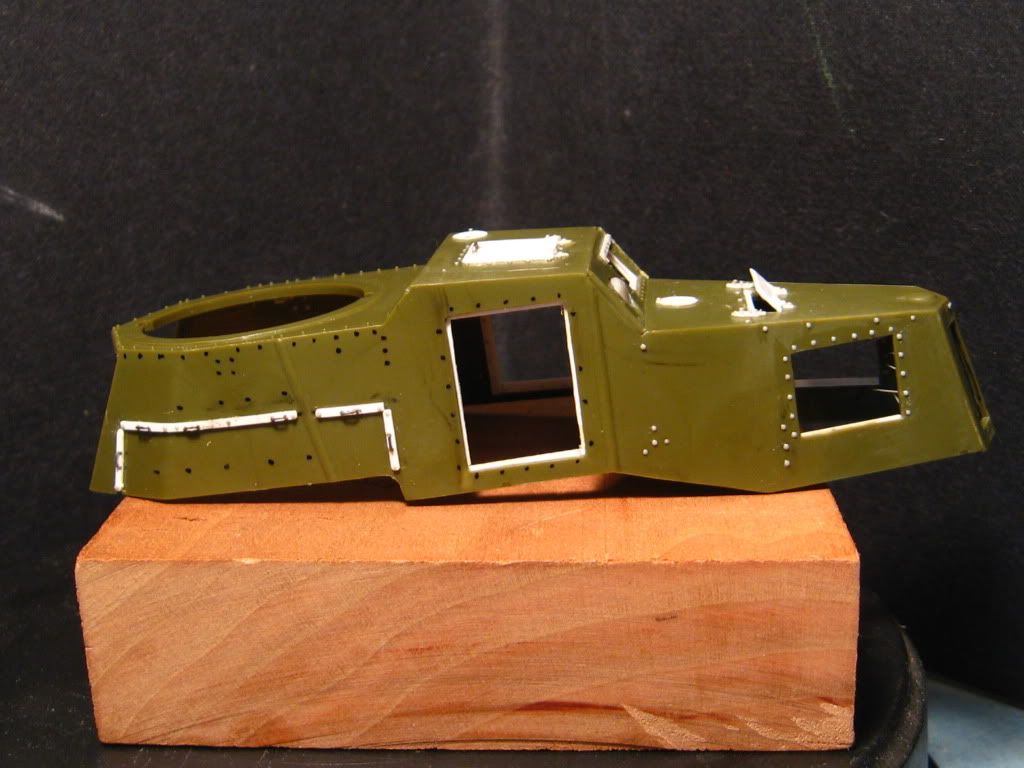
  

   What they look like on the outside and the inside.
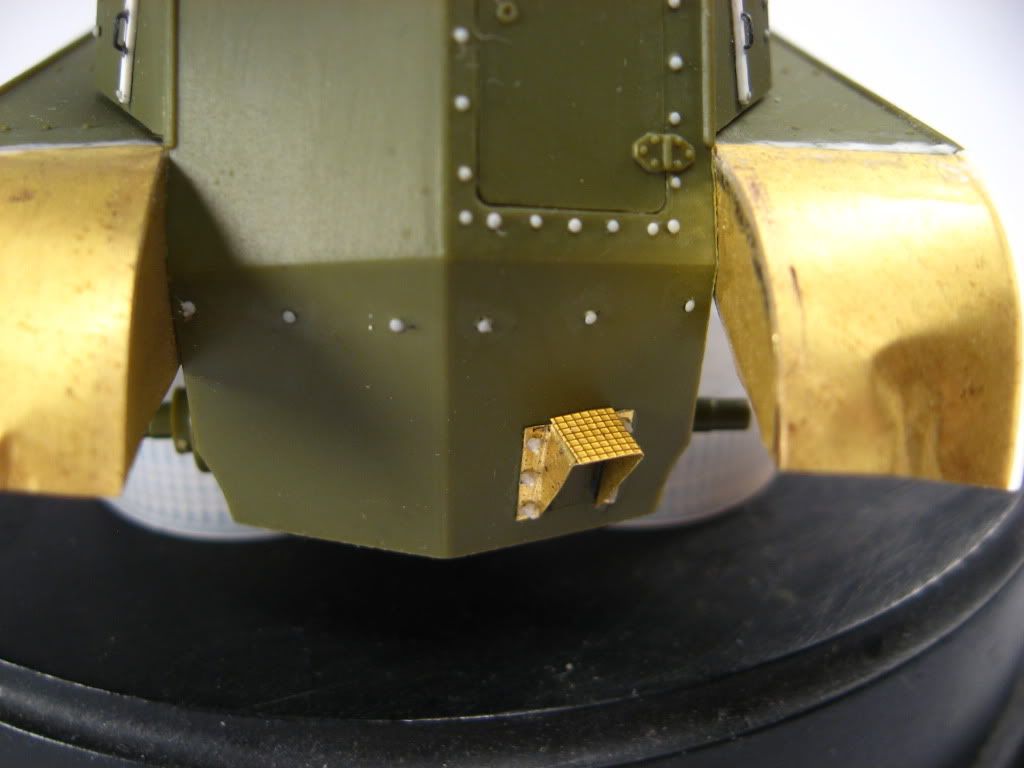


   Here's a list of what I replaced and added so far' rear fenders, tie down brackets on the sides above the rear fenders, step below rear door, roof hatch above driver, drivers front visor hatch, mg mantel, turret periscope and lifting rings. All scratched using the following, brass sheet, evergreen plastic, sprue, Verlinden nuts and bolts, and some wire. The air vent door on the hood was molded on so I cut it out and scratched a new one in the open position. The same thing was done to the one's in the nose in front of the radiator. 
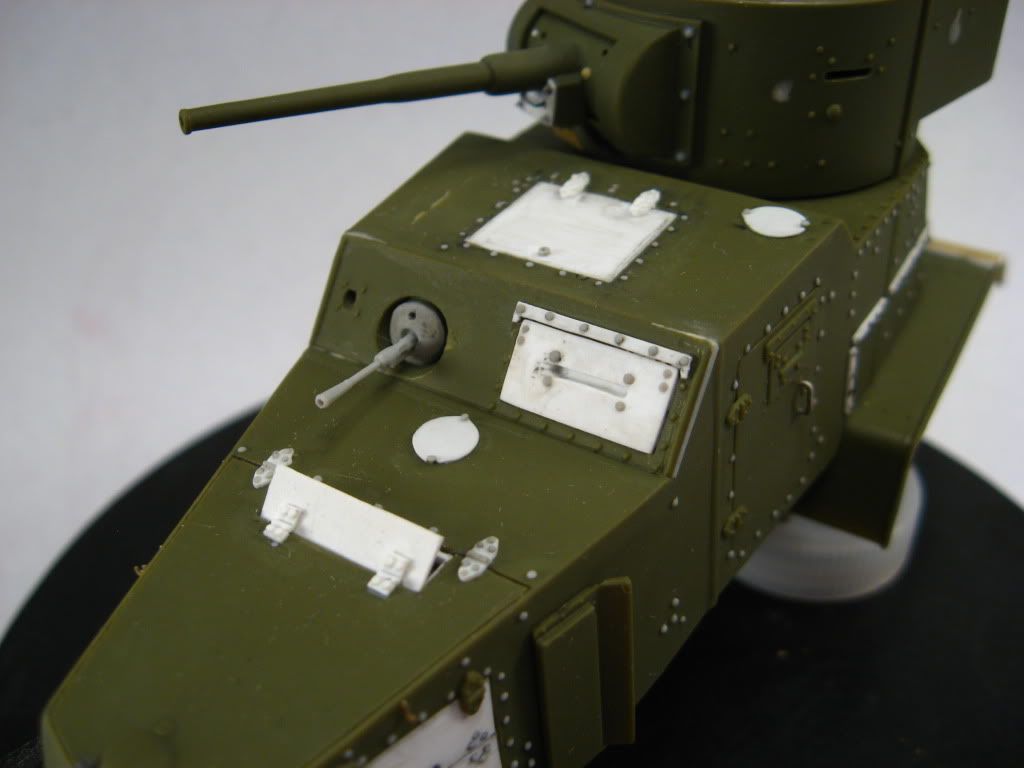
        The side engine access doors that came with the kits were not only wrong, they were supposed to be hinged in the middle, but also too small and had to go. New ones were made using evgrn plastic. Wire handles, rivets and the hinges I shaved off the old doors were also added after the door was attached and allowed to dry over night.
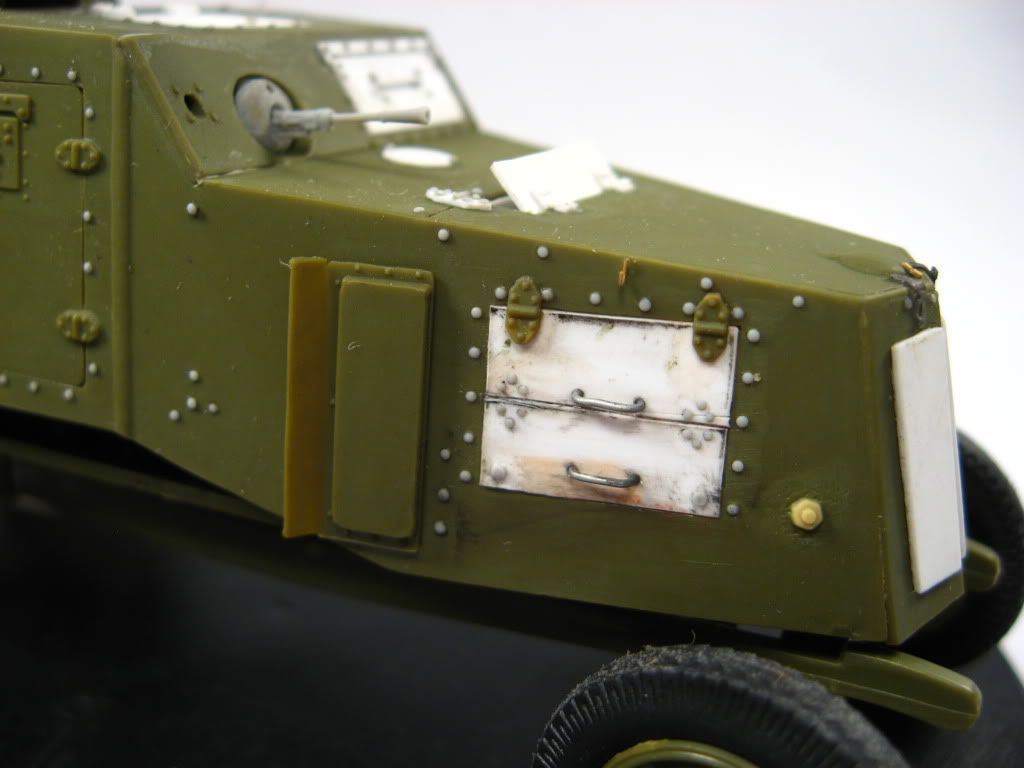
    I'm still working on the two radiator doors and have started on the frame and running gear.
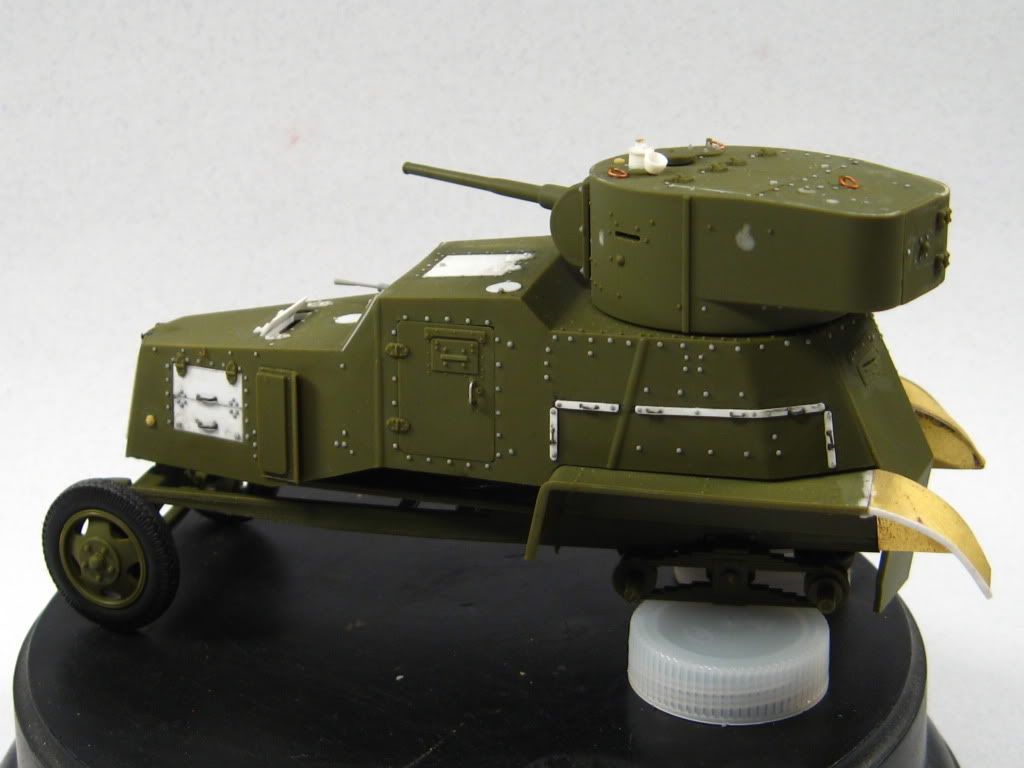
 

  I also plan on scratching the tracks that mounted to the rear wheels I just need to find a couple of close ups of them. If anyone has a pic or two of them it would be a big help.

  All comments suggestions and question are welcome Big Smile [:D]

   Steve

"Happiness is a belt fed weapon"

  • Member since
    February 2009
  • From: mass,USA
Posted by scratchmod on Friday, June 12, 2009 6:11 PM

That is sweeeet, love all the rivets. I like what I see so far Steve. I haven't thought about what I will bring to Danbury Whistling [:-^] hmmm maybe a wreck.

What's the second model to be???


Rob

  • Member since
    November 2006
  • From: Massachusetts
Posted by jadgpanther302 on Friday, June 12, 2009 8:38 PM

i think i might be at AMPS this year. Maybe i'll do some work to Tamiya's SAS jeep for it. Dont really know.


Looks good steve. THose rivets are far beyond my skills at the least.


-jagd-

  • Member since
    July 2006
  • From: New Jersey
Posted by redleg12 on Friday, June 12, 2009 8:41 PM

Steve - Now the inside looks like a chinese torture chamber but from the outside the scratch work looks great

Rounds Complete!!

"The Moral High Ground....A Great Place to Emplace Artillery."

  • Member since
    October 2007
  • From: N.H.
Posted by panzerguy on Friday, June 12, 2009 9:13 PM

   Thanks guys

  Rob I'm still trying to decide between a Pnzr II D kit that I want to convert to an Flamm Ausf A flame thrower and a Pnzrbefehlswagen that I'll be building as an armored ambulance. Maybe I'll just do both. Looking forward to seeing you at amps.

   Paul I hope you can make I know you'd have a blast.

   Mike your right it does lol! Looking forward to seeing you again this year.

   Didn't realize that I posted this as a BA6. It's a BA3. Correction made.

"Happiness is a belt fed weapon"

  • Member since
    December 2007
  • From: Bridgeview, Illinois
Posted by mg.mikael on Friday, June 12, 2009 9:49 PM

Now that is some amazing scratch work your doing for a Zvezda kit.....(even better scratching then mine.Wink [;)]) That must have taken some patience to drill out the holes for all those rivets, but I think it paid off.Thumbs Up [tup]

As for those tracks you'll be scratching for the rear fender, I think I may be able to help. Here's a link with quite a few pics: http://www.o5m6.de/ba_6.html (pics may be of a BA-6, but theirs clear views of the tracks) Hope it helps.Smile [:)]

"A good plan executed now is better than a perfect plan next week." - George S. Patton

  Photobucket 

  • Member since
    October 2007
  • From: N.H.
Posted by panzerguy on Friday, June 12, 2009 10:13 PM

   Michael Thank you! That's just what I needed something to give me an idea of what they looked like. I wont be placing them on the fender though they'll be on the wheels.

   I also like the pic with the rail wheels mounted. Hmmm... wonder if they make a BA6 kit?

   Again thank you

      Steve

"Happiness is a belt fed weapon"

  • Member since
    January 2009
  • From: Everett, WA
Posted by Schnobs on Friday, June 12, 2009 10:35 PM

Holy Scratch Building Batman!,  or should i say Panzerman!!

Your approach to the lack of rivets was brilliant!  I will definately be watching this one!

"There is a principle which is a bar against all information, which is proof against all arguments and which cannot fail to keep a man in everlasting ignorance. That principle is contempt prior to investigation." Herbert Spencer
  • Member since
    July 2004
  • From: Texas
Posted by wbill76 on Friday, June 12, 2009 10:45 PM
Very nice solution on the rivets Steve! Looks the part and once you get it painted and weathered no one will be able to tell (except us of course!) that they weren't part of the original kit. Always love to see the little details that you add to dress up these kits, looking forward to the next update! Thumbs Up [tup]
  • Member since
    June 2006
  • From: Netherlands
Posted by Grem56 on Friday, June 12, 2009 10:45 PM

A "riveting" tale Steve ! It's a very interesting subject and seeing your build so far makes it very tempting to buy this Zvezda offering. The approach to the rivets is logical, ( I just finished building Italeri's S-100 and some other builders were going nuts with Archer's rivets that departed with the masking tape each time they finished masking things Whistling [:-^]), and is a way of fitting them that I can manage as well (optivisor builder Cool [8D]). Can't wait to see it painted and weathered.

Julian Thumbs Up [tup]


illegal immigrants have always been a problem in the United States. Ask any Indian.....................

Italeri S-100: http://cs.finescale.com/FSMCS/forums/t/112607.aspx?PageIndex=1

Isu-152: http://cs.finescale.com/FSMCS/forums/t/116521.aspx?PageIndex=1


  • Member since
    April 2005
  • From: Piscataway, NJ!
Posted by wing_nut on Saturday, June 13, 2009 6:06 AM

Note to self, don't bother builing an theme entry for the AMPS East '09.

I agee that it looks like a torture device.  I couldn't help but think of an Iron Maiden.  Impressive scrath work and detialing Steve.  I look forward to seeing it in the flesh.  In the plastic?  Well, seeing it for realWink [;)]

Marc  

  • Member since
    October 2007
  • From: N.H.
Posted by panzerguy on Saturday, June 13, 2009 3:40 PM


Thanks Bill Schnobs Julian Marc


 Schnobs wrote:

Holy Scratch Building Batman!,  or should i say Panzerman!!

 Schnobs lolLaugh [(-D] I wonder if Stan Lee would be interested in a new character for Marvel.


 wbill76 wrote:
Always love to see the little details that you add to dress up these kits, looking forward to the next update! Thumbs Up [tup]

   Thanks Bill. These types of builds are probably the most fun for me. I find them to be extremely relaxing especially after finishing a kit that almost had me doing the ‘doog stuka stomp'!

     Julian having the rivets falling off was one of my concerns when I was deciding on how I would add them. I remembered reading in Military Modeler magazine how someone had used pushpins as rivets on a build. But they were way oversize imo. I definitely need magnification on this project but not optivisors. I use a one of the lamp magnifiers. Since I wear glasses when I work I don't think I'd be able to use the opti's.    

   Marc don't sell your self short friend. I've seen what you can do with a sharp knife and some plastic. Hey you just gave me an idea, anybody know how to write ‘Iron Maiden' in RussianWink [;)]?


"Happiness is a belt fed weapon"

  • Member since
    June 2005
  • From: Indiana U.S.A.
Posted by Panther F on Saturday, June 13, 2009 4:11 PM
Nice save with the rivet work!  It never would have looked right without them.
  • Member since
    April 2005
  • From: Piscataway, NJ!
Posted by wing_nut on Saturday, June 13, 2009 5:55 PM

Steve, according to Babelfish translator...


девушка утюга

Marc  

  • Member since
    October 2007
  • From: N.H.
Posted by panzerguy on Sunday, June 21, 2009 8:20 PM
  Well I haven't had too much time at the bench in the last week and a half do to twelve-hour days at work but I managed to get some work in last night and today.   Here's a rundown of my progress.

  Finished the two radiator doors added some detail to the steering linkage and cut the front wheels and turned them to the right.

  The kit supplied front bumper was scrapped and a whole new one was made using some left over brass I had in the spare parts bin. Some work was also done to the radiator to give it a little more detail. The driver/ co driver footsteps had some diamond plate added.

   Mounting points for the frame and rear axel were given some extra detail by adding some nuts and bolts that were shaved off a spare rear hull plate and drive sprocket from a Tiger II courtesy of the parts bin.


  I should be able to get the rest of the primer coat on tonight and I'm hoping to have some time this week to get a base coat down but it may have to wait for the weekend. 

  Thanks for looking

   Steve 

"Happiness is a belt fed weapon"

  • Member since
    July 2004
  • From: Texas
Posted by wbill76 on Sunday, June 21, 2009 8:45 PM
Coming along very nicely Steve! Just keeps getting better and better. Something was different about this week, been kind of slow in the forums but busy everywhere else! Hope those 12 hour days aren't too hard on you. Wink [;)]
  • Member since
    August 2008
  • From: S.W. Missouri
Posted by Pvt Mutt on Sunday, June 21, 2009 9:28 PM

Steve that thing looks like it means business.Approve [^]I've never seen one of these before and i'm impressed.Thumbs Up [tup]

Tony the Mutt

Shoot Low Boys They're Ridin Ponys

  • Member since
    April 2007
  • From: Schroon Lake, NY
Posted by SMJmodeler on Monday, June 22, 2009 9:29 AM
 wing_nut wrote:

Note to self, don't bother building an theme entry for the AMPS East '09.

Sign - Ditto [#ditto]...DANG-IT!...and I was just about to buy that Pz II like wbill76 is building right now and join the theme build!Grumpy [|(].

...Nasty looking AFV Steve...darn right, "butt-ugly"!   I'm sure your work will make her pretty thoughBlush [:I].  Looking good so far!

  • Member since
    July 2006
  • From: New Jersey
Posted by redleg12 on Monday, June 22, 2009 9:36 AM

Steve - Very nice scratch work!! Can't wait to see this one in Danbury.

Yep it has been slow on the forums and slow modelling week. I think it is the advent of summer. Too much grass to mow and too little time for the bench!

Rounds Complete!!

"The Moral High Ground....A Great Place to Emplace Artillery."

  • Member since
    February 2009
  • From: mass,USA
Posted by scratchmod on Monday, June 22, 2009 10:06 AM

looking very very nice my friend. I think when this build is done one of us will be doing a shot of Vodka.

Rob

  • Member since
    December 2007
  • From: Bridgeview, Illinois
Posted by mg.mikael on Monday, June 22, 2009 2:34 PM

Ouuu Ahhhh......I'm admiring all the scratch detail.Thumbs Up [tup] It may take alot of time, but I can see it's gonna pay off. Can't wait to see this beast all painted up!Cool [8D]

By the way, panzerguy do you need another pic of those tracks you're scratching? Because I found another one in Great Scale Modeling 2008, page 27.

"A good plan executed now is better than a perfect plan next week." - George S. Patton

  Photobucket 

  • Member since
    May 2005
  • From: Dublin Rep Of Ireland
Posted by terry35 on Monday, June 22, 2009 2:47 PM

WOW STEVE THAT IS AMAZING WORK. KEEP THIS PUPPY GOING.

TERRY. 

  • Member since
    October 2007
  • From: N.H.
Posted by panzerguy on Sunday, June 28, 2009 10:00 PM
 

  Thanks for looking in and the great comments guys it's much appreciated Big Smile [:D]

  So this weekend I managed some progress followed by a slight set back and then a little more progress.

   The progress started on Friday night. I managed to figure out how to scratch some head light lenses using clear sprue and brass screen.

    I first made a dimple in the brass screen using the end of a paintbrush handle. Next I heated the end of the sprue till it mushroomed a bit then pressed it in to the screen. It took a couple of tries to get one that was just right.


   After a little sanding and a coat of future on the inside of the lens it was attached to the headlight using white glue and then coated with liquid mask which will be removed after painting. The mounting brackets were cut off and new ones were made from plastic rod. There was no horn supplied in the kit so I scratched one.


     It was while I was trying to attach the headlights that the set back occurred. I dropped the cab! Both rear fenders the radiator doors and one of the side steps broke off.

  So after about five minutes of spewing out some of the most colorful metaphors that I could come up with I took a step back and assessed the damaged. I had to rebuild one of the fenders and scratch two new side steps so they would match up. I was able to re-attach the front doors without any problems.


   Today I got the base coat down and next up is some highlighting followed by a coat of future.


  Hopefully I'll be able to hold on to it this timeWhistling [:-^].  


"Happiness is a belt fed weapon"

  • Member since
    December 2007
  • From: Bridgeview, Illinois
Posted by mg.mikael on Sunday, June 28, 2009 10:38 PM

If you didn't tell me you dropped your build, panzerguy, I seriously would have never known because your BA-3 looks fantastic. Thus you shouldn't feel too bad about the drop.Wink [;)] 

Great tip about scratching clear lenses. I soooooo gotta try that technique out sometime.Thumbs Up [tup]

"A good plan executed now is better than a perfect plan next week." - George S. Patton

  Photobucket 

  • Member since
    March 2006
Posted by TD4438 on Monday, June 29, 2009 2:08 AM
Looks awesome.I built the BA-10M and loved it.I was gonna mention the brackets for those steps.I broke them off constantly.Also,did you have any problems putting the rear tires on?

  • Member since
    July 2006
  • From: New Jersey
Posted by redleg12 on Monday, June 29, 2009 4:19 AM

Steve - Based on the last picture I would almost have to say dropping sounds like bovine scatology or you should drop every model....No, I take that back.....like you answer to the other thread, you would be in a padded cell hooked to an IV of Thorizine.

Very nice. Looks great

I love the headlights...fantastic

Rounds Complete!!

"The Moral High Ground....A Great Place to Emplace Artillery."

  • Member since
    June 2009
Posted by Guney on Monday, June 29, 2009 4:44 AM
Only say...It's simply outstanding....Good luck with the painting/weathering my friend....:)
  • Member since
    April 2005
  • From: Piscataway, NJ!
Posted by wing_nut on Monday, June 29, 2009 6:00 AM
WOW Steve, that is really looking nice.  Clever why of doing the headlights... they look great.

Marc  

  • Member since
    January 2009
  • From: Everett, WA
Posted by Schnobs on Monday, June 29, 2009 9:36 AM

Steve could I schedule some time fo ryuo to come over and drop soem of my models if what I see i your pics is the final result.

Looks great man!  I love thos rivets!

"There is a principle which is a bar against all information, which is proof against all arguments and which cannot fail to keep a man in everlasting ignorance. That principle is contempt prior to investigation." Herbert Spencer
  • Member since
    October 2007
  • From: N.H.
Posted by panzerguy on Monday, June 29, 2009 5:42 PM

    Thanks guysBig Smile [:D].

   Edmund you don't need me just get yourself a cat they do some great work. Usually I get my major damage do to pet attacks, this was the first time that I alone was responsible for the damage.

  Glad the headlights are a hit. I'm in the process of looking for other sizes of screen so as to get different types of patterns for the lens.

"Happiness is a belt fed weapon"

JOIN OUR COMMUNITY!

Our community is FREE to join. To participate you must either login or register for an account.

SEARCH FORUMS
FREE NEWSLETTER
By signing up you may also receive reader surveys and occasional special offers. We do not sell, rent or trade our email lists. View our Privacy Policy.