SEARCH FINESCALE.COM

Enter keywords or a search phrase below:

1/6th scale Early Production M4 Sherman

21249 views
43 replies
1 rating 2 rating 3 rating 4 rating 5 rating
  • Member since
    April 2005
1/6th scale Early Production M4 Sherman
Posted by armourguy on Sunday, July 26, 2009 5:47 PM

Hi Guys, Now that I finished off a batch of German tanks I decided to build some more American tanks. First will be this old Viper Sherman Hull and turret that I recently acquired in a trade.
For those of you who are un familiar with the Viper Sherman it was an all resin and fiberglass early production M4 Sherman that was released in limited numbers back in 2003. The Model itself is a scaled up copy of the Tamiya 1/35th scale early production Sherman. The model came with a two piece upper and lower hull, non functional VVSS suspension, and lots of crew equipment that would be inserted into all of the holes that are drilled into the tank's surface. The problem with these models is that their resin construction made them very fragile and prone to damage. They also became unpopular because of their weight. Viper soon folded after the release of their Late Tiger I kit that was very un popular because of the same reasons.  
I always liked their M4 and I have built two of them when they were released. After building my two Shermans I saw room for improvement, and in making the tanks more rugged and robust.
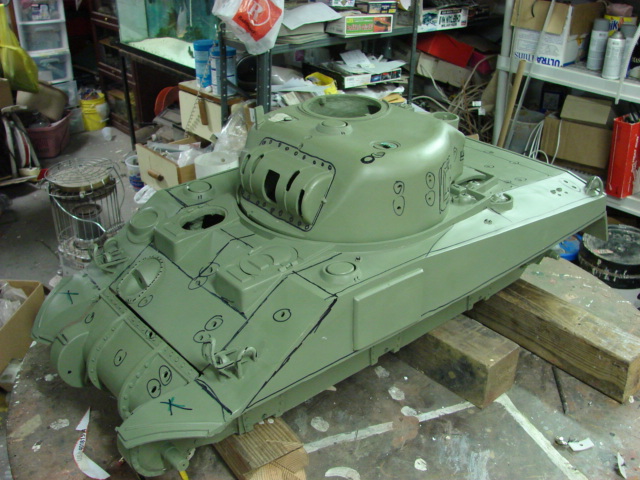
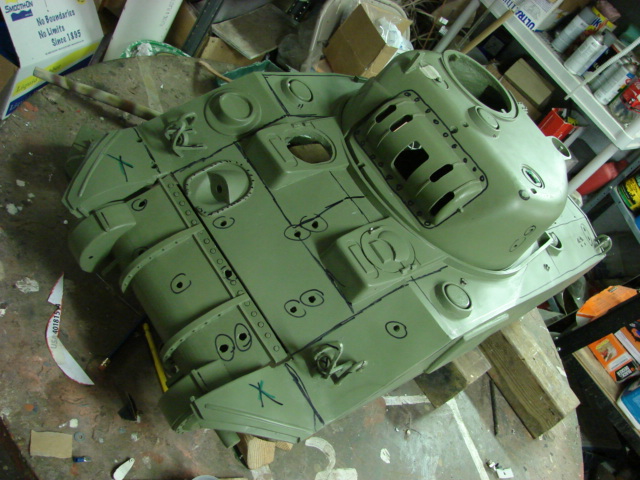
One problem that the kit has is that the lower hull doesn't have the hull sponsons. The hull is also molded that the hull wall is lower than the sponson by 1/2 an inch. Because of this there is a huge gap that can be shows through to the other side of the tank.
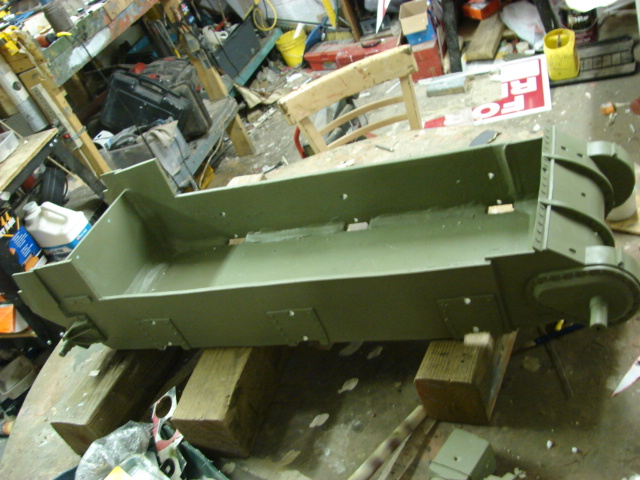
To correct this I cut several pieces of 1/2 inch plywood to construct the sponson and hull wall extender. I used this thickness of material because I wanted to use a material that was the same thickness of the tank's hull, also because it gives me a stronger point to attach fasteners. The sponsons had to be very strong because they will also be used to attach the top hull and the bottom hulls turning them into one solid piece. This alone reduces the fragility of the tank immensely. The sponsons were attached to the tank via fasteners, then they were treated and reinforced with fiberglass cloth and resin.
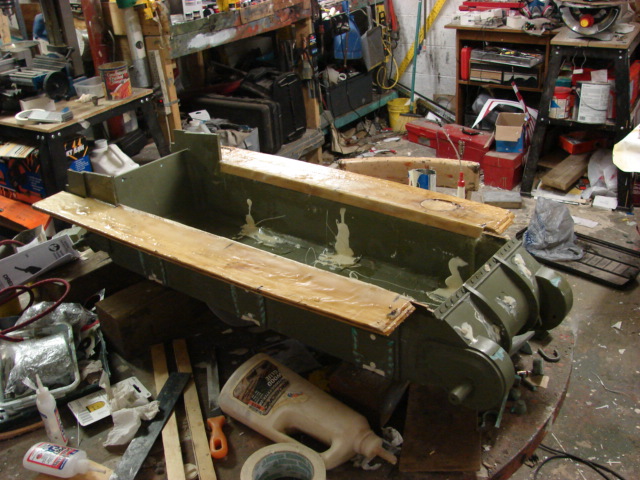
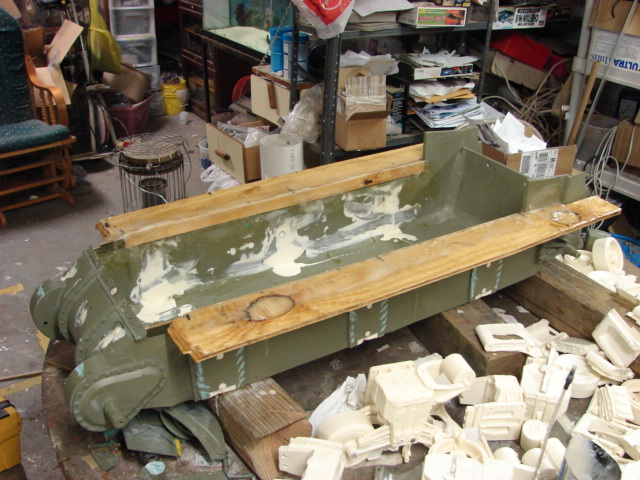
Prior to in the upper hull installation I reinforced the entire upper hull with more fiberglass cloth and resin. The tank does have cloth imbedded in its casting, but I felt that the thickness was too thin and the extra cloth and resin was a good measure. The Hull now sounds more "Solid".
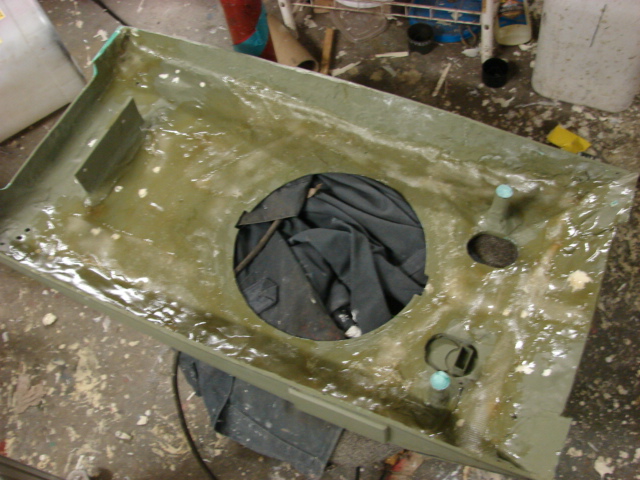
The upper Hull was attached permanently to the lower hull with fasteners, fiberglass cloth, resin, and epoxies.
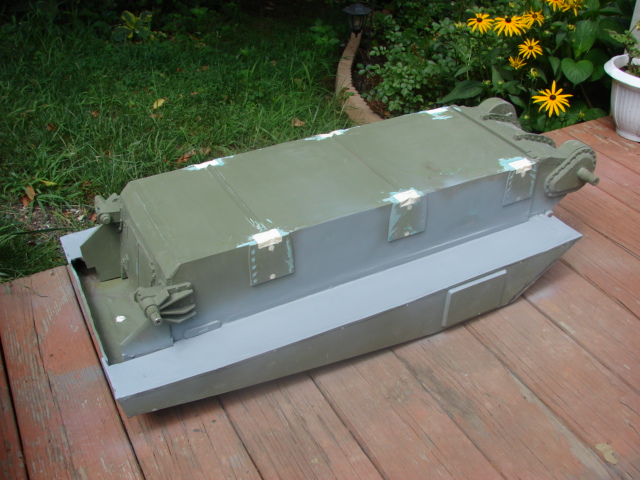
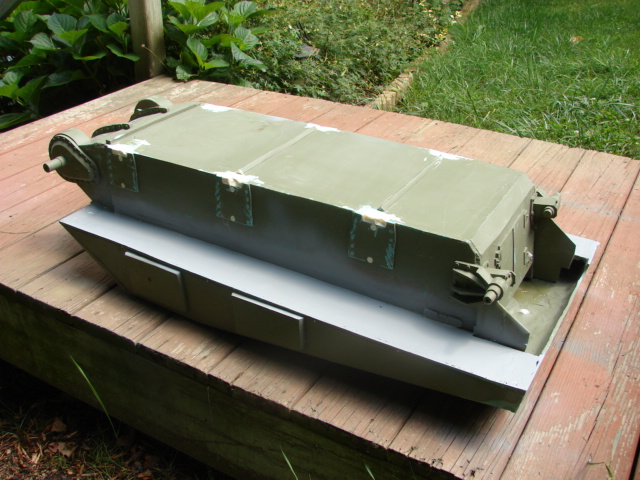
I will not be using the stock Viper VVSS suspension. In it's place I will be using my own functional VVSS suspension. Because of this I plugged up the holes for the kit supplied suspension with casting resin. I also used the casting resin to plug up all of the equipment holes.
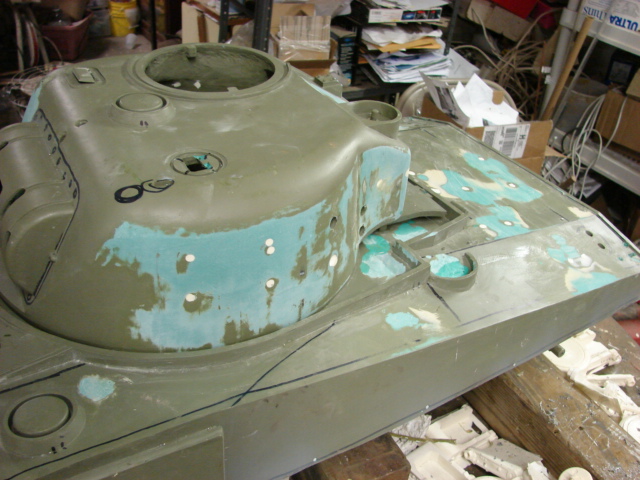
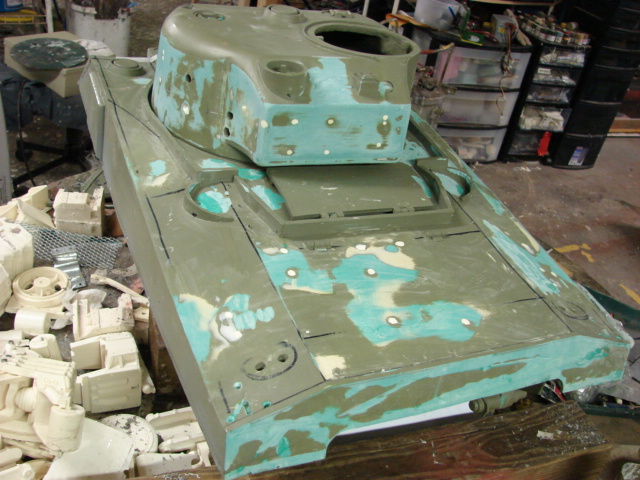
The tank came with a few tools and other accessories molded in shovels, fenders, head/ tail lights...ect. These were all removed and new ones will be added in their place

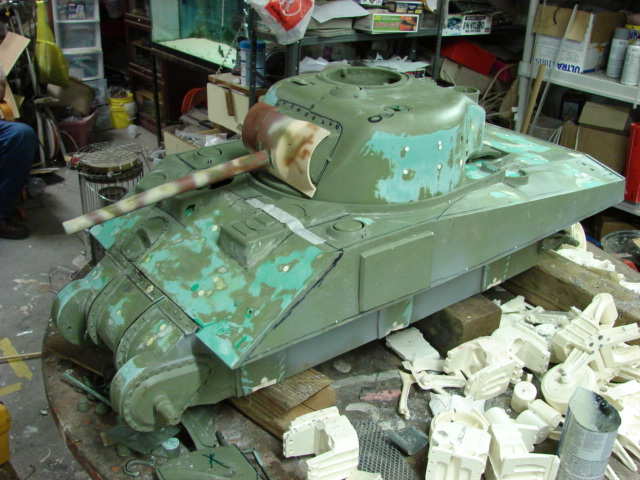
The tank's turret also had it's extra armor molded in. The problem was that the kit has the armor placed too low and had to be removed
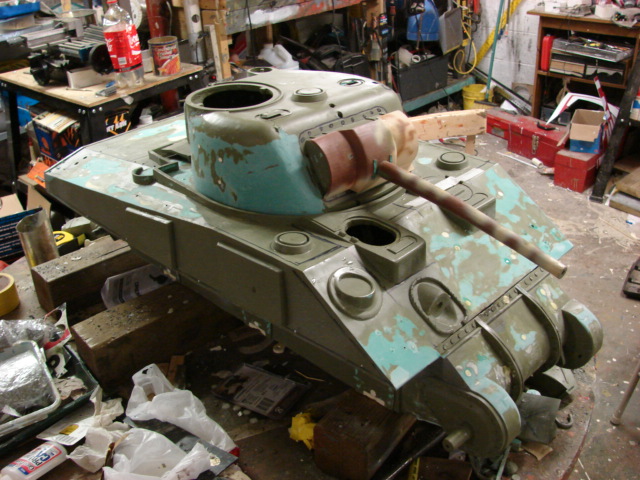
I will also be tooling up some new Resin components, as well as updating some of the older ones with newer tooling.

  • Member since
    March 2007
  • From: Northeast WA State
Posted by armornut on Sunday, July 26, 2009 6:41 PM
 HUGE please post more wips looks like fun but i don't have room for my 35th stuff much less a small volkswagon.hats off to ya.

we're modelers it's what we do

  • Member since
    September 2006
  • From: Dripping Springs, TX, USA
Posted by RBaer on Monday, July 27, 2009 3:37 PM
Shermans rock! Big Shermans even more!

Apprentice rivet counter.

  • Member since
    January 2006
  • From: Pineapple Country, Queensland, Australia
Posted by Wirraway on Monday, July 27, 2009 7:56 PM
Always blown away with your level of work and scratchbuilding.  Cant wait to see more. Bow [bow]

"Growing old is inevitable; growing up is optional"

" A hobby should pass the time - not fill it"  -Norman Bates


GIF animations generator gifup.com

  • Member since
    December 2003
  • From: Montreal
Posted by buff on Monday, July 27, 2009 8:13 PM
This is really interesting stuff.  Please keep the wip shots coming.

On the bench: 1/32 Spit IXc

  • Member since
    July 2006
  • From: New Jersey
Posted by redleg12 on Tuesday, July 28, 2009 5:18 AM

Very interesting to see building on this size and scale.....How do you display these????

Rounds Complete!!

"The Moral High Ground....A Great Place to Emplace Artillery."

  • Member since
    April 2008
  • From: Philadelphia PA
Posted by smeagol the vile on Thursday, July 30, 2009 2:08 AM
I wish I had the time, money, and space to build tanks this size.  Any chance you'd ever do anything WWI in that scale?


  • Member since
    February 2006
  • From: Cincinnati Ohio
Posted by DantheMan85 on Friday, July 31, 2009 11:44 AM
Look at the size of that Sherman!!!! HUGE  Nice job, keep us posted!!   Thumbs Up [tup] Thumbs Up [tup]

On my Work Bench: Tamiya Ford GT 1/24

Up Coming: ?


  • Member since
    April 2005
Posted by armourguy on Friday, July 31, 2009 6:35 PM

Thanks Guys, Compared to the Jag this build will be a vacation for me :D. I have some progress on the tank. I also have some parts in the molding phase and will be ready and on the product line shortly. WWI tanks are interesting, but I don't see myself building one in the future.

On the tank's engine deck I engraved the tank's engine hatch and engine access lid panel lines. I also severed the engine hatch armored ring from the tank's armored ring.


The tank's molded in air intake grill was removed. a new netal mesh one will be added soon.

I decided to reinforce the tank's upper hull roof. The hull is pretty sturdy, but I wanted to put extra reinforcement to eliminate the chance that the heavy turret could warp the hull over time. To reinforce the tank's upper hull roof I used three lengths of a hollow PVC pipe. The hollow pipe was then epoxied into the tanks hull. The hollow column gives me the maximum amount of strength with the minimum amount of added weight.  

For the tank's rear wall the kit was designed that the rear wall and the tank's upper hull would be connected via two fasteners. Instead of using fasteners I used two segments of Aluminum rods that were sanded flush with the rear wall.  

Resin and epoxy weld seams were added. There are still more welds that are needed; these will be added down the road.
 

On these vipers the early three piece transmission cover has molded in bolt details. The molded in bolts are simple round nubs with no fastener detail. These molded in bolts were removed and new metal fasteners were added. I added two seam lines to the transmission flange, giving the illusion that the transmission is in three pieces. Cast texture and the grease fittings were also added to the transmission cover.

Replacement bolts were also added to the final drives, idler mounts, and side wall. In addition to the bolts a circular disc was also added to the final drives.

On these Vipers where the Upper hull and the lower hull meet at the bolt strip there is a severe warp that leaves a large hole. To fix this I used a scrap piece of 20 gauge sheet metal left over from the jag. This plate was bolted to the upper hull with counter sunk fasteners. These fasteners were sanded flush with the tank's hull and are no longer visible. The other part of the steel plate is connected to the rivet strip with the rivet strip bolts. This plate forced the gap closed.
 

I'm now complete with the hull fragility improvements. The tank's hull is now not only more "stabile" and rugged, but is also easier to pick up then before.

The tank's fragility was easy to fix, but for the weight the only equipment that I know of that will fix the problem would be a set of these tools Big Smile [:D]

  • Member since
    April 2005
Posted by armourguy on Tuesday, August 4, 2009 2:49 PM

I have added a new component to the US AFV poduct Line. More parts are to follow.  http://www.eastcoastarmory.com/ustankparts.htm
Resin M4 Sherman Bow 30.cal canvas mount ring

I have also assembled and installed the tank's functional VVSS Suspension. On this model I went with the Mid production VVSS skid rail. I also used different styles of swing arms, and road wheels for the "in field" mix and match look.

One weak point that these kits had were their suspension. The stock VVSS suspension was made out of the same brittle resin that the tank was constructed out of. The stock suspension was also ridged and non functional. This made the tank very unrealistic when placed on an uneven surface. Another problem because of the ridged and fragile combination was that when the tank was placed on an uneven terrain all of the tank's weight would be focused on one or two pressure points, giving the potential for the swing arms to snap.

With the new functional VVSS the tank now has a natural look on an uneven surface, and the tank's weight is distributed thought the entire suspension safely.

Now that the suspension is out of the way the tank's progress will be more rapid.

  • Member since
    September 2006
  • From: Dripping Springs, TX, USA
Posted by RBaer on Tuesday, August 4, 2009 3:07 PM

Whoa.....

That's all I have.

Apprentice rivet counter.

  • Member since
    April 2005
Posted by armourguy on Saturday, August 8, 2009 10:58 AM

I have made more progress on the model, and I have added some new parts to the product line.
http://www.eastcoastarmory.com/ustankparts.htm

M4 Sherman Exhaust manifold set. This style of exhaust will work on the Viper M4, M4A1, M3 Lee, and the M7 Priest.

Early 60 degree M4 frontal additional armor set. Set includes port, starboard armor plates, and one 30. cal canvas ring. This set will work on Viper and Armortek sherman tank Kits.

M4 rear Sponson access cap set.

On the tank's rear deck I completed reworking the large air intake. I also made the recessed wells for the fuel caps, which will be added soon. The two angle pieces are mounts for the retaining bolts, which keep the large hatch locked to the rear deck. 

For the tanks sprockets I modified a set of Panzerwerk VVSS sprockets to fit over the Viper sprocket mounts.

The origonal kit came with two cast resin early spoke sprockets. These sprockets would be bolted onto metal studs that protrude out of the tank's transmission hub.

To make the Panzerwerk sprocket mount to the Viper stud I had to first widen the original bolt hole to 1/4 of an inch. I also extended the hole to run through the entire stud. This will be for mounting a 1/4 inch shaft that will be connected to the sprocket.

The panzerwerk sprockets were modified be first having a 1/4 inch hole drilled all the way through the sprocket. This will be for the 1/4 inch steel shaft.

Half way through the sprocket the 1/4 inch hole was bored out larger to the diameter of the viper stud. The 1/4 inch shaft was then glued in it's place. This allows the sprocket to spin freely, and with plenty of support from the stud.

More progress to follow.

  • Member since
    July 2003
  • From: On my kitchen counter top somewhere in central North Carolina.
Posted by disastermaster on Saturday, August 8, 2009 12:24 PM

I always look forward to these wonderful updates as they are repeatedly full of valuable information.

http://www.innovationbyinstinct.com/services/hosting/clients/accountyp/status/DisasterMaster/%23t1-4.jpg

 https://i.imgur.com/LjRRaV1.png


  • Member since
    February 2006
  • From: Cincinnati Ohio
Posted by DantheMan85 on Saturday, August 8, 2009 12:39 PM
All I can say is WOW!!Bow [bow]

On my Work Bench: Tamiya Ford GT 1/24

Up Coming: ?


  • Member since
    April 2005
Posted by armourguy on Wednesday, August 12, 2009 10:15 PM

I have completed more new components for the M4 and the M4 family. All of these new items have been added to the product line.
http://www.eastcoastarmory.com/ustankparts.htm

1. Resin M4 Sherman Family Lower Hull Lift Hook set.

2. Viper M4 Sherman Idler Mount Quick Fix set. Set comes with two resin Hex heads, and two plastic discs. This set is a simple quick dress up kit for the Viper Idler Mounts.

Stock Viper Idler Mount:

Modified with the dress up kit:

3. Rear deck Armored air intake. This part will work on all 1/6th scale M4 Sherman on the market.

4. Resin M4 Sherman Rear Engine Air Filter canister set. This set will work on The Viper M4, M4A1, M3 Lee, M7 Priest, and M12 SPG. These sets will not work on the Panzerwerk, Armortek, Plastic Panzer, and JD M4A3 Sherman. The Air filters are hollow and come with a removable top, and air filter. These sets would be perfect for a maintenance diorama. This set also comes in two options, One as a kit form, the other as a pre built set.

On the tank I completed the tank's rear firewall details.

I have also been working on the tank's front armored plate details including a travel lock, side view mirror mounts, and front antanna mount cover plate.  

On the tanks top deck, new tow cable cleats and a new fire extinguisher control box were added.

  • Member since
    April 2005
Posted by armourguy on Tuesday, August 18, 2009 2:34 PM

I have been working on some more parts to finish up the tank's hull.
http://www.eastcoastarmory.com/ustankparts.htm
1. M4 and M4A1 Resin Engine air intake set.

I have been working on the tank's replacement hatches and will have them up on the product line very soon. Here is a sneak peek of the new hatch

I have also been re tooling many of the older parts with newer molds. The first is the folding Comb wire cutting device. This new tooled version is easier to produce then the first version.

The tank's hull is mostly complete. The front head light and Horn brush guards have been added. New sheet metal fenders were also fabricated and installed.

The functional gas cap covers were installed. The cover's hinges are made out of a copper tube soldered to a brass hex bolt. The whole unit is then screwed into the tank's hull. The retaining pin chain mounts were also added. The tank's fuel caps will be machined out of alluminum and will be installed after the tank is painted. 

For the engine air intake mounts to be installed I needed to drill out the positions that the intakes would be mounted to. On these shermans the intakes are also counter sunk into the rear deck. To do this I engraved the counter sink with a dremel.

The intakes now have the proper height and seam around their base.

  • Member since
    July 2006
  • From: New Jersey
Posted by redleg12 on Tuesday, August 18, 2009 7:54 PM

Unbelieveable....very very nice......love the welds and the thousands of details

Rounds Complete!!

"The Moral High Ground....A Great Place to Emplace Artillery."

  • Member since
    September 2003
  • From: South Central Wisconsin
Posted by Daywalker on Wednesday, August 19, 2009 6:49 AM
This is incredible stuff!  I am using your build as a reference on my 1/35 Sherman. Thumbs Up [tup] 

Frank 


  • Member since
    April 2005
  • From: Piscataway, NJ!
Posted by wing_nut on Wednesday, August 19, 2009 7:14 AM
Can't think of a thing to say beyond... incredible!

Marc  

  • Member since
    April 2009
  • From: Carmel, IN
Posted by deafpanzer on Wednesday, August 19, 2009 9:29 AM
Bow [bow] WOW! Bow [bow]  Your tank is starting to look like 1/1 scale kit now!  It has been fun following your build.  Can't wait to see it painted! 

Andy

  • Member since
    April 2005
Posted by armourguy on Thursday, August 20, 2009 8:08 PM
Thanks Guys, One advantage about working in this scale is that a lot of the small details that are too small to be replicated or are ignored in smaller scales are more noticeable and are easier to scratch build.   

I have completed the last parts for the hatches and they have been added to the product line.http://www.eastcoastarmory.com/ustankparts.htm
 
All of the components that are included with my older hatch upgrade kit have been included and molded into these hatches. The hatches also come with pre assembled spring loaded hatch retaining latches. The hatches don't come with the bottom portion of the periscope. A superb set can be purchased through Panzerwerks, and Armorpax.

The tank's lower hull is mostly complete. All that needs to be added to complete the lower hull are the tool mounts, cast numbers, and side view mirrors.

To install the hatches some modifications were made to the tank's hatch wells. Slots were cut into the wells for the hatch handle, and the counter spring arm. Panzerwerk US periscope bottoms were added to the hatch, and mounts for the pad lock and foul weather driving hood were also added.

The spring hatch retaining latches are functional and actually lock the hatch in place.

Here is the new hatch compared with the original kit supplied version

I also installed the tank's rear idler wheels. The original kit supplied idler wheels were a solid cast resin wheel, with nice molded in detailing. When I acquired the tank hull the running gear was not supplied so alternative wheels were used. For the replacement wheels I used a set of Hollow Rotomoled VVSS idler wheels from Plastic Panzers. The wheels were reworked and modified to fit onto the viper idler mounts.

To solidify the wheels I filled them in with casting resin. Now that the wheels are solid I can begin to machine them.

The molded in hub caps were removed and Grease plug inlets were milled into the wheel. Replacement hub caps will be added shortly.

Like on the drive sprocket I had to modify the viper wheel Axel, by drilling out the threaded hole to 1/4 of an inch.

The new Axel was made out of a 1/4 steel rod. The rod had a hole drilled into it and a lock pin and washer were added. This keeps the licked to the Axel, but also allows it to spin freely.

  • Member since
    April 2005
Posted by armourguy on Sunday, August 23, 2009 9:09 PM

On the tank's front driver's hood I replaced the molded in bow periscopes with a set of my resin ones.

  I have also started working on the tank's turret. It has been brought to my attention that the front of the stock viper turret is too blunt and needed to be reworked.

BEFORE

AFTER

The Mantlet drum was reworked. The seams where the drum meets the turret were added along with the slotted screws. The Stock M34A1 Mantlet is too thin and the shape is not very accurate. The stock mantlet is missing the holes for the slot screws, Coax 30 MG, and Gunner's scope. The Mantlet also has it's 75mm gun attached. The problem that I noticed from all of the vipers thatI have seen is that the solid resin main gun is warped. This gun will not be used and a new one will be machined soon.

I made a new M34A1 Mantlet and added it to the product line. http://www.eastcoastarmory.com/ustankparts.htm

To show the scale of this model here is a size comparison of the mantlet to a 1/35th scale tamiya M4 sherman.


The stock mantlet was installed by screwing in two screws with that were attached with nylon washers. The nylon would "in theory" secure the mantlet to the tank. The problem with this method was that the barrel would be too heavy for the nylon mounts and the gun would sag. The other problem was that the resin mounts were the mantlet would attach were very week and can break. The technique that I developed replaces the nylon with two pieces of PVC pipe. The smaller PVC gets inserted onto the mantlet and the larger PVC pipe. The larger PVC simply rotates inside the mantlet drum. Extension springs could also be added to prevent barrel droop if necessary.

The tank's turret is a smooth casting, too smooth. Casting marks were added.

 I'm now working on the masters for the tank's turret hatches. more images and progress is to follow.

  • Member since
    September 2006
  • From: Dripping Springs, TX, USA
Posted by RBaer on Monday, August 24, 2009 11:07 AM
Ya'll remember what Peter Boyle's character on "Everybody Loves Raymond" used to say all the time?

Apprentice rivet counter.

  • Member since
    December 2005
  • From: Goteborg / Sverige
Posted by Svenne Duva on Monday, August 24, 2009 11:19 AM
Bow [bow]Bow [bow]Bow [bow]

Thank you for sharing this armourguy!

Svenne

sic transit gloria mundi

  • Member since
    April 2009
  • From: Carmel, IN
Posted by deafpanzer on Monday, August 24, 2009 1:54 PM
Your work continue to amaze me. Shock [:O] Hopefully one day I get to see all of your T-O-Y-S!  IN one of your pictures, I see a Me-109 in the background... is it in 1/6th scale?  It looked BIG! 

Andy

  • Member since
    April 2005
Posted by armourguy on Thursday, September 3, 2009 6:42 PM

 deafpanzer wrote:
I see a Me-109 in the background... is it in 1/6th scale?  It looked BIG! 

Thanks everyone, The Plane is a 1/5th scale FW 190. The plane was bought pre built from a hobby shop over 10 years ago. The plane was built RC, but I have never flown it.


It's been awhile since I had some progress posted. I have been working on the tank, but I was spending most of the time focusing on the retooling of the tanks copula and other parts, which are now complete.


I have completed the last of the large components. These parts have also been added to the product line. http://www.eastcoastarmory.com/ustankparts.htm

M4 Sherman VVSS Idler Wheel Hub Caps.


M4 Sherman turret Spent Shell Ejection Port.


M4 Sherman Late War Commanders Copula. I have replaced my first copula with this new advanced version. The copula is offered in two versions, one without the interior periscope detailing, the other with the interior periscope detailing. Both versions feature the interior detailing on the Copula's hatch.


I installed many of the tank's turret details. Including the Gunner's scope slot screw details, Gunners scope guard box, folding 50.cal travel lock, 50.cal folding Pintle mount, and smoke grenade launcher.


I also added many of the 50.cal storage equipment to the tank's rear turret bustle.


The tank's new machined PVC gun barrel was installed onto the mantlet.


After adding the gun the barrel was too heavy and caused the gun to droop. to fix this I added a single extension spring to the inside of the gun permanently fixing the drooping problem.


These were the last of the big parts that needed to be patterned and molded. Now that they are complete I can steam ahead on the model with full steam to completion, The tank should be ready for paint in one week.

  • Member since
    April 2005
Posted by armourguy on Sunday, September 6, 2009 6:23 PM

I have completed the last of the new and retooled parts and have added them to the product line. http://www.eastcoastarmory.com/ustankparts.htm

1. Metal M4 VVSS Sherman front fenders. After starting this project I have recieved many requests for front replacement fenders, and I decided to add them to the product line.

2. Early M4 sherman "shark Fin" range finder.

3. M4 sherman / US AFV Late style range finder. This component has phased out the metal version that was previously offered on the website.

3. Retooled US AFV Pivot able searchlight kit. This revised and retooled component is offered in two versions. The first version has a solid resin light bulb lens. The second version has a hollow search light mount, and comes with a vacume form clear plastic insert. This version can be made with a bulb or LED inside.

The tank is now almost ready for painting

The tank's turret details have been installed and completed

On the rear of the turret, the tank's MP-48 anntenna base was added alond with the 50.cal barrel clamp was added.

The Antenna's tip has the knurled antenna connector added to the tip. This part will be added to the antenna that are offered on the product line with no added cost.

The 50.cal barrel clamp was scratch biult out of sheet steel. The spring loaded clamp lock is functional

Brass periscope brush guards were installed on all of the exposed periscopes.

I also re worked the tank's spare antenna base plate, by added 5 hex bolt heads replacing the molded in round nubs.

As a side note I have seen many 1/6th shermans that have the 50.cal pintle mount mounted on this position. Many people miss identify this location for the pintle mount because both the pintle mount and the aerial mount have four holes drilled into them. This Position was never intended for the pintle mount and was only for the use to install a second aerial base. Typically most M4's had only one radio and the antenna would be run through the large antenna well. Since the other position was not in use a plate was bolted over it.    

I also added the tank's side view mirrors. I made the mirrors fully telescoping and functional, and real mirriors were used.

The tank is now getting it's tool posts. Once they are complete the tank will be ready for painting


  • Member since
    October 2007
  • From: N.H.
Posted by panzerguy on Sunday, September 6, 2009 10:11 PM
 

   Just got done going over you're rebuild from the beginning armorguy and there are some words I could use to describe how freaking cool this is but I don't want to get a possible suspension. So let me just reiterate what everyone else has said:

                WOW!

  By the way my sons GI Joe's would like to know if you're looking for a crewWink [;)]

"Happiness is a belt fed weapon"

  • Member since
    December 2008
  • From: Northern Va
Posted by psstoff995's lbro on Sunday, September 6, 2009 10:52 PM

Sign - Ditto [#ditto]

WOW! All I can say.

Thumbs Up [tup]Thumbs Up [tup]Thumbs Up [tup]

-Will young modeler Test fit master
  • Member since
    April 2005
Posted by armourguy on Monday, September 7, 2009 3:17 PM

Thanks Guys

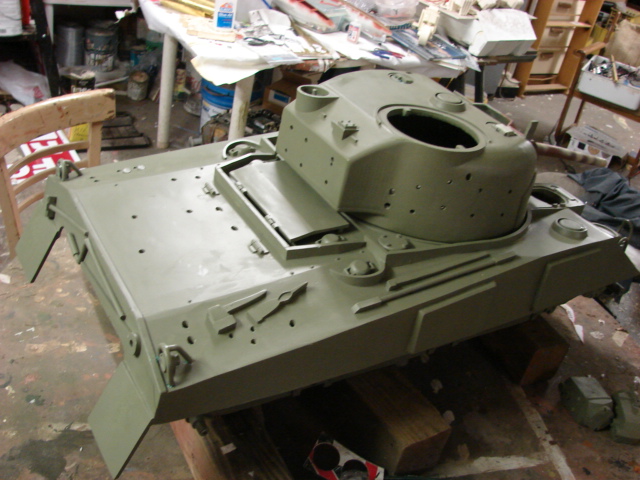
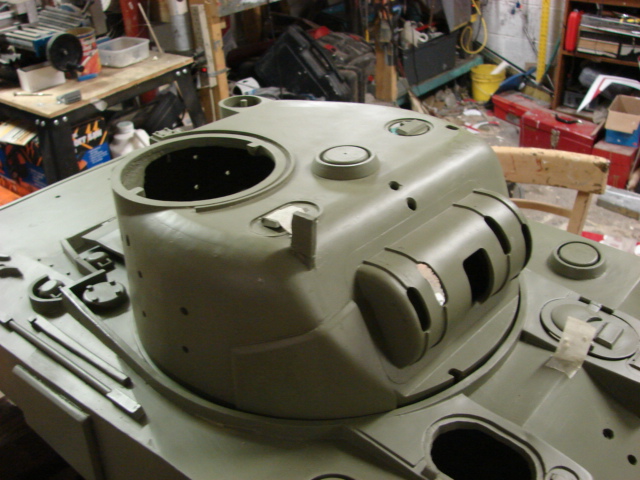
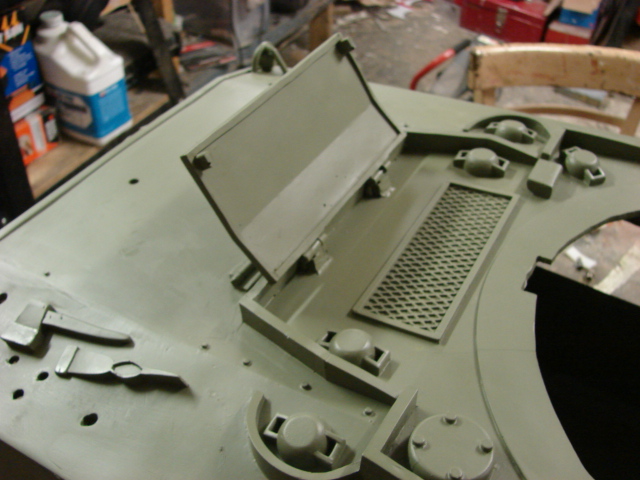
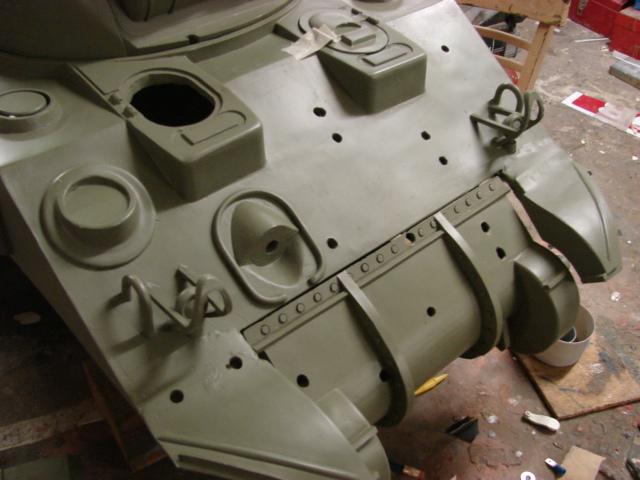
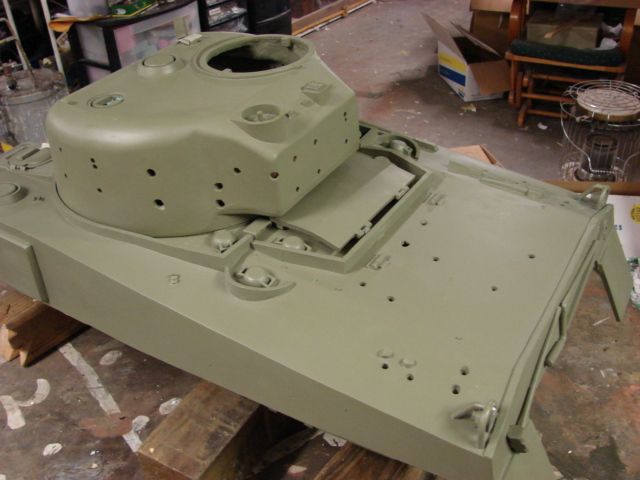
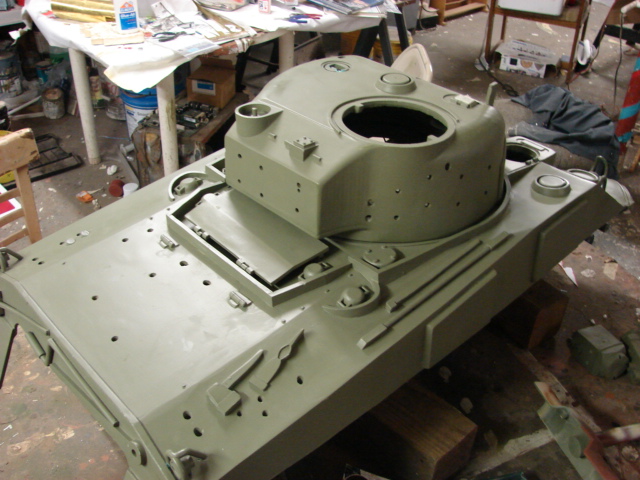
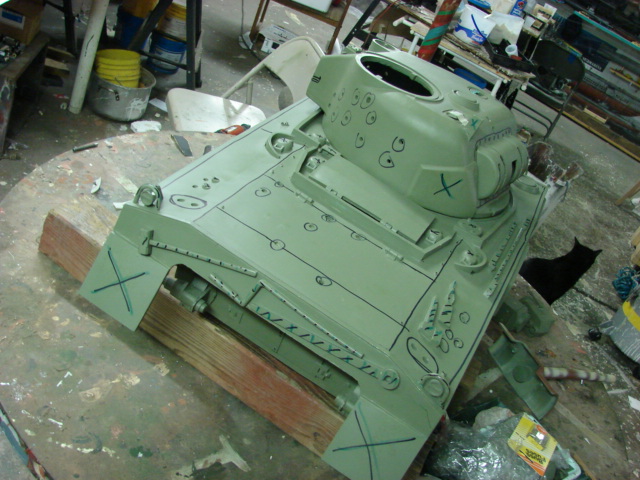
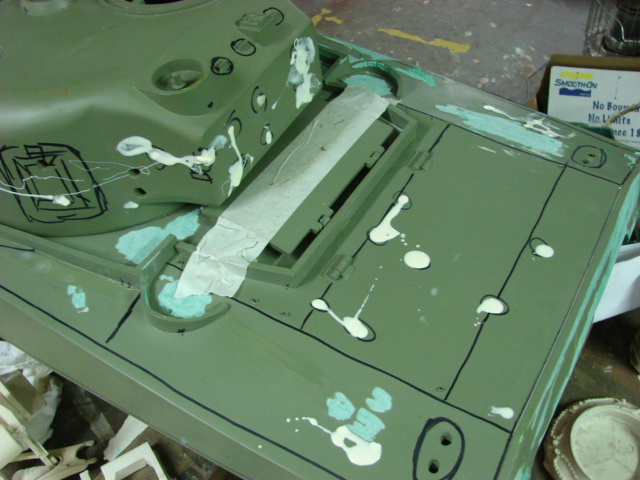
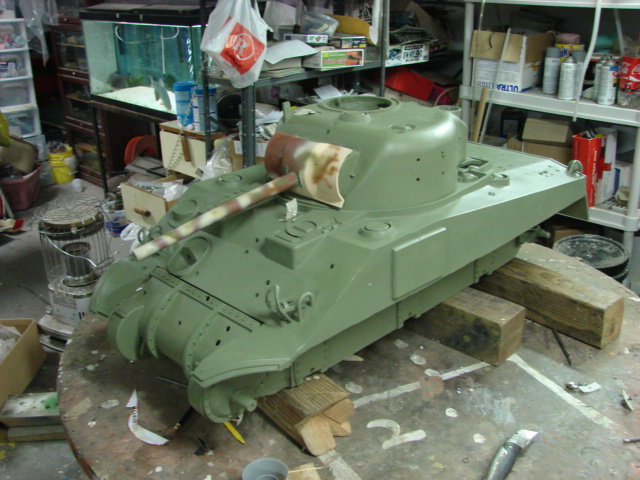
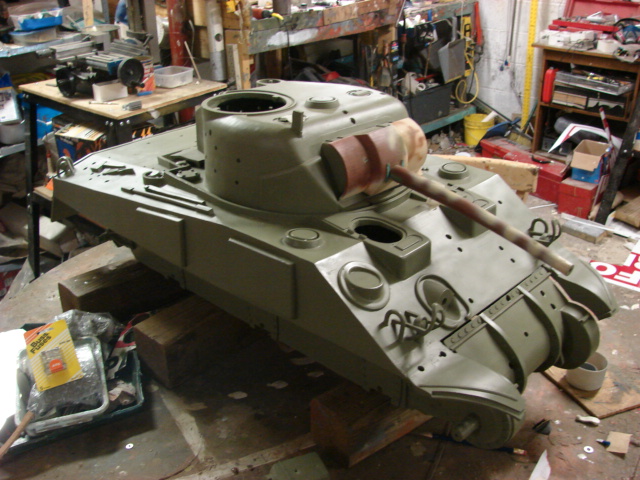
I added the tank's tool clamps, the tank is now complete and has been painted in it's base coat. It is now off to the next step  :D . 

Final Prime

Base OD

JOIN OUR COMMUNITY!

Our community is FREE to join. To participate you must either login or register for an account.

SEARCH FORUMS
FREE NEWSLETTER
By signing up you may also receive reader surveys and occasional special offers. We do not sell, rent or trade our email lists. View our Privacy Policy.