SEARCH FINESCALE.COM

Enter keywords or a search phrase below:

Soviet-Afghan War T-72 ~FINISHED~ Pics on Page 4

41637 views
67 replies
1 rating 2 rating 3 rating 4 rating 5 rating
  • Member since
    March 2008
  • From: Steilacoom, Washington
Posted by Killjoy on Tuesday, June 1, 2010 7:31 PM

Very nice looking build you have going there!  I am not sure who posted those photos from Afghanistan, but I have seen a few like that before.  It's amazing how much old Soviet equipment is still sitting around in the desert.

Chris

A veteran is someone who, at one point in their life, wrote a blank check made payable to "The United States of America," for an amount of "up to and including my life."

  • Member since
    December 2007
  • From: Bridgeview, Illinois
Posted by mg.mikael on Tuesday, June 1, 2010 9:06 PM

Hey, wing_nut and killjoy, thanks for checkin' out the build!Smile

agentg- Windbreak you say, guess that one of the few uses for soviet armor, other then being moving targets when their still operational.Wink


"A good plan executed now is better than a perfect plan next week." - George S. Patton

  Photobucket 

  • Member since
    September 2006
  • From: Dripping Springs, TX, USA
Posted by RBaer on Wednesday, June 2, 2010 11:23 AM

Glad I finally looked in here, very nice progress. I've got the same kit, started a re-do on it since I built it OOB about 10 years ago.....This will be very helpful!

One thing I will say, the kit tracks on mine hardened, then started popping apart after a few years on the shelf. I scored some Friuls at a show for a very reasonable price....

Apprentice rivet counter.

  • Member since
    December 2007
  • From: Bridgeview, Illinois
Posted by mg.mikael on Wednesday, June 2, 2010 3:44 PM

RBaer- Glad my build will be able to help out on your re-do. But now you're starting to scare me, I hope my rubber tracks don't harden and pop off. Sad When I bought this kit at a show, I could have bought Friuls.....but I got this kit so cheap($10Big Smile) I didn't want to spend almost $30 on just the tracks.

"A good plan executed now is better than a perfect plan next week." - George S. Patton

  Photobucket 

  • Member since
    September 2006
  • From: Dripping Springs, TX, USA
Posted by RBaer on Wednesday, June 2, 2010 6:12 PM

You did good, I bought my kit when it was new, in a hobby shop. I know for sure I paid more than $10.......Crying

Oh, well. But if I built it, then am re-doing it, it was half-price, right?

Apprentice rivet counter.

  • Member since
    December 2007
  • From: Bridgeview, Illinois
Posted by mg.mikael on Wednesday, June 2, 2010 11:46 PM

Half-price.....sure, if it makes you feel better I guess you could say that.Wink

"A good plan executed now is better than a perfect plan next week." - George S. Patton

  Photobucket 

  • Member since
    December 2007
  • From: Bridgeview, Illinois
Posted by mg.mikael on Sunday, June 6, 2010 6:19 PM

Alright now I finally have some work done worth posting about(everything else was just little tid-bits here and there). That said the two main lights are done, the searchlight and IR searchlight. ALong with a rear tow cable and FINALLY the two gas tanks.Cool

 Tamiya includes not one clear piece in the entire kit, yet their are multiple lights where a clear lens in necessary. Why Tamiya took the easy way out, I don't know.....No That said, I had to get out the srcibe and drill out the plastic piece which is what Tamiy calls a "light lens." Had some mishaps with the IR searchlight (cracking the lens holder) but I think I fixed them pretty nicely. Ater drilling out both prominent lights on the turret, I scratched some lenses for them. The lenses were also given a coat of Tamiya acrylic clear Smoke, it makes the lenses more realistic and the instructions orginally called out for the lens to be painted black, thus this variant is right on line.
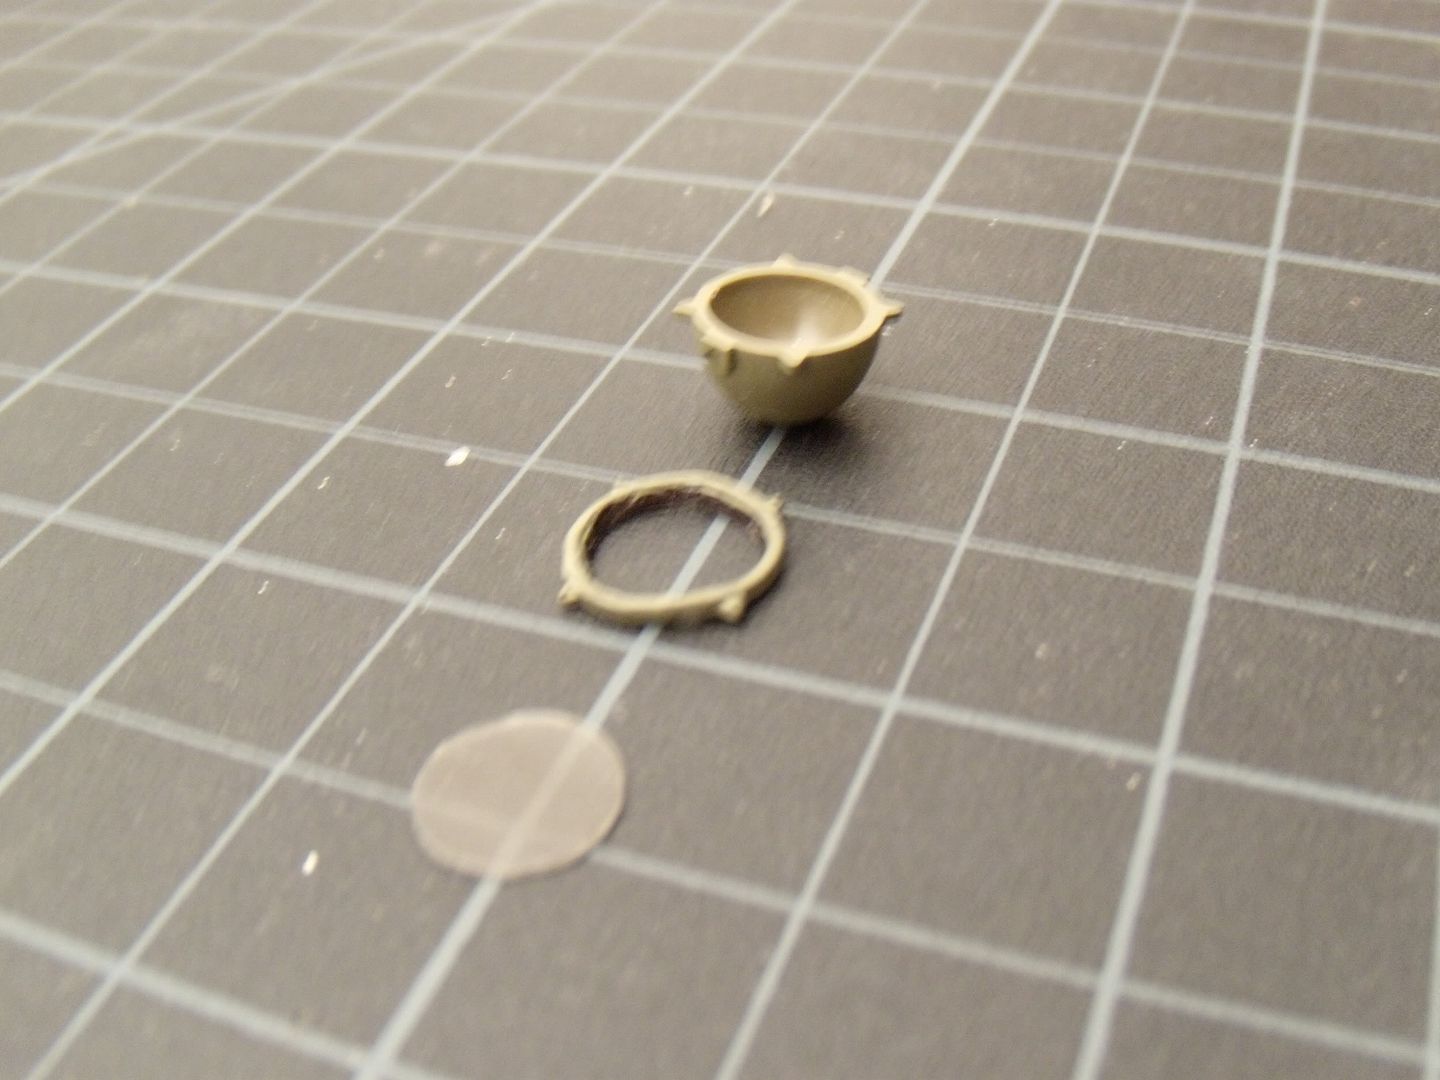
http://i267.photobucket.com/albums/ii291/mgmikael/T-72%20Afghanistan/DSCN0929.jpg


After drilling, and lens making, I tried something new for my lights. Instead of going the usual route of painting the interior of the light, I used gift wrap. Okay a certian kind of gift wrap(though aluminum foil might also be a good way to go), the one that has a shiny reflective color on one side and plain silver reflecting on the other. Not having a color I needed, I took the plain silver side and painted a portion Tamiya Smoke(for regular searchlight) and another Tamiya clear red and over that Tamiya smoke(for the infra-red light).

http://i267.photobucket.com/albums/ii291/mgmikael/T-72%20Afghanistan/DSCN0928.jpg


Once the paints dryed, I took the 'gift wrap' that was painted, applied glue to the insides of the lights, and then stuffed the 'gift wrap' inside.
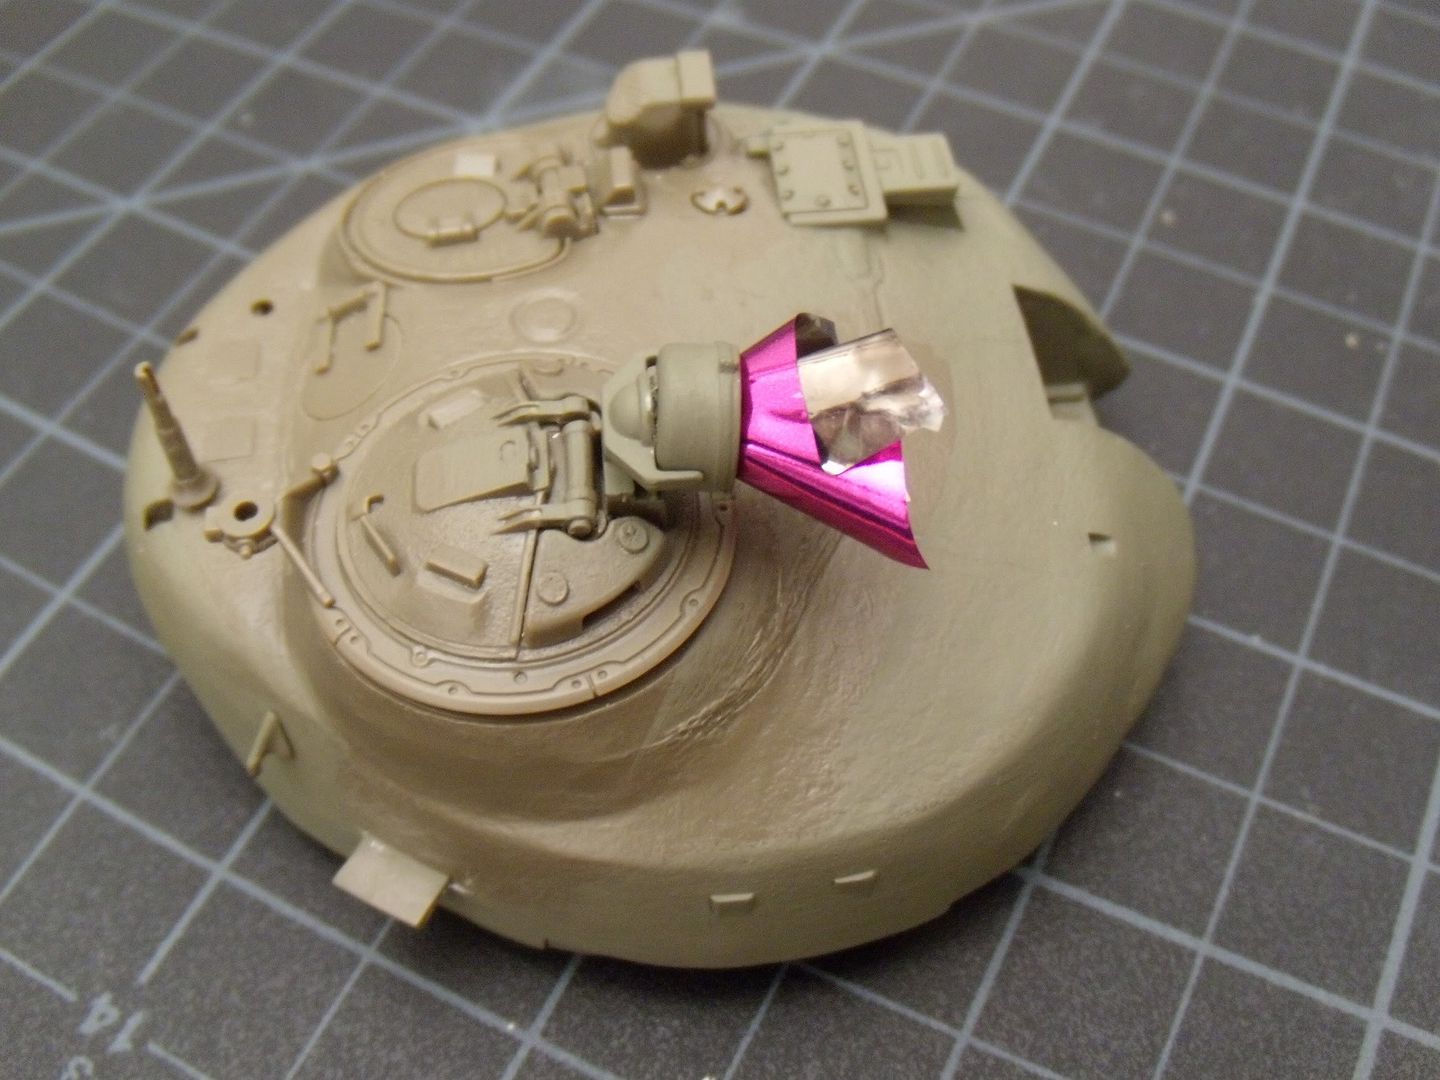
http://i267.photobucket.com/albums/ii291/mgmikael/T-72%20Afghanistan/DSCN0930.jpg


Once the glue dried, I cut off all the excess 'wrap' coming out of the light(which was quite tricky.) Once cut I applied more glue to make sure the 'wrap' ends wouldn't come off the sides of the light. Then it was just a matter of sticking the lens on, and finishing touches. So what do you think?
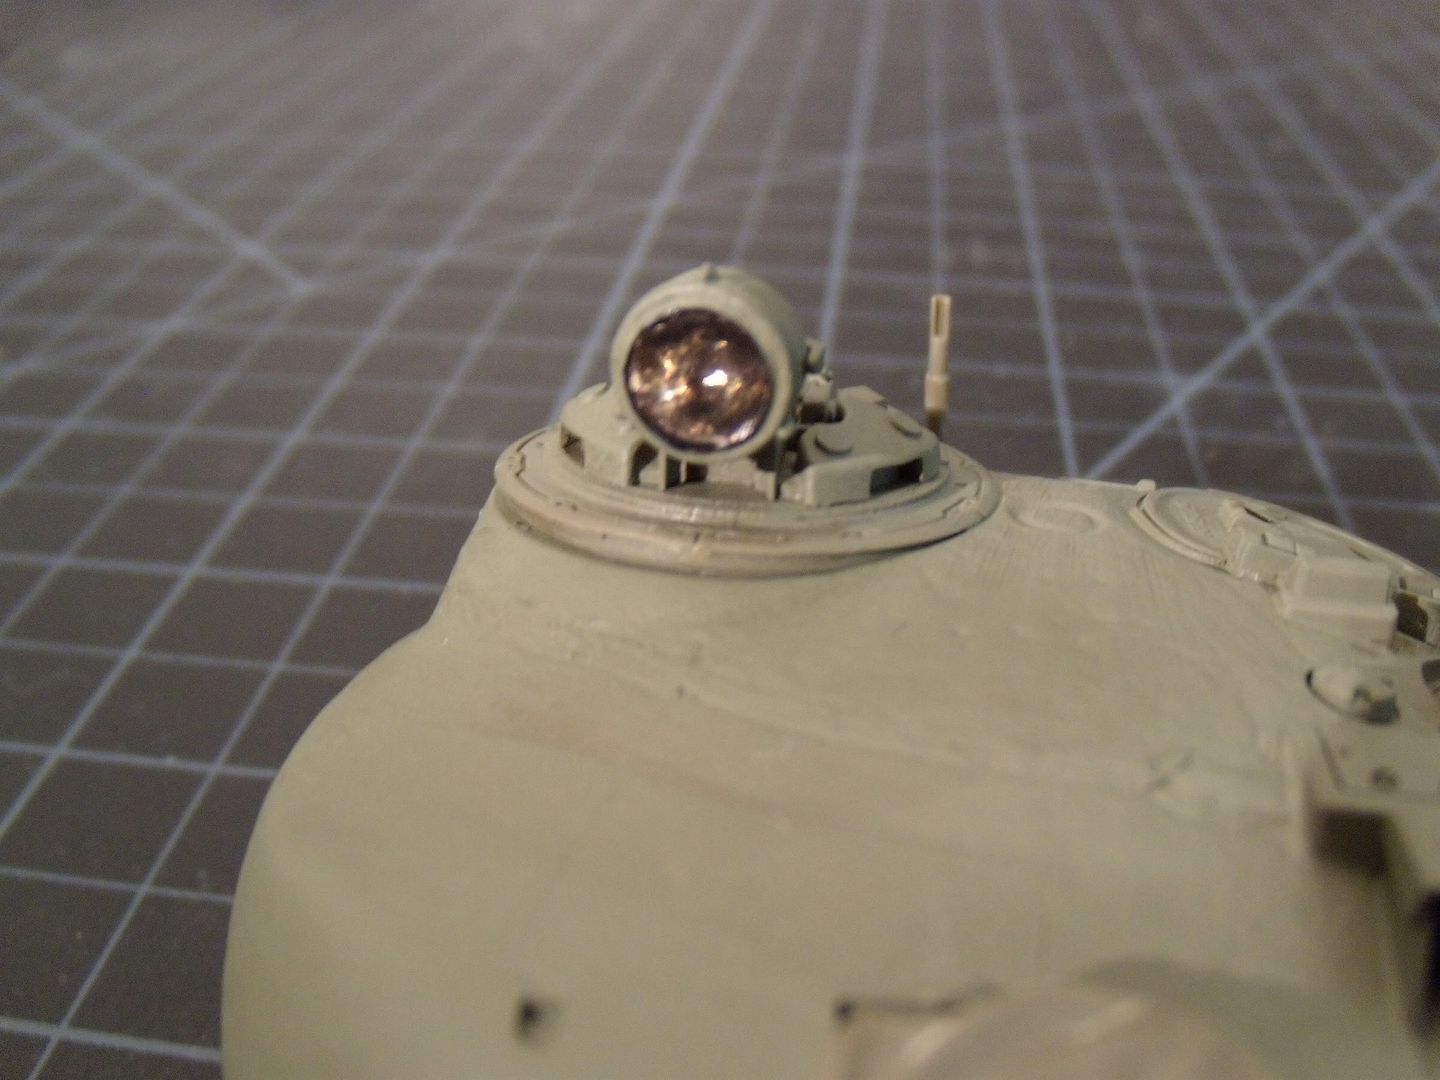
http://i267.photobucket.com/albums/ii291/mgmikael/T-72%20Afghanistan/DSCN0935.jpg


For the towcable, here the Tamiya kit dissapoints once again with the thread given. Sure it's the right scale and looks good, but the ends are all split and coming apart. Even if you cut off the ends, the thread just keeps coming apart, so you gotta use you own substitute.
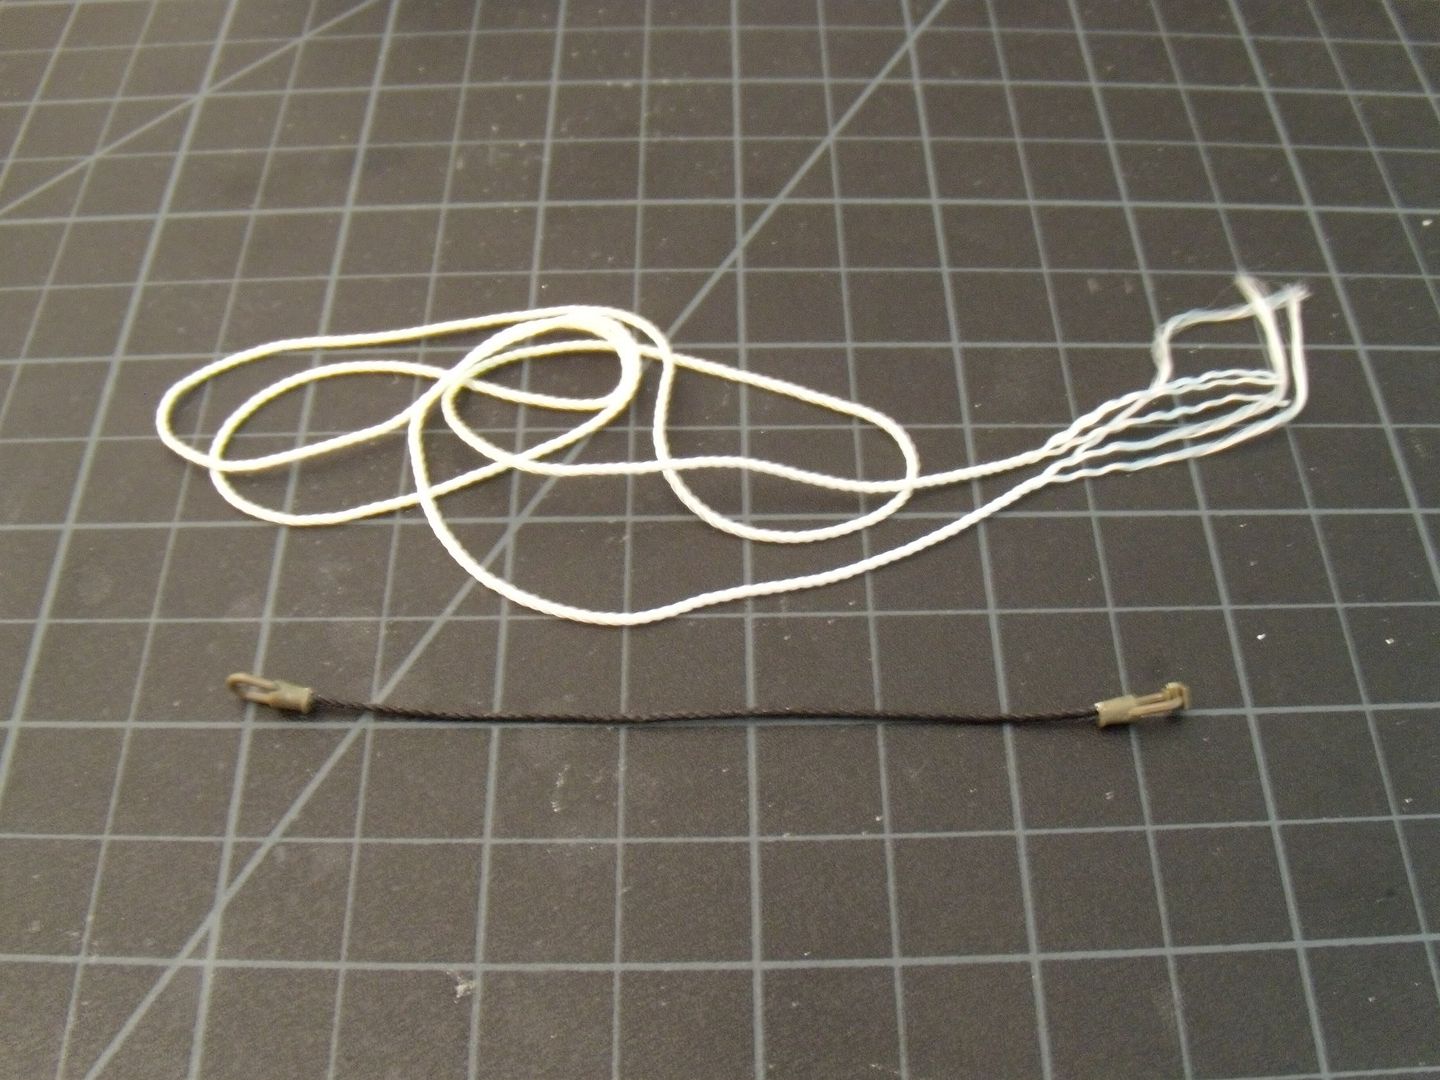
http://i267.photobucket.com/albums/ii291/mgmikael/T-72%20Afghanistan/DSCN0932.jpg


Finally, the fuel tanks. I felt that a T-72 wouldn't have a complete fuel system(all the fuel tanks along with auxillary tanks.) Considering, the T-72 reportedly stuck around base in Afghanistan when going through some field tests. That's why I had orginally scratched the fenders, and now I finally have two fuels tanks to actually power the tank. Scratched using veneer,(I talked about the top piece with the anti-slip marks and detail awhile back, in a past update) their complete fuel tanks, meaning they can essentiall be a stand alone piece since they have a top, bottom and four sides.  The one on the right has a scratched cap and handle(the green piece) while the one has a kit salvaged paortion.....hopefully they look the same. A for the one on the left, the only special thing was the angled edge to the fuel tank(which is necessary, considering it was part of the orginal piece too.) To make the angled edge I simply filled it with putty and sanded smooth.

http://i267.photobucket.com/albums/ii291/mgmikael/T-72%20Afghanistan/DSCN0949.jpg


Here's where the fuel tanks will be postioned on the tank. Thankfully all my measurement were right on the money, otherwise I'd be having some serious fit issues.
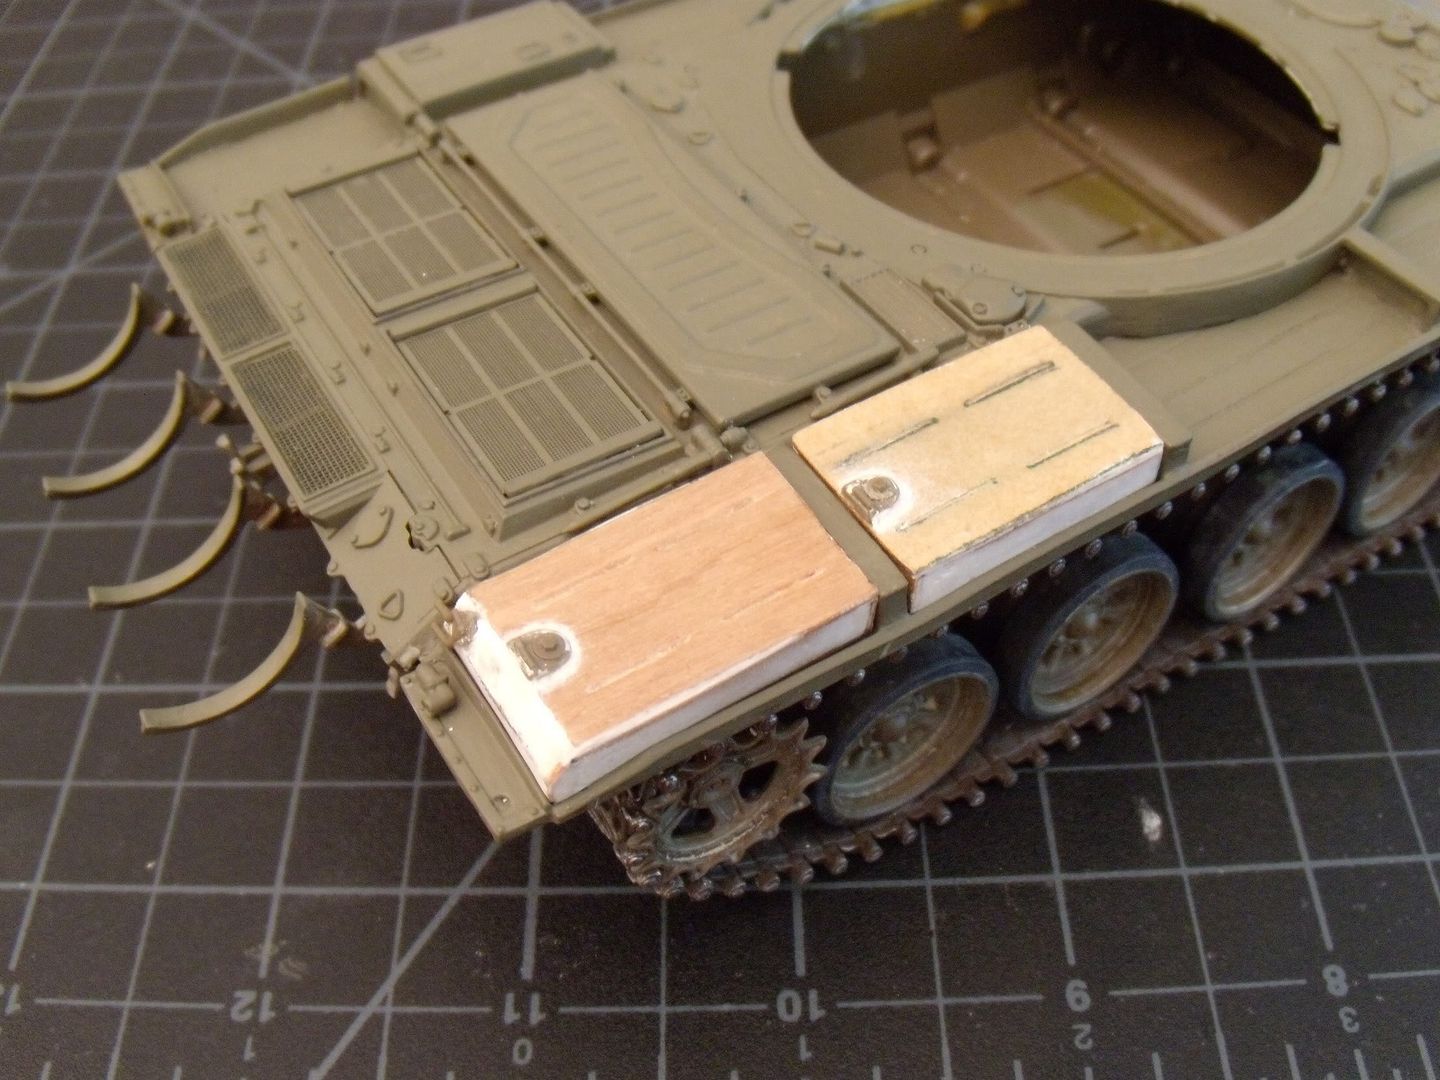
http://i267.photobucket.com/albums/ii291/mgmikael/T-72%20Afghanistan/DSCN0950.jpg


Thanks for looking!Smile

"A good plan executed now is better than a perfect plan next week." - George S. Patton

  Photobucket 

  • Member since
    February 2009
  • From: mass,USA
Posted by scratchmod on Sunday, June 6, 2010 7:04 PM

I like how this T72 is coming along, very nice. The trick with the gift wrap paper for the light is totally awesome, but of course will only work with the outside lens. I might have to try that out sometime. Keep up the great work.


Rob

www.scratchmod.com

Dre
  • Member since
    June 2007
  • From: here, not over there
Posted by Dre on Sunday, June 6, 2010 7:24 PM

Mg-  That light treatment is slick, dude.  It looks like natural shadowing in there.Yes

  • Member since
    July 2004
  • From: Texas
Posted by wbill76 on Sunday, June 6, 2010 7:36 PM

Ditto on the light, very nice effect/result. Yes

  • Member since
    March 2008
  • From: Steilacoom, Washington
Posted by Killjoy on Sunday, June 6, 2010 8:28 PM

Ok, I am totally stealing that trick for my next spotlight!  Very nice work on this kit!

Chris

A veteran is someone who, at one point in their life, wrote a blank check made payable to "The United States of America," for an amount of "up to and including my life."

Dre
  • Member since
    June 2007
  • From: here, not over there
Posted by Dre on Monday, June 7, 2010 9:22 AM

Oh, those Tamiya string cables?  Super easy fix to them- if you have extra-thin CA around, that is.

Grab one in a clothes pin or similar clamp, hold it vertically and let the extra-thin CA run down the string length.  Any drippage can be wicked off with a paper towel.  Let dry thoroughly and you have a relatively stiff yet workable cable ready to paint.  

  • Member since
    December 2007
  • From: Bridgeview, Illinois
Posted by mg.mikael on Monday, June 7, 2010 11:03 AM

scratchmod-  Glad you like the build and the light technique.Wink

Dre- Guess the extra time spent on the light is paying off. Thanks for the tip about the crazy glue and string.....definitely will try that out.Yes

wbill76- Thanks again, just wait to you see the IR serchlight I don't think it will dissapoint.

Killjoy- Looks like this light technique was a success.....now I just have to sell the tip to FSM.

"A good plan executed now is better than a perfect plan next week." - George S. Patton

  Photobucket 

  • Member since
    December 2007
  • From: Bridgeview, Illinois
Posted by mg.mikael on Friday, June 11, 2010 1:37 PM

Got some more work done that really pushes this build torwards completion. The mantlet has been fixed up, barrel attatched, and the rear hull(un-ditching log and all) have been finished up.

As for the rear hull portion, the fuel tanks are finally in place. The unditching log has been glued to it's proper supports and then to make it seem like it's tied down, I took the kit-supplied string(the one with the loose-ends) made two tie-downs for the log and now it's actually realistic  versus a log that would make you wonder how it's just sitting there. As for the the string, I first painted it with a mix of Testor's wood and Winsor & Newton yellow ochre. Then gave it a wash of burnt umber to bring out the detail.

 The tow cable has also been finished up, painted with a mix of Testor's steel and black, then washed with black. Signal lights were touched with a sharpie and then given a clear coat. Simple but effective. 

Now we come to the turret and barrel. After alot, and I mean alot of sanding the barrel is pretty much ready to go. The mantlet cover was another story.....as you can see in the first image below, the fit was non-existent.Surprise That wasn't due to Tamiya but me, since I added the turret bulge. That meant the mantlet no longer sat flush with the turret itself. So after cleaning up the mantlet detail, I glued it in position(polyurethane glue), but as is obvious their was a huge gap left over.

After letting the barrel set in place, I went to work. Putting the entire gap and at the same time molding the putty into fabric folds like on the kit piece. Essentially creating a mantlet out of a glob, yes sanding was necessary.Wink After puttying I started the tissue treatment(tissue pulled apart into one ply and soaked in a mix of water and glue), it helps add more detail, not to mention hide some of the imperfection of the putty work. Long live the mighty tissue.Big Smile

Finally the finished mantlet, all ready for painting.Smile After cutting off the excess tissue and adding more folds to the mantlet, I called it quits. The mantlet cover itself  was done, last but not least I then added a small rubberband(cut to fit, so in other words it's no longer a working rubberband) to the area where in the orginal piece a slight wraparound brace was for the cover.

Thanks for looking, all comments, questions, and suggestions welcome!

"A good plan executed now is better than a perfect plan next week." - George S. Patton

  Photobucket 

  • Member since
    January 2007
Posted by the doog on Friday, June 11, 2010 2:04 PM

Awesome work so far on this--a great looking build going on. Like everyone, I say that that light thing is brilliant!

Nice detailing, Mikael!

  • Member since
    July 2004
  • From: Texas
Posted by wbill76 on Friday, June 11, 2010 6:02 PM

Nice fix on the mantlet cover Michael, keeps getting better and better! Yes

  • Member since
    December 2007
  • From: Bridgeview, Illinois
Posted by mg.mikael on Saturday, June 12, 2010 12:24 PM

doog- Thanks for stoppin' by, and thank you for the comments. Glad that light technique payed off.Wink

wbill76- Thanks, now it's onto getting the vision blocks scratched and finishing up all the little headlights & searchlights. Then it's the final stretch.

"A good plan executed now is better than a perfect plan next week." - George S. Patton

  Photobucket 

  • Member since
    January 2009
  • From: clinton twp, michigan
Posted by camo junkie on Sunday, June 13, 2010 10:48 AM

yep, im really liking this one mg.

"An idea is only as good as the person who thought of it...and only as brilliant as the person who makes it!!"
  • Member since
    December 2007
  • From: Bridgeview, Illinois
Posted by mg.mikael on Sunday, June 13, 2010 12:18 PM

Thanks for the comments, camo junkie!Smile

"A good plan executed now is better than a perfect plan next week." - George S. Patton

  Photobucket 

  • Member since
    December 2007
  • From: Bridgeview, Illinois
Posted by mg.mikael on Saturday, June 19, 2010 12:41 PM

The infra-red light is in place and so is all the vision blocks. So now I can safely say all construction is 100% completed. Woo Hoo!Cool

Vision blocks have been finished, drilling out would be a ridiculous waste of time considering how small they are. So I simply took a fine-point sharpie and used that for coloring in the vision block areas, then I took some clear plastic and simply cut to size and glued(using a clear parts cement) the pieces over the 'sharpied' areas. Done and done....simple yet adds some extra detail.

Infra-red light is also in place, used the same process as I did with the search light on the turret. (process was discussed in an earlier post.....so if you want some info on it go back to the older posts.Wink) I also finished all the headlights and mini-searchlights using the 'wrapping paper' process but for all those I didn't drill them out, considering they were way too small. Also light wiring has been added too.

Oh, and finally the mantlet has been painted in a burlap color made from mixing Testor's wood, olive green, and black. Once the paint dryed I started adding some pin wahses to the mantlet, like black burnt umber here and there in the fabric folds. Now with construction all finished up, it's onto weathering the beast. Lower hull and suspenion areas were weathered before tracks were installed so now it's onto the upper hull. Hope to get the first wash on later today......yes, one more update before the final pics!

 Thanks for looking!Smile

"A good plan executed now is better than a perfect plan next week." - George S. Patton

  Photobucket 

  • Member since
    December 2007
  • From: Bridgeview, Illinois
Posted by mg.mikael on Wednesday, June 30, 2010 5:47 PM

Alrighty then, I said I'd get those finished pics up and here they are. Weathering consisted of an overall grime wash(to get that dry arid feel), then a light dirt color made from burnt umber and Floquil aged concrete. With those two washes done, I then did some pinwashes here and there with burnt umber for a little dark splotching, and aged concrete for some very light areas of weathering. Once letting that dry, I took a graphite pencil to areas on the hull, fenders, and turret and really rubbed it in. Creating the appearance of areas where the paint rubbed off showing the metal.

Sealed that in with Krylon, finished up with pastels, and an iron powder wash to the exhaust. Hopefully it created a realistic appearance to what a T-72 in testing may look like in a non-combat postion during the Soviet-Afghan War. The parts I scratched include.......yeah right, like I'm gonna list everything. If you wish to know what I scratched, modified, and removed then your simply gonna have to read the entire WIP.Stick out tongue


Thanks to all those who followed this WIP and for checkin' out this build! All comments and questions welcome!!

"A good plan executed now is better than a perfect plan next week." - George S. Patton

  Photobucket 

  • Member since
    September 2006
  • From: Dripping Springs, TX, USA
Posted by RBaer on Wednesday, June 30, 2010 6:28 PM

I like it a lot!

I personally think T72s look like hot rods with the skirts off, as well.

Yes

Apprentice rivet counter.

  • Member since
    April 2005
  • From: Piscataway, NJ!
Posted by wing_nut on Thursday, July 1, 2010 7:10 AM

Yup, me too.  I like it.

Marc  

  • Member since
    April 2003
  • From: 41 Degrees 52.4 minutes North; 72 Degrees 7.3 minutes West
Posted by bbrowniii on Thursday, July 1, 2010 7:32 AM

Put me in the 'I like it' crowd too!!  Well done! YesBeer

'All that is necessary for the triumph of evil is for good men to do nothing' - Edmund Burke (1770 ??)


  • Member since
    December 2007
  • From: Bridgeview, Illinois
Posted by mg.mikael on Thursday, July 1, 2010 9:19 AM

RBaer, wing_nut, and bbrowniii - Glad you guy's all like it, thanks for the comments! Hmmm.....now where are the people that love it.Wink

"A good plan executed now is better than a perfect plan next week." - George S. Patton

  Photobucket 

  • Member since
    July 2004
  • From: Texas
Posted by wbill76 on Thursday, July 1, 2010 10:06 AM

Very nice work Michael, definitely one to be proud of to have on your shelf! Beer

  • Member since
    March 2008
  • From: Steilacoom, Washington
Posted by Killjoy on Thursday, July 1, 2010 12:04 PM

Excellent build! You really did yourself proud with this one!

Chris

A veteran is someone who, at one point in their life, wrote a blank check made payable to "The United States of America," for an amount of "up to and including my life."

Dre
  • Member since
    June 2007
  • From: here, not over there
Posted by Dre on Thursday, July 1, 2010 12:20 PM

I think that you knocked this one outta the park- the lights and gun shroud are enough to be proud of, but all of the extra work that you've done is really sweet.

  • Member since
    May 2005
  • From: Eugene, Oregon
Posted by hughes2682 on Thursday, July 1, 2010 12:40 PM

RBaer

I like it a lot!

I personally think T72s look like hot rods with the skirts off, as well.

Yes

Ditto  A rather lethal hot rod.  I got on board with this one late but, I will go back and read the beginnings of this build.  I do really like the lights and the mantlet cover. You should be very proud of this build sir. YesYesYes

Cheers

Dave

http://img.photobucket.com/albums/v317/Aaronw/Groupbuilds/ClassicAviationGB2010bomb.jpg

With enough thrust, pigs fly just fine.

  • Member since
    April 2003
  • From: 41 Degrees 52.4 minutes North; 72 Degrees 7.3 minutes West
Posted by bbrowniii on Thursday, July 1, 2010 2:52 PM

mg.mikael

.....now where are the people that love it.Wink

C'mon now... I gave you a Yes and a Beer...  that equals love in my book...Geeked

'All that is necessary for the triumph of evil is for good men to do nothing' - Edmund Burke (1770 ??)


JOIN OUR COMMUNITY!

Our community is FREE to join. To participate you must either login or register for an account.

SEARCH FORUMS
FREE NEWSLETTER
By signing up you may also receive reader surveys and occasional special offers. We do not sell, rent or trade our email lists. View our Privacy Policy.