SEARCH FINESCALE.COM

Enter keywords or a search phrase below:

1/35 Academy M50 Ontos, WIP 6/12/10, Completed

70216 views
192 replies
1 rating 2 rating 3 rating 4 rating 5 rating
  • Member since
    March 2007
  • From: Michigan
Posted by tonka on Tuesday, May 4, 2010 8:05 PM

Redleg..,,.your WIP got me thinking I could take 106MM RR jeep kit and try and find an old Jeep Honcho kit in 1/32 nd scale,,close enough and have my " Gunny React " vehicle,,thanks a lot just what I need another project..:-)

Now that I have found this site again I can see too many 'ideas' coming up.

It will be good to see the bbls once you paint them. The parkerized green I remember is just a little grayer than the type you often see on the old 03A3 Springfield rifles ...

I take it by your name and comments you were arty...

Well good luck and shot out!! Look forward to more pics..

]

  • Member since
    July 2006
  • From: Philippines
Posted by constructor on Tuesday, May 4, 2010 9:13 PM

It has been a long while since my Renwal Ontos and it's nice to see it back now by Academy. I was supposed to ask you about the justification of the replacement metal barrels but you have answered it already. I will be looking forward to more of your step-by-step infos. I hope to get my kit anytime soon. How does the MK PE look?

On the bench:

Bronco Staghound

Revell B-17G

Tamiya Mercedes-Maclaren

DML USS Buchanan

  • Member since
    July 2006
  • From: Philippines
Posted by constructor on Tuesday, May 4, 2010 9:22 PM

I do not think Tamiya has an M46 Patton.

  • Member since
    July 2006
  • From: New Jersey
Posted by redleg12 on Tuesday, May 4, 2010 9:56 PM

Tonka - Now that would be a cool project!!! It is always good to see the "different".....not just another tank Whistling

Yep...I was artillery....the king of battle..Propeller

Constructor - The barrels have better detain including rifiling of the barrels. The PE I will let you know by the end of this week as that is my next task, to apply the PE items and final details to the hull.

Rounds Complete!!

"The Moral High Ground....A Great Place to Emplace Artillery."

  • Member since
    September 2009
  • From: Rugby, England
Posted by Hinksy on Wednesday, May 5, 2010 6:18 AM

constructor

I do not think Tamiya has an M46 Patton.

I think I'm getting confused with this one buddy! 

Hey Constructor,

It would appear not? It was this one I was thinking of-I knew what I meant-not much good for anyone else though is it!

I think I'm getting confused with this one buddy! The M48 A3 Patton Embarrassed

http://www.tamiya.com/english/products/list/35mm_img/35120m.jpg

ATVB & I hope the Ontos is coming along nicely, Redleg!

Ben Yes


On the Bench - Dragon Pz. IV Ausf. G (L.A.H.) Yes

Your image is loading...


  • Member since
    July 2006
  • From: Philippines
Posted by constructor on Wednesday, May 5, 2010 4:24 PM

I'm sorry about that. Actually it was a reaction to an earlier post by Ben (5.3.10) about him wanting to build a Tamiya M46. His post was not included with my reply

  • Member since
    June 2005
  • From: Massachusetts
Posted by minimortar on Wednesday, May 5, 2010 7:02 PM

My God Mike... you're building faster than I can read! Off to another fine start on this "Thing" for sure! I also remember the Renwal version of a few years back and look forward to the step-by-step on your build here.

To add to the discussion of the color of the rifle barrels for the M40, I am attaching some photos that I took of a restored Mule several years ago for your ref. This tube was a black gunmetal on this rebuild and I do recall them being black(ish) at Ft. Polk LA in 1972.

Hope these'll help

Your faithful NCO,

Thanks,
Kevin Keefe

Mortars in Miniature
A Scale Model (Plus!) Collection of the Infantryman's Artillery

  • Member since
    January 2007
Posted by the doog on Wednesday, May 5, 2010 7:44 PM

This model is tailor-made for you to WIP it, Mike. It's already chock-full of information and great hints!

I was going to insert a DEVO "Whip it" video link here, but thought better of it. Wink---cuz I know you certainly will! lol

  • Member since
    July 2006
  • From: New Jersey
Posted by redleg12 on Thursday, May 6, 2010 5:39 AM

Kevin - There are way too many strange armor items on my shelf still waiting to be built.  Thanks for the pics.....man, I could use one of those for yard work.....the 106 with an AP round would save soo much time over the trimmer!! Whistling

Thanks again for stopping by. Painting the 106s is Sat. Sun is for the lady of the house!! The nice thing about this kit is not too many parts...should not take months to build.

From one mother to another...happy mothers day brother!! Thanks

Karl - Hummmm..."Whip it good"....and as I am working on it I think of "Wild Thing". Thanks for stopping by.

 It is a fun little build and you know me. I love my details!!

Thanks again

Rounds Complete!!

"The Moral High Ground....A Great Place to Emplace Artillery."

cb1
  • Member since
    December 2009
  • From: D/FW Texas
Posted by cb1 on Thursday, May 6, 2010 9:40 AM

excellent thread!

I can't wait to start building mine....Cool

  • Member since
    September 2009
  • From: Rugby, England
Posted by Hinksy on Thursday, May 6, 2010 5:12 PM

cb1

excellent thread!

I can't wait to start building mine....Cool

Ditto

My Ontos is next in the WIP queue! I can't wait to open that beast up!

ATVB

Ben Cool

On the Bench - Dragon Pz. IV Ausf. G (L.A.H.) Yes

Your image is loading...


  • Member since
    December 2008
  • From: Goffstown, NH
Posted by New Hampshire on Thursday, May 6, 2010 6:16 PM

agentg

Fond memories of bored jarheads conducting "mule" races in and around the company area.

G

Knowing you jarheads the recoiles rifles were probably loaded. Big Smile

Brian

  • Member since
    April 2003
  • From: 41 Degrees 52.4 minutes North; 72 Degrees 7.3 minutes West
Posted by bbrowniii on Thursday, May 6, 2010 6:53 PM

New Hampshire


Knowing you jarheads the recoiles rifles were probably loaded. Big Smile

Brian

Wouldn't want them any other way!!! Geeked

Redleg, great WIP.  Looking forward to your next installment...

'All that is necessary for the triumph of evil is for good men to do nothing' - Edmund Burke (1770 ??)


  • Member since
    July 2006
  • From: New Jersey
Posted by redleg12 on Thursday, May 6, 2010 9:01 PM

CB1, Boyd - Thanks

Wanye and the USMC cast....you guys crack me up....we had some of them too.....nothing like the OD super lawn tractor!!!

Like I said....would make a great yard tool!!

Rounds Complete!!

"The Moral High Ground....A Great Place to Emplace Artillery."

  • Member since
    March 2004
  • From: Kincheloe Michigan
Posted by Mikeym_us on Friday, May 7, 2010 5:12 PM

And I bet the Jarheads still juggle live grenades.Stick out tongue

On the workbench: Dragon 1/350 scale Ticonderoga class USS BunkerHill 1/720 scale Italeri USS Harry S. Truman 1/72 scale Encore Yak-6

The 71st Tactical Fighter Squadron the only Squadron to get an Air to Air kill and an Air to Ground kill in the same week with only a F-15   http://photobucket.com/albums/v332/Mikeym_us/

  • Member since
    April 2003
  • From: 41 Degrees 52.4 minutes North; 72 Degrees 7.3 minutes West
Posted by bbrowniii on Friday, May 7, 2010 5:25 PM

Mikeym_us

And I bet the Jarheads still juggle live grenades.Stick out tongue

Is there any other way...?Wink

'All that is necessary for the triumph of evil is for good men to do nothing' - Edmund Burke (1770 ??)


  • Member since
    March 2007
  • From: Michigan
Posted by tonka on Saturday, May 8, 2010 8:38 PM

Why would we juggle inert ones..?? FOR THAT MATTER WHY EVEN HAVE INERT ONES??Surprise

]

  • Member since
    March 2004
  • From: Kincheloe Michigan
Posted by Mikeym_us on Saturday, May 8, 2010 9:49 PM

tonka

Why would we juggle inert ones..?? FOR THAT MATTER WHY EVEN HAVE INERT ONES??Surprise

So you don't hurt yourselves needlessly.Stick out tongue And I bet some industrious marine tried fitting bottle rockets to their barrels to make a rocket launcher.LOLWink

On the workbench: Dragon 1/350 scale Ticonderoga class USS BunkerHill 1/720 scale Italeri USS Harry S. Truman 1/72 scale Encore Yak-6

The 71st Tactical Fighter Squadron the only Squadron to get an Air to Air kill and an Air to Ground kill in the same week with only a F-15   http://photobucket.com/albums/v332/Mikeym_us/

  • Member since
    November 2006
  • From: Coastal Maine
Posted by dupes on Sunday, May 9, 2010 12:46 PM

Mike - haven't poked my head in here in a while, but I'll be watching this thread with great interest!

Man, that's a lot of AM barrels...Surprise

  • Member since
    July 2006
  • From: New Jersey
Posted by redleg12 on Sunday, May 9, 2010 1:51 PM

Holy cow it's Marc...the mad group build man!! Thanks for stopping in...yep, the thing does have a bunch of barrels!!

Rounds Complete!!

"The Moral High Ground....A Great Place to Emplace Artillery."

  • Member since
    July 2006
  • From: New Jersey
Posted by redleg12 on Sunday, May 9, 2010 1:56 PM

This week I finished up the 6 recoilless rifles and then move on to the main hull. It was time for PE.

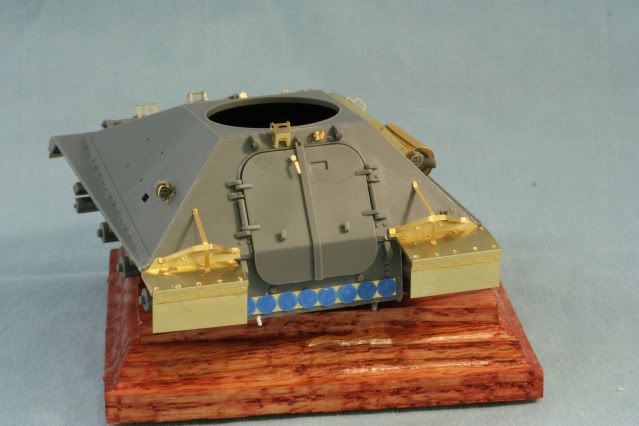
In the rear I used the MV PE fenders and the PE fender supports. The MV PE is good quality and bends nicely. The fenders have all the required bolt holes and the fret includes a bunch of PE bolt heads. So besides bending and shaping the fender, then each one need about a dozen PE bolt heads added. Then inside two bolt heads on the attachment flap can be added prior to the PE support but the support goes over the two end holes, after which those bolts can be attached.

The PE box on the top left is an antenna base for an RT-524 style radio antenna. The PE door latch is more to scale than the kit. The handle is supposed to be raised from the surface. To raise the PE handle, I used some .040 rod. On the right top is an additional bracket from the MV set.

Lastly at the bottom is a PE rack of stored 106mm rounds. Since this is a nice brass PE, I covered the casings with punched painters tape until finishing is completed.

 Here is the completed rear view
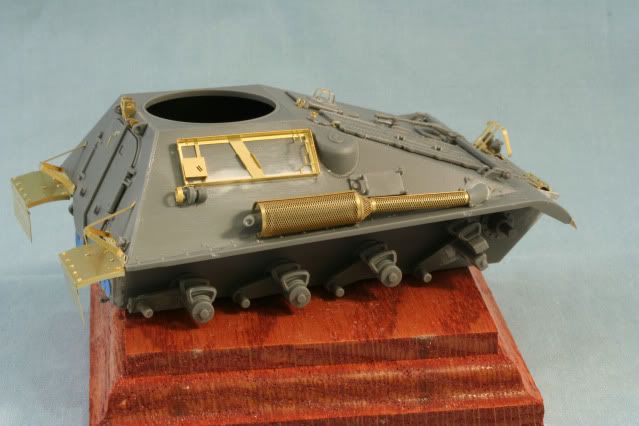
The right side of the vehicle was a bit of work. I replaced the styrene tool holder with the PE holder from the MV fret. The styrene holder was designed to fit into a “depression” molded into the hull. That had to be filled and sanded prior to mounting the PE tool holder. The PE tool holder is actually quite complicated and made up of 3 parts but fits together nicely when completed.

The exhaust is covered by a screen from the kit supplied PE fret. I must admit this is a PITA to assemble and time, care and patience to get everything to line up. The exhaust pipe end is molded solid from the kit and requires drilling out at the exit end.

The tail lights have a guard which is supplied on the MV PE fret. What I have here is mounted a bit behind the light. Actual photos have it closer to the light end. I decided not to rip off and state again….I’ll stay with this arrangement….beat me later!!

Where the exhaust meets the body has a poor fit and required a bit of putty work.
Now, I moved on to the front of the vehicle. After mounting most of the larger kit supplied parts last week I began with the PE. Near the top are a few PE tie towns from the MV fret. The kit supplies a styrene diver vision block guard. The also supply a PE guard on their fret and the MV fret has one. I had to fill the mounting holes for the styrene guard and I used the PE guard from the kit as it was less “fiddly” than the MV guard.

The MV fret has a complete front fender with mud guard which requires you to cut/grind off the styrene molded guard on the upper hull. I though the styrene fender looked fine but was missing the mud guard. I used the PE fenders and cut off the mud guard with a bit of excess which I folded into an attachment lip to secure them to the styrene.

Then there are the lights and the mounts. The kit supplied lights are pre mounted on a styrene rail. The MV PE set has a rail mount which you see alone on the left. After this is mounted, it needs to be bolted in place with 5 PE bolts. The lights need to be cut from the styrene rail. You will need to shave and shape the bottom pin to fit the mounting holes in the PE. The headlight is drilled out for later attachment of an MV .116 Headlight after painting. The white BO light was due to the kit supplied light flying off to the twilight zone while handling!! A little scratch work to make a new one.

After the lights are mounted the PE light guard is mounted. Here again you have a styrene guard, a kit supplied PE guard and another PE guard on the MV fret. The guard here is from the MV fret and still requires 4 more PE bolts to finish it.
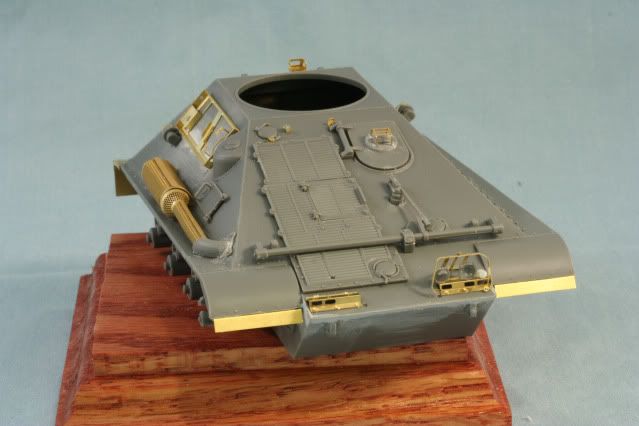
 The mounted items on the left side consist of the 5 gallon can and holder, the spare track cleats, and though not supplied with the kit but on many Ontos, a 30 cal MG tripod for which the MV PE fret has two mounting holders. Since all of these items along with the tools require detail painting, I left them off until the base color is completed on the hull.

The other thing to note is this kit has a bit of Italeri diesease....you need to check every part closely as there are lots of pin marks and mold seams!!

I need to finish up the lights on the left side and then it is time to power up the paint booth.  That will be in next week’s installment as it is time to take care of the “mom” in the house!!

 As always your comments either good or bad are appreciated.

Rounds Complete!!

"The Moral High Ground....A Great Place to Emplace Artillery."

  • Member since
    August 2008
  • From: S.W. Missouri
Posted by Pvt Mutt on Sunday, May 9, 2010 2:46 PM

That's some good looking PE work you've done there Mike,I just love that stuff don't you?Dunce

When you live in Tornado Alley you hate for it to get dark when storms are in the forecast.Storm

Looking forward to the next up-date

Tony LeeSmile

Shoot Low Boys They're Ridin Ponys

  • Member since
    December 2008
  • From: Goffstown, NH
Posted by New Hampshire on Sunday, May 9, 2010 3:34 PM

Oh no, there goes that darn light!

Big Smile Wink

So, on the line marked "comments" I reply "I love photo etch...yummy!" Big Smile  Some fine detail you got going on there.

Brian

  • Member since
    December 2002
  • From: Valrico, FL
Posted by HeavyArty on Sunday, May 9, 2010 4:31 PM

Coming along great Mike.  Can't wait to see some paint on her.

Gino P. Quintiliani - Field Artillery - The KING of BATTLE!!!

Check out my Gallery: https://app.photobucket.com/u/HeavyArty

"People sleep peaceably in their beds at night only because rough men stand ready to do violence on their behalf." -- George Orwell

  • Member since
    July 2006
  • From: New Jersey
Posted by redleg12 on Sunday, May 9, 2010 6:18 PM

Tony - PE.....it is like calculators, cell phones and the internet......what did we do before it!!!

Brian - LMAO.....it has been a while since I have lost a part like that....it is always frustrating....thanks for the humor

Gino - Yep....me too...coming soon

Thanks eveybody

Rounds Complete!!

"The Moral High Ground....A Great Place to Emplace Artillery."

  • Member since
    January 2012
Posted by I make stuff on Sunday, May 9, 2010 6:30 PM

This is looking cool, Redleg, and the PE work is very nice and neatly done.  It's going to look fantastic with some paint on it.

Bill

  • Member since
    July 2006
  • From: New Jersey
Posted by redleg12 on Sunday, May 9, 2010 7:12 PM

Bill - Thanks....yep, the paint is up next.....actually looking forward to the USMC Green!!

So many shades so many greens!!

Rounds Complete!!

"The Moral High Ground....A Great Place to Emplace Artillery."

  • Member since
    June 2005
  • From: Massachusetts
Posted by minimortar on Sunday, May 9, 2010 8:15 PM

Nice PE work there Mike! Any possibility of having a figure (standing along side for ex.) with this? Might help to really show the 'scale' of this 'Thing'.

You did a nice job with the figs in your Loach but, there's been none since. (?)

Thanks,
Kevin Keefe

Mortars in Miniature
A Scale Model (Plus!) Collection of the Infantryman's Artillery

  • Member since
    July 2004
  • From: Texas
Posted by wbill76 on Sunday, May 9, 2010 9:10 PM

Sweet work with all that brass Mike, coming together nicely! Yes

  • Member since
    July 2006
  • From: New Jersey
Posted by redleg12 on Sunday, May 9, 2010 9:32 PM

Kevin - The kit comes with two figs, one for the turret which I plan to have closed but one for handling ammo. I may give him a try, though I do truly $uck at figs but I will see how he looks. The ammo that comes with the kit is all screwed up....it scales to 122mm....it is a bit fat and looks it. So I may have him handling fibers!!

Anyway...I'm thinking about it.

thanks for the visit and as always the comments!

Bill - Yep, the little guy has a lot of metel in his makeup. Hoping to start charging the compressor soon. Thanks again.

Rounds Complete!!

"The Moral High Ground....A Great Place to Emplace Artillery."

JOIN OUR COMMUNITY!

Our community is FREE to join. To participate you must either login or register for an account.

SEARCH FORUMS
FREE NEWSLETTER
By signing up you may also receive reader surveys and occasional special offers. We do not sell, rent or trade our email lists. View our Privacy Policy.