SEARCH FINESCALE.COM

Enter keywords or a search phrase below:

1/6th scale King Tiger project

72617 views
61 replies
1 rating 2 rating 3 rating 4 rating 5 rating
  • Member since
    April 2005
1/6th scale King Tiger project
Posted by armourguy on Wednesday, August 11, 2010 2:32 PM

Hi Guys, My next project will be this RC Armortek King Tiger. I have had the kit in storage for about a year and now that the M26 is out of the way I can finally start on this tank.

So far I have the tank's hull and turret bolted together.

Like all armortek tank kits the tank is all metal. The only polymer components that the kit contains is the rubber bump stops, electrical equipment, and a small hand full of resin detail parts from armorpax. The hull's panels are all bolt together and the hull and turret go up fairly quick.

Like all of their other models all of the tank's armored plates are to scale thickness. The one plate in particular that impressed me the most is the front glacis plate. The plate is solid aluminum and is over an inch thick.

Now that the hull is together I can add the welds and under hull detailing.

This model is going to be the heaviest model that I have ever built. The hull and turret, in it's current empty condition already weighs over 100lbs. Once the tank is up to the suspension I will have to move the tank out of the shop into another location that is easier for me to work on. If I don’t remove the model out of the shop before the suspension is added the tank will be too heavy to get it out of the shop.   

  • Member since
    July 2008
  • From: Florida
Posted by Railfan 233 on Wednesday, August 11, 2010 2:38 PM

Man, that's one monster!

I think it may be a smart move to go ahead and add the RC stuff, so the tank can do all the work of transporting itself where ever you need it to go.

You could probably shoot it with a gun, and have the round bounce off (acually, that would make for realistic battle damage) That steel is really 1 inch thick!?

I'm looking foward to this. If it's like your WIP on the M-26, it will be good.


http://i6.photobucket.com/albums/y211/razordws/GB%20Badges/WMIIIGBsmall.jpgRed, White, and YOU! group build of 2010

  • Member since
    October 2009
  • From: South Carolina
Posted by jetmodeler on Thursday, August 12, 2010 7:24 AM

Railfan 233

If it's like your WIP on the M-26, it will be good.

If its like any of his other projects. It is going to be a good build.Toast

If it is already 100 pounds, it is probably going to weigh atleast 250-300 pounds when finished.Indifferent Have fun.Wink


  • Member since
    June 2006
  • From: Tampa, FL USA
Posted by The Mad Klingon on Thursday, August 12, 2010 7:35 AM

Damn. What does something like that weigh?

  • Member since
    March 2003
  • From: Western North Carolina
Posted by Tojo72 on Thursday, August 12, 2010 7:42 AM

Very ImpressiveYes

  • Member since
    December 2007
  • From: Bridgeview, Illinois
Posted by mg.mikael on Thursday, August 12, 2010 1:08 PM

Whoa, now that is a BIG build to say the least. Turret and hull weigh over 100lbs, heck I don't think my work bench can even support anything near that.Stick out tongue

"A good plan executed now is better than a perfect plan next week." - George S. Patton

  Photobucket 

  • Member since
    July 2003
  • From: On my kitchen counter top somewhere in central North Carolina.
Posted by disastermaster on Thursday, August 12, 2010 4:24 PM

http://i252.photobucket.com/albums/hh24/ilsevrolijk/fainting.gif

 https://i.imgur.com/LjRRaV1.png


  • Member since
    July 2003
  • From: On my kitchen counter top somewhere in central North Carolina.
Posted by disastermaster on Thursday, August 12, 2010 4:31 PM

Railfan 233

You could probably shoot it with a gun, and have the round bounce off (acually, that would make for realistic battle damage) That steel is really 1 inch thick!?

I'm pretty sure it's aluminum.

If it was steel..... http://i827.photobucket.com/albums/zz192/denistephenson/smileys/panicsmiley.gif ........ probably 500 lbs (at least) when completed.

http://i20.photobucket.com/albums/b232/gluetank/Decorated%20images/th_T1-4-copy.jpg

 https://i.imgur.com/LjRRaV1.png


  • Member since
    September 2007
  • From: Truro Nova Scotia, Canada
Posted by SuppressionFire on Thursday, August 12, 2010 5:18 PM

armorguy,

That is one king of a tiger tank!

The ends of the armor plate could be ground to simulate cut marks. Simulating welds? The TIG (Tungsten Inert Gas) welding process could be used to make the welds! Just do not cheep out on the Tungsten rods as some lower priced ones are radioactive & sharpening them will release partials hazardous to your health.

Regardless of how you plan on construction I am sure it will be superb as I followed your other builds.


http://i6.photobucket.com/albums/y211/razordws/GB%20Badges/WMIIIGBsmall.jpg


  • Member since
    March 2010
Posted by Crapgame on Thursday, August 12, 2010 10:59 PM

Cool project !!

The armortek tanks are great, but man o man they are expensive. I would love to have one but the cost is just too high. I know its very early into the project, but I have a paint question. Will you be doing the late war "ambush-pattern" cammo ?

I am looking forward to this one !!

CrapGame


  • Member since
    April 2005
Posted by armourguy on Saturday, August 21, 2010 4:24 PM

Thanks Guys, It has been a little while since I had any updates, but I have been working on the model in between processing orders and working on another non 1/6th scale project.

The Tank will weigh about 500 pounds once finished, which is why I can't finish the model in my shop. I also have their early Tiger I which weighs about 300lbs and thier M4A3 which is the feather weight at around 150 to 200 lbs. All of these models are RC. 

The tank will be painted with an ambush cammo pattern, but that won't be for a little while.

Since my last post I have been working on the tank's lower hull, and getting it ready for the suspension, and a coat of primer.   

The tanks lower hull seams were all cover up with sculpted epoxie weld beads.

Before


After

Along with the welds I have been plugging up the bolt holes, and added the torch cut lines to the intersecting panels.

Along the bottom portion of the tank I added several recessed torsion bar bolt details. These bolts are found on either side of the reverse side of the torsion bars.  

On the tank's lower front portion the kit has four bolts that are used to mount the final drive hub to the tank's hull. On the real vehicle there are three counter sunken cap screws, rather than four surface bolts. To correct this I drilled recessed into the tank's hull for the new cap screw detail, and I drilled the recesses for the actual final drive mounts. When the final drives are installed the four bolts will be covered up with the body work, and the three cap screws will remain as detail only.

To mount the final drive armored rings to the tank the kit wants you to use a hex bolt. The hex bolt head that remains on the surface is not found on the real vehicle. To correct this I replaced the hex bolt with a counter sunk allen bolt, A counter sunk recess was added to the tank's hull, after the armored ring is added the bolt will be covered up with putty. Welds will be added to this portion once all of the body work in this area is complete
   

Unlike their older early Tiger I kit the King tiger kit supplies you with the tank's bump stops. The bump stops themselves are very basic and a little bit of detail was added to them.

The bump stops are installed with cap screws, and the bump stop tops have a large cap screw protruding out of it.

The stock bump stop has the overall shape and appearance of the real bump stop, but what was needed was to rework the bump stop frame, and re detail the bump stop top. To start on the bump stops sides I milled away a recess for the new bolts. A new recess was also milled into the bottom bolt hole replacing the counter sunk screw with the correct recessed hex screw.

On the bump stop top to replace the cap screw I used a counter sunk hex bolt in it's place. to do this I had to add the counter sink divot to the bump stop top.

The reason for the bump stop top is because I machined a resin detail disc that fits over the entire bump stop top. In the resin disc I cut out the recesses for the small resin hex bolt details. a rough cast texture was also added to the bump stop frame and bump stop rein detail top.

The real tank bump stop has more detail on them, which I could have added, but because this bump is not only for detail, but is designed to function I decided to leave the detail towards the top half only where damage is less likely to occur. In addition the top half will be the only part of this component that will be seen once the running gear and suspension are added. 

I also machined out of aluminum two pointed caps that I have seen on the real King tiger's hull. There is only one per side and are both found under one of the bump stops. I will be adding these parts to the product line.

On the tank's interior I have add the motor mounts. Both motor mounts needed a small amount of material removed for a better fit with the motors.

For the left hand motor mount I borrowed Dale's modification technique and milled in a recess into the motor mount so once fitted I can fit the torsion bar tension screw

The motors can now be installed.

In addition to the motor mounts I have also added the tank's final drives. The final drives themselves are nicely engineered complete with ball bearings and main drive gears. They were installed as is with no added mods.

One nice new addition was the gasket. A smear of marine grease and the mounts were added to the tank.

After I complete some body work I will be able to start on the torsion bar suspension.

  • Member since
    October 2009
  • From: Fort Collins, Colorado, USA
Posted by Njal Thorgeirsson on Saturday, August 21, 2010 5:43 PM

So wait, are you building it as an RC vehicle then? Like are you adding all the RC components? If not, how will you go about moving it? Lastly, are the tracks aluminum too?

It's great to see such a rare/limited kit built up in such detail.

Looking SWEET! Cool

FACEBOOK: Ryan Olson Thorgeirsson for pics of all my builds.

"There are two kinds of people in this world; those who put fries/chips on their sandwiches, and those who don't enjoy life."

PhotobucketPhotobucket

  • Member since
    July 2003
  • From: On my kitchen counter top somewhere in central North Carolina.
Posted by disastermaster on Saturday, August 21, 2010 8:26 PM

The Armortek series has been an elusive subject for me.

http://i827.photobucket.com/albums/zz192/denistephenson/smileys/p0116.gifThanks for putting up this detailed build as I've only been able to view the Armortek videos online. I've never had the opportunity to examine one up close & personal.

This is going to be http://i827.photobucket.com/albums/zz192/denistephenson/smileys/kissykissy.gif  s u u u w w e e e t t...........http://i827.photobucket.com/albums/zz192/denistephenson/smileys/kissykissy.gif

http://i20.photobucket.com/albums/b232/gluetank/Decorated%20images/th_T1-4-copy.jpg

 https://i.imgur.com/LjRRaV1.png


  • Member since
    April 2005
Posted by armourguy on Tuesday, August 24, 2010 11:29 AM

This model is being built fully RC, It is really the only way to moved this tank. These armortek models are realy designed to be built RC. Once the RC is out of the way I can get to the super detailing pahse of the build.

I have made more progress on the model.


The tank's lower hull has been primed. a coat of primer was also added to the interior.


The body work was complete on the lower front portion, and on the motor mount rotors, that would have been seen behind the final drives. The six Allen cap screws will be added next.


The tank's idler mounts were added. The mounts are fully adjustable and were assembled out of the box. The idler tension is adjusted via a Allen wrench, which is concealed behind the actual idler adjustment caps that are on the rear wall of the vehicle. The armored caps will be added along with the rest of the rear wall detailing after the running gear is completed.


Along with the idler mounts the torsion bar suspension has also been added.


On the armortek tanks the torsion bar suspension uses actual steel torsion bars. No springs are used on the suspension. The torsion bars are made of several components; the rods that are mounted in the tank's front and rear are thicker than the rods that are used on the middle portion of the vehicle.


One nice addition that was added to the newer generation armotek kits was the addition of brass bushings for the swing arms, and the addition of rubber O rings that create a water tight seal on the tank.


One modification that I made to the swing arms was to lock the axels to the swing arms. I learned to do this mod after I built their tiger I and noticed that some of the axels unscrewed themselves. To lock the axels I drilled a small hole through the swing arm and the axel. A brass rod is then inserted into the hole and is then expanded and ground flush.


To keep the rods from slipping a small flat is ground into each of the steel bars on either end. The flat makes a better surface for the lock bolts to grab.


After the rods get painted, they get a smear of grease and are then installed into the tank.


The tank is now ready for the running gear. Before I start on the running gear the tank will have to be moved out of the shop because of the weight. More progress to follow.   


  • Member since
    September 2006
  • From: Bethlehem PA
Posted by the Baron on Tuesday, August 24, 2010 11:58 AM

Another fantastic project!  I'm excited to follow your progress!

A question to other forum members out there--how do I flag this thread so that I am a follower of it?  I have never been able to find that, in the new forum format.  I've tried More>Add This Post as a Favorite and Add this Forum as a Favorite, but those didn't work as I expected.

I'm going to search the FAQs and help subforum again, but in the meantime, if anyone has clear instructions, please let me know, though through a PM, or "conversation", whatever the heck PSM calls it now, I'd prefer not to clog Armorguy's thread.

Best regards,

Brad

The bigger the government, the smaller the citizen.


  • Member since
    April 2005
Posted by armourguy on Thursday, September 2, 2010 11:59 PM

I have made some progress on the tank. The base dark yellow has been applied to lower hull and the wheels. The Hull was then moved to its new location where the remainder of the tank's construction will be completed. The tank will be built on a high capacity hydraulic lift dolly.


When the base coat was applied the axels were covered with masking tape, once the paint dried the tape was removed. After a smear of grease the wheels were added.


For the wheels the kit supplied wheels are nicely done, but needed a few mods to increase their detail.


One nice addition that the kit supplies are PE bolt tension plates. These plates are bent into shape and grab the nuts.


The hub portion of the wheel is one CNCed aluminum turning. On the real hub the hub is divided in three segments. These segments were added to the kit hub.


The fasteners that are used to assemble the wheels are all slot screws, which are attached with hex nuts on the hub surface.


On the real tank the hubs have half of the fasteners reversed. This means that some of the bolts have their bolt heads on the out side of the wheel, and the other bolts are on the inside and their hex nuts are exposed on the exterior of the wheel.     


On the model I first added the bolts that have thier hex nuts exposed in the positions that they are exposed on the real tank.


For the reversed hex bolt details the mod that I had to make was I first bolted the hex bolts to the hubs like the other screws. I then ground off the extra threading overhanging off of the nut. I then soldered the nut to the bolt. This makes the nut look like a hex bolt. This was done because the bolt itself is a slot screw and not a hex bolt, a0nd I had trouble locating a hex bolt of this size and length.   


The overhang threading on the other rim bolts were also trimmed.


The wheels have been added to the tank. The tanks wheels hub caps will be added after a few more mods have been added. These will be next along with the addition of the sprockets and the idlers.   

  • Member since
    April 2005
Posted by armourguy on Saturday, September 11, 2010 9:43 AM

The suspension is now mostly complete.


After my last post on another forum it was brought to my attention by another member that I was missing one bolt on the road wheels. This reverse bolt was added and the road wheels were then installed.


The road wheels are secured to the tank with a counter sink Allen screw and a counter sunk washer. The bolts get screwed into a threaded hole in the swing arms. All of these bolts are secured with locktite.


The hub caps were also installed. These parts need some modifications.


The stock armortek hub caps are all turned aluminum and have the correct shape and size.


On the real vehicle the stems of the hub caps are casted. The cap itself is a flange that bolts to the stem. The cap is fastened to the stem with several hex bolts around the rim that bolt into a casted steel lump that is casted into the stem. I used this image that I took from the Aberdeen Jagdtiger for reference.


On the armotek piece the cap is one with the stem and the flange seem is missing. These seems were added to all of the caps on my lathe.


Cast texture was then added to the stems. There are cast numbers on the real vehicle on these parts, but I didn't add them because of the location of the stems the road wheels could hit the stems on a bump and knock the cast numbers off.


The lumps where the bolts from the cap thread into the stem were also added. these were all sculpted into each of the stems with epoxy. This was the most time consuming part of the mod, but give the tank's road wheels a nice touch.


On the face of the hub cap there are several bolts that mount the hub cap plate to the stem. There are also securing plates to keep the bolts from getting loose like on the road wheels. The securing plates were not supplied with the kit, so I made the bolt detail with securing plates out of resin. I also used resin hex bolt heads for the center grease fitting bolt. The resin casting saved a lot of time with having to create every securing plate out of metal by hand. In addition the resin casting work well for this application because in my experience this area is not hit very often when the tank is driving.


After a shot of primer they were installed to the tank.


To instal the parts they simply get screw into the wheel plate.


The completed hubs


Lastly the tank's Idlers were installed. These idlers are also made out of CNC turned aluminum and were mounted to the tank OOB with no mods needed.


I have added the turned suspension caps and the resin hub cap details to the product line. http://eastcoastarmory.com/germanparts.htm


I'm currently working on the tank's sprockets. More info to come.


  • Member since
    April 2005
Posted by armourguy on Thursday, September 16, 2010 7:50 PM

I have made progress on the tank's sprockets and drive train.

The tank's sprockets are made out of CNCed Aluminum and the bell housing is separate from the teeth rings like the real vehicle. The sprockets mount to the drive axel via a taper lock. The sprockets also come with PE fastener locks. 

Overall the sprockets are nicely done, but a few mods were needed to improve on the sprockets detailing. The sprockets have several tooling marks where the bell housing curves.

These marks were easily ground off with a dremel using a sanding drum.

After the tool marks were removed cast texture was added to the entire bell housing of the sprocket. Cast numbers were also added to the bell housing. Epoxie sculpt was added to the spokes because on the real vehicle the spokes stand slightly above the center hub. This bit of detail will be more noticeable once the center hub is mounted to the sprocket.

The teeth rings were a very tight snug fit on to the sprocket, to help with the installation I sanded the inner ring down very slightly with a large sanding drum that was mounted in my drill press.

To mount on the sprocket rings the kit wants you to use the same slot screws that were used on the road wheels. The slot screw heads were positioned on the inside of the sprocket and the hex bolt would be positioned on the exterior face of the sprocket ring. On the real tank the bolts are inverted, which means the bolt face is on the exterior and the nut is on the inner portion. In stead of the slot screws I used M3 X 12 hex bolts and nuts. To do this I had to slightly enlarge the holes on the sprocket bell housing, the teeth ring, and the PE fastener retainers.

A small length of track was assembled and was used as a timing jig to make sure the sprocket teeth align perfectly with the track.

One of the sprockets is complete and has been installed to the tank. The other sprocket is still going through it's finishing touches.  

To install the sprocket with the taper lock the instructions are listed in the armortek instruction booklet and they work very well on my other armotek tanks.

The same length of track that I used before as a timing jig was also used to adjust the placement of the sprocket on the axel.

In addition to the sprockets I have also mounted the tanks very large and heavy drive motors. These motors come pre assembled with the small drive gear and are simply bolted onto the motor mounts.

For a size comparison here is the motor next to a 1/35th scale DML Panther II

I have also started on assembling the track. The track links are all cast aluminum alloy. They come pre drilled and are nicely scaled and detailed. The track is held together by a single pin. The newer generation armortek tank tracks are locked to the link by the use of a miniature cotter pin and retaining ring like the actual tank. Both the track pin and the retaining ring are pre drilled.

The next bit of detail that needs to be added to the sprockets is the center hub detail. This will be complete with the next update. More to come soon.

  • Member since
    April 2005
Posted by armourguy on Tuesday, September 28, 2010 6:16 PM

It has been over a week since my last update but I have made more head way on the tank.

The other sprocket was completed and installed,

The six allen screw bolt heads were added to the lower front, this completes the lower front portion of the tank.

I'm now focusing on the tank's rear wall detailing. The kit supplies you with most of the details. Some like the idler tension cover caps and the engine starter caps were added as is, with no added detailing.

The tank's kit supplied exhausts come with very basic detailing and left an area which I saw room for improvement. The kit supplied exhausts each comprises of two CNC aluminum parts and one copper tube. The whole exhaust is then covered by an all aluminum CNC armored cover. The exhaust stacks and bases are hollow which allows a smoke unit to be installed.

To re detail the exhausts would have required too much work, instead I decided to fabricate new exhausts and to cast them in resin. These new exhausts have a more accurate appearance and do spice the exposed exhausts up a bit.

The exhausts are a solid resin casting, but I will be making my tank with a smoke generator, so the solid exhausts stacks were hollowed out. To do this I simply drilled a hole down the top of the exhaust base, and a connecting hole towards the exhausts stack rear.

For the exhausts pipes I used the stock armortek copper pipes. The pipes themselves are nicely shaped out of the box. To make them fit my resin exhausts bases I machined an adaptor tube out of a length of PVC tube.

The pipe's thickness is slightly too thick, so I thinned the walls on the end that is exposed with a dremel sanding drum. A small steel support rod was then soldered in the opening, as I have seen this on the actual vehicles. These stacks have been added to the product line in two variations, One as a complete set with my own resin solid exhausts pipes designed more for static king tigers, The other with just the exhausts bases and the copper pipe adaptor for the armortek and other RC King tigers with smoke generators.

http://eastcoastarmory.com/germanparts.htm

The hollow exhausts were then ready for installation.

before I installed the stacks a small amount of silicone was added around the center exhaust hole. This hole is to give me an air tight seal which will keep any exhaust smoke from seeping out between the gaps.

The kit supplied exhaust covers are all CNCed aluminum and also appear to have the correct basic shape and appearance.

What was added to the exhausts covers was some cast texture, and a set of my metal armored exhaust lift bolts.

These were then installed to the tank with no problems

Now that the exhausts have been added all that remains to finish the exhausts is the crank started guide. This descends off of the right hand exhaust cover, and will have to be all scratch built. Once complete I can then finish off the remaining rear wall details.

On the tank's interior I have assembled the kit supplied electronics mounting tray. This tray will hole the batteries, smoke generator and other electronics. More Info to follow

  • Member since
    July 2008
  • From: Florida
Posted by Railfan 233 on Tuesday, September 28, 2010 6:30 PM

Really nice work, armorguy.

I'm still blown away at the size of this thing (especially when there is something, like a roll of duct tape, to compare the size to)

Is there any guess to the weaght of it right now?


http://i6.photobucket.com/albums/y211/razordws/GB%20Badges/WMIIIGBsmall.jpgRed, White, and YOU! group build of 2010

  • Member since
    April 2009
  • From: Carmel, IN
Posted by deafpanzer on Tuesday, September 28, 2010 9:56 PM

WOW!  This has to be the best WIP.  Maybe because I just love those Panthers?  Thanks for posting.  Sorry I have to ask... you don't have to answer my question... what would be the final cost to complete this massive Panther kit?  I'd love to try this one day!

Andy

  • Member since
    August 2009
  • From: Cary, North Carolina
Posted by M1Carbine on Wednesday, September 29, 2010 2:59 PM

Outstanding WIP

I think the cost is more than I would want to know...........LOL


Bob

  • Member since
    May 2005
  • From: Eugene, Oregon
Posted by hughes2682 on Thursday, September 30, 2010 1:12 PM

Cost?????  Heck!!! I'm still tripping over my jaw at the shear scale of this beast of beasts!  I want one of these to keep the kitties out of my flower beds.  Here kitty, kitty, kitty.  heheheAngry 

Cheers

Dave

http://img.photobucket.com/albums/v317/Aaronw/Groupbuilds/ClassicAviationGB2010bomb.jpg

With enough thrust, pigs fly just fine.

  • Member since
    July 2008
  • From: Florida
Posted by Railfan 233 on Thursday, September 30, 2010 2:11 PM

hughes2682

Cost?????  Heck!!! I'm still tripping over my jaw at the shear scale of this beast of beasts!  I want one of these to keep the kitties out of my flower beds.  Here kitty, kitty, kitty.  heheheAngry 

Cheers

Dave

No, dave. Save the cannon for the next intruder who makes the mistake to enter your house.


http://i6.photobucket.com/albums/y211/razordws/GB%20Badges/WMIIIGBsmall.jpgRed, White, and YOU! group build of 2010

  • Member since
    November 2004
Posted by snapdragonxxx on Thursday, September 30, 2010 4:08 PM

For those who wish to know the cost of this beast if you purchase ALL the option packages which include motion, sound, smoke and a blank firing gun is around £6000 GBP At the moment Armourtek have a very nice Panther G available in either BergPanther JagdPanther and Panther G.

All their stuff is a limited run and order only stuff so get an order in quick!!!!

  • Member since
    May 2005
  • From: Eugene, Oregon
Posted by hughes2682 on Friday, October 1, 2010 1:11 PM

Railfan 233

 hughes2682:

Cost?????  Heck!!! I'm still tripping over my jaw at the shear scale of this beast of beasts!  I want one of these to keep the kitties out of my flower beds.  Here kitty, kitty, kitty.  heheheAngry 

Cheers

Dave


No, dave. Save the cannon for the next intruder who makes the mistake to enter your house.

No worries sir.  There are other "surprises" for intruders foolish enough to enter someones house that they were not invited to. 

I just got caught up on this build now.  Holy Smoke!!!  That scale thickness glacis plate is most impressive.  Heck! the whole thing is impressive.

Cheers

Dave

http://img.photobucket.com/albums/v317/Aaronw/Groupbuilds/ClassicAviationGB2010bomb.jpg

With enough thrust, pigs fly just fine.

  • Member since
    May 2009
  • From: Poland
Posted by Pawel on Friday, October 1, 2010 2:47 PM

You have to put in a lot of work to make 6000 pounds. And then when you add all the hours to build that baby you probably double that. I'm amazed by the amount and quality of your work armourguy, but looking at the WIP I get the feeling it would be too much for me... Anyhow it's the real heavy metal!!!

Good luck with your project and have a nice day

Paweł

All comments and critique welcomed. Thanks for your honest opinions!

www.vietnam.net.pl

  • Member since
    April 2005
Posted by armourguy on Tuesday, October 5, 2010 10:56 PM

Thanks guys, The model was a heafty investment, and not one that I make very often. But to save on costs I didn't get some of the option packs ie, the sound, smoke, and the blank gun. I will be adding some of these functions my self which will save on the budget.

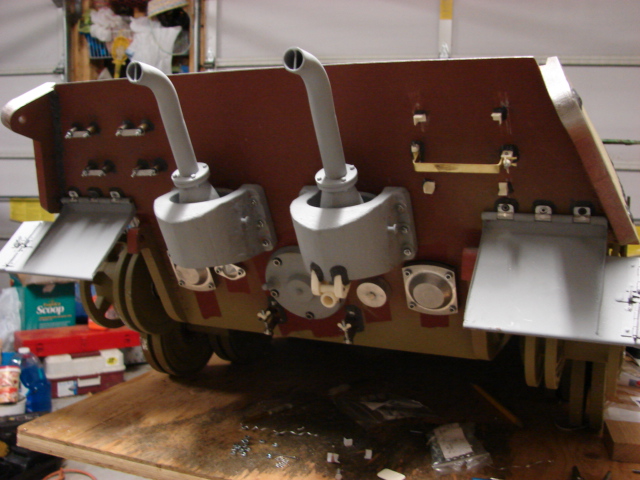
I have completed 96% of the rear wall detailing.
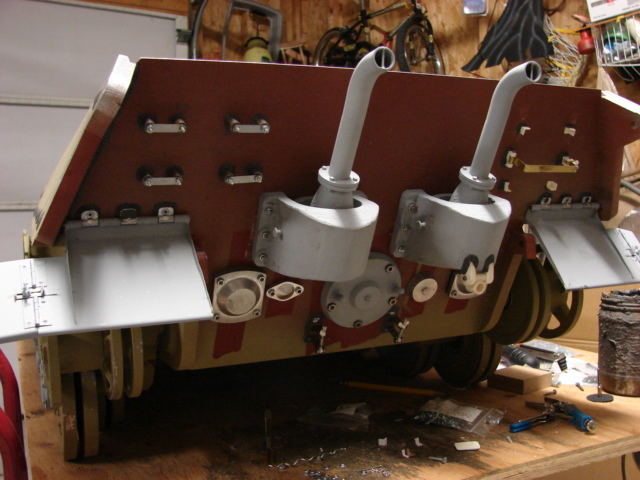


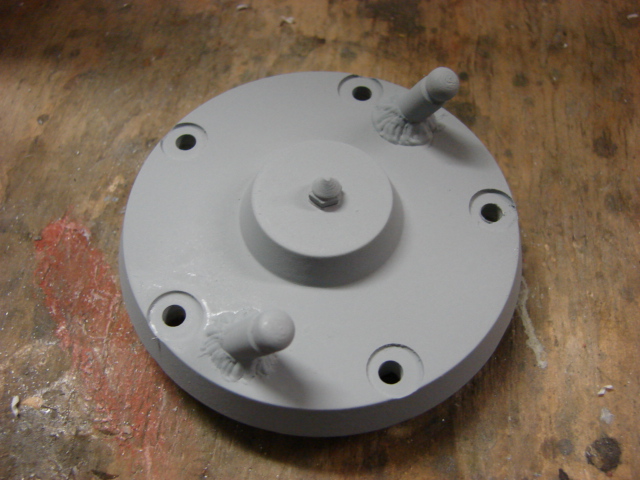
The tank's rear engine access hatch / engine started was reworked and added.


The kit supplied piece was made of CNCed turned aluminum and is the correct size and shape.
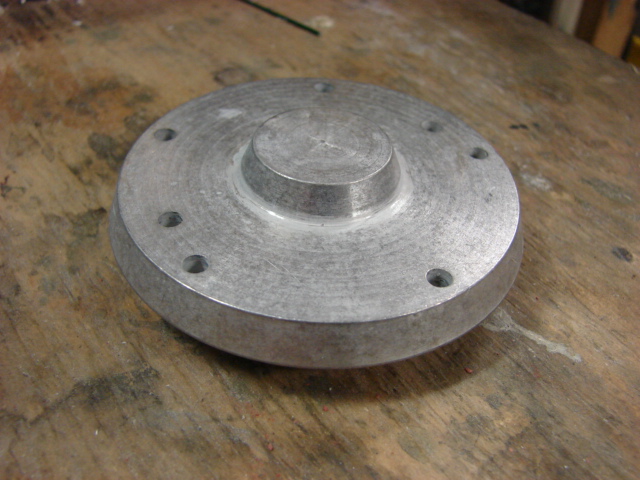


All that was needed to improve the part was I milled recessed divots into each of the locations that the mounting nuts are located, I added a resin Acorn nut to the center of the access hub, and I added two resin cold weather starter electrode nubs that was from my Tiger I cold weather starter kit.


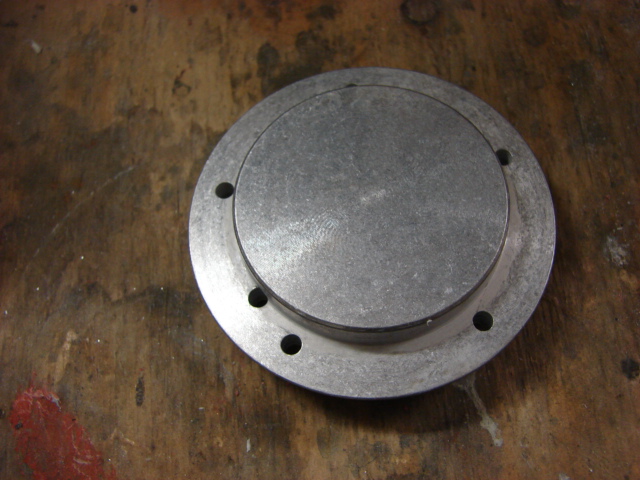
The tank's tow hook swing mounts were added. These mounts are nicely done out of the box and the only mods that were added were the weld beads. The kit supplies you with cast bronze wing nuts that thread onto the exposed threaded shaft. The kit also supplies you with two cast brass tow hooks. These appear to need no further mods and will be added once the tank is painted.


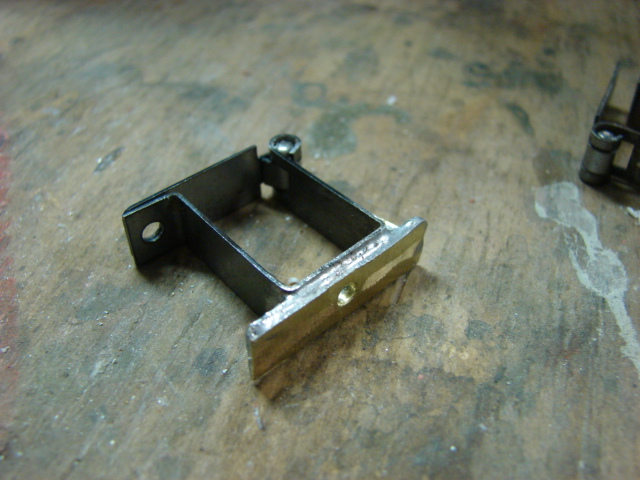
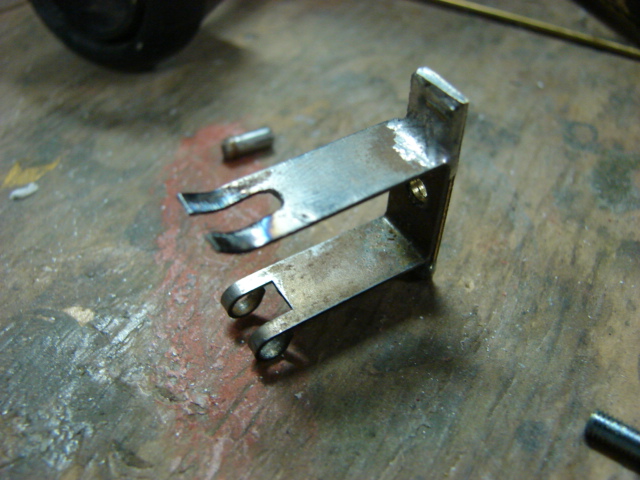
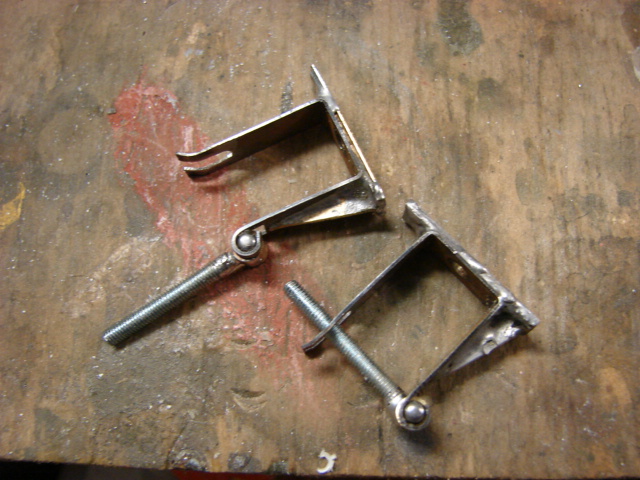
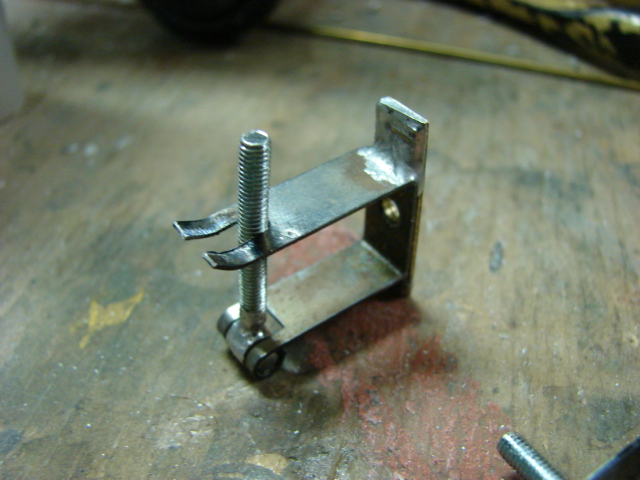
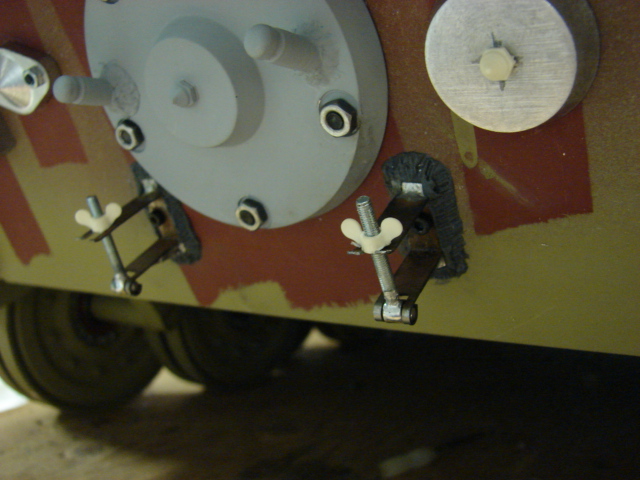
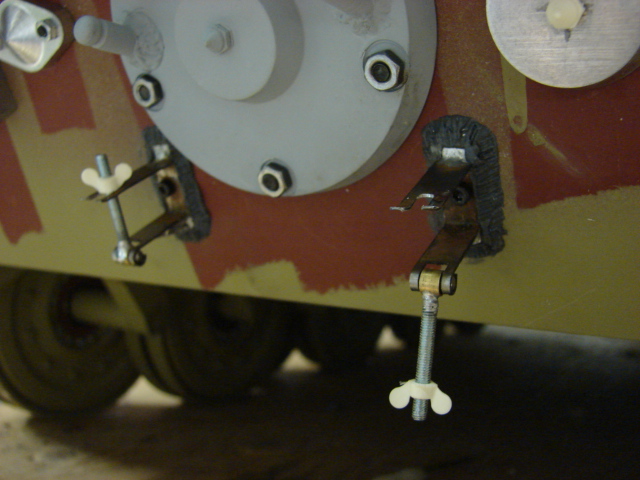
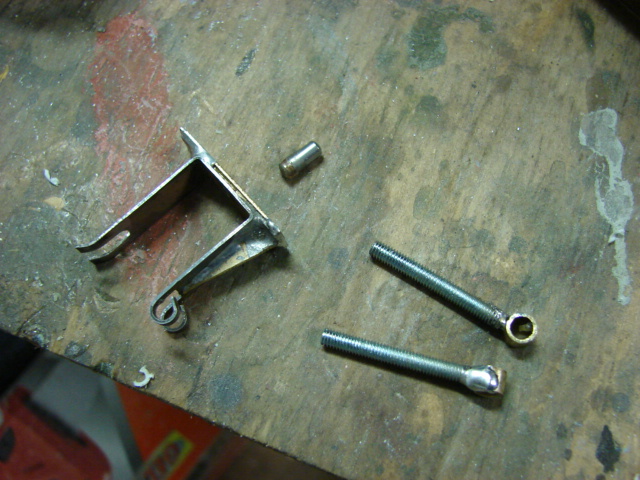
The tank's jack mounts were added. The kit supplied mounts are made out of two laser cut and pre shaped sheet steel strips. The kit supplied mounts are made to swing open. On the real tank the mounts are welded to a longer plate and have a bulkhead welded to the lower portion of the mount for more strength. On my component I made the bulk head and the longer base plate out of a brass strip that was then soldered onto the kit supplied jack mount.


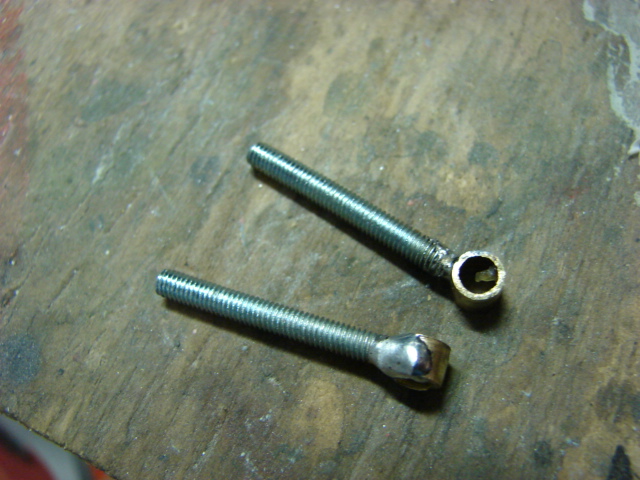
At first I was going to install the component with the kit supplied hinged gate, but after reviewing the real component I decided to rework the jack mounts further. To do this I removed the kit supplied gate and replaced it with a threaded rod that was soldered to a brass tube. The new rod swings in place where the old gate once went. The op portion of the jack mount was to be secured by a singe Allen screw and nut, this part of the mount was bent straight and a threaded shaft size notch was then cut into the now protruding steel. A resin wing nut will hold the unit together.


As for the tank's Jack, the kit comes with an Armorpax Resin and metal King tiger Jack, which is an excellent bit of kit. This too will be added later.


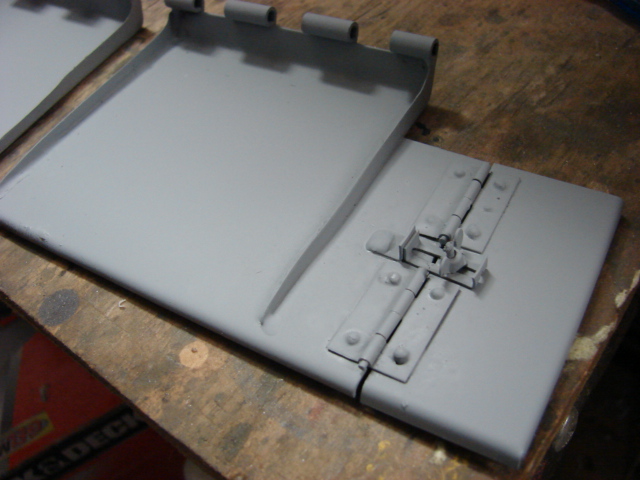
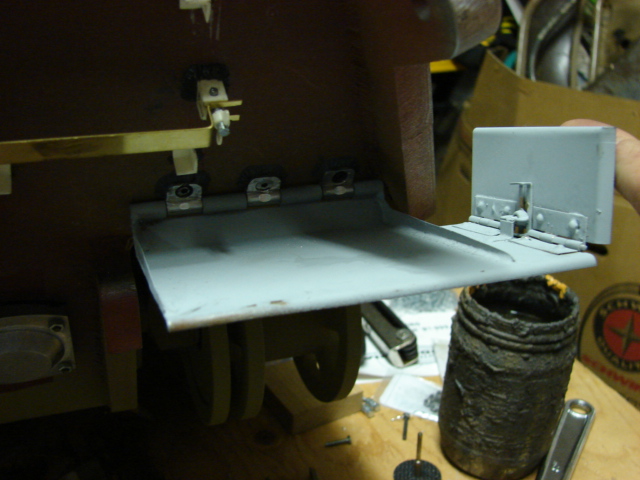
The tanks Rear mud flaps have also been assembled and installed.


The kit supplied mud flaps are all made out of pre shaped laser cut sheet steel, brass hinges, copper rivets, and two machined aluminum one piece hinges.


The kit supplied mud flap bulk heads were not used. New sheet steel bulk heads were fabricated and soldered to the mud flap in it's place. The original mounting holes for the kit supplied bulk heads were plugged up with solder and were sanded smooth.


All of the hinges and copper components were soldered directly onto the mud flaps. The mud flap corner hinged section had it's adjustment plate detail added. These details were all scratch built out of brass. A resin wing nut adds the last bit of detail to the section.


To complete the mud flaps, the one piece main hinge needed to be reworked.


On the real King tiger the mud flap hinge was comprised out of three separate small blocks. To make the alteration I cut the one piece hinge into three small blocks. A hole was added to the center block hinge, and all six blocks had counter sinks drilled into them. The counter sink bolts will replace the cap screws that armortek recommends in their instructions. They all were then mounted to the tank with counter the sink bolts and weld beads. All that needs to be done to finish them up is to have some small putty work done to the counter sink bolts making them flush with the hinge.


The mud flaps retain all of their functionality, and are very sturdy


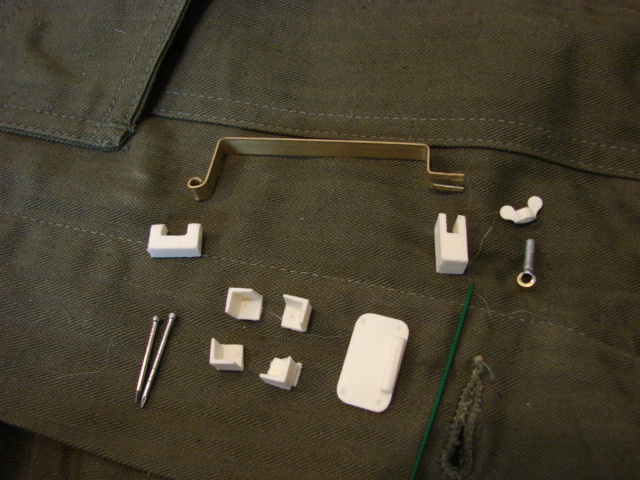
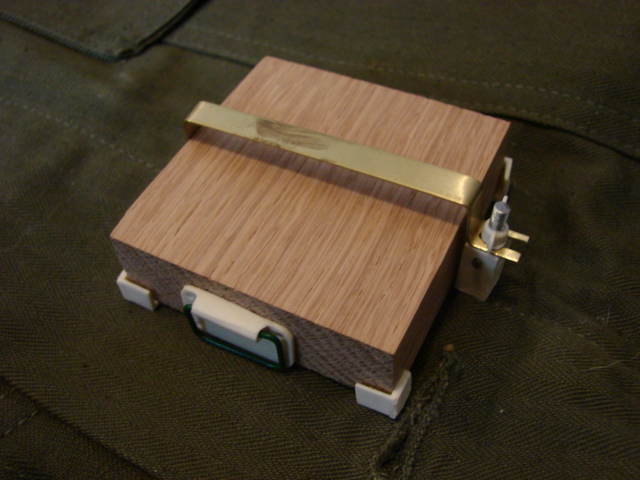
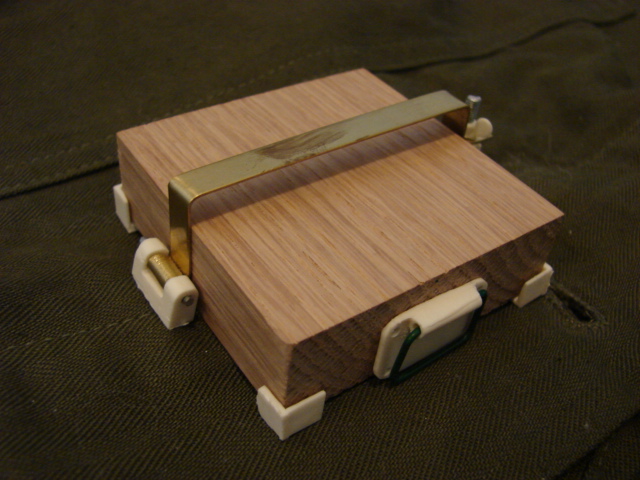
The tank's new jack block mounts were added. The Kit supplied jack block is comprised of a block of wood and a singe laser cut pre bent strip that gets bolted to the tank.


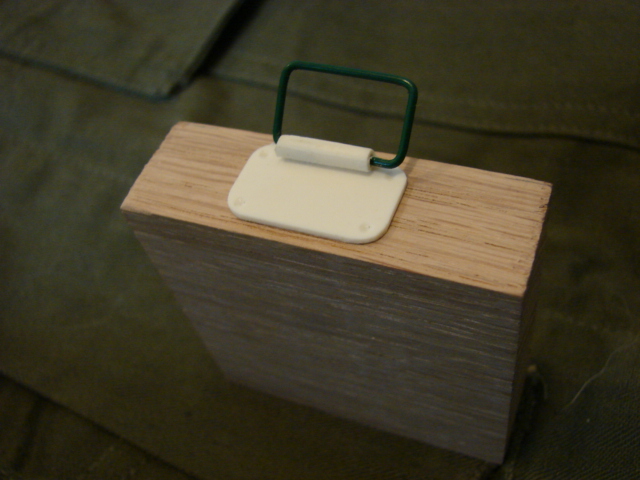
I decided to fabricate new jack block mounts that were full function and were more accurately detailed than the basic kit supplied version.


htp://eastcoastarmory.com/german_parts/king_tiger_box/DSC00040.JPG


In addition to the new jack block mounts I also made the jack block carrying handle.


The pivoting crank handle guide was added to the tank’s right hand armored exhaust cover. The component does have a small length of chain and will be added once the tank is painted.


both the jack block detail upgrade and the pivoting crank handle set have been added to the product line. 

http://eastcoastarmory.com/germanparts.htm


All that remains left to be fabricated is the tube tail light and the lower tail light. Once those parts have been completed the rear wall is 100% finished. More progress to follow!


  • Member since
    April 2005
Posted by armourguy on Tuesday, October 5, 2010 10:56 PM

Thanks guys, The model was a heafty investment, and not one that I make very often. But to save on costs I didn't get some of the option packs ie, the sound, smoke, and the blank gun. I will be adding some of these functions my self which will save on the budget.

I have completed 96% of the rear wall detailing.


The tank's rear engine access hatch / engine started was reworked and added.


The kit supplied piece was made of CNCed turned aluminum and is the correct size and shape.
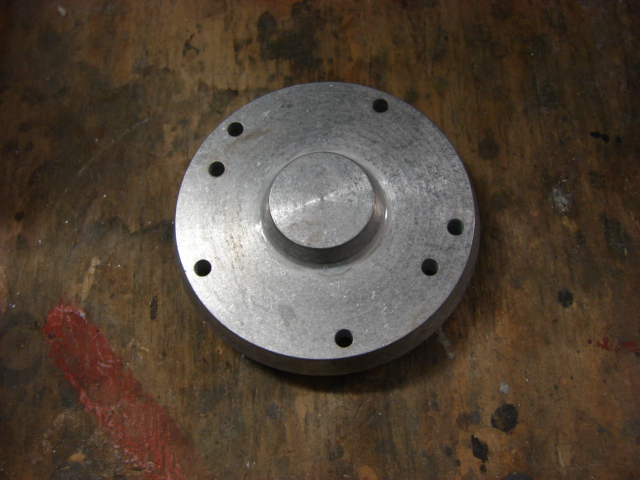


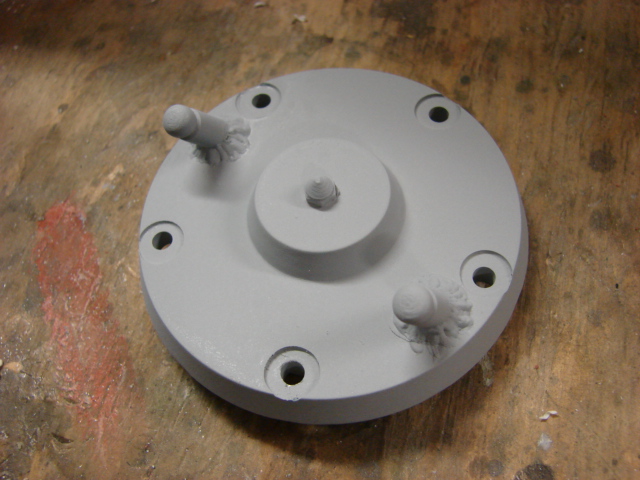
All that was needed to improve the part was I milled recessed divots into each of the locations that the mounting nuts are located, I added a resin Acorn nut to the center of the access hub, and I added two resin cold weather starter electrode nubs that was from my Tiger I cold weather starter kit.


The tank's tow hook swing mounts were added. These mounts are nicely done out of the box and the only mods that were added were the weld beads. The kit supplies you with cast bronze wing nuts that thread onto the exposed threaded shaft. The kit also supplies you with two cast brass tow hooks. These appear to need no further mods and will be added once the tank is painted.
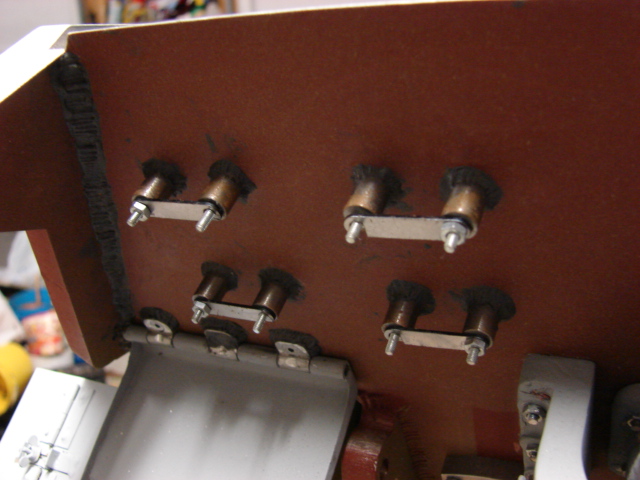
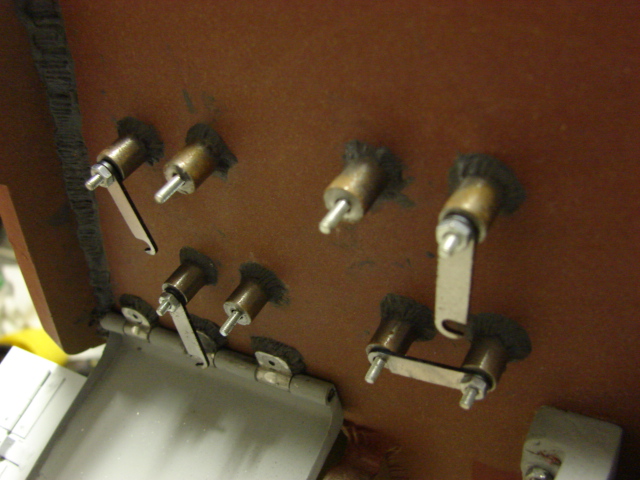


The tank's jack mounts were added. The kit supplied mounts are made out of two laser cut and pre shaped sheet steel strips. The kit supplied mounts are made to swing open. On the real tank the mounts are welded to a longer plate and have a bulkhead welded to the lower portion of the mount for more strength. On my component I made the bulk head and the longer base plate out of a brass strip that was then soldered onto the kit supplied jack mount.
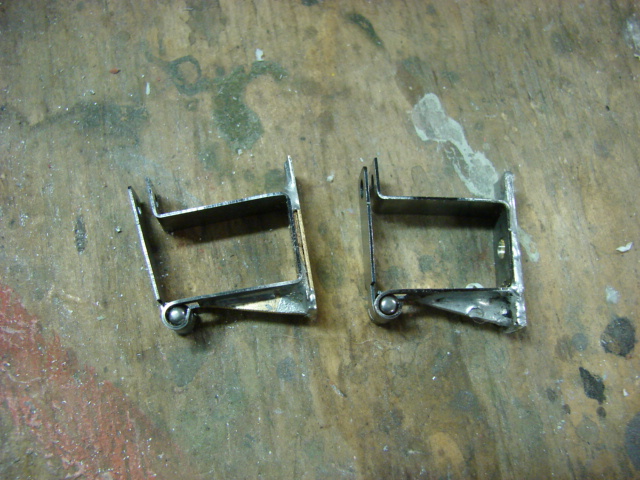
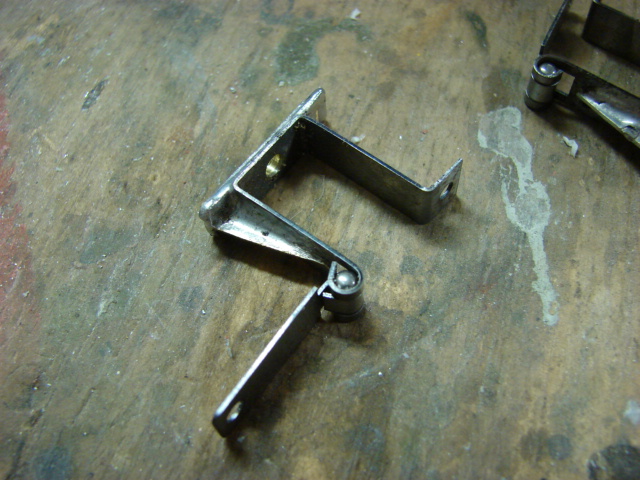


At first I was going to install the component with the kit supplied hinged gate, but after reviewing the real component I decided to rework the jack mounts further. To do this I removed the kit supplied gate and replaced it with a threaded rod that was soldered to a brass tube. The new rod swings in place where the old gate once went. The op portion of the jack mount was to be secured by a singe Allen screw and nut, this part of the mount was bent straight and a threaded shaft size notch was then cut into the now protruding steel. A resin wing nut will hold the unit together.


As for the tank's Jack, the kit comes with an Armorpax Resin and metal King tiger Jack, which is an excellent bit of kit. This too will be added later.


The tanks Rear mud flaps have also been assembled and installed.
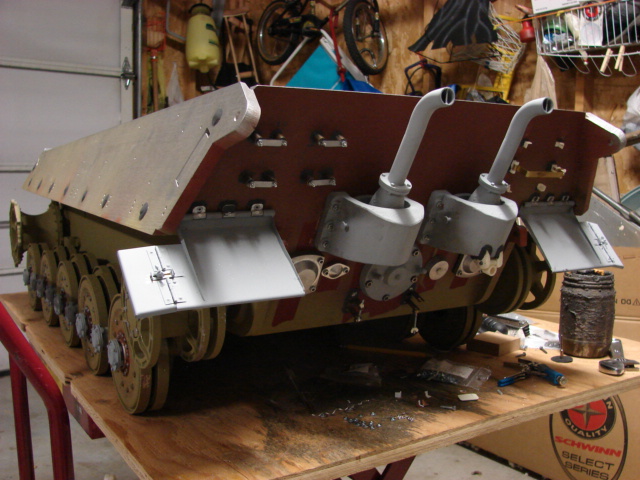


The kit supplied mud flaps are all made out of pre shaped laser cut sheet steel, brass hinges, copper rivets, and two machined aluminum one piece hinges.
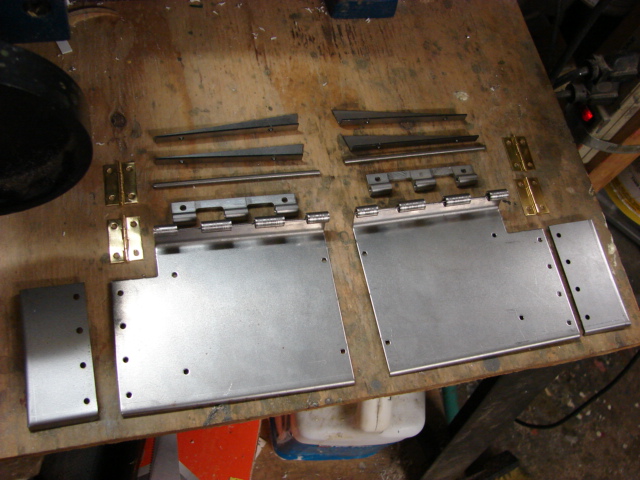
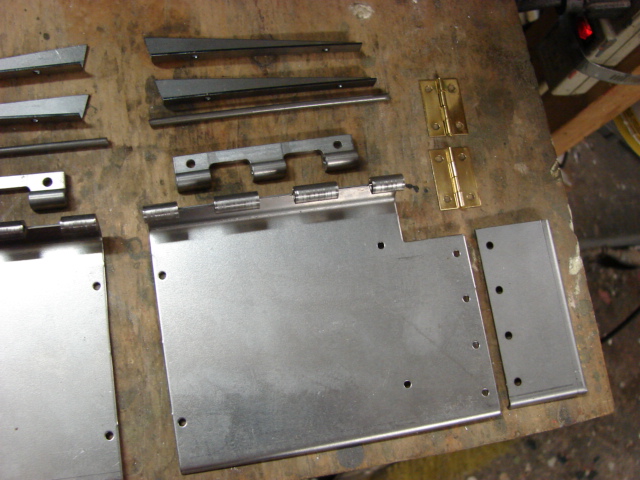


The kit supplied mud flap bulk heads were not used. New sheet steel bulk heads were fabricated and soldered to the mud flap in it's place. The original mounting holes for the kit supplied bulk heads were plugged up with solder and were sanded smooth.
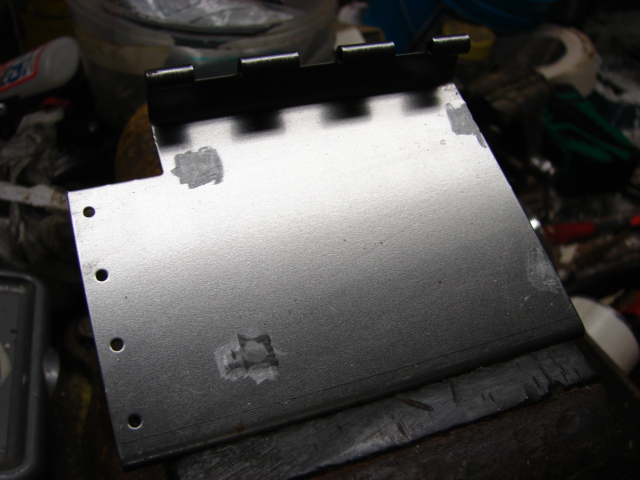
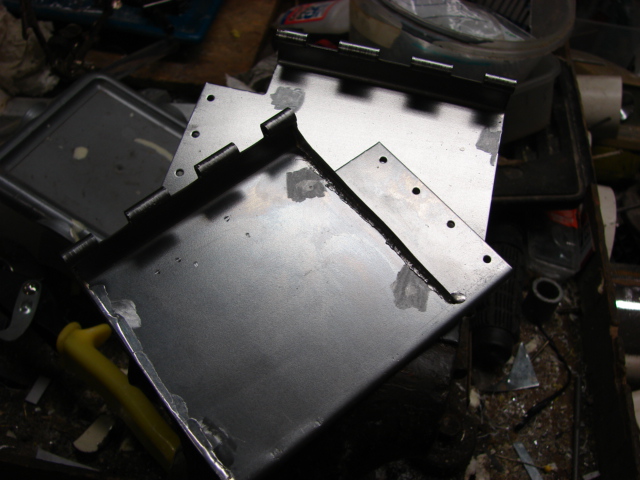


All of the hinges and copper components were soldered directly onto the mud flaps. The mud flap corner hinged section had it's adjustment plate detail added. These details were all scratch built out of brass. A resin wing nut adds the last bit of detail to the section.
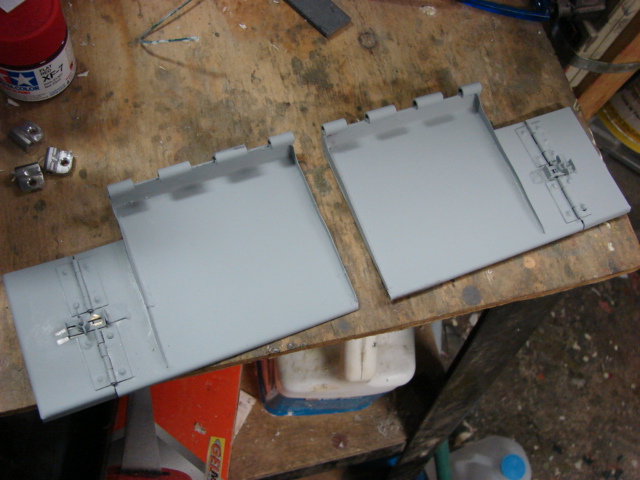
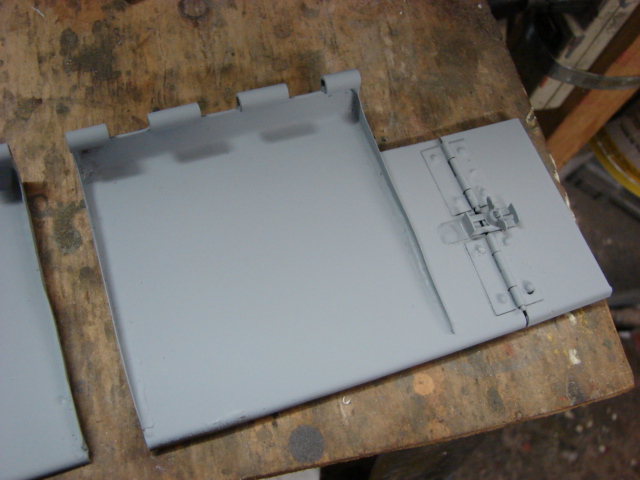


To complete the mud flaps, the one piece main hinge needed to be reworked.
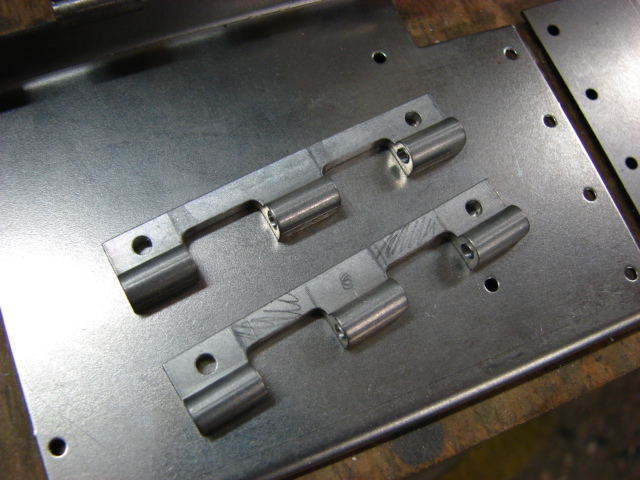


On the real King tiger the mud flap hinge was comprised out of three separate small blocks. To make the alteration I cut the one piece hinge into three small blocks. A hole was added to the center block hinge, and all six blocks had counter sinks drilled into them. The counter sink bolts will replace the cap screws that armortek recommends in their instructions. They all were then mounted to the tank with counter the sink bolts and weld beads. All that needs to be done to finish them up is to have some small putty work done to the counter sink bolts making them flush with the hinge.
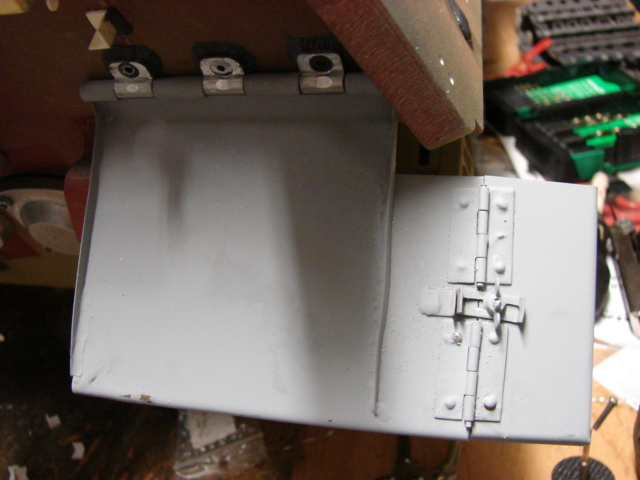
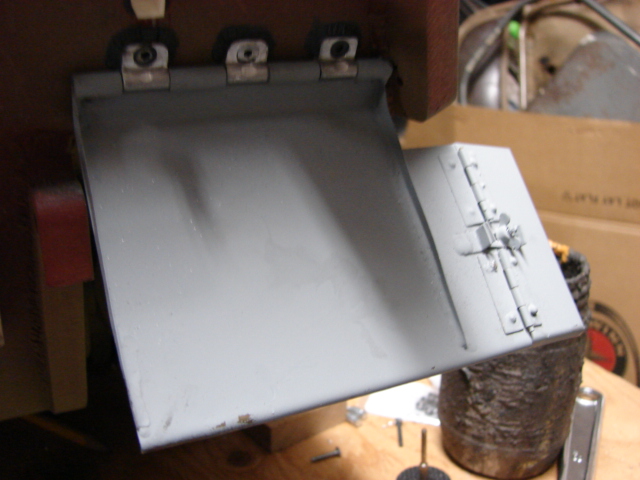


The mud flaps retain all of their functionality, and are very sturdy


The tank's new jack block mounts were added. The Kit supplied jack block is comprised of a block of wood and a singe laser cut pre bent strip that gets bolted to the tank.
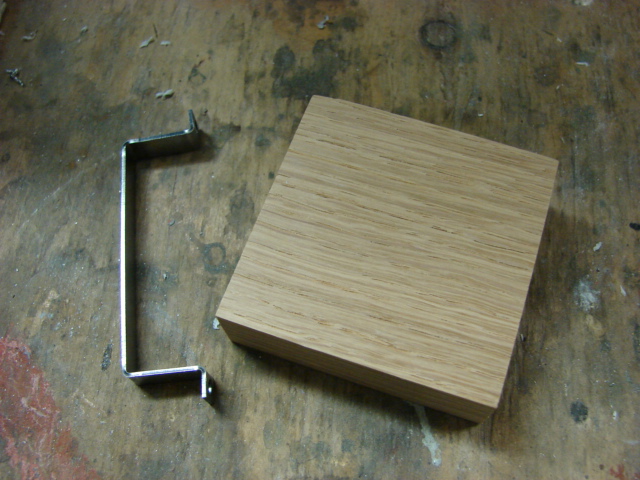
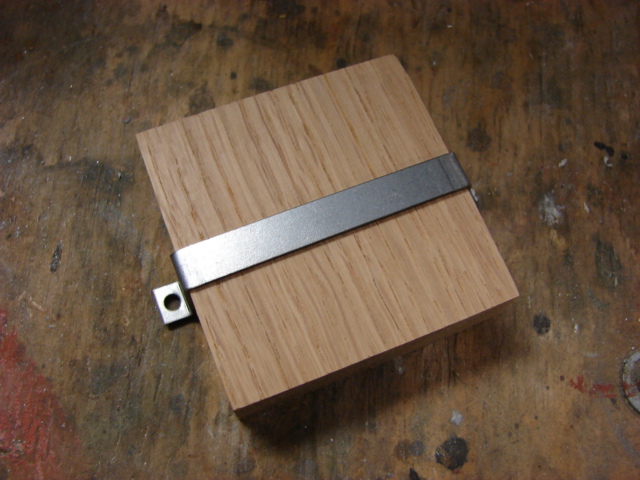


I decided to fabricate new jack block mounts that were full function and were more accurately detailed than the basic kit supplied version.


htp://eastcoastarmory.com/german_parts/king_tiger_box/DSC00040.JPG
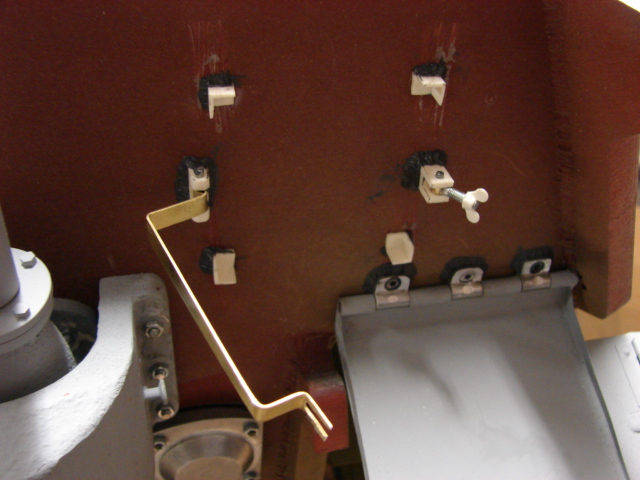


In addition to the new jack block mounts I also made the jack block carrying handle.


The pivoting crank handle guide was added to the tank’s right hand armored exhaust cover. The component does have a small length of chain and will be added once the tank is painted.
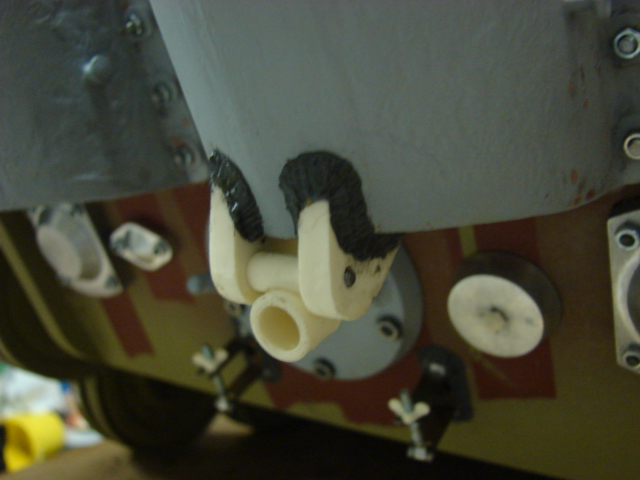


both the jack block detail upgrade and the pivoting crank handle set have been added to the product line. 

http://eastcoastarmory.com/germanparts.htm


All that remains left to be fabricated is the tube tail light and the lower tail light. Once those parts have been completed the rear wall is 100% finished. More progress to follow!


  • Member since
    March 2010
Posted by Crapgame on Monday, October 11, 2010 12:13 AM

Once again EXCELLENT work Mr. OddBall

your attention to fine-detail will set this KT apart from the rest.  I wanted to share some paint ideas. I know you said you were going to do the late war "ambush pattern" camouflage on the machine, but I ran across this version of a ambush pattern variant..

another Armortek king tiger. IMHO, there is something sexy about this camouflage. Just something to thing about. Keep up the great work. What's even better ( for KT owners ) is that the custom parts your making are available for purchase on your website.

CrampGame : Have a bottle of booze, your beautiful ...


JOIN OUR COMMUNITY!

Our community is FREE to join. To participate you must either login or register for an account.

SEARCH FORUMS
FREE NEWSLETTER
By signing up you may also receive reader surveys and occasional special offers. We do not sell, rent or trade our email lists. View our Privacy Policy.