SEARCH FINESCALE.COM

Enter keywords or a search phrase below:

1/35 DML T19 105mm HMC, WIP, 01/02/11, Complete

34587 views
150 replies
1 rating 2 rating 3 rating 4 rating 5 rating
  • Member since
    July 2006
  • From: New Jersey
Posted by redleg12 on Tuesday, November 30, 2010 7:48 PM

Kevin - Thanks.....at our age we love the classics!!Wink

Andy - Glad you are enjoying this. I'm sure Ken will lend a helping hand.

Steve - Thanks. As far as PE, I agree....why replace perfectly good looking molded parts. I have basically stopped buying PE. The only thing I seem to use is tie downs and headlight protectors. Someone highly recommended these sets for the half track. Nice.....but frankly a waste!! Live and learn

Glad to see you around these parts. Hopefully see some fire missions from your way soon!!

Marc - This year has been hard but the past few months have been off the chart NUTS. This build sloowwedd wayyyyyyy downnnnnnn. Hopefully I can make a rebound and finish during the xmas holiday.

Soooo many kits sooo little time

Karl - Always a pleasure. I think of building this way. I am still in the "factory" mode. this is what it looks like coming off the line. My intent is to desert weather as these were used mostly in the North Africa battles. The soft lead is ready....the bottle of graphite on the table.....sand and dust pigments ready......there won't be any green on the high spots of the diamond plate......

Yep...well won't have the wash rack look....nice and dusty...that's the plan

Thanks guys....I appreciate you all dropping by

Rounds Complete!!

"The Moral High Ground....A Great Place to Emplace Artillery."

  • Member since
    January 2007
Posted by the doog on Tuesday, November 30, 2010 6:44 PM

Hey Mike, looking good so far, but you know that i have to tell you to put some weathering in that cab there--some burnished steel on the shift levers where they'd wear and some wear and chipping on the cab floor followed by a layer of dirt or old mud. These guys didn't exactly clean their boots when hopping in and out!

Make the cab look "loved in" Mike! Wink

EDIT--OOPS! I mean "LIVED" in--ha ha hahaha! What the hell was I thinking?!  Left HugKissRight Hug........Whistling

  • Member since
    April 2005
  • From: Piscataway, NJ!
Posted by wing_nut on Tuesday, November 30, 2010 6:10 PM

I see you and I are on a similar pace these days.  Hard to be believe I did 21 or 22 models a few years ago.

But progress is progress and yours is good.

Marc  

  • Member since
    October 2007
  • From: N.H.
Posted by panzerguy on Tuesday, November 30, 2010 2:36 PM

 Mike it's been a little while for me but I had to stop in and see whats up around here. Apparently a lot! Lots of new names and tons of stuff to get caught up on. Of course I had to make this my first stop thoughWink 

  This ones taking shape nicely. The feed back from Ken is really helping our do this one justice.

  One thing about pe sets I've learned you never use all of it. I'm lucky if I use 2/3rds of one and I've never used a whole set. Also some times the molded detail looks better than the pe part.

  Now I think I'll wander around and catch up on thingsBeer

"Happiness is a belt fed weapon"

  • Member since
    April 2009
  • From: Carmel, IN
Posted by deafpanzer on Tuesday, November 30, 2010 10:58 AM

Mike, I agree about those great tips from Ken.  I hope he will be around to help me when I build mine! Big Smile  Looking forward to your next update... Yes

Andy

  • Member since
    June 2005
  • From: Massachusetts
Posted by minimortar on Tuesday, November 30, 2010 9:33 AM

Looks great Mike. I've always liked this combo but can't figure out if it's because of the vehicle or because of the weapon itself. Both are classics. Watching your progress on this for sure!

Thanks,
Kevin Keefe

Mortars in Miniature
A Scale Model (Plus!) Collection of the Infantryman's Artillery

  • Member since
    August 2008
  • From: S.W. Missouri
Posted by Pvt Mutt on Monday, November 29, 2010 8:37 PM

Mike, Kenny has been my bosom buddy since the first day of my modeling career. He helps to keep me pumped up and in return I keep his feet on the ground when he ain't working on a roof.Wink

He ain't heavy he's my brother

Tony LeeSmile

Shoot Low Boys They're Ridin Ponys

  • Member since
    July 2006
  • From: New Jersey
Posted by redleg12 on Monday, November 29, 2010 7:47 PM

Tony - Now, I feel honored to have Ken give his tips.......as I try to give mine when in the back of the breech block!! Wink Always a pleasure to have you stop in!!

Ken - Ahhhh.....thats what I remember.....nice and ugly.....even the metal on the inside of the bogie's was clean on your original photo. I am contemplating a fix.......maybe some rubber/some metal as the sand in the desert would wear the rubber Cool. Thanks for all the help

Bill - Yep....looking forward to knocking the Stuffing out of this one soon!!

Andy - Thanks. I am glad this will be of help to you....especially some of the tips from Ken.

Rounds Complete!!


"The Moral High Ground....A Great Place to Emplace Artillery."

  • Member since
    April 2009
  • From: Carmel, IN
Posted by deafpanzer on Monday, November 29, 2010 5:40 PM

Looking real good Mike!  I have been following you with interest because I have similar DML kit in the stash... thanks for doing this!

Andy

  • Member since
    July 2004
  • From: Texas
Posted by wbill76 on Monday, November 29, 2010 4:47 PM

Moving along nicely after the Turkey Day interruptions Mike, looking good! Beer

  • Member since
    May 2007
  • From: Taxachusetts
Posted by camokid on Monday, November 29, 2010 2:50 PM

redleg12

Ken - You are keeping me honest on these half tracks. I had see some tracks where you could see some rust/metal in the mid section......but it could be bad karma.....

Mom always said honesty was the best policy.

Besides, I'm quite certain you'd offer the same guidance on an artillery piece wouldn't you? Oh wait, you already have in response to some email questions a few times.

Wink


As for seeing the metal in the center section, it's fairly common on 60+ year old museum pieces, or junks sitting around and such to see the rubber breaking down and chipping off but during the vehicles relatively short lifespan it would be pretty odd to see and fairly troublesome in the eyes of the crew I would think.


Ken

Build how you like, like how you build


  • Member since
    August 2008
  • From: S.W. Missouri
Posted by Pvt Mutt on Monday, November 29, 2010 12:49 PM

Stay Frosty Mike maybe he'll get a short in his bionic eye.Black Eye

Tony LeeBig Smile

Shoot Low Boys They're Ridin Ponys

  • Member since
    July 2006
  • From: New Jersey
Posted by redleg12 on Monday, November 29, 2010 12:12 PM

Jetmodeler - Thanks, you will enjoy the kit!! Thanks for stopping in

Ken - You are keeping me honest on these half tracks. I had see some tracks where you could see some rust/metal in the mid section......but it could be bad karma.....

The good thing is it is an easy fix!!

Now.....as for the gun.....as soon as I can finish and finalize the basic half track assembly, next up is the 105....soon...very soon

Thanks for all your help with this one. The video on mounting the tracks is great. Using that method allows the finishing as seperate assemblies and make painting soooooo much eaiser for the track/road wheels

Rounds Complete!!

"The Moral High Ground....A Great Place to Emplace Artillery."

  • Member since
    May 2007
  • From: Taxachusetts
Posted by camokid on Monday, November 29, 2010 8:33 AM

Looking good so far Mike. I'm really waiting on seeing that weapon all done up and pictures posted. I use Archers dash transfer set for the gauges as I can't paint stuff that small, especially with all of those shifters and the steering wheel in the way.

RE: the rusting on the track surface though, the only exposed steel on the tracks was on the inside where it met with the sprocket teeth and inner surface of the road wheel, the rest of the tracks were completely covered in vulcanized rubber. You might want to paint over that?


Good to see some progress but don't take too long to post that boom stick. Cool

Ken

Build how you like, like how you build


  • Member since
    October 2009
  • From: South Carolina
Posted by jetmodeler on Monday, November 29, 2010 6:40 AM

Its good to see some progress on this one. I like the pre-weathering in the tracks.

I'm actually hoping to get this kit for x-mas.


  • Member since
    July 2006
  • From: New Jersey
Posted by redleg12 on Sunday, November 28, 2010 9:20 PM

Well…it has been a few weeks. Work is killing my bench time and finally the big bird day came. After all the festivities, I was finally able to get some time in the studio.

With the frame painted and the wheels and tracks painted, it was time to finish up the drive train. The bogie mount was assembled and mounted, minus the bogies. The idler was glued on. The track halves were assembled. Then the drive wheel was glued into position within the tracks. Now the tracks are worked into place over the idler and carefully pulled until the drive wheel is in position and can be pushed onto the axel. Repeat for the other side and then mount the front tires
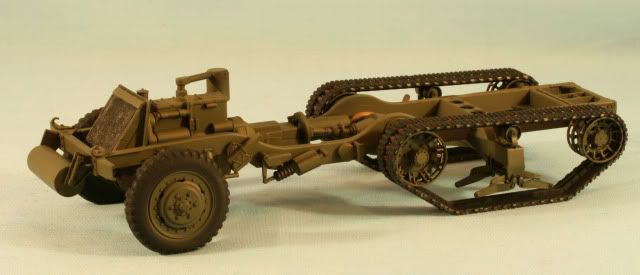
Hummm….daughter use camera……changed white balance…..excuse the color!!

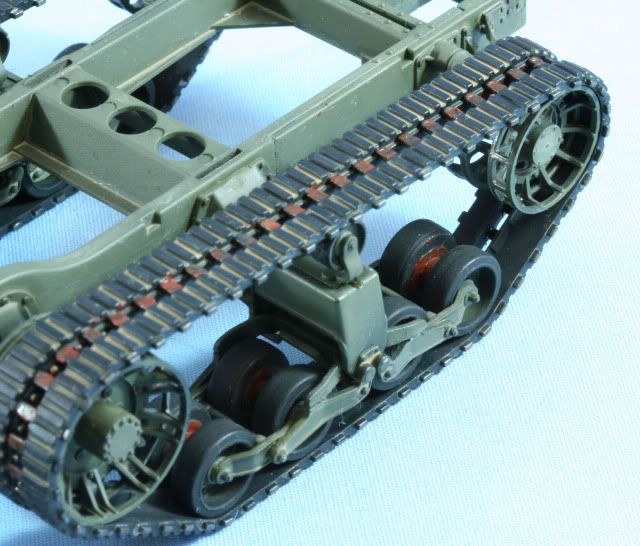
Afterward the bogie sets were mounted. Fixed up the bogies on the inside by using Dark Sienna oil, dry brushed for that rusty rim look. The metal center teeth of the track were painted with Alclad Burnt Metal. After drying, then dry brushed with some Dark Sienna. As some pre-weathering to get at some of the hard to get areas, I used MIG Grey for Green wash to give that some what sandy look. It is visible on the tracks
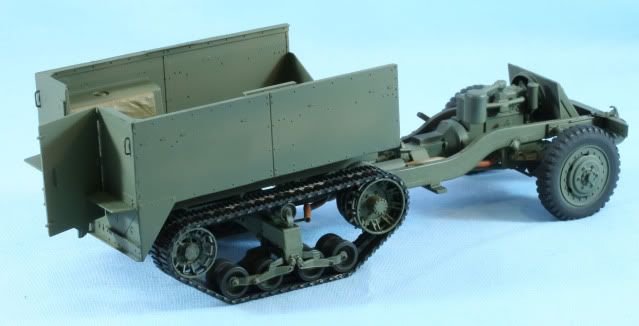
Moving on the cargo section was primed and painted with OD. I will have the model in position with the rear door open. Here is the cargo section mounted to the frame.
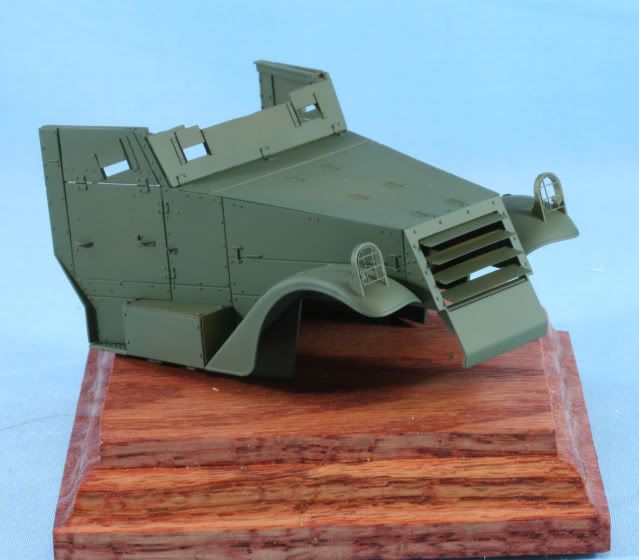
Also primed and painted the cab section
Most of the remaining assembly is around the howitzer and details. I worked on the cab dashboard. There are no decals for the dash and the PE set was…..IMO….a waste of time so after base coating with OD, I hand painted the white gauges with black or red insides. The placards are Archer transfers. The shifter knobs and horn on the steering wheel is black marker. The fire extinguisher is Tamiya Flat Red and Alclad Brushed Aluminum for the handle.  Seats still have to be mounted.
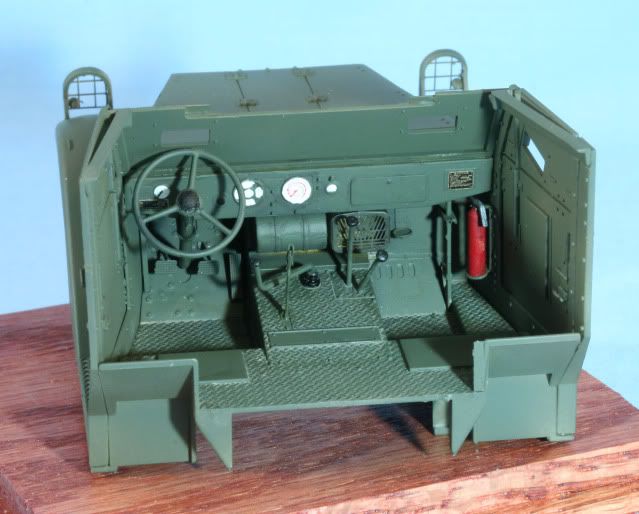
Besides what is shown, I accomplished painting many of the howitzer assemblies which will be used later. Also began work on some of the other details like the Gerry cans, tools, etc.

Next up will be to finish the seats and get the cab mounted….then work the details until it is time for the howitzer.

As always thanks for stopping by. Your comments good or bad are always appreciated.

Rounds Complete!!

"The Moral High Ground....A Great Place to Emplace Artillery."

  • Member since
    July 2006
  • From: New Jersey
Posted by redleg12 on Wednesday, November 10, 2010 9:03 AM

Kevin - LMAO......yep..the Mrs. does call me drooly somtimes Stick out tongue   Thanks for stopping by, always love your comments

Marc - Thanks....now as far as shows....MCon is a question I will be leaving for AMPS Internation the Tues the following week!!!! Sorry Crying

Rounds Complete!! 

"The Moral High Ground....A Great Place to Emplace Artillery."

  • Member since
    April 2005
  • From: Piscataway, NJ!
Posted by wing_nut on Wednesday, November 10, 2010 8:46 AM

Mike, great work.  You always manage to remind me of the next upcoming show.  I just thought to myself, " OH baby, can't wait to see that at M-Con."


Kevin, great pic.  Wait 'til he realizes he will look like that again in 80 years.  that will wipe the smile right off his face.

Marc  

  • Member since
    June 2005
  • From: Massachusetts
Posted by minimortar on Wednesday, November 10, 2010 7:21 AM

Sorry Mike... no words to describe this latest project of yours... I can only drool...

Thanks,
Kevin Keefe

Mortars in Miniature
A Scale Model (Plus!) Collection of the Infantryman's Artillery

  • Member since
    July 2006
  • From: New Jersey
Posted by redleg12 on Tuesday, November 9, 2010 11:35 PM

Bill- Thanks for stopping by. I normally stay away from the "super" kit PEs but I figured I would give it a shot Crying.....Won't do that again!!!....Lots of metal in a drawer

Thanks for stopping by. I know time is short for you these days so it is really appreciated....

Rounds Complete!!

"The Moral High Ground....A Great Place to Emplace Artillery."

  • Member since
    July 2004
  • From: Texas
Posted by wbill76 on Tuesday, November 9, 2010 2:27 PM

Nice work on the interior details and the suspension Mike. I hear you about the Griffon PE sets...sometimes they fall into the trap of "kitchen sink" sets in terms of what they create for the DML kits and the end result is that some of the sets are over-stuffed with things that don't truly need to be there per se. Wink

  • Member since
    July 2006
  • From: New Jersey
Posted by redleg12 on Monday, November 8, 2010 11:56 AM

Tony - Well....I try not to. The older kit benifit more from PE than the newer kits...IMO

Rounds Complete!!

"The Moral High Ground....A Great Place to Emplace Artillery."

  • Member since
    August 2008
  • From: S.W. Missouri
Posted by Pvt Mutt on Monday, November 8, 2010 10:41 AM

So Mike you think I should save my money when it comes to the PE?

Tony LeeSmile

Shoot Low Boys They're Ridin Ponys

  • Member since
    July 2006
  • From: New Jersey
Posted by redleg12 on Monday, November 8, 2010 5:30 AM

Ken - OK....it may not be easy but I think it is doable....I will give it a go...Thanks for the tip. The video is great, I was thinking through how to get the track on...that was great help. Thanks

Steve - Hummm, as long as we are not looking for winter nuts.....he is welcome!!

Thanks for stopping in!

Nate - Thanks for stopping by and the comments.

Rounds Complete!!

"The Moral High Ground....A Great Place to Emplace Artillery."

  • Member since
    August 2003
  • From: Connecticut, USA
Posted by Nachtflieger on Monday, November 8, 2010 3:29 AM

Making real good progress on this one Mike!

Nate


  • Member since
    July 2003
  • From: On my kitchen counter top somewhere in central North Carolina.
Posted by disastermaster on Monday, November 8, 2010 1:07 AM

'Ya got my attention up Mike.

http://img.photobucket.com/albums/v445/iftk2/07/79963644.jpg

http://i20.photobucket.com/albums/b232/gluetank/Decorated%20images/th_T1-4-copy.jpg

 https://i.imgur.com/LjRRaV1.png


  • Member since
    May 2007
  • From: Taxachusetts
Posted by camokid on Monday, November 8, 2010 12:03 AM

Very nice progress Mike, I really like the looks of things so far.  There's a lot of PE work there. Yes


Just a note for the next one you do, as it's probably tough to get in there now. It looks like you have the bogie tire rubber painted on the inside surface, the inside of those bogie wheels should be OD or even better yet, worn steel like you've painted the sprocket surface.

If you look carefully at the kit parts, Dragon do have the demarcation line where the tire and rim meet, the rim wraps up to about the tire face in order to ride on the steel track guides down the center of the track.


I'm not trying to take anything away from your work, Just some food for thought for a detail oriented guy like yourself. This is one of those small details that may never be seen depending on how much weathering you do, or it could be one of those details that jump out at you at a show when they break out those little flashlights. Wink


As for the bogie assemblies being fragile, they certainly are a bit but once you've done a few you get used to them. I even assemble them and disassemble them for painting/weathering throughout the build process.


Ken

Build how you like, like how you build


  • Member since
    July 2006
  • From: New Jersey
Posted by redleg12 on Sunday, November 7, 2010 10:19 PM

Jester - Thanks for stopping in and for the catch on the photos. In 1/35 those bogies are pretty fiddly.....I will admit the Dragon kit does a good job with them!

Rounds Complete!!

"The Moral High Ground....A Great Place to Emplace Artillery."

  • Member since
    December 2006
  • From: N. Georgia
Posted by Jester75 on Sunday, November 7, 2010 10:01 PM

Working now and wow, nice progress!! Those bogey assemblies look soo fragile on US halftracks to me.

Eric


  • Member since
    July 2006
  • From: New Jersey
Posted by redleg12 on Sunday, November 7, 2010 9:58 PM

OOPS......fixed

Rounds Complete!!

"The Moral High Ground....A Great Place to Emplace Artillery."

JOIN OUR COMMUNITY!

Our community is FREE to join. To participate you must either login or register for an account.

SEARCH FORUMS
FREE NEWSLETTER
By signing up you may also receive reader surveys and occasional special offers. We do not sell, rent or trade our email lists. View our Privacy Policy.