SEARCH FINESCALE.COM

Enter keywords or a search phrase below:

I know,I know not another TIGER !!!!

25787 views
155 replies
1 rating 2 rating 3 rating 4 rating 5 rating
  • Member since
    April 2005
  • From: Gothenburg
Posted by JohanT on Monday, December 19, 2011 1:16 PM

That is astonishing work!

So looking forward to your next update Big Smile

Very Best Regards
Johan

  • Member since
    January 2007
Posted by the doog on Monday, December 19, 2011 12:28 PM

WOW, man--it's been a long time since I've seen any panzer detailed quite to the extent that you've done on this Tiger, Greg.

It's stunning and impressive as hell!

  • Member since
    April 2009
  • From: Carmel, IN
Posted by deafpanzer on Monday, December 19, 2011 8:22 AM

Greg, looking real good! Yes  No details were lost during the primer job.  I forgot what primer do you use... from Krylon?  I used Krylon brown red primer recently on my friulmodel tracks and I was very pleased with the result. 

Andy

  • Member since
    December 2006
  • From: t.r.f. mn.
Posted by detailfreak on Sunday, December 18, 2011 10:18 PM

                            Today as I primed the panzer II upper hull I just couldnt resist shooting some on the Tiger firewall.


                             Coming along slowly but surely.As always questins and comments are welcome.


                                                               Greg"Detailfreak"RowleyYes

[View:http://s172.photobucket.com/albums/w1/g-earl828/]  http://i158.photobucket.com/albums/t104/cycledupes/1000Roadwheels4BuildBadge.jpg

  • Member since
    July 2004
  • From: Texas
Posted by wbill76 on Monday, November 28, 2011 3:44 PM

Nice work on the details Greg...may not be huge progress but it is fun seeing this one come to life a little bit at a time. Beer

  • Member since
    December 2006
  • From: t.r.f. mn.
Posted by detailfreak on Monday, November 28, 2011 10:51 AM

                                       Not a big update but an update none the less. I have added the fire bottle to the firewall as well as a couple more of the levers to operate various controls.

                                     Will be adding stencils from archer for the controls as soon as the firewall is primed and painted. As always ,thanks for looking.Any questions and comments are always welcome.


                                                    Greg"Detailfreak"RowleyYes

[View:http://s172.photobucket.com/albums/w1/g-earl828/]  http://i158.photobucket.com/albums/t104/cycledupes/1000Roadwheels4BuildBadge.jpg

  • Member since
    December 2006
  • From: t.r.f. mn.
Posted by detailfreak on Saturday, November 19, 2011 5:05 AM

                              TheWildChild,thanks for your input.At the moment having the spring on the headpad seems to be the most logical place.As you mentioned ,it is out of the way of the feed tray cover and such.


                                                   Greg"Detailfreak"RowleyYes

[View:http://s172.photobucket.com/albums/w1/g-earl828/]  http://i158.photobucket.com/albums/t104/cycledupes/1000Roadwheels4BuildBadge.jpg

  • Member since
    December 2010
  • From: T-34 Hunting
Posted by TheWildChild on Thursday, November 17, 2011 12:00 PM

i would think that the spring attatches to the head pad. attatching it to the gun would probably make loading and cocking the weapon difficult in my opinion.

1/35 XM77  "Sledgehammer", 1964 Chevy Impala Derby Car

Whats next? Aircraft for Ground Attack Group Build

"I dont just tackle to make a play, I tackle to break your will." -Ray Lewis

"In the end, we're all just chalk lines on the concrete, drawn only to be washed away"- 5 Finger Death Punch

"Ahh, my old enemy.......STAIRS"- Po, Kung Fu Panda

  • Member since
    December 2006
  • From: t.r.f. mn.
Posted by detailfreak on Monday, November 14, 2011 10:44 AM

                                        Greetings all,a bit of an update ,if you can call it that. I was very curious to see how CMK's Tiger I transmission compared to Cornerstones and Verlinden. CMK's is just about as under scale as Verlindens,or is Cornerstones over scale??Confused  Well either way I am leaning toward the original choice of using Cornerstones.

                                     Now for a bit of a technical question. The bow gunners M.G. is supported from the roof of the fighting compartment by a spring .My question is : Does the spring attach to the head pad or to the M.G. ?


                                    Hope the pics are not to difficult to see. Still learning you know.


                                   As always any comments criticism ,constructive or not are welcome.


                                                            Greg"Detailfreak"RowleyYes

[View:http://s172.photobucket.com/albums/w1/g-earl828/]  http://i158.photobucket.com/albums/t104/cycledupes/1000Roadwheels4BuildBadge.jpg

  • Member since
    July 2004
  • From: Texas
Posted by wbill76 on Monday, November 7, 2011 5:26 PM

Any progress is good progress Greg! Nice work on the details even if they do end up being hidden away somewhat by the MG ammo when its all said and done. Beer

  • Member since
    April 2009
  • From: Carmel, IN
Posted by deafpanzer on Monday, November 7, 2011 10:02 AM

Loving all of the details... hope we will be able to see all of the details when it is completed!

Andy

  • Member since
    September 2006
  • From: Dripping Springs, TX, USA
Posted by RBaer on Monday, November 7, 2011 9:21 AM

Wow, Greg. Just,...  wow.

Apprentice rivet counter.

  • Member since
    December 2010
  • From: T-34 Hunting
Posted by TheWildChild on Monday, November 7, 2011 9:09 AM

it turns out i picked one heck of a project for my first 1/35 tank in the academy tiger. i am also making a diorama for it (my first real attempt) and building/painting my first figures other than the 1/48 ones that come in the revellogram aircraft kits. although i found most of the parts for the tiger pretty good (other than the gun mantlet and symmetrical turret) the academy figures were a bit disappointing. in 1/35 scale they would all be approx 6'4'' to 6'5'' tall, but i also got a set of tamiya figures just in case and found them satisfactory. (the primary purpose of getting the figure kits was to get some more of the tiger ammo, but since i had the figures i figured i would try my hand at them as well as diorama making) i will be placing my tiger in a late winter-early spring russian front diorama with the crew re-supplying the tank. i will have to look into those PE sets and thanks for the numbers. i will post pics as soon as i can, i have to make a photobucket account and then i will post them in a thread.

also Tigers in The Mud is a great book. not to be a spoiler, but i found Otto's account of destroying a sherman through a house with his Jagdtiger quite interesting. really shows the power of that 128mm gun.

1/35 XM77  "Sledgehammer", 1964 Chevy Impala Derby Car

Whats next? Aircraft for Ground Attack Group Build

"I dont just tackle to make a play, I tackle to break your will." -Ray Lewis

"In the end, we're all just chalk lines on the concrete, drawn only to be washed away"- 5 Finger Death Punch

"Ahh, my old enemy.......STAIRS"- Po, Kung Fu Panda

  • Member since
    December 2006
  • From: t.r.f. mn.
Posted by detailfreak on Saturday, November 5, 2011 6:05 PM

                              Bodge ,WildChild, thanks to everyone for your time. I have spent the last several evenings on and off trying to get the firewall detailed to my satisfaction. Comparing photos and drawings and such trying to get a reasonable facsimile of that area of the vehicle.WildChild the majority of the P.E. is from an Eduard set that was actually made for the kit you are working on.Very nice stuff.As for the rest of the scratchwork it is sheet styrene or brass,much of it the scraps from the P.E. frets.I'll take some snaps and post them later.The firewall is coming along ,although at somewhat of a snailspace,lots of handles knobs and switches,oh and gurtsachs/mg ammo bags 150 rds each.I messed up on the ductwork for the exhaust coolingsystem,it will be mostly hidden by the fire suppression bottle and ammo sacks when finished.The Tiger gurus will no doubt catch the blunder but I guess its a lesson learned.

                                   The following two images were taken from the Tigerfibel and the Haynes Tiger repair manual and are for discussion purposes only.As you can see after adding the Gurtsackes not much is visible.


                                WildChild these are the #'s for the Eduard etch sets#35 500 which is three sheets and contains the turret basket floor and updated instructions,and the second which is bascally the same minus the turret floor is #35 134 .Please post pics of your build WildChild.


                                                           Greg"Detailfreak"RowleyYes

                            P.S. WildChild if you would like the # of the Eduard P.E. set I'll add it next posting.

[View:http://s172.photobucket.com/albums/w1/g-earl828/]  http://i158.photobucket.com/albums/t104/cycledupes/1000Roadwheels4BuildBadge.jpg

  • Member since
    December 2010
  • From: T-34 Hunting
Posted by TheWildChild on Saturday, November 5, 2011 5:16 PM

WOW! all that PE and scratchbuilding is amazing! i am building academys early tiger 1 with the interior and that tries my patience at times, cant imagine doing all the detail work you have done. looks awesome!!!

1/35 XM77  "Sledgehammer", 1964 Chevy Impala Derby Car

Whats next? Aircraft for Ground Attack Group Build

"I dont just tackle to make a play, I tackle to break your will." -Ray Lewis

"In the end, we're all just chalk lines on the concrete, drawn only to be washed away"- 5 Finger Death Punch

"Ahh, my old enemy.......STAIRS"- Po, Kung Fu Panda

  • Member since
    January 2008
  • From: Bournemouth UK
Posted by Bodge on Thursday, October 27, 2011 4:56 AM

Thats looking superb mateyYes

  • Member since
    December 2006
  • From: t.r.f. mn.
Posted by detailfreak on Wednesday, October 26, 2011 10:15 PM

                                  So I have been reading Tigers in the Mud,by Otto Carius during my breaks at work.My question is are there better photos of this tank ,I believe the turret number was/is 312,anywhere on the web or perhaps the Bundesarchive? Any help at all would be appreciated.


                                                            Greg"Detailfreak"RowleyYes

[View:http://s172.photobucket.com/albums/w1/g-earl828/]  http://i158.photobucket.com/albums/t104/cycledupes/1000Roadwheels4BuildBadge.jpg

  • Member since
    April 2005
  • From: Piscataway, NJ!
Posted by wing_nut on Monday, October 10, 2011 7:50 AM

Have not checked in on this one in a while.  That's just SICK!

Marc  

  • Member since
    April 2009
  • From: Carmel, IN
Posted by deafpanzer on Sunday, October 9, 2011 8:58 PM

Hey Greg!  Always looking real good especially the radios! Yes  I am afraid how many PE sheets you have for the Tiger... Big Smile

Andy

  • Member since
    July 2004
  • From: Texas
Posted by wbill76 on Sunday, October 9, 2011 4:26 PM

Nice to see this one's still getting some attention Greg. Amazing how time can get away from you isn't it? Big Smile

  • Member since
    December 2006
  • From: t.r.f. mn.
Posted by detailfreak on Sunday, October 9, 2011 2:20 PM

                               Wow,haven't updated this thread since aug..At the moment the only change is that I have fitted the rear plate and dry fitted the radios and transmission into place. Other than that I have all my irons in the fire and spreading the bench time pretty thin.So on to the pics.


                               Thats a close fit between the radio rack and the roof.Thanks for looking and any questions or comments are welcome.


                                                    Greg"Detailfreak"RowleyYes

[View:http://s172.photobucket.com/albums/w1/g-earl828/]  http://i158.photobucket.com/albums/t104/cycledupes/1000Roadwheels4BuildBadge.jpg

  • Member since
    December 2006
  • From: t.r.f. mn.
Posted by detailfreak on Friday, August 12, 2011 10:17 AM

                         RBaer,thanks for the tip.I shall definately check it out.I also compared the Tamiya roadwheel to the Dragon wheel and it would seem some surgey is inevitable.Thanks again.

                                                              Greg"Detailfreak"RowleyYes


'

[View:http://s172.photobucket.com/albums/w1/g-earl828/]  http://i158.photobucket.com/albums/t104/cycledupes/1000Roadwheels4BuildBadge.jpg

  • Member since
    September 2006
  • From: Dripping Springs, TX, USA
Posted by RBaer on Friday, August 12, 2011 5:35 AM

I think there's an old MMiR that showed these being used, but it was a Tamiya kit, and I seem to remember the roadwheels being a little different in the way they mounted. I think your deduction is correct, based on what the DML roadwheel looks like.

I guess that wasn't any help, was it?

Apprentice rivet counter.

  • Member since
    December 2006
  • From: t.r.f. mn.
Posted by detailfreak on Thursday, August 11, 2011 10:46 AM

                         Greetings all,not much progress on the Tiger but I do have a Question about an item I picked up.TWS Tiger roadwheel hubs for removing the outer roadwheels. Anyone ever use em before? They have no instructions.It appears I will have to remove/saw a short section of the hub extension from the roadwheel and the attach the hub and the extension to the spindle.So as I mentioned,I was just checking to see if anyone had used this item before.


                                                               Greg"Detailfreak"RowleyYes

[View:http://s172.photobucket.com/albums/w1/g-earl828/]  http://i158.photobucket.com/albums/t104/cycledupes/1000Roadwheels4BuildBadge.jpg

  • Member since
    December 2006
  • From: t.r.f. mn.
Posted by detailfreak on Monday, July 4, 2011 5:58 PM

                              Thanks Andy,and Bish as to your question,I have found the Haynes book invaluble,I do not regret that purchase one bit. Thanks for checking me out all.

                                                            Greg"Detailfreak"RowleyYes

[View:http://s172.photobucket.com/albums/w1/g-earl828/]  http://i158.photobucket.com/albums/t104/cycledupes/1000Roadwheels4BuildBadge.jpg

  • Member since
    December 2002
  • From: Bury St Edmunds, Suffolk, England
Posted by Bish on Monday, July 4, 2011 5:17 PM

Some lovely work there. definitely putting a lot into this build. Interesting comparison of the turret bins. I have a Voyager set for one of my Tigers.

I got the Tiger Haynes Manuel last week, but have only had a quick flick through. Have you found it useful for this build.

I am a Norfolk man and i glory in being so


On the bench: Airfix 1/72nd Harrier GR.3/Fujimi 1/72nd Ju 87D-3

  • Member since
    April 2009
  • From: Carmel, IN
Posted by deafpanzer on Monday, July 4, 2011 5:07 PM

The radio set looks great!  I bet they even work now... Happy July 4th buddy! Toast

Andy

  • Member since
    December 2006
  • From: t.r.f. mn.
Posted by detailfreak on Monday, July 4, 2011 4:26 PM

                             Well ladies and gentleman,its not alot of progress but I figured any progress is worth showing. Been dividing my time between the Tigers internal bits and a Bergepanzer III for the up and running Panzer III and Variants G.B.. .As always any comments are welcome.


                               Thanks for looking all.

                                                            Greg"Detailfreak"RowleyYes

[View:http://s172.photobucket.com/albums/w1/g-earl828/]  http://i158.photobucket.com/albums/t104/cycledupes/1000Roadwheels4BuildBadge.jpg

  • Member since
    July 2004
  • From: Texas
Posted by wbill76 on Saturday, June 25, 2011 4:48 PM

Nice to see you're able to get in some bench time here and there Greg! I'm in the middle of a month-long "repaint the house interior" summer exercise (forum regulars may recall that last year was teh outside along with expansion/remodeling) which has made it impossible to get to the bench for a while, so I envy you what you've been able to get squeezed in, the PE and soldering work is sharp! Stick out tongue

  • Member since
    December 2006
  • From: t.r.f. mn.
Posted by detailfreak on Saturday, June 25, 2011 3:59 PM

                       The tale of two storage bins. This is the voyager bin(in primer) as compared to the ET Model bin in raw brass.

                    The ET bin is smaller and looks like the bin on my old Tamiya Tiger. Here it hangs on the rear of the turret.

                           Also spent a bit of time on the radio racks. In the Haynes manual it appears that three individual racks are fastened together with strap material and hung from the cieling fo the vehicle.

                        Work on the Tiger has taken a backseat so to speak as work continues on my kitchen project. Thanks for all the comments and support.Wink

                                                         Greg"Detailfreak"RowleyYes


[View:http://s172.photobucket.com/albums/w1/g-earl828/]  http://i158.photobucket.com/albums/t104/cycledupes/1000Roadwheels4BuildBadge.jpg

  • Member since
    December 2006
  • From: t.r.f. mn.
Posted by detailfreak on Monday, June 13, 2011 9:33 AM

                                   Found one of those ABER stowage bins at GREATMODELS for about ten dollars on sale.I have to get one so that I can do a comparison.Geeked

                                                 Greg"Detailfreak"RowleyYes

[View:http://s172.photobucket.com/albums/w1/g-earl828/]  http://i158.photobucket.com/albums/t104/cycledupes/1000Roadwheels4BuildBadge.jpg

  • Member since
    October 2009
Posted by Kentucky Colonel on Sunday, June 12, 2011 1:06 PM

Pacific Coast Models but I've had it for a while so I don't know if they still have any in stock.

  • Member since
    April 2009
  • From: Carmel, IN
Posted by deafpanzer on Sunday, June 12, 2011 11:36 AM

Another one?  Please check with your wife first... Big Smile

Andy

  • Member since
    December 2006
  • From: t.r.f. mn.
Posted by detailfreak on Sunday, June 12, 2011 10:06 AM

                              Looks pretty good Kentucky Col. can you tell me where you scored that bin? I may need one of those also,just so I can see the differences.

                                                Greg"Detailfreak"RowleyYes

[View:http://s172.photobucket.com/albums/w1/g-earl828/]  http://i158.photobucket.com/albums/t104/cycledupes/1000Roadwheels4BuildBadge.jpg

  • Member since
    October 2009
Posted by Kentucky Colonel on Sunday, June 12, 2011 7:22 AM

I don't know if this will help but here are some pictures of my Aber turret stowage bin.

  • Member since
    December 2006
  • From: t.r.f. mn.
Posted by detailfreak on Saturday, June 11, 2011 10:05 AM

                            As I sit here looking at all the rivet detail on this stowage bin from ET Model I realize that they to have boogered it. Please note the rivet detali has been placed on the same side as the fold lines.

                                If you can see it in the pics you will also note the slight step along the edges to help locate the parts for soldering or glueing . I am no rocket scientist but if the pe is bent in a way so as to reveal the rivets then the fold line will be exposed on the outside and will require filling.Maybe it is just me!

                                 The rivet detail is a small divet or recess so I was thinking that I will fold this thing and solder it with the rivet detail to the inside and use some of those arcer rivets to replace them.Anyone built one of these,any suggestions? Thanks for looking.

                                                        Greg"Detailfreak"RowleyYes

[View:http://s172.photobucket.com/albums/w1/g-earl828/]  http://i158.photobucket.com/albums/t104/cycledupes/1000Roadwheels4BuildBadge.jpg

  • Member since
    December 2006
  • From: t.r.f. mn.
Posted by detailfreak on Thursday, June 9, 2011 5:59 PM

     Wish I had a picture of the view through the sight ,but I do not. Here is a pic of the other stowage bin I ordered.

                           It is an E-bay photo so its not that great.

                                                             Gregory"Detailfreak"RowleyYes

[View:http://s172.photobucket.com/albums/w1/g-earl828/]  http://i158.photobucket.com/albums/t104/cycledupes/1000Roadwheels4BuildBadge.jpg

  • Member since
    January 2008
  • From: Austria
Posted by Byrden on Thursday, June 9, 2011 9:42 AM

Yes, it's in the Tigerfibel, but as that's a sketch it would be nice to see the real thing.

David


  • Member since
    December 2006
  • From: t.r.f. mn.
Posted by detailfreak on Thursday, June 9, 2011 9:12 AM

                             Sorry David . After reviewing the book I can find nothing on the main gun sight. But I wonder if the Tigerfibel didn't have a drawing of the sight reticles.

                                                   Greg'Detailfreak"RowleyYes

[View:http://s172.photobucket.com/albums/w1/g-earl828/]  http://i158.photobucket.com/albums/t104/cycledupes/1000Roadwheels4BuildBadge.jpg

  • Member since
    January 2008
  • From: Austria
Posted by Byrden on Thursday, June 9, 2011 4:38 AM

Does it cover the gunsight - the TZF9b? I never got hold of one of those, but I think that Bovington have one. I'd like to see a photo looking through it, showing the aiming marks...


David


  • Member since
    December 2006
  • From: t.r.f. mn.
Posted by detailfreak on Wednesday, June 8, 2011 9:42 PM

      Bill, I would like to think that it is a book that any Tiger-holic must have. This book even covers proper clutch adjustment for cripes sake. So much info. ,I had not even realized that only six survived the scrap yard/ target range. Fascinating stuff!YesYes

                                                      Greg"Detailfreak"RowleyYes

[View:http://s172.photobucket.com/albums/w1/g-earl828/]  http://i158.photobucket.com/albums/t104/cycledupes/1000Roadwheels4BuildBadge.jpg

  • Member since
    July 2004
  • From: Texas
Posted by wbill76 on Wednesday, June 8, 2011 12:05 PM

Greg,

Unfortunately the AP #2 on the Pz III only covers the gun, command, and Beobachter variants and doesn't cover the Berge variant. The Tiger book does look tempting and can't beat that price!

  • Member since
    December 2006
  • From: t.r.f. mn.
Posted by detailfreak on Wednesday, June 8, 2011 10:25 AM

                      Andy , I believe that you would enjoy this book as much as the Achtung Panzer books. The featured vehicle in the maintenance and starting,as well as a couple of other chapters,is of course the Bovington Tiger,which is inmho, the finest surviving example.

                      Now on another subject,does that Achtung Panzer book on the Panzer III have much info. on the bergepanzer III ?

                        I'll give you the ISBN. for the Tiger manual, you may want to check on its availability right away. By  Zenith Press : ISBN.#978-0-7603-4078-3 . Gotta go ,let me know about the Panzer III book.

                                                        Greg"Detailfreak"RowleyYes

[View:http://s172.photobucket.com/albums/w1/g-earl828/]  http://i158.photobucket.com/albums/t104/cycledupes/1000Roadwheels4BuildBadge.jpg

  • Member since
    July 2003
  • From: Toronto, Ontario, Canada
Posted by zokissima on Wednesday, June 8, 2011 10:16 AM

Wow, that book is a tempting tempting purchase indeed.

  • Member since
    April 2009
  • From: Carmel, IN
Posted by deafpanzer on Wednesday, June 8, 2011 9:06 AM

It looks great!!!  Maybe this is something I can get instead of Achtung Panzer book #6 Tigers if I can not find a good deal.  I am not going to cough $60-$75 for that booik #6! 

Try not to drool all over your new book... Stick out tongue

Andy

  • Member since
    December 2006
  • From: t.r.f. mn.
Posted by detailfreak on Tuesday, June 7, 2011 11:39 PM

                       Alright this is it,the book of all Tiger books,ok maybe to some arriving this very morning before I scurried off to work.

                         I quickly skimmed the pages and I can honestly say that I for one am not dissappointed. The photos I am about to share are for discussion purposes only and no violation of copyright intended. The photos may be removed at the discretion of the moderators. That out of the way.Heres a sneak peek inside.


                           There are pics and diagrams of all types,I must go and browse some more.The info. for modelers is very good hope you like it. all for slightly more than 20.00 dollars.

                                                               Greg"Detailfreak"RowleyYes

[View:http://s172.photobucket.com/albums/w1/g-earl828/]  http://i158.photobucket.com/albums/t104/cycledupes/1000Roadwheels4BuildBadge.jpg

  • Member since
    July 2004
  • From: Texas
Posted by wbill76 on Monday, June 6, 2011 1:41 PM

I'm sure that manual will be used to wondrous effect in your hands Greg! Beer

  • Member since
    December 2006
  • From: t.r.f. mn.
Posted by detailfreak on Monday, June 6, 2011 8:30 AM

                            Recjeved an E-mail tell ing me that my Haynes Tiger repair manual will be released a month earlier than expected. A quick review when it arrives on the 9th of this month. I am very much looking forward to this book as it could be a very valuble reference.

                                                      Greg"Detailfreak"RowleyYes

[View:http://s172.photobucket.com/albums/w1/g-earl828/]  http://i158.photobucket.com/albums/t104/cycledupes/1000Roadwheels4BuildBadge.jpg

  • Member since
    December 2006
  • From: t.r.f. mn.
Posted by detailfreak on Sunday, June 5, 2011 3:34 PM

                           Not much to update,I have ordered another bin and await its arrival. Took care of a couple of chores today so I may get a bit of bench time this afternoon or evening.The bin I ordered is made by ET model and I thinking they may be new to the photo-etch game we'll see.

                                                   Greg"Detailfreak"RowleyYes

[View:http://s172.photobucket.com/albums/w1/g-earl828/]  http://i158.photobucket.com/albums/t104/cycledupes/1000Roadwheels4BuildBadge.jpg

  • Member since
    December 2006
  • From: t.r.f. mn.
Posted by detailfreak on Wednesday, June 1, 2011 9:42 AM

                                 Thanks David,I would appreciate very much some photos of the Tiger you mentioned. And thanks again for your time. Here are a couple of shots of the bin that I believe I have ,note the mounting bracet position just below the loader.


                                This bin must be somewhat of a rarity.

                               Thanks for the interest David and to everyone else who has taken the time to comment ,all are greatly appreciated.

                                                           Geg"Detailfreak"RowleyYes

[View:http://s172.photobucket.com/albums/w1/g-earl828/]  http://i158.photobucket.com/albums/t104/cycledupes/1000Roadwheels4BuildBadge.jpg

  • Member since
    January 2008
  • From: Austria
Posted by Byrden on Tuesday, May 31, 2011 1:02 PM

Didn't you say that you also bought the 'Afrika' turret bin? That's the one that Tiger 2 actually carried.

If you want to model that Tiger, I can send you several photos. It got "painted" with mud in 1943 as far as we can see.

But you will need a turret escape hatch to do it accurately.

David


  • Member since
    February 2011
  • From: San Antonio
Posted by MAJ Mike on Tuesday, May 31, 2011 12:14 PM

deafpanzer

Ditto   I always wondered if I allow my beard to grow that long I will be as good as you are.  Still loving this... storage bin may be incorrect as we just learned but what the heck... it is far better than we have seen so far.  

If nobody is making and selling the correct bins, then it is your opporunity to make the correct one and make million of dollars out of this. Big Smile

Ditto Wish I'd said that!!


 "I'd "I'd rather be historically accurate than politically correct."

"Sic gorgiamus allos subjectatos nunc!"

  • Member since
    April 2009
  • From: Carmel, IN
Posted by deafpanzer on Tuesday, May 31, 2011 12:07 PM

Ditto   I always wondered if I allow my beard to grow that long I will be as good as you are.  Still loving this... storage bin may be incorrect as we just learned but what the heck... it is far better than we have seen so far.  

If nobody is making and selling the correct bins, then it is your opporunity to make the correct one and make million of dollars out of this. Big Smile

Andy

  • Member since
    February 2011
  • From: San Antonio
Posted by MAJ Mike on Tuesday, May 31, 2011 11:55 AM

Greg:  Its a beautiful build no matter what version it may or may not be.  I really get tired of the snipers out there.  Wish i had 1/2 your skill, patience, eyesight and fine motor skills.

Thanks for sharing.


 "I'd "I'd rather be historically accurate than politically correct."

"Sic gorgiamus allos subjectatos nunc!"

  • Member since
    December 2006
  • From: t.r.f. mn.
Posted by detailfreak on Tuesday, May 31, 2011 10:18 AM

                       Well if I am way ou in left field I might just as well stay there. An imaginary Tiger in an imaginary place in WW II,with an imaginary turret # .

                      Given the info. I suppose an upgraded turret w/escape hatch is in order. Thanks for the ino. and looking David and Konigwolf13, MajMike,lotsof interior wrk to do so te external problems can wait..

                                                          Greg"Detailfreak"RowleyYes

[View:http://s172.photobucket.com/albums/w1/g-earl828/]  http://i158.photobucket.com/albums/t104/cycledupes/1000Roadwheels4BuildBadge.jpg

  • Member since
    January 2008
  • From: Austria
Posted by Byrden on Tuesday, May 31, 2011 10:06 AM

An upgraded Initial?

Hmm. There were only 9 of these Initial Tigers, and the only one that we can find in photos that lasts into 1943 and gets upgraded, is Tiger #2. 

And that is exactly the Tiger for which Voyager produced this bin.

Its upgrade consisted of a new turret with escape hatch, plus the Afrika turret bin. It didn't get side fenders or exhaust guards.

David


  • Member since
    February 2011
  • From: San Antonio
Posted by MAJ Mike on Tuesday, May 31, 2011 8:51 AM

Just amazing!!  Let's not get too wrapped up in "fly-sh*t in the pepper" issues.  Who really knows what field modifications may have been applied to individual vehicles?  Your build is truely impressive without all the pot shots.


 "I'd "I'd rather be historically accurate than politically correct."

"Sic gorgiamus allos subjectatos nunc!"

  • Member since
    December 2006
  • From: t.r.f. mn.
Posted by detailfreak on Tuesday, May 31, 2011 8:18 AM

                                 Thanks for the warning David,can you tell me if some manufacturer produces an accurate bin for the time period.Or are the kit supplied bins the most accurate. As you might recall I was leaning toward making the initial into an upgraded/updated initial or an early Tiger. As always any help or suggestions are appreciated.

                                                        Greg"Detailfreak"RowleyYes

[View:http://s172.photobucket.com/albums/w1/g-earl828/]  http://i158.photobucket.com/albums/t104/cycledupes/1000Roadwheels4BuildBadge.jpg

  • Member since
    January 2008
  • From: Austria
Posted by Byrden on Monday, May 30, 2011 11:16 PM

It's all wrong; hopelessly wrong. There was never a Tiger bin as wide as that.

Voyager based this product on diagrams in a Russian magazine, "Frontline Illustration #2". They must have performed no further research because that bin exists nowhere else.

But the artist who drew the bin, had no information except this photo:

He had no views of the top or the rear of the bin. He simply made it all up. And he got it totally wrong; the bin on this tank is actually the 'Afrikakorp' bin, it's simply moved to the side because the tank has an escape hatch.

This calls into question the trustworthiness of both companies, in my opinion. I would say, if you don't know something, leave it as an unknown. Don't package your assumptions as a product and sell them to people who want historical accuracy.

David


  • Member since
    May 2009
  • From: Hobart, Tasmania
Posted by Konigwolf13 on Monday, May 30, 2011 6:33 PM

David, what parts/areas are wrong? I have seen styles similar, that to my unpracticed eye look the same, is it modifable to make accurate?


Andrew

edit in

And not to derail the thread does the same go for the VoyagerModel Tiger I stowage bin (Afrikakorp)

  • Member since
    January 2008
  • From: Austria
Posted by Byrden on Monday, May 30, 2011 4:23 PM

That's the Voyager bin?

I don't know whether to tell you this, but it's what I do.  :/

That bin never existed. Voyager copied it from a drawing in a Russian magazine, and the drawing was just plain wrong.

David


  • Member since
    June 2007
Posted by Labour In Vain on Monday, May 30, 2011 3:31 PM

Greg,
Looking good as always :)
Personally I would never want to weld thin sheet metal to a heavy metal carrier in a any sort of added material process.
Pretty sure your are looking at resistance spot welded or riveted structures.
But sheet soldering is the way to go for scale models I think.
And your work looks great!

As always
Boarder

Avatar © David Byrden 2005 http://Tiger1.info/
  • Member since
    December 2006
  • From: t.r.f. mn.
Posted by detailfreak on Monday, May 30, 2011 11:59 AM

                           Just ben fiddling with my soldering iron again.hasps and mounting brackets and I found myself wondering if the bin is of welded construction or riveted construction. It seems I viewed a bin for a 1/16th scale tiger and it was riveted. Anybody got a close -up?  Of the real deal?

                          Seems to be a bit of a primer dilemna on the lower bin,foofoo can primer at about 12-16 inches should have been good.Must have been the humidity made the paint sagHuh? a bit of sanding should clean it up.


                           That about wraps up the progress on the Tiger for now. Appreciate you folks for stopping and taking a peek,,and take the time to remember today.And happy modeling.

                                                           Greg"Detailfreak"RowleyYes

[View:http://s172.photobucket.com/albums/w1/g-earl828/]  http://i158.photobucket.com/albums/t104/cycledupes/1000Roadwheels4BuildBadge.jpg

  • Member since
    March 2003
  • From: Western North Carolina
Posted by Tojo72 on Sunday, May 22, 2011 9:47 PM

Nice work on all that metal,i wouldn't even attempt it !!

  • Member since
    February 2011
  • From: San Antonio
Posted by MAJ Mike on Sunday, May 22, 2011 9:29 PM

deafpanzer

Buddy, this is one of the BEST TIGER WIPs out there for sure... no argument there.  I should give soldering a shot as I haven't done it before.  Maybe it is time for us to get together so you can show me the soldering stuff while I share you some figure painting tips.  Of course Beer is a must...


What he said!!!


 "I'd "I'd rather be historically accurate than politically correct."

"Sic gorgiamus allos subjectatos nunc!"

  • Member since
    April 2009
  • From: Carmel, IN
Posted by deafpanzer on Sunday, May 22, 2011 9:25 PM

Buddy, this is one of the BEST TIGER WIPs out there for sure... no argument there.  I should give soldering a shot as I haven't done it before.  Maybe it is time for us to get together so you can show me the soldering stuff while I share you some figure painting tips.  Of course Beer is a must...


Andy

  • Member since
    July 2004
  • From: Texas
Posted by wbill76 on Sunday, May 22, 2011 8:33 PM

You made short work of the bin and other details Rob, very nice! Yes

  • Member since
    October 2009
Posted by PANZERWAFFE on Sunday, May 22, 2011 5:26 PM

Ditto

Just fantastic work!  Will be looking forward to your next post.

Rob

  • Member since
    February 2011
  • From: San Antonio
Posted by MAJ Mike on Sunday, May 22, 2011 4:51 PM

Wow.  I started a Tiger I, but I've put it on hold to participate in the Made in USSR GB.  You work is amazing.  I'll certainly use this thread a build guide.  Thanks for helping the rest of us with your posts.


 "I'd "I'd rather be historically accurate than politically correct."

"Sic gorgiamus allos subjectatos nunc!"

  • Member since
    July 2003
  • From: On my kitchen counter top somewhere in central North Carolina.
Posted by disastermaster on Sunday, May 22, 2011 4:45 PM

Good Job And great results too!

                     http://i20.photobucket.com/albums/b232/gluetank/Animated/th_1-Animated-Disastermaster.gif?t=1296616998

 https://i.imgur.com/LjRRaV1.png


  • Member since
    December 2006
  • From: t.r.f. mn.
Posted by detailfreak on Sunday, May 22, 2011 4:31 PM

                         A few hours of soldering time yielded much progress.


One more set of lid hinges,pair of hasps,and mounting straps.Thanks for looking.

                                                  Greg"Detailfreak"RowleyYes

[View:http://s172.photobucket.com/albums/w1/g-earl828/]  http://i158.photobucket.com/albums/t104/cycledupes/1000Roadwheels4BuildBadge.jpg

  • Member since
    December 2006
  • From: t.r.f. mn.
Posted by detailfreak on Friday, May 20, 2011 10:58 AM

                             Morning ladies and gentlemen ,it appears that I will have to warm up the soldering iron as my stowage bin has arrived.

                                                        Greg"Detailfreak"RowleyYes

[View:http://s172.photobucket.com/albums/w1/g-earl828/]  http://i158.photobucket.com/albums/t104/cycledupes/1000Roadwheels4BuildBadge.jpg

  • Member since
    December 2006
  • From: t.r.f. mn.
Posted by detailfreak on Tuesday, May 10, 2011 9:25 PM

                          Thanks for all the kind words gentlemen,please excuse the missed letters an spaces and such as my remote/wireless keyboard is not my best friend as of late.Theres a tonof stuff left,and to be honest,not enough reference material to go on.But the TIger grows fatter,wieght wise,and I gain a bit more knowledgable of the Tigers inner workings. So with that stay tuned for the next installment.

                                                              Greg"Detailfreak"RowleyYes

[View:http://s172.photobucket.com/albums/w1/g-earl828/]  http://i158.photobucket.com/albums/t104/cycledupes/1000Roadwheels4BuildBadge.jpg

  • Member since
    February 2011
  • From: San Antonio
Posted by MAJ Mike on Tuesday, May 10, 2011 8:34 PM

It just gets better and better. Yes


 "I'd "I'd rather be historically accurate than politically correct."

"Sic gorgiamus allos subjectatos nunc!"

  • Member since
    July 2004
  • From: Texas
Posted by wbill76 on Tuesday, May 10, 2011 1:04 PM

Any progress is good progress Greg, nice to see this one continuing to move forward. Beer Nice work on the screens, the distressed look on the one side adds a nice little personal touch IMHO.

  • Member since
    December 2006
  • From: t.r.f. mn.
Posted by detailfreak on Tuesday, May 10, 2011 9:34 AM

                               Thanks Andy,those creens are scratch built using a very unique material. Ever bought a cheapo box of chocolates? Well the screens are made of the fancy gold ribbon that goes around the box. Cut to size and with the addition of some styrene strip round the border,voila grenade screens.

                             SuppressionFire,I believe you are reffering to the Panther when you speak of removin the roof over the driver and radio operators position.There was no need to remove the turret on the Panther. Also the credit for the radios belongs to another,also they are from a 1/16th king Tiger and are for discussion purposes only. I was only referring to them as to the simlarities to the Tiger I. Are those racks similar or the same as? Thanks for stopping by.

                                                                 Greg"Detailfreak"RowleyYes

[View:http://s172.photobucket.com/albums/w1/g-earl828/]  http://i158.photobucket.com/albums/t104/cycledupes/1000Roadwheels4BuildBadge.jpg

  • Member since
    September 2007
  • From: Truro Nova Scotia, Canada
Posted by SuppressionFire on Tuesday, May 10, 2011 7:23 AM

Wow...

Best looking radio sets I have seen in 1/35 scale!

This interior deserves a full view, changing the transmission requires turret removal along with the roof plate over the driver's & radio operators seats. Better scenario than a roof off display to show interior design.

http://i6.photobucket.com/albums/y211/razordws/GB%20Badges/WMIIIGBsmall.jpg


  • Member since
    April 2009
  • From: Carmel, IN
Posted by deafpanzer on Tuesday, May 10, 2011 7:13 AM

Great work on the screens... I agree nobody loves handgrenades! Stick out tongue I have to say many thanks for saving me more than $50 maybe $100 because I don't have to buy reference books on Tiger tanks.  Who needs one now after reading this...


Andy

  • Member since
    December 2006
  • From: t.r.f. mn.
Posted by detailfreak on Monday, May 9, 2011 11:23 AM

                                  An update,although not much every bit gets me one step closer to the finish line. Work was focused on the engine cooling screens,gotta keep those pesky hand grenades out ya know. And the drivers and radio operators hatch hinges recieved so work. Thanks for looking guys and gals.


                       As always yor opinions and comments are always welcome.

                                                          Greg"Detailfreak"RowleyYes

[View:http://s172.photobucket.com/albums/w1/g-earl828/]  http://i158.photobucket.com/albums/t104/cycledupes/1000Roadwheels4BuildBadge.jpg

  • Member since
    May 2009
  • From: Hobart, Tasmania
Posted by Konigwolf13 on Monday, April 25, 2011 5:35 AM

Looking great mate. Now I'm getting on top of things again I'll have an update on mine in the next day or so, so where near as far along as yours, keep it up.

Andrew

  • Member since
    April 2009
  • From: Carmel, IN
Posted by deafpanzer on Monday, April 25, 2011 12:27 AM

I am loving this! Yes  You are saving us alot of $$$.  How come???  We don't have to go out and buy reference books on Tiger tanks because this is OUR reference.   Thank you my friend.  Looking forward to your next update. Beer

Andy

  • Member since
    May 2005
  • From: Dublin Rep Of Ireland
Posted by terry35 on Sunday, April 24, 2011 6:02 PM

I'm thoroughly impressed, great work and attention to detail.

Terry.

  • Member since
    October 2009
Posted by PANZERWAFFE on Sunday, April 24, 2011 4:50 PM

Amazing work!! Really looks good, cant wait too see more.

Rob

  • Member since
    December 2006
  • From: t.r.f. mn.
Posted by detailfreak on Sunday, April 24, 2011 1:22 PM

                           MajMike ,help yourself to any of the pics.,you are more han welcome.

                                                         Greg"Detailfreak"RowleyYes

[View:http://s172.photobucket.com/albums/w1/g-earl828/]  http://i158.photobucket.com/albums/t104/cycledupes/1000Roadwheels4BuildBadge.jpg

  • Member since
    February 2011
  • From: San Antonio
Posted by MAJ Mike on Sunday, April 24, 2011 12:05 PM

(sigh!)  Another reason why I hesitate to post photos of my poor efforts.

With your permission, I'd like to use the photos of your Tiger's exterior as a reference when I build mine.  I admire the internal detailing, but I lack the fine motor skills to attempt to follow your lead.

I envy your skill. ToastWow


 "I'd "I'd rather be historically accurate than politically correct."

"Sic gorgiamus allos subjectatos nunc!"

  • Member since
    June 2007
Posted by Labour In Vain on Sunday, April 24, 2011 11:48 AM

That is some excellent detail you have for reference there Greg.
Yepp, sure as () I would like to get hold of the Fibel.
Had some old copies on an external HD that stopped smoking and I have not been able to retrieve these yet.

Is this the picture you mentioned?


This is s.H.Pz.Abt.503 turret #322.
If not maybe you have a reference to the GD one?


The picture and 20 more on the suvject are available on Bundesarchiv / wikimedia under this link;


http://commons.wikimedia.org/wiki/Category:Photographs_by_Kipper,_PK

_http://commons.wikimedia.org/wiki/File:Bundesarchiv_Bild_101I-022-2922-24,_Russland,_Reparatur_Panzer_VI_%22Tiger_I%22.jpg_

As always
Boarder 


Avatar © David Byrden 2005 http://Tiger1.info/
  • Member since
    April 2009
  • From: Carmel, IN
Posted by deafpanzer on Tuesday, April 12, 2011 2:18 PM

Greg, I really love what you have done with the nuts? Indifferent  I am afraid I may have said it the wrong way.  Outstanding work with the nuts on your Tiger! LOL 

Andy

  • Member since
    December 2006
  • From: t.r.f. mn.
Posted by detailfreak on Tuesday, April 12, 2011 10:45 AM

                           Well I finally finished fabricating both of the inner panels for the engine compartment.

                          Also re-worked the intermediate hull brace and tacked it into place,the bolts are stolen from a spare armor plate from a stug . Maybe a tad large,but then again how noticable will they be with the ammo bins in place.


                          Although it seems like very little progress this is a few hours work.Any comments and such are more than welcome as always. Thanks for stopping by.

                                                          Greg"Detailfreak"RowleyYes

[View:http://s172.photobucket.com/albums/w1/g-earl828/]  http://i158.photobucket.com/albums/t104/cycledupes/1000Roadwheels4BuildBadge.jpg

  • Member since
    December 2006
  • From: t.r.f. mn.
Posted by detailfreak on Thursday, April 7, 2011 9:15 AM

                               Thanks so much for the positive responses and I must say everyones words are encouraging.

                                Wingnut, thanks for the schaaaa-wing, the intended final outcome is to have the turret lifted off,or preferably in the process of being lifted of to a point of revealing the interior of the Tiger.Cool

                              Labour-in-vain, this little book may be of interest to you ,and really anyone who dabbles in fine detailingon the darkside,it's as old as the Tiger itself.


                             I purchased two of these for a small sum from an e-bayer with intentions of turning one copy around,but alas I was the only one interested in it.lol Or perhaps the fact that it's in German scared everyone away. Beautifully done reproduction by the way.

                            This next group of photo's are strictly for reference,I believe these are from a 1/16th king tiger,but may very well share some of the same configuration as the Tiger 1. I would like to thank the gentleman who built this radio rack as it could very well be one of the finest I have yet to see.


[View:http://s172.photobucket.com/albums/w1/g-earl828/]  http://i158.photobucket.com/albums/t104/cycledupes/1000Roadwheels4BuildBadge.jpg

  • Member since
    April 2005
  • From: Piscataway, NJ!
Posted by wing_nut on Thursday, April 7, 2011 7:41 AM

I think I will bring a copy of this thread to my club meeting.  That way if anyone starts to too much of an ego rush, me included, just pull this out.  That'll knock 'em down a peg or tow.Wink


Dude, I impart on you the the double schwing...Schwing, SCHA-WING.


Did I miss the part whee you said how all this marvelous detail will be seen.  Just open hatches or cutaway?  Or a dio with the turret on a craneStick out tongue

Marc  

  • Member since
    March 2006
  • From: Right Side of a Left State
Posted by Shellback on Thursday, April 7, 2011 3:06 AM

Beautiful !

  • Member since
    February 2010
  • From: Maine
Posted by Stage_Left on Wednesday, April 6, 2011 12:59 PM

Simply outstanding work, DF. I'm really enjoying this WIP......

  • Member since
    January 2007
Posted by the doog on Wednesday, April 6, 2011 11:33 AM

WOW, Greg--the detail in this is just SICK! You're doing a great reference thread for building the ultimate Tiger!

Superb!!

  • Member since
    December 2006
  • From: t.r.f. mn.
Posted by detailfreak on Wednesday, April 6, 2011 11:00 AM

                              Zokissma,I will have to say that my resources are limited to a couple of builds on other websites,pics readily available on the www, and believe it or not Academies instruction booklet.lol.David Byrden,Alan Hamby and the restoration of the Bovington Tiger all offer great material.

                             Have done some rework on those intermediate hull braces,and set the hull top in place to check clearances of the engine and such. So far so good,but still a loooong way to go.


                               All comments and critiques are always welcome,oh and the gap at the base of the fighting compartment roof support will be closed eventually.Thanks again for looking.

                                                              Greg"Detailfreak"RowleyYes

[View:http://s172.photobucket.com/albums/w1/g-earl828/]  http://i158.photobucket.com/albums/t104/cycledupes/1000Roadwheels4BuildBadge.jpg

  • Member since
    July 2003
  • From: Toronto, Ontario, Canada
Posted by zokissima on Friday, April 1, 2011 9:33 PM

detailfreak

                                  Thank you for the comment Zokissma ,at this time I will have to say that the fries 16 ton crane is on hold until I can find an alternative to the lifting apparatus, DES ,a french company I believe is the only manufacturer of 1/35 scale version of this crane.And the last one I saw sold on e-bay for a sum of 169.00 and change,WOW,so you see the dilemna.Does anyone sell or have line drawings of this that can be used as blueprints? Or I guess there is alway the old oak tree out back and a come-along,hehehe,old backyard mechanics never die they justget a bigger hoist.

                                  Again I wish to thank all for the comments tips and what not,and good evening to all.Beer

                                                   Greg"Detailfreak"RowleyYes

Yep, my sentiments exact; the DES kit is the only game in town, but from what I hear, it is a disastrous kit, and difficult to build. Personally, I'm in the same boat as you, I'd love to get enough detailed drawings and pics to be able to just scratch one, since the overall shape is not complicated.

If I may ask you, what are you using as your primary references thus far?

I have the Tigers in Combat I book, but to be perfectly honest, as a modeling reference for the physical vehicle, there is a lot to be desired.

  • Member since
    June 2007
Posted by Labour In Vain on Friday, April 1, 2011 12:39 PM

Greg,

I would say that following your post is one reason to come back to this forum regularly :)
Looking very good, I am just curios why you leave a gap to the lower side plate? 

And I am still interested in any reference you would have to that radio mount in the front Propeller 

Thank you again for sharing!

As always
Boarder 

Avatar © David Byrden 2005 http://Tiger1.info/
  • Member since
    December 2006
  • From: t.r.f. mn.
Posted by detailfreak on Friday, April 1, 2011 11:25 AM

                                 Well I've been at it again,more scratch building. This time it is the intermediate hull braces that divide the sponson ammo lockers. This item I added after viewing an item on e-bay which I'm sure some have seen. A bare production tiger hull. Dave Byrdens site does not show these intermediate hull braces,and I could not find any sponson ammo lockers so the actual permanent install will wait. I really will have to record my time spent on one of these builds,whew,hours upon hours already. But on to the pics,oh and I could not resist a pic of the track. Thank you all for the comments tips and such and hope for a good update this wknd.Wink


                                                      Greg"Detailfreak"RowleyYes

[View:http://s172.photobucket.com/albums/w1/g-earl828/]  http://i158.photobucket.com/albums/t104/cycledupes/1000Roadwheels4BuildBadge.jpg

  • Member since
    March 2006
  • From: Right Side of a Left State
Posted by Shellback on Thursday, March 31, 2011 12:13 PM

Beautiful build your doing . Looking at another well done Tiger is like looking at another beautiful woman ..................well , sorta .Stick out tongue

  • Member since
    January 2008
  • From: Bournemouth UK
Posted by Bodge on Thursday, March 31, 2011 11:26 AM

Really nice stuff going on here.Never have tooo much tiger stuff. Lovely deYestailing.

  • Member since
    December 2006
  • From: t.r.f. mn.
Posted by detailfreak on Wednesday, March 30, 2011 10:23 PM

                                  Thank you for the comment Zokissma ,at this time I will have to say that the fries 16 ton crane is on hold until I can find an alternative to the lifting apparatus, DES ,a french company I believe is the only manufacturer of 1/35 scale version of this crane.And the last one I saw sold on e-bay for a sum of 169.00 and change,WOW,so you see the dilemna.Does anyone sell or have line drawings of this that can be used as blueprints? Or I guess there is alway the old oak tree out back and a come-along,hehehe,old backyard mechanics never die they justget a bigger hoist.

                                  Again I wish to thank all for the comments tips and what not,and good evening to all.Beer

                                                   Greg"Detailfreak"RowleyYes

[View:http://s172.photobucket.com/albums/w1/g-earl828/]  http://i158.photobucket.com/albums/t104/cycledupes/1000Roadwheels4BuildBadge.jpg

  • Member since
    July 2003
  • From: Toronto, Ontario, Canada
Posted by zokissima on Tuesday, March 29, 2011 4:34 PM

What a joy to watch this build. I've had the Academy Mid I with interior, and over the years have been gathering a mountain of AM for it; damn but does this thread make it tempting to start.

Since you mentioned a dio, are you planing on the Fries crane that was used to lift the turret off?

  • Member since
    December 2006
  • From: t.r.f. mn.
Posted by detailfreak on Sunday, March 27, 2011 2:58 PM

                                 wbill ,it would seem that the barley in the barley pop stimulates my whisker growthWink. At least thats what I tell some folks,LOL Thanks for the comments wbill,oh and Deafpanzer ,Doog,Tigerman and anyone else who has taken time to stop and see whats going on.

                                                                  Greg"Detailfreak"RowleyYes

[View:http://s172.photobucket.com/albums/w1/g-earl828/]  http://i158.photobucket.com/albums/t104/cycledupes/1000Roadwheels4BuildBadge.jpg

  • Member since
    July 2004
  • From: Texas
Posted by wbill76 on Sunday, March 27, 2011 10:32 AM

So Gregg, have to ask...what were the results of your whisker-extension observations? Big Smile

Nice work as usual on the details, by the time you're done it will look like it could start up at any moment and drive off your workbench!

  • Member since
    April 2009
  • From: Carmel, IN
Posted by deafpanzer on Saturday, March 26, 2011 11:45 PM

Ditto  Agree with Tigerman... my brain would explode with so many details going on.  Only detailfreaks can handle... not me! Whistling  Looking great buddy! Yes

Andy

  • Member since
    March 2003
  • From: Rain USA, Vancouver WA
Posted by tigerman on Saturday, March 26, 2011 11:18 PM

Stupendous work. if i did all the detailing that you do, I'd never finish a kit!

   http://i7.photobucket.com/albums/y269/wing_nut_5o/PANZERJAGERGB.jpg

 Eric 

  • Member since
    January 2007
Posted by the doog on Saturday, March 26, 2011 6:41 PM

Marc,

You're doing some stupendous work here. The only thing I would dare add is to add is that I'm surprised that you put the jerry cans in there and painted them primer red--I would have just painted and finished them separately and then glued them in. A little forethought and voila'-- a little less work, IMHO.

Not a critique though--just an idea to consider when planning the next complex construction phase wherever that may be!

  • Member since
    April 2005
  • From: Piscataway, NJ!
Posted by wing_nut on Saturday, March 26, 2011 3:32 PM

Bow Down  Beautiful work.

Marc  

  • Member since
    December 2006
  • From: t.r.f. mn.
Posted by detailfreak on Friday, March 25, 2011 11:00 PM

                                   Well after all the work on the turret floor I decided to mosey on back to the engine compartment for a bit of work. The idler wheel axle inner mount is'nt much ,and will not be very visible.Just depends on where this maintenance depot thing goes. The inner wall of the engine compartment was added also.There are many details that could be added but then the available reference materials are rather weak in some aspects.But I will keep searching for more references.Pirate Anyone who has a good shot of the engine compartment overhead view anything,please share.


                                       Well it's Fri.,the wife and I are on the couch sipping Busch Ice and watchin my whiskers grow so see yous later.

                                                                 Greg"Detailfreak"RowleyYes

[View:http://s172.photobucket.com/albums/w1/g-earl828/]  http://i158.photobucket.com/albums/t104/cycledupes/1000Roadwheels4BuildBadge.jpg

  • Member since
    December 2006
  • From: t.r.f. mn.
Posted by detailfreak on Monday, March 21, 2011 11:50 AM

                              Thanks Heer Manstien. Well a spark of ambition before work got me to clean up the turret floor and the exhaust shields and primer the.And this is what I have.


                                                        Greg"Detailfreak"RowleyYes

[View:http://s172.photobucket.com/albums/w1/g-earl828/]  http://i158.photobucket.com/albums/t104/cycledupes/1000Roadwheels4BuildBadge.jpg

  • Member since
    November 2005
Posted by Anonymous on Monday, March 21, 2011 8:39 AM

I like what I'm seeing in here, for the most part. Yes Everything but the pic of you in optivisors...

  • Member since
    December 2006
  • From: t.r.f. mn.
Posted by detailfreak on Monday, March 21, 2011 8:37 AM

                              A quick little transmission comparision and its plain to see how badly the verlinden piece was done. I would like to think it was made that way because design people only had photos to use for reference.

                              On a brighter note I will say that the soldering is complete on the turret floor,and I am very happy with the results. A few small styrene bits to finish it out and it will be married up to the rest of the turret,hopefully by the weekend.


                               Thanks again for looking and comments all are welcome.

                                            Greg"Detailfreak"RowleyYes

[View:http://s172.photobucket.com/albums/w1/g-earl828/]  http://i158.photobucket.com/albums/t104/cycledupes/1000Roadwheels4BuildBadge.jpg

  • Member since
    December 2006
  • From: t.r.f. mn.
Posted by detailfreak on Sunday, March 20, 2011 1:10 PM

                             The Academy part is a gem compared the Verlinden Labour In Vain. The way I figured it was that if I model the turret being hoisted away in a workshop the bottem of the turret basket would be visible,as well as many other items.

                              Thanks for stopping by friend and sharing the pic and comments.

                                                             Greg"Detailfreak"RowleyYes

[View:http://s172.photobucket.com/albums/w1/g-earl828/]  http://i158.photobucket.com/albums/t104/cycledupes/1000Roadwheels4BuildBadge.jpg

  • Member since
    June 2007
Posted by Labour In Vain on Sunday, March 20, 2011 1:03 PM

detailfreak

                                    Ok,thursday the postman dropped off a little something from Andy"Deafpanzer" that truly made my day,An Eduard photo-etch set for the Academy Tiger1 interior which includedmany great items,many thanks again for taking time during your visit to the model show to scrounge this baby up!!

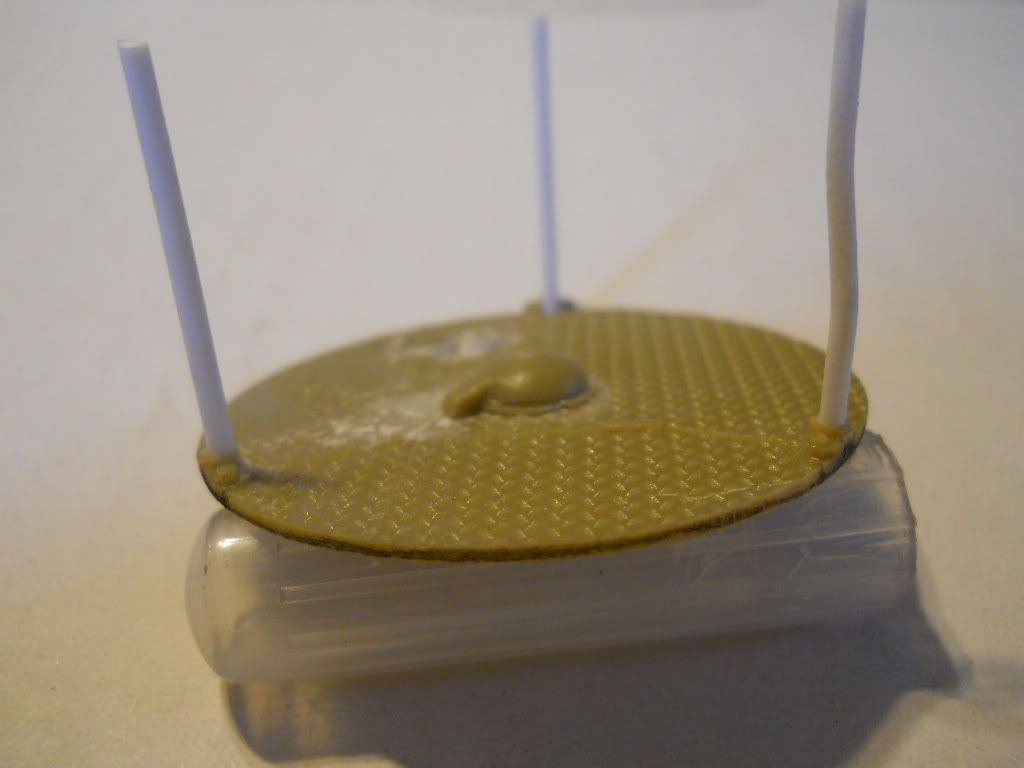
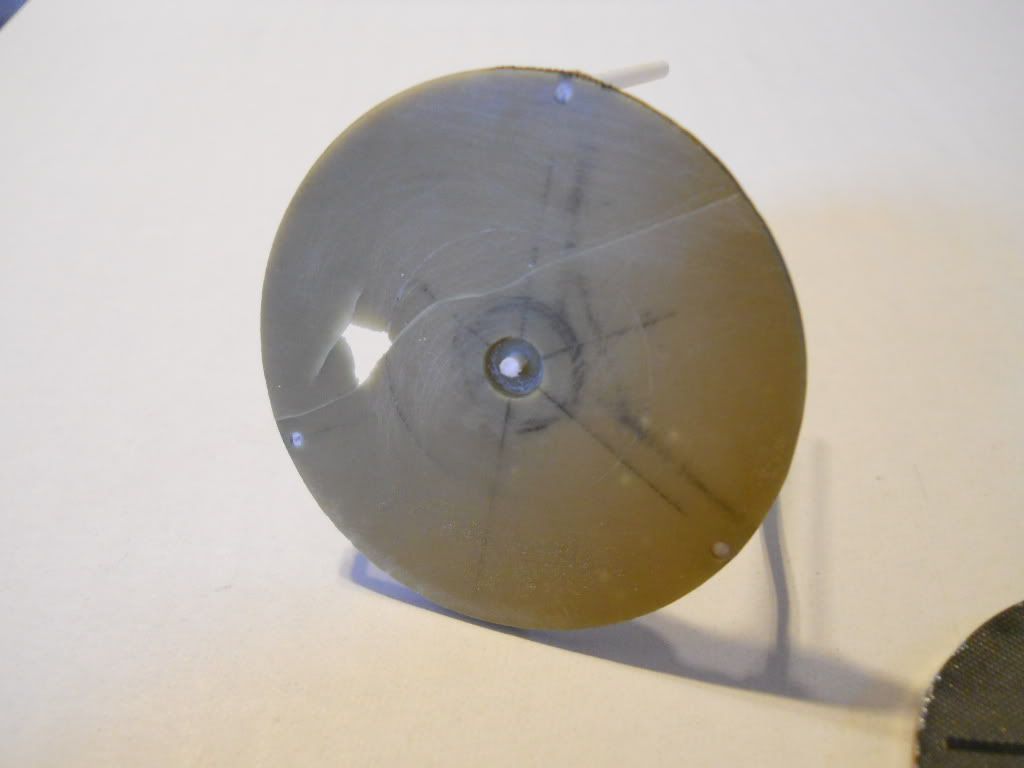
                                   As work progresses on the tiger I was very disappointed with the quality of the resin Verlinden turret basket floor. It was thick and of course has the wrong tread pattern.
http://i172.photobucket.com/albums/w1/g-earl828/TIGERIWIP074.jpg
http://i172.photobucket.com/albums/w1/g-earl828/TIGERIWIP073.jpg
http://i172.photobucket.com/albums/w1/g-earl828/TIGERIWIP072.jpg

                                  The lovely photo-etch set I had recieved has a turret floor in it and the instuctions show the detail being sanded from the Academy piece and then the etched piece being fitted on,well I do not have the Academy kit so I did the next best thing.

http://i172.photobucket.com/albums/w1/g-earl828/TIGERIWIP076.jpg
http://i172.photobucket.com/albums/w1/g-earl828/TIGERIWIP075.jpg


http://i172.photobucket.com/albums/w1/g-earl828/TIGERIWIP071.jpg
http://i172.photobucket.com/albums/w1/g-earl828/TIGERIWIP070.jpg
http://i172.photobucket.com/albums/w1/g-earl828/TIGERIWIP077.jpg

                            Using images available I copied the turret floor as best as I could,its not done yet. The frame is made up of scraps of photo-etch frets,I knew there was a reason for keeping all of that stuff, and all of this was soldered together.I hope you likeWink Once again I appreciate any and all comments,and happy modeling.

                                                            Greg"Detailfreak"RowleyYes


Greg,
I like a lot Stick out tongue
Here is the Academy part for comparsion, if you thought that the tread pattern was a big problem in the VL offering...


I noticed on page 2 that you have a frame in place for the radio, would you have any photo reference that you could share for that? It is such a prominent feature if you want to leave that hatch open.

Great stuff - please keep them coming Smile 

As always
Boarder

Avatar © David Byrden 2005 http://Tiger1.info/
  • Member since
    December 2006
  • From: t.r.f. mn.
Posted by detailfreak on Sunday, March 20, 2011 12:29 PM

                           Early verlinden stuff I probably would not mess with,poor as far as accuracy ,and as you said somewhat fragile..I am not sure wether the photo-etch is red brass or soft copper,to me it seems to be soft copper

                           The Eduard Tiger 1 set is a breeze to solder and I have nearly completed the soldering.Must get myself a new soldering iron with interchangeable tips Right now the iron I have was from an old woodburning set.LOL It  does the job but is not good for the tiny stuff.  Also have nearly completed the exhaust shields,as you may have guessed ,more brass. All good practice to prepare myself to finish the brass ammo lockers for my Brummbar

                           My only regret is that there is no radio rack in the Eduard sets I have. I'll have to check the Jaguar set for my Jagdpanther to see what it has for a rack,they may be somewhat similar.

                            This weekend has been pretty good for bench time as it's rather drizzly ,rainy cool and crappy outside I will post some more progress pics soon. Thanks for looking in

[View:http://s172.photobucket.com/albums/w1/g-earl828/]  http://i158.photobucket.com/albums/t104/cycledupes/1000Roadwheels4BuildBadge.jpg

  • Member since
    April 2009
  • From: Carmel, IN
Posted by deafpanzer on Saturday, March 19, 2011 11:18 PM

Anytime for you my friend. Beer Looks like you couldn't wait that long.  Tell me about Verlinden upgrade set!  I have been using one for my Chaffee... its a hit and miss.  Brass PE was pretty good but resin parts... not too good.

Get to work! Stick out tongue

Andy

  • Member since
    July 2004
  • From: Texas
Posted by wbill76 on Saturday, March 19, 2011 8:50 PM

Nice job of "gizmology" Greg, looks pretty good to me! Beer

  • Member since
    December 2006
  • From: t.r.f. mn.
Posted by detailfreak on Saturday, March 19, 2011 6:06 PM

                                    Ok,thursday the postman dropped off a little something from Andy"Deafpanzer" that truly made my day,An Eduard photo-etch set for the Academy Tiger1 interior which includedmany great items,many thanks again for taking time during your visit to the model show to scrounge this baby up!!

                                   As work progresses on the tiger I was very disappointed with the quality of the resin Verlinden turret basket floor. It was thick and of course has the wrong tread pattern.


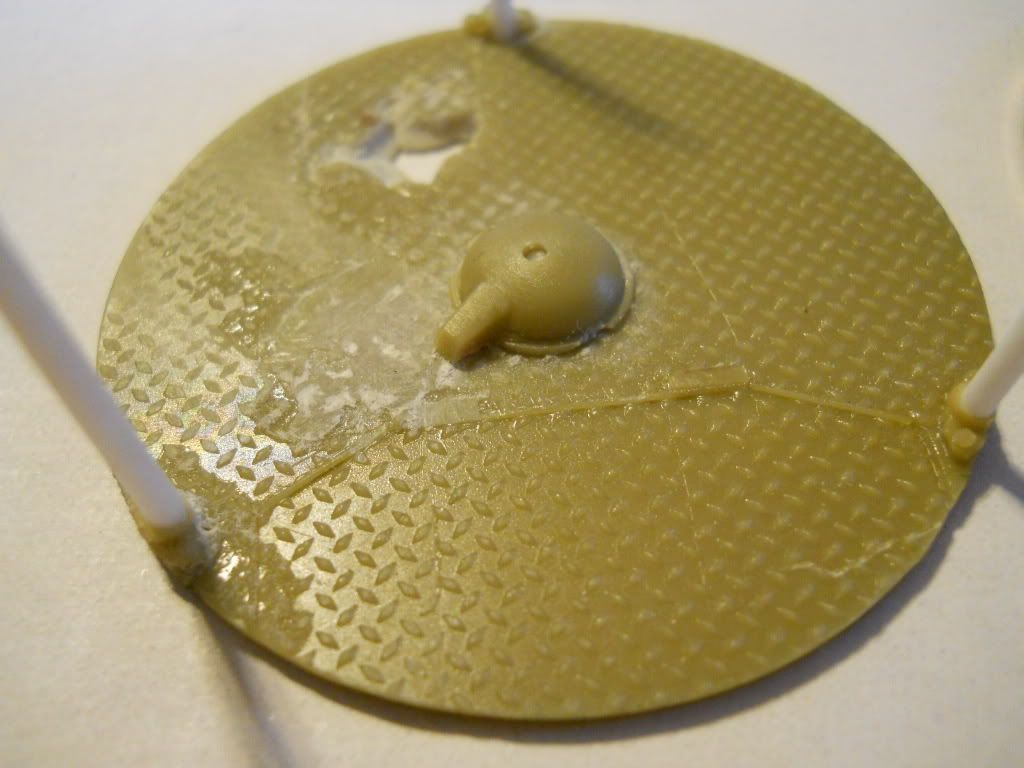
                                  The lovely photo-etch set I had recieved has a turret floor in it and the instuctions show the detail being sanded from the Academy piece and then the etched piece being fitted on,well I do not have the Academy kit so I did the next best thing.
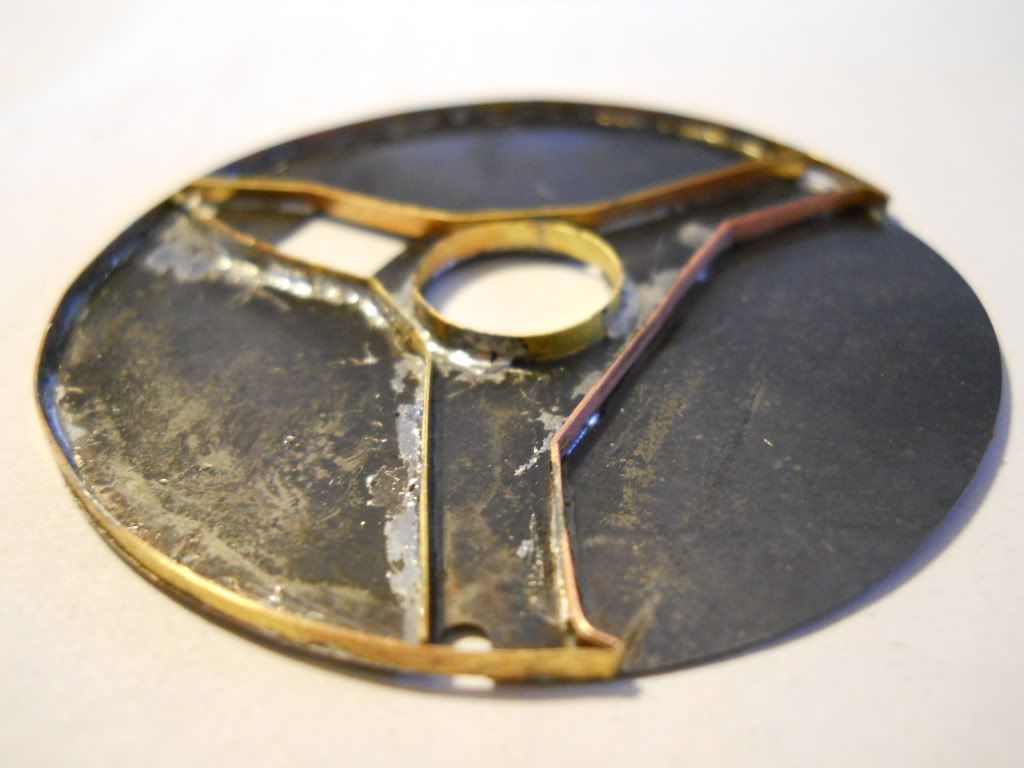
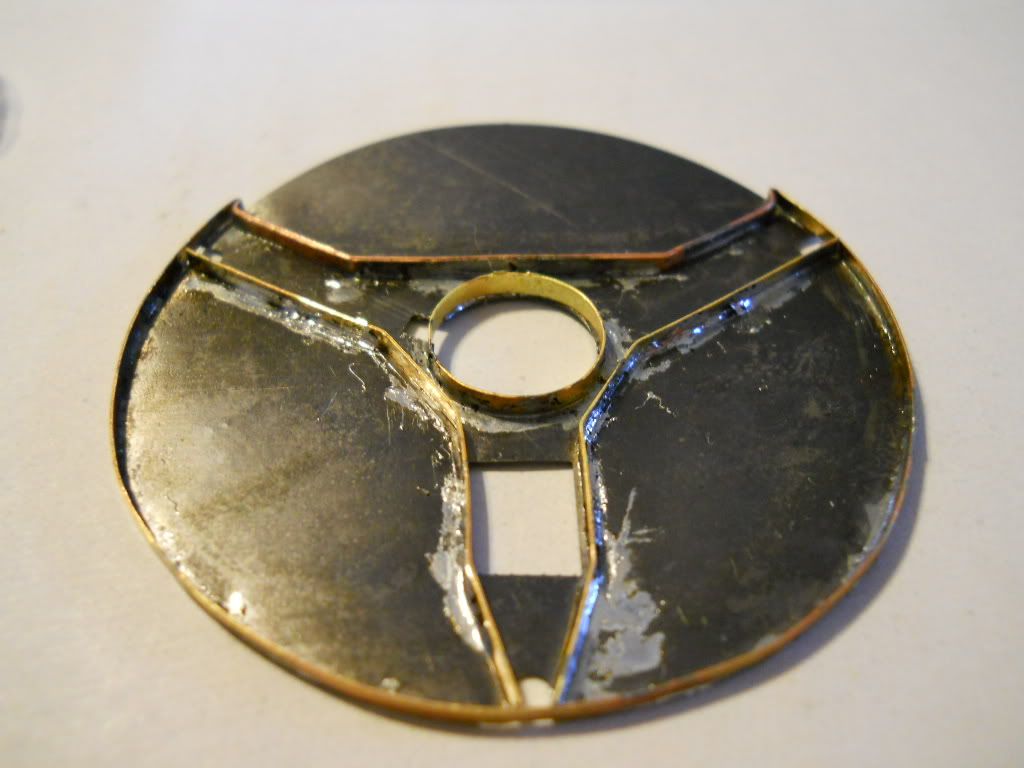
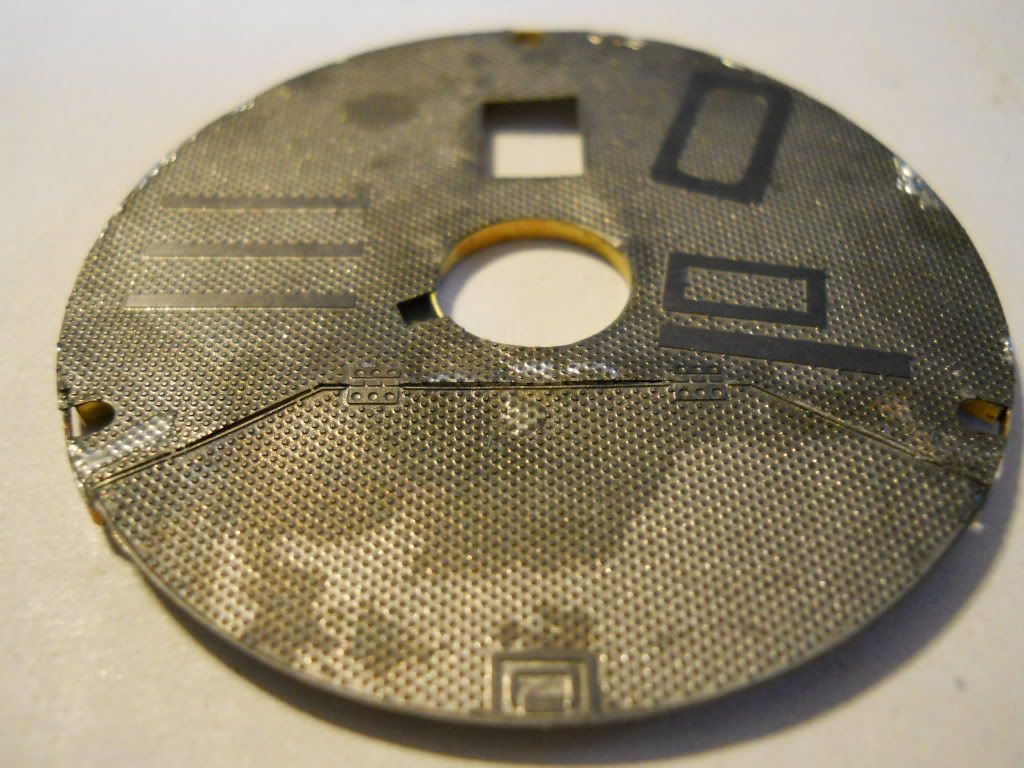
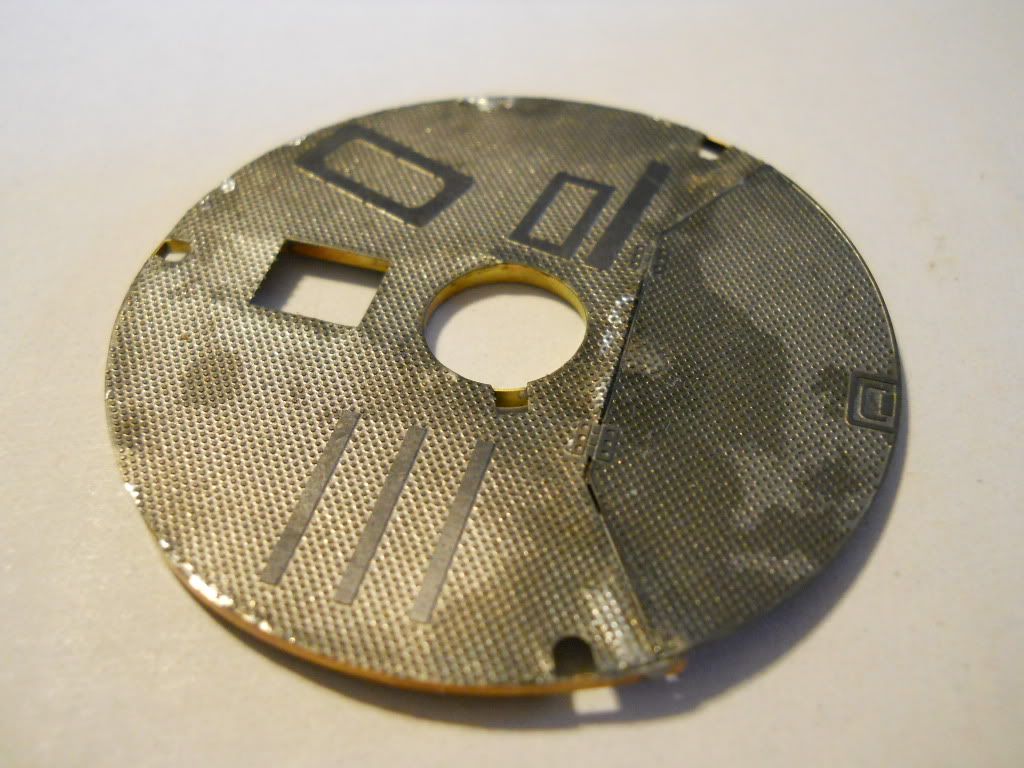
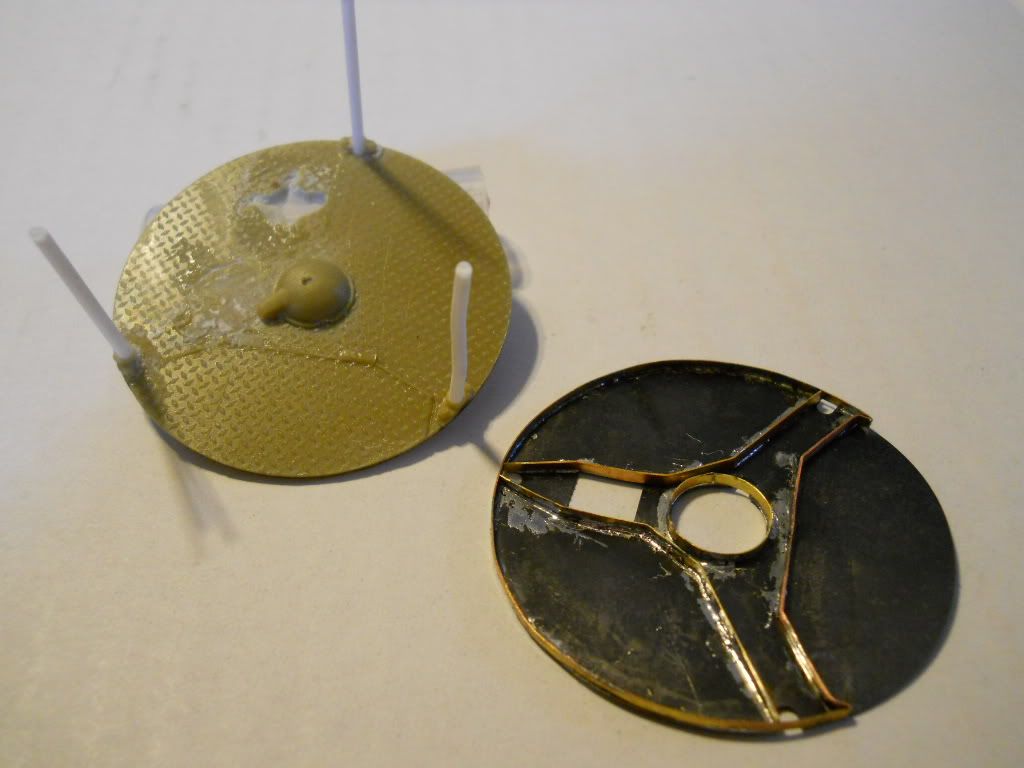


                            Using images available I copied the turret floor as best as I could,its not done yet. The frame is made up of scraps of photo-etch frets,I knew there was a reason for keeping all of that stuff, and all of this was soldered together.I hope you likeWink Once again I appreciate any and all comments,and happy modeling.

                                                            Greg"Detailfreak"RowleyYes

[View:http://s172.photobucket.com/albums/w1/g-earl828/]  http://i158.photobucket.com/albums/t104/cycledupes/1000Roadwheels4BuildBadge.jpg

  • Member since
    June 2007
Posted by Labour In Vain on Thursday, March 17, 2011 3:40 PM

Your build looks great but I am puzzled by the colours.
No need to explain though, I am pretty sure I will figure out Stick out tongue

Looking forward to the next stage...securily tagged threadCool

As always
Boarder

Avatar © David Byrden 2005 http://Tiger1.info/
  • Member since
    December 2006
  • From: t.r.f. mn.
Posted by detailfreak on Wednesday, March 16, 2011 11:48 AM

                         Just been doing some fitting,updating the turret chin welds,engine fitting and such. Does anybody have an overhead pic of the engine compartment that shows the upper radiator hose and fan drive layout any help would be much appreciated. Thanks in advance.


                                                          Greg"Detailfreak"RowleyYes

[View:http://s172.photobucket.com/albums/w1/g-earl828/]  http://i158.photobucket.com/albums/t104/cycledupes/1000Roadwheels4BuildBadge.jpg

  • Member since
    December 2006
  • From: t.r.f. mn.
Posted by detailfreak on Sunday, March 6, 2011 9:26 PM

         Question for ant Tiger fans out there,were the engine deck screens welded on? I just cant seem to find a picture that shows this clearly.Or maybe my poor opti-visor eyes just are'nt picking this detail up!!

                                                       Greg"Detailfreak"RowleyYes

[View:http://s172.photobucket.com/albums/w1/g-earl828/]  http://i158.photobucket.com/albums/t104/cycledupes/1000Roadwheels4BuildBadge.jpg

  • Member since
    December 2006
  • From: t.r.f. mn.
Posted by detailfreak on Sunday, March 6, 2011 4:28 PM

      Hey Deafpanzer thanks for stopping in. Got some anti-biotics from the doc so mine is on its way out. Sure would love to see that show,be sure to get some pics. Looking for the big bin goes on the back of the turret. Seems there were two types,I guess what is called the initial or early works. One thing I am really scouting for is an Eduard set #35 500 interior set for  Academy tiger,looks like it has a nice turret floor and such. Local shop in Apple Valley Mn. here has one for bout 20.00 dollar plus an outrageous shipping amount. My step-daughter and her hubby are only minutes from the shop where its at so if all else fails I'll have to try that route through the wife as she does not care much for me.

[View:http://s172.photobucket.com/albums/w1/g-earl828/]  http://i158.photobucket.com/albums/t104/cycledupes/1000Roadwheels4BuildBadge.jpg

  • Member since
    April 2009
  • From: Carmel, IN
Posted by deafpanzer on Sunday, March 6, 2011 3:29 PM

No kidding... was hit with stomach virus last week.  It sure caused no workbench time for few days.  Your Tiger is really looking great. Yes What kind of storage bins were you looking for?  Huge model show is coming up this Saturday and I can look around for you. 

Andy

  • Member since
    December 2006
  • From: t.r.f. mn.
Posted by detailfreak on Sunday, March 6, 2011 2:15 PM

   Thanks for looking Tigerman,must have been terribly crowded working in there!! Just picking my way along Still a long way to go.Stick out tongue

[View:http://s172.photobucket.com/albums/w1/g-earl828/]  http://i158.photobucket.com/albums/t104/cycledupes/1000Roadwheels4BuildBadge.jpg

  • Member since
    March 2003
  • From: Rain USA, Vancouver WA
Posted by tigerman on Sunday, March 6, 2011 1:44 PM

You're packing that guy to the rafters. Yes

   http://i7.photobucket.com/albums/y269/wing_nut_5o/PANZERJAGERGB.jpg

 Eric 

  • Member since
    December 2006
  • From: t.r.f. mn.
Posted by detailfreak on Sunday, March 6, 2011 1:22 PM

     Bill,thanks for stopping by. It's been an adventure so far.I have't posted to much progress but every little bit helpsBow Downas always I've been lurking around your blog a little everyday also.

                 And a quick question or two about the floor and turret basket floor,what is the correct pattern for the treadplate?The sellers of this stuff do not share this info.,could it depend on the sub-contractor that constucts the turret basket?

                 And thanks for stopping by all.

                                                           Greg"Detailfreak"RowleyYes

[View:http://s172.photobucket.com/albums/w1/g-earl828/]  http://i158.photobucket.com/albums/t104/cycledupes/1000Roadwheels4BuildBadge.jpg

  • Member since
    July 2004
  • From: Texas
Posted by wbill76 on Sunday, March 6, 2011 1:07 PM

Sorry to hear about your flu bug but looks like you've made the most of it and still made some progress on your Tiger details. Looking sharp with the details you've added. Beer

  • Member since
    December 2006
  • From: t.r.f. mn.
Posted by detailfreak on Sunday, March 6, 2011 12:23 AM

         I don't know how many out there have had to deal with the flu bug this season,but since last tues. nite it's been kickin my *** around ,got the fever ,lethargic aches and pains,and I even got twenty lbs. of snot from a ten lb. head,imagine that!! On second thought don't.

         Well using my better judgement ,I stayed at home for three days from work,but still managed to get a little more test fitting,sanding fitting,oh crapping,and re-working.Been somewhat alternating my time btwn the hull and the turret.


         Practice with the lighting and the flash a bit,some good results some bad,.Also came up with a little scratchbuilt item that was available at pretty reasonable prices,but I can not justify 5.00-8.00 dollars for shipping.

        Not qiute finished yet but it may be a keeper.As it was said before,to be able to show the turret being lifted off,as in a workshop dio.will present many challeges.One at a time I guess. Thanks for stopping by and stay tuned for the next chapter .

           Greg"Detailfreak"RowleyYes

[View:http://s172.photobucket.com/albums/w1/g-earl828/]  http://i158.photobucket.com/albums/t104/cycledupes/1000Roadwheels4BuildBadge.jpg

  • Member since
    May 2009
  • From: Hobart, Tasmania
Posted by Konigwolf13 on Wednesday, February 23, 2011 3:59 PM

Excellent job Greg, puts me and my current amount of work to shame, will endevour to pull the finger out and do an update.

Andrew

  • Member since
    April 2009
  • From: Carmel, IN
Posted by deafpanzer on Wednesday, February 23, 2011 1:54 PM

Jeez, I am speechless.  Not because I am deaf or mute.  So many details going on... I hope it doesn't mean fishes are not biting lately at your end.  Good work! Yes

Andy

  • Member since
    June 2007
Posted by Labour In Vain on Wednesday, February 23, 2011 1:38 PM

Looking good Greg.
Good detail on the bridge, was that included in the big V stuff?
Watching this with great interest!

As always
Boarder 

Avatar © David Byrden 2005 http://Tiger1.info/
  • Member since
    December 2006
  • From: t.r.f. mn.
Posted by detailfreak on Wednesday, February 23, 2011 11:08 AM

        Well it has been awhile since I updated so here goes.

         Most of the work as of late has been on the turret interior and is based more on pics I have used as reference. Believe me when I tell you that you do not want to use the Big V's interior set as this leaves way more room for improvement. I would like to also thank Dave Byrden,Alan Hamby and others for the technical info. that they have on there sites. I scratch built most everything in the following pics exceptions being the seats and other obvious parts.I wish to stress that this is still an interpretation of available info.. Any suggestions ,comments are most welcome.


         Also recieved a Tank Workshop engine in the mail and straight off had to lop off the front engine cradle as it was to narrow. Like they say,nothing is as it should be. Much more work has been done but my time this morning runs short. More on this later. Thanks

                                                   Greg"Detailfreak" Rowley

[View:http://s172.photobucket.com/albums/w1/g-earl828/]  http://i158.photobucket.com/albums/t104/cycledupes/1000Roadwheels4BuildBadge.jpg

  • Member since
    January 2007
Posted by the doog on Monday, January 31, 2011 7:33 AM

WOW, man--nice to see an in-depth WIP on a Tiger with all the gory details and innards!

You're swinging for the fence on this one and I'd say you're solidly connecting, detailfreak! Some great looking work here so far!

  • Member since
    September 2007
  • From: Truro Nova Scotia, Canada
Posted by SuppressionFire on Monday, January 31, 2011 6:42 AM

Great start Detailfreak,

Squadron / Signal's Tiger I Walk Around has many great photographs of the vehicles under maintenance like you plan on modeling. My favorite is of a turret off the tank supported on top of four 45 gallon fuel drums and heavy planks. I believe the floor plate is holding weight and the drums are more for stability. 

Turret removed is a good way to show off the interior work, cut-a-ways are not for everyone and only show limited views.

Looking forward to more progress, tanks for posting!

Stageleft,

I purchased the initial Tamiya kit in 1980 for the kings ransom of 25$! Its still in the stash 3000 miles away patiently waiting its destiny. Along with the kit a Lion Roar PE set was added and stashed in the box as well.

http://i6.photobucket.com/albums/y211/razordws/GB%20Badges/WMIIIGBsmall.jpg


  • Member since
    January 2008
  • From: Austria
Posted by Byrden on Monday, January 31, 2011 6:24 AM

The turret lifted off? That would be heroic, in that you need to provide the turret floor, legs, gearbox, and other things down there.

Also the interior hull floor, which had stuff under it, and that becomes exposed when the turret is lifted off.

The turret ring is a problem.  Just making this alone, takes some skill:


Dragon are now providing this in their new Tiger kits, they want to support efforts like yours; but only kit #6660 has it so far.


David


  • Member since
    May 2009
  • From: Hobart, Tasmania
Posted by Konigwolf13 on Monday, January 31, 2011 5:25 AM

Looking Good, further than I am on mine. Between getting addicted to the new world of tanks game beta (fun playing in a tiger) and having my loungeroom turned upside down for a week (where my workbench is) I've done bugger all.

Andrew

  • Member since
    December 2006
  • From: t.r.f. mn.
Posted by detailfreak on Saturday, January 29, 2011 1:31 PM

       First off I would like to thank Byrden for hosting such a great Tiger ! site,also Alan Hamby site. The research these people have done I will say is second to none.

       Current progress has been limited to picking away at the hull ribs as these hold brackets for some of the other items found under the floor,although none are installed two can be seen.also many hours invested in the fighting compartment roof support as well as the engine firewall,it will be nearly impossible to duplicate exactly. In the end my plans are for a maintenance dio. with the turret lifted off . Now some pics .


          As always any comments good bad ,or ugly are always accepted,and thanks for looking.Yes

[View:http://s172.photobucket.com/albums/w1/g-earl828/]  http://i158.photobucket.com/albums/t104/cycledupes/1000Roadwheels4BuildBadge.jpg

  • Member since
    February 2010
  • From: Maine
Posted by Stage_Left on Monday, January 17, 2011 12:01 AM

I went back to my library and did a little more research, and found I should have left the questions to Svenne and Byrden....thanks for the info guys, and my apologies if I caused confusion about when the side fenders/exhaust guards appeared. I did find it interesting that at least some Tigers were sent to Leningrad without these components. Nice Tiger I info site, David!

  • Member since
    May 2009
  • From: Hobart, Tasmania
Posted by Konigwolf13 on Sunday, January 16, 2011 7:03 PM

David - Ahhhhh, now things drop together tiger1.info is your site, I found it a couple of weeks ago, book marked it righ away, nice site.

Andrew

  • Member since
    May 2009
  • From: Hobart, Tasmania
Posted by Konigwolf13 on Sunday, January 16, 2011 6:57 PM

Thanks for the information david Yes

Andrew

  • Member since
    January 2008
  • From: Austria
Posted by Byrden on Sunday, January 16, 2011 1:25 PM

 #1 were or can an initial Tiger be fitted with sheet metal exhaust gaurds ?

#2 what about the sheet metal fenders?

The modern term "initial Tiger" refers to the first 9 vehicles that went to Leningrad. Dragon's kit addresses them only. They were lacking a lot of parts seen on the later Tigers.

Before the exhaust guards appeared, the Tigers got: the Feifel air filter system; reversed left-side track; a spade at the front; side fenders; folding front and rear mudguards; a turret side hatch; the S-mine system; and some other details that I could describe.

#3 can the spare track stowage be up-dated to the side of the turret?

They came along later, after even more changes.

FYI: the beams under the roof are not exactly where Verlinden puts them.


See http://tiger1.info/EN/RoofBeams.html

David


  • Member since
    February 2010
  • From: Maine
Posted by Stage_Left on Sunday, January 16, 2011 12:46 PM

DF- nice start to this kit. I know some armor guys groan about more Tigers, but I for one have an affinity for the beast. Maybe because I haven't inundated myself with them?

Anyway, I've picked up Dragon's Stalingrad early Tiger, and although it may be months to years until I dig into it, I'm excited about it all the same. Years ago I bought Tamiya's early Tiger (the 1972 mold), and as I went along with the build (while collecting 6-8 books on the vehicle) and discovered the lacking/inaccurate detail, I somehow felt as if I needed to replace or add most items. It's been sitting on the shelf for about 15 years with considerable new surface detail along with a 40% complete drivers station. The things I get myself into.....

About your questions: initial/early Tigers had both sheet metal fenders and rounded exhaust guards. If I remember correctly, the rounded exhaust guards were changed to a more angular  shape- like a triangle with the top cut off- beginning either late in the early model production run or for mid-production vehicles. Both the fenders and exhaust guards were regularly damaged in battle, and if the effort was made to repair or replace them, crews apparently gave up at some point as many photos show vehicles with these items missing. Eventually they disappeared from production altogether. As for spare track links on the turret, one of the links below will show a photo of an early tiger with mounting brackets on the turret but no track links. I don't recall this being a common practice on the initial/early models- the thing for me that stood out were the smoke grenade dischargers which were phased out somewhere between the early and mid-production runs. It's at this point I recall seeing more spare track being mounted on the turret. Hope this helps; I could go dig through my references if you need anything else.

http://www.alanhamby.com/early.shtml

http://books.google.com/books?id=S1gbrYELbT4C&pg=PA16&lpg=PA16&dq=Tiger+tank+exhaust+guards&source=bl&ots=15etEKPj6d&sig=82hD4BrQzaWPrRE_ovocFhyOXRQ&hl=en&ei=fzQzTYipNo-t8AaoianDCA&sa=X&oi=book_result&ct=result&resnum=6&ved=0CDkQ6AEwBQ#v=onepage&q=Tiger%20tank%20exhaust%20guards&f=false 

  • Member since
    February 2003
  • From: Allentown, PA
Posted by BaBill212 on Sunday, January 16, 2011 11:46 AM

Nice,,,   thanks for sharing detail

Enjoy the ride!


  • Member since
    July 2004
  • From: Texas
Posted by wbill76 on Sunday, January 16, 2011 11:34 AM

Looks like you're dressing this one up nicely, making the hatches workable is a nice touch. Looking forward to more! Yes

  • Member since
    December 2005
  • From: Goteborg / Sverige
Posted by Svenne Duva on Sunday, January 16, 2011 6:28 AM

Great start detailfreak, I never knew what to do with the very sparce interior that Dragon provides, your detail set is a wast improvement.

To your questions;
Dragons # 6252 has a number of unique features:
The track design with the right track beeing a mirror image of the left.
The Pz III stowage bin or the 2 side mounted stowage bins.
What is not there is:
The heat deflectors and mud guards where added as standard features for practical reasons later in the production run, but some repair units added them in service.
The first design mud guards where added in Setember 42, the heat deflectors in January 43. 
The picture is from the Bundesarchiv and shows a Tiger I from Schwere Heeres Panzer Abteilung 501 in Tunisia.

As you can see the Tiger has the air cleaners(November 42) assembled aswell, you will not fing these in the kit.
The sheet metal fenders covering the front are the early type, I think the instructions tells you to add them.
The only reason they would be missing is if they had been ripped off.
I would advice against assembling spare tracks on the turret side since the mounting brackets only where introduced later.

Already looking forward to your next posting Stick out tongue

Svenne

sic transit gloria mundi

  • Member since
    May 2009
  • From: Hobart, Tasmania
Posted by Konigwolf13 on Saturday, January 15, 2011 5:51 PM

Detailfreak, I have all the photos uploaded to photobucket was waiting for the academy kit to arrive so there wouldnt be the break but might add it sooner.

Andrew

  • Member since
    December 2006
  • From: t.r.f. mn.
Posted by detailfreak on Saturday, January 15, 2011 5:32 PM

Konigwolf, glad you stopped in interesting to see how your kitbashing works out. I've read a couple of reviews about the Academy kit. Hope you start a thread.

[View:http://s172.photobucket.com/albums/w1/g-earl828/]  http://i158.photobucket.com/albums/t104/cycledupes/1000Roadwheels4BuildBadge.jpg

  • Member since
    May 2009
  • From: Hobart, Tasmania
Posted by Konigwolf13 on Saturday, January 15, 2011 5:23 PM

I just started the same kit. I have the torsion bars and the rear hull done. Alot I know LOL. I got that much done then thought I want an interior (hatches will be an open due to diorama I have planned). So I'm waiting for an academy tiger I picked up cheap (to kit bash its internals into my dragon) to arrive.

I will be watching t his thread well

Andrew

  • Member since
    March 2003
  • From: Western North Carolina
Posted by Tojo72 on Saturday, January 15, 2011 5:07 PM

very nice start

  • Member since
    April 2005
  • From: Piscataway, NJ!
Posted by wing_nut on Saturday, January 15, 2011 4:56 PM

detailfreak

Wingnut ,thanks for stopping in also.Sorry no new Tiger release here,do we need another? 

Ah, nope!Wink

Marc  

  • Member since
    December 2006
  • From: t.r.f. mn.
Posted by detailfreak on Saturday, January 15, 2011 4:38 PM

Jeebus,these are the indie link tracks from the kit #6252.

Wingnut ,thanks for stopping in also.Sorry no new Tiger release here,do we need another? 

Now a question for all those out there with beter ref's. than mine #1 were or can an initial Tiger be fitted with sheet metal exhaust gaurds ? #2 what about the sheet metal fenders? #3 can the spare track stowage be up-dated to the side of the turret?

Now a couple more pics.


[View:http://s172.photobucket.com/albums/w1/g-earl828/]  http://i158.photobucket.com/albums/t104/cycledupes/1000Roadwheels4BuildBadge.jpg

  • Member since
    April 2005
  • From: Piscataway, NJ!
Posted by wing_nut on Saturday, January 15, 2011 4:21 PM

I thought it was a release too.

Looks grreat... living up to your screen name. 

Marc  

  • Member since
    March 2005
  • From: Des Moines IA.
Posted by Jeebus on Saturday, January 15, 2011 3:48 PM

tigerman

LOL. I thought you were going to announce the release of another Tiger.

Hey we always enjoy a good build, and this shaping up to be one. Are those indie tracks?

I think those are DS-100 tracks.

  • Member since
    December 2006
  • From: t.r.f. mn.
Posted by detailfreak on Saturday, January 15, 2011 3:47 PM

Tigerman, those are the kit indie link tracks. The lower hull and the rear plate are pretty much completed ,primed and a base coat applied.

Deafpanzer, thanks for stopping in. I will try to update and keep the pic flowing in.

[View:http://s172.photobucket.com/albums/w1/g-earl828/]  http://i158.photobucket.com/albums/t104/cycledupes/1000Roadwheels4BuildBadge.jpg

  • Member since
    April 2009
  • From: Carmel, IN
Posted by deafpanzer on Saturday, January 15, 2011 3:28 PM

Looking great! Yes You have caught my attention... it has been a while since somebody did a WIP on Tiger.

Andy

  • Member since
    March 2003
  • From: Rain USA, Vancouver WA
Posted by tigerman on Saturday, January 15, 2011 2:14 PM

LOL. I thought you were going to announce the release of another Tiger.

Hey we always enjoy a good build, and this shaping up to be one. Are those indie tracks?

   http://i7.photobucket.com/albums/y269/wing_nut_5o/PANZERJAGERGB.jpg

 Eric 

JOIN OUR COMMUNITY!

Our community is FREE to join. To participate you must either login or register for an account.

SEARCH FORUMS
FREE NEWSLETTER
By signing up you may also receive reader surveys and occasional special offers. We do not sell, rent or trade our email lists. View our Privacy Policy.