SEARCH FINESCALE.COM

Enter keywords or a search phrase below:

I know,I know not another TIGER !!!!

25786 views
155 replies
1 rating 2 rating 3 rating 4 rating 5 rating
  • Member since
    April 2005
  • From: Piscataway, NJ!
Posted by wing_nut on Thursday, April 7, 2011 7:41 AM

I think I will bring a copy of this thread to my club meeting.  That way if anyone starts to too much of an ego rush, me included, just pull this out.  That'll knock 'em down a peg or tow.Wink


Dude, I impart on you the the double schwing...Schwing, SCHA-WING.


Did I miss the part whee you said how all this marvelous detail will be seen.  Just open hatches or cutaway?  Or a dio with the turret on a craneStick out tongue

Marc  

  • Member since
    March 2006
  • From: Right Side of a Left State
Posted by Shellback on Thursday, April 7, 2011 3:06 AM

Beautiful !

  • Member since
    February 2010
  • From: Maine
Posted by Stage_Left on Wednesday, April 6, 2011 12:59 PM

Simply outstanding work, DF. I'm really enjoying this WIP......

  • Member since
    January 2007
Posted by the doog on Wednesday, April 6, 2011 11:33 AM

WOW, Greg--the detail in this is just SICK! You're doing a great reference thread for building the ultimate Tiger!

Superb!!

  • Member since
    December 2006
  • From: t.r.f. mn.
Posted by detailfreak on Wednesday, April 6, 2011 11:00 AM

                              Zokissma,I will have to say that my resources are limited to a couple of builds on other websites,pics readily available on the www, and believe it or not Academies instruction booklet.lol.David Byrden,Alan Hamby and the restoration of the Bovington Tiger all offer great material.

                             Have done some rework on those intermediate hull braces,and set the hull top in place to check clearances of the engine and such. So far so good,but still a loooong way to go.


                               All comments and critiques are always welcome,oh and the gap at the base of the fighting compartment roof support will be closed eventually.Thanks again for looking.

                                                              Greg"Detailfreak"RowleyYes

[View:http://s172.photobucket.com/albums/w1/g-earl828/]  http://i158.photobucket.com/albums/t104/cycledupes/1000Roadwheels4BuildBadge.jpg

  • Member since
    July 2003
  • From: Toronto, Ontario, Canada
Posted by zokissima on Friday, April 1, 2011 9:33 PM

detailfreak

                                  Thank you for the comment Zokissma ,at this time I will have to say that the fries 16 ton crane is on hold until I can find an alternative to the lifting apparatus, DES ,a french company I believe is the only manufacturer of 1/35 scale version of this crane.And the last one I saw sold on e-bay for a sum of 169.00 and change,WOW,so you see the dilemna.Does anyone sell or have line drawings of this that can be used as blueprints? Or I guess there is alway the old oak tree out back and a come-along,hehehe,old backyard mechanics never die they justget a bigger hoist.

                                  Again I wish to thank all for the comments tips and what not,and good evening to all.Beer

                                                   Greg"Detailfreak"RowleyYes

Yep, my sentiments exact; the DES kit is the only game in town, but from what I hear, it is a disastrous kit, and difficult to build. Personally, I'm in the same boat as you, I'd love to get enough detailed drawings and pics to be able to just scratch one, since the overall shape is not complicated.

If I may ask you, what are you using as your primary references thus far?

I have the Tigers in Combat I book, but to be perfectly honest, as a modeling reference for the physical vehicle, there is a lot to be desired.

  • Member since
    June 2007
Posted by Labour In Vain on Friday, April 1, 2011 12:39 PM

Greg,

I would say that following your post is one reason to come back to this forum regularly :)
Looking very good, I am just curios why you leave a gap to the lower side plate? 

And I am still interested in any reference you would have to that radio mount in the front Propeller 

Thank you again for sharing!

As always
Boarder 

Avatar © David Byrden 2005 http://Tiger1.info/
  • Member since
    December 2006
  • From: t.r.f. mn.
Posted by detailfreak on Friday, April 1, 2011 11:25 AM

                                 Well I've been at it again,more scratch building. This time it is the intermediate hull braces that divide the sponson ammo lockers. This item I added after viewing an item on e-bay which I'm sure some have seen. A bare production tiger hull. Dave Byrdens site does not show these intermediate hull braces,and I could not find any sponson ammo lockers so the actual permanent install will wait. I really will have to record my time spent on one of these builds,whew,hours upon hours already. But on to the pics,oh and I could not resist a pic of the track. Thank you all for the comments tips and such and hope for a good update this wknd.Wink


                                                      Greg"Detailfreak"RowleyYes

[View:http://s172.photobucket.com/albums/w1/g-earl828/]  http://i158.photobucket.com/albums/t104/cycledupes/1000Roadwheels4BuildBadge.jpg

  • Member since
    March 2006
  • From: Right Side of a Left State
Posted by Shellback on Thursday, March 31, 2011 12:13 PM

Beautiful build your doing . Looking at another well done Tiger is like looking at another beautiful woman ..................well , sorta .Stick out tongue

  • Member since
    January 2008
  • From: Bournemouth UK
Posted by Bodge on Thursday, March 31, 2011 11:26 AM

Really nice stuff going on here.Never have tooo much tiger stuff. Lovely deYestailing.

  • Member since
    December 2006
  • From: t.r.f. mn.
Posted by detailfreak on Wednesday, March 30, 2011 10:23 PM

                                  Thank you for the comment Zokissma ,at this time I will have to say that the fries 16 ton crane is on hold until I can find an alternative to the lifting apparatus, DES ,a french company I believe is the only manufacturer of 1/35 scale version of this crane.And the last one I saw sold on e-bay for a sum of 169.00 and change,WOW,so you see the dilemna.Does anyone sell or have line drawings of this that can be used as blueprints? Or I guess there is alway the old oak tree out back and a come-along,hehehe,old backyard mechanics never die they justget a bigger hoist.

                                  Again I wish to thank all for the comments tips and what not,and good evening to all.Beer

                                                   Greg"Detailfreak"RowleyYes

[View:http://s172.photobucket.com/albums/w1/g-earl828/]  http://i158.photobucket.com/albums/t104/cycledupes/1000Roadwheels4BuildBadge.jpg

  • Member since
    July 2003
  • From: Toronto, Ontario, Canada
Posted by zokissima on Tuesday, March 29, 2011 4:34 PM

What a joy to watch this build. I've had the Academy Mid I with interior, and over the years have been gathering a mountain of AM for it; damn but does this thread make it tempting to start.

Since you mentioned a dio, are you planing on the Fries crane that was used to lift the turret off?

  • Member since
    December 2006
  • From: t.r.f. mn.
Posted by detailfreak on Sunday, March 27, 2011 2:58 PM

                                 wbill ,it would seem that the barley in the barley pop stimulates my whisker growthWink. At least thats what I tell some folks,LOL Thanks for the comments wbill,oh and Deafpanzer ,Doog,Tigerman and anyone else who has taken time to stop and see whats going on.

                                                                  Greg"Detailfreak"RowleyYes

[View:http://s172.photobucket.com/albums/w1/g-earl828/]  http://i158.photobucket.com/albums/t104/cycledupes/1000Roadwheels4BuildBadge.jpg

  • Member since
    July 2004
  • From: Texas
Posted by wbill76 on Sunday, March 27, 2011 10:32 AM

So Gregg, have to ask...what were the results of your whisker-extension observations? Big Smile

Nice work as usual on the details, by the time you're done it will look like it could start up at any moment and drive off your workbench!

  • Member since
    April 2009
  • From: Carmel, IN
Posted by deafpanzer on Saturday, March 26, 2011 11:45 PM

Ditto  Agree with Tigerman... my brain would explode with so many details going on.  Only detailfreaks can handle... not me! Whistling  Looking great buddy! Yes

Andy

  • Member since
    March 2003
  • From: Rain USA, Vancouver WA
Posted by tigerman on Saturday, March 26, 2011 11:18 PM

Stupendous work. if i did all the detailing that you do, I'd never finish a kit!

   http://i7.photobucket.com/albums/y269/wing_nut_5o/PANZERJAGERGB.jpg

 Eric 

  • Member since
    January 2007
Posted by the doog on Saturday, March 26, 2011 6:41 PM

Marc,

You're doing some stupendous work here. The only thing I would dare add is to add is that I'm surprised that you put the jerry cans in there and painted them primer red--I would have just painted and finished them separately and then glued them in. A little forethought and voila'-- a little less work, IMHO.

Not a critique though--just an idea to consider when planning the next complex construction phase wherever that may be!

  • Member since
    April 2005
  • From: Piscataway, NJ!
Posted by wing_nut on Saturday, March 26, 2011 3:32 PM

Bow Down  Beautiful work.

Marc  

  • Member since
    December 2006
  • From: t.r.f. mn.
Posted by detailfreak on Friday, March 25, 2011 11:00 PM

                                   Well after all the work on the turret floor I decided to mosey on back to the engine compartment for a bit of work. The idler wheel axle inner mount is'nt much ,and will not be very visible.Just depends on where this maintenance depot thing goes. The inner wall of the engine compartment was added also.There are many details that could be added but then the available reference materials are rather weak in some aspects.But I will keep searching for more references.Pirate Anyone who has a good shot of the engine compartment overhead view anything,please share.


                                       Well it's Fri.,the wife and I are on the couch sipping Busch Ice and watchin my whiskers grow so see yous later.

                                                                 Greg"Detailfreak"RowleyYes

[View:http://s172.photobucket.com/albums/w1/g-earl828/]  http://i158.photobucket.com/albums/t104/cycledupes/1000Roadwheels4BuildBadge.jpg

  • Member since
    December 2006
  • From: t.r.f. mn.
Posted by detailfreak on Monday, March 21, 2011 11:50 AM

                              Thanks Heer Manstien. Well a spark of ambition before work got me to clean up the turret floor and the exhaust shields and primer the.And this is what I have.


                                                        Greg"Detailfreak"RowleyYes

[View:http://s172.photobucket.com/albums/w1/g-earl828/]  http://i158.photobucket.com/albums/t104/cycledupes/1000Roadwheels4BuildBadge.jpg

  • Member since
    November 2005
Posted by Anonymous on Monday, March 21, 2011 8:39 AM

I like what I'm seeing in here, for the most part. Yes Everything but the pic of you in optivisors...

  • Member since
    December 2006
  • From: t.r.f. mn.
Posted by detailfreak on Monday, March 21, 2011 8:37 AM

                              A quick little transmission comparision and its plain to see how badly the verlinden piece was done. I would like to think it was made that way because design people only had photos to use for reference.

                              On a brighter note I will say that the soldering is complete on the turret floor,and I am very happy with the results. A few small styrene bits to finish it out and it will be married up to the rest of the turret,hopefully by the weekend.


                               Thanks again for looking and comments all are welcome.

                                            Greg"Detailfreak"RowleyYes

[View:http://s172.photobucket.com/albums/w1/g-earl828/]  http://i158.photobucket.com/albums/t104/cycledupes/1000Roadwheels4BuildBadge.jpg

  • Member since
    December 2006
  • From: t.r.f. mn.
Posted by detailfreak on Sunday, March 20, 2011 1:10 PM

                             The Academy part is a gem compared the Verlinden Labour In Vain. The way I figured it was that if I model the turret being hoisted away in a workshop the bottem of the turret basket would be visible,as well as many other items.

                              Thanks for stopping by friend and sharing the pic and comments.

                                                             Greg"Detailfreak"RowleyYes

[View:http://s172.photobucket.com/albums/w1/g-earl828/]  http://i158.photobucket.com/albums/t104/cycledupes/1000Roadwheels4BuildBadge.jpg

  • Member since
    June 2007
Posted by Labour In Vain on Sunday, March 20, 2011 1:03 PM

detailfreak

                                    Ok,thursday the postman dropped off a little something from Andy"Deafpanzer" that truly made my day,An Eduard photo-etch set for the Academy Tiger1 interior which includedmany great items,many thanks again for taking time during your visit to the model show to scrounge this baby up!!

                                   As work progresses on the tiger I was very disappointed with the quality of the resin Verlinden turret basket floor. It was thick and of course has the wrong tread pattern.
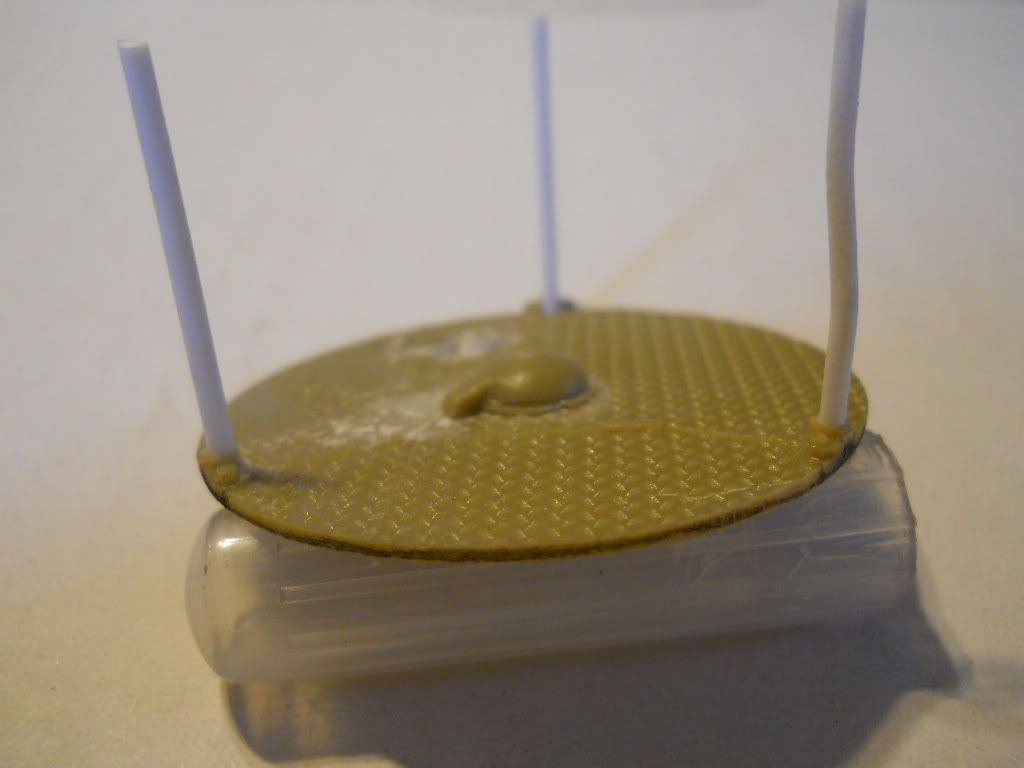
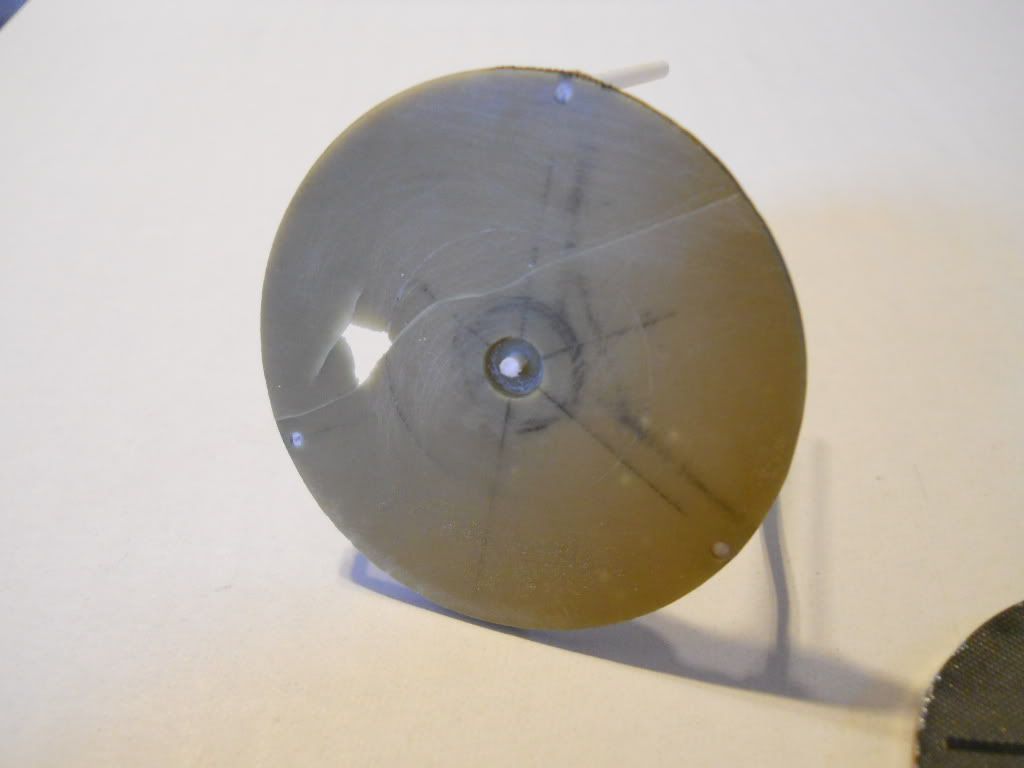
http://i172.photobucket.com/albums/w1/g-earl828/TIGERIWIP074.jpg
http://i172.photobucket.com/albums/w1/g-earl828/TIGERIWIP073.jpg
http://i172.photobucket.com/albums/w1/g-earl828/TIGERIWIP072.jpg

                                  The lovely photo-etch set I had recieved has a turret floor in it and the instuctions show the detail being sanded from the Academy piece and then the etched piece being fitted on,well I do not have the Academy kit so I did the next best thing.

http://i172.photobucket.com/albums/w1/g-earl828/TIGERIWIP076.jpg
http://i172.photobucket.com/albums/w1/g-earl828/TIGERIWIP075.jpg


http://i172.photobucket.com/albums/w1/g-earl828/TIGERIWIP071.jpg
http://i172.photobucket.com/albums/w1/g-earl828/TIGERIWIP070.jpg
http://i172.photobucket.com/albums/w1/g-earl828/TIGERIWIP077.jpg

                            Using images available I copied the turret floor as best as I could,its not done yet. The frame is made up of scraps of photo-etch frets,I knew there was a reason for keeping all of that stuff, and all of this was soldered together.I hope you likeWink Once again I appreciate any and all comments,and happy modeling.

                                                            Greg"Detailfreak"RowleyYes


Greg,
I like a lot Stick out tongue
Here is the Academy part for comparsion, if you thought that the tread pattern was a big problem in the VL offering...


I noticed on page 2 that you have a frame in place for the radio, would you have any photo reference that you could share for that? It is such a prominent feature if you want to leave that hatch open.

Great stuff - please keep them coming Smile 

As always
Boarder

Avatar © David Byrden 2005 http://Tiger1.info/
  • Member since
    December 2006
  • From: t.r.f. mn.
Posted by detailfreak on Sunday, March 20, 2011 12:29 PM

                           Early verlinden stuff I probably would not mess with,poor as far as accuracy ,and as you said somewhat fragile..I am not sure wether the photo-etch is red brass or soft copper,to me it seems to be soft copper

                           The Eduard Tiger 1 set is a breeze to solder and I have nearly completed the soldering.Must get myself a new soldering iron with interchangeable tips Right now the iron I have was from an old woodburning set.LOL It  does the job but is not good for the tiny stuff.  Also have nearly completed the exhaust shields,as you may have guessed ,more brass. All good practice to prepare myself to finish the brass ammo lockers for my Brummbar

                           My only regret is that there is no radio rack in the Eduard sets I have. I'll have to check the Jaguar set for my Jagdpanther to see what it has for a rack,they may be somewhat similar.

                            This weekend has been pretty good for bench time as it's rather drizzly ,rainy cool and crappy outside I will post some more progress pics soon. Thanks for looking in

[View:http://s172.photobucket.com/albums/w1/g-earl828/]  http://i158.photobucket.com/albums/t104/cycledupes/1000Roadwheels4BuildBadge.jpg

  • Member since
    April 2009
  • From: Carmel, IN
Posted by deafpanzer on Saturday, March 19, 2011 11:18 PM

Anytime for you my friend. Beer Looks like you couldn't wait that long.  Tell me about Verlinden upgrade set!  I have been using one for my Chaffee... its a hit and miss.  Brass PE was pretty good but resin parts... not too good.

Get to work! Stick out tongue

Andy

  • Member since
    July 2004
  • From: Texas
Posted by wbill76 on Saturday, March 19, 2011 8:50 PM

Nice job of "gizmology" Greg, looks pretty good to me! Beer

  • Member since
    December 2006
  • From: t.r.f. mn.
Posted by detailfreak on Saturday, March 19, 2011 6:06 PM

                                    Ok,thursday the postman dropped off a little something from Andy"Deafpanzer" that truly made my day,An Eduard photo-etch set for the Academy Tiger1 interior which includedmany great items,many thanks again for taking time during your visit to the model show to scrounge this baby up!!

                                   As work progresses on the tiger I was very disappointed with the quality of the resin Verlinden turret basket floor. It was thick and of course has the wrong tread pattern.


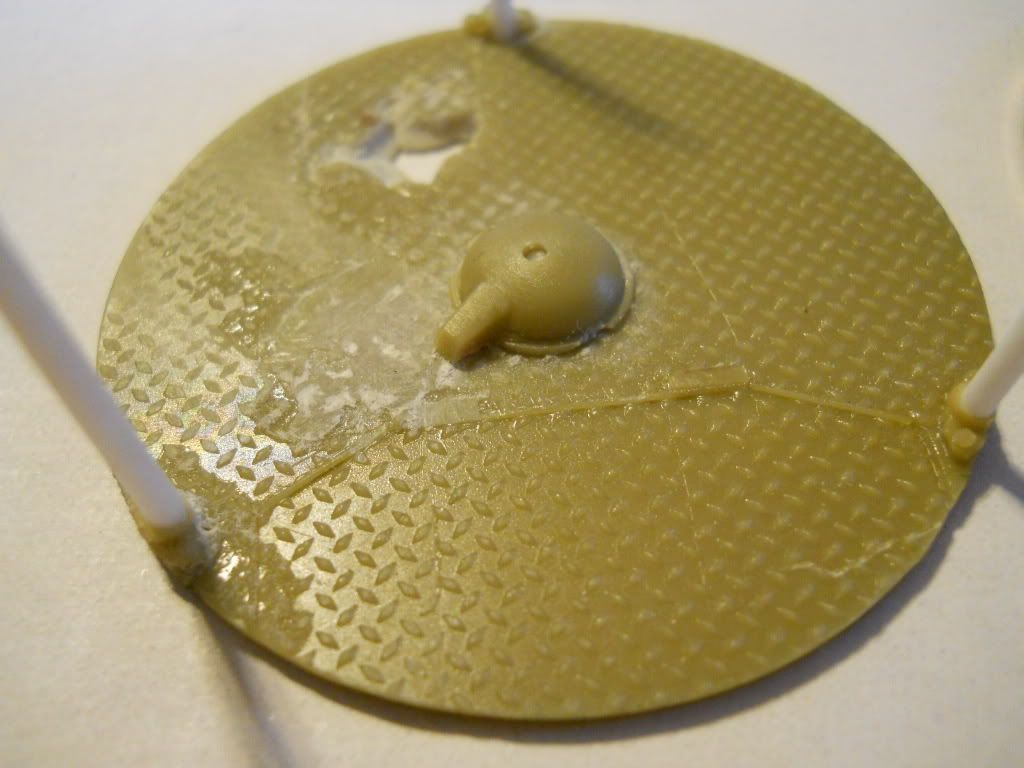
                                  The lovely photo-etch set I had recieved has a turret floor in it and the instuctions show the detail being sanded from the Academy piece and then the etched piece being fitted on,well I do not have the Academy kit so I did the next best thing.
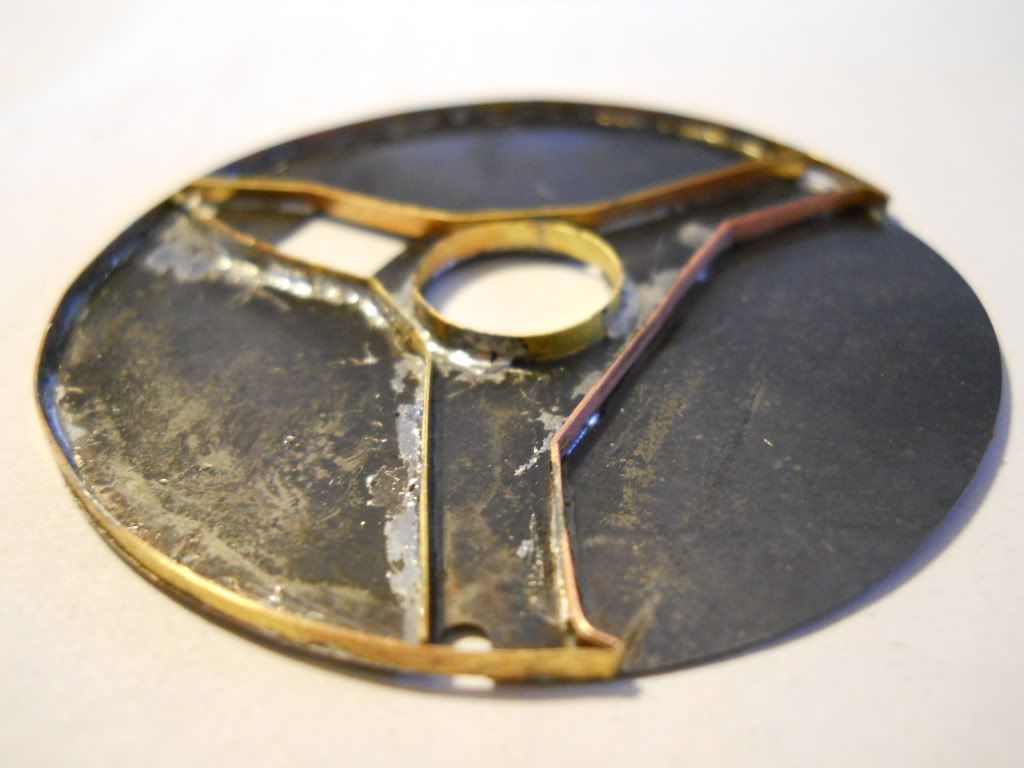
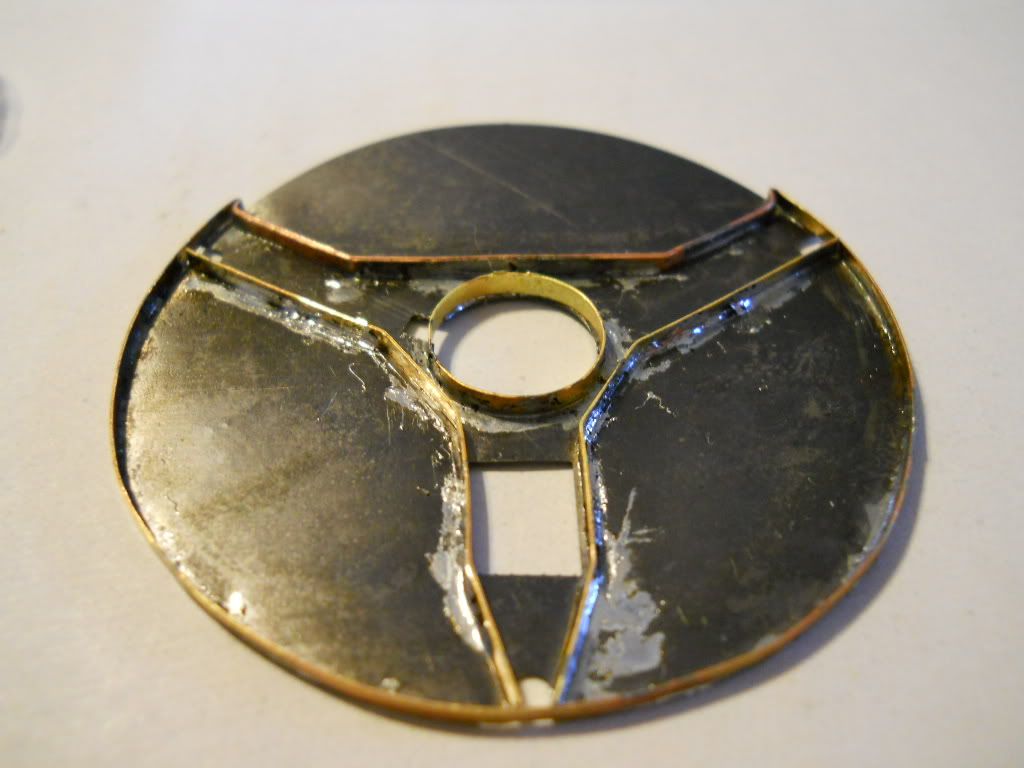
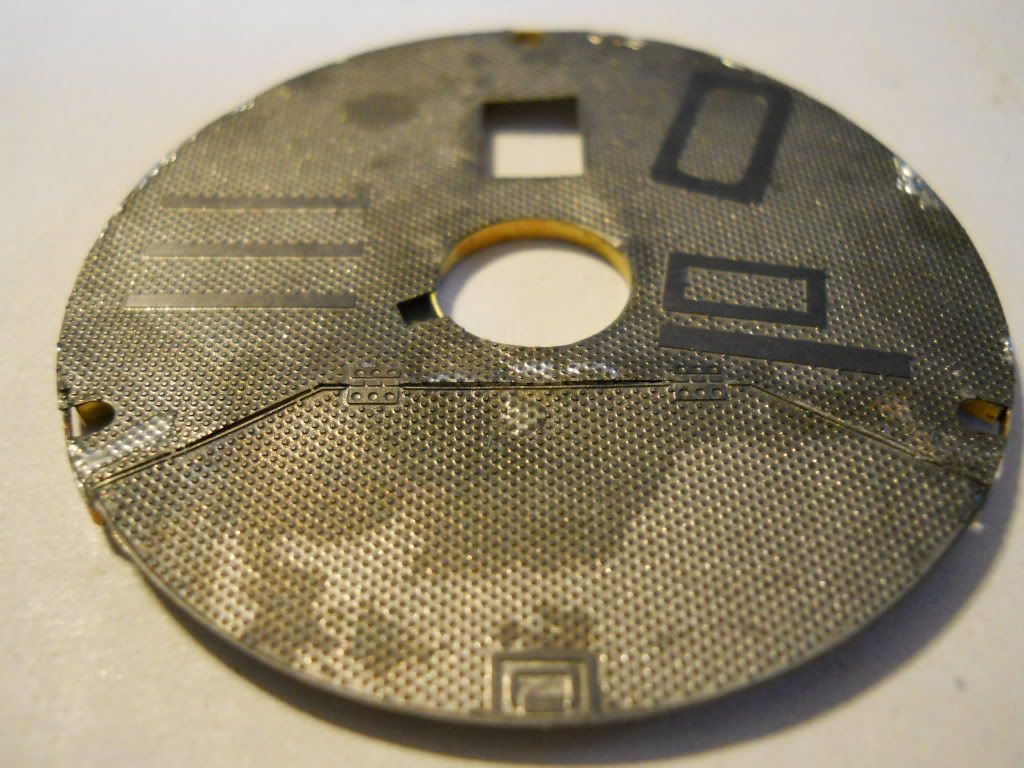
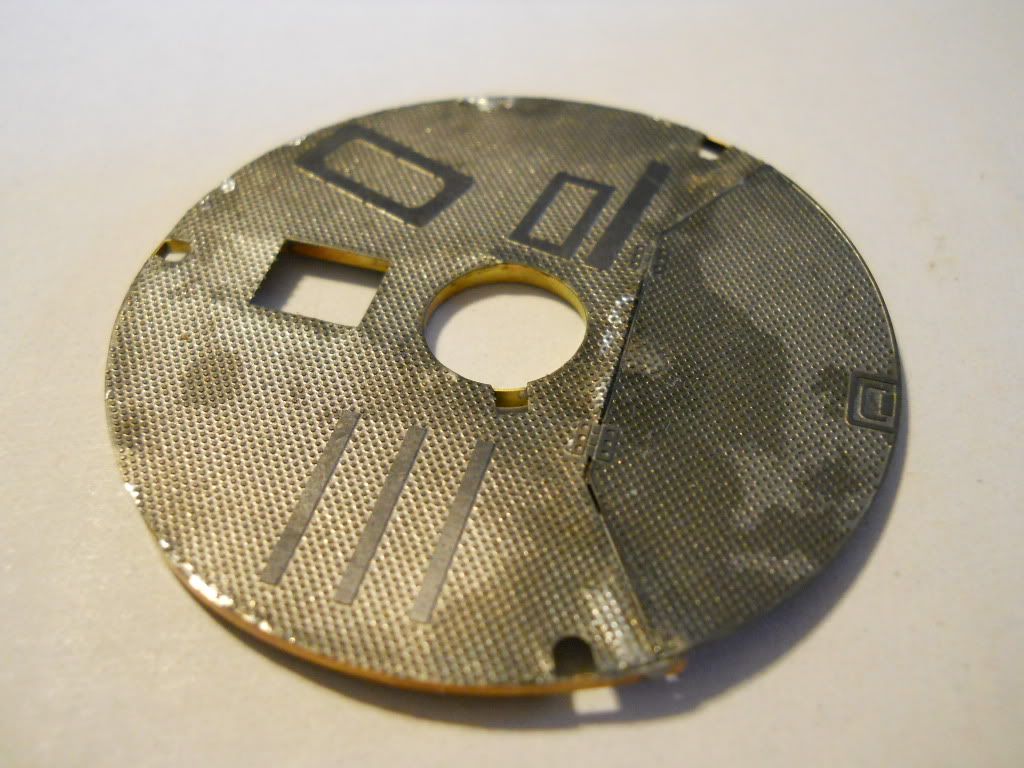
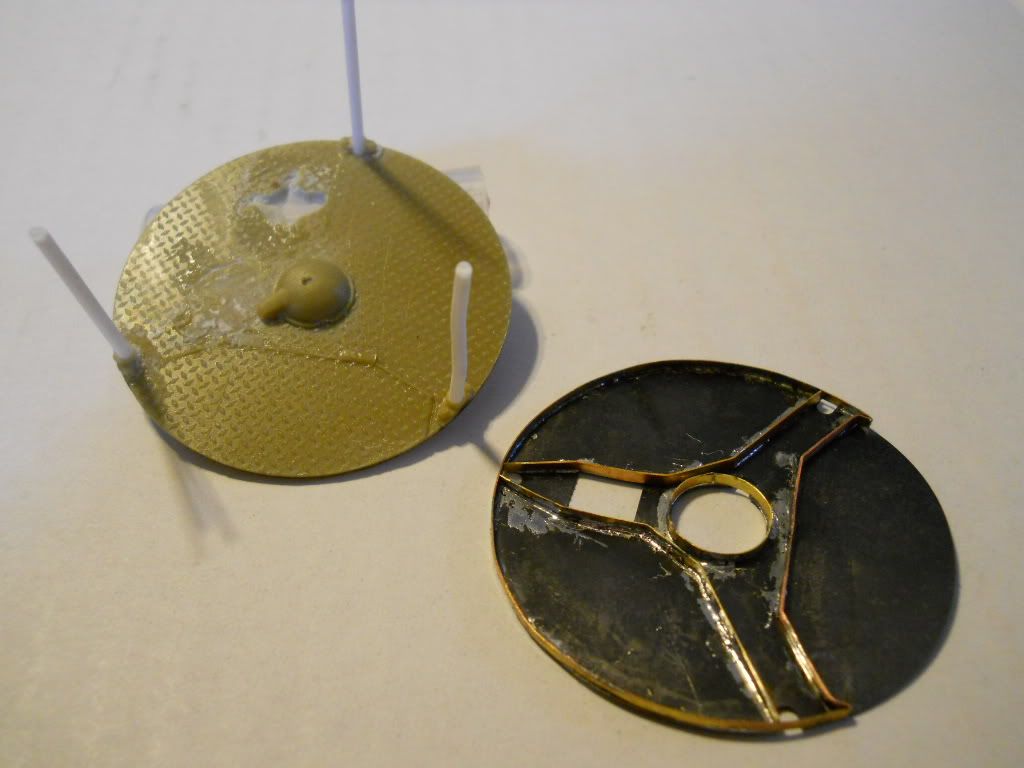


                            Using images available I copied the turret floor as best as I could,its not done yet. The frame is made up of scraps of photo-etch frets,I knew there was a reason for keeping all of that stuff, and all of this was soldered together.I hope you likeWink Once again I appreciate any and all comments,and happy modeling.

                                                            Greg"Detailfreak"RowleyYes

[View:http://s172.photobucket.com/albums/w1/g-earl828/]  http://i158.photobucket.com/albums/t104/cycledupes/1000Roadwheels4BuildBadge.jpg

  • Member since
    June 2007
Posted by Labour In Vain on Thursday, March 17, 2011 3:40 PM

Your build looks great but I am puzzled by the colours.
No need to explain though, I am pretty sure I will figure out Stick out tongue

Looking forward to the next stage...securily tagged threadCool

As always
Boarder

Avatar © David Byrden 2005 http://Tiger1.info/
  • Member since
    December 2006
  • From: t.r.f. mn.
Posted by detailfreak on Wednesday, March 16, 2011 11:48 AM

                         Just been doing some fitting,updating the turret chin welds,engine fitting and such. Does anybody have an overhead pic of the engine compartment that shows the upper radiator hose and fan drive layout any help would be much appreciated. Thanks in advance.


                                                          Greg"Detailfreak"RowleyYes

[View:http://s172.photobucket.com/albums/w1/g-earl828/]  http://i158.photobucket.com/albums/t104/cycledupes/1000Roadwheels4BuildBadge.jpg

JOIN OUR COMMUNITY!

Our community is FREE to join. To participate you must either login or register for an account.

SEARCH FORUMS
FREE NEWSLETTER
By signing up you may also receive reader surveys and occasional special offers. We do not sell, rent or trade our email lists. View our Privacy Policy.