SEARCH FINESCALE.COM

Enter keywords or a search phrase below:

BT-7 mod 1937

18509 views
77 replies
1 rating 2 rating 3 rating 4 rating 5 rating
  • Member since
    April 2009
  • From: Carmel, IN
Posted by deafpanzer on Sunday, February 27, 2011 9:15 PM

One of techniques I learned during my airbrushing class at Hobby Lobby for 16 weeks but never thought it can be done on models.  How clever!  Love those silly putty... it made the job alot easier. 

Can't wait to see next update but I promise the anxiety will not kill me... Stick out tongue

Andy

TRM
  • Member since
    May 2010
  • From: Massachusetts
Posted by TRM on Sunday, February 27, 2011 8:54 PM

Excellent work Rob!  Nice find as well!  Pays to shopping with them from time to time!Toast

Regards,

T


In Flanders fields the poppies grow
Between the crosses, row on row,
That mark our place, and in the sky,
The larks, still bravely singing, fly,
Scarce heard amid the guns below.

~John McCrae

  • Member since
    January 2006
  • From: California
Posted by SprueOne on Sunday, February 27, 2011 8:18 PM

whoa, that totally worked! 


Tags: russian camo

Anyone with a good car don't need to be justified - Hazel Motes


Iron Rails 2015 by Wayne Cassell Weekend Madness sprueone

  • Member since
    October 2009
Posted by PANZERWAFFE on Sunday, February 27, 2011 6:43 PM

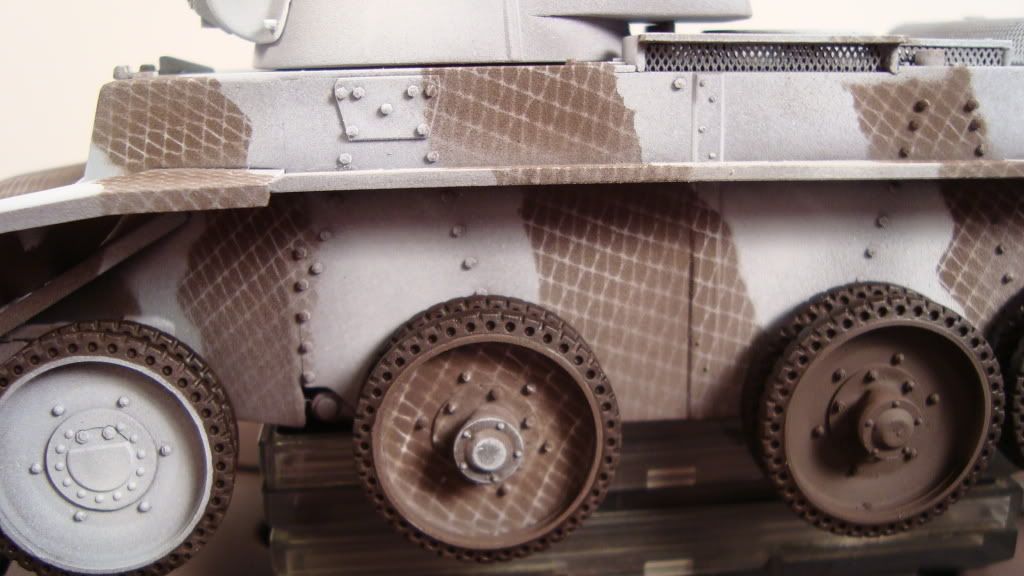
Nate - Thanks.  Went to the fabric store with my wife and found some bridel netting, bought a yard of that for almost nothing.  Found a lot of good things at that store such as styrofoam boards, silly putty, Dried floral, big cutting matts and the list goes on.  The prices are cheaper than any place I've seen before.  Did not think the fabric store was going to become one of my most common stops from now on.

Anyway, cut the netting into stripes, place where desired then use the silly putty to push in and hold the net down.  The silly putty worked great, you can move and shape it by just pushing it were ever you want with a toothpick.  It's easy to get back off also.  Just take another piece in your hand, touch it to the putty on the model and it pulls right back off.

Here a picture explains it a lot easier.

WBill - Thanks for the great words.  Time-consuming, yes, can only get one side done at a time or found trying to use to much net the whole thing would just start turning into a mess.  Took about 30 min per stripe per side to prep before painting, only about 5 min of painting.  Then of course there was airbrush clean up after finishing the one set of stripes and then prep and do the next set.  Have two more stipes to finish at the rear and then will be done with this part of it.  So there is a light at the end of the tunnel Big Smile

Rob

  • Member since
    July 2004
  • From: Texas
Posted by wbill76 on Sunday, February 27, 2011 4:29 PM

I can see why the camo would be time-consuming, holy cow! Big Smile Going to look absolutely stunning when you get it done and weathered. Yes Yes

  • Member since
    August 2003
  • From: Connecticut, USA
Posted by Nachtflieger on Sunday, February 27, 2011 5:35 AM

All the hard work is really paying off Rob. The camo looks fantastic! How did you do it? Lay some kind of netting down on the tank and spray green through it? Looking REALLY good.

Nate


  • Member since
    October 2009
Posted by PANZERWAFFE on Sunday, February 27, 2011 12:10 AM

Dave - OH BOY HOWDY is right !!  This one has been sitting for a while and it was begging for some paint.

Dupes - Nice to have you stop in.  Would love to see your BT can you give us a look at it?  Sounds like it will be very nice with all of the extras.

F.Matthews - That was a great find/price for the Tamiya.  Will have to keep my eye out for a deal like that would really like to try the Tamiya kit.  Still no complaints with this EE kit, believe I paid $10 for it.  Already planning on getting a BT-5 maybe two so that I can convert one into a BT-2.  Are you going to put on a WIP with your BT-7?  Would like to see that one build up.

Painting up date.

This has been one of the most time consuming and difficult to get right camo jobs I have done.  Originally did not forsee it taking so long.  Have been working on this all day straight.
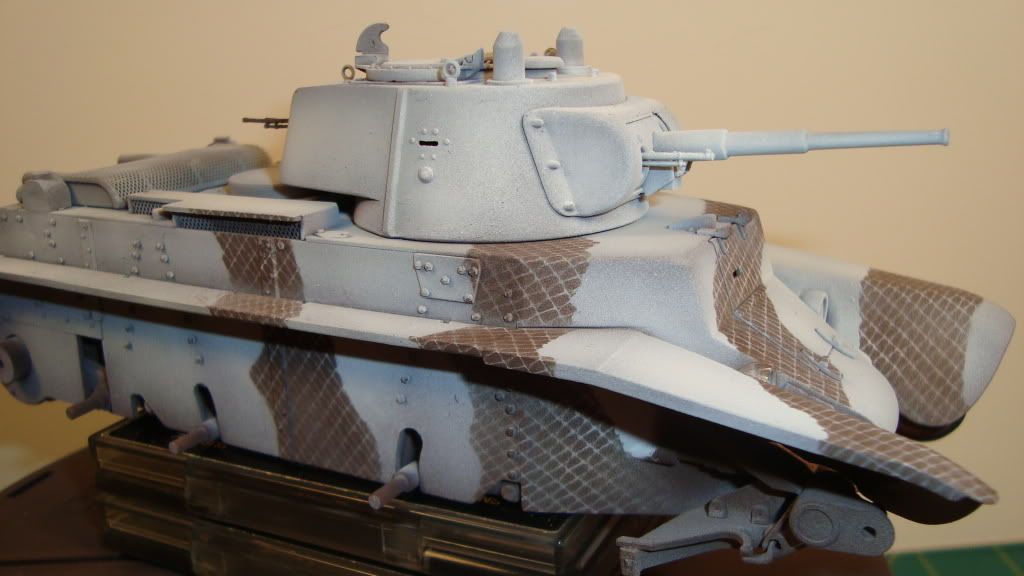
Road wheels always take some time, always paint all of my road wheels by hand. 
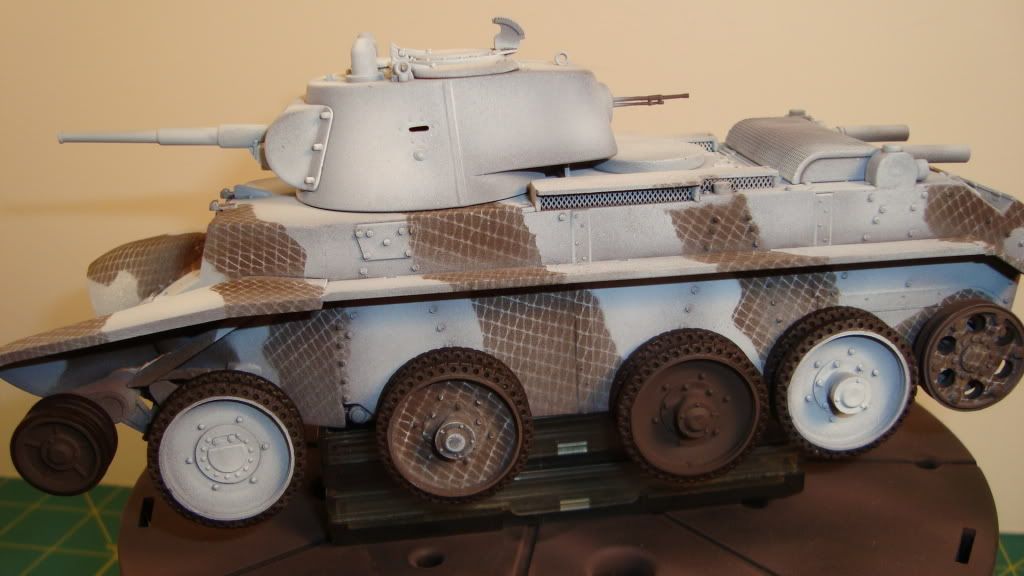
Wheels are just dry fit for the time.  One more picture.
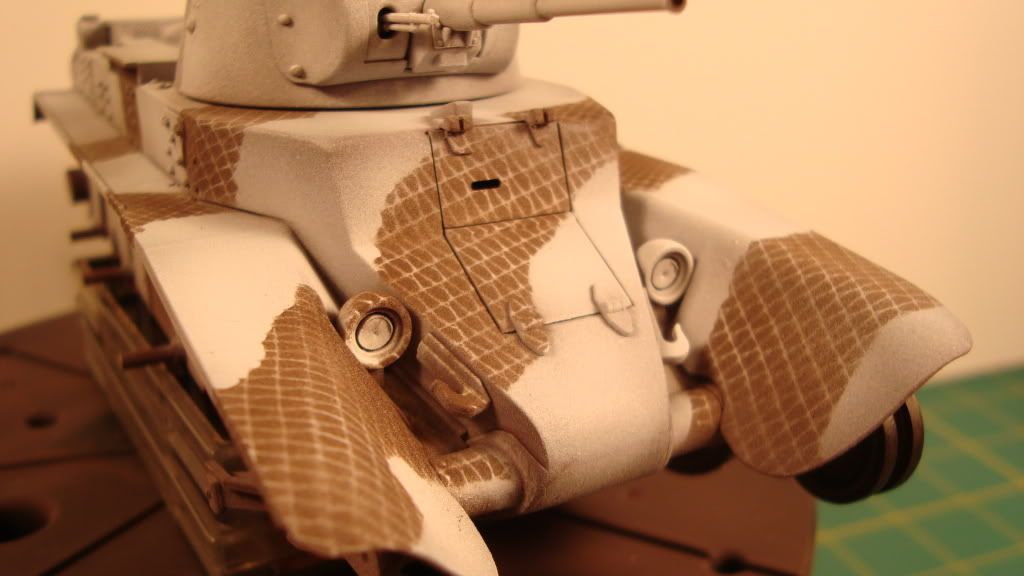
As you can see much work left to do.  Apply remaining camo to the rear of the hull, turrret, and right side road wheels.  Put on last of the pieces: horn, fender tanks and couple other small things.  Then paint small details: exhaust, shovels, etc.

Trying to make up my mind on weathering.  Was originally going to go with a heavy weather but now think maybe a light weather.  Any opinions?

Thanks, and any comments are welcome.

Rob

  • Member since
    May 2009
Posted by F Matthews on Saturday, February 26, 2011 5:26 PM

The Eduard set is really nice.  The Fruils too!  I picked up my Tamiya kit for well under $40 on eBay, so that turned out to be less than my EE kits with all of the other goodies that they need.  All of them are good, but the Zvezda one doesn't look as accurate.

  • Member since
    November 2006
  • From: Coastal Maine
Posted by dupes on Saturday, February 26, 2011 2:12 PM

Nifty! I too decided to give the EE kit a look instead of shelling out for the new Tamiya - with an AM barrel, a set of Eduard etch, and some Ebay Fruils it was still cheaper!

Can't wait for paint.

  • Member since
    May 2009
Posted by F Matthews on Saturday, February 26, 2011 8:37 AM

Looks fantastic!  I just dug into the Tamiya BT-7 last night.  Great kit, but then I loved the EE kit too.

  • Member since
    May 2005
  • From: Eugene, Oregon
Posted by hughes2682 on Friday, February 25, 2011 11:23 PM

Oh boy howdy!  It's got color on it.  Yes

Cheers

Dave

http://img.photobucket.com/albums/v317/Aaronw/Groupbuilds/ClassicAviationGB2010bomb.jpg

With enough thrust, pigs fly just fine.

  • Member since
    October 2009
Posted by PANZERWAFFE on Friday, February 25, 2011 11:03 PM

Marc - Dont let the "Reds" hear you call ther tank a Duesenberg Surprise  The fenders really are a prominent feature on this tank.

Andy - Would like to see you build the Tamiya BT-7!  The other two vehicles you talk of are the: T-28 (medium) had a 76.2mm main gun turret and two auxiliary MG turrets on the front hull: T-35 (heavy) had a 76.2mm gun main turret a 45mm gun turret and MG turret on the the front hull and a 45mm gun turret and MG turret on the rear hull.  Total of 5 turrets.  Have both of these kits by ICM in stash.

F. Matthews - Glad you like it.  Was able to free the last road wheel shafts and it now swings free again.  Believe some glue had got in there when tackeling the difficulties of gluing the rear hull togther.  All is right now.  The louvers did make the difference thanks for the advice with them.

Tigerman - Thanks for taking a look.  Your right about the grills.

Dave - Thanks for the words and happy you stopped in.

WBill - Thanks!  I agree with you and I am pleased with the results.  As always thanks for stopping in.

Now here is a quick update.

Everything received a primer coat.

Then received first coat of paint, flat white.

Will be receiving Schokoladenbraun 1943 for its camo scheme.  Hope to wrap most of this project up this weekend.  Thanks for looking

Rob

  • Member since
    July 2004
  • From: Texas
Posted by wbill76 on Sunday, February 20, 2011 8:51 PM

Looking at the rear engine deck now is like comparing night and day...definitely worth the extra effort and attention. Yes Yes

  • Member since
    May 2005
  • From: Eugene, Oregon
Posted by hughes2682 on Sunday, February 20, 2011 3:25 PM

Rob,

Good to see you went the extra step(s) and put in the PE grills.  It looks quite nice.  I've just gotten caught up on this build. This tank has got a lot of character.  Keep up the solid work.  I hope your mom is feeling better.

Cheers

Dave

http://img.photobucket.com/albums/v317/Aaronw/Groupbuilds/ClassicAviationGB2010bomb.jpg

With enough thrust, pigs fly just fine.

  • Member since
    March 2003
  • From: Rain USA, Vancouver WA
Posted by tigerman on Saturday, February 19, 2011 2:30 PM

Those PE grills make all the difference.

   http://i7.photobucket.com/albums/y269/wing_nut_5o/PANZERJAGERGB.jpg

 Eric 

  • Member since
    May 2009
Posted by F Matthews on Saturday, February 19, 2011 12:43 PM

Looking great!  The reason the last roadwheel is glued high is that it is supposed to swing freely to attach the tracks-looks like you glued it in place.  Worst case, you could place it on a base with some rough terrain with individual tracks.

The Tamiya kit is VERY nice, but I like the EE kits too-they're a lot of fun, even with the minor fit issues.  Opening up that engine compartment and adding the louvres makes a HUGE difference.

  • Member since
    April 2009
  • From: Carmel, IN
Posted by deafpanzer on Saturday, February 19, 2011 9:30 AM

I received my AMPS Boresight copy yesterday.  Tamiya BT-7 kit made a special appearance and now I WANT IT!  It will be probably my first Russkie tank in my stash... maybe not just one I always to get one of those T-29 or T-35 (I forgot the exact number) kits... one with many turrets! 

Agree with Marc... it has been fun following this WIP. Yes

Andy

  • Member since
    April 2005
  • From: Piscataway, NJ!
Posted by wing_nut on Saturday, February 19, 2011 6:37 AM

Have noit checked in here for a while ROb.  That looks real nice.  Those are wild looking fenders... like a Duesenberg.

Marc  

  • Member since
    October 2009
Posted by PANZERWAFFE on Saturday, February 19, 2011 12:43 AM

TRM, Andy, and WBill, thanks for stopping in.  Thought would try to get a little work done on this build tonight.  Went to work on the rear engine deck.  Cut out top section with drimel and #11 blade and added to louvers cut from .020 styrene sheet. Filled the mounting holes for the exhaust pipes with putty and moved the pipes further back so that they would actually be comeing from under the screen as should be.  Also put the pipe elbow backwards of what the directions had said to do.  By doing this it lowered the height of the pipes and the pipes where easier to mount to the elbow because of the monting pins that were suppose to go into the hull, they were insead used to go into the pipe.  Finally thinned out the pipes with a drill bit.

next put the screening on the frame.  This is dry fitted on the hull for now.

Went onto put the fenders and the tanks on the fenders.  Found some better looking tail lights from the spare parts box to replace the kit ones.

Front fenders were also added.

Here is an over all view.  Problem I'm seeing is somehow the last road wheel shaft is glued/ stuck in to high of a postion.  Not sure what happened here?  Will have to get it broken free somehow.

Paint should be coming very soon.Thanks for taking a look.


Rob

  • Member since
    July 2004
  • From: Texas
Posted by wbill76 on Monday, February 14, 2011 8:32 PM

Hope things improve for your mother Rob, hang in there and the bench/models will always be waiting when you can get back to them. Beer

Nice work on the grills and looks like you did a great job of carving out the intake frames on the rear deck as well. Yes

  • Member since
    April 2009
  • From: Carmel, IN
Posted by deafpanzer on Monday, February 14, 2011 4:45 PM

Great looking little tank! Yes I think I want to build it despite the fact I am not really into Russian tanks. 

Andy

TRM
  • Member since
    May 2010
  • From: Massachusetts
Posted by TRM on Monday, February 14, 2011 3:54 PM

Nice progress Rob!  Hope to see you back at it soon.  How is your Mother doing?  Hope all is well.

Regards,

T


In Flanders fields the poppies grow
Between the crosses, row on row,
That mark our place, and in the sky,
The larks, still bravely singing, fly,
Scarce heard amid the guns below.

~John McCrae

  • Member since
    October 2009
Posted by PANZERWAFFE on Tuesday, February 8, 2011 12:39 PM

Did not make my Sunday night up date as promised.  Had some bad news here.  The last cold front we had here put my mother in the hospital and things were looking bad for a while.  Just talked with the doctor and things are getting better now.  I'm off of work now and will be heading to stay at the hospital.  Not sure when I will get back to things here, so this is were it's at.  Just wanted to reply to you guys sence all of you took the time for me.

Tigerman, SprueOne - Thanks for the comps. It was nerve racking at times.

F Matthews - Thanks for checking in.  Looks like you might be the guy to talk to about these early Soviet tanks.  I agree the early ones are really cool.  Nice BT's you have there.  Found some pictures of the louvers you are talking about, plan on putting them in.  Good to know about the Eduard PE set, it looks very nice.  Do plan on having more BT's.

Bob - Thanks for stopping in.

There some spots that still need work and the pictures showed other spots that I missed, I'll get to them when I can.

Thanks again to all of you

Rob

Rob

  • Member since
    May 2003
  • From: fort mill SC
Posted by Robert92562 on Monday, February 7, 2011 8:12 PM

I also like the Russian armor. I'm looking forward to seeing the final product.

My SU 100.

Bob

  • Member since
    May 2009
Posted by F Matthews on Monday, February 7, 2011 7:48 PM

I really like the early war Soviet stuff.  Clunky but cool!  Here's a shot of my BT-7A (this one's an Eastern Express kit).  You did a great job dealing with the fit issues-this one was ok, but I have a few more in the stash and I stopped forward progress (for now) on one because of the gaps.  The 1937 model looks great.  You can see the louvres a little better here as well as the cutout of the hull top for the engine compartment.  This also shows off some of the Eduard PE well.


Photobucket

  • Member since
    May 2009
Posted by F Matthews on Monday, February 7, 2011 4:17 PM

Photobucketp>I agree that this kit looks MUCH better with the screen added.  There are two louvered vents under the screen leading to the engine bay that are easily fabricated.  I cut the top out on my BT-7A, but don't have any pics handy.  I can try to take a couple to post.  Here is a photo of my recently completed BT-5 with the same arrangement, just without the exhausts. On my BT-7A, I used the Eduard PE set which is really nice.


  • Member since
    January 2006
  • From: California
Posted by SprueOne on Sunday, February 6, 2011 4:30 PM

Great job on that engine screen cover part modification so far. Looks nerve racking 


Anyone with a good car don't need to be justified - Hazel Motes


Iron Rails 2015 by Wayne Cassell Weekend Madness sprueone

  • Member since
    March 2003
  • From: Rain USA, Vancouver WA
Posted by tigerman on Sunday, February 6, 2011 4:11 PM

Need a motor saw, like a jigsaw or bandsaw. Amazing job so far.

   http://i7.photobucket.com/albums/y269/wing_nut_5o/PANZERJAGERGB.jpg

 Eric 

  • Member since
    October 2009
Posted by PANZERWAFFE on Sunday, February 6, 2011 3:39 PM

Nate - Thanks , the hull had to be the worst part of the kit.  The fit was so bad I was losing faith in this build but now that it is togther, I am very happy with it.

WBill, Tigerman - Agree the mesh will be the biggest improvement on this kit as long as I can get it trimed out without breaking the frame.  About halfway and the frame is getting very fragile also have not really figured out how I'm going to get the mesh in there.

Just in case this thing breaks, does anyone know of PE that would handle this?  I still plane on not using a PE one just like to have a back up plan.

I'll post an update tonight.  Have all of the suspenssion on and all remaining parts cut, trimed and ready to put on just need to finish the work on the engine screen.

Rob

  • Member since
    July 2004
  • From: Texas
Posted by wbill76 on Saturday, February 5, 2011 3:36 PM

Putty work and modifications turned an ill-fitting set of hull slabs into a nice hull Rob, looking forward to more! Wink Definitely think your mesh plan will be a big improvement over the kit part for sure. You've already got it handy so no need to go the PE/AM route an incur the additional expense IMHO.

JOIN OUR COMMUNITY!

Our community is FREE to join. To participate you must either login or register for an account.

SEARCH FORUMS
FREE NEWSLETTER
By signing up you may also receive reader surveys and occasional special offers. We do not sell, rent or trade our email lists. View our Privacy Policy.