SEARCH FINESCALE.COM

Enter keywords or a search phrase below:

GERMAN RAILWAY GONDOLA TYP OMMR

43973 views
134 replies
1 rating 2 rating 3 rating 4 rating 5 rating
  • Member since
    June 2012
Posted by ghostt180 on Friday, July 27, 2012 6:21 PM

That timber looks awesome. The whole build is going to be amazing. I will be following your progress as I haven't seen one of these before. Could you please let us know what comes with that kit?

Great work

  • Member since
    August 2011
Posted by Jumo213A1 on Thursday, July 26, 2012 1:53 PM

They have been widely used after WW2 . Take a look at this picture with the Marder on top , a bewildering likeness between this and the Deutsche Reichsbahn SSys Schwerer Plattformwagen ? Wink

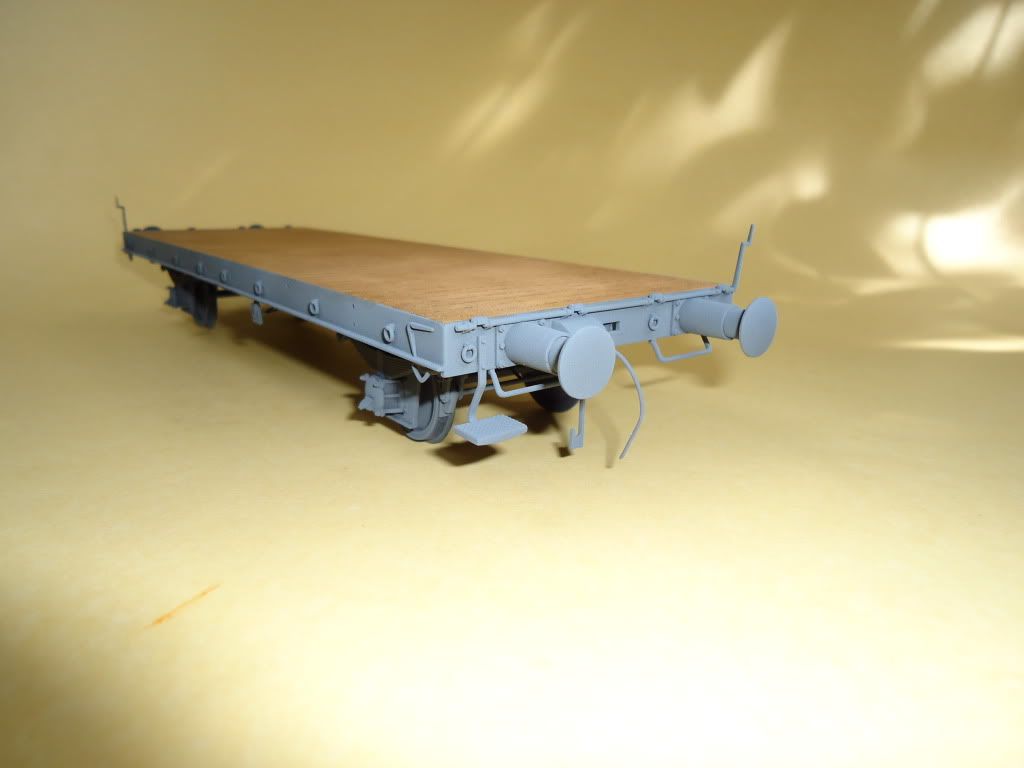
The platform posted earlier is from the German Railway Flatbed Typ Ommr with armored sides , I want to mount the Trumpeter 3,7cm Flak 37 on it . 

I have a question about Trumpeters German Railway Gondolas the axles don't seem to be the German design like on the Dragon cars have . To me it looks like they have copied it from Tank Workshop or someone else . Can someone help me out ?

The L.Z. Models railwaycars have the right ones I've bought the German G10 type wagon and I'm very impressed by the detailing ! If anyone wants to buy a covered wagon this is the one to get ! 

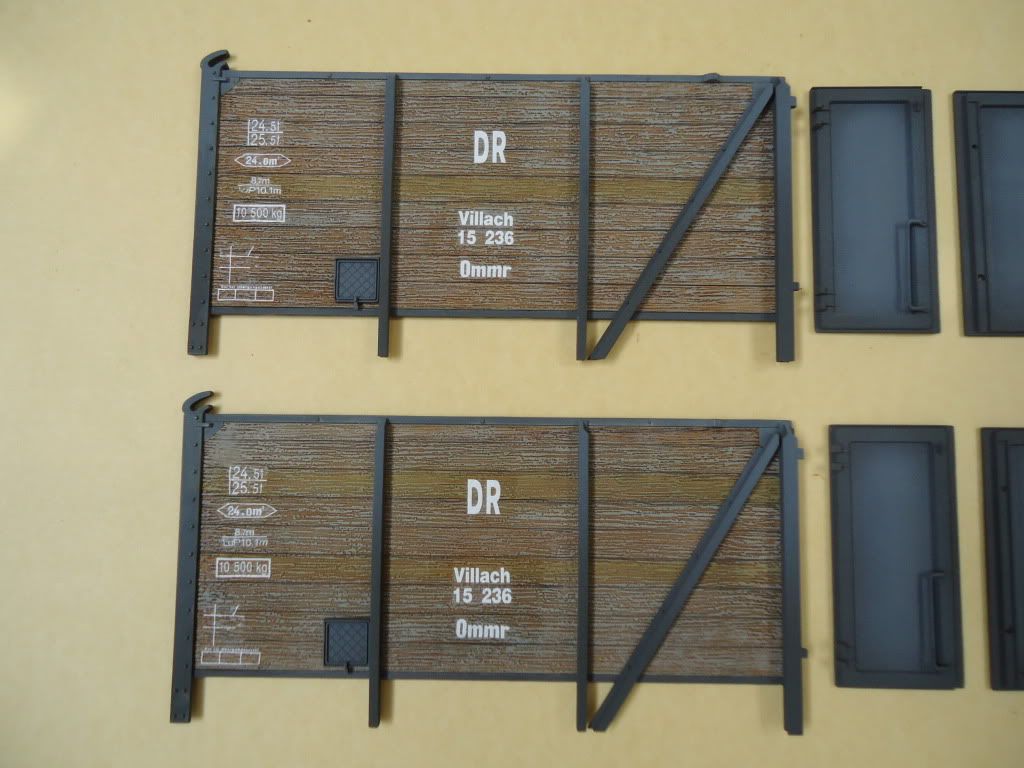
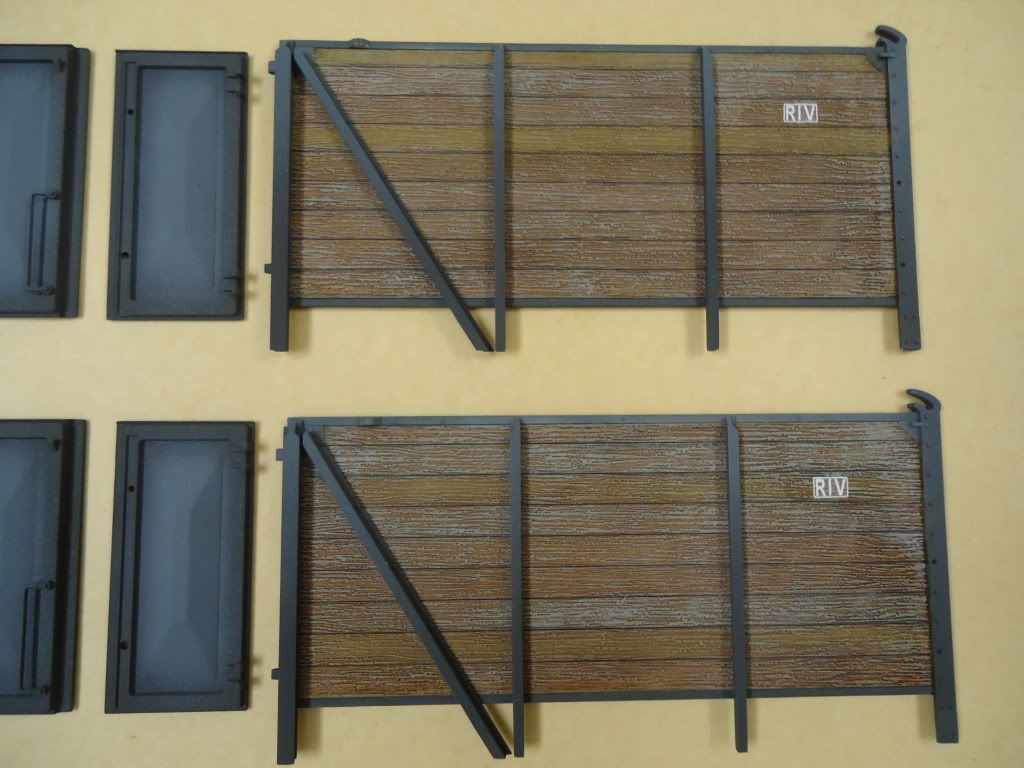
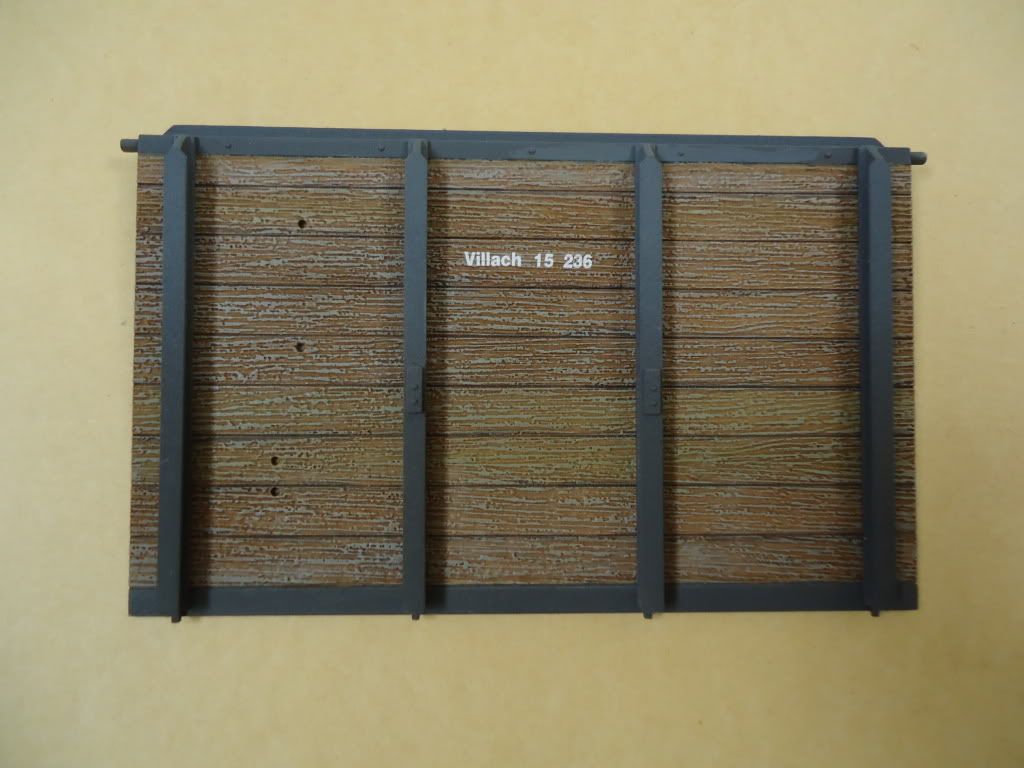
Here are some of the parts , some are slightly warped but due to the thin resin it's no problem to bend it back . The walls are so thin that the light is shining through !

P.S. I would like to see more of my car too but I don't have the time at the moment to get it done ... Crying 

  • Member since
    March 2003
  • From: Western North Carolina
Posted by Tojo72 on Monday, July 23, 2012 7:51 AM

That is some really great work,I especially like the weathering on the wood.It is also a subject you don't see every day.Great job.

  • Member since
    October 2009
Posted by PANZERWAFFE on Sunday, July 22, 2012 8:17 PM

Did not realize the wagons were still in use, interesting.

Your wood looks pretty good but I do agree with you that it looks newer.  For the older look you need to add more variation of color.  I would suggest adding a "dirty" yellow color, Light Sea Gray, and Light Gray to random boards then re-apply some of your black weathering.  You may have already but go to page 4 and I have a little better explanation of how I achieved this look.  Hope this helps but if you have any other questions just PM me I'll be glad to help you out.

Is this the Heavy Transport car?  Will you have the Pz III on it?  Sure would like to see more.

Rob

  • Member since
    August 2011
Posted by Jumo213A1 on Sunday, July 22, 2012 7:38 AM

I really like your painting of the "wood" parts , it's just enough not too much .

In Germany those cars are still in service just like the G10 wagon from L.Z. Models (not in regular transport role but as workshop wagon) .

This is my  Dragon flatbed platform so far ... I'm still not satisfied with the look it seems to be too new Sad


  • Member since
    July 2004
  • From: Texas
Posted by wbill76 on Saturday, May 12, 2012 11:29 AM

Can't think of a better ending to this project Rob! Very sharp work all around...the headless LW gunner will wait patiently I'm sure until your move is complete. Good luck with packing things up and moving to the new digs! Beer

  • Member since
    September 2005
  • From: beacon falls , Ct.
Posted by treadwell on Saturday, May 12, 2012 7:38 AM

looking terrific ,Rob  !!!!   good luck with the move and look forward to you settling in and finishing this beauty !

hurry back, but take your time !

treadCool


  • Member since
    July 2003
  • From: On my kitchen counter top somewhere in central North Carolina.
Posted by disastermaster on Saturday, May 12, 2012 3:42 AM

http://im-smiley.com/imgs/lost-it/lost-it006.gif

My God Rob, you should be proud........   http://im-smiley.com/imgs/lost-it/lost-it010.gif

 https://i.imgur.com/LjRRaV1.png


  • Member since
    March 2003
  • From: Rain USA, Vancouver WA
Posted by tigerman on Saturday, May 12, 2012 1:11 AM

What will become of the headless crewman? 

Great build log Rob. I hate to see this one end. I'v just been in awe of the whole thing from the beginning. 

   http://i7.photobucket.com/albums/y269/wing_nut_5o/PANZERJAGERGB.jpg

 Eric 

  • Member since
    March 2006
  • From: Right Side of a Left State
Posted by Shellback on Friday, May 11, 2012 11:47 PM

My goodness Rob that is a real interesting piece to look at ......all of the details are fun to look for. YesBeer

Hope you can get back with us soon .


  • Member since
    October 2009
Posted by PANZERWAFFE on Friday, May 11, 2012 10:56 PM

Thanks too everyone for following along with this one Beer

THE END

Rob

  • Member since
    October 2009
Posted by PANZERWAFFE on Friday, May 11, 2012 10:49 PM

With the exception of the 4 crewmen and the car connecting hook (picture below) I am going to call this one done.  Had wanted to finish the crew before calling it but it has to get packed in a box for now, the time has come.  Will update this WIP with the crewmen when all is moved and settled.  The hook for the car connection will be completed when another railcar has been built in order to be able to glue the hook into the correct position and length.

The crewmen are Luftwaffe and you may not be able to see the hint of blue in this uniform pic but it is visible here in person.  This guy is just waiting for his head and his other three companions.

There are lots of pics here so will break them into 2 post.  This will be my last post of any building until I'm in my new place.  Will try to check in when I can to keep an eye on everyone else's builds.  So onto the completed pics.........

More pics coming in a few

Rob

  • Member since
    October 2009
Posted by PANZERWAFFE on Tuesday, May 8, 2012 7:56 PM

No TP either Surprise


Bill , thanks but still have not decided if I will use one of those heads, they are just kind of plain.  I may wait until I get the chance to order some new heads.  Have been wanting to get some for other builds anyway.  Still undecided though.  Have been trying to paint the rest of the figure though but have had very little time to sit at the bench Sad

Rob

  • Member since
    March 2006
  • From: Right Side of a Left State
Posted by Shellback on Monday, May 7, 2012 10:26 PM

disastermaster

 PANZERWAFFE:

http://i951.photobucket.com/albums/ad352/PANZERI/German%20RR%20figures/DSC01580.jpg


OH MY !! Embarrassed

http://gtg.blox.pl/resource/210pxNormal_wermacht.jpg

Real germans don't need no steekin bucket.

And no t.p either ?

  • Member since
    July 2004
  • From: Texas
Posted by wbill76 on Monday, May 7, 2012 11:53 AM

Nice fix on the chair...and not a bad collection of heads either! Yes

  • Member since
    July 2003
  • From: On my kitchen counter top somewhere in central North Carolina.
Posted by disastermaster on Monday, May 7, 2012 1:01 AM

PANZERWAFFE

http://i951.photobucket.com/albums/ad352/PANZERI/German%20RR%20figures/DSC01580.jpg

OH MY !! Embarrassed

http://gtg.blox.pl/resource/210pxNormal_wermacht.jpg

Real germans don't need no steekin bucket.

 https://i.imgur.com/LjRRaV1.png


  • Member since
    October 2009
Posted by PANZERWAFFE on Sunday, May 6, 2012 11:05 PM

REDLEG - Agree, we need no details here.  No sauerkraut !


Problem fixed

Gaps in the shoulders will require some filling and sanding.

These were the only spare heads I could find. 

This solder may be able to get ahead in this world yet.

Rob

  • Member since
    April 2009
  • From: Carmel, IN
Posted by deafpanzer on Sunday, May 6, 2012 9:10 PM

Beer

PANZERWAFFE

http://i951.photobucket.com/albums/ad352/PANZERI/German%20RR%20figures/DSC01580.jpg

OH MY !! Embarrassed

Be prepared... those will be your "new' furniture in NC.  I spent 8 years in NC... Beer

Andy

  • Member since
    March 2006
  • From: Right Side of a Left State
Posted by Shellback on Sunday, May 6, 2012 8:26 PM

disastermaster

https://encrypted-tbn3.google.com/images?q=tbn:ANd9GcT902KTmVVpqqkIe2z44TLuiLBADNS2g_J5oUY1X_9vFdlsq65Uu351PQI vould shorten the chair legs if it vas me.

Steve , thats too easy man !

  • Member since
    March 2006
  • From: Right Side of a Left State
Posted by Shellback on Sunday, May 6, 2012 8:23 PM

PANZERWAFFE

http://i951.photobucket.com/albums/ad352/PANZERI/German%20RR%20figures/DSC01580.jpg

OH MY !! Embarrassed

Hmmm , you know Rob , i would think that could happen on a rail car with a long time between stops ............especially after eating some of that peasant made 3 day old suerkraut eaten a couple of hrs ago ....OopsWowWhistling.......

  • Member since
    July 2006
  • From: New Jersey
Posted by redleg12 on Sunday, May 6, 2012 6:16 PM

OK....I love all the details, but I presume this soldier has motion sickness Surprise

He should not have had such a large dinner the night before.....WOW I don't want to think of details if the soldier gets up!!! He may need a piano roll.

Rounds Complete!!

"The Moral High Ground....A Great Place to Emplace Artillery."

  • Member since
    July 2003
  • From: On my kitchen counter top somewhere in central North Carolina.
Posted by disastermaster on Sunday, May 6, 2012 5:41 PM

https://encrypted-tbn3.google.com/images?q=tbn:ANd9GcT902KTmVVpqqkIe2z44TLuiLBADNS2g_J5oUY1X_9vFdlsq65Uu351PQI vould shorten the chair legs if it vas me.

 https://i.imgur.com/LjRRaV1.png


  • Member since
    October 2009
Posted by PANZERWAFFE on Sunday, May 6, 2012 5:27 PM

OH MY !! Embarrassed

Rob

  • Member since
    September 2005
  • From: beacon falls , Ct.
Posted by treadwell on Sunday, May 6, 2012 4:59 PM

You could take some Apoxie Sculpt and sculpt his pants down around his ankles and have him sittin' on a bucket !! WinkWhistling ....  just sayin'    LOL

treadCool


  • Member since
    October 2009
Posted by PANZERWAFFE on Sunday, May 6, 2012 4:30 PM

TREAD - Thanks Cool  Good to hear you like the gear, I am pleased with it myself.  I too think the figures will really make the difference but the figures are my weak spot.  The only way to get better at them is to keep trying so thats the plan.  Defiantly know I want to fill all the train cars I have planed with figs though.

Dont worry, breaking things is not in the plan.....I hope Indifferent

OK guys, BILL, should have listen to your advice but Andy showed up at my house last night and made me start the sitting figure.  Another reason should have waited to start him is because I need to get some new heads for them.  The ones they come with are fine but I want some not wearing helmets.  I should have caught this before starting Embarrassed  Anyway here you can see why I wanted to see how he would fit in the chair.

Did you see the problem?  Look at his feet.  He looks like a little kid sitting in a chair without his feet on the ground Smile  Have two options: 1. cut the chair legs down a bit  2. put the fig on the edge of the chair, looks like he is just sitting or getting up.

Besides this one issue, like how he fits.

Rob

  • Member since
    September 2005
  • From: beacon falls , Ct.
Posted by treadwell on Sunday, May 6, 2012 10:54 AM

Hiya Rob :  )

Tarps, crates, helmets, guns...every piece looks great !   Adding the figures will be topper !

Good luck with your move, don't you dare break anything !

treadCool


  • Member since
    October 2009
Posted by PANZERWAFFE on Saturday, May 5, 2012 9:39 PM

Thanks guys !

BILL - Thats probably the smart call with the figs..........Paris is nice this time of the year Wink

ANDY - I think you would build the figs and have them sitting on your dashboard for the move so that you could discuss the plan of attack at the new house LOL Big Smile

CARL - Yes

Rob

  • Member since
    March 2006
  • From: Right Side of a Left State
Posted by Shellback on Saturday, May 5, 2012 8:18 PM

I like the idea of the wood shavings "packing " . Looks great Rob .Yes

  • Member since
    April 2009
  • From: Carmel, IN
Posted by deafpanzer on Saturday, May 5, 2012 6:59 PM

Outstanding!  Dig all details you have done.  I'd assemble the figures and have them primed so they will be ready for painting at new place if I have enough time. 

Good luck with the move!

Andy

  • Member since
    July 2004
  • From: Texas
Posted by wbill76 on Saturday, May 5, 2012 6:57 PM

Nice work on the details...can't say about the packing material in the crates but it's a nice detail either way IMHO! As for the figures, I would say hold off on them until the move is complete if you think there's a chance they could go AWOL in an attempt to go sight seeing in Paris when you're not looking! Wink

  • Member since
    October 2009
Posted by PANZERWAFFE on Saturday, May 5, 2012 6:11 PM

ERIC, CARL - Thanks guys !  ............me in a magazine............i kant even spel Dunce

BILL - Thank you too Yes  The unfortunate thing is that the large tarp is hardly noticeable when the gun deck is put on Sad  I tried it knowing the majority would not be seen but was a little disappointed at how little..OH well.

Slow but sure, here is the latest.

Finished up with the large crate and accessories.  Spent a little extra time making a sling from a sliver of paper but can hardly see this when in place so thought would give you a closer look.

Also a bit closer look at the completed helmets.

A lot of ammo crates depending on the type of ordnance will have a packing filler.  Was not sure if this would be found in the ammo for the Flak Gun but had put it in there anyway, I liked it.  Used pencil shavings and cut them up further with scissors.

And the finished product in place in the car

The large crate and most of the gear permanent in place in the car

Ammo crates permanently in place

Overview so far

Still a few flak gun ammo cans to place in put they will be on the gun deck.  Of course the gun deck to put in and the AA gun on the tripod...and a few more helmets.  Also have the chair to put in the car but think I will build and finish this figure first in order to fit him to the chair properly.

Now the question is, do I dare try to finish the figure now or wait until I move?  For those that do not know, I am packing up after this weekend and will be moving Tongue Tied  so not sure if I should pull figs out yet or not.  Wont do no good to have them laying in pieces in a box.  Who knows, might have an update tomorrow?

Rob

  • Member since
    July 2004
  • From: Texas
Posted by wbill76 on Saturday, May 5, 2012 11:41 AM

Nice work on the details Rob, the helmet liners and small tarps just add that much more depth to the project! Beer

  • Member since
    March 2006
  • From: Right Side of a Left State
Posted by Shellback on Friday, May 4, 2012 8:57 PM

tigerman

 Shellback:

Hmmmm ...Hmm......which one ?Whistling


Well there is only one isn't there?

tigerman

 Shellback:

Hmmmm ...Hmm......which one ?Whistling


Well there is only one isn't there?

Eric ..................Yes

  • Member since
    March 2003
  • From: Rain USA, Vancouver WA
Posted by tigerman on Friday, May 4, 2012 8:43 PM

Shellback

Hmmmm ...Hmm......which one ?Whistling

Well there is only one isn't there?

   http://i7.photobucket.com/albums/y269/wing_nut_5o/PANZERJAGERGB.jpg

 Eric 

  • Member since
    March 2006
  • From: Right Side of a Left State
Posted by Shellback on Friday, May 4, 2012 7:40 PM

Hmmmm ...Hmm......which one ?Whistling

  • Member since
    March 2003
  • From: Rain USA, Vancouver WA
Posted by tigerman on Friday, May 4, 2012 6:05 PM

This seriously needs to get into a magazine. Big Smile Great stuff to watch with envy.

   http://i7.photobucket.com/albums/y269/wing_nut_5o/PANZERJAGERGB.jpg

 Eric 

  • Member since
    March 2006
  • From: Right Side of a Left State
Posted by Shellback on Thursday, May 3, 2012 7:36 PM

Tarps and helmets are cool Rob Cool..............great looking progress man .Yes

  • Member since
    October 2009
Posted by PANZERWAFFE on Thursday, May 3, 2012 6:38 PM

ERIC - Easy tiger Smile

Little weathering on the trap

Then decided to put a small one on the large crate

Base coat, after dry the same process as the other tarp will follow

When the crate and tarp are complete will stack some more small personal gear on top of it.

Also started the helmet liners and straps

Beer


Rob

  • Member since
    March 2003
  • From: Rain USA, Vancouver WA
Posted by tigerman on Wednesday, May 2, 2012 10:08 PM

PANZERWAFFE

It's been a loooong day, no work at the bench tonight.

Angry

   http://i7.photobucket.com/albums/y269/wing_nut_5o/PANZERJAGERGB.jpg

 Eric 

  • Member since
    October 2009
Posted by PANZERWAFFE on Wednesday, May 2, 2012 9:48 PM

Thanks guys Yes

Bill, the tissue is the Walmart brand "Great Value" (soft).  It's there own make facial tissue.  There are no identifying marks on the box to tell you any better.  Have found this to be cheaper and it works very well for bed rolls, tarps, etc.

It's been a loooong day, no work at the bench tonight.

Rob

  • Member since
    July 2004
  • From: Texas
Posted by wbill76 on Wednesday, May 2, 2012 12:42 PM

Neat trick with the tarp. What type of tissue did you use?

  • Member since
    March 2006
  • From: Right Side of a Left State
Posted by Shellback on Tuesday, May 1, 2012 10:30 PM

Agreed , snot rag looks .....Oops Whistling........i mean tarp is looking good Rob .

  • Member since
    March 2003
  • From: Rain USA, Vancouver WA
Posted by tigerman on Tuesday, May 1, 2012 8:13 PM

The tarp is a great addition.

   http://i7.photobucket.com/albums/y269/wing_nut_5o/PANZERJAGERGB.jpg

 Eric 

  • Member since
    October 2009
Posted by PANZERWAFFE on Tuesday, May 1, 2012 8:00 PM

ERIC - Thats what I said about the Quad-20's.  It will be mounted on one of the flat cars if all goes right.  Thanks for the input Yes

REDLEG - As long as you armor guys are happy then I am too.....well lets keep our RR guys happy too Smile  I know your not much for German but you are Artillery, may need some help when I start the 15cm Field Howitzer.  It will be stowed on one of the flat cars for transport.

DOOG - Thanks man Big Smile  It's good to have you and all the other guys checking in and keeping an eye on things.  Please do, if you see anything that can be improved while closing in on the end, let me know Yes  It's real good to hear things are looking good.

CARL - Beer

Thank you all for your great words.

Sneak peak of what is happening tonight.  Stocking the car.

Did not want to use all crates under the gun deck and did not want to make more.  Placed a few crates in place and then added some wood pieces for filler.

OK, dont let this next picture scare you.  Looks like someone blew there nose in the car but it is the beginning of a tarp made of tissue.  Looks a lot better here in person.  Here goes

Used 50 / 50 water and white glue mix and spread it all over the tissue.  Let dry and then gave it a base coat.  Now looks like this

When this dries completely will start weathering it and adding some shadow.  Thats it for now.

Rob

  • Member since
    March 2006
  • From: Right Side of a Left State
Posted by Shellback on Tuesday, May 1, 2012 1:24 AM

Rob, gotcha Yes

  • Member since
    January 2007
Posted by the doog on Monday, April 30, 2012 10:14 PM

I'm honestly speechless! I can't see a thing I would change or improve upon!

Absolutely SUPERIOR work! Bow Down

  • Member since
    July 2006
  • From: New Jersey
Posted by redleg12 on Monday, April 30, 2012 7:23 PM

I'm speechless.....the model RR guys would be drooling......as for the armor guys.....fantastic

Rounds Complete!!

"The Moral High Ground....A Great Place to Emplace Artillery."

  • Member since
    March 2003
  • From: Rain USA, Vancouver WA
Posted by tigerman on Monday, April 30, 2012 7:00 PM

What's a German train without quad-20's? 

Excellent work sir.


   http://i7.photobucket.com/albums/y269/wing_nut_5o/PANZERJAGERGB.jpg

 Eric 

  • Member since
    October 2009
Posted by PANZERWAFFE on Monday, April 30, 2012 6:49 PM

CARL - OMG is right...........lets see if I can make it too all those rail cars Indifferent  I am REALLY enjoying this build but I am missing my armor Heart

All the markings were the kit supplied decals.  The ones on the wood texture were applied with micro set / sol and the ones on the car frame with Future.  Thanks for the great words.

DISASTER MASTER - As always, Thanks.......you are too kind with your words.

Beer

Rob

  • Member since
    October 2009
Posted by PANZERWAFFE on Monday, April 30, 2012 6:27 PM

TREAD hey man !  Thanks for that great complement.  That has to be about the best one could get.....cant get no better than looking real.  Lets see how everything looks when all components are put together.

Thats a good question with armor scale to train scales and not an easy answer.  This has been my first experience with train related items and am not very familiar with them.  I have often looked at some of the accessories in the train department, they have so much, and once in a great while find something that works for a diorama.  About 3 weeks ago had stopped by a train store here and asked the owner the same question you have asked.  His answer was ...It is difficult to say, train manufactures competing with each other went the wrong route and messed up the scales in the process.  There was one company that intermixed parts on there trains with different scales in order for there trains to fit on others tracks and then this eventually carried over to other parts and so on and so on.  Now scales for even trains is kinda off.  The closest to 1/35 should be I scale = 1/32.  Here is a chart that may be more useful then me blabbing Smile

1:12 Large Scale
1:13.7 7/8 inch scale
1:20.3 G, Three-Foot Gauge on Gauge 1 Track
1:22.5 LGB and Bachman
1:24 Half scale
1:29 Aristo-Craft, USA Trains, standard gauge on #1 gauge
1:32 I scale
1:48 O scale
1:64 S scale
1:87.1 HO scale
1:120 TT scale
1:160 N scale
1:220 Z scale

This is from this site which also has a scale calculator on the page.  May be useful for you.  http://www.csgnetwork.com/modrrscalecalc.html

Rob

  • Member since
    July 2003
  • From: On my kitchen counter top somewhere in central North Carolina.
Posted by disastermaster on Sunday, April 29, 2012 11:38 PM

Absolutely Masterfully Gorgeous.

http://forums.digitalpoint.com/image.php?u=187332&dateline=1324488554  A REAL treat and treasure.

 https://i.imgur.com/LjRRaV1.png


  • Member since
    March 2006
  • From: Right Side of a Left State
Posted by Shellback on Sunday, April 29, 2012 9:48 PM

OMG, this is going to be an impressive train !

Rob , did you use dry transfers or decals for the rail car markings ? I cant tell , they look painted on (complement) though !Yes

  • Member since
    September 2005
  • From: beacon falls , Ct.
Posted by treadwell on Sunday, April 29, 2012 9:44 PM

Hi Rob :  )

Man what a fantastic job you are doing on thisYes  I gotta say that the chassis (under carriage) on this just looks real..... I can't think of a better adjective !   even without the gun and extras it's great.

On a side note , I was wondering what scale in model rail roading does 1/35 translate to ?  I know H.O. is 1/87 I think...

nice man !

treadCool


  • Member since
    October 2009
Posted by PANZERWAFFE on Sunday, April 29, 2012 9:34 PM

ANDY, BILL, CARL - Thanks for the feedback and it's good to hear you guys like it.  I like the idea of the mirror but dont think I will use it in the end when everything is done.  If this was the only car I would use a mirror.  Believe it or not, I have a stack of mirrors of different shapes and sizes that I have collected just for the purpose of placing under models.  Funny, I have not yet used one of them for this purpose........on day.  Will not use the mirror because back to what I had mentioned early on in this WIP when finished there will be several cars connected and things going on around the train.  Here are some of the other cars waiting to be connected.  There are also a few other small kits included in this pic that will be on the train or in the scene when complete.  There is also some more stuff buried in the stash that will be pulled out at a later date.

Rob

  • Member since
    March 2006
  • From: Right Side of a Left State
Posted by Shellback on Sunday, April 29, 2012 7:14 PM

Holy mackeral  !!!!

Rob , beautiful detail and weathering !!!

I agree with Andy and Bill about putting a mirror under the model .........all of that super detail has got to be seen !!!

I impressed Rob Yes

  • Member since
    July 2004
  • From: Texas
Posted by wbill76 on Sunday, April 29, 2012 6:24 PM

Rob,

I was going to suggest the same thing as Andy but he beat me to the punch! Very nice work on the underside. Yes

  • Member since
    April 2009
  • From: Carmel, IN
Posted by deafpanzer on Sunday, April 29, 2012 5:10 PM

Looking great with all of those scratch building... good move replacing the air line!  Beer

At AMPS Auburn a guy put a mirror under his truck so we could see the scratch built details so I thought maybe you can add thin strip of mirror between the rails so your friends can see your work better.  It may sound corny but it worked... 


Andy

  • Member since
    October 2009
Posted by PANZERWAFFE on Sunday, April 29, 2012 5:05 PM

ERIC - Thanks!  Almost to the point of loading the gear in........almost.  Stat tuned Smile

TONY - Agree about the MG case.  Look in the last pic, the case under the MG came with it and I believe the intention was that is suppose to be the MG case.  Will try to come up with something better, may cut some barrels off some extra MG 34's and use them for spare barrels?

CARL, WBILL - Thanks guys Beer

Lots of pictures here, hope not too many.  Pics were hard to take and still did not come out as well as wanted because of lighting.  When I get to my new place, next month, will make a photo booth.  This is the main reason for so many pics and different backgrounds.  Weathering has started.  There were several applications of washes, pin washes, various powders and pigments and paints.  Almost there........

There was one last modification done before going any further.  Did not care for the kit supplied air line connector so had cut the hose off and replaced with wire.  Added some metal valve handles and then slide a rubber tube over the wire to simulate the hose.  The advantage of the wire is that it is flexible and should make things easier when connecting to the future cars.

went back to the undercarriage, to bad it wont be seen.

And now back topside

Thanks to all for taking a look.  Until next time Beer


Rob

  • Member since
    July 2004
  • From: Texas
Posted by wbill76 on Wednesday, April 25, 2012 12:01 PM

Sharp work on the details and gear Rob, look forward to seeing the car equipped and ready for action. Yes

  • Member since
    March 2006
  • From: Right Side of a Left State
Posted by Shellback on Wednesday, April 25, 2012 11:58 AM

Rob , details , details and details !!! YesYesYes

  • Member since
    September 2005
  • From: Uppsala, Sweden
Posted by bultenibo on Wednesday, April 25, 2012 2:33 AM

Great choice of equipment for the AA wagon! The painting on the green wooden box is really realistic with its worn off paint!

The only thing I think is missing is a case containing the spare barrels for the MG. They should atleast have one extra barrel to function effectively.


/Tony

  • Member since
    March 2003
  • From: Rain USA, Vancouver WA
Posted by tigerman on Tuesday, April 24, 2012 11:31 PM

I like all the different gear you have there Rob. Going to look sweet!

   http://i7.photobucket.com/albums/y269/wing_nut_5o/PANZERJAGERGB.jpg

 Eric 

  • Member since
    October 2009
Posted by PANZERWAFFE on Tuesday, April 24, 2012 8:05 PM

TREAD, CARL, ANDY, WBILL, Thanks guys.  Really appreciate the comments and glad you like.

TONY - Thanks for the comments and thanks for that bit of history Yes  Was unaware of this information and was very pleased to receive it, very interesting and agree helps support the car as an AA.  One of the reasons I like too build is because of the history / research and building provides a more "Hands on" way of learning.  It's even more enjoyable when someone, such as yourself, is able to fill in and share some of their knowledge.  Thanks Beer

Here is the bulk of the gear now painted.  The last addition of gear will be a tarp laid over, or what should be, the remainder of ammo boxes.  Ignore the woodpecker MG thats for something elseWink  Hope you enjoy.

Rob

  • Member since
    July 2004
  • From: Texas
Posted by wbill76 on Sunday, April 22, 2012 2:44 PM

Looking great Rob, the decals and other details including the wood finish have really brought it to life! Yes

  • Member since
    September 2005
  • From: Uppsala, Sweden
Posted by bultenibo on Sunday, April 22, 2012 1:33 AM

The build is coming along nicely. Yes

I just love the attention to the details and the composition of the equpiment, and can't wait to see the wagon wheathered.

Also, with some figures added the wagon should come alive and become a small world in itself, so to say.

One thing that caught my attention is that the Deutche Reichsbahn district type (Gattungsbezirk) of the wagon, as shown on the decals, is Villach. It was a small, insignificant town in southern Austria, but due to the fact that is was - and  still is - a central railroad connection point with Italy and the Balkans the town was frequently bombed by the allies during ww2. During 37 air missons some 42 000 bombs was dropped on the town, which atleast in relation to the town's population - just some 35 000 inhabitants - made it one of the most heavily bombed German towns during the war! Surprise

In this regard I would say that your choice of making the wagon into a AA-wagon gives the whole build quite a symbolic dimension. So you better add some seriuos amount of ammo crates! Big Smile


/Tony

  • Member since
    April 2009
  • From: Carmel, IN
Posted by deafpanzer on Saturday, April 21, 2012 10:44 PM

I swear I saw it few days ago at the train crossing.  Your work turned a styrene into very realistic looking wood... 

Andy

  • Member since
    March 2006
  • From: Right Side of a Left State
Posted by Shellback on Saturday, April 21, 2012 7:33 PM

Looks perfect Rob ! I really like the wood colors . They are just a bit different than what i usually see for wood and thats makes the color even more interesting and realistic ................like Tread sead .Yes

  • Member since
    September 2005
  • From: beacon falls , Ct.
Posted by treadwell on Saturday, April 21, 2012 5:19 PM

Really looking great, Rob ! The wood and all the colors you have chosen really work well together

forming a real 'realistic' , cohesive build !Toast .

treadCool


  • Member since
    October 2009
Posted by PANZERWAFFE on Saturday, April 21, 2012 2:44 PM

After a few days have completed construction on the ammo boxes that will loaded into the railcar but they still need to be painted.  Have completely assembled all kit parts onto the car, latches, hand grabs, etc. and applied all decals with future.

Added a handle to the inside on the doors for the gun crew.

With the car complete it is now time to weather the car as a whole.  Then there is just the gear that will be inside left to paint.

Rob

  • Member since
    April 2006
  • From: Denver, Colorado
Posted by waynec on Sunday, April 15, 2012 10:29 PM
the mounts i talked about looked more permanent. if anyone asks you can tell them this a quick mount to protect the train in transit and the gun will be removed at the final destination. which means you need another car for the trailer and supplies and maybe a third car for the truck and an engine to move it and....... i will revisit mine after early may ipms club annual contest which i am finishing stuff up for. and they chain cars to flatbed trucks all the time plus i don't think the 20mm has much of a recoil. don't recall it being so when shooting the 20 on the m-114 recon vehicle in the '70s.

Никто не Забыт    (No one is Forgotten)
Ничто не Забыто  (Nothing is Forgotten)


  • Member since
    March 2006
  • From: Right Side of a Left State
Posted by Shellback on Sunday, April 15, 2012 8:42 PM

Of course i agree with you Andy .................Yes  Beer

  • Member since
    October 2009
Posted by PANZERWAFFE on Sunday, April 15, 2012 8:41 PM

WBILL - Working on some more smaller crates now and think I will use your suggestion of storing them under the gun deck, also know as the "Penthouse" thanks to Andy.

ERIC - There will defiantly be figs in the build but it may be a while before getting to them.  Have been looking at this car along with the other cars I have and am still working on which figs would work best.  Presently, believe this car may have the crew sitting and relaxing in this car and enjoying the ride.  One fig will be on top of the "Penthouse" acting as a look out.

CARL - Good point and good question.  Bill good answer and agree.  The chains are going to stay.

WAYNEC - Had remembered your suggestion and appreciated it Yes  That is what started me thinking of how to secure the gun.  If I would of planned this out more from the beginning I may have taken the feet off of the Flak gun but decided to leave them on because had already had everything built.  I did go back looking though and have found these guns mounted on various things and some still had there feet.  For these reasons I went with the chains. 

ANDY - Sounds like were going to have to keep you chained up in the "Penthouse" Surprise  That barrel you see in the car is actually full of German beer Beer  Just have to make a tap for it Wink  Glad you like.

This is what I have been working on today.  They are not to difficult but quit time consuming.

Will make a few more until I cant take making them anymore so that means not sure how many more will be made?

Rob

  • Member since
    April 2009
  • From: Carmel, IN
Posted by deafpanzer on Sunday, April 15, 2012 6:25 PM

Love those chains!  I believe everything had to be secured.  Train rides can be rough and I have seen tanks being secured down with chains too so it is very possible that flak had to be secured too.  

The only thing is missing... a case of German beer for a long ride.  Of course Carl would agree with me! Beer

Andy

  • Member since
    April 2006
  • From: Denver, Colorado
Posted by waynec on Sunday, April 15, 2012 5:53 PM
i have seen these jury-rigged on truck beds. usually the feet are taken off the base and large timbers are secured to the bed on either side (like the 3.7cm at on the bow of pt-109). i was thinking big u-bolts over the legs too, but chains are used to tie down light vehicles so why not.

Никто не Забыт    (No one is Forgotten)
Ничто не Забыто  (Nothing is Forgotten)


  • Member since
    March 2006
  • From: Right Side of a Left State
Posted by Shellback on Sunday, April 15, 2012 5:20 PM

That makes perfect sense Bill .Yes

  • Member since
    July 2004
  • From: Texas
Posted by wbill76 on Sunday, April 15, 2012 4:48 PM

Carl,

Recoil wouldn't necessarily be an issue...the gun itself was designed to be mobile and didn't require any special arrangements to account for recoil when deployed. Generally when the Flak 38 was used in an SPG mount (like the famous "sled" mount in the back of an Opel or on the Sdkfz 10/5) some method was used to secure the base because of the inevitable "objects in motion" physics. That's why I still think the chains are a good idea for Rob to keep...trains did travel at a decent speed and had to stop eventually...and you wouldn't want a heavy object like the gun to decide on its own that it still had a little bit more distance to travel. Smile

  • Member since
    March 2006
  • From: Right Side of a Left State
Posted by Shellback on Sunday, April 15, 2012 4:34 PM

Rob and Bill , i've been thinking about how practical the chain would be and it occurred to me as to ask how much recoil is there from the 20mm ? What with the gun mount sitting on a wood deck i would think the mount would be supsceptible to moving around on those boards from the vibration of the recoil ............Hmm

  • Member since
    March 2003
  • From: Rain USA, Vancouver WA
Posted by tigerman on Sunday, April 15, 2012 2:22 PM

Hi Rob. I hope you're going to add some figgies to this piece to give a it some extra pop.

   http://i7.photobucket.com/albums/y269/wing_nut_5o/PANZERJAGERGB.jpg

 Eric 

  • Member since
    July 2004
  • From: Texas
Posted by wbill76 on Sunday, April 15, 2012 2:10 PM

Rob,

I think you should keep the chains...I wasn't trying to discourage you from using them by any means. Wink The MG34 on the AA tripod and other goodies look good too...the crew needed some place to "be" when not manning the guns after all, right? Maybe you could use some of the empty space under the platform for the Flak 38 to house the ammo...gives you more options at least without crowding things too much in the car?

  • Member since
    October 2009
Posted by PANZERWAFFE on Sunday, April 15, 2012 11:23 AM

WBILL - Not sure either if the chains should be there or not, spent all day thinking about it and looking at them and as you see decided to put them on if for no other reason to add a little more something.  I doubt they would actually be on there though.  They can be removed if everyone thinks that would be better?

Been slowly working on some stuff to fill the car.  Have scratch built a large crate and thinking about making some of the smaller, long ones you usually see with German ammo.

Here is the layout of the car I have so far.

What really is needed are more Flak 38 and some MG 34 ammo cans.  Looking through my parts box I have discovered I am finally out of German ammo cans.  Guess I can buy some or I may just wait and collect cans from other kits as I build them and slowly add them into the car.  They would be easy to just throw them in at any time.

Rob

  • Member since
    July 2004
  • From: Texas
Posted by wbill76 on Saturday, April 14, 2012 2:10 PM

Chains are a nice touch Rob, I can't comment as to whether they would be actually used or not but they are a neat feature regardless. The Flak 38 wasn't a light piece of equipment (weighed in at around 400 kgs) and gravity alone would probably have been sufficient to keep it in place.

  • Member since
    October 2009
Posted by PANZERWAFFE on Saturday, April 14, 2012 12:25 AM

Carl, Yes

Was thinking of a way to help hold the Flak 38 in place on the car.  Liked the idea brought up earlier with using the large U bolts but wanted something a bit more.  Decided to use chain and make some small pad eye's.  The chain is pretty small and was a pain to get into place.  What took longest was had to make tiny links from wire to connect the chain on the front of the gun.  The gun is still dry fit for pics will remove to paint the chain.

Rob

  • Member since
    March 2006
  • From: Right Side of a Left State
Posted by Shellback on Friday, April 13, 2012 11:05 PM

Yup , way cool looking results Rob .Yes

  • Member since
    March 2003
  • From: Rain USA, Vancouver WA
Posted by tigerman on Friday, April 13, 2012 10:44 PM

Helped you out? Big Smile I think you have it reversed.

   http://i7.photobucket.com/albums/y269/wing_nut_5o/PANZERJAGERGB.jpg

 Eric 

  • Member since
    October 2009
Posted by PANZERWAFFE on Friday, April 13, 2012 10:21 PM

DOOG - Hey, thanks man.  I tell you, a lot of the guys on here have helped me out and I am just happy to be able to show something in return and hope that it can help someone else Yes

WBILL, ERIC - YesBeer

Rob

  • Member since
    March 2003
  • From: Rain USA, Vancouver WA
Posted by tigerman on Friday, April 13, 2012 12:39 PM

the doog

WAY COOL, dude! THAT'S what makes this forum shine and thrive--the willingness of modelers like you who take the time to selflessly share their methods here, that we all might learn and become better modelers!

Thanks for taking the time to share this with us! Smile

+!

Well done Rob. 

   http://i7.photobucket.com/albums/y269/wing_nut_5o/PANZERJAGERGB.jpg

 Eric 

  • Member since
    July 2004
  • From: Texas
Posted by wbill76 on Friday, April 13, 2012 9:57 AM

Glad to be of assistance Rob and sweet little step-by-step on the wood effect! Yes

  • Member since
    January 2007
Posted by the doog on Friday, April 13, 2012 8:50 AM

WAY COOL, dude! THAT'S what makes this forum shine and thrive--the willingness of modelers like you who take the time to selflessly share their methods here, that we all might learn and become better modelers!

Thanks for taking the time to share this with us! Smile

  • Member since
    October 2009
Posted by PANZERWAFFE on Thursday, April 12, 2012 9:39 PM

Here is how I painted the wood effect.  All paints enamel Model Masters.

Base coat of MM wood and then gave it a coat of Dullcote, let dry overnight.  On the car bed had also used MM Military Brown in random places, not on the gun deck though.

Car bed had a very light wash, gun deck gave a little heavier wash of Winsor & Newton Raw Umber oil.  It was thinned with Turpenoid (Blue Can), let dry then spray a coat of Dullcote.

(This is the step I had forgot to mention before)  using AIM Products Weathering Powder applied on selected boards Dirty Yellow and Medium Brown.  Used mostly the Dirty Yellow.  Put on dry with an old paint brush.

Next heavy dry brush random boards with MM Light Sea Gray.

Then light dry brush the majority of the boards with MM Light Gray. (I know, crappy pic)

Now the fun part, use an old brush and apply MIG pigment SMOKE BLACK P023 and INDUSTRIAL CITY DIRT P039 in areas and amount of your liken.  Use rubbing alcohol as a carrier.

At this point I called it done for the gun deck but on the car bed I had once again gave the bed a very light dry brushing with the LIGHT GRAY to give a more worn look. 

And here is the Gun Deck temporally in place


Rob

  • Member since
    March 2006
  • From: Right Side of a Left State
Posted by Shellback on Thursday, April 12, 2012 7:38 PM

deafpanzer

Your work reminds me of a lodge I stayed in Maryland years ago... floors and walls were made of wood.  You did GREAT!  Keep it coming...


Andy , was it a caboose ? Whistling

  • Member since
    October 2009
Posted by PANZERWAFFE on Thursday, April 12, 2012 2:38 PM

CARL - Working on the wood graining now for the gun deck.  Taking pics of each step and will post in case anyone is interested.  Figure pictures are better than words.  When I had first explained the process, had forgot one step Oops  That will be corrected with the picture show.

Will see what I can do about the refrigerated car...........

ANDY - "Penthouse" it is.  Almost ready for you to move in.  Thinking I should come up with some gear and what not to put in there before putting the overhead deck on, will see?  Glad you like the scratch work.  This work was not too difficult due to I already had and used the correct shape and size of Evergreen styrene.  Just had to cut everything to the correct length and attach into place.

DISASTER - I'm surprised at how much feedback I'm getting with this build, was not sure if there was going to be much interest not truly being an armor piece.  Happy to hear that I could inspire someone who inspires so many.  It would be fun to watch you work your sprue juice magic one one of these railcars.  Thank you for the great comments.

How is your 4502 coming along?  Knew you were working on it, is there any pic's out yet?  I don't want to miss it.

WBILL - That answer helps indeed, just the answer I was looking for.  Many Thanks Yes  I now just have to decide what the scenario of the scene will be.  The overall plan with the train is still real early in the planning stag but it's out come will largely depend on what / how the Pz III's will be represented and since they will dictate  the theme so much, I really appreciate you filling in the answers Beer

DOOG - It's great too have you stop in.  Thank you very much for the comments.  This is my first exploration into these railcars and I have to admit, have been enjoying working on it.  Glad you too like the wood effect.  After playing around with it for a while was surprised at how easy it was to achieve the effect.  As mentioned, will show the process on my next post.


Thanks to all for looking and for your comments Beer

Rob

  • Member since
    January 2007
Posted by the doog on Wednesday, April 11, 2012 4:59 PM

Man, this is just STUNNING. Bow Down

That wood is just a home run outta the park! Great work!

A very unusual and compelling project, for sure. You're doing some awesome detailing and painting here!!!

  • Member since
    July 2004
  • From: Texas
Posted by wbill76 on Wednesday, April 11, 2012 10:04 AM

Rob,

Your question has a two-part answer....if it's a "factory depot" setting where the tanks are shipping out for delivery to units in the field, they wouldn't yet have any tactical markings applied as that would be done by the units in the field. If you want to show an established unit on the move, then they would all have the same divisional/tactical markings but different turret numbers. The turret numbers would likely all start with the same first digit (like 3 or 5) for example to denote they belonged to the same company (you could even go further and have the second digit match as well to show they were from the same platoon) as it was common for units to entrain as entities to make it easier when they offloaded to stay organized and move together as a unit. HTH!  

  • Member since
    July 2003
  • From: On my kitchen counter top somewhere in central North Carolina.
Posted by disastermaster on Tuesday, April 10, 2012 11:13 PM

http://t3.gstatic.com/images?q=tbn:ANd9GcT00Y3T1E7lA8R3i_OPIaYnDs8fX1TpgMvqKxoIvimuGHQgeaXxSAY6 Aw crap, now you got me wanting to do one of    these......

  http://www.gif-mania.net/animated-signatures/img/attente.gif  .........and I'm still working on my 4502.

        Now THIS is what inspiration is about.

             Some really superior woodwork and detail here.

                   You go man.........

 https://i.imgur.com/LjRRaV1.png


  • Member since
    April 2009
  • From: Carmel, IN
Posted by deafpanzer on Tuesday, April 10, 2012 10:44 PM

Great scratch building result! Beer I am going to call that space the 'penthouse'... isn't that normally the best room in the building?  

Andy

  • Member since
    March 2006
  • From: Right Side of a Left State
Posted by Shellback on Tuesday, April 10, 2012 9:46 PM

Nicely done Rob . Yes I'll remember your wood graining technique .

Hope you find a refrigerated rail car to hall my beer ........Beer......you can leave Andys beer out in the sun .Whistling

  • Member since
    October 2009
Posted by PANZERWAFFE on Tuesday, April 10, 2012 9:00 PM

CARL - Thanks buddy Yes  I had to build this train car so that I could move you and Andy's Beer around.

WBILL - Good to hear you like the frame work.  Question for you or for anyone who may have a suggestion: This is for later on when I get around to the flat cars.  Have 3 flat cars that will be attached to this gondola and each car will have a Pz III on it so what would the numbering on the tanks be?  Meaning would they be in sequential order or what / how would they be represented?  I'm assuming the Pz's would be leaving a factory or a unit would be moving to a new position at the front so the tactical numbers would would have to represent them belonging all to the same group.  Any suggestions?

ERIC, REDLEG - Thanks guys Yes  Have the gun deck left to get the wood treatment and then will revisit the car as a whole and give it some heavy grim to finish off the wood / car.  Stay tuned, it's great to have yall along for the ride.

ANDY - Are you sure it was Maryland or was it on your way to the Eastern front Hmm  Glad you like.


The update does not look to busy but a little time was put in to cut and texture all of the gun deck boards.  Wanted to of course try to match the kits supplied boards and what I had come up with is:  Used some Evergreen .015 x .188" strips, that measures out to 3/16" wide and that is the exact same width of the kit boards Yes  Then used a razor saw and drug it across the styrene strips to give it texture.  After texture then cut 21 boards and made the deck. 

In order to get the proper board placement and spaces between the boards, had taped down a small carpenters square and placed tape with the sticky side up to the bench.  Now took the boards and laid into position and used a razor for the spacing between the boards.

Now that all the boards are in place had then used .022 x .066" strips and glued 2 of these at equal distances on the bottom to hold the boards together.  Let dry and this is how it came out.  Not sure if you will be able to see the wood grain in the pic but it's there and should show much better once painted.

The deck has now been prepped and a coat of MM wood has been applied.  Will let that dry overnight then it will receive the same wood technique as the rest of the wood has.

Can now get a better idea of how things will look with the deck temporally in.

Until next time Beer


Rob

  • Member since
    July 2006
  • From: New Jersey
Posted by redleg12 on Tuesday, April 10, 2012 7:55 PM

DAM NICE WOOD......Nuff Said

Rounds Complete!!

"The Moral High Ground....A Great Place to Emplace Artillery."

  • Member since
    April 2009
  • From: Carmel, IN
Posted by deafpanzer on Tuesday, April 10, 2012 10:44 AM

Your work reminds me of a lodge I stayed in Maryland years ago... floors and walls were made of wood.  You did GREAT!  Keep it coming...


Andy

  • Member since
    March 2003
  • From: Rain USA, Vancouver WA
Posted by tigerman on Tuesday, April 10, 2012 10:39 AM

Just love that wood detail.

   http://i7.photobucket.com/albums/y269/wing_nut_5o/PANZERJAGERGB.jpg

 Eric 

  • Member since
    July 2004
  • From: Texas
Posted by wbill76 on Tuesday, April 10, 2012 10:03 AM

Beat that sucker into shape Rob! Nice fix on the framing and the gun platform is shaping up nicely. Beer

  • Member since
    March 2006
  • From: Right Side of a Left State
Posted by Shellback on Monday, April 9, 2012 10:56 PM

Good griefe Rob thats comin out great !Yes

  • Member since
    October 2009
Posted by PANZERWAFFE on Monday, April 9, 2012 10:20 PM

TREAD - Thanks buddy!  Good to "see" you.

OK, a little bit more.  Painted the gun deck frame work.

This was just a simple frame sense it would not really be seen but have had so concern with the deck possibly sagging in the middle with no support.  Have added a center support beam.

My original idea was to put the front side cross bracing on both sides but after some thought had decided to leave the side you see on the right open.  My thought process is if there was a crew in the car on a long ride....were would they stay to relax and get out of the elements?  Leaving the cross members out allows access under the gun deck and figure this space can be used for crew quarters and gear / stowage.  Not sure how realistic that would be but that was the thought.

Rob

  • Member since
    September 2005
  • From: beacon falls , Ct.
Posted by treadwell on Monday, April 9, 2012 9:09 PM

Man Rob.....very cool : )


  • Member since
    October 2009
Posted by PANZERWAFFE on Monday, April 9, 2012 9:06 PM

GUN TECH - Thanks for those comments and good too hear you like.

WAYNEC - Sounds like you have a lot going on at the bench.  Think the railbed looks good and your Baureihe 52 looks GREAT!  Thats the locomotive I have but in 1/35 will use your tips when construction begins on it.  It looks to be quite intense in the box.

CARL - That's alright too say "You like my wood"  Thanks buddy.

ANDY - Quit drooling on my wood, you'll make it swell.

Have not had much time at the bench lately but have done some here and there.  Will start with the Flak gun.  Painted and some light weathering may go back later and weather a bit more, dont know, but will see how the rest of the build progresses first.

After the gun went ahead and attached the car sides onto the bed.  I now know why maybe you do not see many people finish these Gondola kits.  The sides did not go on easy and actually had to remove all of the side beams, bend some and manipulate them into position once the wood section had already been glued onto the bed.  Also had to cut off all the locating taps from the beams.  It was a real challenge to get the sides erected and attached.  They came out all right but not as good as I had expected.

Any flaws that may be there I'm not to worried with because the weathering that is to come should cover any that may be there up.  I figured that these cars are actually really dirty.  In the picture above you may have seen some stuff going on in the inside of the car.  The frame work for the "gun deck" has begun.  Here some views from the inside of the car.

Back too the problem with the sides giving problems, well that made them not square with the bed and the tops bowed out something awful.  To fix this had made the beam seen going across the car and it had a notch cut out on each end and that would hook onto the sides of the car pulling them together.  There was too much pressure for the thin styrene and it was bending / warping the beam and it's ends.  To fix this had made some aluminum end caps and fixed them to the ends of the beam, that solved the problem.  Can see the end caps in this picture:

Thats it for now.  Will get some more pictures up soon.

Thanks to all for looking.

Rob

  • Member since
    April 2009
  • From: Carmel, IN
Posted by deafpanzer on Monday, April 2, 2012 10:24 PM

Catching up here... it still makes me drool every time I look at your work on the wood.  Nice work on the flak too!  

Andy

  • Member since
    March 2006
  • From: Right Side of a Left State
Posted by Shellback on Monday, April 2, 2012 10:12 PM

Rob , i didnt say it b4 , but thats some nice wood man ! OopsHmm Thats ok to say i think ...........Toast

  • Member since
    April 2006
  • From: Denver, Colorado
Posted by waynec on Monday, April 2, 2012 9:39 PM
mine is partially done. i think the dragon kit has a more detailed undercarraige which no one will see. it's on hold as i finished or will have finished this week my 1/35 MAS (ship forum), 1/72 k-5 rr gun (get 'er done group build), me-163, LAV-III and COUGAR (armor forum). i hand brushed it after it was together. bad move lots of hard to get to nooks and crannies. see lessons below. i will post some pics by end of the week. this is my first rail bed which i will use for 1/72 k-5. o guage rail, basswood ties ballast on top of modeling clay. (NOTE PAINT MODELING CLAY CLOSE TO BALLAST COLOR SO THE BLUE CLAY DOESN'T SHOW THROUGH GAPS IN THE BALLAST.) they may make them but i think they are still attached to the plastic ties. i will investigate further. i have not built the big locomotives yet, just 3 1/72 and 1/87 locomotives. WHAT I LEARNED DOING RAILROAD STUFF: 1. patience. 2. really look at the instructions to figure out what can be put together before painting and what has to be painted before assembly 3. don't put all the fiddley stuff like ladders, lights, etc on until major construction and painting is done. keeps it from getting broken. 4. on 1/35 be very careful building the couplers. they should be completely moveable in order to couple cars together. in 1/72 thet tend to be one piece so that is not an option. look at how some of these guns are mounted on trucks. looks like you take the feet off so the bottom is flush, brace on both dsides of the legs with lumber and maybe BIG u-bolts through the deck.

Никто не Забыт    (No one is Forgotten)
Ничто не Забыто  (Nothing is Forgotten)


  • Member since
    August 2006
  • From: Oromocto, Canada
Posted by Gun Tech on Monday, April 2, 2012 7:35 PM

Rob,

I am utterly speechless...  That wooden effect is simply amazing!!! Yes


BRAVO!!!!!

Jean-Michel    "Arte et Marte"

  • Member since
    July 2004
  • From: Texas
Posted by wbill76 on Monday, April 2, 2012 7:21 PM

Rob,

That pic is of a Flak 30 and they were commonly fielded without splinter shields regardless...one of the reasons the Flak 38 did get them...the crews were awfully exposed otherwise as you can see! Wink I would suggest sticking with the shields...if for no other reason than it gives you some more "canvas" to work with in terms of painting/finishing.

  • Member since
    October 2009
Posted by PANZERWAFFE on Monday, April 2, 2012 7:00 PM

ERIC - Thanks for helping me stay on track.

WBILL - Thanks for the input.  That was on the same lines I was thinking.  My only concern would be is if it really should have the splinter shield on or not?  Have seen them with the shields on flat cars but not sure about these taller gondolas.  Don't think it would make any difference if it was a tall or short car as long as it had enough room to traverse 360 as you had pointed out.  I'm still going with the shields unless anyone knows any better.  Went back searching for pictures and this is the closest thing I could come up with on a high sided car.


Have been detailing the Flak Gun, will get pic's when finished with it.

Rob

  • Member since
    October 2009
Posted by PANZERWAFFE on Monday, April 2, 2012 6:45 PM

WAYNEC - Have not tried any of the Trump kits yet though I do have a few in the stash.  You say you have a start on yours, sure would like to take a look.  The low sided car sure would make things easier for mounting an anti-aircraft gun of any type in.  Have found a few pictures on line of the low sided car with the 20, 37, and a lot of quad mountings.  That will be quite the job to lay all of that track.  Not sure how to make the rail holders?  Could be wrong but I believe either Dragon or Trumpeter makes them as an accessory kit?  Will have to take a look.  I too have thought about laying my own track when ever I get to a permanent location but for now will just use the kit supplied ones.  Have you built up any of the Trumpeter locomotives in 1/35?  OH yea, thats alot of cars....12' - 14' !

This is how I painted the wood:  All MM enamel paints.  Base coat of WOOD 1735, a few small random spots of MILITARY BROWN for an addition to the base coat.  Light wash this with Winsor & Newton RAW UMBER.  Heavy dry brush (almost paint them) random boards with LIGHT SEA GRAY and then go back over all the boards lightly, dry brush LIGHT GRAY.  Use the W&N RAW UMBER again and pin wash the lines between the boards.  Thats it for paint, now the fun part is using MIG pigments.  I used 2 different pigments, P023 BLACK SMOKE and P039 INDUSTRIAL CITY DIRT.  Put these pigments on at your discretion and use rubbing alcohol as a carrier.  Thats it, let me know if you have any questions when you try it.

Rob

  • Member since
    April 2006
  • From: Denver, Colorado
Posted by waynec on Sunday, April 1, 2012 9:47 PM
i have the trumpeter version of this kit partially built. i will use your techniques for the wood. that looks really nice. i will put the sides on since i have a low sided car too. the single 20mm is a good choice, maybe even a 37mm. the quad 20mm gun would fit but there are too many crew members which us why thay didn't stay long on u-boats. i will be laying my own track. already did this with 1/72 br-52 and k-5. i use o scale rails and basewood with a miter saw to cut the ties after staining the entire strip(s). at 1/72 i can spike the rails but at 1/35 i am going to have to figure out how to make a boat load of german rail holders since i probably have 12'-14' of 1/35 rolling stock and locomotives.

Никто не Забыт    (No one is Forgotten)
Ничто не Забыто  (Nothing is Forgotten)


  • Member since
    July 2004
  • From: Texas
Posted by wbill76 on Sunday, April 1, 2012 11:07 AM

I like the idea you're heading in with this one Rob, the 2.0cm Flak 38 was often used in this kind of an ad-hoc role. Just a thought in terms of the platform, make sure there's enough room for 3 crew members to work/serve the gun (gunner, spotter, ammo loader) effectively and you should be golden with the concept! The width of the car should be sufficient to allow the gun to rotate cleanly through 360 degrees even with the splinter shields fitted so you have some options as to how high to mount the platform within the bed. Stock the car with plenty of ammo and you should have a nicely occupied space while still showing off some of that awesome wood work! Yes  

  • Member since
    March 2003
  • From: Rain USA, Vancouver WA
Posted by tigerman on Sunday, April 1, 2012 3:37 AM

I like the idea of a 20mm. I was thinking maybe a couple of MG-34's, but I think you're on the right track.

   http://i7.photobucket.com/albums/y269/wing_nut_5o/PANZERJAGERGB.jpg

 Eric 

  • Member since
    October 2009
Posted by PANZERWAFFE on Sunday, April 1, 2012 1:47 AM

Yes, wasn't very sure if it should have been in here with armor but now with the Flak Gun it fits right in.  Much later on when I get to the other cars it will all make a little more since being here.  Have a few other cars that will be transporting Pz III's and they will be connected to this car along with the engine and another flat car.  Beside this train I may put my armored train on the track next to it?  Thats all a long way from here now so will just have to see how it all pans out.  With all of that said, thats another reason had wanted to arm this gondola car.  With a full load transport figured it would need some air protection.

Thanks for taking a look Yes


Rob

  • Member since
    March 2006
  • From: Right Side of a Left State
Posted by Shellback on Sunday, April 1, 2012 12:36 AM

When i looked at this the other day i was thinking "what would make this a piece of armor ? " A gun !Yes

  • Member since
    October 2009
Posted by PANZERWAFFE on Sunday, April 1, 2012 12:18 AM

CARL, ERIC - Yes

WBILL, ANDY - Thanks guys Yes

Was going to add those fresh oil stains that I had mentioned and throw some barrels and just junk in the car..........after thinking for a while figured that was a waste of a gondola car and it needed to be carrying something?????

This is what I came up with.

There is not much for parts or really a build progress for this little fellow so just slapped it together real quick.  Here are the sprue's.

It had a fair amount of detail and the fit was really good.  There were no big problems but care had to be taken removing and cleaning some of the small and fragile parts.  Everything is out of the box and the only mod I did was to drill out the sight telescope tube.  Even on something this small I normally paint things as I go but this time, the first time, I just built everything first.  I did leave the shields off for now to make it easier to paint.  Here she is built.

This is the basic concept.

Now since the gondola has the high sides I figured I will have to make a platform for the Flak Gun to sit on.  Had first thought of making a grate like platform so that you could still see the wood planking underneath but thought that would not be correct.  Will just build a wood planked platform for the gun.  Picture below you can see how high the sides are compared to the Flak Gun.

I'm thinking of going 4 boards from the bottom to put the platform in.  That should provide enough hight and not give any interference to the gun but still give the gun crew some protection.

More to come.

Rob

  • Member since
    April 2009
  • From: Carmel, IN
Posted by deafpanzer on Wednesday, March 28, 2012 7:25 PM

DittoDittoDitto  Wood just look great and very realistic!  Just found this... now you have my attention! Beer

Andy

  • Member since
    July 2004
  • From: Texas
Posted by wbill76 on Wednesday, March 28, 2012 12:59 PM

The wood variation is just beautiful Rob. Yes

  • Member since
    March 2003
  • From: Rain USA, Vancouver WA
Posted by tigerman on Wednesday, March 28, 2012 12:04 PM

PANZERWAFFE

REDLEG - Thanks brother Yes  Since most of the car is wood it is really good too hear you like it.

ERIC - Yes Figured because of the large volume of wood it would need some variation.  Those side panels are a combination of 2 different base colors, 3 powders, and 2 shades of dry brushing.  Finished it off with a shot of Dullcote.  There will be more too follow with those panels once all is put together.

DM - Always good to see your smilies approve, Thanks.  Standby though because their is more to come Yes


Little more weathering on the deck was done.  Not completely finished, there will be some fresh oil stains and such, but thought would go ahead and let yall take a look.

http://i951.photobucket.com/albums/ad352/PANZERI/Train%20-%20Gondola%20Type%20Ommr/DSC01313.jpg

http://i951.photobucket.com/albums/ad352/PANZERI/Train%20-%20Gondola%20Type%20Ommr/DSC01314.jpg

Now that is what I'm talking about!

   http://i7.photobucket.com/albums/y269/wing_nut_5o/PANZERJAGERGB.jpg

 Eric 

  • Member since
    March 2006
  • From: Right Side of a Left State
Posted by Shellback on Tuesday, March 27, 2012 10:23 PM

WOW !


  • Member since
    October 2009
Posted by PANZERWAFFE on Tuesday, March 27, 2012 9:48 PM

REDLEG - Thanks brother Yes  Since most of the car is wood it is really good too hear you like it.

ERIC - Yes Figured because of the large volume of wood it would need some variation.  Those side panels are a combination of 2 different base colors, 3 powders, and 2 shades of dry brushing.  Finished it off with a shot of Dullcote.  There will be more too follow with those panels once all is put together.

DM - Always good to see your smilies approve, Thanks.  Standby though because their is more to come Yes


Little more weathering on the deck was done.  Not completely finished, there will be some fresh oil stains and such, but thought would go ahead and let yall take a look.

Rob

  • Member since
    July 2003
  • From: On my kitchen counter top somewhere in central North Carolina.
Posted by disastermaster on Tuesday, March 27, 2012 8:56 PM

http://a4.ec-images.myspacecdn.com/profile01/116/1ad98af9f19c4a3e99ebba63e0ee85b6/t.jpgTHIS is just beautiful.

        No other words do it justice.

https://encrypted-tbn0.google.com/images?q=tbn:ANd9GcTWpabX0aT5gpbzDCT2GDm7OnuORHmf_n6Ew6CkwtKfjPc_FErUFqTE LOVE IT!

 https://i.imgur.com/LjRRaV1.png


  • Member since
    March 2003
  • From: Rain USA, Vancouver WA
Posted by tigerman on Tuesday, March 27, 2012 7:22 PM

I think different variations of color of wood was a smart call.

   http://i7.photobucket.com/albums/y269/wing_nut_5o/PANZERJAGERGB.jpg

 Eric 

  • Member since
    July 2006
  • From: New Jersey
Posted by redleg12 on Tuesday, March 27, 2012 6:37 PM

Very nice job on the wood...love it!!

Rounds Complete!!

"The Moral High Ground....A Great Place to Emplace Artillery."

  • Member since
    October 2009
Posted by PANZERWAFFE on Tuesday, March 27, 2012 6:10 PM

ERIC - Yes, haven't seen one of these on here myself giving me that much more interest in this project.  This is though only one small piece of the project Wink

WBILL - The planking is a sheet of real wood veneer made for dollhouses.  Have a few different sheets with different board widths.  comes in handy every now and then.

Could not help myself with adding some of the stuff on the bottom.  Like you said, it will not be seen but I know it's there Big Smile

TREAD - Hey man, thanks!  How's the hand doing?

TONY - The kit came with 2 figure sets and they do not go together.  1 of them is an anti-aircraft MG team and they are topless Surprise  (hot weather)  The other is 2 policemen with dogs and they are dressed in great coats and cold weather gear.

There will be fig's but they too will come much later with the other cars that are waiting to be built.  That way I can see what figs will work best in the overall plan.

Continuing with the Gondola:

Laid down some base color.  Some of the pics make it hard to work out the colors properly.  Some have flash and some do not, just could not get a good picture of the car with my little camera but here goes.

Not sure if you can see it but there is some modulation with the grays.  Darker base color is MM Euro I Gray and then feathered in at the top sections is MM German Uniform Gray.
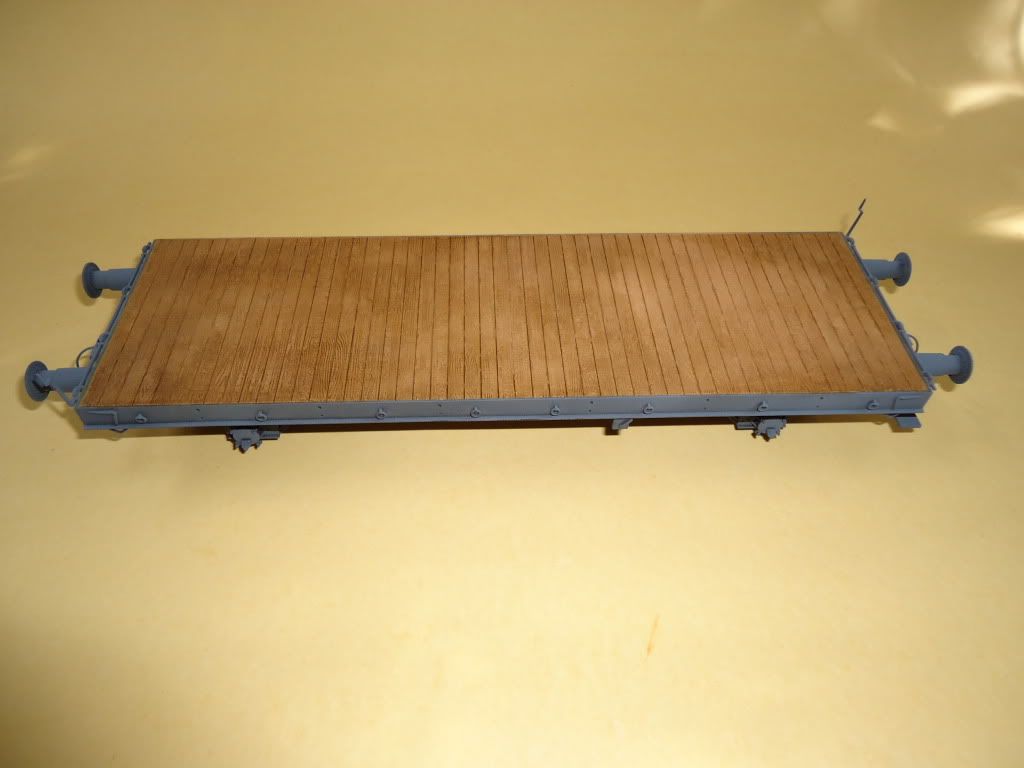
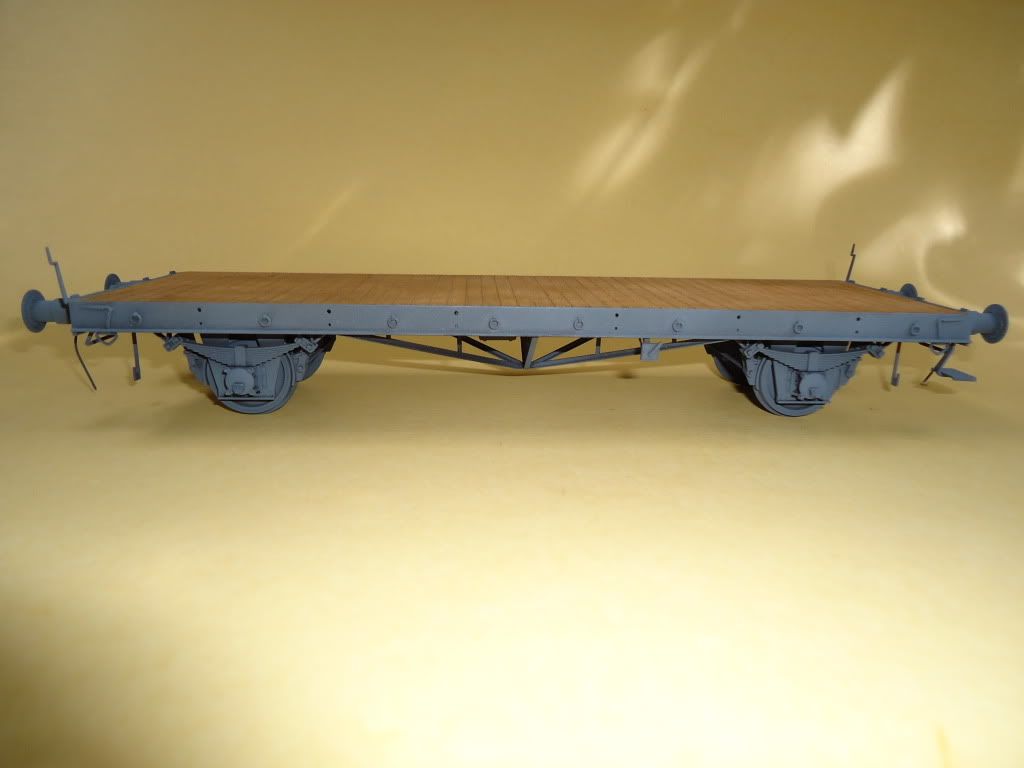
Base coat on the bottom is Flat Black with some over spray of the German uniform color.
Sides of the car with base coat.
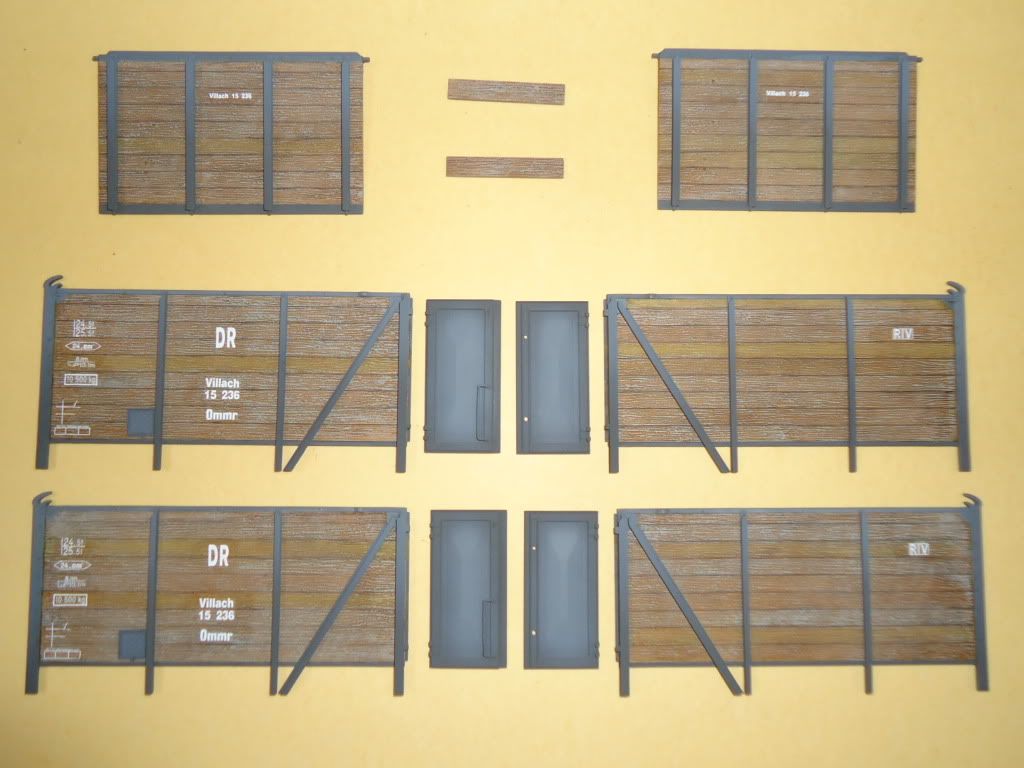
These are all just base coated and all will still be receiving some detail painting and weathering.

Thanks to all for stopping by Yes


Rob

  • Member since
    September 2005
  • From: Uppsala, Sweden
Posted by bultenibo on Tuesday, March 27, 2012 4:45 PM

A very unusual build! I've never seen this kit finnished, so I'm going to follow it.

Have you given any thought to the figs? I see that there are some included in the kit.

/Tony

  • Member since
    September 2005
  • From: beacon falls , Ct.
Posted by treadwell on Tuesday, March 27, 2012 4:16 PM

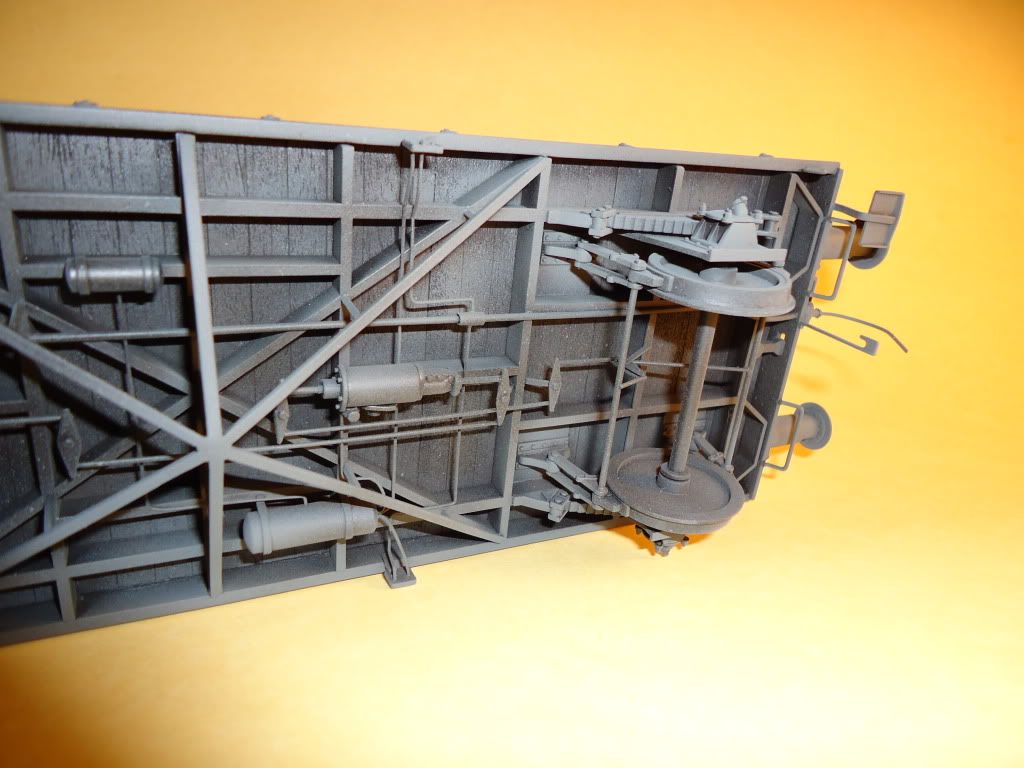
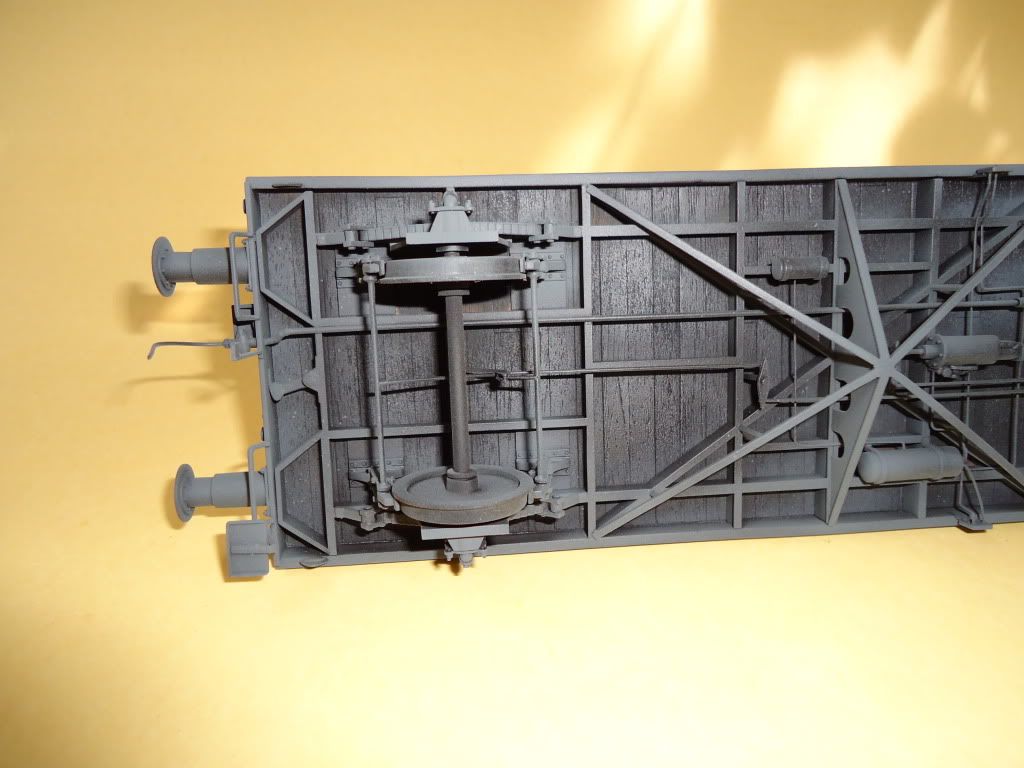
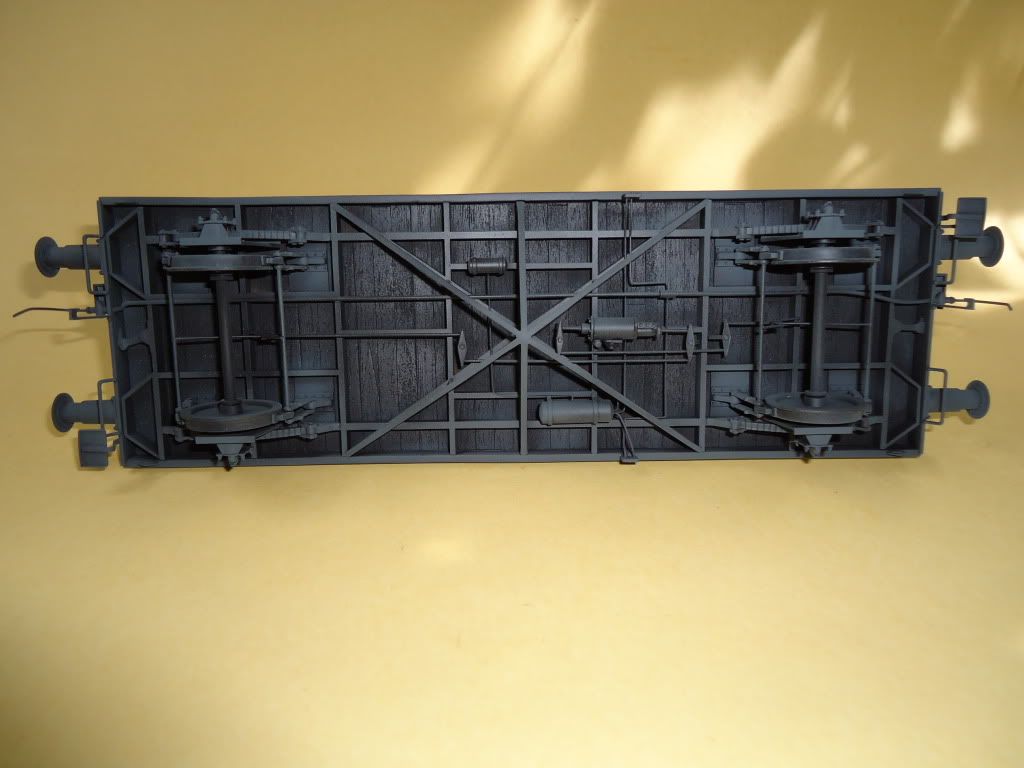
Hey Rob, nice job on all the brake linkages.. really adds a lot !

treadCool


  • Member since
    July 2004
  • From: Texas
Posted by wbill76 on Tuesday, March 27, 2012 1:45 PM

Nice work on the railbed Rob...and the detailing you're adding to the car itself is a nice touch as well. Only you know it will be there when it's done, but then that's the fun! What did you use to replace the wood planking with?

  • Member since
    March 2003
  • From: Rain USA, Vancouver WA
Posted by tigerman on Tuesday, March 27, 2012 1:22 PM

Cool project Rob. You don't see any of these here.

   http://i7.photobucket.com/albums/y269/wing_nut_5o/PANZERJAGERGB.jpg

 Eric 

  • Member since
    October 2009
Posted by PANZERWAFFE on Tuesday, March 27, 2012 1:19 PM

PMITCH, FELIX - Thanks guys.  Will later add some grass and more weathering to the rail bed but that will be much later.  Have other cars that will be build in the future and added to this one, when that happens will connect the rails and continue to weather.  Now onto the car.

Gondola went together fairly straight forward and with no problems.  Their were some details lacking underneath and have decided to add a bit to it.  Added real wood planking to the bottom, it had no wood details on it and it should have.  Then added the air system and plumbing.  Also added the brakes and linkage for them.

Rob

  • Member since
    February 2012
  • From: Jersey Shore
Posted by Thecat40 on Tuesday, March 27, 2012 9:04 AM

WOW... that's a great job!!! It's going to be a very interesting build.

  • Member since
    October 2008
  • From: England
Posted by P mitch on Tuesday, March 27, 2012 2:08 AM

NIce work on the wood there Yes

"If anybody ever tells you anything about an aeroplane which is so bloody complicated you can't understand it, take it from me: it's all balls." R J Mitchell


JOIN OUR COMMUNITY!

Our community is FREE to join. To participate you must either login or register for an account.

SEARCH FORUMS
FREE NEWSLETTER
By signing up you may also receive reader surveys and occasional special offers. We do not sell, rent or trade our email lists. View our Privacy Policy.