SEARCH FINESCALE.COM

Enter keywords or a search phrase below:

AFV Club M42A1 Duster WIP - Done with pictures!!

83265 views
249 replies
1 rating 2 rating 3 rating 4 rating 5 rating
  • Member since
    July 2004
  • From: Texas
Posted by wbill76 on Sunday, June 17, 2012 7:54 PM

Nice round of updates Pawel, looking forward to more. Beer

  • Member since
    May 2009
  • From: Poland
Posted by Pawel on Monday, June 18, 2012 8:29 AM

Thanks a lot for your comments, gennulmen!

Bill - glad you like it, good to know youo're still following this one!

Beav - it's never too late for some nice reference. Aren't you going to get in trouble photographing that Duster? If I may, could you get some shots of the space in the gun mount, below the 40mm barrels (where the equilibrators are, and the backs of the oil gear are visible). The other detail inetersting to me would be the gun racks on the turret (there should be four of them). If you could get me those photos, I'd appreciate it a lot.

Thanks for reading, have a nice day

Paweł

All comments and critique welcomed. Thanks for your honest opinions!

www.vietnam.net.pl

  • Member since
    May 2003
  • From: Ft. Sill, OK
Posted by beav on Sunday, June 24, 2012 10:56 PM

Hope I'm not to late, I've left a bewildered CW2 in my wake to get these.  The warning to 'be fast and don't leave any footprints or you get to clean it' still sticks in my head though.

Spare barrel stowage

Looking into the turret from under the barrels.  Luckily they have it sitting with turret to the rear, giving me lots of room to maneuver.

Looking at what would be the curbside barrel.

Roadside

This next group is taken from inside the turret, this would be if you stood to the right of the gun mount, or on the curbside of the vehicle.

And from the rear of the mount

(this would be the foot pedal for the crewman who sits curbside of the mount, not sure about who is who on one of these)

And the roadside crewman's station

Roadside, from inside turret to under the barrels

A policeman from Sherlock Holmes holding what undoubtedly must be a Martini Henry .577/.450 carbine.

There was no travel locking mechanism evident, but I was being rushed by the aforementioned chief.  Any other detail areas, I'd be more than happy to oblige.

"First to Fire!"

Steven

  • Member since
    May 2009
  • From: Poland
Posted by Pawel on Thursday, June 28, 2012 8:33 AM

Steven - thanks a lot those are great photos. I thought it's not going to be so easy to photograph a vehicle on a military installation. I appreciate your dedication!

As for the travel lock, you got the elevation lock on your photos - it's the traingular piece of iron with two round lightening holes mounted forward of the equilibrators. There's also traverse lock - it's a bolt driven into the floor of the mount. They are both controlled by the gunner (who sits on the left) - he has two small levers right to his seat, I believe, to operate the locks. The guy sitting on the right is called sight setter or assistant gunner.

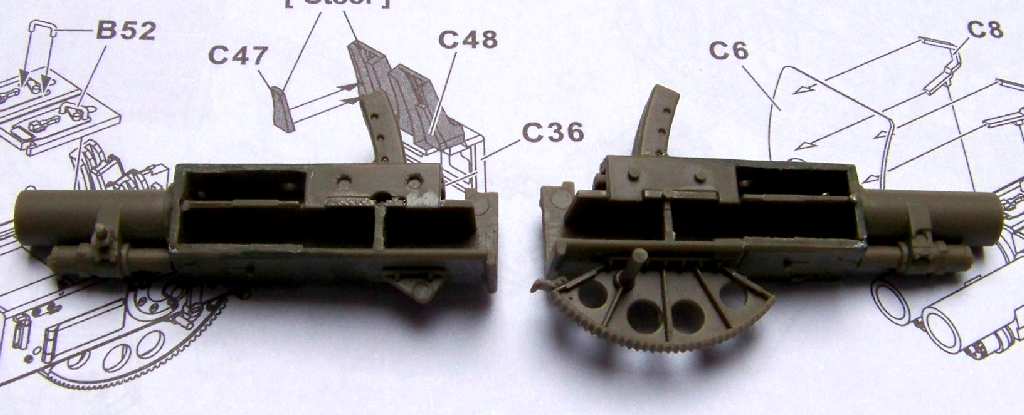
And I just started working on the guns themselves, Steven's photos are a great reference:

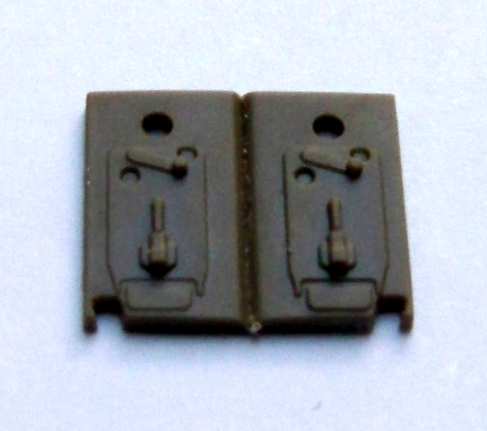
But before I got that I had to cut this part (top receiver covers) in two:

You see I went away from the kit instructions - they have you assemble the two guns as a unit, I decided to assemble the guns individually, do as much of the filling and sanding as practical, and then to put the guns together. and there is a lot of filling and sanding to do, around the receiver covers, top and bottom.

Aligning the guns requires careful sanding, you also have tu cut like 1mm of the rod connecting the elevation wheel with the mount on the other gun in orders for the guns to fit to each other. Correct positioning of the autoloaders (C39 and C40) is also critical. I'd recomment fixing them with some slow-curing glue (I did it with lacquer thinner) and fitting the guns together - then you have the option to correct the position of the autoloaders, so that everything snaps into place.

I did my filling using thick CA glue and mr. Surfacer. Here's what I have so far:

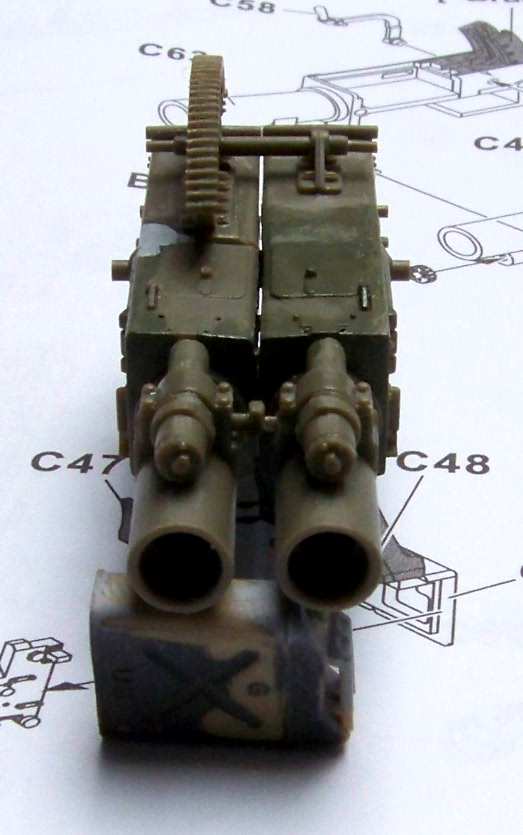
Please note how nice those little recoil mechanisms are!

Lots of work, not so much to show. Thanks for reading, have a nice day

Paweł

All comments and critique welcomed. Thanks for your honest opinions!

www.vietnam.net.pl

  • Member since
    September 2005
  • From: beacon falls , Ct.
Posted by treadwell on Thursday, June 28, 2012 8:54 AM

coming along nice,Pawel : )

Nice to have that 1/1 reference !

keep up the good work,

treadCool


  • Member since
    May 2003
  • From: Ft. Sill, OK
Posted by beav on Friday, June 29, 2012 8:27 AM

I won't be able to get any more pictures of this one until mid-july since I've decided to take quite a bit of leave over the fourth.  They probably would have minded me taking reference photos of our current missile systems, but even with those; you can get a very good idea of every detail from a web search.  I've even had to host tours of our equipment when we were at an air force base.  They often call it the 'Patriot Petting Zoo'  yay.

"First to Fire!"

Steven

  • Member since
    May 2009
  • From: Poland
Posted by Pawel on Friday, June 29, 2012 1:03 PM

Tread - thanks for your kind words!

Steven - thanks anyhow, you already helped me a lot. Check back when you return from the leave, maybe it will be done by then.

Have a nice weekend

Paweł

All comments and critique welcomed. Thanks for your honest opinions!

www.vietnam.net.pl

  • Member since
    May 2009
  • From: Poland
Posted by Pawel on Sunday, July 1, 2012 10:53 AM

OK, I'm movin' on with the guns. I joined them together and I also worked on the shell ejection chutes. It wouldn't be like me, not to replace some of the detail with copper. Here's what it looks like:

I also fixed the base of the mount, with other shell ejection chutes, and cleaned up the top of the slip ring assembly so it can accept the cables:

Then I tried to mock-up the guns to see how everything works together. Oh yeah, it's tight:

The cool thing is, if I do everything right, I'l b able to show the guns elevating - all the necessary parts are movable. Thanks fo reading, have a nice day

Paweł

All comments and critique welcomed. Thanks for your honest opinions!

www.vietnam.net.pl

  • Member since
    March 2006
  • From: Right Side of a Left State
Posted by Shellback on Sunday, July 1, 2012 11:25 AM

I'm liking all of the detail .Yes

  • Member since
    May 2009
  • From: Poland
Posted by Pawel on Monday, July 2, 2012 8:32 AM

Thanks Carl, good to know you're watching this one!

Have a nice day

Paweł

All comments and critique welcomed. Thanks for your honest opinions!

www.vietnam.net.pl

  • Member since
    July 2006
  • From: New Jersey
Posted by redleg12 on Monday, July 2, 2012 6:34 PM

Ahh the best part and they are looking great. Very nice details

Rounds Complete!!

"The Moral High Ground....A Great Place to Emplace Artillery."

  • Member since
    May 2009
  • From: Poland
Posted by Pawel on Wednesday, July 4, 2012 8:28 AM

Thanks for your kind words Mike - I like details! Have a nice day

Paweł

All comments and critique welcomed. Thanks for your honest opinions!

www.vietnam.net.pl

  • Member since
    July 2004
  • From: Texas
Posted by wbill76 on Wednesday, July 4, 2012 2:54 PM

Devil's always in the details and looks like you're finding them all and dealing with them Pawel, nice work so far. Beer

  • Member since
    January 2003
  • From: Hancock, Me USA
Posted by p38jl on Thursday, July 5, 2012 3:18 PM

keep up the good stuff.. !

[Photobucket]

  • Member since
    May 2009
  • From: Poland
Posted by Pawel on Wednesday, July 11, 2012 9:31 AM

Bill, p38jl - thanks a lot for your comments! I'd write sooner, but a storm took away lots of the network hardware at the place where I spend weekends and I was busy...

Apart of fixing the computers I also put some work into the model. I slowly started installing stuff in the gun mount. Of course it wouldn't be like me not to add some wiring:

The foremost box is the electrical junction box, and the rearmos wired box is the slip ring I already wrote about. The middle box is an inverter, making 115V current out ov 24V current, for the traverse and elevation motors. Lots more of wires to come!

I also built the computer:

That was something - a mechanical computer (working with gears, not electronics!) calculating the lead for the guns, after dialing in target's course and attitude and speed. You were supposed to align "the rod" with the attitude of the aircraft you were trying to shoot down. In Vietnam this whole stuff sat unused all the time anyhow..

I replaced the knob for rotating the whole thing with a scratch-built one - I liked mine betterthan the kit-supplied one.

I also begun to fit the upper mount parts. There is a lot of them:

The fit isn't bad, but not without problems, and complicated. It will take time to do it without too much putty and cursing. I also have to cut some additional holes to make it more accurate.

That would be it for now - thanks for reading and have a nice day

Paweł

All comments and critique welcomed. Thanks for your honest opinions!

www.vietnam.net.pl

  • Member since
    July 2004
  • From: Texas
Posted by wbill76 on Wednesday, July 11, 2012 12:46 PM

We often take for granted the "digital" form of computing vs. analog computing that was "state of the art" in the 50's and 60's...my how technology has advanced in such a relatively short space of time! Nice work as usual on the details Pawel. Yes

  • Member since
    May 2009
  • From: Poland
Posted by Pawel on Thursday, July 12, 2012 9:58 AM

Bill - thanks a lot! As I wrote before, that Duster must have been an engineering marvel in the fifties. I really admire the people who designed it - building a mechanical computer is so much harder than a modern electronics machine. Anyhow, it's important for me to understand how the real thing operated - I feel after that I can build a much better model. Thanks again, have a nice day

Paweł

All comments and critique welcomed. Thanks for your honest opinions!

www.vietnam.net.pl

  • Member since
    May 2009
  • From: Poland
Posted by Pawel on Thursday, July 12, 2012 9:58 AM

OK, another update!

I put some more detail in the oil gear. Now it looks like that:

I also modified the kit-supplied grenade boxes - I filled the large hole molded in each of them and also cut off the corresponding large plastic chunks from the mount. Same goes for the loaders' seats:

I decided to build the frames of the loaders' seats out of copper sheet to give them scale thickness. Now the mount looks like on the photos below:

To put more stuff in I had to start painting. I started weathering at this point - I preshaded with red-brown (Humbrol 113) and then finished with OD (Humbrol 66). that's the effect:

Next thing to do is to install the oil gear and put in as much of the wiring and stuff as possible before installing the guns. Thanks for reading and have a nice day!

Paweł

All comments and critique welcomed. Thanks for your honest opinions!

www.vietnam.net.pl

  • Member since
    May 2009
  • From: Poland
Posted by Pawel on Sunday, July 22, 2012 11:54 AM

Updated!

All comments and critique welcomed. Thanks for your honest opinions!

www.vietnam.net.pl

  • Member since
    July 2004
  • From: Texas
Posted by wbill76 on Sunday, July 22, 2012 1:05 PM

Definitely going the extra mile on this one Pawel! Yes

  • Member since
    March 2006
  • From: Right Side of a Left State
Posted by Shellback on Sunday, July 22, 2012 2:54 PM

I like the plumbing Pawel , its really going to look great when your done . Talking of mechanical/analog computers the cruiser i was on had  those for our main battery tripple 6 inch(152mm) turret . That thing stood about 4 feet tall , 5 ft long and 4 ft wide ............as i remeber . 1940's technology , it was huge , There were all kinds of gears , cams , synchro's , gyro's etc in it . It controlled the elevation and bearing that theguns were aimed . so when the ship went up and down with the ocean swells or the ship changed heading those guns stayed on target . Cool to tsee hose long barrels (23 feet) go up and down automatically as the ship pitched and rolled .

  • Member since
    May 2009
  • From: Poland
Posted by Pawel on Monday, July 23, 2012 9:37 AM

Bill - thanks for your comment!

Carl - Thanks a lot! Yeah, that musta been really something! By the way, what was the name of this ship? I was only once onboard of a US Navy Ship - that was USS Valley Forge visiting port in Freemantle, Australia. No big guns, but also interesting to see.

Thanks again for the comments, have a nice day

Paweł

All comments and critique welcomed. Thanks for your honest opinions!

www.vietnam.net.pl

  • Member since
    May 2009
  • From: Poland
Posted by Pawel on Sunday, July 29, 2012 8:33 AM

Hello!

I'm movin' on with the wiring:

I also scratchbuilt two levers, operating the elevation and traverse travel locks. Those details start getting annoyingly tiny:

Thanks for reading, have a nice day

Paweł

All comments and critique welcomed. Thanks for your honest opinions!

www.vietnam.net.pl

  • Member since
    July 2004
  • From: Texas
Posted by wbill76 on Sunday, July 29, 2012 4:26 PM

Tiny is right Pawel! Pretty soon you'll be able to answer the age-old question about angels on the heads of pins at the rate you're going. Big Smile Nice job on the details.

  • Member since
    September 2005
  • From: beacon falls , Ct.
Posted by treadwell on Sunday, July 29, 2012 4:55 PM

Hi Pawel... Still following along ... you are doing a great job with the wiring and all and the parts you are scratching would make anyone shudder.

great looking WIP !Yes

treadCool


  • Member since
    May 2009
  • From: Poland
Posted by Pawel on Tuesday, July 31, 2012 10:10 AM

Bill, Tread - thanks a lot for your kind words! It's good to have you onboard! Dang, I just couldn't leave those levers out Big Smile Have a nice day

Paweł

All comments and critique welcomed. Thanks for your honest opinions!

www.vietnam.net.pl

  • Member since
    March 2006
  • From: Right Side of a Left State
Posted by Shellback on Tuesday, July 31, 2012 5:59 PM

Pawel , that was the USS Oklahoma City , CLG-5 . She's long gone now . Here's her history ..........

www.okieboat.com/Ship&

I sure like your scrstch detailing .Yes

  • Member since
    May 2009
  • From: Poland
Posted by Pawel on Wednesday, August 1, 2012 9:11 AM

Steve, thanks a lot!

USS Oklahoma City - interesting history, looks like it was an important ship for the Vietnam War!

Thanks again, have a nice day

Paweł

All comments and critique welcomed. Thanks for your honest opinions!

www.vietnam.net.pl

  • Member since
    February 2007
  • From: Calgary, Alberta, Canada
Posted by T-rex on Thursday, August 2, 2012 1:07 PM

Wow, you put alot more time and effort than my Duster, but then again, I kind of meant to be easy.

Keep up the posting update.

Working on: Trumpeter SU-152 (1/35) Trumpeter E-10 (1/35) Heller Somua (1/35)

"The world is your enemy, prince of a thousand enemy. And when they'll find you, they will kill you... but they will have to catch you first ''

  • Member since
    June 2009
Posted by Guney on Thursday, August 2, 2012 4:35 PM

Impressive works Pawel....:)

JOIN OUR COMMUNITY!

Our community is FREE to join. To participate you must either login or register for an account.

SEARCH FORUMS
FREE NEWSLETTER
By signing up you may also receive reader surveys and occasional special offers. We do not sell, rent or trade our email lists. View our Privacy Policy.