SEARCH FINESCALE.COM

Enter keywords or a search phrase below:

AFV Club M42A1 Duster WIP - Done with pictures!!

83841 views
249 replies
1 rating 2 rating 3 rating 4 rating 5 rating
  • Member since
    July 2006
  • From: New Jersey
Posted by redleg12 on Thursday, August 2, 2012 7:24 PM

Pawel - I have been a bad boy and not posted to this thread for a bit but....OMG.....your going way deep on the details. It is obvious you have been researching and waiting for this one for a while. LOOOOOOKING Great

Rounds Complete!!

"The Moral High Ground....A Great Place to Emplace Artillery."

  • Member since
    May 2009
  • From: Poland
Posted by Pawel on Sunday, August 5, 2012 9:55 AM

T-rex - thanks a lot. Yeah, I gues I really try to go to town on this one Big Smile

Guney - thanks a lot!

Mike - yeah, I missed you! Like I wrote, first I tried to turn the Tamiya model into something accurate, but it took me like four years, and then when the AFV Club came out, I had most things already figured out, and now you can see the results of my previous research.

By the way, let me show you what I did recently.

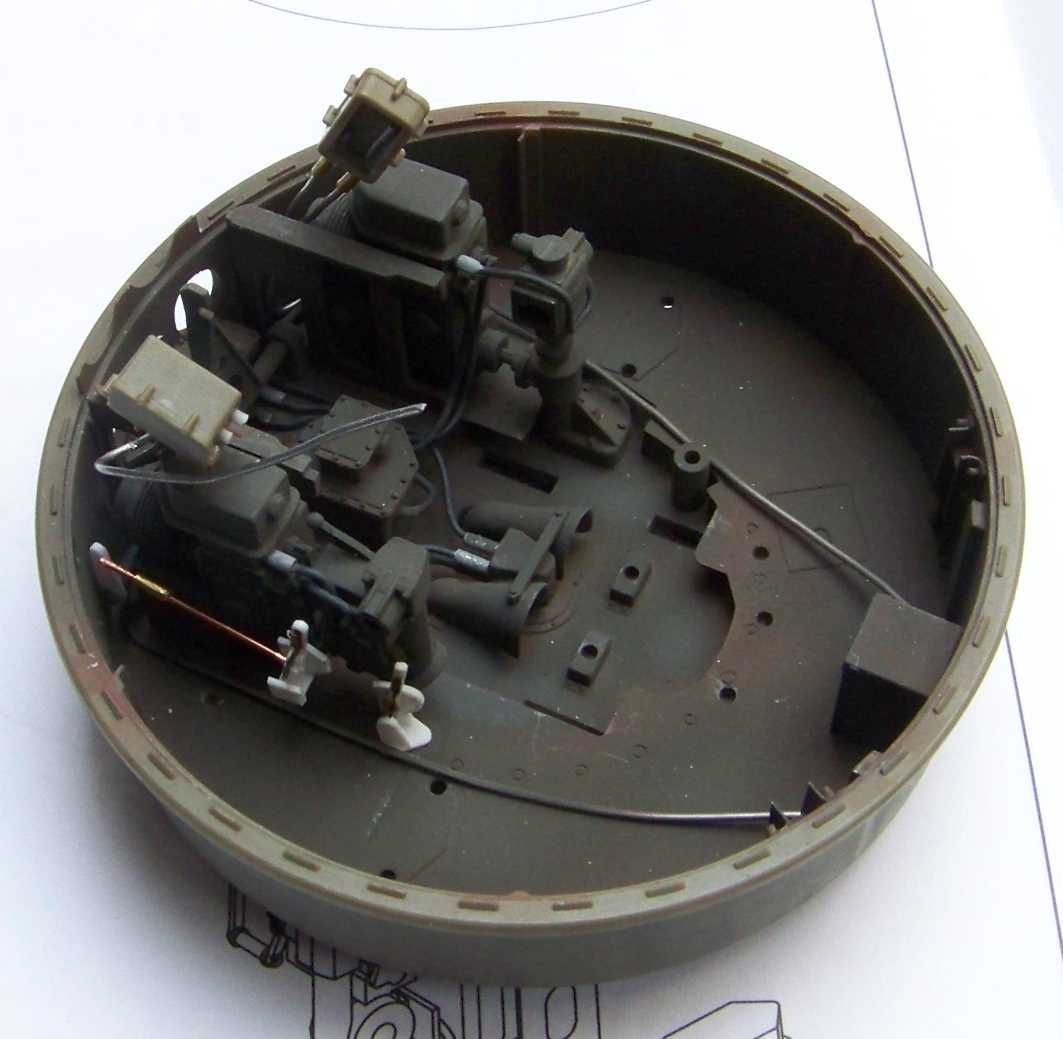
I worked on the wiring some more and I put in the junction boxes - decided to wire them now and let them dangle on the wires, 'till I can fix them to the armor plates they belong to. I also installed the travel lock and it's levers done previously:
And the front armour is in the works too:
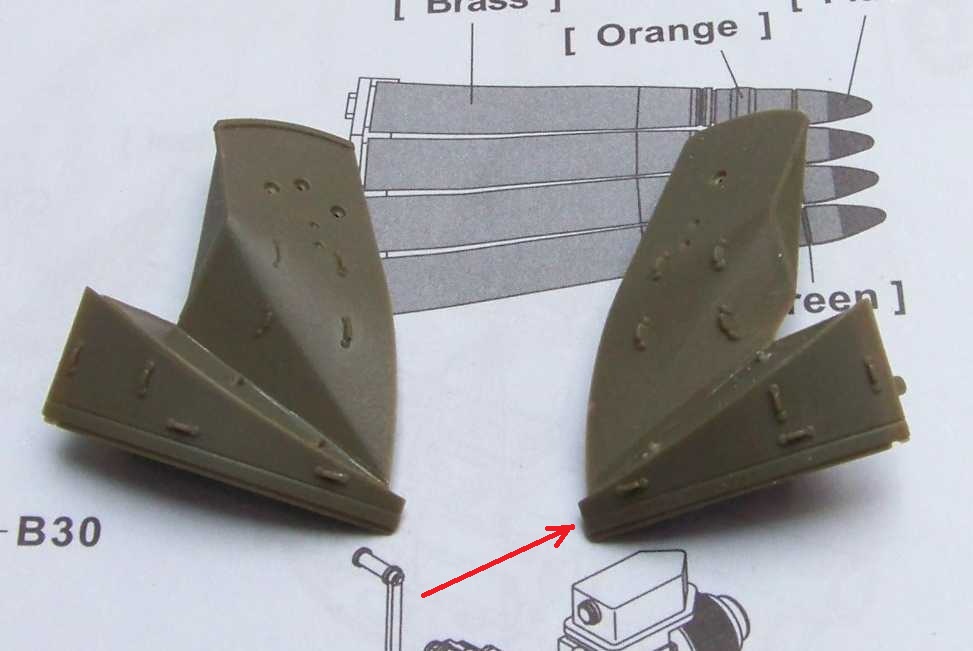
You need to trim about 1mm at the point the arrow indicates, or else the top portion of the mount isn't going to fit. Thought somebody might be interested in that.

From the other side it shows, that some filling and sanding is necessary:
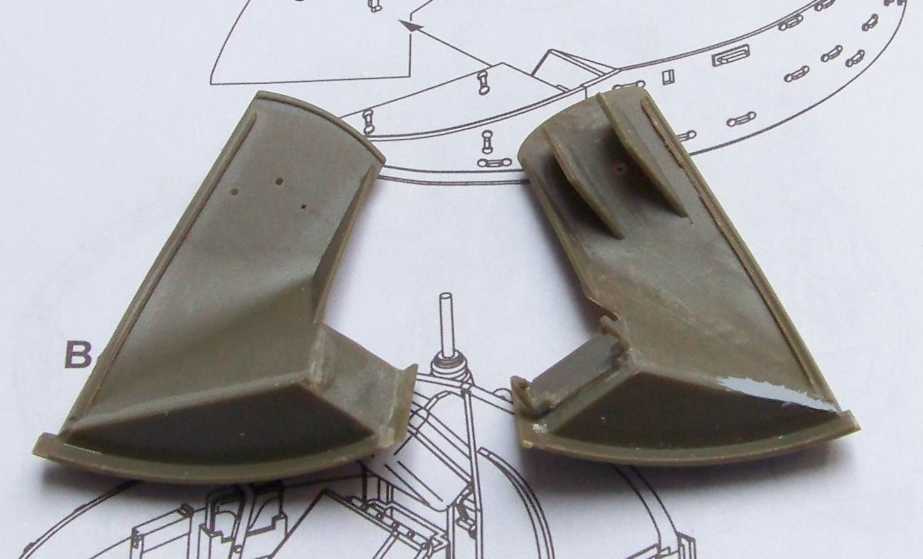
I removed the binoculars holder and will replace it with a PE part.

I also scratchbuilt the MG ammo holders that will be installed in the back of the mount. Here's what the old and the new parts look like:
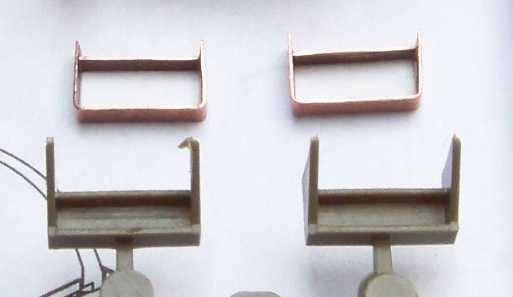
I like mine better Big Smile And they still miss the flashlight holders, but I'll take care of that.

And that would be it for now - thanks for reading, have a nice day

Paweł

All comments and critique welcomed. Thanks for your honest opinions!

www.vietnam.net.pl

  • Member since
    September 2010
  • From: Qubec, Canada
Posted by Ben323 on Sunday, August 5, 2012 10:04 AM

Amazing.... wow

Great job! Amazing workYes

Ben K.

  • Member since
    March 2006
  • From: Right Side of a Left State
Posted by Shellback on Sunday, August 5, 2012 11:54 AM

Pawel you got the details nailed !

  • Member since
    July 2004
  • From: Texas
Posted by wbill76 on Sunday, August 5, 2012 12:44 PM

Always neat to see what other little details you'll upgrade on this project Pawel, keep it coming! Beer

  • Member since
    May 2009
  • From: Poland
Posted by Pawel on Tuesday, August 7, 2012 10:08 AM

Ben, Karl, Bill - thanks a lot for your comments and your kind words. They give me the additional motivation and make this build even more fun! Thanks again and have a nice day

Paweł

All comments and critique welcomed. Thanks for your honest opinions!

www.vietnam.net.pl

  • Member since
    July 2006
  • From: New Jersey
Posted by redleg12 on Wednesday, August 8, 2012 5:39 AM

Mind bending details.....very nice

Rounds Complete!!

"The Moral High Ground....A Great Place to Emplace Artillery."

  • Member since
    August 2012
Posted by Colin P on Tuesday, August 14, 2012 10:24 AM

Well just spent the morning reading this build and just gotta say this just blows me away!!!! Phenominal job with the details!

Now I need to order the AFV kit, strip down the PE parts off the Revell kit and smash it against the wall LOL!!! I have to side with you on your point about a detailed kit, I started my Revell last June and still chipping away at the engine deck Ick!

If you think the Tamiya kit is bad the Revell kit is identical to the Matchbox build from the 70's. I've had to do a lot of modding just to get the Track Fenders to scale  I cant complain though it's taught me a lot about scratch building.I tore the curb side ammo storage locker apart 6 times and they can say what they want to about CA glue I've never had a problem seperating two parts metal/metal or metal/plastic. I'll have to make up a video and show you the Revall kit so far. I should just throw it against the wall LOL

Keep up the great work looking forward to seeing the finished build.

  • Member since
    May 2009
  • From: Poland
Posted by Pawel on Thursday, August 16, 2012 10:26 AM

Mike - thanks a lot!

Colin - welcome to the forums, and thanks for your kind words. Well, I say don't smash nothing, but starting over should save you lots of time and give you opportunities to practice not only the scratchbuilding, but also other skills, like painting, weathering and so on. Good luck with your project and have a nice day

Paweł

All comments and critique welcomed. Thanks for your honest opinions!

www.vietnam.net.pl

  • Member since
    August 2012
Posted by Colin P on Thursday, August 16, 2012 12:03 PM

Thanks for the warm welcome Pawel! Wanted to also thank you for pointing me to the website, gonna take me awhile to catch up on all this great info. (Currently going through the tools section LOL)

I thought about that when I woke up this morning it would be useful to practice some weathering on after I strip the PE parts!

Going to order the AFV kit next week, until it arrives I have a lot of work ahead as the Friulmodel Track Link set and the Verlinden Bofors and Ammo boxes came yesterday.

Have a good one!!!

Colin

  • Member since
    May 2009
  • From: Poland
Posted by Pawel on Sunday, August 19, 2012 11:35 AM

Colin - that with the weathering - sounds like a good idea. I see you're getting a lot of goodies, too.

I worked some on the update. I came to the point, where the gun mount is in subassemblies that will be connected in the end, but for now I'm working on them individually:

For example the upper mount sheet metal (hard to call it armor) - I decided to join the three pieces together, to fill and sand the seams now:

I'm going to install it as one piece, but not before I detail the tub completely.

The dry fit looks interesting:

As you can see I scratchbuilt the firing pedal for the gunner, and also put together the spent brass chutes - they needed thinning with a motor tool to allow for free movement of the guns.

Colin asked me to post more pictures of the seats I scratchbuilt for my old model. In my opinion they are good enough to install them in my new model, here thay are:

The spots are evidence of my younger brother carelessly using my airbrush while I wasn't there - that happened some time ago, and I still want to hurt him...

Kit seat parts for comparison:

Other than that, my weekends are busy recently - hope to do more next time. Thanks for reading, have a nice day

Paweł

All comments and critique welcomed. Thanks for your honest opinions!

www.vietnam.net.pl

  • Member since
    August 2012
Posted by Colin P on Sunday, August 19, 2012 2:05 PM

These are the track sets I am currently working on that I messaged you about. Thanks for sending me the pics of the tools nice to finally know what they look like. Beautiful job on the seats, I'm a little intimidated but I'm gonna try to replicate them!

 The set contains 160 links 80/side (I counted 176 total 4 of them were bad castings) 180 nuts (210 counted) wire for pinning and instructions.

 The Nuts to cover the pinning holes come on sprues and are well detailed. With an extra 30 I plan on using them on other areas of the model if scale allows.

The links themselves are well detailed and needed minimum trimming. Each link must be drilled out with a 0.5mm bit to clean the flash from the casted holes. However, I used a 1/32" bit a replaced the wire with paper clips for the pins. I fitted two links together before drilling to keep the holes aligned then switched top and bottom to complete  them.

Inner Tracks

Outer Tracks

THe pinning side with some of the nuts glued in place.

 As you can see the track is slowly curving. I applied some pressure on the center links at the same time forcing the outerlinks in the opposite direction and it straightened right out.


  • Member since
    March 2006
  • From: Right Side of a Left State
Posted by Shellback on Monday, August 20, 2012 9:35 AM

Hey Pawel those seats you made look a lot better than the kits parts , for sure Yes

Colin , i've never used Fruils . Are they easy or difficult to assemble ?

  • Member since
    August 2012
Posted by Colin P on Monday, August 20, 2012 10:06 AM

Hello Carl, pretty easy assembly, just time consuming. The supplied wire is thin imo and seemed to leave too much slack in the joints so I used a 1/32" bit and paper clips instead. I'd estimate the assembly time at around 48 Hrs. The most tediuos part is trimming the flash and drilling out the holes.

  • Member since
    March 2006
  • From: Right Side of a Left State
Posted by Shellback on Monday, August 20, 2012 4:03 PM

Colin thats good info . Maybe i'll invest in a set . I've read where its difficult to get the tracks to look tarnished .

  • Member since
    July 2004
  • From: Texas
Posted by wbill76 on Monday, August 20, 2012 5:53 PM

Nice update Pawel!

  • Member since
    May 2009
  • From: Poland
Posted by Pawel on Tuesday, August 21, 2012 10:04 AM

Colin - you're welcome and thanks for your kind words. Those tracks look nice. Maybe the idea was, if the fit was a little bit more loose, the track wouldn't be curving? Good luck with the assemblying, it's a lot of work.

Carl - thanks a lot, that's what I told myself, too.

Bill - thanks fot stopping by!

Have a nice day, everybody!

Paweł

All comments and critique welcomed. Thanks for your honest opinions!

www.vietnam.net.pl

  • Member since
    May 2009
  • From: Poland
Posted by Pawel on Tuesday, September 11, 2012 8:16 AM

Hello!

It's been a long time, finally, on sunday I managed to do something and so I have a small update for you.

First, I started working on the crew. There's this guy from Bravo 6 - he's going to ride shotgun on my Duster:

Then I started working on the figures of the gunner and the assistant gunner. the beginnings are humble:

The "outer" legs (orange plastic) come from Master Box kit "Charlie on the left", from the driver figure. The "inner" legs (grey plastic) come from the Dragon's Modern tank crew set, also from the driver. They hed to be cut, shortened and repositioned. I filled the gaps with thick CA glue.

I also worked on the gun mount:

I installed the firing pedal (absent in the kit) and the asimuth indicator cover - the kit provides this part, but I already had a metal part made, so I decided to with it.

I had more work with the antenna bases:

There were two types of that fitting - round and sqare. The kit gives you a pair of round bases, but most of the Vietnam-era photos show vehicles with square ones, so I went to scratchbuild the square antenna bases. Gettitng the right angles was the most challenging part of it.

And that would be all for now - thanks for reading, have a nice day

Paweł

All comments and critique welcomed. Thanks for your honest opinions!

www.vietnam.net.pl

  • Member since
    March 2006
  • From: Right Side of a Left State
Posted by Shellback on Tuesday, September 11, 2012 1:24 PM

Good to see you were able to get more done on this one Pawel , i was just thinking last night i hadnt seen an update recently . Everything looks great ! Yes

  • Member since
    May 2009
  • From: Poland
Posted by Pawel on Thursday, September 13, 2012 8:56 AM

Thanks a lot for your comment, Carl! Have a nice day

Paweł

All comments and critique welcomed. Thanks for your honest opinions!

www.vietnam.net.pl

  • Member since
    May 2009
  • From: Poland
Posted by Pawel on Sunday, September 30, 2012 10:43 AM

Hello everybody!

Apart of fitting the figures, which is a very fiddly job, I also did some weathering and put a few parts together. I glued on one of the seats, installed the spent brass chutes and the grenade boxes (in the rear of the mount). I dry-fitted the guns and the upper armor and then the mount looked like this:

I didn't weather the guns yet, so they stand out a little bit - I will work on that later. Thanks for reading, have a nice day

Paweł

All comments and critique welcomed. Thanks for your honest opinions!

www.vietnam.net.pl

  • Member since
    July 2004
  • From: Texas
Posted by wbill76 on Sunday, September 30, 2012 8:02 PM

Nice update Pawel, the detail work really shows up at this stage, impressive!

  • Member since
    August 2012
Posted by Colin P on Monday, October 1, 2012 7:52 PM

Wow, the details are really standing out now. Keep up the great work!

  • Member since
    October 2009
Posted by PANZERWAFFE on Monday, October 1, 2012 8:44 PM

That's some VERY NICE detailing Yes  Excellent work, keep at her.

Rob

  • Member since
    March 2006
  • From: Right Side of a Left State
Posted by Shellback on Monday, October 1, 2012 9:01 PM

Oh ya Pawel , really looking realistic !!!

  • Member since
    May 2009
  • From: Poland
Posted by Pawel on Tuesday, October 2, 2012 8:53 AM

Bill, Colin, Rob, Carl - thanks a lot for your kind words, glad you like it. your comments really motivate me! Have a nice day

Paweł

All comments and critique welcomed. Thanks for your honest opinions!

www.vietnam.net.pl

  • Member since
    May 2009
  • From: Poland
Posted by Pawel on Sunday, October 7, 2012 11:39 AM

And a little update - I'm working on the crew now - have to have them done to close up the gun mount.

I have the guy sitting on the left of the guns almost shaped up - I just have to glue on his right arm and the head:

The soldier sitting on the left of the guns is not that complete:

The torsos and arms come from the Legend 0107 set, and the heads are from Hornet. I had to rework most of the arms, to get an appropriate pose, and in the photo above you can see I took a right arm from the Dragon Mule set (number 3315, the driver figure). Frankensteining, like Hans used to say! Hope you like it, thanks for reading and have a nice day

Paweł

All comments and critique welcomed. Thanks for your honest opinions!

www.vietnam.net.pl

Van
  • Member since
    February 2010
  • From: London, UK
Posted by Van on Wednesday, October 10, 2012 2:46 PM

Damn nice Paweł...watching you from now :)

"So many models so little time"

  • Member since
    March 2006
  • From: Right Side of a Left State
Posted by Shellback on Wednesday, October 10, 2012 8:40 PM

Figures sure add a lot to a model when done right . Looks good Pawel .Yes

  • Member since
    May 2009
  • From: Poland
Posted by Pawel on Friday, October 12, 2012 3:18 PM

Van - welcome to my thread, nice to have you onboard!

Carl - thanks for your kind words! I agree - just after trying to fit the crew in, I realized, how cramped the gun mount really was.

Thanks for your comments, have a nice day

Paweł

All comments and critique welcomed. Thanks for your honest opinions!

www.vietnam.net.pl

JOIN OUR COMMUNITY!

Our community is FREE to join. To participate you must either login or register for an account.

SEARCH FORUMS
FREE NEWSLETTER
By signing up you may also receive reader surveys and occasional special offers. We do not sell, rent or trade our email lists. View our Privacy Policy.