SEARCH FINESCALE.COM

Enter keywords or a search phrase below:

1/35 HobbyBoss German Leopard 2 A4/ WIP 070212, Hull

13692 views
41 replies
1 rating 2 rating 3 rating 4 rating 5 rating
  • Member since
    April 2007
  • From: Schroon Lake, NY
Posted by SMJmodeler on Thursday, July 5, 2012 10:17 AM

Phil_H

...grousers are attached to the tracks to increase traction, usually in snow, but sometimes also in muddy conditions.

 
Dunce...I was thinking they were some sort of foothold for climbing on the tank.  They probably do get used for that somewhat but I was DEFINATELY not thinking of them as part of the track system.  Glad to have guys like you aroundBow Down
 
wing_nut:  HEY!!!...touche!  Stop typing yourself and keep painting!!!...Stick out tongue  Seriously, I had a half-dozen train cars to finish and they're done so I plan to get back to this beast tonight.  I'm excited to see her with the turret on! 

  • Member since
    April 2005
  • From: Piscataway, NJ!
Posted by wing_nut on Thursday, July 5, 2012 9:53 AM

Less typing... More gluing please! Whistling

Marc  

  • Member since
    August 2005
  • From: Sydney, Australia
Posted by Phil_H on Thursday, July 5, 2012 9:51 AM

Steve, grousers are attached to the tracks to increase traction, usually in snow, but sometimes also in muddy conditions. I'm not sure on the Leopard whether they clip on or if the rubber track pad is slid out and replaced with the grouser (it looks as if that may be possible - each individual "X" plate appears to be the same size as a single runner tack pad).

  • Member since
    April 2007
  • From: Schroon Lake, NY
Posted by SMJmodeler on Thursday, July 5, 2012 9:33 AM

waynec:  Glad this will help you someday,  Sounds like you've got a lot on your plateEats

wbill76:  No sweat...glad you found your way over here!  I'm struggling with the read/un-read posts too.  I gave feedback to FSM and Aaron said he was looking into it...hopefully they'll modify the system to make things more clear. 

Phil_H:  Probably too late on those grousers...but that picture sure tells the tale, thanks.  There would be a fair amount of deconstruction and Dremel work required to fix the problem and I don't think I'll risk it.  I'll take one for the team and be the guinea pig this timeBlack Eye.  Not sure what to do about the mirrors...I'll copy your photo and take it to the workbench and see if I can modify the parts to simulate a folded-down position. 

BTW:  Can you define grouser please.  What are they for...?

bufflehead:  There seemed to be a lot interest on the build-ability of this kit and HobbyBoss in general.  I think this kind of thing is what this forum is all about. Beer

  • Member since
    July 2004
  • From: Texas
Posted by wbill76 on Wednesday, July 4, 2012 2:50 PM

Looking good Steve! Sorry I haven't posted on this sooner, but I'm still working out the new posting interface and have the sneaking suspiscion that the filters are doing too good a job of filtering posts when the "Unread" filter is used... Propeller

  • Member since
    August 2005
  • From: Sydney, Australia
Posted by Phil_H on Wednesday, July 4, 2012 12:05 AM

bufflehead
phil - Man where did you get that awesome photo?  Is a perfect resource pic that clearly indicates what you're pointing out.  My only question is:  Is the grouser configuration on the Leopard in the pic the only way to put them?  If so, Hobby Boss clearly got that wrong!

 
Believe it or not, the clearest pics showing what I wanted to show were found on Wikipedia. In terms of mounting locations, the ancient Italeri kit mounts them this way. (The Italeri kit also suffers badly from ejection pin marks between the "X"s) I have seen some very unclear pics of A5/A6's which seem to stow them this way too, though it seems some of the later marks also omit them entirely from the fenders. They also appear to be omitted from the hull front on the uparmoured(?) variants like the (Swedish) STRV 122.
  • Member since
    July 2006
  • From: San Francisco Bay Area
Posted by bufflehead on Tuesday, July 3, 2012 8:26 PM

smj - great post with the corrections on the instructions and photos of some of the build issues!  Those following this and planning on building the kit will definitely appreciate the hard work your doing here!  BRAVO sir!

phil - Man where did you get that awesome photo?  Is a perfect resource pic that clearly indicates what you're pointing out.  My only question is:  Is the grouser configuration on the Leopard in the pic the only way to put them?  If so, Hobby Boss clearly got that wrong!

Ernest

Last Armor Build - 1/35 Dragon M-26A1, 1/35 Emhar Mk.IV Female


Last Aircraft Builds - Hobby Boss 1/72 F4F Wildcat & FW-190A8


  • Member since
    August 2005
  • From: Sydney, Australia
Posted by Phil_H on Tuesday, July 3, 2012 8:03 PM

SMJmodeler
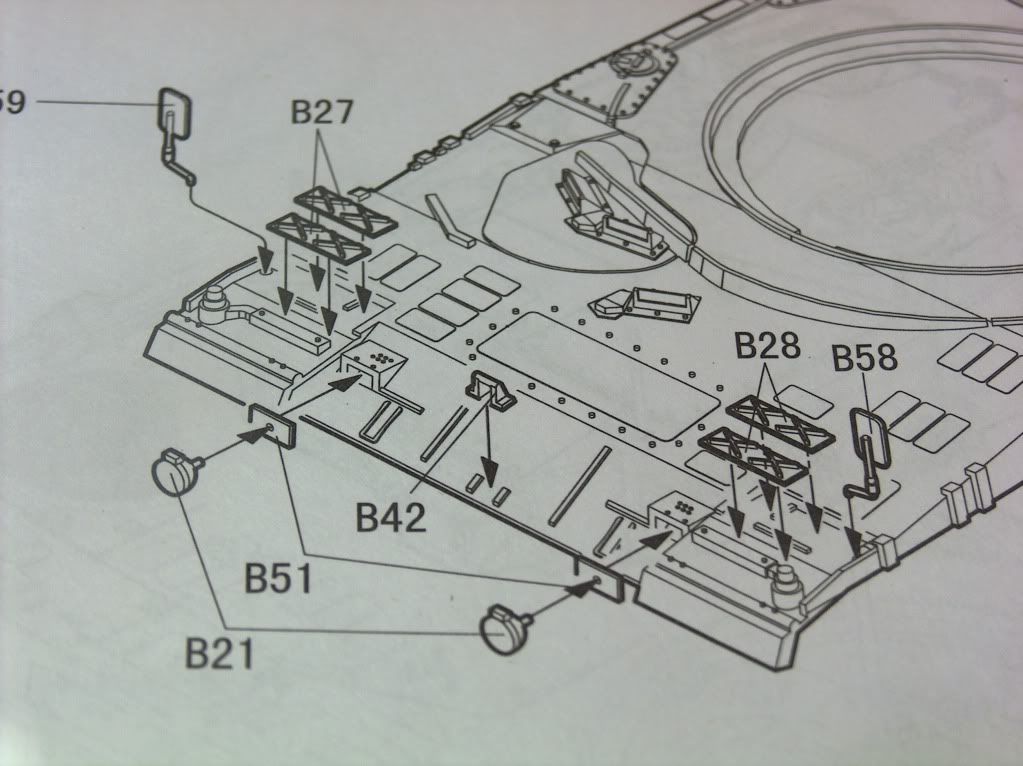
There are some nasty ejector marks to deal with on the 'X' 's on the plates added to the front, parts B25, B26, B27, and B28. Notice the directions are mis-marked too, calling for (2) B27 and (2) B28 when only one is used and instead there is a smaller piece on the sprue with one 'X'...they are next to parts 27 & 28.  
........
.............
Finally, I don't see the rear view mirrors in my reference photos so I will leave them off and fill the holes above the fender :
You know what they say, never say never. Smile

There should be two pairs of grousers (B27,B28) on each fender, plus the single. The instructions are wrong - one of each (B27/B28) goes in front of that heavy moulded ridge. The instructions put both aft of that ridge.

As far as the mirrors go, they are on hinged mounts and are often folded flush to the hull.

This one's Austrian, but you can see both points above clearly. Note the spare track end-connectors below the mirror:

  • Member since
    April 2006
  • From: Denver, Colorado
Posted by waynec on Tuesday, July 3, 2012 5:10 PM

i will follow this and grab your comments and put them in a folder attached to the box. probably won't get to it for a while. i gave up on tracks but will be starting an idf SHOT KAL next week for a GB. planning on leaving the skirts off ala barak bde, golan, '73. working on an old zvezda t-34/85. why do i build these with all the new stuff? i have (and i measeured it) a 3mm gap between the upper and lower hull in the front, good thing it's not a ship or plane. will do it in egyptian '56 sand.

Никто не Забыт    (No one is Forgotten)
Ничто не Забыто  (Nothing is Forgotten)


  • Member since
    April 2007
  • From: Schroon Lake, NY
Posted by SMJmodeler on Tuesday, July 3, 2012 2:25 PM

Guys: I'm just about done building the hull and I did find a few noteworthy items.

DON'T clip and throw-away what is noted as un-used parts in the directions.  Note the un-used part list along the bottom of the picture, part B39, then note the directions call-out for this part to be used.  I recall a couple/few of these mistakes or wrong designations of parts:

There are some nasty ejector marks to deal with on the 'X' 's on the plates added to the front, parts B25, B26, B27, and B28. Notice the directions are mis-marked too, calling for (2) B27 and (2) B28 when only one is used and instead there is a smaller piece on the sprue with one 'X'...they are next to parts 27 & 28.  Also, the pin that would hold the tow hooks doesn't go through the part but instead appears like an ejector mark. I can't confirm this is wrong but I will probably add a piece of styrene to get it to look like an inserted pin. Finally, I don't see the rear view mirrors in my reference photos so I will leave them off and fill the holes above the fender :

Some fender putty work needed. The top and lower hull have a slot and seam to confirm correct fit/location but there is still a gap that tapers from nothing up front to what you see in these photos. A couple seams and holes to fix too:

A little filing of flash/seam and sprue connection points needed on the fenders...but not too bad:

I'm currently working on the turret, more to come...

  • Member since
    April 2007
  • From: Schroon Lake, NY
Posted by SMJmodeler on Tuesday, July 3, 2012 8:49 AM

redleg12:  This tank has been a nice change...it's like a nice Mercedes sedan/sports car.  The tracks still have me a be a bit baffledTongue Tied...they appear to be rubber and metal.

bufflehead: Thanks again and CONGRATSYes...sounds like a full "dark-side" conversion in the making...you realize when you buy cheap kits just to beat 'em up you're hooked!  Eventually you'll be buying Dragon kits and all the AM goodies AND be weathering the heck-out-of-'em!  FYI:  Go check out my "1/35 Tiger I Initial-DONE" post.  It's my latest completed project...there is a salt technique toot' too if you're interested. 

  • Member since
    July 2006
  • From: New Jersey
Posted by redleg12 on Monday, July 2, 2012 6:39 PM

Steve - glad to see you back in the saddle again....that is doing a model where the tracks move!!

Rounds Complete!!

"The Moral High Ground....A Great Place to Emplace Artillery."

  • Member since
    July 2006
  • From: San Francisco Bay Area
Posted by bufflehead on Monday, July 2, 2012 4:50 PM

SMJmodeler

bufflehead:   WOW, I'm impressed that my T34/85 still inspires you...thank you for the compliment.

Are you kidding?  I followed both that build and the Tamiya Jagdpanzer IV that you did back then!  I was (and continue to be) inspired by your bold weathering experiments!  I plan on doing just what you did....build an older kit OOB so as not to worry about cost, extra build time and delicate PE parts and focus on new (for me!)  weathering techniques!  Things like fading with oil colors, hairspray and salt chipping, color modulation, etc!!  Yeah Baby Yeah!!

Ernest

Last Armor Build - 1/35 Dragon M-26A1, 1/35 Emhar Mk.IV Female


Last Aircraft Builds - Hobby Boss 1/72 F4F Wildcat & FW-190A8


  • Member since
    April 2007
  • From: Schroon Lake, NY
Posted by SMJmodeler on Monday, July 2, 2012 9:14 AM

stikpusher:  Thanks for the help on the tarp...I think it will make for a nice custom touch!

waynec:  Grabbed yourself one these bad-boys, huh?  Watch for my build notes/commentary...there's a few things you'll want to be aware of as you build!

Shellback: Cool powerplant photo!!!

bufflehead:  There's been a few people wanting to know the quality/build-ability of HobbyBoss.  Go check out redleg's High-Speed tractor too!  The weathering will have to be a bit different for the "modern look".  I have some nice photos of a real 6 x 6 cargo truck and humvee that are in a three-color scheme...they should help.  WOW, I'm impressed that my T34/85 still inspires you...thank you for the compliment.

wbill76:  Thank's for checking in!

  • Member since
    August 2005
  • From: Sydney, Australia
Posted by Phil_H on Sunday, July 1, 2012 8:03 PM

bufflehead
Shows you how much I know about moder AFVs!!  Thanks for the heads-up Phil, I did mean to type EX.  What is it a prototype of?

BTW, anyone know the best 2A6 kit available?

 
As far as I know, the 2A6EX was pretty much a "fully loaded" 2A6, with all the available add-ons the company had available. (Like what car manufacturers do at car shows)
 
For a rundown on Leopard 2 kits, check this out: http://www.onepointed.com/dan/model/Leopard_Lists/2-kit/
 
Big Smile
  • Member since
    July 2006
  • From: San Francisco Bay Area
Posted by bufflehead on Sunday, July 1, 2012 7:22 PM

Shows you how much I know about moder AFVs!!  Thanks for the heads-up Phil, I did mean to type EX.  What is it a prototype of?

BTW, anyone know the best 2A6 kit available?

Ernest

Last Armor Build - 1/35 Dragon M-26A1, 1/35 Emhar Mk.IV Female


Last Aircraft Builds - Hobby Boss 1/72 F4F Wildcat & FW-190A8


  • Member since
    August 2005
  • From: Sydney, Australia
Posted by Phil_H on Sunday, July 1, 2012 7:16 PM

bufflehead
I've been kind of eyeing the Leopard 2A6X as well as this one.  

Bufflehead, if you are thinking about the HB Leopard 2A6EX, be aware that this is based on a one-off company demonstrator/prototype "show vehicle" built to enourage export sales (hence the "EX" designator). None have entered service in this particular configuration.

  • Member since
    July 2006
  • From: San Francisco Bay Area
Posted by bufflehead on Sunday, July 1, 2012 2:39 PM

smj - I'm really looking forward to this one!  First, I've been wondering about the quality and buildability of these Hobby Boss kits.  I've been kind of eyeing the Leopard 2A6X as well as this one.  Second, I'm eager to see how you'll weather a modern tank.  You're armor weathering always inspired me and I was actually thinking of your old T-34/85 when was weathering an Italian M-13/40 yesterday!

Ernest

Last Armor Build - 1/35 Dragon M-26A1, 1/35 Emhar Mk.IV Female


Last Aircraft Builds - Hobby Boss 1/72 F4F Wildcat & FW-190A8


  • Member since
    March 2006
  • From: Right Side of a Left State
Posted by Shellback on Sunday, July 1, 2012 12:00 PM

Yes , good looking tank them Germans have . I always thought the Germans were smart for staying with a conventional diesel power plant ...........instead of going the way of the Abrams gas turbine engine .

  • Member since
    April 2006
  • From: Denver, Colorado
Posted by waynec on Saturday, June 30, 2012 1:45 PM
that sounds like a good explanation though i have never seen that on a western tank. just picked up one of these at lhs after pre saturday morning ipms breakfast. with our ioms discount a good price.

Никто не Забыт    (No one is Forgotten)
Ничто не Забыто  (Nothing is Forgotten)


  • Member since
    July 2004
  • From: Texas
Posted by wbill76 on Saturday, June 30, 2012 12:47 PM

Ought to make for a fun project Steve, looking forward to seeing what you do with it.

  • Member since
    July 2004
  • From: Sonora Desert
Posted by stikpusher on Friday, June 29, 2012 8:35 PM

SMJmodeler

An educated SWAG says that the sheeting in front is a skirt to detonate ATGMs or other hollow/shaped charged warhead projectiles that are coming in to the lower front armor. I have only seen that on some Soviet tanks before. Interesting....Hmm


F is for FIRE, That burns down the whole town!

U is for URANIUM... BOMBS!

N is for NO SURVIVORS...

       - Plankton

LSM


  • Member since
    April 2007
  • From: Schroon Lake, NY
Posted by SMJmodeler on Friday, June 29, 2012 4:42 PM

waynec:  I bought the Leopard for $15.99 + shipping through LuckyModel...the sale goes on for two more days.

Thanks for the tarp info...I thought it looked cool.

  • Member since
    April 2006
  • From: Denver, Colorado
Posted by waynec on Friday, June 29, 2012 2:02 PM
what sale are you talking about? i may have to get one of these for my BRD tank transporter. took it into photoshop and zoomed and brightened. just looks like a small tarp hanging down from the front slope like a bib. i have no idea what it's for. if you want the AM barrel because of plastic barrel seams, you can always drape a camo net on it.

Никто не Забыт    (No one is Forgotten)
Ничто не Забыто  (Nothing is Forgotten)


  • Member since
    April 2007
  • From: Schroon Lake, NY
Posted by SMJmodeler on Friday, June 29, 2012 9:09 AM

Phil_H:  I feel like such a dunce!!!Dunce  I seem to have a real problem finding AM stuff.  I tried the web and keyword searched and I also went to Sprue Brothers...both to no avail!

AND YOU, within 30 minutes of my request, give me a link to LuckyModel and BAM there it is!  Thank youBow Down.   I think I'll stick to LuckyModel (which I like) and just learn to surf the site better.  Thanks again!

  • Member since
    August 2005
  • From: Sydney, Australia
Posted by Phil_H on Friday, June 29, 2012 9:02 AM

Hey SMJ,

Try this one for a barrel - http://www.luckymodel.com/scale.aspx?item_no=RB-35B47

If you want to go the whole hog, Bronco make workable indy-tracks if you don't like the original rubber bands.

The HobbyBoss Leopards are nice kits, but they do have some pretty badly exaggerated anti-slip patches, which resemble raised panels. I don't know what, if anything, you can do about those.

  • Member since
    April 2007
  • From: Schroon Lake, NY
Posted by SMJmodeler on Friday, June 29, 2012 8:02 AM

Gamera:  Yep, she's a good-looking beast!

Stikpusher/waynec:  Thanks for the info on the hardware gentlemen...while I have your attention will you scroll back to the 3rd photo and please tell me what the black drape is for on the lower front of the hull.

bbrowniii:  Cool man...of course great minds think alike!   FYI: only 2 DAYS LEFT on the sale so grab it soon.  IF YOU DO, be sure to follow along, I'll be posting a several things you'll want to be aware of as you build.  AND,

Guys: I'm striking out on my search for an AM barrel...any help/info would be appreciated.

  • Member since
    April 2006
  • From: Denver, Colorado
Posted by waynec on Thursday, June 28, 2012 10:18 PM

it is a good looking tank,

yes a whoopie light. and the "God" gun. i had a lanyard i always wore with all 4 keys: yellow, orange, green "God" key, and the "illegal black key with not nub to realign pins. still have them in fact. i could walk down a bradley line, look through the down ramp into the turret and tell if the cable was connected to the box just by the angle. did you ever hear the garanimal explanation for connecting cables? that was my invention.

Никто не Забыт    (No one is Forgotten)
Ничто не Забыто  (Nothing is Forgotten)


  • Member since
    December 2002
  • From: Fort Knox
Posted by Rob Gronovius on Thursday, June 28, 2012 9:34 PM

MILES kill light? Come on, we all know it's called a "Whoopie Light"! Back in the day it was rare to see a German tank muddy, but the Leopard 2 is definitely one of the better looking MBTs of the 20th Century.

JOIN OUR COMMUNITY!

Our community is FREE to join. To participate you must either login or register for an account.

SEARCH FORUMS
FREE NEWSLETTER
By signing up you may also receive reader surveys and occasional special offers. We do not sell, rent or trade our email lists. View our Privacy Policy.