SEARCH FINESCALE.COM

Enter keywords or a search phrase below:

M2A1 Halftrack-The offical final pics to wrap the WIP

27568 views
233 replies
1 rating 2 rating 3 rating 4 rating 5 rating
  • Member since
    April 2005
  • From: Piscataway, NJ!
Posted by wing_nut on Saturday, August 25, 2012 11:46 AM

Thanks for all the comments guys. And Mike, yes the pucker point was... extra tightWhistling

Ben, that is a liquid glue that "welds" the plastic.  Hold the pieces to glues  together and a tiny touch of the stuff run though by capillary action.  99% of all the plastic gluing i do is with that.

Had a bit of time this AM, woke up WAY too ealry, and remade the coil over shocks.  Thereis actullya lsiding piston in there but it was really done to be able to have room to get the length right to glue in place.

Marc  

  • Member since
    April 2005
  • From: Piscataway, NJ!
Posted by wing_nut on Saturday, August 25, 2012 11:53 AM

BTW... I have since even out the spacing on the one on the right side of the pic

Marc  

  • Member since
    September 2005
  • From: beacon falls , Ct.
Posted by treadwell on Saturday, August 25, 2012 12:01 PM

Hi Marc.. was gone a couple days and I can see you had a lot of action !!!.. Nice recovery...next time, spill on the brass... it's not so damaging !Devil..LOL... we can laugh now every thing is o.k. Big Smile

DEEEEP BREATH.... AHHHHH

treadCool

P.S. if your cement isn't vise gripped to your bench and it happens again, I have your kit in my stash...I will Fed Ex it to ya...seriouslyBig Smile


  • Member since
    April 2005
  • From: Piscataway, NJ!
Posted by wing_nut on Saturday, August 25, 2012 12:37 PM

Brother tread... thanks for the off but I really really am going to try to never need any parts from youWink

Marc  

  • Member since
    August 2007
  • From: back country of SO-CAL, at the birth place of Naval Aviation
Posted by DUSTER on Saturday, August 25, 2012 5:24 PM

WHEEW!    finaly can let my breath out.


nice recovery and  advance-ment-ing (?)

Steve

Building the perfect model---just not quite yet  Confused

  • Member since
    March 2003
  • From: Western North Carolina
Posted by Tojo72 on Saturday, August 25, 2012 5:54 PM

Nice recovery Marc,continuing to look good

  • Member since
    March 2006
  • From: Right Side of a Left State
Posted by Shellback on Saturday, August 25, 2012 11:20 PM

Marc , nicely done detail on the springs . Glad you re-sprung the one on the right . Yes

  • Member since
    July 2004
  • From: Texas
Posted by wbill76 on Sunday, August 26, 2012 6:33 PM

Neat trick with the springs Marc. Yes

  • Member since
    July 2006
  • From: New Jersey
Posted by redleg12 on Sunday, August 26, 2012 7:49 PM

Great job with the springs.....it  makes it jump off the page.....it gives the model a sense of bounce....

Rounds Complete!!

"The Moral High Ground....A Great Place to Emplace Artillery."

  • Member since
    April 2005
  • From: Piscataway, NJ!
Posted by wing_nut on Sunday, August 26, 2012 10:04 PM

Thanks fellas. Advancementing... I like that one.

I spent a good part of a gorgeous Sunday afternoon spending the afternoon perfecting my Mojito recipe and oh boy did I ever. I did manage to get a bit of work done too.

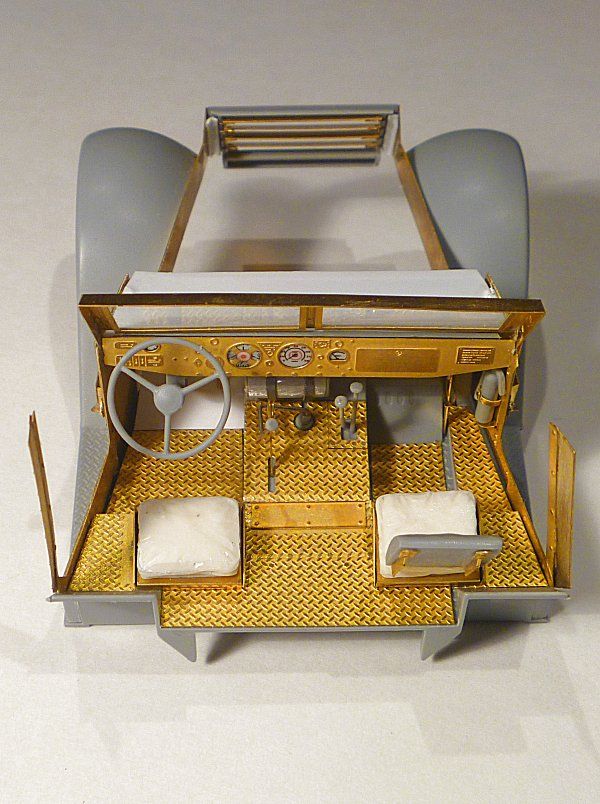
After the can floor alignment issue… never could figure out where I went wrong… the plan was to use the kit parts and swap out as much brass as I could as long as they fit.   The diamond plate was pulled out off the brass floor and was pretty darn near a drop in replacement.  The resin engine is just dry fit for the moment.


The door openings are dead on match so I tried a brass side piece and it fit great.  Just a small gap at the back.  I noticed the little flange on the kit side panels and cut those off to glue on the floor section.  If all of this lines up from this point the fighting compartment should fit well too… I hope.


Here’s what the panel will look like. They are not glued yet so it may look a bit off but when I hold them in place the fit is just about DSP.  Dashboard is ready to go in too.


Marc  

  • Member since
    March 2006
  • From: Right Side of a Left State
Posted by Shellback on Sunday, August 26, 2012 10:47 PM

Oh man Marc that Dash is too cool !!! Wowzers , this is some sharp looking metal work . Nice fit too .Yes

I wont pretend to have known what a Mojito is so i looked it up .............sounds great Toast

  • Member since
    September 2005
  • From: beacon falls , Ct.
Posted by treadwell on Monday, August 27, 2012 2:10 PM

Dash looks great,MarcSmile...but what I really,really like, the main thing that both Tamiya and DML kit really botched up, is the fasteners on the body side. It is nice to see how perfectly the slotted screws are reproduced on the brass. That ,for me, was one thing keeping me from building the kit. I just couldn't live with a whole model with the incorrect and over sized fasteners on the plastic offerings..I guess now maybe some day I got no excuse !

treadCool


  • Member since
    April 2009
  • From: Carmel, IN
Posted by deafpanzer on Monday, August 27, 2012 2:45 PM

Another "Marder" project, please do count me in.  Never forget how great your Marder came out.  Great process especially the springs!  

Sorry I have to ask about this... I was surprised you applied decals to the dashboard now instead of doing them after being painted.  Bet you have another trick up your sleeve to have them masked during painting stages... 8-)

Andy

  • Member since
    December 2004
  • From: ohio
Posted by vonryan on Monday, August 27, 2012 2:52 PM

very cool buildYes  like that your not useing solder. the  CA glue looks much cleaner Yes and a very good name for this build wing-NUT [:D] HAHAHA i have built the small kit for that Half track kit very fun. do like watching this build fun funToast looking forward to your next update.


Clay

  • Member since
    April 2005
  • From: Piscataway, NJ!
Posted by wing_nut on Monday, August 27, 2012 3:08 PM

Thanks  guys.

Shell, when you have a hankerin' for one say the word and I share..  the recipe... not my booze.

Tread, you of the reviews I read also liked all the slotted screws.  Their only complaint was they are flat should be domed I think.

Andy, DOn't have to say your sorry and you don't have to worry.  This is not going to be painted at all.  It will remain starkers, as they say.Embarrassed

Clay, glad to have you along for the ride.  I got lucky with the handle.  the wingnut came from being nuts about airplanes, I was all aircraft all the time for a long time.  Then when the dark side latched onto my soul and yanked it out of me, the "nut" part was handy to have there.Wink

Marc  

  • Member since
    July 2004
  • From: Texas
Posted by wbill76 on Monday, August 27, 2012 5:11 PM

Nice body work Marc, sounds like you got some *** to go with those Mojitos! Wink

  • Member since
    July 2006
  • From: New Jersey
Posted by redleg12 on Monday, August 27, 2012 6:51 PM

Ahh...the tin knocker worked hard this weekend. Looking real good. Nice dash.....you even have Tread drooling....about the screws!!  Surprise

Rounds Complete!!

"The Moral High Ground....A Great Place to Emplace Artillery."

  • Member since
    August 2007
  • From: back country of SO-CAL, at the birth place of Naval Aviation
Posted by DUSTER on Tuesday, August 28, 2012 3:47 PM

Wing _ nut not being a armor guy by heritage, even one such as I, can recognize a craftsman when he gets  the correct parts to make it better.  

 Da dash  is sweeet!  as is the rest. Cant see how, after this, anyone could fail to use the brass;

 the upgrade is....

Steve

Building the perfect model---just not quite yet  Confused

  • Member since
    April 2003
  • From: 41 Degrees 52.4 minutes North; 72 Degrees 7.3 minutes West
Posted by bbrowniii on Wednesday, August 29, 2012 6:26 PM

deafpanzer
Sorry I have to ask about this... I was surprised you applied decals to the dashboard now instead of doing them after being painted.  Bet you have another trick up your sleeve to have them masked during painting stages... 8-)

DeafPanzer

Marc won't admit this, but he is building this for an upcoming.... event Stick out tongue that has as its theme "Naked Models" - no paint, just the bare nekkid metal and plastic and resin.

That's why he applied the decals. Big Smile

'All that is necessary for the triumph of evil is for good men to do nothing' - Edmund Burke (1770 ??)


  • Member since
    April 2009
  • From: Carmel, IN
Posted by deafpanzer on Thursday, August 30, 2012 5:23 PM

Thanks Marc!!!  It sounds like fun... that's something I always wanted to try one day.   Have Voyager PE set (five sheets) for M16 Multiple Gun and it would be a shame to hide 'em.

Andy

  • Member since
    June 2008
  • From: Piscataway,NJ
Posted by jtrace214 on Monday, September 3, 2012 7:42 AM

Marc,looking great you got some skills,lol.....Have you gone to the new Hobby Lobby yet? Not much in the model section but some pretty good supplies...

John

the pic to the left is my weekend condo lol

  • Member since
    April 2005
  • From: Piscataway, NJ!
Posted by wing_nut on Monday, September 3, 2012 6:50 PM

Hi John... Thanks pal.  No, not been yet but I figured  your description was gonna be the deal.  It's just nice to not have to go all the way to Micheal's or AC Moore.


When the plan is to do absolutely nothing all day you can really get stuck in that mode.  Watch a string of movies with the wifey and daughter splayed out on the couches. 

Did get "work" done.  The working with only glue deal has it good side and bad side and they both have to do with the popping off of pieces.  Good to be able to pop off a piece with a little well placed prying to fix or realign but bad when they start popping off in one place while working in another.

Finished most of the cab inteiror and so far, fit wise, using the kit floor is working out well. Side door frame are permanently installed now.  The window frame turned out to be a real lady-dog to bend let me tell ya. Working and small sub-assmeblies too... like the front louvers.

Marc  

  • Member since
    September 2005
  • From: beacon falls , Ct.
Posted by treadwell on Monday, September 3, 2012 8:12 PM

Hi Marc Smile

Glad you got an update in, man ! ...I have been waitin' all weekend Smile  It sure looks nice !  I will say I don't envy doing all the brass work but in the same hand I do envy the result...! YesBeer

I will confess you got me thinking about mine and I got the box open and maybe some Tenax might start to fall on the chassis...I don't know...

Keep the updates coming, great stuff....I almost forgot to ask about the resin engine ... is it another extra or does it come with the brass ? ...it looks great and the fan in brass looks REAL good !

treadCool


  • Member since
    March 2006
  • From: Right Side of a Left State
Posted by Shellback on Monday, September 3, 2012 8:13 PM

Its a beaut Marc , thats for sure .......................Toast

  • Member since
    July 2004
  • From: Texas
Posted by wbill76 on Tuesday, September 4, 2012 8:33 PM

Sharp work Marc, shiny! Beer

  • Member since
    July 2006
  • From: New Jersey
Posted by redleg12 on Tuesday, September 4, 2012 8:37 PM

Moving along nicely.....3 weeks left......PRESSURE!!!

Hey, I am in the same boat!

Rounds Complete!!

"The Moral High Ground....A Great Place to Emplace Artillery."

  • Member since
    April 2005
  • From: Piscataway, NJ!
Posted by wing_nut on Wednesday, September 5, 2012 6:46 AM

Thanks guys or all the comments.

Tread... the engine comes in the set along with a mountain of resin stowage.

Mike... It's 3 1/2 weeks.  I am feeling that pressure so don't make it worse.

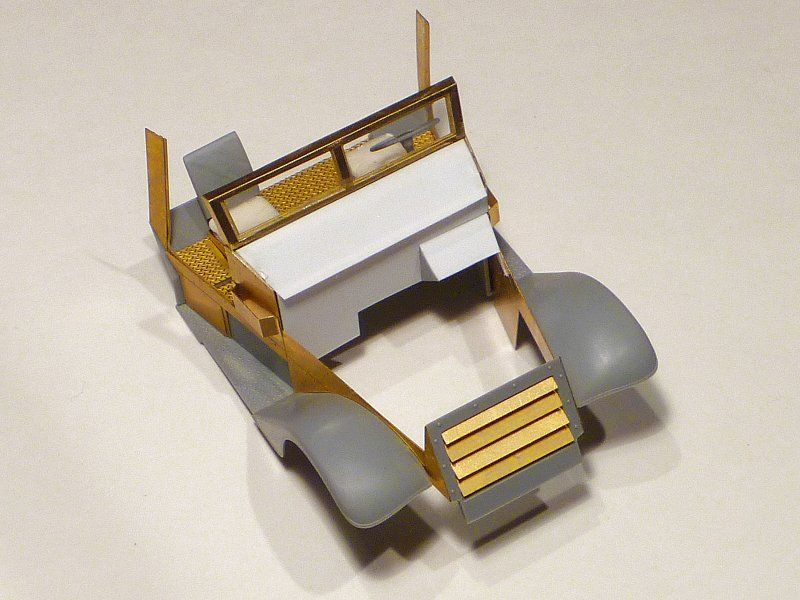
I bought Toadman's M2A1 photo reference, a $5 download of 230+ pics of an easily and late version, and discovered that the firewall is wrong in the kit. The open top cube in front of the drivers area is neither a cube nor open.  Cutting that at an angle would have been less of a nightmare had it been done before all the delicate brass.

The side had a bit of a toe in and the delicate brass louvered section was distorting when installed.  I modified the kit part, added some styrene "angle iron" in the back and it straightened it all out.

Dash and glass are in but ya can't see the glass.
Marc  

  • Member since
    March 2010
  • From: Democratic Peoples Republic of Illinois
Posted by Hercmech on Wednesday, September 5, 2012 10:23 AM

Very nice update...she is coming along nice


13151015

  • Member since
    September 2005
  • From: beacon falls , Ct.
Posted by treadwell on Wednesday, September 5, 2012 10:28 AM

Yes Looking sweet Marc !  ... Will you be using the  'flattened' kit tires on the front?  I know guys either hate them or love them and there are a lot of after market ones available.  ...  Don't put the pressure on yourself..

It is supposed to be enjoyable !  ...the dash looks great installed Big Smile

treadCool


  • Member since
    April 2005
  • From: Piscataway, NJ!
Posted by wing_nut on Wednesday, September 5, 2012 11:09 AM

Thanks Herc

Thanks Tread.  I used the kit tires.  I think the "flattening" looks really well done on them.

Marc  

JOIN OUR COMMUNITY!

Our community is FREE to join. To participate you must either login or register for an account.

SEARCH FORUMS
FREE NEWSLETTER
By signing up you may also receive reader surveys and occasional special offers. We do not sell, rent or trade our email lists. View our Privacy Policy.