SEARCH FINESCALE.COM

Enter keywords or a search phrase below:

Dragon #6253 Tiger I Late Production-Complete 12-20-13

39889 views
155 replies
1 rating 2 rating 3 rating 4 rating 5 rating
  • Member since
    March 2003
  • From: Rain USA, Vancouver WA
Posted by tigerman on Tuesday, October 1, 2013 1:36 AM

Cheers Bill. Glad to see a WIP again, and of cool subject no less. Wink

   http://i7.photobucket.com/albums/y269/wing_nut_5o/PANZERJAGERGB.jpg

 Eric 

  • Member since
    January 2013
Posted by jibber on Tuesday, October 1, 2013 10:01 AM

Bill, I've built this kit a bit ago and I found really good fits all the way around, I can't wait to see more progress and see how you finish it. Love a Tiger build...  

  • Member since
    March 2003
  • From: Western North Carolina
Posted by Tojo72 on Tuesday, October 1, 2013 10:24 AM

You know i'm with you Bill,great start.I'll be starting Wittman's 007 soon,so this should help.

  • Member since
    December 2006
  • From: N. Georgia
Posted by Jester75 on Tuesday, October 1, 2013 10:39 AM

Tagging along Bill. I like they way they have designed the pins with the ability to insert 4 or 5 at a time. I do love MK tracks!!

Eric


  • Member since
    July 2004
  • From: Texas
Posted by wbill76 on Tuesday, October 1, 2013 5:52 PM

Eric

glad to have you along for the ride!

BeerJibber

I've also built it's brother, #6252, so I'm looking forward to it. Glad to hear it doesn't have any major issues!

Anthony

pull up a chair and hope it helps your build! Yes

Jester

MKs are my go-to option for workable tracks and this one's been fairly straightforward in the assembly. The multi-pin handle and jig arrangement certainly helps in the speed department! Wink
  • Member since
    December 2008
  • From: Goffstown, NH
Posted by New Hampshire on Tuesday, October 1, 2013 6:59 PM

Ahhhh the good old Tiger.  I think the reason so many are built by modelers is because....THEY ARE AWESOME! Big Smile  I have to say modern armor, like the Abrams, Merkava, etc., have these elegant utilitarian lines that make them look rather aggressive in a beautiful way.  But for sheer "I am here to kick *** and chew bubble gum....and I am all out of bubble gum" attitude the Tiger has the lines and the reputation, to back up it's own version of beauty. Cool

As usual, can't wait to watch the show progress. Yes

Brian

  • Member since
    July 2004
  • From: Texas
Posted by wbill76 on Wednesday, October 2, 2013 5:26 PM

Hard to argue with you there Brian! Beer Glad to have you along.

  • Member since
    April 2005
  • From: Gothenburg
Posted by JohanT on Thursday, October 3, 2013 2:19 PM

Hi Bill,
You have been saving up on this one just to tease us...
I don't mind Stick out tongue

This thread is firmly tagged Yes

Very Best Regards
Johan 

  • Member since
    December 2002
  • From: Bury St Edmunds, Suffolk, England
Posted by Bish on Thursday, October 3, 2013 2:23 PM

Count me in for the ride, always a pleasure watching you build. This will be fun.

I am a Norfolk man and i glory in being so


On the bench: Airfix 1/72nd Harrier GR.3/Fujimi 1/72nd Ju 87D-3

  • Member since
    July 2004
  • From: Texas
Posted by wbill76 on Thursday, October 3, 2013 8:18 PM

Johan

and Bish

Glad to have you along for the ride as well! Beer

  • Member since
    October 2009
Posted by Kentucky Colonel on Friday, October 4, 2013 8:31 PM

I want to watch it since I'm building the same model this winter. Only I'll use Friuls.

  • Member since
    July 2004
  • From: Texas
Posted by wbill76 on Saturday, October 5, 2013 4:56 PM

Appreciate the interest KC, glad to have you along! Beer

  • Member since
    July 2004
  • From: Texas
Posted by wbill76 on Sunday, October 6, 2013 7:08 PM

Another weekend means another update! Work continued on the Tiger with attention given to the rear hull plate. The kit part received the corresponding Atak zim panels using a combination of Gator Grip glue to position them and then running liquid glue under the panels to tack down the edges and ensure the panels bonded to the part underneath.

Dragon deliberately molded the hull with a slight warp in the hull tub as a design intended to allow for a snug fit with the plates. The rear plate is big enough and strong enough to force the hull sides into the proper alignment using just regular glue. Once the plate was in place the lower-most zim panel was added around the base of the tow hitch to round things out.

The front of the hull however needs a little help to overcome the warp, so a piece of sprue was cut down to the necessary size and glued in place to brace the hull and help it hold its shape better.

I dry-fitted the glacis plate along with the hull roof and the front plate of the fighting compartment. This not only ensured that the bracing length of sprue was providing the right level of correction, it also ensured that the brace held its position correctly while the glue set.

Then I sat down to deal with the remaining 2nd track. 2 football games and 93 links later, the second one was completed.

Next up will be more work on the hull side panels and other similar details.

  • Member since
    December 2006
  • From: N. Georgia
Posted by Jester75 on Sunday, October 6, 2013 8:39 PM

Looking sharp Bill!!  I believe the inward bow on the Tiger hull is an "issue" or "an on purpose" design with the Dragon Tigers right?

Eric


  • Member since
    March 2003
  • From: El Dorado Hills, CA
Posted by IBuild148 on Sunday, October 6, 2013 11:07 PM

I'm on board Bill. Always enjoy your WIP builds. Always learning something from you.

IBuildOne48

Teach modeling to youth!

Scalefinishes.com

http://i712.photobucket.com/albums/ww122/randysmodels/NMF%20Group%20build%20II/Group%20Badge/NMFIIGBbadgesmall.jpg


  • Member since
    March 2011
  • From: Ottawa,Ontario,Canada
Posted by modeler#1 on Monday, October 7, 2013 7:17 AM

Love that zermmit!

On the Bench: Nothing atm

  • Member since
    July 2004
  • From: Texas
Posted by wbill76 on Monday, October 7, 2013 11:20 AM

Jester75

Looking sharp Bill!!  I believe the inward bow on the Tiger hull is an "issue" or "an on purpose" design with the Dragon Tigers right?

That's right Eric, the bow/warp on the hull is an intentional design element in the Dragon kits. It's supposed to make the fit tighter for the modular hull plates that build up on the 'frame' of the tub and it fulfills that purpose very nicely. The tension on the front plates though is pretty strong, I was able to actually get everything to attach and align correctly without the sprue brace but it created so much stress that parts would pop off with the slightest shift, so I added the brace to make life a little bit easier when it comes time to permanently attach them.


IB48

thanks very much for the high praise and glad to hear the builds are helpful, glad to have you along!


BeerModeler#1

I'm a big fan of the Atak resin zim sets, definitely worth the extra money for builds that require the zim IMHO. Yes


  • Member since
    September 2006
  • From: Dripping Springs, TX, USA
Posted by RBaer on Friday, October 11, 2013 10:09 AM

Bill, Dragon ought to just put a link to your builds in the box.....

Apprentice rivet counter.

  • Member since
    July 2004
  • From: Texas
Posted by wbill76 on Friday, October 11, 2013 4:11 PM

RBaer

Bill, Dragon ought to just put a link to your builds in the box.....


I'd be happy if they just proofed their instructions! Big Smile Always glad to have you stop by my friend! Beer

  • Member since
    December 2006
  • From: N. Georgia
Posted by Jester75 on Friday, October 11, 2013 4:16 PM

wbill76
 

I'd be happy if they just proofed their instructions! Big Smile 

Amen!!!

Eric


  • Member since
    July 2004
  • From: Texas
Posted by wbill76 on Sunday, October 13, 2013 7:31 PM

This round of effort focused on getting the remaining zim work done on the hull. First up was the left side. The kit includes pre-formed brass fenders with PE braces that need to be added to them to construct each fender portion. Dragon designed them to sit on the little mount tabs and the Atak zim set sits flush around them, so it's necessary to cut the Atak panels to allow the fenders to sit correctly. I decided to leave one of the fenders off on this side to show the detail and the zim extending down the full hull side for a little variety.

Because the hull side integrates with the front plate, I went ahead and installed it along with the glacis plate so I could get everything lined up. The three fenders were installed and some Squadron White putty used to fill back in the gaps on the zim panels where needed.

The front hull plates received their zim panels as well and the ball MG mount installed along with the driver's visor. Just a little bit of putty was needed to match things up with the zim and fill a couple of gaps.

Then the right hull side received its zim and fenders using the same approach as on the left side. 

Next came the details for the engine compartment as called out in Step 7. The kit provided PE frames for the fans are a very tight fit into the space available and they also make it impossible to fit the radiator hoses (parts G13), which isn't a big deal for me since all of this disappears under the hatches and screens regardless.

I installed the roof plate for the hull next, working at the front using liquid glue and moving slowly toward the rear to get the hull to close up properly along the edges. The engine compartment hatches were assembled and installed. It's worth noting that the part numbers in Step 11 for the fan hatches are reversed in terms of which side they belong to but nothing that isn't easily figured out with a test fit. The kit supplied larger intake PE screens were bent so some careful straightening with pliers was required before they were installed.

Rounding things out for the day, I added most of the rear hull details outlined in Steps 5 and 6. The tools and other remaining gear will be installed later on after painting.

Still more work to do on the hull before heading over to the turret.

  • Member since
    December 2006
  • From: N. Georgia
Posted by Jester75 on Sunday, October 13, 2013 7:34 PM

Smooth work with that zimm Bill! Going to have to try that one of these days..

Eric


  • Member since
    July 2004
  • From: Texas
Posted by wbill76 on Sunday, October 13, 2013 7:42 PM

Thanks Eric! Atak's the best stuff to work with IMHO, give it a shot, you won't be disappointed. Beer

  • Member since
    January 2007
Posted by the doog on Sunday, October 13, 2013 7:56 PM

WOW, Bill----COOL to see you doing a mighty Tiger! I think I can't help but echo what everyone else said about being excited to see what it's going to be in the end!

I predict....an FSM cover?!

  • Member since
    March 2003
  • From: El Dorado Hills, CA
Posted by IBuild148 on Sunday, October 13, 2013 9:28 PM
As always Bill looking great. Just out of curiosity how long did it take you to assemble 1 run of your MK's?
Just curious.

IBuildOne48

Teach modeling to youth!

Scalefinishes.com

http://i712.photobucket.com/albums/ww122/randysmodels/NMF%20Group%20build%20II/Group%20Badge/NMFIIGBbadgesmall.jpg


  • Member since
    January 2008
  • From: Austria
Posted by Byrden on Monday, October 14, 2013 8:20 AM

That odd-shaped plate between the mufflers; it should be aligned vertically. Everything else looks good.

David

  • Member since
    July 2004
  • From: Texas
Posted by wbill76 on Monday, October 14, 2013 11:14 AM

Karl

thanks buddy! It's been a while since I've done a big cat so figured might as well tackle this one.

BeerIB48

this particular set took a little longer because of the need to attach the guide horns but I'd say about 4 hours per track run. That includes of course the necessary sprue removal and clean-up of the links as well as the actual assembly.

David

Good eye and catch! It had come loose from one of the mount posts and was leaning as a result. Easily fixed, appreciate it! Beer
  • Member since
    March 2003
  • From: Western North Carolina
Posted by Tojo72 on Monday, October 14, 2013 11:54 AM

Up to your usual standard Bill,Metal looks great.

  • Member since
    July 2004
  • From: Texas
Posted by wbill76 on Monday, October 14, 2013 5:48 PM

Thanks Anthony, Dragon packed this kit to the brim with all kinds of goodies. Ah, the good ol' days! Big Smile

  • Member since
    July 2003
  • From: On my kitchen counter top somewhere in North Carolina.
Posted by disastermaster on Tuesday, October 15, 2013 1:05 PM

    Bill, looks like a good day for a Tiger.

                    http://media.moddb.com/cache/images/groups/1/3/2074/thumb_620x2000/images.1.jpg

(Of course, any day is good for a Tiger)

 https://i.imgur.com/LjRRaV1.png


  • Member since
    July 2004
  • From: Texas
Posted by wbill76 on Tuesday, October 15, 2013 3:45 PM

I hear you there DM! Beer Thanks for dropping in.

  • Member since
    August 2012
  • From: Parker City, IN.
Posted by Rambo on Tuesday, October 15, 2013 3:59 PM

I still want to get some of that Atak Zim it seems really easy to work with. The rest of the Tiger is coming along nicely too.

Clint

  • Member since
    July 2004
  • From: Texas
Posted by wbill76 on Wednesday, October 16, 2013 3:36 PM

Thanks Clint! Atak's the way to go IMHO. Not only do they typically include the zim panels but they also provide full resin replacement parts for things like the gun mantlet that would be very difficult to zim otherwise. Well worth the price to produce a zim finish. Wink

  • Member since
    July 2006
  • From: San Francisco Bay Area
Posted by bufflehead on Wednesday, October 16, 2013 11:36 PM

Dang Bill!  I had no idea you were building this kit!  I've had mine in the stash for 6 yrs....I think it was the 5th kit I bought when I returned back to the hobby.   I was too intimidated back then to build it and it still intimidates me!! Tongue Tied  Some day I'll work up the courage to attack it, but for now I'll live vicariously through your top notch blog!

Ernest

Last Armor Build - 1/35 Dragon M-26A1, 1/35 Emhar Mk.IV Female


Last Aircraft Builds - Hobby Boss 1/72 F4F Wildcat & FW-190A8


  • Member since
    July 2004
  • From: Texas
Posted by wbill76 on Thursday, October 17, 2013 12:45 PM

Hi Ernest! Glad you found it, still in the early stages yet so you're not far behind. Wink This one was also one of my early stash-building kit acquisitions that has been sitting patiently waiting its eventual turn at the bench. You shouldn't be intimidated by this kit, it's got options of either styrene or PE for most of the parts in question so there's no reason not to tackle it whenever you feel the urge! Beer Happy to feed your Tiger-fix needs until then though.

  • Member since
    July 2004
  • From: Texas
Posted by wbill76 on Sunday, October 20, 2013 6:21 PM

More progress in the hull details in this session. First up was the front Bosch headlight and platform. The kit part doesn't accommodate the addition of zim, so the little tab on the back needed to be notched at the top for it to sit properly. The kit-supplied pre-bent steel wire for its conduit falls into the same trap, so I replaced it with 0.5mm solder bent to shape and installed with CA gel.

Then it was time to work on the tools. I used the kit-supplied 'clean' tools for the most part, the only one that wasn't usable was the pry bar, TA2. That's because this is a generic tool set sprue and the pry bar there is a much shorter bar than the one used on the Tiger. Griffon PE clamps were used in place of the kit clamps because I find them easier to work with. For those tools with molded-on tool clamps, I removed their thick handles and replaced them with Griffon handles. The kit-supplied brass tube antenna holder was attached with CA gel to round things out.

The tools that attach to the rear hull were also dealt with, receiving Griffon PE handle replacements. The jack is a multi-part assembly and beautifully detailed but the handle has to be placed just so to line-up properly with the mount hole in the rear. I also cleaned up the large tow cables and prepped the cleaning rods. The rods had their solid ends drilled out with a #76 finger drill to create the 'female' ends where appropriate.

Next up will begin work on the turret.

  • Member since
    August 2008
  • From: S.W. Missouri
Posted by Pvt Mutt on Sunday, October 20, 2013 6:36 PM

I want MORE

I want more

Tex give us MORE

Tony leeWink

Shoot Low Boys They're Ridin Ponys

  • Member since
    July 2006
  • From: San Francisco Bay Area
Posted by bufflehead on Sunday, October 20, 2013 6:41 PM

YEAH!!  

Looking good Bill!  Thanks for the heads up on the parts that need mods or replacement due to the zim!

Ernest

Last Armor Build - 1/35 Dragon M-26A1, 1/35 Emhar Mk.IV Female


Last Aircraft Builds - Hobby Boss 1/72 F4F Wildcat & FW-190A8


  • Member since
    July 2004
  • From: Texas
Posted by wbill76 on Monday, October 21, 2013 1:55 PM

Tony

careful what you wish for! Big Smile

BeerErnest

happy to be of assistance! It's not an uncommon thing for those little types of things to pop up since of course the kit designers can't know what the actual thickness of AM or DIY zim might be, so the parts are designed to fit without that consideration. Makes life just a little bit more interesting but that's all part of the process of adding mods anyhow. Thanks for the comments as always! Beer
  • Member since
    December 2002
  • From: Bury St Edmunds, Suffolk, England
Posted by Bish on Monday, October 21, 2013 2:56 PM

Looking good bill.

I am a Norfolk man and i glory in being so


On the bench: Airfix 1/72nd Harrier GR.3/Fujimi 1/72nd Ju 87D-3

  • Member since
    October 2009
Posted by Panther Ausf G 122 on Monday, October 21, 2013 3:06 PM

Nice build, watching your WIP.

  • Member since
    July 2004
  • From: Texas
Posted by wbill76 on Monday, October 21, 2013 8:55 PM

Thanks Bish!

Panther G

glad to have you along as well! Beer
  • Member since
    July 2004
  • From: Texas
Posted by wbill76 on Sunday, October 27, 2013 1:52 PM

Work moved on to the turret in the latest round with efforts focused on Steps 13 and 14 to build up the main gun and mantlet. The kit includes a metal spring to allow for 'recoil' but it's not essential and I left it out deliberately. I opted for the kit-included turned aluminum barrel. The small locking piece that secures the base of the barrel into the breech and recoil housing, part A9, is shown in the instructions installing upside down. The 'open' end installs down and not up, otherwise you can't get the recoil housing halves together.

The Atak set includes two different resin replacement mantlets that have the zim pattern, The 'monocular' sight version was introduced in April '44 so I went with that one. I replaced the kit coaxial MG34 barrel with a turned brass item from JB Models. I used a small amount of ApoxieSculpt putty to provide something for the brass barrel to hold onto and also blank off the open port since the JB barrel's base diameter was smaller than that of the kit part.

The rest of the gun was assembled per the instructions. The kit provides a choice of muzzle brakes but has the part numbers backward on the instruction diagrams. Parts A11-A17-A18 construct the larger type brake used before April '44 while parts E7-E10-E11 construct the smaller type seen after that date. I used the smaller type to match with the mantlet type selected previously. The brake has a 'D' shaped opening that has to be opened up to a full round opening to mate up with the aluminum barrel, so that was carefully drilled out with a small drill pit and pin vise.

Step 15 adds interior details that I skipped since I'm not showing any of the turret hatches open. Step 16 addresses the turret roof, I chose the roof style used after June '44 and added the hatches and other details. The clear periscopes were left out for now since they can be installed into their spots from the turret underside later after painting.

Step 17 assembles the turret but before I could do that, I needed to add the zim. The Atak set includes the choice of small or large ridge patterns panels and I opted for the larger patterns often seen on Tiger turrets vs. the smaller pattern used on the hull. Panels were added using a combination of CA gel and liquid glue since the curves of the turret put a little more stress on the panels in terms of the surfaces they needed to conform to. Strategic use of some smooth-jaw clips helped get everything to stay put until the glue set. The Atak set provides a replacement resin escape hatch as well as zimmed parts for the view ports on the turret sides. The view port parts aren't the same size as what is molded on the turret, so the turret ports were carefully sanded down until the resin parts sat flush with the zim panel. Then just a little bit of white putty to join everything up to round it out.

Turret roof was then installed in place and the rest of the details added in the form of the spare track holders, the rear turret bin, and the MG AA mount.

Test fit with the hull showed that I needed to adjust the placement of the shovel clamp installed earlier to allow it to clear the bottom of the mantlet. Otherwise everything else played nice.

Next up will be starting the paint work.

  • Member since
    March 2003
  • From: Rain USA, Vancouver WA
Posted by tigerman on Sunday, October 27, 2013 1:58 PM

Looking impressive Bill.

   http://i7.photobucket.com/albums/y269/wing_nut_5o/PANZERJAGERGB.jpg

 Eric 

  • Member since
    July 2006
  • From: San Francisco Bay Area
Posted by bufflehead on Sunday, October 27, 2013 4:00 PM

Sweeeeet!!!  The Dragon kit and Atak zim is going together very nicely!  But what are those "white" spots on the zim?  Different glue?

Ernest

Last Armor Build - 1/35 Dragon M-26A1, 1/35 Emhar Mk.IV Female


Last Aircraft Builds - Hobby Boss 1/72 F4F Wildcat & FW-190A8


  • Member since
    August 2008
  • From: S.W. Missouri
Posted by Pvt Mutt on Sunday, October 27, 2013 5:28 PM

Nice clean construction BillYes

I'm ready for some color.

Tony lee

Shoot Low Boys They're Ridin Ponys

  • Member since
    July 2004
  • From: Texas
Posted by wbill76 on Sunday, October 27, 2013 5:56 PM

Eric

thanks as always!

Ernest

the Atak sheets vary slightly in thickness/translucence, so the 'white spots' you're seeing (if I understand correctly) are areas where the sheet is a little thicker and adheres slightly differently to the underlying surface as a result. Some of what you are seeing is the result of different glues as well but mostly it's the thickness difference.

Tony

me too! Wink
  • Member since
    March 2003
  • From: Rain USA, Vancouver WA
Posted by tigerman on Sunday, October 27, 2013 6:43 PM

I guess I always thought the white spots were a result of no glue in that spot. I learn something every day.

   http://i7.photobucket.com/albums/y269/wing_nut_5o/PANZERJAGERGB.jpg

 Eric 

  • Member since
    March 2003
  • From: El Dorado Hills, CA
Posted by IBuild148 on Sunday, October 27, 2013 10:45 PM

As always Bill things are looking stellar. Yes

IBuildOne48

Teach modeling to youth!

Scalefinishes.com

http://i712.photobucket.com/albums/ww122/randysmodels/NMF%20Group%20build%20II/Group%20Badge/NMFIIGBbadgesmall.jpg


LSJ
  • Member since
    October 2013
Posted by LSJ on Monday, October 28, 2013 1:45 AM
I am truly amazed... After coming back to the game after 30 some years, it's an absolute joy to see things like this.. Craftsmanship on a level I can only dream of. And a wealth of information in how to build (and patience) in this thread.
And as an amateur historian I am very happy with the precision to historical correct details.


Lars
  • Member since
    July 2004
  • From: Texas
Posted by wbill76 on Monday, October 28, 2013 12:38 PM

Tigerman

It's one factor or the other, sometimes both! Wink

IB

thanks for the comments

BeerLars

the hobby has changed a lot in the past decade, no question about it. Welcome back to the hobby and thanks very much for the kind words. Always glad to hear a build of mine provides helpful info to anyone else looking to build the same kit.
  • Member since
    January 2011
  • From: The Great North Woods, Maine
Posted by Chazzer on Monday, October 28, 2013 5:52 PM

WOW!!! This is one great build and an absolute "clinic" for modelers.  I am proud to be following this. Damn, it's good to be back and see this. Thanks for this!!!

ChazzerBlack Eye

  • Member since
    March 2013
  • From: Puebla, Mexico
Posted by garzonh on Monday, October 28, 2013 6:12 PM

Hey, very nice, its the kind of pictures used to make on "how to...." book or magazine.

  • Member since
    July 2004
  • From: Texas
Posted by wbill76 on Monday, October 28, 2013 7:50 PM

My pleasure Scott! Wink

Garzon

, I always try to provide as much info as possible in the build logs, glad you find it helpful! Beer
  • Member since
    April 2005
  • From: Gothenburg
Posted by JohanT on Tuesday, October 29, 2013 5:22 PM

Hi Bill,
Super blog as always Bow Down

Your comment about having to cut the side zim panels to allow for the mudguards to sit correctly made me think...(don't laugh Stick out tongue)
Got the same ATAC set and I was simply going to cut it off under the mounting brackets. I was not sure if they would have ever applied zim under the side skirts...but they sure did.

The brackets where high enough to allow for a good connection even with the coat applied.
If I am not mistaking the skirts are bent in an U shape at the top allowing for some flex when the bolt goes through into the threaded bracket hole. Need to check tiger1.info.

Very good fix - the cut is not visible at the missing skirt.

Very nice progress - thank You for sharing! 

Very Best Regards
Johan 

  • Member since
    July 2004
  • From: Texas
Posted by wbill76 on Tuesday, October 29, 2013 5:27 PM

No worries Johan, I went through the same thought process myself and considered the same solution! But, as you discovered, the zim goes all the way down the hull. On the real vehicle the mount points were raised out from the hull enough to allow the fender panels to sit properly once attached but Dragon designed theirs to sit flush to the hull, so that's why the surgery and putty work was necessary for them to sit correctly.

  • Member since
    April 2005
  • From: Gothenburg
Posted by JohanT on Tuesday, October 29, 2013 5:57 PM

Thanks Bill!

And I was wrong - no U bend but still some flex...

tiger1.info/.../Side-skirts.html

Very Best Regards

Johan

  • Member since
    April 2006
  • From: ON, Canada
Posted by jgeratic on Wednesday, October 30, 2013 4:07 AM

Bill, is there room for one more passenger on this bus?

Looking very good, and great tips along the way.  One question about the second use of glue on the zim sections, do you have a special tip on the liquid glue bottle, or some other dedicated tool to apply it?

regards,

Jack

  • Member since
    July 2004
  • From: Texas
Posted by wbill76 on Wednesday, October 30, 2013 5:46 PM

Of course Jack! Glad to have you along for the ride. As for your question on the liquid glue, I typically will use the bottle's built-in brush to let the glue flow via capillary action under the panel. For smaller pieces, I use a smaller ordinary paint brush to do the same trick. HTH! Beer

  • Member since
    July 2004
  • From: Texas
Posted by wbill76 on Sunday, November 3, 2013 5:14 PM

I had a couple of small details to attend to on the build before paint work could begin. Those details involved the spare tracks. The 7 links that mount to the turret were missing their individual pin details so I used some 0.8mm diameter styrene rod to recreate the pins on each link. I also drilled out the exposed end of each link to show the empty pin hole at the top that's exposed once they are mounted in their holders.

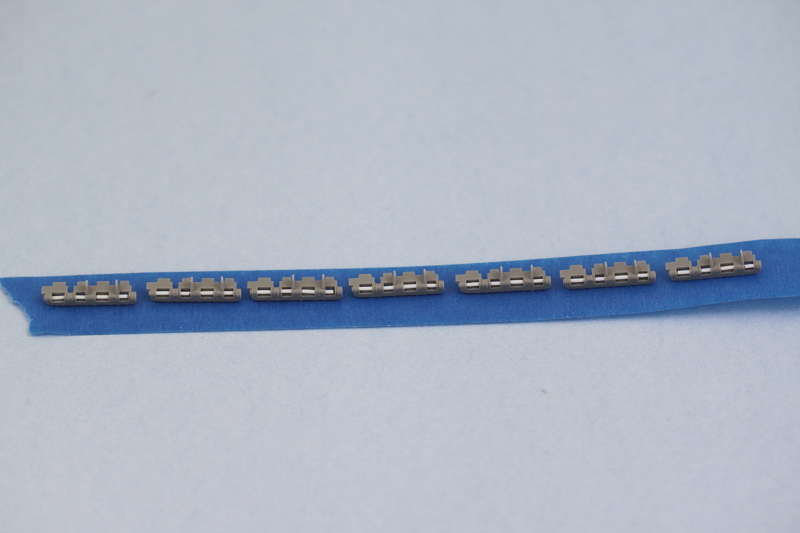
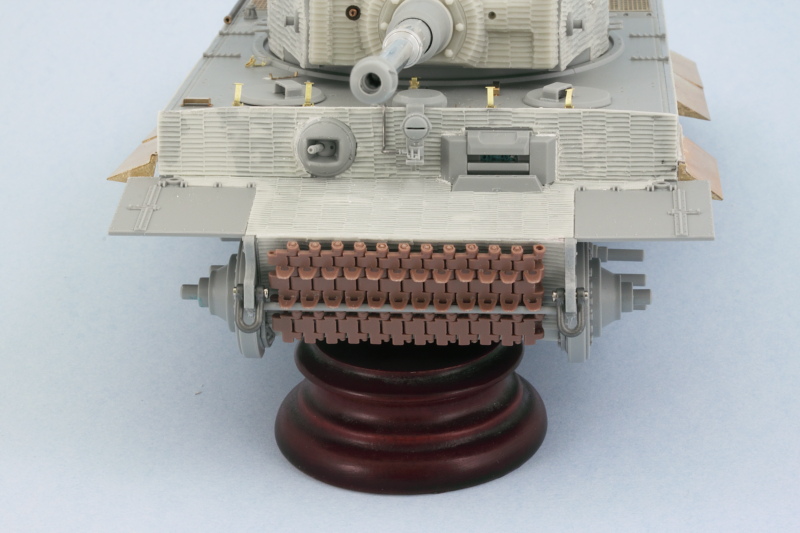
For the front spare track run, I used the remaining links I had from the MK set for the 12 links required there. There weren't enough links left over in the MK set to do this and the turret links and since the workables are better suited here, that's where they got used. The instructions for this little addition are in Step 12 but they parts callout for the support bar is wrong, it should be K3 and not C15.

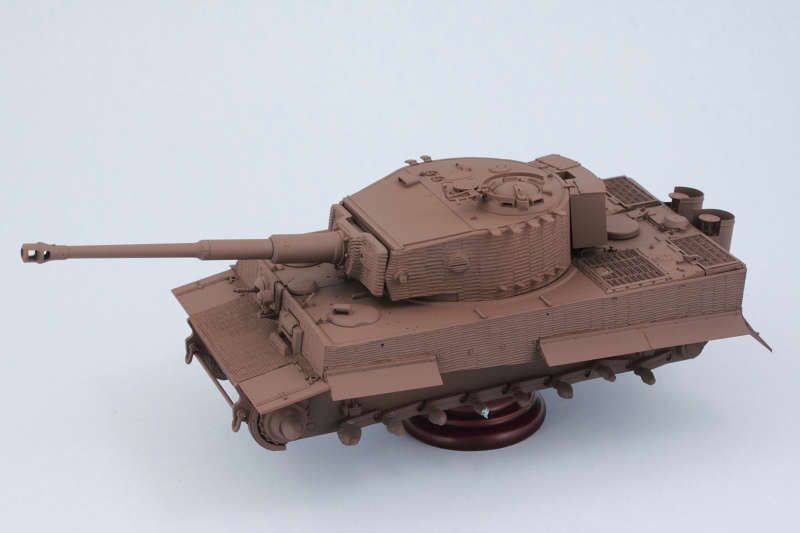
With that done, I prepped the vehicle for painting by masking off all the suspension arm mount points with blue-tack to prevent paint build-up from causing an issue with the wheel fit later on. I also mounted all the wheels, sprockets, and idlers on toothpicks with blue tack to make it easier to deal with them, fitted a temporary handle to the turret in the form of a cardboard toilet-paper cylinder cut down to size and let the paint fly.

First up was an overall primer treatment using MM enamel Italian Dark Brown. The zimmed surfaces exponentially increase the surface area so more paint than usual was required to get complete coverage.

Next came the base coat using a custom mix of 50/50 MM enamel Panzer Dunkelgelb and enamel Light Gray.

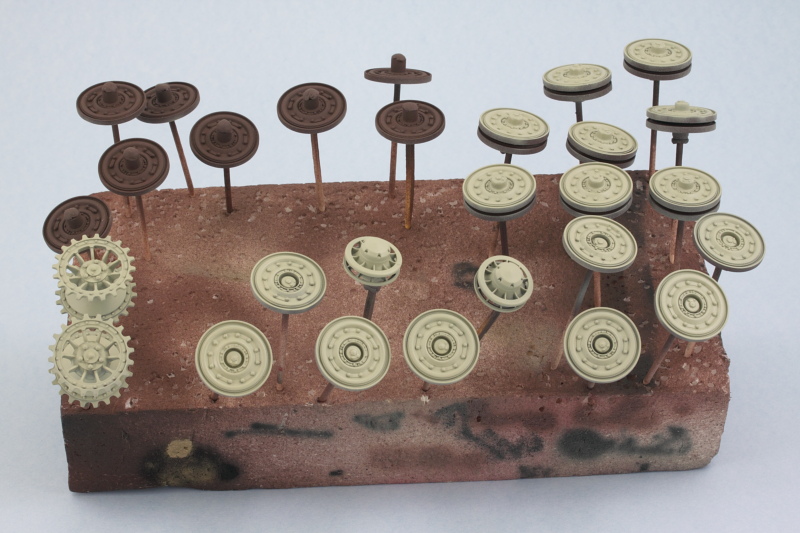
Same treatment was applied to the road wheels, sprockets, and idlers. Since everything's all steel wheels, that sped up the process here a little bit but I still have to paint and detail the contact surfaces for them before they are fully detailed.

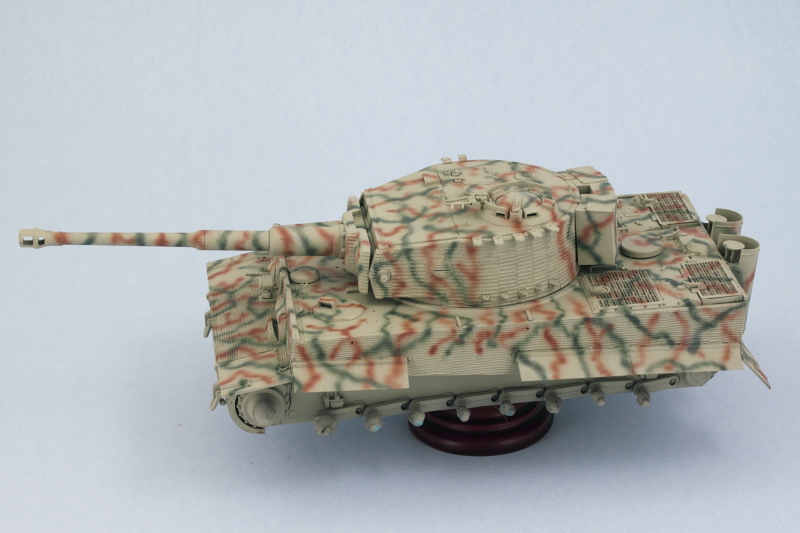
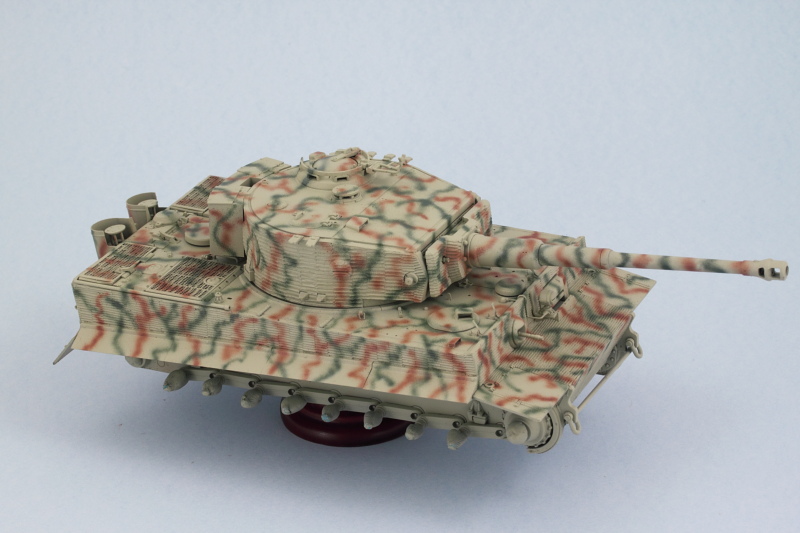
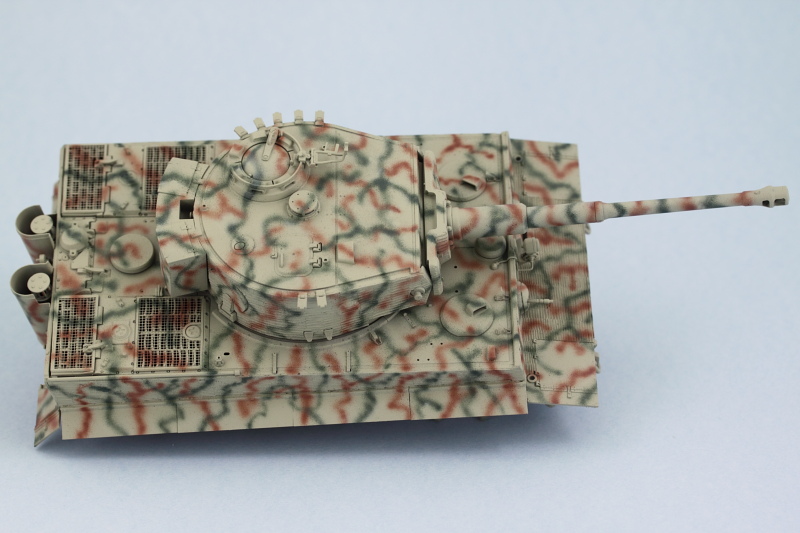
Then the real fun began with the application of the camo pattern. First I applied the rot-braun elements using a custom mix of 50/50 MM enamel Military Brown and Leather and then the olivgrun elements using MM enamel Khaki. Final step involved spraying a mist coat/filter of the original base coat highly thinned from a distance of about 12 inches to help tie everything together.

Top down view shows what it would've looked like from the air.

This will get a chance to sit and cure up thoroughly before moving on to the next phases. Still a lot of work to do in the details department as well with the tools and suspension.

  • Member since
    March 2003
  • From: Rain USA, Vancouver WA
Posted by tigerman on Sunday, November 3, 2013 5:20 PM

That camo looks sweet Bill.

   http://i7.photobucket.com/albums/y269/wing_nut_5o/PANZERJAGERGB.jpg

 Eric 

  • Member since
    July 2004
  • From: Texas
Posted by wbill76 on Sunday, November 3, 2013 5:35 PM

Thanks Eric! Had to work a little at a time to avoid getting to repetitious with the squiggles...that's the trouble with trying to create something that's supposed to be disruptive, the mind's eye wants to set a pattern with it! Big Smile

  • Member since
    December 2008
  • From: Goffstown, NH
Posted by New Hampshire on Sunday, November 3, 2013 6:50 PM

"Here comes the paint, do do do dooooo" Big Smile

It all starts to come together.  The best part of every build! Yes

Brian

  • Member since
    July 2006
  • From: San Francisco Bay Area
Posted by bufflehead on Sunday, November 3, 2013 8:48 PM

Man that's looking soooo good Bill! I better make sure to renew my FSM subscription!  This one is sure to be in a future issue!

Ernest

Last Armor Build - 1/35 Dragon M-26A1, 1/35 Emhar Mk.IV Female


Last Aircraft Builds - Hobby Boss 1/72 F4F Wildcat & FW-190A8


  • Member since
    July 2004
  • From: Texas
Posted by wbill76 on Monday, November 4, 2013 10:26 AM

Thanks Brian! Always a huge hurdle to clear to get the major paint work done.

Ernest

, appreciate the kind words, glad you like where it's headed.
  • Member since
    March 2003
  • From: Western North Carolina
Posted by Tojo72 on Monday, November 4, 2013 12:42 PM

Hey,that camo is making me dizzy,it does look good Bill

  • Member since
    July 2004
  • From: Texas
Posted by wbill76 on Tuesday, November 5, 2013 7:36 PM

Thanks Anthony! Don't stare at it too hard or your eyes will stay that way! Big Smile

  • Member since
    March 2003
  • From: El Dorado Hills, CA
Posted by IBuild148 on Wednesday, November 6, 2013 10:33 PM

I really "graben" that camo scheme Bill!

IBuildOne48

Teach modeling to youth!

Scalefinishes.com

http://i712.photobucket.com/albums/ww122/randysmodels/NMF%20Group%20build%20II/Group%20Badge/NMFIIGBbadgesmall.jpg


  • Member since
    July 2004
  • From: Texas
Posted by wbill76 on Friday, November 8, 2013 1:41 PM

Thanks IB! Yes

  • Member since
    January 2007
Posted by the doog on Friday, November 8, 2013 5:23 PM

LOVE your base-DY color, Bill! That's a nice pale Tigger!

The camo is very imaginative and well-rendered, too---should look great under some weathering!

  • Member since
    March 2013
  • From: Puebla, Mexico
Posted by garzonh on Friday, November 8, 2013 6:32 PM

OOOhh that cammo is going to look great!

Great steady hand, so nice the flow of colors.

Liked it!

  • Member since
    July 2004
  • From: Texas
Posted by wbill76 on Friday, November 8, 2013 7:47 PM

Thanks Karl! I've found the 50/50 mix for the DY makes the ideal foundation for later weathering and such, there's still a lot more to do with this one in the details department for sure.

Garzon

thanks for the comments as well. Just had to take my time with the pattern and think three-dimensionally while applying the pattern. Easier said than done! Big Smile
  • Member since
    July 2004
  • From: Texas
Posted by wbill76 on Sunday, November 10, 2013 8:34 PM

Not a lot of photos in this update round but definitely a lot of progress. I got the tracks ready for more work later on by airbrushing a base coat of MM enamel Burnt Umber. This is just the first step in their finishing and weathering process of course.

Attention then shifted to the details for the hull. All of the tools and tow cables that I'd cleaned up earlier were now hand detailed and installed. The larger tow cables proved more of a challenge than I expected as they kept wanting to lift up out of their mounts on the rear deck. Some finger pressure and liquid glue provided the necessary persuasion to get them to ultimately settle down.

Next up will be continuing work on the remaining hull and turret details before moving on to the suspension and tracks.

  • Member since
    July 2006
  • From: San Francisco Bay Area
Posted by bufflehead on Sunday, November 10, 2013 9:18 PM

The little details are making it come to life Bill!

Ernest

Last Armor Build - 1/35 Dragon M-26A1, 1/35 Emhar Mk.IV Female


Last Aircraft Builds - Hobby Boss 1/72 F4F Wildcat & FW-190A8


  • Member since
    July 2004
  • From: Texas
Posted by wbill76 on Monday, November 11, 2013 10:04 AM

Thanks Ernest! It's always one of those stages where so much time goes into little things but it's all worth it in the end! Wink

  • Member since
    December 2008
  • From: Goffstown, NH
Posted by New Hampshire on Monday, November 11, 2013 5:20 PM

She is getting two thumbs up from me so far Bill! YesYes

Brian

  • Member since
    July 2004
  • From: Texas
Posted by wbill76 on Monday, November 11, 2013 7:43 PM

Thanks Brian! Beer

  • Member since
    April 2006
  • From: ON, Canada
Posted by jgeratic on Tuesday, November 12, 2013 1:59 AM

Bill, great application  of that camou.  Do you have a separate airbrush for fine lines, or a fine tip set you would interchange with?

regards,

Jack

  • Member since
    June 2006
  • From: Michigan
Posted by ps1scw on Tuesday, November 12, 2013 10:07 AM

VERY COOL

  • Member since
    December 2002
  • From: Bury St Edmunds, Suffolk, England
Posted by Bish on Tuesday, November 12, 2013 12:52 PM

Love that scheme bill, she's looking great.

I am a Norfolk man and i glory in being so


On the bench: Airfix 1/72nd Harrier GR.3/Fujimi 1/72nd Ju 87D-3

  • Member since
    July 2004
  • From: Texas
Posted by wbill76 on Tuesday, November 12, 2013 1:07 PM

Jack

I use the same airbrush for all my paint work, an Aztek metal body, and just swap out the nozzles depending on how wide/narrow of a pattern I need. For the camo pattern here I used the tan 'ultra fine' nozzle (don't remember the exact nozzle diameter off the top of my head but it's the smallest one available for the brush). That and controlling how thin the paint is, the air pressure level, and getting very very close to the surface being painted is what's needed to pull off fine lines.

Thanks ps1 and Bish always good to see you drop in and comment! Beer

  • Member since
    July 2004
  • From: Texas
Posted by wbill76 on Sunday, November 17, 2013 4:57 PM

More progress to report in the details department. Following on from last week's efforts, I turned my attention to the remaining hull details first. The spare track run for the front hull and the turret individual links were given a light dry-brush of MM enamel Steel followed by a wash of MM enamel Rust. Then some burnt orange and raw umber artist pastels were worked into their finish to add some additional depth/layering. I also detailed the hull MG and coaxial MG in the turret using a base coat of MM non-buffing Metalizer Gunmetal followed by a light dry-brush of Steel. Rounding things out, I also detailed the exhausts using a base of metalizer Gunmetal followed by a heavy wash of enamel Rust and then some artist pastels using the same colors as the tracks as well as black for some soot staining.  

The rear hull also received some attention. The tools were installed in their respective positions and the rear Notek convoy light added. I used Tamiya Clear Smoke for the light's body

Efforts shifted back to the suspension and I detailed the road wheels using MM non-buffing Metalizer Steel for the wheels contact surfaces as well as the idlers and sprocket teeth. Some enamel Burnt Umber was stippled on the wheels to simulate scuffing/wear in anticipation of more weathering to come. The innermost wheels were left in primer since they get hidden away and the middle wheel pairs were installed in place while the outer wheels were left off for now to make it easier to weather them separately prior to their installation. Sprockets and idlers are dry-fit only at this point as well.

Tracks also received some attention as well. Dry brush pass with MM enamel Steel followed by a wash of MM enamel Raw Umber to tone things down and get them ready for the pigment weathering later on.

Next up will be dealing with the markings!

  • Member since
    December 2006
  • From: N. Georgia
Posted by Jester75 on Sunday, November 17, 2013 5:15 PM

Love those tracks Bill, this one is gonna be sharp!

Eric


  • Member since
    July 2004
  • From: Texas
Posted by wbill76 on Monday, November 18, 2013 12:19 PM

Thanks Eric! Got to love the advantage that workables bring to a build. Smile

  • Member since
    December 2002
  • From: Bury St Edmunds, Suffolk, England
Posted by Bish on Monday, November 18, 2013 12:26 PM

Nice, great work on the tracks.

I am a Norfolk man and i glory in being so


On the bench: Airfix 1/72nd Harrier GR.3/Fujimi 1/72nd Ju 87D-3

  • Member since
    July 2004
  • From: Texas
Posted by wbill76 on Tuesday, November 19, 2013 12:08 PM

Thanks Bish! Happy belated b-day btw, hope you had a good one! Beer

  • Member since
    December 2002
  • From: Bury St Edmunds, Suffolk, England
Posted by Bish on Tuesday, November 19, 2013 12:58 PM

thanks, ye it was. Got two new kits and went to the village pantomime sat night that my other half's daughter was in, again.

I am a Norfolk man and i glory in being so


On the bench: Airfix 1/72nd Harrier GR.3/Fujimi 1/72nd Ju 87D-3

  • Member since
    March 2003
  • From: El Dorado Hills, CA
Posted by IBuild148 on Tuesday, November 19, 2013 1:03 PM

Its looking good Bill, as always. Yes

Question---How do you get the painted tools on after you have painted your armor? I either use elmers or blu tack to hold the tool clamps in place.

Curios as to your technique.

Thanks

IBuildOne48

Teach modeling to youth!

Scalefinishes.com

http://i712.photobucket.com/albums/ww122/randysmodels/NMF%20Group%20build%20II/Group%20Badge/NMFIIGBbadgesmall.jpg


  • Member since
    July 2004
  • From: Texas
Posted by wbill76 on Tuesday, November 19, 2013 1:20 PM

IBuild148

Its looking good Bill, as always. Yes

Question---How do you get the painted tools on after you have painted your armor? I either use elmers or blu tack to hold the tool clamps in place.

Curios as to your technique.

Thanks

Thanks IB! If I understand your question correctly, it depends on whether I'm using PE clamps or not. If PE clamps, they are glued to the hull with CA gel and then painted along with the rest of the hull. The Griffon clamps I prefer allow the top portion to be bent over and locked in place without glue after the tools are installed which makes life much simpler. When I'm not using replacement clamps, I glue the tools directly into place using regular Testors glue (or sometimes liquid glue depending) after the tools have been painted/detailed. Because I work with enamels, the glue will bond with the painted surface and once dry the tools are secure in place for the next stages. HTH!

  • Member since
    April 2005
  • From: Gothenburg
Posted by JohanT on Tuesday, November 19, 2013 3:14 PM

Hi Bill,

That scheme is a true nerve wrecker, but you have managed it very well Yes 

Congratulations Big Smile

One thought - would the pattern towards the missing side shirt be a sharp edge or continue down to the bottom of the side armor?

And would the spare tracks have been taken off, over painted or painted around?

Looking forward to see how those primed inner wheels look behind the rest of the road wheels and some weathering.

Super blog as always - dropped everything else and pulled out 6383 in pure excitement Bow Down

Very Best Regards

Johan

  • Member since
    July 2004
  • From: Texas
Posted by wbill76 on Tuesday, November 19, 2013 4:13 PM

Thanks Johan! You could have the pattern go either way depending on your view of the crew's thinking. My view here is that the skirt is gone and the crew didn't have time to repaint the pattern down to the hull or replace the skirt, so the pattern cuts-off where it would've normally been continuing on over the fender like you see with the other skirts that are still in place. This adds a little bit of visual variety and character to my Tiger I think, that's why I opted for that appearance. Since these camo schemes were field applied and the skirts were in place when vehicles were delivered, there's no reason to believe the crew would go to the trouble of applying camo under existing/in-place fenders on the off-chance that they might lose one down the road. Wink

The spare tracks question is one that depends on what particular scenario or vehicle you're modeling I suppose and what photos do/don't show for a particular vehicle. The only times you see tracks typically over-painted to match the hull or camo pattern is if those tracks are fixed in place as add-on armor as opposed to being true spares...since of course, spares did often get used and you didn't want extra paint interfering with the ability of spare links to fit in with existing tracks, blocking up track pin holes, or other similar issues when you needed to repair a track in a hurry. Lots of photos out there with Tigers with the spare links on the turret showing they weren't blended in with the hull color or camo pattern from what I've seen.

The innermost wheels will all but disappear once the outer wheels and tracks are fitted, so you won't see much of them unless you behave like a 1/35 mechanic! Big Smile

  • Member since
    April 2005
  • From: Gothenburg
Posted by JohanT on Tuesday, November 19, 2013 4:48 PM
Thanks Bill,
I notice now that the pattern cuts of with a sharp edge, need to stop following this thread on my mobile...
Are you going to do one of the Villers-Bocage turret numbers?

VBR
Johan
  • Member since
    July 2004
  • From: Texas
Posted by wbill76 on Tuesday, November 19, 2013 4:55 PM

Yes, I was intending to mark this one as #213 with the sPzAbt 101.

  • Member since
    April 2006
  • From: ON, Canada
Posted by jgeratic on Tuesday, November 19, 2013 5:05 PM

Bill, very adept work here, and have to comment on how pristine the surfaces are, which is so crucial in the final stages.  Do you wear gloves or have some kind of special apparatus to hold the model when working on it?

regards,

Jack

  • Member since
    July 2004
  • From: Texas
Posted by wbill76 on Tuesday, November 19, 2013 8:04 PM

Thanks Jack! No gloves or anything special when handling the model. One of the advantages of working with enamels I suppose, there's no real worry about potential for flaking paint or other issues once it's applied and fully cured.

  • Member since
    January 2007
Posted by the doog on Wednesday, November 20, 2013 9:40 AM

Love the camo, and the choice of red primer in the inside wheels, Bill!

I like the lack of camo in the missing shield too! I see this alot in some old pics.

  • Member since
    March 2013
  • From: Puebla, Mexico
Posted by garzonh on Wednesday, November 20, 2013 5:04 PM

Myself being a cammo handfree challenged I can surely appreciate when this is done so nicely,

Those lines are clean!, and perfectly laid out.

Cant wait for the finished kit!

  • Member since
    July 2004
  • From: Texas
Posted by wbill76 on Wednesday, November 20, 2013 5:26 PM

Karl

thanks for stopping by! Always try to introduce a little bit of character to a build whenever I can. Smile

Garzon

free-hand camo can take some practice but once you get the hang of it, it goes down pretty well. Just a matter of getting the thinner and psi settings right on the brush and compressor. I keep a sheet of ordinary styrene taped to the back of the spray booth as a test bed before committing to the actual model. Wink
  • Member since
    July 2004
  • From: Texas
Posted by wbill76 on Saturday, November 23, 2013 11:00 AM

A minor mishap occurred in the Tiger's progress today. It seems that one of the idlers managed to go missing and as I was searching for it, my 75 lb. Boxer named Brenda found it before I did. Here's all that was left after her adventure!

Thankfully the kit includes the larger idlers as additional parts but doesn't provide additional mount arms. Old kits in the closet to the rescue! I salvaged a mount arm off a previously built Tamiya Tiger and made some slight modifications to it so it would fit the Dragon parts. Installed the rear-most outer wheel to help serve as a guide for the idler's placement and did a test-fit with the MK track run. As expected 1 more link was needed due to the larger idler. Once that was added, the idler was glued permanently into position and left to set up and will get painted later to match the rest of the suspension. So now my Tiger has a little extra character courtesy of Brenda's 'assistance'!

Now back to work and what was actually scheduled for today...the markings. ;)

  • Member since
    December 2006
  • From: N. Georgia
Posted by Jester75 on Saturday, November 23, 2013 11:29 AM

Nice save BIll! Dogs will be dogs wont they.

Eric


  • Member since
    March 2003
  • From: Western North Carolina
Posted by Tojo72 on Saturday, November 23, 2013 12:36 PM

thankfully you have a well stock parts box

  • Member since
    March 2003
  • From: El Dorado Hills, CA
Posted by IBuild148 on Sunday, November 24, 2013 11:31 AM

YOW!!! At least you had a replacement.

With me it is my 3 yr. old. A while back I was at the bench and he wanted to see if one of my planes could fly.

IBuildOne48

Teach modeling to youth!

Scalefinishes.com

http://i712.photobucket.com/albums/ww122/randysmodels/NMF%20Group%20build%20II/Group%20Badge/NMFIIGBbadgesmall.jpg


  • Member since
    July 2004
  • From: Texas
Posted by wbill76 on Sunday, November 24, 2013 5:58 PM

Yes indeed Eric, Anthony, and IB! Thank goodness for Dragon's overstuffed box of parts and the 'graveyard'  of older kits to bail this one out. Smile

  • Member since
    July 2004
  • From: Texas
Posted by wbill76 on Sunday, November 24, 2013 5:59 PM

Despite the minor disruptions yesterday, there was a planned effort on the program that dealt with getting the markings on. First up was a sealing coat of Future to protect the paint work from the weathering stages. This was allowed to air-dry for about an hour or so and then the markings were applied. The kit-supplied markings provide the turret numbers as individual numbers so you can create your own chosen vehicle, mine is 213. Decals were treated with multiple passes of Solvaset and gentle prodding with a wooden toothpick where necessary to ensure they settled down correctly into the zim pattern. This is a time-consuming process that involves lots of waiting for the Solvaset to do its work. If you rush it, you can easily damage a decal beyond repair so lots of hurry-up-and-wait involved.

In between some of those hurry-up-and-wait sessions, I worked on the road wheels some more. They had gotten the Future treatment as well so I had the chance to apply a pin wash of enamel Burnt Umber to bring out their details before installation.

With the decals set and ready to go, the wheels were installed on both sides and a 2nd sealing coat of Future applied to get things ready for the weathering stages ahead.

The Future will be allowed to fully cure for at least 24 hours before moving on. Since this is a holiday week, expect more updates sooner rather than later hopefully.

  • Member since
    July 2006
  • From: San Francisco Bay Area
Posted by bufflehead on Monday, November 25, 2013 12:59 AM

Ooh, its getting close and looking soo good!!  Sorry about your canine altered idler Bill, but as usual, you've come up with a solution!  Question on the MK tracks:  I noticed on the replacement link that the guide horn is missing...are those added separately?  

Ernest

Last Armor Build - 1/35 Dragon M-26A1, 1/35 Emhar Mk.IV Female


Last Aircraft Builds - Hobby Boss 1/72 F4F Wildcat & FW-190A8


  • Member since
    July 2004
  • From: Texas
Posted by wbill76 on Monday, November 25, 2013 11:01 AM

Thanks Ernest! The doggy 'PaK of doom' could've been quite devastating! A new secret weapon...

The guide horns on the MKs are indeed added separately. I added the guide horns using some of the Dragon separate horns for the spare tracks since I'd run out of the MK supplied horns doing the hull front spare run earlier. The Dragon horns fit perfectly to the MKs without any issue.

  • Member since
    January 2007
Posted by the doog on Monday, November 25, 2013 7:31 PM

That just looks great with those bright numbers, Bill. Those wheels are nicely detailed too.!

  • Member since
    March 2004
  • From: Spartanburg, SC
Posted by subfixer on Monday, November 25, 2013 7:42 PM

I dropped a seat from a Jeep the other day and my lab instantly retrieved it. Soft mouths my eye!

You have my sympathy.

I'm from the government and I'm here to help.

  • Member since
    April 2006
  • From: ON, Canada
Posted by jgeratic on Tuesday, November 26, 2013 3:42 AM

Bill, looks you barely skipped a beat with that mishap, nice fix there.  It will lend to an interesting conversation piece if anyone ever notices the different idler.  

Those turret numbers do look bright, almost fluorescent.  No doubt the weathering will take care of that.

regards,

Jack

  • Member since
    March 2003
  • From: Rain USA, Vancouver WA
Posted by tigerman on Tuesday, November 26, 2013 11:00 AM

I like the pop on the wheels. Nice save on the idler too.

   http://i7.photobucket.com/albums/y269/wing_nut_5o/PANZERJAGERGB.jpg

 Eric 

  • Member since
    July 2003
  • From: On my kitchen counter top somewhere in North Carolina.
Posted by disastermaster on Tuesday, November 26, 2013 5:36 PM

Really nice Bill,

      http://wapgroups.com/pics/ATTHECROSS/6HJRNuTaSFz30WSYEiHp.gif

  I MEAN IT!

  REALLY NICE!

 https://i.imgur.com/LjRRaV1.png


  • Member since
    July 2004
  • From: Texas
Posted by wbill76 on Tuesday, November 26, 2013 7:09 PM

Karl

Thanks as always, the numbers always make a difference on these beasts IMHO.

Subfixer

Brenda falls into the 'power chewer' class so once she's got hold of something it's always a question of seconds before it's too late!

Jack

the numbers are bright at the moment because of the 2nd coat of Future over them but will tone down with the weathering and the flat coat when the time comes as well.

Steve

Always a pleasure to have the Smiley King weigh in! Yes
  • Member since
    February 2006
  • From: Cincinnati Ohio
Posted by DantheMan85 on Friday, November 29, 2013 9:26 AM

Excellent work on your Tiger wbill76, after getting back into building I'm starting work on my Dragon Tiger I Late Production w/Zimmerit.  Along with five other tanks.  

On my Work Bench: Tamiya Ford GT 1/24

Up Coming: ?


  • Member since
    July 2004
  • From: Texas
Posted by wbill76 on Friday, November 29, 2013 1:50 PM

Thanks FMS Model! Sounds like you've got a good production line going yourself. Beer

  • Member since
    July 2004
  • From: Texas
Posted by wbill76 on Sunday, December 1, 2013 5:12 PM

Weathering process is under way with the Tiger, the first step being the application of an overall wash of MM enamel Raw Umber.

This was followed by a dot filter process using MM enamel Flat White, Raw Sienna, and Panzer Dunkelgelb.

Some additional blending and fading was added by dry-brushing the 50/50 base coat mix using a wide square-tip brush.

Then a pin wash using MM enamel Burnt Umber to bring out more of the details.

After touching up the pin wash a bit, everything was sealed in with a dull coat using MM Lusterless Flat in the spray can. The remaining clear parts were detailed and added for the turret and hull crew periscopes.

Next up will be working on the pigment weathering for the tracks and hull.

  • Member since
    March 2003
  • From: Western North Carolina
Posted by Tojo72 on Sunday, December 1, 2013 6:04 PM

Well that toned it down rather nicely,looks great

  • Member since
    July 2006
  • From: New Jersey
Posted by redleg12 on Sunday, December 1, 2013 6:19 PM

OK...it appears you knocked the "stuffing" out of this one. The "gravy" weathering is excellent. Once you get the "drumsticks" on the road wheels you will be ready for desert. Things going forward should be easy as "pie".

Rounds Complete!!

"The Moral High Ground....A Great Place to Emplace Artillery."

  • Member since
    January 2007
Posted by the doog on Sunday, December 1, 2013 7:02 PM

Looking like it should, Bill! Nice way to soften it up a little and get some *** going!

  • Member since
    January 2007
Posted by the doog on Sunday, December 1, 2013 7:03 PM

They blocked out my "m o j o " reference?!?!

  • Member since
    July 2004
  • From: Texas
Posted by wbill76 on Sunday, December 1, 2013 7:30 PM

Anthony

thanks buddy! Yes It's always interesting to see how things transform in the weathering process.

Mike

sounds like you've got too many leftovers in the fridge! Big Smile Thanks for dropping by.

Karl

Always funny what the auto-censor will flag, you've been warned! Wink Thanks for the comments as always.
  • Member since
    March 2003
  • From: El Dorado Hills, CA
Posted by IBuild148 on Sunday, December 1, 2013 10:57 PM

Always like your paint blending tips and visual applications of which ive used. Your Tiger is looking good as always..

IBuildOne48

Teach modeling to youth!

Scalefinishes.com

http://i712.photobucket.com/albums/ww122/randysmodels/NMF%20Group%20build%20II/Group%20Badge/NMFIIGBbadgesmall.jpg


  • Member since
    July 2004
  • From: Texas
Posted by wbill76 on Monday, December 2, 2013 10:43 AM

Thanks IB! Glad to hear the painting/finishing tips have been helpful for you on your own projects. Beer

  • Member since
    July 2004
  • From: Texas
Posted by wbill76 on Sunday, December 15, 2013 7:24 PM

Made a lot of progress in the weathering process with the Tiger. This round of effort focused on the pigment weathering. First up were the tracks. I applied a wet mixture of Mig Productions Dry Mud pigment combined with tap water (adding a drop of dishwashing soap to break the surface tension) and applied with a brush.

This is allowed to air dry and looks a bit of a mess, but the next step corrects that. Using a round stiff-bristled brush, I adjusted the dried pigments working one link at a time.

This treatment is applied to both sides of the track run to get the overall effect.

Then it was the hull and suspension's turn. Same approach but the wet mix here is Dark Mud pigments and has a couple extra steps involved.

Excess pigment is removed with a larger brush vs. the one used on the tracks.

More pigment is removed/adjusted using Q-tips, dry for the most part but using wet ones were the pigment was more stubborn.

Until finally the end result is achieved, producing a nice layered result working off the earlier washes, scuffing/chipping, etc.

Then it was time to mount the tracks. The sprockets and idler were added and the tracks installed to both sides.

And that's where the Tiger sits for now, just a few small details to work on as the last elements to complete it.

  • Member since
    January 2007
Posted by the doog on Sunday, December 15, 2013 7:46 PM

Excellent job, Bill---that's lean and mean looking. Really nice job on those wheels, too. :)

  • Member since
    March 2003
  • From: Western North Carolina
Posted by Tojo72 on Monday, December 16, 2013 8:17 AM

nice work on the running gear Bill

  • Member since
    April 2005
  • From: Gothenburg
Posted by JohanT on Monday, December 16, 2013 9:59 AM

Hi Bill,

In addition to everyone's positive comments I would like to add I find it quite interesting to see how close your build is to the Dragon box-art, always thought that was very convincing!

The effect you are getting with the pigments is xlnt - -and you make it look so easy Stick out tongue

Congratulations and thank you for sharing your blogs here Toast

Very Best Regards
Johan 

  • Member since
    July 2004
  • From: Texas
Posted by wbill76 on Monday, December 16, 2013 11:32 AM

Karl

Thanks as always for stopping by, figured you would like the look of that suspension and wheels. Wink

Anthony

appreciate the comments as well! We seem to be in a parallel-Tiger universe with your Wittman project. Big Smile

Johan

thank you very much indeed. The box-art is what I was working off of, so I'm glad to have gotten pretty close to it. Key to working with pigments is patience (and wearing a dust mask! Pigment dust doesn't taste too good I can assure you!) and a willingness to experiment. It's my pleasure to share the blogs here, it's how I've learned (and continue to learn from other builders) many of my techniques/approaches, so it's a sort of 'pay it forward' approach that I'm happy to do. Beer
  • Member since
    December 2002
  • From: Bury St Edmunds, Suffolk, England
Posted by Bish on Monday, December 16, 2013 12:47 PM

Bill, lovely work as always. And love the little tut on pigments as well. I haven't tried any of those yet, but have them on the shopping list, and now I don't need to ask how to use them.

Lovely.

I am a Norfolk man and i glory in being so


On the bench: Airfix 1/72nd Harrier GR.3/Fujimi 1/72nd Ju 87D-3

  • Member since
    October 2007
  • From: Louisville, KY
Posted by pordoi on Monday, December 16, 2013 3:42 PM

Bill,

Nice job!  I've been waiting for this weathering step because I couldn't remember whether you fix your pigments or overspray after application?  If not, do you just keep handling of the finished model to a minimum?  I seem to always end up smudging pigment weathering when photographing, and attempts to fix or spray with dullcote significantly lessens the effects.

Don

  • Member since
    July 2004
  • From: Texas
Posted by wbill76 on Tuesday, December 17, 2013 10:12 AM

Bish

I'm glad to have provided you with some timely info on the pigments! Smile They are a very nice tool to have in the weathering arsenal and a little bit goes a very long way.

Don

I don't use any kind of pigment fixer as the wet application pretty much does that for me, although it's not a true sealing coat, so some care in handling is necessary afterwards to avoid . Like you, I've found that applying a sealing coat, especially anything lacquer-based, tends to mute or even eliminate the pigment result depending. A little trick I use to move the model around when photographing is to shift it using a long-handled paint brush, I 'push' it around using the handle part to guide/shift it vs. using my hands/fingers to also reduce handling once the pigments are applied. HTH!
  • Member since
    April 2006
  • From: ON, Canada
Posted by jgeratic on Tuesday, December 17, 2013 12:16 PM

Bill, looking sharp!

Interesting technique with the water applied pigments... I've used Florys wash in the same manner, wiping off after application.

regards,

Jack

  • Member since
    July 2004
  • From: Texas
Posted by wbill76 on Tuesday, December 17, 2013 8:18 PM

Thanks Jack! Pigments are a very versatile tool and their behavior changes depending on whether you use them wet, dry, or in combination. Lots of room to play with and have fun experimenting! Yes

  • Member since
    July 2004
  • From: Texas
Posted by wbill76 on Friday, December 20, 2013 1:58 PM

Managed to get the finishing touches in on the Tiger and get it across the finish line. First things first though, the remaining details included some additional pigment treatment for the running gear and fenders. I applied some dry Mig Light Dust pigments to further blend in the previous efforts and tone down the reddish effects a bit as well as tie things back in with the rest of the vehicle.

Using the same pigments and approach, I also added some dust tones to the spare tracks on the turret and the hull tools/equipment.

The turret was added back to the hull for the final time to allow the antenna to be added. Once that was installed, it was no longer possible to remove the turret due to the clearance issues with rotating the turret to the other side to line up the tab/notches in the hull...so that's why this was saved to the very end. An RB Models brass antenna filled the role here and was detailed with MM non-buffing Metalizer Gunmetal.

After a few minor tweaks here and there, it was off to the photo booth for the walk-arounds.

  • Member since
    March 2013
  • From: Puebla, Mexico
Posted by garzonh on Friday, December 20, 2013 2:27 PM

Me liked it so much!!

Those colors and cammo are amazing, light weathering and rusting gives it a perfect, out of a book look!

Great build and photo and explanations are worth of magazine report.

Cheers!

  • Member since
    February 2010
  • From: Maine
Posted by Stage_Left on Friday, December 20, 2013 2:28 PM

Another outstanding effort as usual Bill! Thanks for another WIP- more tools for my techniques toolbox Yes

Dave

  • Member since
    March 2003
  • From: Western North Carolina
Posted by Tojo72 on Friday, December 20, 2013 3:42 PM

You kept this one pretty clean,another great job,your website and logs are so helpful

PS,just getting to the camo tonite on Wiitmans,pics soon

  • Member since
    April 2006
  • From: ON, Canada
Posted by jgeratic on Friday, December 20, 2013 4:52 PM

Bill, exquisite build and an uber job on that camou! Yes

regards,

Jack

  • Member since
    July 2004
  • From: Texas
Posted by wbill76 on Friday, December 20, 2013 7:48 PM

Garzon

thanks for the comments, glad you like how it turned out!

BeerDave

my pleasure and glad to have added something to your arsenal, can't ever have too many methods/approaches to things available. Wink

Anthony

look forward to seeing what you do with Wittman's Ride!

BeerJack

this particular scheme is one I've been wanting to tackle for a while and I finally got around to doing it. Glad you like the end result. Yes
  • Member since
    October 2007
  • From: Louisville, KY
Posted by pordoi on Friday, December 20, 2013 7:50 PM

Really nice, Bill.  The thin line camo is done perfectly.  You have a distinctive style; a very clear attention to detail and an approach to depict a weathered but not abused vehicle.  Just curious if you have considered modeling a wreck or severely weathered vehicle (ala DisasterMaster).  For me, it would be a very interesting build to follow.

wbill76

The turret was added back to the hull for the final time to allow the antenna to be added. Once that was installed, it was no longer possible to remove the turret due to the clearance issues with rotating the turret to the other side to line up the tab/notches in the hull..

After a few minor tweaks here and there, it was off to the photo booth for the walk-arounds.

So this was an error in this kit or something that occurred with the 1:1 vehicles? 

Don

  • Member since
    July 2004
  • From: Texas
Posted by wbill76 on Friday, December 20, 2013 9:57 PM

Thanks Don! I have thought about doing a wreck but in my mind that would require a base to show the context properly and that's not something I have the display space for, so haven't done it as a result.

I'm not sure I understand your question about an 'error in the kit', are you talking about the turret rotation? The radio antenna on the actual vehicles had a rubber base that allowed it to flex so that the turret could traverse but the gun barrel would prevent a full 360 degrees unless the antenna was dismounted. The rear turret bin clears the antenna just fine though regardless of direction. The clearance issue I have is a small one regarding the height of the shovel on the front and the mantlet, not one with the antenna. I found that if I started the turret with the gun pointed to the rear and rotated it counter-clockwise, I could get it to clear by lifting up on the turret after the tabs had engaged every so slightly but the clockwise rotation would snag on the shovel every time even with the lift attempt...no real explanation for why other than just a fractional mm difference in how the turret 'floats' in the ring I guess and interacts with the shovel from one direction vs. the other.  

  • Member since
    March 2003
  • From: Rain USA, Vancouver WA
Posted by tigerman on Saturday, December 21, 2013 12:25 AM

Another beautiful build Bill. You nailed the camo and as others have stated, you have a unique style which is easily recognized.

   http://i7.photobucket.com/albums/y269/wing_nut_5o/PANZERJAGERGB.jpg

 Eric 

  • Member since
    December 2008
  • From: Goffstown, NH
Posted by New Hampshire on Saturday, December 21, 2013 7:04 AM

One more fine effort to add to the collection Bill!  Two thumbs up.

Brian

  • Member since
    October 2007
  • From: Louisville, KY
Posted by pordoi on Saturday, December 21, 2013 8:13 AM

wbill76

The rear turret bin clears the antenna just fine though regardless of direction. The clearance issue I have is a small one regarding the height of the shovel on the front and the mantlet, not one with the antenna.

Ah.  I misunderstood.  I thought the problem was that the turret bin didn't clear the antenna.

Don

  • Member since
    July 2004
  • From: Texas
Posted by wbill76 on Saturday, December 21, 2013 10:19 AM

Eric

thank you sir! I'm always trying to raise the bar with my builds and am glad to hear there's a recognizable quality to them, hopefully without them all appearing to be exactly the same too.

Brian

, much appreciated as always! Yes
  • Member since
    March 2003
  • From: El Dorado Hills, CA
Posted by IBuild148 on Saturday, December 21, 2013 4:18 PM

Puuuuuurfect!!! Another winner!

Will be using your track weathering techniques.

IBuildOne48

Teach modeling to youth!

Scalefinishes.com

http://i712.photobucket.com/albums/ww122/randysmodels/NMF%20Group%20build%20II/Group%20Badge/NMFIIGBbadgesmall.jpg


  • Member since
    July 2003
  • From: On my kitchen counter top somewhere in North Carolina.
Posted by disastermaster on Sunday, December 22, 2013 9:13 AM

            Super Job Bill!

                                                    http://www.killersklan.it/forum/smile/berlusca.gif

        A great way to finish out the year.

 https://i.imgur.com/LjRRaV1.png


  • Member since
    December 2002
  • From: Bury St Edmunds, Suffolk, England
Posted by Bish on Sunday, December 22, 2013 9:34 AM

Yep, its another beauty. Always a pleasure watching your builds, and always something to learn.

Have you ever thought about doing a base or even a diorama for your builds.

I am a Norfolk man and i glory in being so


On the bench: Airfix 1/72nd Harrier GR.3/Fujimi 1/72nd Ju 87D-3

  • Member since
    July 2004
  • From: Texas
Posted by wbill76 on Sunday, December 22, 2013 10:40 AM

IB

thanks for the comments, glad the track weathering technique is helpful for you. Wink

DM

thanks as well! 2013 isn't quite over yet...even if the armor production is currently finished. As a little 'filler' project, I'm working on a Moebius Battlestar Galactica since I got the kit as an 'early' Xmas present. Wink

Bish

always glad to have you along for the ride! I have done bases and dioramas in the past but didn't really get into that aspect of modeling...combined with the display issues for the end result and I've developed a preference away from bases/dios as a result. Doesn't mean I don't appreciate the amount of work and talent that dio builders put in though of course. Smile
  • Member since
    January 2007
Posted by the doog on Sunday, December 22, 2013 3:04 PM

Beautful work, BIll, a real "classic" Tiger! Beer

  • Member since
    July 2006
  • From: San Francisco Bay Area
Posted by bufflehead on Monday, December 23, 2013 9:20 PM

A little late here Bill!  You've produced another beauty!  I really like the freehand camo job you applied, it looks quite realistic!  That Dragon kit sure builds up nicely, one of these days I've got to work on mine, but until then yours will serve as inspiration!

Ernest

Last Armor Build - 1/35 Dragon M-26A1, 1/35 Emhar Mk.IV Female


Last Aircraft Builds - Hobby Boss 1/72 F4F Wildcat & FW-190A8


  • Member since
    July 2004
  • From: Texas
Posted by wbill76 on Tuesday, December 24, 2013 8:45 PM

Merry Christmas to you Ernest! Glad you were able to stop by and catch this one. The kit is a lot of fun to build, look forward to yours when the time comes! Beer

  • Member since
    December 2013
Posted by NicPanther1 on Wednesday, December 25, 2013 1:09 PM

An absolute Killer Tiger and awesome build!!!

  • Member since
    July 2004
  • From: Texas
Posted by wbill76 on Friday, December 27, 2013 10:40 AM

Thanks Nic! Beer

  • Member since
    December 2006
  • From: N. Georgia
Posted by Jester75 on Saturday, December 28, 2013 11:30 PM

Pretty late chiming in here but she turned out great Bill, just gorgeous!

Eric


  • Member since
    July 2004
  • From: Texas
Posted by wbill76 on Friday, January 3, 2014 4:02 PM

Missed your reply before the New Year's stuff Eric, thanks for the comments as always! Beer Hope you have a Happy New Year in 2014!

JOIN OUR COMMUNITY!

Our community is FREE to join. To participate you must either login or register for an account.

SEARCH FORUMS
FREE NEWSLETTER
By signing up you may also receive reader surveys and occasional special offers. We do not sell, rent or trade our email lists. View our Privacy Policy.