SEARCH FINESCALE.COM

Enter keywords or a search phrase below:

Dragon #6253 Tiger I Late Production-Complete 12-20-13

39238 views
155 replies
1 rating 2 rating 3 rating 4 rating 5 rating
  • Member since
    July 2004
  • From: Texas
Dragon #6253 Tiger I Late Production-Complete 12-20-13
Posted by wbill76 on Monday, September 30, 2013 8:20 PM

After spending the last month working on a floaty-thingy project as a change of pace, it's time to return to the world of armor building. The selected victim is Dragon's 1/35 kit #6253 Tiger I Late Production 3-in-1 with the assorted goodies seen below.

Off and rolling with the usual bane of German tank models, the road wheels! Following the instructions in Steps 1 and 3, the road wheels, sprockets, and idlers were assembled. I opted for the G5 style of wheel appropriate to a standard Late Tiger I as well as the small idler wheels consisting of parts B2-B3 as those are the correct type vs. the larger idler wheel option of G8-G7. I also assembled a short run of 10 of the MK workable links to ensure the sprockets would fit and were spaced properly as well as to test the fit of the paired road wheels.

Step 2 involves the installation of the workable torsion bar suspension, so the first order of business was removing the 16 bars from the sprue and cleaning up their three attachment points.

The bars were installed with glue used only on the square ends of the bars to allow them to remain workable. The road wheels were used to ensure the bars and suspension arms sat at the right height with no floaters and the glue allowed to set up.

Sunday's are the perfect days for working on tracks as I've found that football games make for great background noise and help break up the tedium of track assembly. Today had some good games on and I had the house to myself, so I started in on the MK workables. The set provides a jig for assembling 5 links at a time and the guide horns are separate. Both the MK instructions and the Dragon instructions call for 95 links for the full track run, but that works with the larger idler...the smaller idler doesn't need as many. I initially assembled 90 links and then a test fit revealed that another 3 were needed for 93 total on the left side. The right side may need one more due to the offset of the torsion bar system but I won't be sure until I build that track run next.

Test fit of the first track run with the movable idler and the sprocket held in place with blue tack showed everything playing nice so far.

Next will be finishing up the 2nd track and beginning work on the rest of the lower hull.

  • Member since
    March 2003
  • From: Rain USA, Vancouver WA
Posted by tigerman on Tuesday, October 1, 2013 1:36 AM

Cheers Bill. Glad to see a WIP again, and of cool subject no less. Wink

   http://i7.photobucket.com/albums/y269/wing_nut_5o/PANZERJAGERGB.jpg

 Eric 

  • Member since
    January 2013
Posted by jibber on Tuesday, October 1, 2013 10:01 AM

Bill, I've built this kit a bit ago and I found really good fits all the way around, I can't wait to see more progress and see how you finish it. Love a Tiger build...  

  • Member since
    March 2003
  • From: Western North Carolina
Posted by Tojo72 on Tuesday, October 1, 2013 10:24 AM

You know i'm with you Bill,great start.I'll be starting Wittman's 007 soon,so this should help.

  • Member since
    December 2006
  • From: N. Georgia
Posted by Jester75 on Tuesday, October 1, 2013 10:39 AM

Tagging along Bill. I like they way they have designed the pins with the ability to insert 4 or 5 at a time. I do love MK tracks!!

Eric


  • Member since
    July 2004
  • From: Texas
Posted by wbill76 on Tuesday, October 1, 2013 5:52 PM

Eric

glad to have you along for the ride!

BeerJibber

I've also built it's brother, #6252, so I'm looking forward to it. Glad to hear it doesn't have any major issues!

Anthony

pull up a chair and hope it helps your build! Yes

Jester

MKs are my go-to option for workable tracks and this one's been fairly straightforward in the assembly. The multi-pin handle and jig arrangement certainly helps in the speed department! Wink
  • Member since
    December 2008
  • From: Goffstown, NH
Posted by New Hampshire on Tuesday, October 1, 2013 6:59 PM

Ahhhh the good old Tiger.  I think the reason so many are built by modelers is because....THEY ARE AWESOME! Big Smile  I have to say modern armor, like the Abrams, Merkava, etc., have these elegant utilitarian lines that make them look rather aggressive in a beautiful way.  But for sheer "I am here to kick *** and chew bubble gum....and I am all out of bubble gum" attitude the Tiger has the lines and the reputation, to back up it's own version of beauty. Cool

As usual, can't wait to watch the show progress. Yes

Brian

  • Member since
    July 2004
  • From: Texas
Posted by wbill76 on Wednesday, October 2, 2013 5:26 PM

Hard to argue with you there Brian! Beer Glad to have you along.

  • Member since
    April 2005
  • From: Gothenburg
Posted by JohanT on Thursday, October 3, 2013 2:19 PM

Hi Bill,
You have been saving up on this one just to tease us...
I don't mind Stick out tongue

This thread is firmly tagged Yes

Very Best Regards
Johan 

  • Member since
    December 2002
  • From: Bury St Edmunds, Suffolk, England
Posted by Bish on Thursday, October 3, 2013 2:23 PM

Count me in for the ride, always a pleasure watching you build. This will be fun.

I am a Norfolk man and i glory in being so


On the bench: Airfix 1/72nd Harrier GR.3/Fujimi 1/72nd Ju 87D-3

  • Member since
    July 2004
  • From: Texas
Posted by wbill76 on Thursday, October 3, 2013 8:18 PM

Johan

and Bish

Glad to have you along for the ride as well! Beer

  • Member since
    October 2009
Posted by Kentucky Colonel on Friday, October 4, 2013 8:31 PM

I want to watch it since I'm building the same model this winter. Only I'll use Friuls.

  • Member since
    July 2004
  • From: Texas
Posted by wbill76 on Saturday, October 5, 2013 4:56 PM

Appreciate the interest KC, glad to have you along! Beer

  • Member since
    July 2004
  • From: Texas
Posted by wbill76 on Sunday, October 6, 2013 7:08 PM

Another weekend means another update! Work continued on the Tiger with attention given to the rear hull plate. The kit part received the corresponding Atak zim panels using a combination of Gator Grip glue to position them and then running liquid glue under the panels to tack down the edges and ensure the panels bonded to the part underneath.

Dragon deliberately molded the hull with a slight warp in the hull tub as a design intended to allow for a snug fit with the plates. The rear plate is big enough and strong enough to force the hull sides into the proper alignment using just regular glue. Once the plate was in place the lower-most zim panel was added around the base of the tow hitch to round things out.

The front of the hull however needs a little help to overcome the warp, so a piece of sprue was cut down to the necessary size and glued in place to brace the hull and help it hold its shape better.

I dry-fitted the glacis plate along with the hull roof and the front plate of the fighting compartment. This not only ensured that the bracing length of sprue was providing the right level of correction, it also ensured that the brace held its position correctly while the glue set.

Then I sat down to deal with the remaining 2nd track. 2 football games and 93 links later, the second one was completed.

Next up will be more work on the hull side panels and other similar details.

  • Member since
    December 2006
  • From: N. Georgia
Posted by Jester75 on Sunday, October 6, 2013 8:39 PM

Looking sharp Bill!!  I believe the inward bow on the Tiger hull is an "issue" or "an on purpose" design with the Dragon Tigers right?

Eric


  • Member since
    March 2003
  • From: El Dorado Hills, CA
Posted by IBuild148 on Sunday, October 6, 2013 11:07 PM

I'm on board Bill. Always enjoy your WIP builds. Always learning something from you.

IBuildOne48

Teach modeling to youth!

Scalefinishes.com

http://i712.photobucket.com/albums/ww122/randysmodels/NMF%20Group%20build%20II/Group%20Badge/NMFIIGBbadgesmall.jpg


  • Member since
    March 2011
  • From: Ottawa,Ontario,Canada
Posted by modeler#1 on Monday, October 7, 2013 7:17 AM

Love that zermmit!

On the Bench: Nothing atm

  • Member since
    July 2004
  • From: Texas
Posted by wbill76 on Monday, October 7, 2013 11:20 AM

Jester75

Looking sharp Bill!!  I believe the inward bow on the Tiger hull is an "issue" or "an on purpose" design with the Dragon Tigers right?

That's right Eric, the bow/warp on the hull is an intentional design element in the Dragon kits. It's supposed to make the fit tighter for the modular hull plates that build up on the 'frame' of the tub and it fulfills that purpose very nicely. The tension on the front plates though is pretty strong, I was able to actually get everything to attach and align correctly without the sprue brace but it created so much stress that parts would pop off with the slightest shift, so I added the brace to make life a little bit easier when it comes time to permanently attach them.


IB48

thanks very much for the high praise and glad to hear the builds are helpful, glad to have you along!


BeerModeler#1

I'm a big fan of the Atak resin zim sets, definitely worth the extra money for builds that require the zim IMHO. Yes


  • Member since
    September 2006
  • From: Dripping Springs, TX, USA
Posted by RBaer on Friday, October 11, 2013 10:09 AM

Bill, Dragon ought to just put a link to your builds in the box.....

Apprentice rivet counter.

  • Member since
    July 2004
  • From: Texas
Posted by wbill76 on Friday, October 11, 2013 4:11 PM

RBaer

Bill, Dragon ought to just put a link to your builds in the box.....


I'd be happy if they just proofed their instructions! Big Smile Always glad to have you stop by my friend! Beer

  • Member since
    December 2006
  • From: N. Georgia
Posted by Jester75 on Friday, October 11, 2013 4:16 PM

wbill76
 

I'd be happy if they just proofed their instructions! Big Smile 

Amen!!!

Eric


  • Member since
    July 2004
  • From: Texas
Posted by wbill76 on Sunday, October 13, 2013 7:31 PM

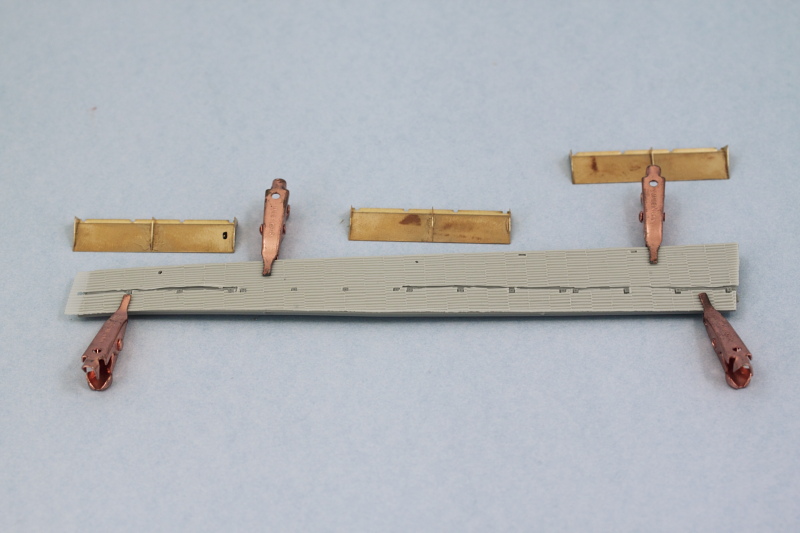
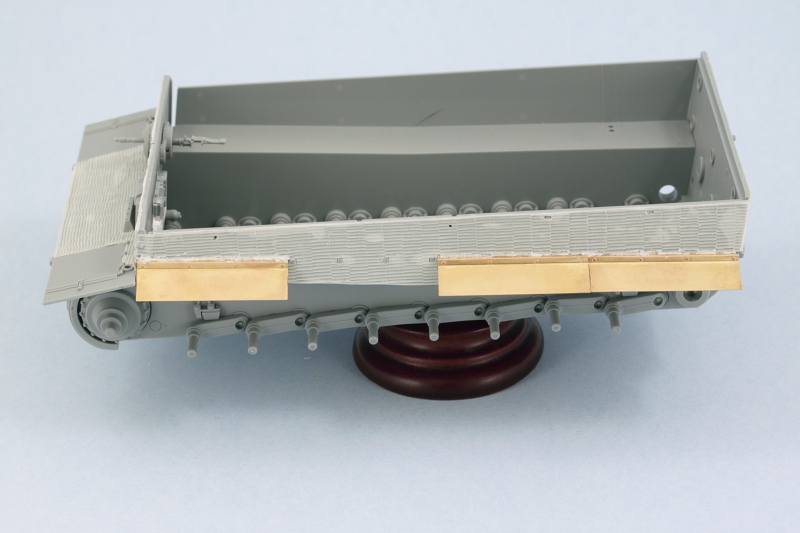
This round of effort focused on getting the remaining zim work done on the hull. First up was the left side. The kit includes pre-formed brass fenders with PE braces that need to be added to them to construct each fender portion. Dragon designed them to sit on the little mount tabs and the Atak zim set sits flush around them, so it's necessary to cut the Atak panels to allow the fenders to sit correctly. I decided to leave one of the fenders off on this side to show the detail and the zim extending down the full hull side for a little variety.

Because the hull side integrates with the front plate, I went ahead and installed it along with the glacis plate so I could get everything lined up. The three fenders were installed and some Squadron White putty used to fill back in the gaps on the zim panels where needed.

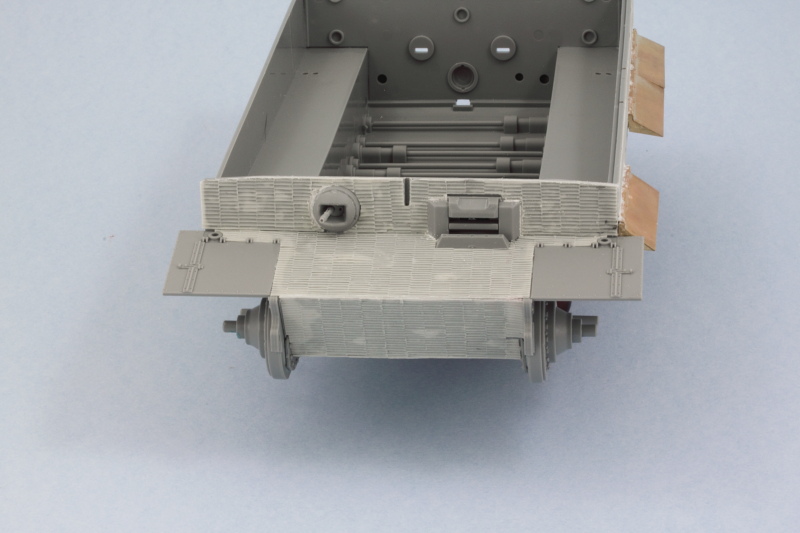
The front hull plates received their zim panels as well and the ball MG mount installed along with the driver's visor. Just a little bit of putty was needed to match things up with the zim and fill a couple of gaps.

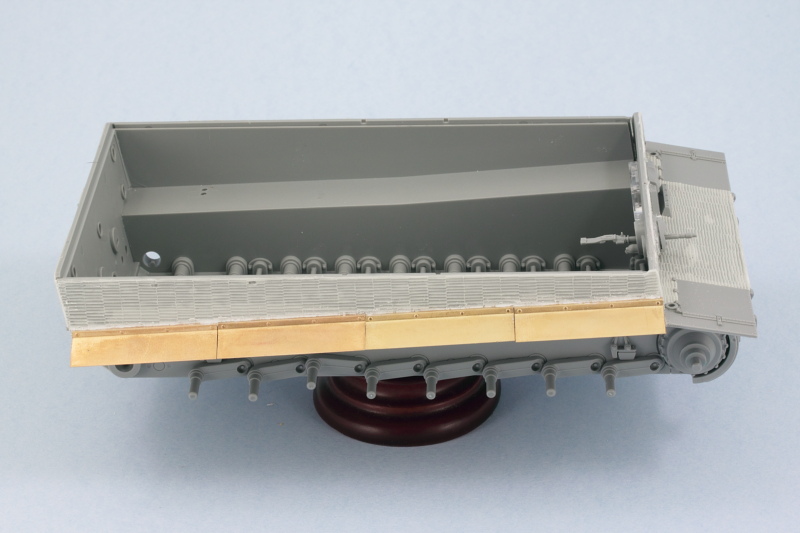
Then the right hull side received its zim and fenders using the same approach as on the left side. 

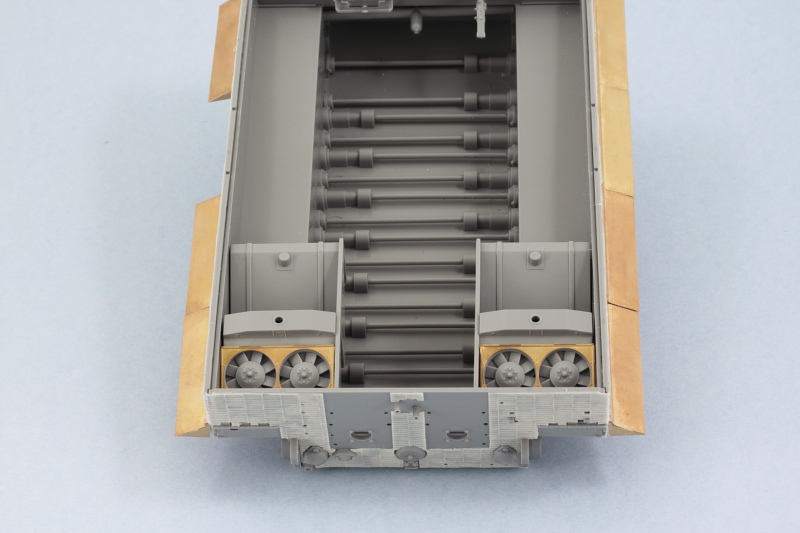
Next came the details for the engine compartment as called out in Step 7. The kit provided PE frames for the fans are a very tight fit into the space available and they also make it impossible to fit the radiator hoses (parts G13), which isn't a big deal for me since all of this disappears under the hatches and screens regardless.

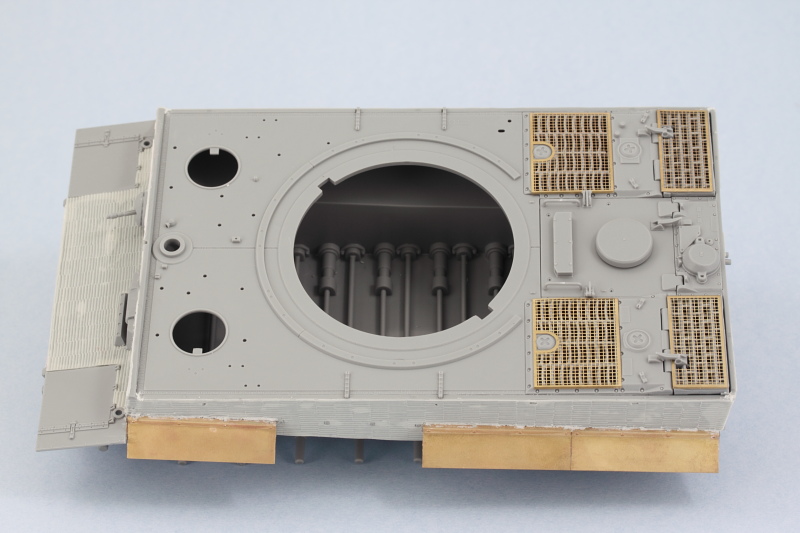
I installed the roof plate for the hull next, working at the front using liquid glue and moving slowly toward the rear to get the hull to close up properly along the edges. The engine compartment hatches were assembled and installed. It's worth noting that the part numbers in Step 11 for the fan hatches are reversed in terms of which side they belong to but nothing that isn't easily figured out with a test fit. The kit supplied larger intake PE screens were bent so some careful straightening with pliers was required before they were installed.

Rounding things out for the day, I added most of the rear hull details outlined in Steps 5 and 6. The tools and other remaining gear will be installed later on after painting.

Still more work to do on the hull before heading over to the turret.

  • Member since
    December 2006
  • From: N. Georgia
Posted by Jester75 on Sunday, October 13, 2013 7:34 PM

Smooth work with that zimm Bill! Going to have to try that one of these days..

Eric


  • Member since
    July 2004
  • From: Texas
Posted by wbill76 on Sunday, October 13, 2013 7:42 PM

Thanks Eric! Atak's the best stuff to work with IMHO, give it a shot, you won't be disappointed. Beer

  • Member since
    January 2007
Posted by the doog on Sunday, October 13, 2013 7:56 PM

WOW, Bill----COOL to see you doing a mighty Tiger! I think I can't help but echo what everyone else said about being excited to see what it's going to be in the end!

I predict....an FSM cover?!

  • Member since
    March 2003
  • From: El Dorado Hills, CA
Posted by IBuild148 on Sunday, October 13, 2013 9:28 PM
As always Bill looking great. Just out of curiosity how long did it take you to assemble 1 run of your MK's?
Just curious.

IBuildOne48

Teach modeling to youth!

Scalefinishes.com

http://i712.photobucket.com/albums/ww122/randysmodels/NMF%20Group%20build%20II/Group%20Badge/NMFIIGBbadgesmall.jpg


  • Member since
    January 2008
  • From: Austria
Posted by Byrden on Monday, October 14, 2013 8:20 AM

That odd-shaped plate between the mufflers; it should be aligned vertically. Everything else looks good.

David

  • Member since
    July 2004
  • From: Texas
Posted by wbill76 on Monday, October 14, 2013 11:14 AM

Karl

thanks buddy! It's been a while since I've done a big cat so figured might as well tackle this one.

BeerIB48

this particular set took a little longer because of the need to attach the guide horns but I'd say about 4 hours per track run. That includes of course the necessary sprue removal and clean-up of the links as well as the actual assembly.

David

Good eye and catch! It had come loose from one of the mount posts and was leaning as a result. Easily fixed, appreciate it! Beer
  • Member since
    March 2003
  • From: Western North Carolina
Posted by Tojo72 on Monday, October 14, 2013 11:54 AM

Up to your usual standard Bill,Metal looks great.

  • Member since
    July 2004
  • From: Texas
Posted by wbill76 on Monday, October 14, 2013 5:48 PM

Thanks Anthony, Dragon packed this kit to the brim with all kinds of goodies. Ah, the good ol' days! Big Smile

JOIN OUR COMMUNITY!

Our community is FREE to join. To participate you must either login or register for an account.

SEARCH FORUMS
FREE NEWSLETTER
By signing up you may also receive reader surveys and occasional special offers. We do not sell, rent or trade our email lists. View our Privacy Policy.