SEARCH FINESCALE.COM

Enter keywords or a search phrase below:

Takom Objekt 279: UPDATE! The Goon Squad and a new doog

20816 views
133 replies
1 rating 2 rating 3 rating 4 rating 5 rating
  • Member since
    January 2007
Posted by the doog on Wednesday, September 3, 2014 6:51 PM

Thanks, Hugo! I always appreciate your enthusiasm!! :)

  • Member since
    March 2013
  • From: Puebla, Mexico
Posted by garzonh on Tuesday, September 2, 2014 5:57 PM

O M G !

When will you ever disappoint us?

This is a perfect build, the colors look so real from that burnt out.

Figures look terrific. what can I say my friend. Just keep us instructing on building kits and paiting technics.

Yes

  • Member since
    January 2007
Posted by the doog on Sunday, August 31, 2014 8:53 AM

Thanks, SchattenSpartan! I appreciate you taking the time to comment!

  • Member since
    April 2013
Posted by SchattenSpartan on Sunday, August 31, 2014 8:43 AM

Marvellous work as always, Karl! That Goon squad sure is damn scary. I'd prefer not to run into them at night! Indifferent

  • Member since
    January 2007
Posted by the doog on Saturday, August 30, 2014 9:34 PM

Thanks, Mike and Sprue!!!

  • Member since
    January 2006
  • From: California
Posted by SprueOne on Saturday, August 30, 2014 9:11 AM

Super neat build and paint, Doog. The "post apoc" looking figures really accentuate the whole piece 

Anyone with a good car don't need to be justified - Hazel Motes


Iron Rails 2015 by Wayne Cassell Weekend Madness sprueone

  • Member since
    July 2006
  • From: New Jersey
Posted by redleg12 on Friday, August 29, 2014 7:08 PM

Karl - Out F...... Standing!!! A usual Doog masterpiece...love it

Rounds Complete!!

"The Moral High Ground....A Great Place to Emplace Artillery."

  • Member since
    January 2007
Posted by the doog on Friday, August 29, 2014 1:55 PM

Heh, "1:! scale doog", that's cute!

Thanks again for the positive comments, guys!

And I agree, the Godzilla thing is pretty cool! You can always count on Steve to post up the coolest stuff!

  • Member since
    April 2006
  • From: Denver, Colorado
Posted by waynec on Friday, August 29, 2014 11:26 AM

disastermaster

Having some fun with this.

    So, reported on the net at 350 feet tall, this would scale out in 1/35 scale to a be a ten foot Godzilla (just not enough room here).

http://i20.photobucket.com/albums/b232/gluetank/Decorated%20images/doogzilla_zps019b9722.jpg

  Just might fit snugly between two of 'zillas toes.

i was looking for the godzilla dimensions so i can make a footprint base for a couple of JGSDF vehicles AND HERE IT IS.

the goon squad looks positively alien. as for the wires along the side they do look more like steps and grab rails than anything else.

congrats on the new abode and the new 1/1 scale DOOG

Никто не Забыт    (No one is Forgotten)
Ничто не Забыто  (Nothing is Forgotten)


  • Member since
    March 2003
  • From: Western North Carolina
Posted by Tojo72 on Friday, August 29, 2014 11:05 AM

Hadn't caught the finished product, looks great.And a great looking Doog also.

  • Member since
    September 2006
  • From: Dripping Springs, TX, USA
Posted by RBaer on Friday, August 29, 2014 10:56 AM

Gotta say, the Goon Squad is perfectly chilling....

Apprentice rivet counter.

  • Member since
    January 2007
Posted by the doog on Friday, August 29, 2014 10:22 AM

Hi guys

Hey, thanks to everyone who has responded here--and honestly, my apologies for not responding to the previous replies. For some reason, I'm not getting notified on some of my FSM posts. Anyone have any idea why his happens or how to rectify that?

Anyway, I appreciate all your positive comments. The tracks on this baby are really a chore, but if you're patient, they go by and get done soon enough.

Those hull wires are a mystery, honestly? Using them as an aid to climbing on is an interesting theory perhaps? I can't imagine what else they'd be used for?

I am currently working on the Takom civilian pickup truck to put in, wrecked, in the dio. It will take a little bit to get this finished, but I'll post in-progress picks to keep you updated!

Thanks again, all!!!

  • Member since
    November 2009
  • From: SW Virginia
Posted by Gamera on Friday, August 29, 2014 9:23 AM

This gets better and better Karl, the 'goon squad' is definitely nightmare fuel. Looking forward to the dio.

On of course congrads on the new doog..er..dog!  

"I dream in fire but work in clay." -Arthur Machen


  • Member since
    July 2013
Posted by DURR on Friday, August 29, 2014 4:21 AM

the doog

Thanks for looking in and commenting, guys!

 it's not so bad once you get committed to it.

you only get commited after you do all those indy tracks       Bang Head

  • Member since
    December 2002
  • From: Bury St Edmunds, Suffolk, England
Posted by Bish on Friday, August 29, 2014 2:23 AM

That looks awesome karl, great work.

As for the wires, in the absence of any step, maybe they are a way of climbing on board, I can't see anything else.

I am a Norfolk man and i glory in being so


On the bench: Airfix 1/72nd Harrier GR.3/Fujimi 1/72nd Ju 87D-3

  • Member since
    July 2004
  • From: Sonora Desert
Posted by stikpusher on Friday, August 29, 2014 2:05 AM

That "goon squad" is the stuff of nightmares.... vey well done Karl!


F is for FIRE, That burns down the whole town!

U is for URANIUM... BOMBS!

N is for NO SURVIVORS...

       - Plankton

LSM


  • Member since
    July 2003
  • From: On my kitchen counter top somewhere in central North Carolina.
Posted by disastermaster on Thursday, August 28, 2014 10:25 PM

http://upload.wikimedia.org/wikipedia/en/9/91/Smiley_bounce.gif At last!

Been looking forward to it.

  Waaay nice stuff here.

 The creativity factor is awesome and "I" too would like to know what those lines under the sponson are.

  Whew, and I thought you meant a two legged version of the doog.

 https://i.imgur.com/LjRRaV1.png


  • Member since
    January 2007
Posted by the doog on Thursday, August 28, 2014 8:23 PM

Hey guys,

Apologies for not being around much--man, having a new house is a LOT of work,- getting it organized, getting new shelves up, etc. Add to that a new doog, and I have been busy at the bench, but admittedly slow on the forums. The important thing s, I"m making good progress toward completing this project and the dio I have envisioned. I may add some more "smoke" powder to this hull and maybe rust up the tracks a little more depending on what I do to the base.

Here's the model, with a modified NBC soldier as a commander figure:

I added those wire things under the side sponsons...I have no idea what they were for, but they're on the real tank.

Note the commander's NBC unit set upon the turret behind him..

"The Goon Squad"--a trio of Takom NBC soldiers, modified quite extensively. (What a PITA!) They should really look wicked in the dio!

I am now undertaking the building of another model that will be in the dio. Watch this space for more announcements! Any comments, suggestions, or critiques always welcomed!

OH! By the way, here's the new doog! An AKC longhaired Creme-Dapple Dachshund!

  • Member since
    July 2003
  • From: On my kitchen counter top somewhere in central North Carolina.
Posted by disastermaster on Monday, July 14, 2014 1:06 AM

Having some fun with this.

    So, reported on the net at 350 feet tall, this would scale out in 1/35 scale to a be a ten foot Godzilla (just not enough room here).

http://i20.photobucket.com/albums/b232/gluetank/Decorated%20images/doogzilla_zps019b9722.jpg

  Just might fit snugly between two of 'zillas toes.

 https://i.imgur.com/LjRRaV1.png


  • Member since
    July 2006
  • From: New Jersey
Posted by redleg12 on Sunday, July 13, 2014 9:34 PM

Outstanding.....it will be interesting in any movie...now all you need is a scorched earth base!!

Rounds Complete!!

"The Moral High Ground....A Great Place to Emplace Artillery."

  • Member since
    April 2006
  • From: Denver, Colorado
Posted by waynec on Sunday, July 13, 2014 9:17 PM

Very cool looking. A scale Godzilla standing in front would cause the damage. Maybe look at Dresden pics or terminator 1 movie. Using that for my T2 SciFi GB.

Might try real charcoal grill ash for ash. As an aside the BEDFORD PORTEE I did for rommel GB that I weathers with artist oils took a 2d in softskins at chili con 3 regionals. Thanks for the help.

Никто не Забыт    (No one is Forgotten)
Ничто не Забыто  (Nothing is Forgotten)


  • Member since
    July 2004
  • From: Texas
Posted by wbill76 on Saturday, July 12, 2014 4:46 PM

Very nice Carl. Even more impressive with the full gun in place and the added weathering to the finish. Yes

  • Member since
    November 2009
  • From: SW Virginia
Posted by Gamera on Saturday, July 12, 2014 3:09 PM

I was just watching 'Godzilla vs. Gigan' and she looks a lot like one of the JSDF tanks that was hit by Ghidorah's energy blast! Wink

"I dream in fire but work in clay." -Arthur Machen


  • Member since
    April 2013
Posted by SchattenSpartan on Saturday, July 12, 2014 11:19 AM

She's looking absolutely perfect, Karl! I love the burnt paint effect!

  • Member since
    March 2013
  • From: Puebla, Mexico
Posted by garzonh on Friday, July 11, 2014 9:49 PM

Way to go, pal!!

The burnt out, paint looks amazing.

Hot stuff!..haha

  • Member since
    July 2003
  • From: On my kitchen counter top somewhere in central North Carolina.
Posted by disastermaster on Friday, July 11, 2014 9:29 PM

                          http://www.freesmileys.org/smileys/smiley-signs011.gif

 https://i.imgur.com/LjRRaV1.png


  • Member since
    July 2004
  • From: Sonora Desert
Posted by stikpusher on Friday, July 11, 2014 2:07 PM

Oh it definitely has an Asimov/Bradbury Sci Fi look to it. And a "Red Dawn" scenario fits it even more so. Thats the fun of a "what if?"... anything goes! And you my freind are knocking this one out of the park... again!  I look forward to the diorama.


F is for FIRE, That burns down the whole town!

U is for URANIUM... BOMBS!

N is for NO SURVIVORS...

       - Plankton

LSM


  • Member since
    January 2007
Posted by the doog on Friday, July 11, 2014 2:01 PM

stikpusher

As far as the multi color camo goes here is my two cents: First off, this is "what if?" build, so anything goes; second, multi color schemes did not really starts appearing on Soviet Armor (at least what was visible to us in the West) until late in the Cold War. Most noticeably in Afghanistan in the early 80s and later with forward deployed units in Eastern Europe arrayed against NATO in the few years prior to the collapse of the Communists. That scheme is typical of stuff seen from about 1986 onwards as camo began to appear regularly. I suspect that Kubinka painted that scheme on the tank strictly for effect in the museum. Prior to the Soviet/Afghan war, while Soviet AFVs did occasionally sport camo schemes they were temporary types, being either mud or whitewash applied in the field and removed when coming out of the field. Otherwise, Soviet armor was uniformly green. For the invasions of Czechoslovakia in 1968 and Hungary in 1956, prominent white air recognition markings were applied, as were white sub unit markings aside from turret numbers. Have a look at photos from those incidents to see what I am referring to. Had a WWIII occurred with Soviet armor leading the way, most likely, similar markings would have been applied.

Anyways, I am looking forward to what's next here!

Carlos,

That's a boatload of info, and much appreciated--although I can't say whether or not I would have painted it any differently if I'd had the info beforehand. I'm going somewhere with this that I think will be almost "Sci-Fi" in its completion, and, as such, will necessarily be "inaccurate", technically. Ahh, such is the price of "Art"! Thanks for posting this though, and for the great pics of the Cold War era! I"m going to actually be setting this scene in Amerika, in the hypothetical  future, if you can believe that? I just think this tank has such a "futuristic" look, like a flying saucer!

STEVE---thanks for those reminders about the ash! Good call!

And thanks to everyone still looking in! Got an update!

I got the tracks on, and they fit perfectly and with no problems! You'll notice a lot of "speckling" that I did with Adam WIlder's Nitro Line products. I've been using those exclusively on this build, and I have to say that they're some pretty cool, versatile products.  Next up: detail painting and other neat things....

Should be finishing the model itself soon. The diorama is going to take a little longer, Stay tuned!! Comments always appreciated! Smile

  • Member since
    July 2004
  • From: Sonora Desert
Posted by stikpusher on Thursday, July 10, 2014 12:30 PM

As far as the multi color camo goes here is my two cents: First off, this is "what if?" build, so anything goes; second, multi color schemes did not really starts appearing on Soviet Armor (at least what was visible to us in the West) until late in the Cold War. Most noticeably in Afghanistan in the early 80s and later with forward deployed units in Eastern Europe arrayed against NATO in the few years prior to the collapse of the Communists. That scheme is typical of stuff seen from about 1986 onwards as camo began to appear regularly. I suspect that Kubinka painted that scheme on the tank strictly for effect in the museum. Prior to the Soviet/Afghan war, while Soviet AFVs did occasionally sport camo schemes they were temporary types, being either mud or whitewash applied in the field and removed when coming out of the field. Otherwise, Soviet armor was uniformly green. For the invasions of Czechoslovakia in 1968 and Hungary in 1956, prominent white air recognition markings were applied, as were white sub unit markings aside from turret numbers. Have a look at photos from those incidents to see what I am referring to. Had a WWIII occurred with Soviet armor leading the way, most likely, similar markings would have been applied.

Anyways, I am looking forward to what's next here!


F is for FIRE, That burns down the whole town!

U is for URANIUM... BOMBS!

N is for NO SURVIVORS...

       - Plankton

LSM


  • Member since
    May 2014
Posted by Nomad53 on Wednesday, July 9, 2014 7:05 PM

Looking great doog. keep it up.

Nomad53


  • Member since
    October 2004
  • From: Northern Virginia
Posted by ygmodeler4 on Wednesday, July 9, 2014 6:40 PM

I understand...not a critique, just a question and it looks great to me so far!

-Josiah

  • Member since
    July 2003
  • From: On my kitchen counter top somewhere in central North Carolina.
Posted by disastermaster on Wednesday, July 9, 2014 3:46 PM

                            http://www.animatedimages.org/data/media/318/animated-computer-smiley-image-0008.gif

                        We're all having a real

                               blast here Karl!

          Been watchin' this take shape and enjoying

      this imaginative trip on this very interesting ride.


   Here's something else you might wanna consider...

     Along with the twisted - burnt signs

       and ruined landscape, there would be

         a lot of the grayish white ash residue http://freesmileyface.net/smiley/nature/snow.gif

          distributed everywhere. That could add

            greatly to the bleak doomsday http://3.bp.blogspot.com/-HDxr8QJS6n4/TucNzC3N3ZI/AAAAAAAAAG0/NYyvlXhjjJw/s1600/smiley-char055-01.gif effect.

    It could be tricky because it might be

      difficult to produce that effect without

        it looking like snow.

             It might be hard to play this theme out....

                         but if anyone can do it....

                                          http://i1108.photobucket.com/albums/h415/Stoltzpus/Decorated%20images/Smilies%20and%20GIFs/organist_zps83b91207.gif

                              I know you could .

 https://i.imgur.com/LjRRaV1.png


  • Member since
    July 2004
  • From: Sonora Desert
Posted by stikpusher on Wednesday, July 9, 2014 3:22 PM

the doog

Thanks again, guys---I am thinking of the highway sign idea. It might work if I can figure out how to model one from the 1950s in a convincing way.

On my way to rock Spain for now.....see ya all when I get home on Sunday!

Oh this is a beautiful project! I love the doomsday scenario!

In the 1950's Europe had not changed too much from WWII, save for continuing repair work of the war damage. Highway signs, especially in Germany where the fighting would most likely have been, would be similar to that era.

something like the old Tamiya signs set may work for you. Check out these photos of the Berlin Crisis in 1961 for a good idea

enjoy Spain Karl! No running with the Bulls now, you have to finish this kit!


F is for FIRE, That burns down the whole town!

U is for URANIUM... BOMBS!

N is for NO SURVIVORS...

       - Plankton

LSM


  • Member since
    January 2007
Posted by the doog on Wednesday, July 9, 2014 9:02 AM

Thanks guys, I appreciate you stopping by for a look-see and to comment!

Thank you too, Josiah---I know that people will say "You should have distorted the front lights and bent the guards" etc, but I'm going to resist that. I really just want to portray the tank "as is", but with a unique finish. I've never seen a tank finished with this kind of idea behind it, and I don't really want to "destroy" the tank, just to put it in a hypothetical finish that's "artistic". It may not be as technically accurate as some people may think it should be, but hey--that's the joy of modeling. Have fun, make your own kind of music!

  • Member since
    November 2009
  • From: SW Virginia
Posted by Gamera on Wednesday, July 9, 2014 7:27 AM

Yes, very cool Karl, she does look like she's been though a war!

"I dream in fire but work in clay." -Arthur Machen


  • Member since
    March 2003
  • From: Western North Carolina
Posted by Tojo72 on Wednesday, July 9, 2014 5:55 AM

Really nice job on the wear and tear so far,that's a lot of RoadwheelsI for sure

  • Member since
    October 2004
  • From: Northern Virginia
Posted by ygmodeler4 on Tuesday, July 8, 2014 11:02 PM

Looking good Karl, I know you said that you're taking artistic license with this build, and I don't disagree with doing that, but are you planning on doing anything to the front lights or the mantle/turret light?

-Josiah

  • Member since
    January 2007
Posted by the doog on Tuesday, July 8, 2014 7:57 PM

Hi guys,

I'm back from Barcelona and at the bench again---yay!

Got into some weathering now....lets see, what have I done?./...OK, I did some metallic sponge-chipping all over the tank. Secondly, I added pin washes in black-brown, and in some dark rust tones in different places for variety's sake.

I added some "Bright Green filter" from Adam Wilder's Nitro Line to alter the inner parts of the green patches. I also added some Gray Brown filters over the sand and gray colors.

I also used the "Spatter method"--loading up a stiff brush with paint and then flicking it to transfer the paint in small drops against the model--to ad some rusty micro-chips to the hull and to tint the tracks.

The wheels got hair-spray treatment first, a wash of gray-brown and then rust, and then flicked with rust. Still quite a bit to do here....

It's starting to look grimier.The rear is going to be a BIT cleaner, obviously.

SStill much to do in terms of adding actual dust, dirt, etc.  I'm hoping to make good progress tomorrow and with a little luck get the track on. Stay tuned!!!  Big Smile

  • Member since
    September 2006
  • From: Dripping Springs, TX, USA
Posted by RBaer on Wednesday, July 2, 2014 6:07 PM

Spain! I'm very jealous.

Apprentice rivet counter.

  • Member since
    January 2007
Posted by the doog on Wednesday, July 2, 2014 12:00 PM

Thanks again, guys---I am thinking of the highway sign idea. It might work if I can figure out how to model one from the 1950s in a convincing way.

On my way to rock Spain for now.....see ya all when I get home on Sunday!

  • Member since
    September 2006
  • From: Dripping Springs, TX, USA
Posted by RBaer on Wednesday, July 2, 2014 11:35 AM

I like it!

I also like the idea of a toasted-up road sign and the tanker in the full-kitchen NBC suit.  Nice and creepy.

Apprentice rivet counter.

  • Member since
    August 2007
  • From: back country of SO-CAL, at the birth place of Naval Aviation
Posted by DUSTER on Wednesday, July 2, 2014 4:19 AM

This is totally nuts in the best sort of way.

The paint burn is spectacular.  ya can almost feel the heat and hear the tinking of the cooling metal.

On your display base:  may be a highway sign: NewYork / Los Angeles/ Berlin/Moscow/ ???-  XX miles/ kilometers...   twisted and with singed paint 

Steve

Building the perfect model---just not quite yet  Confused

  • Member since
    December 2002
  • From: Bury St Edmunds, Suffolk, England
Posted by Bish on Tuesday, July 1, 2014 2:41 PM

After I asked you that, I relised it looked familiar and wondered if this was the scheme of the one at Kubinka. I guess I am so used to seeing Soviet armour in a one colour scheme and I think this one is rather reminiscent of German 3 colour camo. Looking at that pic, you have done a spot on job of this one.

I am a Norfolk man and i glory in being so


On the bench: Airfix 1/72nd Harrier GR.3/Fujimi 1/72nd Ju 87D-3

  • Member since
    January 2007
Posted by the doog on Tuesday, July 1, 2014 2:04 PM

Bish--thanks again for the comments and your memories! This paint scheme is actually what the actual tank is painted as at Kubinka. I was recently in Russia and Adam Wilder graciously took me out to see that famous museum; it was unbelievably cool----the "mecca" of armor modeling! It was also 17 degrees, and the buildings are all unheated! We froze our butts off, but had an incredible time. Here's the actual tank in the "new" camo scheme they've done it up in. I'm assuming that that would be "period correct" fro the time?

BILL----thanks too, buddy! I'm kinda "flying by the seat of my pants" on this one, so it's nice to get some positive feedback! Smile

Thanks too, Gamera! I was actually scared to start painting this one because I couldn't find a reference shot to use for help. I'm relieved that it seems to look ok so far. Let's see how I can mes it up now with weathering! Whistling.....Wink

SchattenSpartan--thanks for those kind sentiments too, man! I appreciate you taking the time to stop in and leave a nice comment!

Rob, thanks to you as well! I hope you'll stay tuned and stick around for the finish!

On to Barcelona for the weekend tomorrow, guys. I"ll probably have an update when I get home after Sunday. Maybe by Tuesday or so?

Stay tuned! Big Smile

  • Member since
    January 2014
  • From: Toronto
Posted by Rob S. on Monday, June 30, 2014 9:05 PM

Great subject,and great looking build so far. Very interesting to watch this one come together. Thanks!

______________________________________________________________________________


On the Bench: Nothing on the go ATM

  • Member since
    April 2013
Posted by SchattenSpartan on Monday, June 30, 2014 7:17 PM

Simply breathtaking work, Karl! I love every bit of your paint job! I got one of those Takom kits on it's way to me and I thought about doing something similar with it, but there's no way of my efforts coming even close to the masterpiece you created here... My hat's off to you!

  • Member since
    November 2009
  • From: SW Virginia
Posted by Gamera on Monday, June 30, 2014 7:08 PM

Yes, very cool- I love the way you've feathered the scorched paint back away from the bow impact area.

"I dream in fire but work in clay." -Arthur Machen


  • Member since
    July 2004
  • From: Texas
Posted by wbill76 on Monday, June 30, 2014 7:00 PM

Some very impressive layered results on display here Karl, very nice, love where you're taking this one including the figures. Beer

  • Member since
    December 2002
  • From: Bury St Edmunds, Suffolk, England
Posted by Bish on Monday, June 30, 2014 4:55 PM

All that time sweating my 'bleep' off in an NBC sut, I never thought it would come in useful.

Loving the look of this, and I really like the scheme. I take it that's your own creation.

I am a Norfolk man and i glory in being so


On the bench: Airfix 1/72nd Harrier GR.3/Fujimi 1/72nd Ju 87D-3

  • Member since
    January 2007
Posted by the doog on Monday, June 30, 2014 4:37 PM

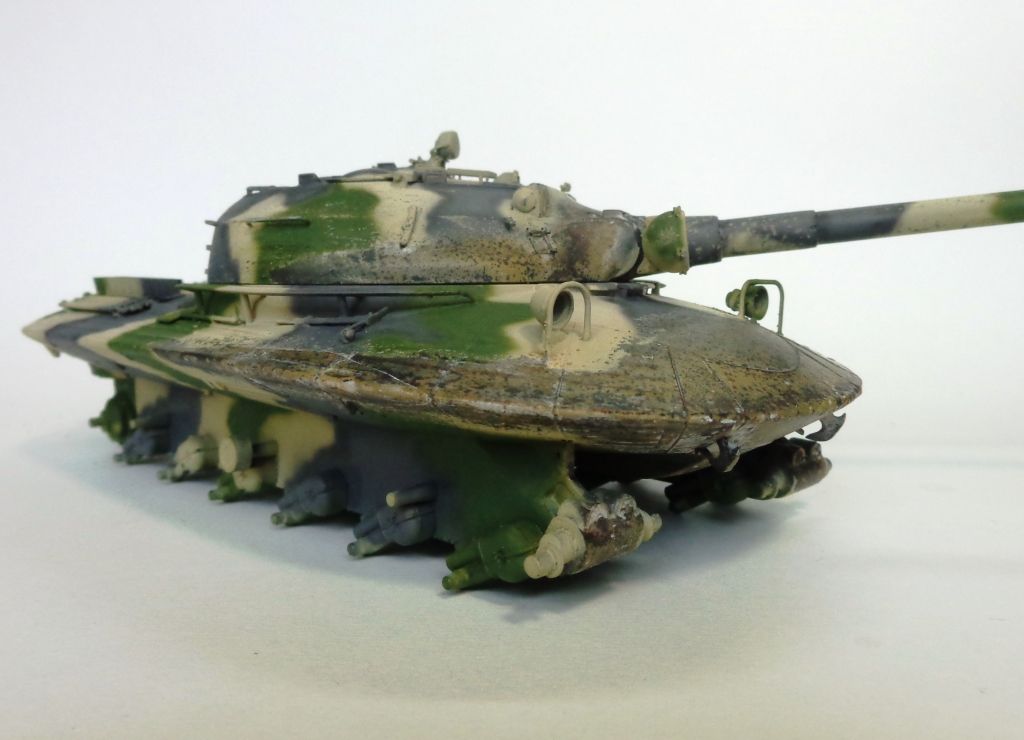
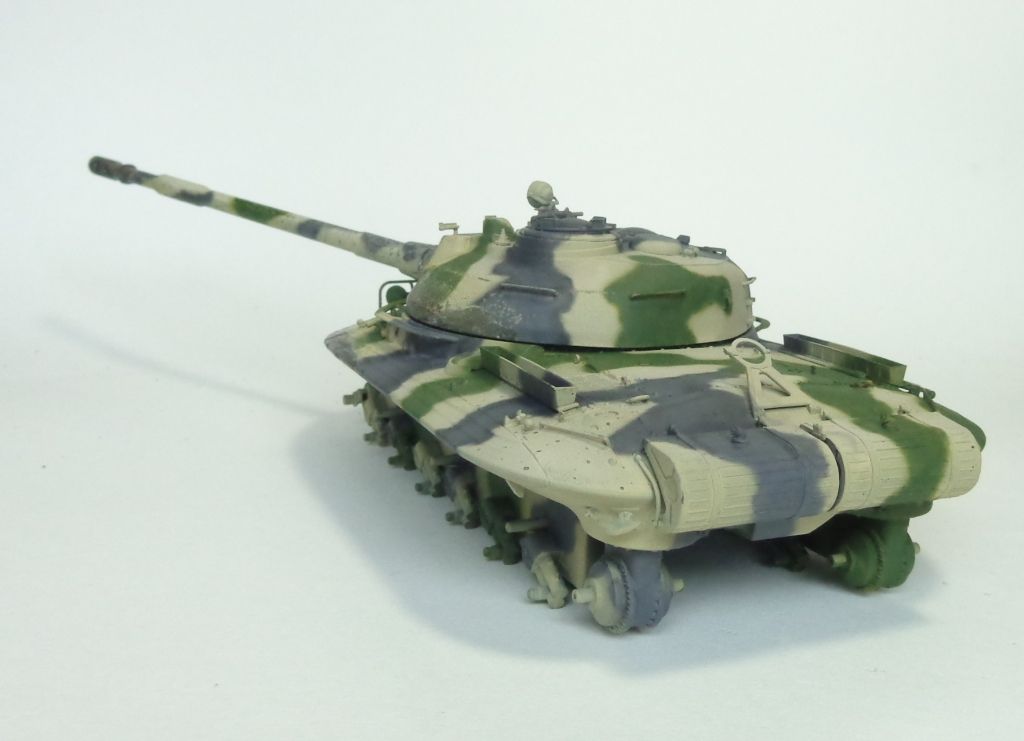
Well here's the painting update, completed.

I used the same technique to add a little more "scorching" around the various smaller protruding angles and projections; under the turret, along the side rails, etc. A little more "smoke" and soot along the hull as well... It looks a little more realistic now, I think? I gotta admit, I"m stoked at how the painting has turned out with basically zero weathering done at all yet! Time for washes and chips and pigments, etc. Here's the latest pics---stay tuned for the rest of the ride!

Thanks again for following along, guys! I appreciate all the suggestions and comments! Toast

  • Member since
    January 2007
Posted by the doog on Monday, June 30, 2014 4:31 PM

garzonh

Hi,

Oh wow!!, that recent damage looks great!.

Sorry I've not being around, but work has been crazy.

I like very much this technique and looks very real.

Good work.

Good to see you back! THanks for the positive comments! Smile

  • Member since
    January 2007
Posted by the doog on Monday, June 30, 2014 4:31 PM

waynec

the doog

waynec

.... we tankers had the hose attached to a filter in a bag. when you got in the tank you plugged the canister filter into the tank nbc system.

Wayne that brings up a good point--do you think that the tank crew would have on the full suits here--the "raincoat" type thing? Or would they just wear the facemask with their regular uniforms? It would be cool to put a tanker looking out of the hatch with a goon mask on!

hey DOOG - there were 4 levels of MOPP (Mission Oriented Protective Posture) in the us army. understand i am speaking from the late '70s.  MOPP 1 is having all your chem gear (booties, gloves, mask, suit available) and 4 is wearing EVERYTHING.  we always carried the masks in training no matter what.

our M60s didn't have the positive over pressure and, quite frankly, even if they did, i wouldn't trust the system that much. in any possible chem situation we would have the suit on but not the mask (our hood was attached to the mask). that way, when the alarm went off, it was just mask and gloves in maybe 11 seconds.

SO TO FINALLY ANSWER YOUR QUESTION yes he could quite believably be hanging out the hatch completely suited up. you get the right camera angle and a bit of photoshopping and you could turn your 1950s picture into an alien invasion picture.insane ideas are already swirling through my head.

Thanks again, Wayne! great information, and together with Bish's posting, you guys have convinced me that a suited-up goon crewman could be plausibly put into the scene!

It should be really wicked-cool! Got an update coming right away....! Thanks again for your input and the great firsthand info!!!! If I write this up into an article, I"m going to mention you guys and thank you for the knowledge!

  • Member since
    January 2007
Posted by the doog on Monday, June 30, 2014 4:28 PM

Bish

I can't speak for the Russians or US forces dog, but even though our vehicles were could be sealed with a forced air system and special air filters for an NBC environment, we still had to wear the full suit when inside the vehicle. Its just not worth the risk.

Well that's GREAT news! I would assume that if we did it, THEY did it!

Goon Squad tanker on the way!!!

Thanks for the input, Bish! It's much apreciated!

  • Member since
    April 2006
  • From: Denver, Colorado
Posted by waynec on Monday, June 30, 2014 2:49 PM

the doog

waynec

.... we tankers had the hose attached to a filter in a bag. when you got in the tank you plugged the canister filter into the tank nbc system.

Wayne that brings up a good point--do you think that the tank crew would have on the full suits here--the "raincoat" type thing? Or would they just wear the facemask with their regular uniforms? It would be cool to put a tanker looking out of the hatch with a goon mask on!

hey DOOG - there were 4 levels of MOPP (Mission Oriented Protective Posture) in the us army. understand i am speaking from the late '70s.  MOPP 1 is having all your chem gear (booties, gloves, mask, suit available) and 4 is wearing EVERYTHING.  we always carried the masks in training no matter what.

our M60s didn't have the positive over pressure and, quite frankly, even if they did, i wouldn't trust the system that much. in any possible chem situation we would have the suit on but not the mask (our hood was attached to the mask). that way, when the alarm went off, it was just mask and gloves in maybe 11 seconds.

SO TO FINALLY ANSWER YOUR QUESTION yes he could quite believably be hanging out the hatch completely suited up. you get the right camera angle and a bit of photoshopping and you could turn your 1950s picture into an alien invasion picture.insane ideas are already swirling through my head.

Никто не Забыт    (No one is Forgotten)
Ничто не Забыто  (Nothing is Forgotten)


  • Member since
    March 2013
  • From: Puebla, Mexico
Posted by garzonh on Monday, June 30, 2014 2:42 PM

Hi,

Oh wow!!, that recent damage looks great!.

Sorry I've not being around, but work has been crazy.

I like very much this technique and looks very real.

Good work.

  • Member since
    December 2002
  • From: Bury St Edmunds, Suffolk, England
Posted by Bish on Monday, June 30, 2014 2:31 PM

I can't speak for the Russians or US forces dog, but even though our vehicles were could be sealed with a forced air system and special air filters for an NBC environment, we still had to wear the full suit when inside the vehicle. Its just not worth the risk.

I am a Norfolk man and i glory in being so


On the bench: Airfix 1/72nd Harrier GR.3/Fujimi 1/72nd Ju 87D-3

  • Member since
    January 2007
Posted by the doog on Monday, June 30, 2014 2:14 PM

waynec

.... we tankers had the hose attached to a filter in a bag. when you got in the tank you plugged the canister filter into the tank nbc system.

Wayne that brings up a good point--do you think that the tank crew would have on the full suits here--the "raincoat" type thing? Or would they just wear the facemask with their regular uniforms? It would be cool to put a tanker looking out of the hatch with a goon mask on!

  • Member since
    April 2006
  • From: Denver, Colorado
Posted by waynec on Monday, June 30, 2014 1:20 PM

the doog

Gamera

Maybe just an interstate section and a twisted and burned Route 66 (Route 666?) sign if you didn't want to do too much?

Wow, that's a really good idea---the iconic Route 66.....a good idea to pursue. Thanks for that idea, Gamera! I"ll have to look into the possibilities on this... Big Smile

i like the route 66 sign idea  too.  wilted tree dead ravens brown grass twisted rusted barbed wire fence section.

or park it next to a smashed GOLDEN ARCHES with a "we sell a thousand a day" sign.

yeah BISH MOPP 4 was no fun. at NTC the war basically stops during the day when in MOPP 4 but the weather isn't suited for gas warfare not unlike the sandbox. the grunts could drink water with their mask, we tankers had the hose attached to a filter in a bag. when you got in the tank you plugged the canister filter into the tank nbc system.

Никто не Забыт    (No one is Forgotten)
Ничто не Забыто  (Nothing is Forgotten)


  • Member since
    November 2009
  • From: SW Virginia
Posted by Gamera on Monday, June 30, 2014 11:27 AM

No problem Karl, I'm a fount of ideas- just too lazy to put most of them into action...Sleep

"I dream in fire but work in clay." -Arthur Machen


  • Member since
    January 2007
Posted by the doog on Monday, June 30, 2014 9:18 AM

Gamera

Maybe just an interstate section and a twisted and burned Route 66 (Route 666?) sign if you didn't want to do too much?

Wow, that's a really good idea---the iconic Route 66.....a good idea to pursue. Thanks for that idea, Gamera! I"ll have to look into the possibilities on this... Big Smile

  • Member since
    November 2009
  • From: SW Virginia
Posted by Gamera on Monday, June 30, 2014 8:34 AM

Maybe just an interstate section and a twisted and burned Route 66 (Route 666?) sign if you didn't want to do too much?

"I dream in fire but work in clay." -Arthur Machen


  • Member since
    January 2007
Posted by the doog on Monday, June 30, 2014 7:29 AM

Guys,

Thanks for all your posts and memories with your firsthand experiences with these things. It makes for interesting reading!

Bish

Ye, I was thinking its 50/60's time frame. Are you thinking of having building rubble in there or more of a country setting. If the latter, the effects on trees could be something to consider. There is some footage of A-Bomb tests showing trees still standing or at worst snapped half way down the trunk. I would imagine these would be burnt on the side facing the blast.

I want to make it somewhat "city-ish", but it will have to be in a concise sort of way. I don't want any 2' x 3' massive diorama taking up valuable display case. I'm thinking of like maybe a conspicuous highway or street setting which definitively confers an American city with a recognizable icon that isn't too huge---maybe a highway sign or something?

Like I said, lots to think about. I'm looking for "the perfect dio accessory", basically. Oh joy...Confused

  • Member since
    May 2009
  • From: Poland
Posted by Pawel on Monday, June 30, 2014 3:17 AM

Hello!

Once I owned several of those gas masks - when I was in primary school, the socialism ended in Poland and one day they opened a big bunker that still stands in the middle of the building estate I was living in at that time, and there was a warehouse with those gas masks stockpiled - kids just got in and took them as souvenirs. I got mine as gifts from my school colleagues. They later all carried their books to school in the gas mask bags - that was a similar bag to the american Claymore bag.

The concept of those masks was you carry the filter in the bag all of the time, and when you put the headpiece on, it is connected to the filter with about one meter of hose, similar to the vacuum cleaner hose. I had this mask on several times - not a very nice feeling... Boy, am I glad I never HAD to use them!

Good luck with your project Karl, I'm sure it will be something special when done!

Paweł

All comments and critique welcomed. Thanks for your honest opinions!

www.vietnam.net.pl

  • Member since
    December 2002
  • From: Bury St Edmunds, Suffolk, England
Posted by Bish on Monday, June 30, 2014 2:48 AM

redleg12

Karl, you think it looks like a nightmare.....you should try wearing the NBC gear, that is truly a nightmare!!

Rounds Complete!!

Now isn't that a fact. I remember doing my first section attack in full NBC when I was in depot. Not fun.

I am a Norfolk man and i glory in being so


On the bench: Airfix 1/72nd Harrier GR.3/Fujimi 1/72nd Ju 87D-3

  • Member since
    December 2002
  • From: Bury St Edmunds, Suffolk, England
Posted by Bish on Monday, June 30, 2014 2:47 AM

Ye, I was thinking its 50/60's time frame. Are you thinking of having building rubble in there or more of a country setting. If the latter, the effects on trees could be something to consider. There is some footage of A-Bomb tests showing trees still standing or at worst snapped half way down the trunk. I would imagine these would be burnt on the side facing the blast.

I am a Norfolk man and i glory in being so


On the bench: Airfix 1/72nd Harrier GR.3/Fujimi 1/72nd Ju 87D-3

  • Member since
    November 2009
  • From: SW Virginia
Posted by Gamera on Sunday, June 29, 2014 7:42 PM

WhooHoo, looking forward to seeing how this comes out more and more Karl!

"I dream in fire but work in clay." -Arthur Machen


  • Member since
    July 2006
  • From: New Jersey
Posted by redleg12 on Sunday, June 29, 2014 6:55 PM

Karl, you think it looks like a nightmare.....you should try wearing the NBC gear, that is truly a nightmare!!

Rounds Complete!!

"The Moral High Ground....A Great Place to Emplace Artillery."

  • Member since
    January 2007
Posted by the doog on Sunday, June 29, 2014 5:46 PM

That's a great idea, Bish. I've got to keep in mid that my setting should probably be in the 1950s. It's kinda hard to find diorama accessories from that era. I've really gotta wrack my brain to come up with something that's going to work.

  • Member since
    December 2002
  • From: Bury St Edmunds, Suffolk, England
Posted by Bish on Sunday, June 29, 2014 12:47 PM

Ye, they look like something the Dr Who team might dream up.

Tough decision on the base. Have you tried looking at pics of Chernobyl. I know there wasn't a nuclear explosion, but it might give you some ideas, perhaps combined with images of the aftermath of an earth quake or volcanic eruption.

I am a Norfolk man and i glory in being so


On the bench: Airfix 1/72nd Harrier GR.3/Fujimi 1/72nd Ju 87D-3

  • Member since
    January 2007
Posted by the doog on Sunday, June 29, 2014 12:00 PM

Yeah, it's like something out of a SCi-FI movie! I hope to make a base that can give the same general feeling. Really trying to think of something that will make people "Ooh and "Awww!".

  • Member since
    December 2002
  • From: Bury St Edmunds, Suffolk, England
Posted by Bish on Sunday, June 29, 2014 11:56 AM

Well, you have to do what you have to do.

That photo is damn scary. I hope I never looked like that in full NBC. I'm just grateful we never had to use it for real.

I am a Norfolk man and i glory in being so


On the bench: Airfix 1/72nd Harrier GR.3/Fujimi 1/72nd Ju 87D-3

  • Member since
    January 2007
Posted by the doog on Sunday, June 29, 2014 11:54 AM

<p>Thanks too, Mike! Working hard here not to disappoint! </p>  

I've been rather inspired by this photo, for the figures....stuff of nightmares if you ask me!

  • Member since
    January 2007
Posted by the doog on Sunday, June 29, 2014 11:49 AM

Bish

Stunning work as always karl, I know if anyone can pull off that look, its you.

And what a show of dedication to the hobby in getting another kit.

Thanks, Bish---that was a tough decision-and not cheap either--but I just couldn't live with it as it was. At least everything went quicker and smoother the second time around! Big Smile

  • Member since
    December 2002
  • From: Bury St Edmunds, Suffolk, England
Posted by Bish on Saturday, June 28, 2014 6:33 AM

Stunning work as always karl, I know if anyone can pull off that look, its you.

And what a show of dedication to the hobby in getting another kit.

I am a Norfolk man and i glory in being so


On the bench: Airfix 1/72nd Harrier GR.3/Fujimi 1/72nd Ju 87D-3

  • Member since
    July 2006
  • From: New Jersey
Posted by redleg12 on Saturday, June 28, 2014 6:20 AM

OUTSTANDING!!!!!  The artistry of your finish work comes through. Love the figs in the NBC gear. The usual "Doog" creativity.

Rounds Complete!!

"The Moral High Ground....A Great Place to Emplace Artillery."

  • Member since
    January 2007
Posted by the doog on Friday, June 27, 2014 5:55 AM

Guys, thanks for all your positive comments!

I admit that I was somewhat intimidated to even start this project as I too, "had no idea what it was supposed to look like" to paraphrase Gamera. I'm kinda shooting from the hip on this one, but it seems to have reached a stage of plausibility at least for now. Let's see how I can screw it up with further weathering, lol. (Hopefully not!)

I'm going to add that next step of adding smoke and soot with he airbrush and then see what it looke like--update soon!

  • Member since
    November 2009
  • From: SW Virginia
Posted by Gamera on Thursday, June 26, 2014 2:13 PM

Lol, I can't comment on how realistic it is since I have no idea what it should look like! Indifferent

But it's friggin' awesome in any case!  Toast

"I dream in fire but work in clay." -Arthur Machen


  • Member since
    September 2006
  • From: Dripping Springs, TX, USA
Posted by RBaer on Thursday, June 26, 2014 2:06 PM

I like the effect, and it certainly tells a story.......

Apprentice rivet counter.

  • Member since
    February 2010
  • From: Maine
Posted by Stage_Left on Thursday, June 26, 2014 8:39 AM

Really cool Karl- yeah, I'd say the paint job is telling the story.....

Dave

cml
  • Member since
    March 2007
  • From: Brisbane, Australia
Posted by cml on Wednesday, June 25, 2014 11:00 PM

Some excellent techniques and tips Karl.

The burnt steel is looks terrific.

Chris

  • Member since
    July 2003
  • From: On my kitchen counter top somewhere in central North Carolina.
Posted by disastermaster on Wednesday, June 25, 2014 10:44 PM

Karl, the artistry here really shows.


I think you're hot on the trail of what you're looking for.          http://www.millan.net/minimations/smileys/dog.gif

                              I know I like it!

 https://i.imgur.com/LjRRaV1.png


  • Member since
    January 2007
Posted by the doog on Wednesday, June 25, 2014 5:16 PM

Hello all, once again,

Well, I"e been working away on the Objekt 279; actually, to be perfectly honest, I rebuilt the hull since the last post. Got a new model and all---the tracks and "sit" of the model just weren't 100% level on the last one when I tried to glue the suspension sponsons back on. Through a minor mistake, it became impossible to sit the tank. So the hull ONLY had to be re-built. This time, I glued the suspension sponsons on first. I took the opportunity to improve and stagger a new set of cleaning rods
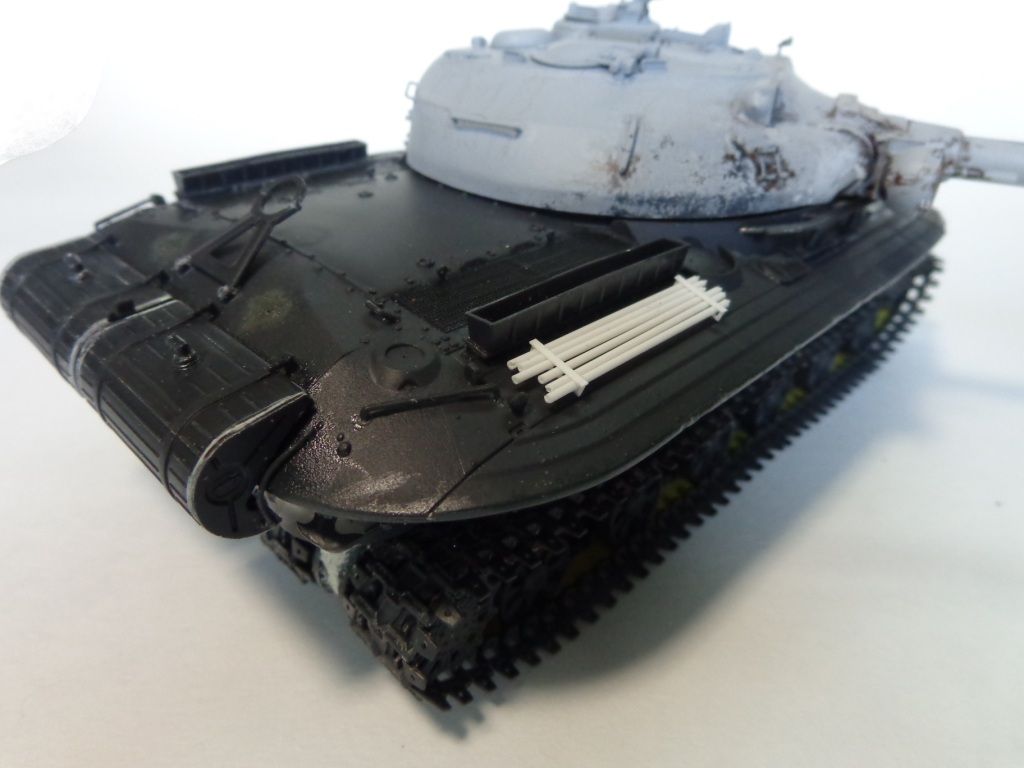
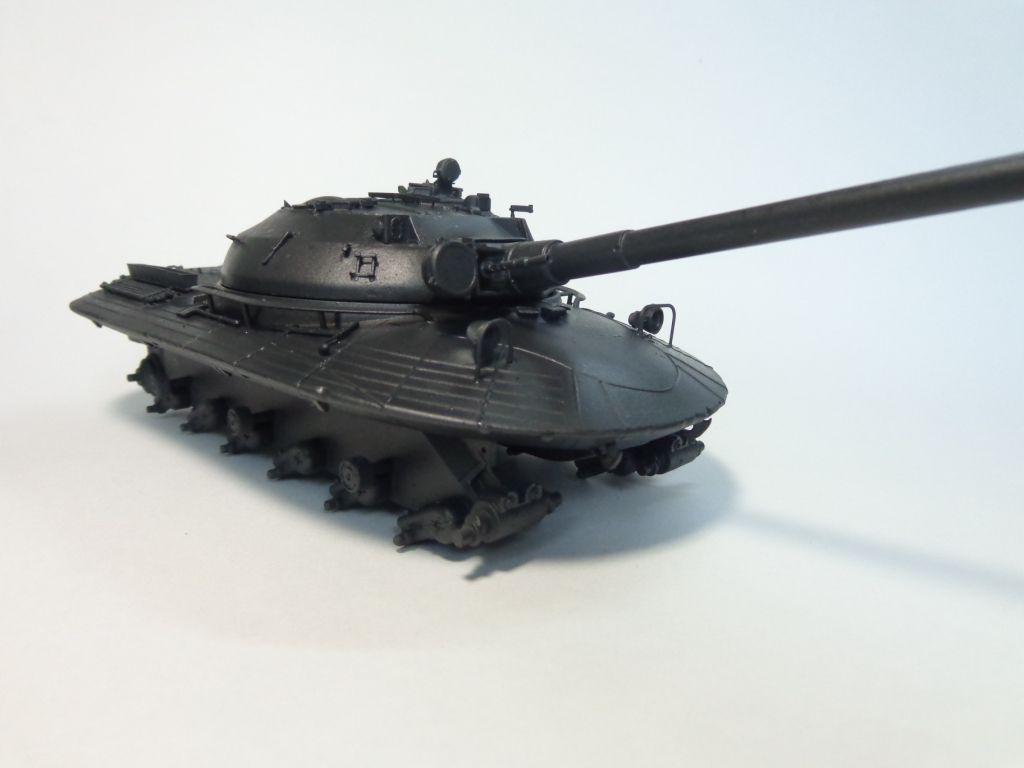
As I had said before, I am going for a "blasted" look, where the tank has just survived a nuclear blast wave. I'm taking some artistic liberties here---damnit, Jim, I'm an artist, not an engineer!.--so you won't see the lights blown of and hull stripped clean. The paint job is going to have to tell the story, for the most part.

I started with an overall coat of Tamiya primer gray again, and then a coat of metallic grey mixed from Tamiya paints.
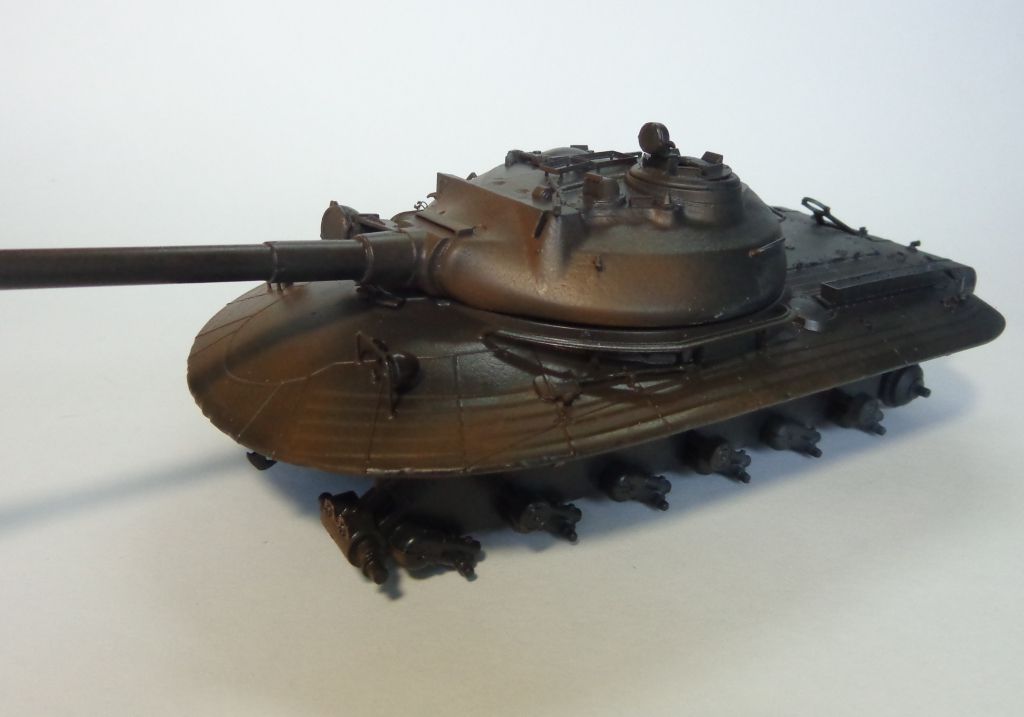
Then, after adding a coat of hair spray, I added a rust-colored top coat.
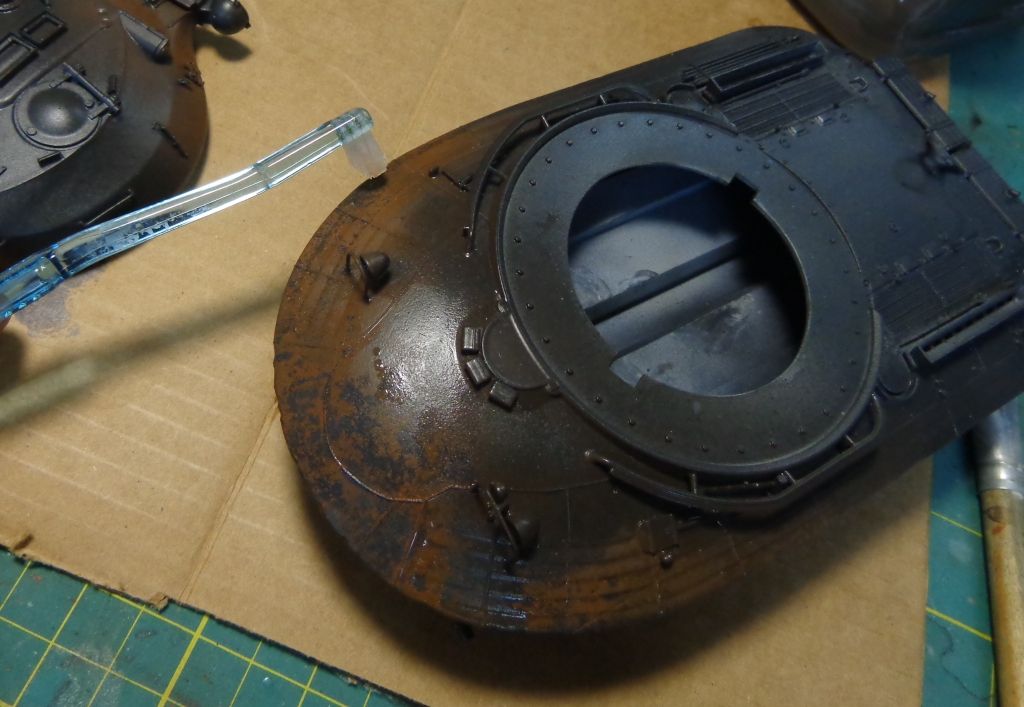
Using a special tooth brush for tight spots, I started removing the top coat:
Then, I added some water and ....
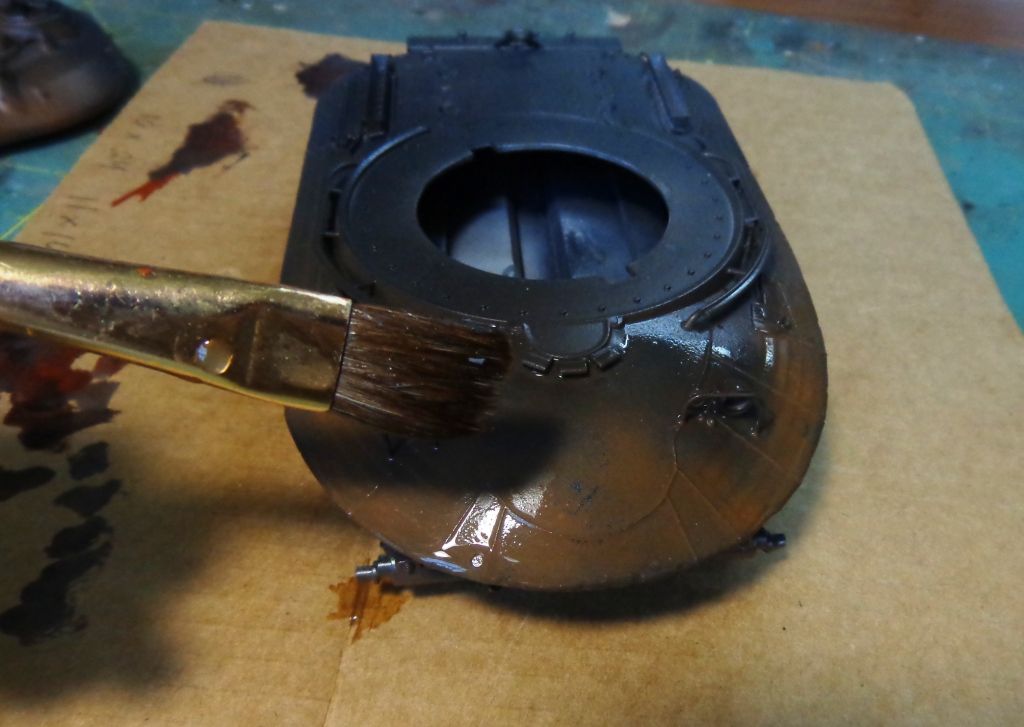
SALT!
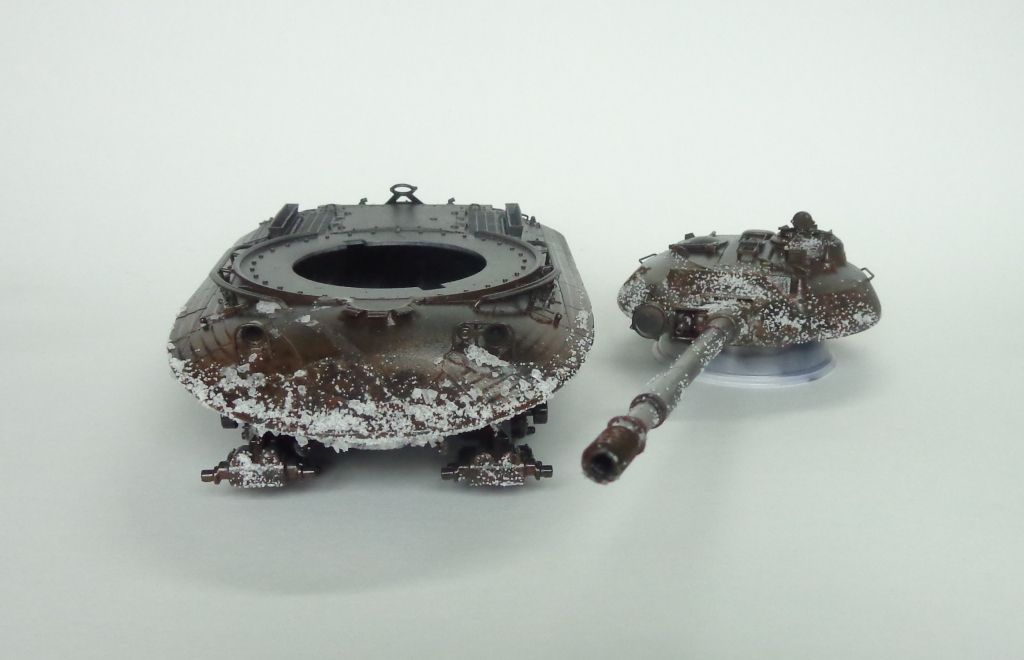
After a coat of lighter rust, and scrubbing away the salt, here's what I have...
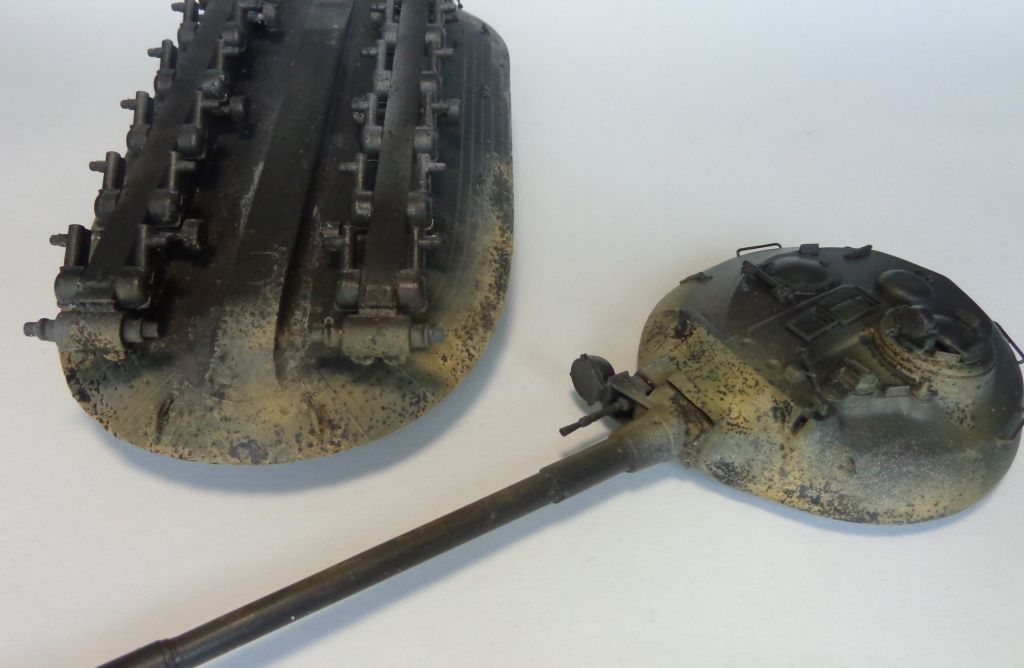
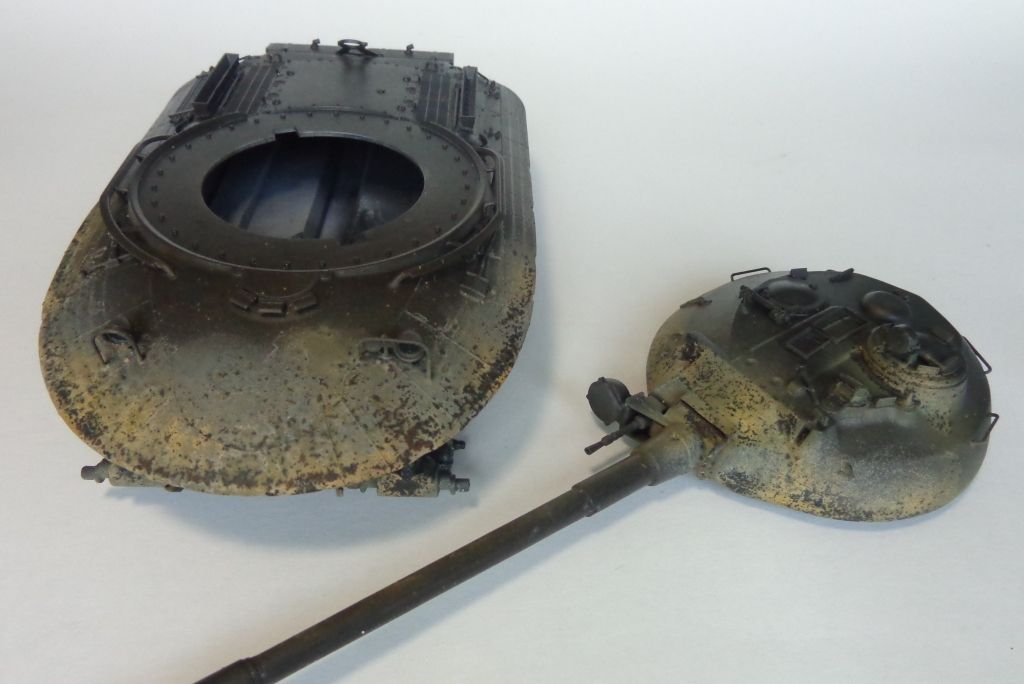
Next, I masked the front with some Adam Wilder clay mask, and started the 3-color camo, which is a custom mix of Sand Yellow,. Olive Green, and Gray, mixed from Tamiya paints.
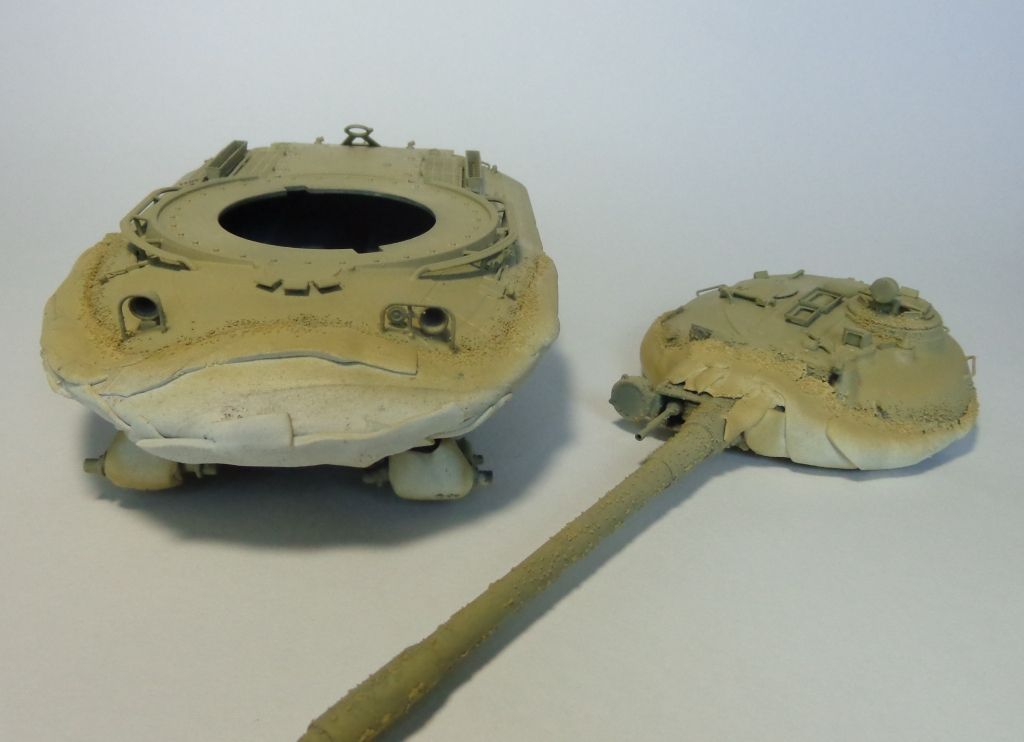
The three colors....
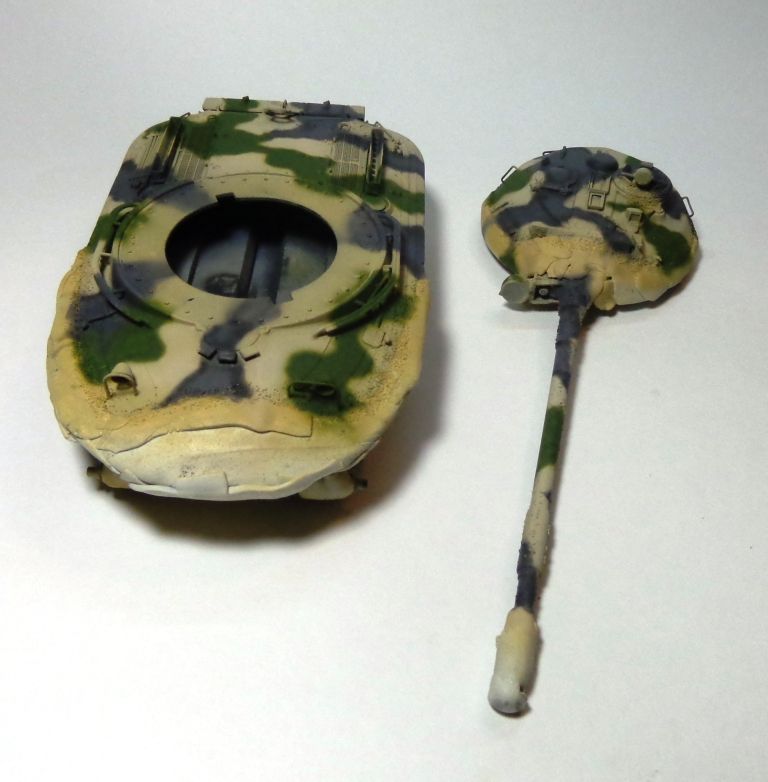
After removing the mask, I have a delineation line of where the paint go scorched off...
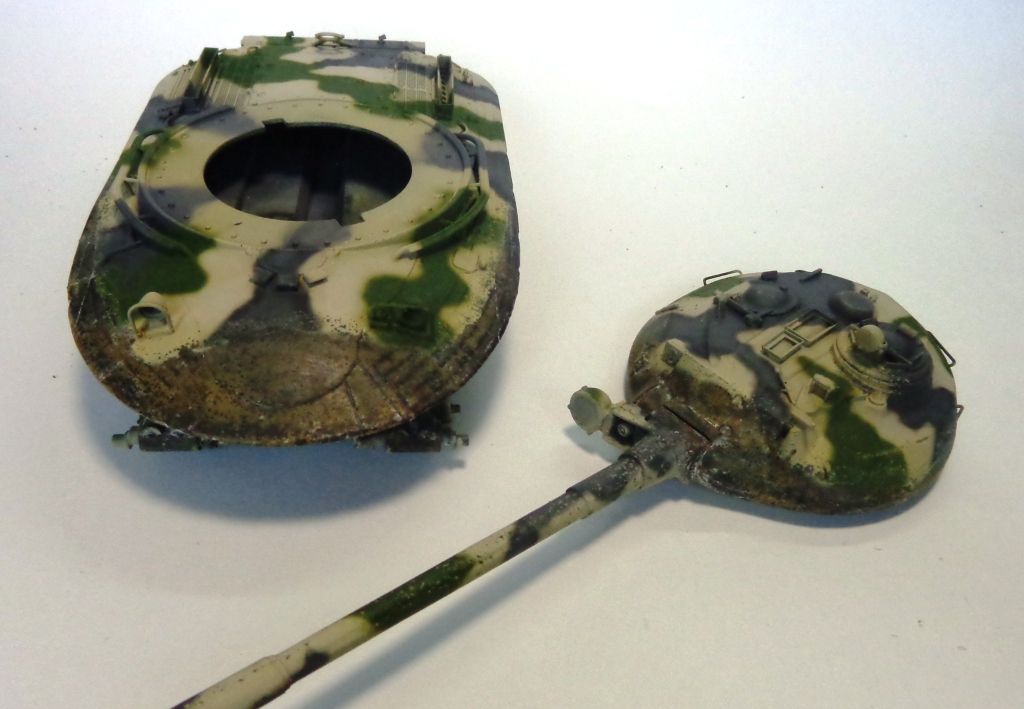
Detail...
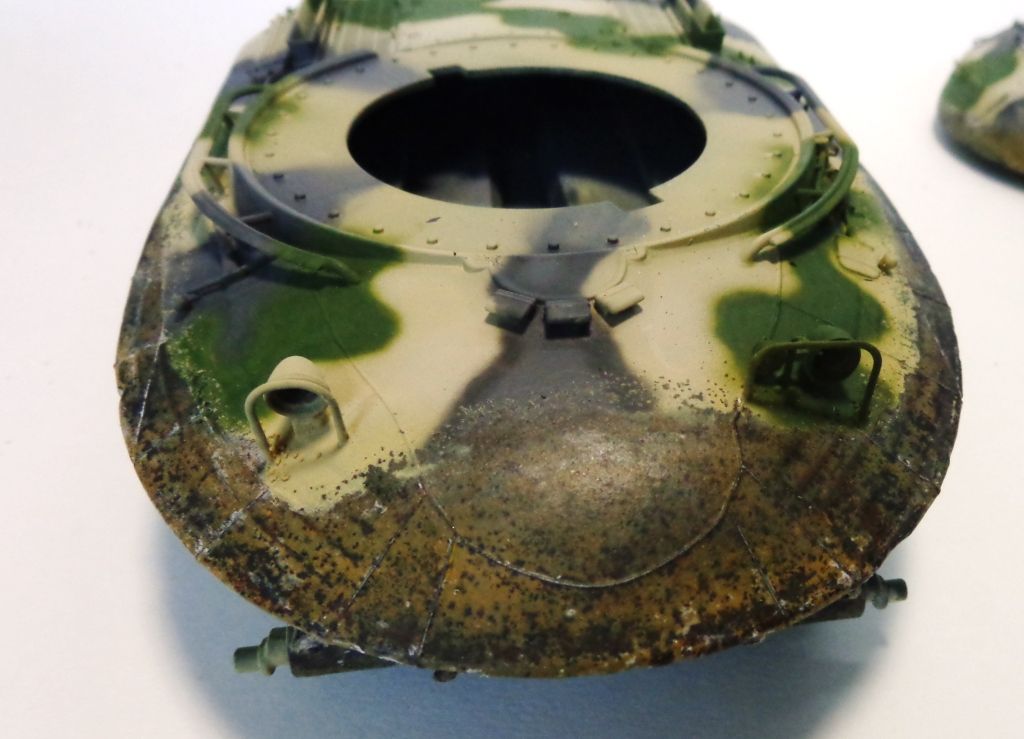
THe rear...
Next, the front was again masked at the line, and salt added in front of the mask, A line of "scorch"white was then painted on...
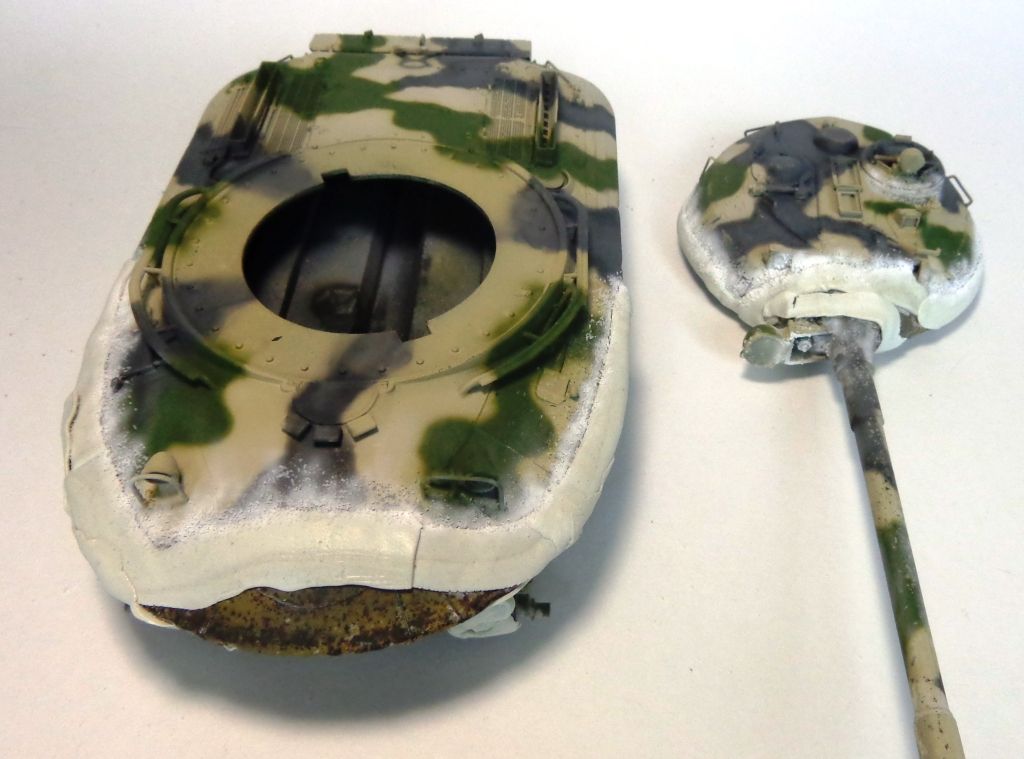
What I got...
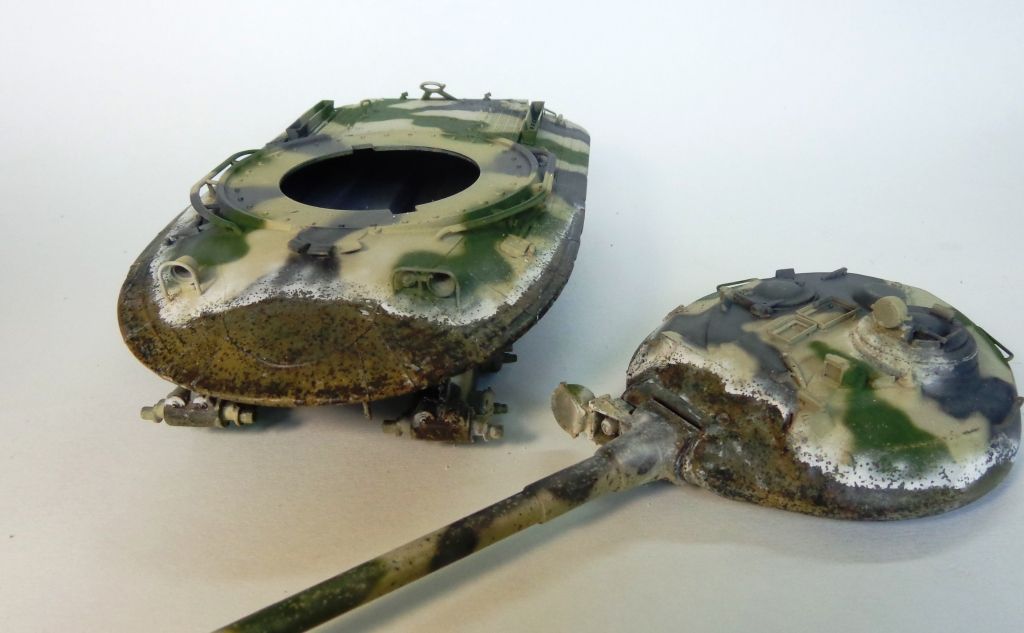
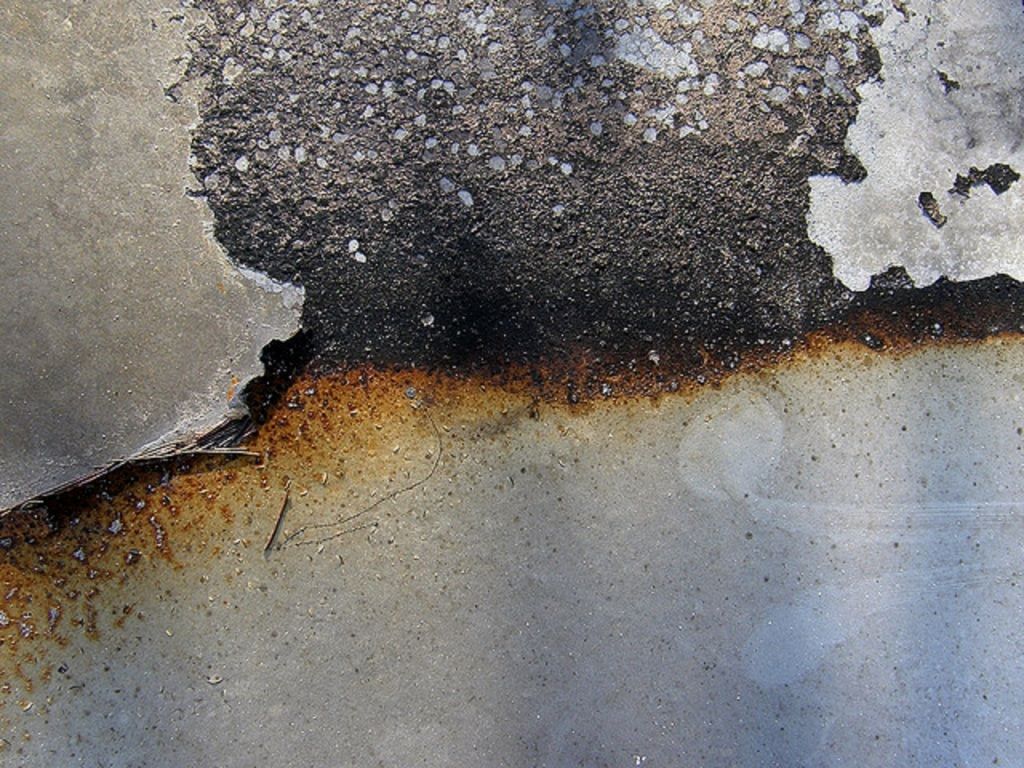
This is going to be the effect that I"m going for:
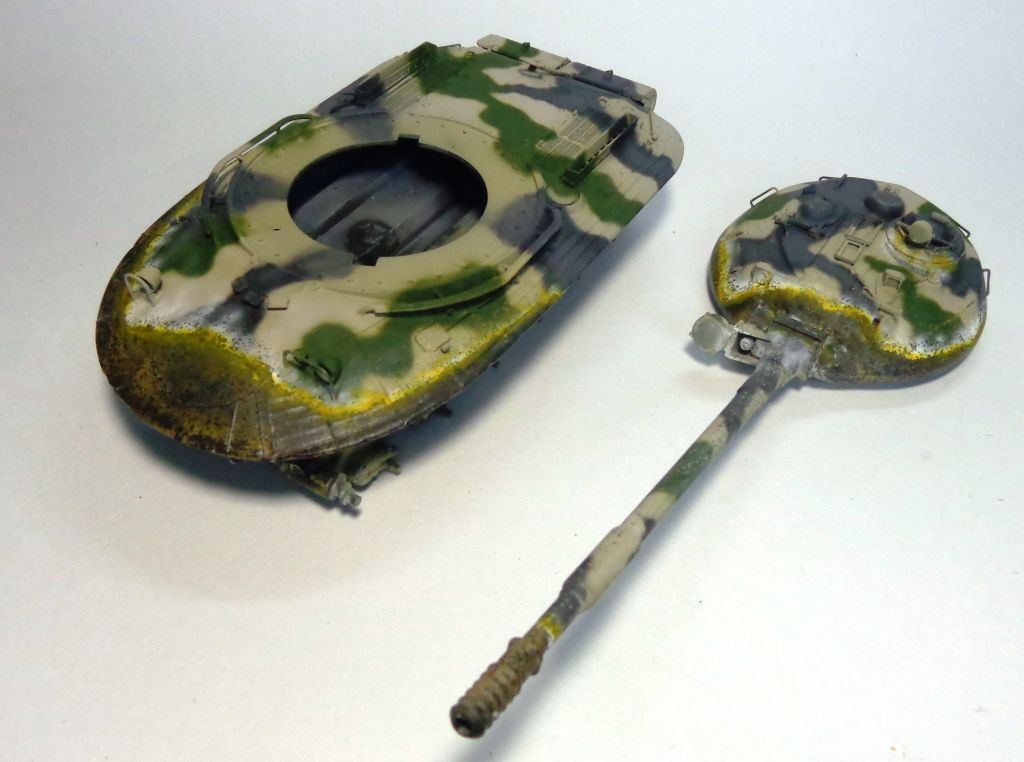
To get this, I now add a yellow line, first...
Then two successively darker shades of rust
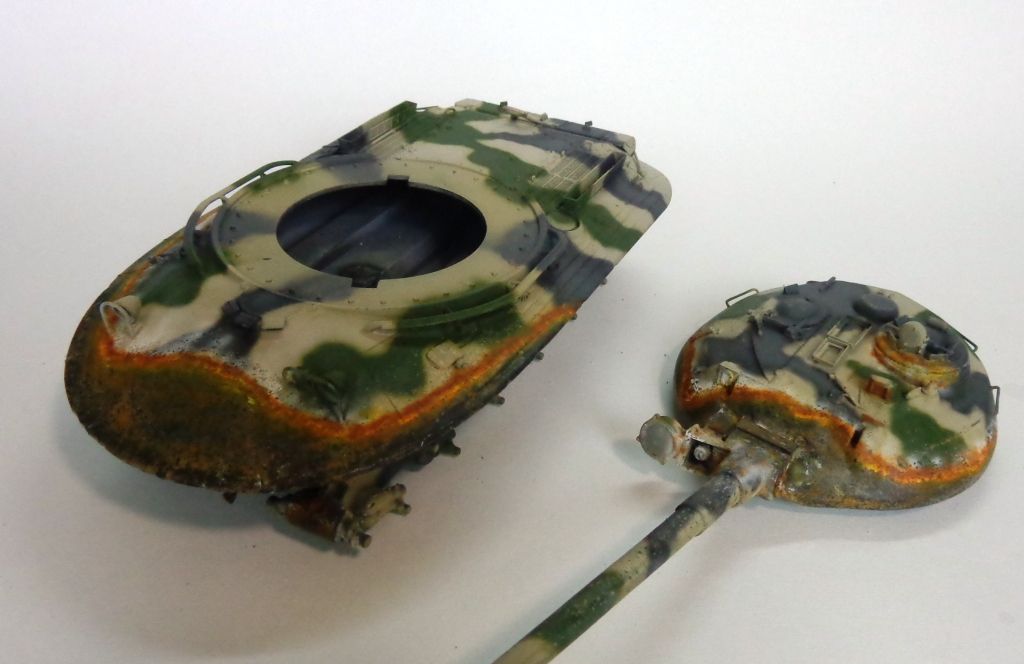
This is where I"m at now.....It looks a little excessive now, almost clownish, but I've been here before, haven't I? Wink The excess is intentional--I need a "background" o rusty tones for the next step--adequately minimizing and sharpening the blast-line. I will next add some weathering filters, and tint the base coat, and then add some more salt, white, and black soot painting.

I've also been working on creating a "goon army" from some extra TAKOM Soviet soldiers in their spooky gas masks...
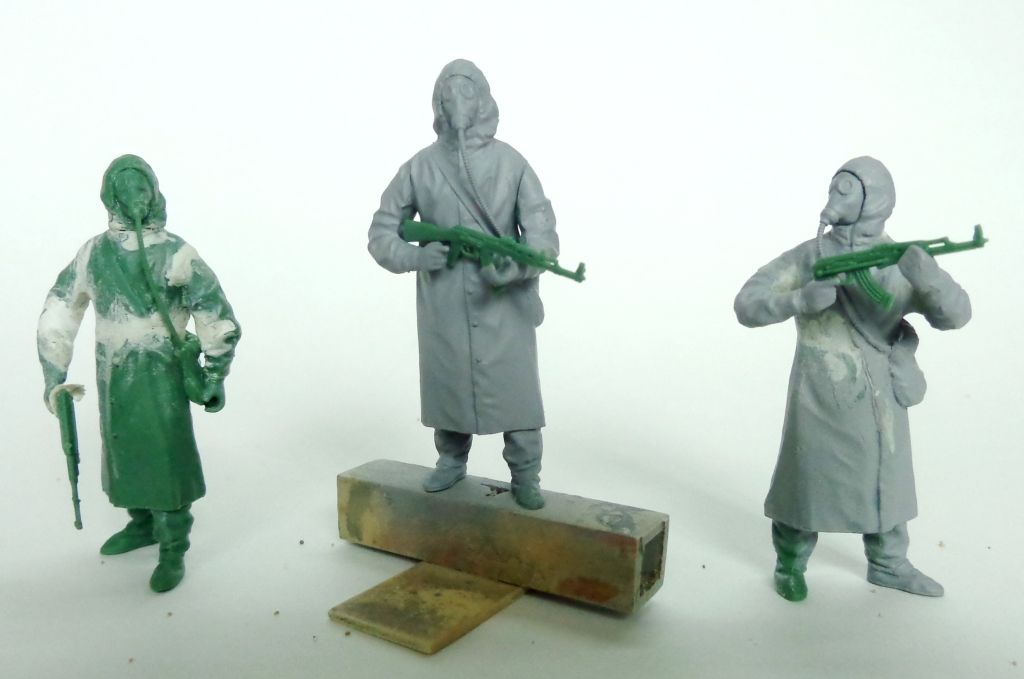
THAT'S IT FOR NOW!

Any comments or questions gladly welcomed!

STAY TUNED!!! It's going to be a wild ride! Stick out tongue

  • Member since
    March 2013
  • From: Puebla, Mexico
Posted by garzonh on Thursday, May 15, 2014 1:42 PM

Hello my friend!!

Sorry for not being so active in this forum, I've been working on a diorama so I was more on that "side" of the site. Still have not finished it, waiting for some Vallejo paints to be delivered for paiting the figures.

Your kits is coming great...will you ever dissapoint us?...heheehe....nooo

Im eager to see how you will paint and "scorch" this one out.

Also, I have suscribed to the GB of FSM Orpahned Armor, so I need to buy some stuff for it...cool you are in NC. In fact I will be in GA and SC next mid June...hopefully can find a lot of weathering paints and stuff.

See you around.

Hugo

  • Member since
    January 2007
Posted by the doog on Thursday, May 15, 2014 8:42 AM

I'm in Charlotte, University area. We moved in about two months ago. :)

Thanks for the comments and welcome to the Carolinas!

  • Member since
    August 2007
Posted by adb2323 on Wednesday, May 14, 2014 8:50 PM

Great new project! Love this crazy tank. Can't wait to see your final product! Saw that you said that you are building a home in North Carolina. I'm moving there in a few weeks to the Winston-Salem/Greensboro area.  What area are you in?

  • Member since
    December 2008
  • From: Goffstown, NH
Posted by New Hampshire on Wednesday, May 14, 2014 5:58 PM

Damn, DM, I knew the Aussies were tough buggers....but their war equipment too!?  Hot dang I knew I love those crazy folks Down Under for a reason. Big Smile

Brian

  • Member since
    January 2007
Posted by the doog on Wednesday, May 14, 2014 6:58 AM

Awesome stuff, Steve! Thanks for posting that!

I have to make an "artist's choice" here---I realize that, realistically, the tank would probably be damaged more than I want to damage it; i.e. lights blown off, parts missing, etc. Except I don't want it to look "bare". I also want to model "the tank" more so than I want to impute the circumstances surrounding its appearance.

I think of myself as a bit of a "director" in a movie here. How many times have you watched a movie and thought "If that had really happened, then X, Y, and Z would have happened too"--yet "X,Y,and Z" are never shown. Or you think "Oh come ON! That totally defied physics!". Of course, the director is more concerned with the "Art" of the film than the strict realism. That's kinda the decision I'm making here. I don't think I"ll bust off the lights and whatnot---I'll imagine the tank as being somewhat farther from the blast than that "Atomic Tank". Enough to abuse the paint but not enough to strip the vehicle of steel.

In any case, I won't be able to get back to it until at least May 26th or so. Gotta go rock the world again...Smile

  • Member since
    July 2003
  • From: On my kitchen counter top somewhere in central North Carolina.
Posted by disastermaster on Wednesday, May 14, 2014 4:34 AM

  Well since I ain't building anything, then maybe I can help you blast it around a bit. This should give you some ideas.

  I had put this info back for a Centurion build later on, but at the rate I'm going at now that probably isn't going to happen ..... read on and enjoy.

                                    http://www.sherv.net/cm/emoticons/war/falling-bomb-smiley-emoticon.gif

            ***********************************************************************************************

 An Australian Army Mk 3 Centurion Type K, Army Registration Number 169041, was involved in a small nuclear test at Emu Field in Australia in 1953 as part of Operation Totem I. Built as number 39/190 at the Royal Ordnance Factory, Barnbow in 1951 it was assigned the British Army number 06 BA 16 and supplied to the Australian Commonwealth Government under Contract 2843 in 1952.

 It was placed less than 500 yards (460 m) from the 9.1kt.1blast with its turret facing the epicentre, left with the engine running and a full ammunition load. Upon examination after detonation it had been pushed away from the blast point by about 5 feet (1.5 m), pushed slightly left and that its engine had stopped working, only because it had run out of fuel. Antennae were missing, lights and periscopes were heavily sandblasted, the cloth mantlet cover was incinerated, and the armoured side plates had been blown off and carried up to 200 yards (180 m) from the tank. Remarkably, though, the tank could still be driven from the site. Had it been manned, the crew would probably have been killed by the shock wave .http://chivethebrigade.files.wordpress.com/2011/07/tank-nuke-500-6.jpg

       (one of the side plates)

http://chivethebrigade.files.wordpress.com/2011/07/tank-nuke-500-7.jpg

      (three days later)

 169041, subsequently nicknamed The Atomic Tank, was later used in the Vietnam war. In May 1969, during a firefight, 169041 (call sign 24C) was hit by a rocket-propelled grenade (RPG). The turret crew were all wounded by shrapnel as the RPG entered the lower left side of the fighting compartment, travelled diagonally across the floor and lodged in the rear right corner. Trooper Carter was evacuated while the others remained on duty and the tank remained battleworthy.

The Atomic Tank is now located at Robertson Barracks in Palmerston, Northern Territory. Although other tanks were subjected to nuclear tests, 169041 is the only tank known to have withstood atomic tests and subsequently gone on for another 23 years of service, including 15 months on operational deployment in a war zone.

  So if 'ya wanna read some more .......

                     .....ride the Bomb.

                                         https://encrypted-tbn3.gstatic.com/images?q=tbn:ANd9GcRoMmqi4Lf94jbnHbYupakNa5CsWes1cewIBMIEMuqe_s9LjYcekgXdHQ


 https://i.imgur.com/LjRRaV1.png


  • Member since
    January 2007
Posted by the doog on Monday, May 12, 2014 7:58 PM

Thanks, Wayne, and Mike, for the comments and suggestions. I realize that the blast wave would probably blow off most of the fittings, but I may take "artistic license" to keep a little more of the tank intact. It will be more of a "paint effect" thing that I"m going for. Like I said, I've got some time to think about it....

  • Member since
    July 2006
  • From: New Jersey
Posted by redleg12 on Monday, May 12, 2014 7:10 PM

Totally cool idea...love it. My one thought is think as the fire hit the front...the items sticking up on the turret would also get burnt.....or welded. the searchlight might be blown off!.... Just some thoughts

Love it!

Rounds Complete!!

"The Moral High Ground....A Great Place to Emplace Artillery."

  • Member since
    April 2006
  • From: Denver, Colorado
Posted by waynec on Monday, May 12, 2014 6:11 PM

hey DOOG

welcome back and congrats on the house. definitely have to put ivan nukeski next to it, perhaps with mounts of rubble ala TERMINATOR  and lots of dust. think i'll stick to my warwheels and pass on this one though i do have a couple of tracks in the queue. have a safe trip.

Никто не Забыт    (No one is Forgotten)
Ничто не Забыто  (Nothing is Forgotten)


  • Member since
    January 2007
Posted by the doog on Monday, May 12, 2014 4:57 PM

Thanks for all the comments, guys! To be honest, I'm still figuring out "how I'm going to pull this off", lol. It's probably a good thing that I've got a 10-day trip coming up---lots of time to strategize and weigh pros-cons of this vs that!

One thing's for sure--I"m looking forward to getting back and getting back TO it!

  • Member since
    May 2009
  • From: Poland
Posted by Pawel on Monday, May 12, 2014 3:47 PM

Hello!

Now the idea is certainly fresh! That's creativity Karl!

I don't have a good idea yet, but I guess some research would make it even better - does anybody have photos of test objects at a nuclear range? Like maybe taken frome some "Duck and cover"-like movie?

Once you have something to hold on, the intensity of the effect would surely vary with the distance from the detonation point. The way I understand it there are different damage from the "flash" and the shockwave - those would have to be held in proportion - or maybe I'm getting too picky here?

Anyhow, good luck with your projects and safe travels, too!

Paweł

All comments and critique welcomed. Thanks for your honest opinions!

www.vietnam.net.pl

  • Member since
    November 2009
  • From: SW Virginia
Posted by Gamera on Monday, May 12, 2014 2:43 PM

Sounds like a really cool idea Karl, looking forward to seeing how you pull this off!

"I dream in fire but work in clay." -Arthur Machen


  • Member since
    April 2006
  • From: ON, Canada
Posted by jgeratic on Monday, May 12, 2014 2:18 PM

Karl, interesting project.

Cool idea with the nuclear blast effect.  I've never witnessed one of these, but wouldn't the whole vehicle get "baked"?  Of course, there is artistic license, or you could be portraying a moment in time as the event is happening?

regards,

Jack

  • Member since
    July 2003
  • From: On my kitchen counter top somewhere in central North Carolina.
Posted by disastermaster on Monday, May 12, 2014 1:36 PM

This is gonna be a blast!

                          http://media.tumblr.com/tumblr_mc17svj1BV1qhm59c.gif

What great imagination here Karl!

 I was thinking that other smaller, less prominent peripheral fittings such as the guards around the lights and the search lights themselves would take a serious smelting too.

 https://i.imgur.com/LjRRaV1.png


  • Member since
    July 2004
  • From: Texas
Posted by wbill76 on Monday, May 12, 2014 1:03 PM

Should be fun to see you bring this 'post-nuke' premise to life Karl. Looking forward to it.

  • Member since
    January 2007
Posted by the doog on Monday, May 12, 2014 10:58 AM

OK, I'm starting to paint!

Here's my "vision" for this beast: since this was a "nuclear tank" which had its "boat" shape designed to withstand the shockwave from a nuclear blast, I figured I would play with that. I see a tank which has just come through the shockwave and the tremendous hurricane of heat and flying debris resulting from the detonation at Ground Zero, The front surfaces of the tank--having absorbed all of that--is scarred, burnt, and scorched; the paint burned off, the tool handles reduced to ash. Hell, if I get inspired enough, I may even do a desolate base to mount "Nookular Ivan" on next to the thing!

With that in mind, I've primed with Tamiya Gray primer. I then used enamels (a rarity for me!)-- Steel, Black, Rust and Rubber from Testors' to paint the undercoated metal of the tank where the degradation will be. I'm going to try to use the "Sand Technique" to really degrade the top camo scheme...oh yes---did I mention a camo scheme? I'm going to go for a fictitious "post-apocalyptic" (yet plausible) Soviet camo scheme in three colors. Man, I hope I can get that to all come together....! Surprise

Anyhoo...stay tuned! I have one more day "in country", and then will be gone until the 25th of May. Updates most likely after that date!

  • Member since
    January 2007
Posted by the doog on Monday, May 12, 2014 7:05 AM

Thanks, guys--painting today!

  • Member since
    July 2006
  • From: New Jersey
Posted by redleg12 on Sunday, May 11, 2014 7:30 PM

Wow...that's a lot of road wheels...looking forward to paint.

Rounds Complete!!

"The Moral High Ground....A Great Place to Emplace Artillery."

  • Member since
    July 2004
  • From: Texas
Posted by wbill76 on Sunday, May 11, 2014 5:29 PM

Looking forward to seeing this one with paint on Karl, so much real estate to play with there! Beer

  • Member since
    July 2003
  • From: On my kitchen counter top somewhere in central North Carolina.
Posted by disastermaster on Saturday, May 10, 2014 5:37 PM

   Details, details, details........... it all appears to be on the right track  (http://i929.photobucket.com/albums/ad138/ultimatenurse/Smilies/smiley_fishslap.gif or is it on the left?).

           I'm glad I got back on tonight to see this.

 https://i.imgur.com/LjRRaV1.png


  • Member since
    January 2007
Posted by the doog on Saturday, May 10, 2014 4:41 PM

Ready for paint!

I noticed some small details that I could ad here; look at the wire pulls on the bottom of the tank's sides here. Also, there are some "loop"-type things that are actually hollowed out, but molded as solid in the model. I cut out the middles of the loops and pit in styrene "wires" between the small stays. I"ll add the actual wire after painting.

All the parts laid out for painting.

And the wheels---thank god these are steel-rimmed!

That's it for now! I should get some base paint on it by the time I leave again on Wednesday! Thanks for looking in and any comments are always welcomed! Big Smile

  • Member since
    January 2007
Posted by the doog on Friday, May 9, 2014 1:29 PM

Update soon! Just got back from a short trip; working now on the final details.

Nice models, Melchior. Just one question: why did you build all three? Did you do a kit review or something?

  • Member since
    September 2006
  • From: Dripping Springs, TX, USA
Posted by RBaer on Friday, May 9, 2014 11:32 AM

Doog's back! Cool......

So, I kind of get the feeling that all this "tank" needs to finish it off would be a giant outboard on the back.

Apprentice rivet counter.

  • Member since
    November 2009
  • From: SW Virginia
Posted by Gamera on Friday, May 9, 2014 8:20 AM

Wow, those look great Melchior! Did you have a favorite or one that seemed to build with less problems/have more detail out of the three?

"I dream in fire but work in clay." -Arthur Machen


  • Member since
    July 2010
  • From: GERMANY
Posted by Melchior on Friday, May 9, 2014 7:21 AM
  • Member since
    July 2010
  • From: GERMANY
Posted by Melchior on Friday, May 9, 2014 7:18 AM
  • Member since
    July 2010
  • From: GERMANY
Posted by Melchior on Friday, May 9, 2014 7:17 AM

Hey guys, all tracks, neither Takom nor Panda or Amusing Hobby, will be easily handled in accordance with the sprocket wheels.

I built all three Objects 279 ... and you'll find them on facebook

www.facebook.com/photo.php

  • Member since
    January 2007
Posted by the doog on Tuesday, April 29, 2014 8:20 AM

Thanks for looking in and commenting, guys!

Gamera, it's not so bad once you get committed to it. It's just like building two tanks on the bench a the same time. Just need to commit to a longer period between building the suspension and laying down paint,. :)

Mke, you said it right----"patience" is a virtue in this build, for sure!

  • Member since
    February 2010
  • From: Maine
Posted by Stage_Left on Monday, April 28, 2014 8:34 PM

Wow- that's some intense work Karl! This thing is definitely an oddity and definitely an interesting piece of armor history. Beer

Dave

  • Member since
    July 2006
  • From: New Jersey
Posted by redleg12 on Monday, April 28, 2014 7:37 PM

Twice the tracks, twice the fun, twice the PITA!! Looks great.  Also shows twice the patience!!

Rounds Complete!!

"The Moral High Ground....A Great Place to Emplace Artillery."

  • Member since
    July 2004
  • From: Sonora Desert
Posted by stikpusher on Monday, April 28, 2014 1:32 PM

That is looking good so far Karl! I see echoes of other Soviet tank designs- T-10/IS III, T-62... all on top of a sci fi hull. Very cool apocalyptic project!


F is for FIRE, That burns down the whole town!

U is for URANIUM... BOMBS!

N is for NO SURVIVORS...

       - Plankton

LSM


  • Member since
    November 2009
  • From: SW Virginia
Posted by Gamera on Monday, April 28, 2014 11:38 AM

Very cool! One of the bigger sticking points to me buying one is looking at those tracks gives me the screaming heebie-geebies (how on earth do you spell that!?!) I can barely get two sets built- four on one tank- ACK!!!

I have been looking around for reviews on the three kits and it looks like this one gets the nod, the Panda and Amusing versions seem to have a few more issues.

"I dream in fire but work in clay." -Arthur Machen


  • Member since
    January 2007
Posted by the doog on Monday, April 28, 2014 7:22 AM

Thanks for looking in, guys!

Bill, yes, it's a bear to snip off and clean up all those links! LIke doing two kits at the same time---quite the challenge!

Brian, you have to really love road wheels and tracks tackle this baby! Not that I really DO, but the end will be worth it. :)

  • Member since
    December 2008
  • From: Goffstown, NH
Posted by New Hampshire on Monday, April 28, 2014 6:29 AM

the doog

This photo is just epic!  They must have used half the ore from the Baltic just to make that many tracks! Big Smile

Brian

  • Member since
    January 2013
Posted by jibber on Sunday, April 27, 2014 7:00 PM

Karl what a beast that thing is and thanks for the pics.

  • Member since
    July 2004
  • From: Texas
Posted by wbill76 on Sunday, April 27, 2014 4:59 PM

Nice work on the tracks Karl, definitely more than your 'usual' share of links on this one eh? Wink

  • Member since
    August 2006
  • From: Oromocto, Canada
Posted by Gun Tech on Sunday, April 27, 2014 3:00 PM

Looking very good so far Karl.  This is sure an odd one! 

Jean-Michel    "Arte et Marte"

  • Member since
    December 2002
  • From: Bury St Edmunds, Suffolk, England
Posted by Bish on Sunday, April 27, 2014 10:11 AM

Its looking good Karl. Nice job on getting the track sag, indeed that couldn't have been easy, but it looks good to me.

I am a Norfolk man and i glory in being so


On the bench: Airfix 1/72nd Harrier GR.3/Fujimi 1/72nd Ju 87D-3

  • Member since
    January 2007
Posted by the doog on Sunday, April 27, 2014 10:08 AM

Hi guys,

Well, I am happy to report that the monumental task of building up four separate sets of track is finito! Whew!

It's a complex affair, but not impossible if you plan it carefully. The task is complicated by a weird arrangement of the sprockets vs the wheels-idler. The wheels and idler mount on a sponson which is separate from the sprocket mount. That arrangement makes it a little tricky to do my usual method of track-building, but I managed to get 'er done anyway. Here's the layout:

I decided to glue in the sprockets mount FIRST, then I glued on the wheels with WHITE water-soluble glue like Elmers. The sprockets snapped right in, so I didn't have to use glue on those. I decided to first do two lengths, let those set, and then switch those to the inside of the suspension, and do the other two lengths. This actually worked pretty well, as I couldn't see any way to do the inside tracks without removing the sponsons. I've seen some build-ups on the web, and some guys have done the track in lengths, with separate links held off for the sprockets, but I never liked this method.

Here's the four finally finished: WARNING!MAKE SURE that the little "arrows" in the track links point UP in the front of the tank! It's VERY easy to put on a run backwards, as I discovered TWICE! Sad

This is the rear of the tank, so the "arrows" are pointing down, as they should be.

Putting sag in the tracks was a little tricky because the shape of the hull didn't exactly help with keeping tissue balls above the tracks, but I managed to get some in there;

Underneath...I got a little aggressive with the glue and it lifted some of the adhesive off of the masking tape; this will clean up easily with a brush slightly wet with some lacquer thinner,

There's a nasty gap where the turret halves join that has to be filled and sanded:

The general layout of the tank---man, that's one looong gun.

Working on putting the details on the turret and hull now. Updates soon! Thanks for looking in, all! Smile

  • Member since
    January 2007
Posted by the doog on Saturday, April 26, 2014 9:10 AM

redleg12

He's Baaaaack

Welcome Back, always good to see the "old timers" back here

Rounds Complete!!

Ha ha--that's cool, Mike; Thanks!

Brian, yes, it's a bulldog. I've seen a couple review build-ups, But I hope to do it justice with some attention to making it a presentation, not just a model. :) Stay tuned!

  • Member since
    July 2006
  • From: New Jersey
Posted by redleg12 on Saturday, April 26, 2014 6:41 AM

He's Baaaaack

Welcome Back, always good to see the "old timers" back here

Rounds Complete!!

"The Moral High Ground....A Great Place to Emplace Artillery."

  • Member since
    December 2008
  • From: Goffstown, NH
Posted by New Hampshire on Wednesday, April 23, 2014 7:56 PM

I have been seeing this kit in the Squadron catalog for a while, but outside of an FSM preview build I think this is the first time seeing it get built up.  Gotta say it has to be the ugliest tank I have ever seen, but where I come from "ugly is interesting". Big Smile  So with that said, I too will be watching with interest!

Brian

  • Member since
    January 2007
Posted by the doog on Wednesday, April 23, 2014 7:03 PM

Thanks, Bil! Nice to hear from ya, buddy! Hope all is well!

  • Member since
    July 2004
  • From: Texas
Posted by wbill76 on Wednesday, April 23, 2014 5:32 PM

Pulling up a chair for this one Karl! Nice start to the monster.

  • Member since
    January 2007
Posted by the doog on Wednesday, April 23, 2014 11:11 AM

Thanks so kindly guys, for the warm welcomes back and the comments! I"m about to post up the Kubinka link and some teaser photos. Hope you enjoy them! Check the Armor forum!

Updates as soon I get something to show. I've got to make four sets of tracks! That might take a few days!  

Thanks again--it's nice to be back. :)

  • Member since
    March 2003
  • From: Western North Carolina
Posted by Tojo72 on Wednesday, April 23, 2014 8:08 AM

welcome back,I'm sure this will be impressive

  • Member since
    December 2002
  • From: Bury St Edmunds, Suffolk, England
Posted by Bish on Wednesday, April 23, 2014 5:03 AM

Welcome back Karl, you lucky so and so. I am sure a lot of modellers would give anything to get to Kubinka. Looking forward to this build, nice figure as well.

And look forward to those museum pics.

I am a Norfolk man and i glory in being so


On the bench: Airfix 1/72nd Harrier GR.3/Fujimi 1/72nd Ju 87D-3

  • Member since
    May 2009
  • From: Poland
Posted by Pawel on Wednesday, April 23, 2014 2:30 AM

Hello Karl!

That sure is an extraordinary subject! I'll be watching, good luck with it and have a nice day

Paweł

All comments and critique welcomed. Thanks for your honest opinions!

www.vietnam.net.pl

  • Member since
    July 2003
  • From: On my kitchen counter top somewhere in central North Carolina.
Posted by disastermaster on Wednesday, April 23, 2014 12:33 AM

Hey........

     Carl builds the armored "Hoveround".

 Gonna be interesting to see what kind of tracks that doog leaves with this'un.

http://www.humorhound.com/wp-content/uploads/funny-butt-scoot-dog-gif-11.gif

Always good to have 'ya back buddy!

 https://i.imgur.com/LjRRaV1.png


  • Member since
    July 2006
  • From: San Francisco Bay Area
Posted by bufflehead on Tuesday, April 22, 2014 11:20 PM

Hey Karl!  Its great to see you back in the Armor forum again with another super blog!  We missed you buddy!   Verry interesting subject this time and I'm glad you went witht he Takom as I (and I'm sure others) know very little about this kit.  You're right, the figure is uber cool and perfect for this vehicle!!  Looking forward to another great work of modeling art!

Ernest

Last Armor Build - 1/35 Dragon M-26A1, 1/35 Emhar Mk.IV Female


Last Aircraft Builds - Hobby Boss 1/72 F4F Wildcat & FW-190A8


  • Member since
    July 2004
  • From: Sonora Desert
Posted by stikpusher on Tuesday, April 22, 2014 11:17 PM

Welcome back... this is gonna be a unique interesting project I think.


F is for FIRE, That burns down the whole town!

U is for URANIUM... BOMBS!

N is for NO SURVIVORS...

       - Plankton

LSM


JOIN OUR COMMUNITY!

Our community is FREE to join. To participate you must either login or register for an account.

SEARCH FORUMS
FREE NEWSLETTER
By signing up you may also receive reader surveys and occasional special offers. We do not sell, rent or trade our email lists. View our Privacy Policy.