SEARCH FINESCALE.COM

Enter keywords or a search phrase below:

TRUMPETER K-5 RAILROAD GUN THERE BE RAPTORS HERE

12357 views
69 replies
1 rating 2 rating 3 rating 4 rating 5 rating
  • Member since
    April 2006
  • From: Denver, Colorado
Posted by waynec on Thursday, March 19, 2015 10:21 PM

SPRUE yep that's a fix. the whole side with all 6 springs and 6 journal boxes, which lubricate the axle bearings, on the HobbyBoss 1/72 K-5 is 1 piece. on the 1/35 it's 90+ and i have a total of 4 of them, 2 per truck.

Karl Thanks for the painting tips. i was thinking of oil filters but the gun may be too big for that. i have misted before, dark yellow over a DY base with green and brown camo to blend the camo a bit. i have a fine airbrush and Vallejo makes it easy to mix paints. it sounds like i should mix some DY with my green and brown even before the first coat of camo. I can try this out on the trucks and generator before doing the gun and carriage. 

got a bit done on it today. added another 20 pieces. still have other end which isn't as complicated and after that the top and than the other truck.

Никто не Забыт    (No one is Forgotten)
Ничто не Забыто  (Nothing is Forgotten)


  • Member since
    January 2006
  • From: California
Posted by SprueOne on Thursday, March 19, 2015 9:57 PM

waynec

interesting colors  Vallejo Air Kubelwagen is dark yellow, Schwimwagen is panzer ocher 1943. as you can see the ocher has a definite green tint. this color will change based on type of lightening, brightness, computer monitor etc. this was a test for the gun and i'm going with the dark yellow. i may use the ocher as a mist to highlight certain areas.

couplers are 8 pieces. these are together with white glue for priming and i will work them as the paint dries. the objective is having a tight but functional fit like on the Gondola. also the air hoses will not be attached until the diorama building phase. i will paint with Tamiya metallic gray.
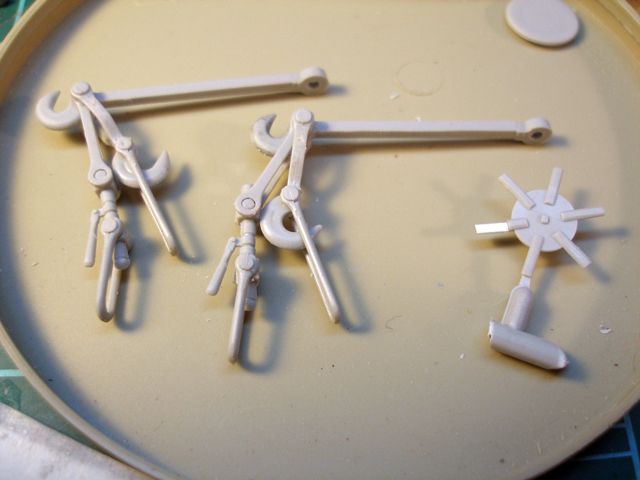
Was that a repair on a short shot part or just a reflection of light on the part on the right? 

This looks like a super detailed model kit and progress is good

Anyone with a good car don't need to be justified - Hazel Motes


Iron Rails 2015 by Wayne Cassell Weekend Madness sprueone

  • Member since
    January 2007
Posted by the doog on Thursday, March 19, 2015 8:17 PM

Looking good, Wayne.

I would strongly recommend that you use an almost eggshell-tan coat of Dark Yellow on your big gun. The effect of light hitting a gun this huge would seriously diffuse the color to an almost pale tan. Painting a "straight" coat of Dark Yellow is going to look much too dark.

Ideally, I would paint a base coat of straight Dark Yellow, and then cut that with up to 75% white. Spray THAT mixture from an upper, high angle, leaving that base coat of DY under the "shadow areas". Spray the gun so as to leave a "stripe" of unlightened DY under about 10% of the barrel to look like a shadow. Your paint coat will gain a nice "3-D" texture to it and really pop.

  • Member since
    April 2006
  • From: Denver, Colorado
Posted by waynec on Sunday, March 15, 2015 10:31 PM

interesting colors  Vallejo Air Kubelwagen is dark yellow, Schwimwagen is panzer ocher 1943. as you can see the ocher has a definite green tint. this color will change based on type of lightening, brightness, computer monitor etc. this was a test for the gun and i'm going with the dark yellow. i may use the ocher as a mist to highlight certain areas.

couplers are 8 pieces. these are together with white glue for priming and i will work them as the paint dries. the objective is having a tight but functional fit like on the Gondola. also the air hoses will not be attached until the diorama building phase. i will paint with Tamiya metallic gray.

Никто не Забыт    (No one is Forgotten)
Ничто не Забыто  (Nothing is Forgotten)


  • Member since
    April 2006
  • From: Denver, Colorado
Posted by waynec on Friday, March 13, 2015 10:47 AM

M. Brindos

I'm wondering of the wine helps with your patience. If it does I may switch from coffee lol.

It does. so does sake. It damn sure helps when spiking 1/35 RR tracks. I quit coffee for 2 days prior to doing squiggle camo to get the proper effect. JUST KIDDING.

got the end plates on the trucks. more clamping but that's because it's a detailed model with some tight fits and long thin pieces. clamping means i don't have to hold the parts for 20 minutes and use a straw for the wine.Geeked

Никто не Забыт    (No one is Forgotten)
Ничто не Забыто  (Nothing is Forgotten)


  • Member since
    January 2015
  • From: Tumwater, WA.
Posted by M. Brindos on Wednesday, March 11, 2015 9:35 PM

I'm wondering of the wine helps with your patience. If it does I may switch from coffee lol.

- Mike Brindos "Lost Boy"

  • Member since
    April 2006
  • From: Denver, Colorado
Posted by waynec on Wednesday, March 11, 2015 8:29 PM

the doog

Jeez, Wayne, looks like you're building something that would put you on the"No Fly" list! lol, Very cool, very cool!

Karl hopefully the ticking sound i heard from the work bench is just my clock. hope you are feeling better

Никто не Забыт    (No one is Forgotten)
Ничто не Забыто  (Nothing is Forgotten)


  • Member since
    January 2007
Posted by the doog on Wednesday, March 11, 2015 8:10 PM

Jeez, Wayne, looks like you're building something that would put you on the"No Fly" list! lol, Very cool, very cool!

  • Member since
    April 2006
  • From: Denver, Colorado
Posted by waynec on Wednesday, March 11, 2015 6:24 PM

CLAMPONADO. this isn't as bad as it looks. the top is a tight fit and the ridge it attaches to is thin. this is 10 inches long so the clamps just make it easier to get a tight seal for the glue. just ran out of clamps.

This was the first big hurdle.

Никто не Забыт    (No one is Forgotten)
Ничто не Забыто  (Nothing is Forgotten)


  • Member since
    April 2006
  • From: Denver, Colorado
Posted by waynec on Tuesday, March 10, 2015 10:44 AM

jibber

Wayne I didn't have them on my BR86, they must fit on the outside of the rails on the spring assemblies?

Terry - You are right. The BR-86 and the BR-52 locomotive do not have journal boxes. The BR-52 tender does. They are on the outside of the springs. The unpainted "spike: slides into a groove ion the back of the springs. 

Put a second coat on the journal boxes. still not sure about the color. maybe i will finish my KUBELWAGEN and try the paint on that first. 

Still figuring out the when to paint scheme.Like everything else on this build, I will find the best way about 2/3s through.

Никто не Забыт    (No one is Forgotten)
Ничто не Забыто  (Nothing is Forgotten)


  • Member since
    January 2013
Posted by jibber on Monday, March 9, 2015 11:18 PM

Wayne I didn't have them on my BR86, they must fit on the outside of the rails on the spring assemblies?

  • Member since
    April 2006
  • From: Denver, Colorado
Posted by waynec on Monday, March 9, 2015 9:15 PM

each truck is about the size of the gondola.  i rattle can painted the underside and inside panzer gray going on the assumption the dark yellow would only be on the outside.  most of this as well as the wheels won't be seen. The journal boxes were hand painted with Vallejo Air dark panzer ocher 1943. The color has some green it and, after doing a bunch of modern desert vehicles, it takes some getting used to.. i can always alter it with washes at a later date.

Никто не Забыт    (No one is Forgotten)
Ничто не Забыто  (Nothing is Forgotten)


  • Member since
    April 2006
  • From: Denver, Colorado
Posted by waynec on Monday, March 2, 2015 8:00 PM

no pics because the second truck suspension is identical to the first. It did go a lot faster.  I should have both suspensions primed this week and the wheels painted and rusted. broke four more pieces but it was i of 4 and a total of 4 sets and the same part broke in the same spot so i suspect a molding issue. easy enough to fix.

Никто не Забыт    (No one is Forgotten)
Ничто не Забыто  (Nothing is Forgotten)


  • Member since
    April 2006
  • From: Denver, Colorado
Posted by waynec on Friday, February 27, 2015 9:59 AM

jibber

I thought an 8 Rad was weird, Wayne you've done a nice job there, its so easy breaking those tie rods.

The second truck will go faster. I still haven't decided if i am going to paint before putting the top on so i can get into all the nooks. I am priming the 12 axles and the separate journal boxes. the journal boxes will be dark yellow while the wheels and axles will be German dark brown, which looks like a good old rust, maybe mixed with some gray. The reason for this is:

The journal boxes have a prong at the top which slide into a groove on the horizontal springs. After everything is painted i can attach the journal boxes to the wheels (without having to mask and paint). This way i can insure the springs are correct without gluing the wheels onto them. NOTE The journal boxes, as i was informed of when building the gondola, are those boxes at the end of the axles and are constantly lubed and therefore, always leaking and oily/greasy. that will stand out nicely against the dark yellow.

Terry -You should take a look at a Revell modern Bundeswehr FUCHS 6x6, especially in 1/72. the front 4 wheels turn so not only do you have tie rods for each axle but both axles have to be connected too.

Ray - Thank you very much. I was able to find a kabob skewer 4mm in diameter and cut 6 of them  then picked the best 2. some sanding and primer and you can barely tell they are wood. given where they are going my fix will be fine. i did break a handle and an undercarriage air tank brace but both were also easy to fix.

Mike, SprueOne - It's a shame no one will see it but I am used to that with my warwheels build. I do have a cool pick of a French locomotive rolled over on its side and may do a i/72 diorama of that.

Karl - Thanks. The 2 long side pieces that go through the indie to the outside were tricky, Clamps were used gingerly because they would cause warpage if too tight but not set properly if  too loose. I will have the same issue when i put the top on the bottom. Well if I was worried about needing patience I wouldn't have started.

Никто не Забыт    (No one is Forgotten)
Ничто не Забыто  (Nothing is Forgotten)


  • Member since
    December 2002
  • From: Lyons Colorado, USA
Posted by Ray Marotta on Friday, February 27, 2015 9:09 AM

Stevens International is VERY good about replacing lost, missing, or broken parts.  They do ask for $5.00 for shipping and handling but they send the entire sprue that contains the missing part.  Now that I think about it, I have a complete sprue "G" less 1 part #19.  Be happy to send it to you if it's any help.

Ray

 ]


  • Member since
    January 2007
Posted by the doog on Friday, February 27, 2015 6:26 AM

Wow, that looks clean, Wayne!

  • Member since
    January 2006
  • From: California
Posted by SprueOne on Wednesday, February 25, 2015 9:54 PM

Serious detailing. Nice kit 

Anyone with a good car don't need to be justified - Hazel Motes


Iron Rails 2015 by Wayne Cassell Weekend Madness sprueone

  • Member since
    April 2006
  • From: Denver, Colorado
Posted by waynec on Wednesday, February 25, 2015 10:02 AM

a K-5 battery had 2 guns and, obviously, a long support train (pun intended).

Никто не Забыт    (No one is Forgotten)
Ничто не Забыто  (Nothing is Forgotten)


  • Member since
    May 2003
  • From: Central USA
Posted by qmiester on Wednesday, February 25, 2015 8:42 AM

I would respectively point out that the Artillery does not have Companies, they have Batteries. I spent a lot of years in HHB, 1/127 FA, 35th ID, Kansas Army National Guard.

Quincy
  • Member since
    January 2013
Posted by jibber on Tuesday, February 24, 2015 6:32 AM

I thought an 8 Rad was weird, Wayne you've done a nice job there, its so easy breaking those tie rods.

  • Member since
    January 2015
  • From: Tumwater, WA.
Posted by M. Brindos on Monday, February 23, 2015 6:47 PM

Wow Wayne, you got your work cut out for ya there. Looks way more complicated than the suspension on the M-103. I don't envy you in this part of your build lol.

- Mike Brindos "Lost Boy"

  • Member since
    April 2006
  • From: Denver, Colorado
Posted by waynec on Monday, February 23, 2015 6:02 PM

i do warwheels including military trucks so i am used to detailed suspensions but this is suspension on steroids, second one will go faster. i am cutting really close with my nippers so, given how that looks, primer paint and weathering, and it's undercarriage and wont be seen, i saved some time there. some warpage on the lower base but clamping the upper part will fix that. painting the underside is going to be amusing. lots of light coats.

.

Никто не Забыт    (No one is Forgotten)
Ничто не Забыто  (Nothing is Forgotten)


  • Member since
    April 2006
  • From: Denver, Colorado
Posted by waynec on Sunday, February 22, 2015 6:55 PM

the doog

Been there, done that, many, many times, Wayne! You get used to it after a while!

KARL fixed. good thing i save all sorts of "crap" like used kabob skewers. just builds more confidence for the next time.

Никто не Забыт    (No one is Forgotten)
Ничто не Забыто  (Nothing is Forgotten)


  • Member since
    August 2007
  • From: back country of SO-CAL, at the birth place of Naval Aviation
Posted by DUSTER on Sunday, February 22, 2015 2:39 AM

 other people have that to them too?  

I had no idea 

Steve

Building the perfect model---just not quite yet  Confused

  • Member since
    January 2007
Posted by the doog on Saturday, February 21, 2015 12:44 PM

Been there, done that, many, many times, Wayne! You get used to it after a while!

  • Member since
    April 2006
  • From: Denver, Colorado
Posted by waynec on Saturday, February 21, 2015 12:06 PM

that is damned annoying ind i know better. lost a part to upper rear truck. just wasn't on the sprue when i went to get it. should have checked the bag more thoroughly. lotsa good news though.

1. there are 4 in the up and 4 in the down and i need either or so i have extra bases.

2. i can  have my friend resin cast a replacement,

3. i can use the incorrect ones knowing no one will know and it doesn't affect the build (we are talking a 4mm diameter 3 mm tall "bumper".

4. i  found a 4mm diameter leftover kabob skewer and cut new bumpers which i can glue on the "down" bases. make 2 for one side and use 2 plastic for the other side.

at least it wasn't half of the gun barrel. i like the way my mind thinks now. even as i grab the flashlight and get on the floor to search i am already thinking of alternatives.

Никто не Забыт    (No one is Forgotten)
Ничто не Забыто  (Nothing is Forgotten)


  • Member since
    April 2006
  • From: Denver, Colorado
Posted by waynec on Thursday, February 19, 2015 11:03 PM

the doog

COOOOOOOOOOOOOOOOLLLL!!

Can't wait to see you tear into this!!


Hey Karl  I'll see your tank suspension and raise you a pair of 6 axle RR trucks.

K-5 suspension. first pic is the bottom of the two 6 axle trucks, second is a pile of wheels and axles, third is a bunch of suspension assemblies.  by using my sprue nippers and cutting really close and understanding what won't be seen so little sanding necessary.

Никто не Забыт    (No one is Forgotten)
Ничто не Забыто  (Nothing is Forgotten)


  • Member since
    January 2007
Posted by the doog on Wednesday, February 18, 2015 7:01 PM

COOOOOOOOOOOOOOOOLLLL!!

Can't wait to see you tear into this!!

  • Member since
    December 2007
  • From: Eagle River, WI
Posted by PANZERJAGER on Wednesday, February 18, 2015 2:49 PM

Eagerly watching this one!!!

 PANZERJAGER


  • Member since
    January 2015
  • From: Tumwater, WA.
Posted by M. Brindos on Wednesday, February 18, 2015 2:07 PM
Thank you for translating that. :)

- Mike Brindos "Lost Boy"

JOIN OUR COMMUNITY!

Our community is FREE to join. To participate you must either login or register for an account.

SEARCH FORUMS
FREE NEWSLETTER
By signing up you may also receive reader surveys and occasional special offers. We do not sell, rent or trade our email lists. View our Privacy Policy.