SEARCH FINESCALE.COM

Enter keywords or a search phrase below:

Tamiya 1/35 T-34/76 1942 Production Finished!

11483 views
45 replies
1 rating 2 rating 3 rating 4 rating 5 rating
  • Member since
    January 2015
  • From: Tumwater, WA.
Posted by M. Brindos on Tuesday, October 17, 2017 6:19 PM

Lookin good, D! Don't be afraid to dirty her up. :)


- Mike Brindos "Lost Boy"

  • Member since
    September 2013
  • From: San Antonio, Texas
Posted by Marcus McBean on Tuesday, October 17, 2017 4:56 PM

ManCityFan


Marcus McBean

Nice work on that T-34.  How do you like those Kaizen tracks for that tank?  I have a set but have not used them yet.  I used Kaizen on a Jagdpanther and a Sherman which both came out very nice.


I have to say they look good.  They clean up fast, so not much prep work.  The thing about this particular set is that the pin only goes in about 3/4 of the width of the track, and the other end has the pin in plastic, so you have to "mash" the two links to get the pin in.  This was pretty frustrating initially, as the tracks did not "mash" well.  I found the best way to get them together when "mashing" was to get the links perpendicular to each other, start the pin, then wiggle one of the links.  First set took me hours, but the second set probably only took an hour and a half.  Have a small set of pliers handy in case the pin doesn't want to play well, and be aware the pin will stick into your thumb quite easily.

You can see how they fit in the picture above.  They are "workable", but not quite as flexible as I thought they would be.  Overall, I think they were a good purchase.  I am going to try the Friuls for my next tank to compare, and decide if the extra $$ are worth it. 


Oh ya, those pins do hurt, I have a few scares on my thumb to show for it.

Those Kaizen tracks do look good on your tank.  Thanks for letting me know about how the install went.  Now I know what to be awhere of when I take on this project.

  • Member since
    September 2016
  • From: Albany, New York
Posted by ManCityFan on Tuesday, October 17, 2017 4:29 PM

Gamera

Looks good! The tracks look just right and I like the mud.


  I am pretty pleased with the tracks.  The mud helped correct a fit problem in the back (shhh, don't tell anyone).  

Thanks for the reply,

D

Dwayne or Dman or just D.  All comments are welcome on my builds. 

  • Member since
    September 2016
  • From: Albany, New York
Posted by ManCityFan on Tuesday, October 17, 2017 4:24 PM

Kien

Hello ManCityFan

Good work on the kit so far, the stowage also looks great, I would put it on. I looked online, and the bedrolls and other stowage were also put on the turret of the t34. You could place it on the sides or rear of turret and just glue it in place without straps, as shown in other photos.The road wheels look nicely weathered and painted. Are you also planning to do a winter whitewash with this kit similar to the box art? I think that could look nice, otherwise current scheme is nice too.

Kien 


Thanks for the reply.  I will see if I can find the pics you mentioned to see how to attach the bedrolls.  I do want to use them, so thank you.  I decided the winter camo will be for another project.  This is only my second tank, so still getting the basics down.  I have the 1943 version in the stash, so that may get the whitewash.  

D

Dwayne or Dman or just D.  All comments are welcome on my builds. 

  • Member since
    November 2009
  • From: SW Virginia
Posted by Gamera on Monday, October 16, 2017 11:00 PM

Looks good! The tracks look just right and I like the mud.

"I dream in fire but work in clay." -Arthur Machen


  • Member since
    September 2017
  • From: HTX
Posted by Kien on Monday, October 16, 2017 10:41 PM

Hello ManCityFan

Good work on the kit so far, the stowage also looks great, I would put it on. I looked online, and the bedrolls and other stowage were also put on the turret of the t34. You could place it on the sides or rear of turret and just glue it in place without straps, as shown in other photos.The road wheels look nicely weathered and painted. Are you also planning to do a winter whitewash with this kit similar to the box art? I think that could look nice, otherwise current scheme is nice too.

Kien 

 Youtube Channel:                                                       https://www.youtube.com/channel/UCkcc2P3-PluSdehvVCEKLdw

  • Member since
    September 2016
  • From: Albany, New York
Posted by ManCityFan on Monday, October 16, 2017 9:14 PM

Here are the latest pics of my work the the T-34.  Hull has been joined to the chassis.  I have not been able to work on this as much as I would like due to recurring back issues. 

Front shot.  Still messing with where to put the tow cables.

Kaizen tracks are on.  With a little CA, I think the tension looks right.  Wheels dirtied up with some pigment. 

I cleaned up the sides where I had been thinking about putting bed rolls.  Just have to get the cables, some spare track, and maybe the bedrolls on.  Minor finish painting (headlight and machine gun) and some more pigment to dirty it up some more, and I think I will be done.

Thanks for looking,

D

As always, comments are welcome, including critical.  I want to get better.

Dwayne or Dman or just D.  All comments are welcome on my builds. 

  • Member since
    September 2016
  • From: Albany, New York
Posted by ManCityFan on Wednesday, October 4, 2017 3:44 PM

Hunter

Hey D,

Your tank is looking sharp, great job thus far. I really like the A/M tracks. Are they plastic or rubber? I'll be checking in on your build.


Thanks Hunter!  The Kaizen tracks are plastic. They are molded very well.  Took 2 weeks to get here, but I had plenty of other tasks to keep me busy while they were in the mail.

Thanks for the look and comment,

D

Dwayne or Dman or just D.  All comments are welcome on my builds. 

  • Member since
    January 2016
  • From: A Galaxy Far, Far Away
Posted by Hunter on Tuesday, October 3, 2017 5:07 PM

Hey D,

Your tank is looking sharp, great job thus far. I really like the A/M tracks. Are they plastic or rubber? I'll be checking in on your build.

Hunter 


  • Member since
    April 2016
  • From: N. Burbs of ChiKawgo
Posted by GlennH on Friday, September 29, 2017 10:17 PM

My concern is that there is no attachment point for the bedrolls. They would just magically appear on the side of the tank.

Yes that would be a concern. I've forgotten ten times more than I remember and did not run into many tracked vehicles in the field save for APC's. There is no end to the resourceful ideas guys in the field come up with to either hump more gear or have it muled for them. That said, there would have to be something on that vehicle that was hijacked to use to secure these bedrolls. What I am getting at is something like a lift eye could easily be used to tie on some gear as it is already part of the vehicle essentially going unused.

A number Army Viet Nam scans from hundreds yet to be done:

https://www.flickr.com/photos/southwestdreams/albums/72157621855914355

Have had the great fortune to be on every side of the howitzers.

  • Member since
    September 2016
  • From: Albany, New York
Posted by ManCityFan on Friday, September 29, 2017 1:46 PM

Marcus McBean

Nice work on that T-34.  How do you like those Kaizen tracks for that tank?  I have a set but have not used them yet.  I used Kaizen on a Jagdpanther and a Sherman which both came out very nice.


I have to say they look good.  They clean up fast, so not much prep work.  The thing about this particular set is that the pin only goes in about 3/4 of the width of the track, and the other end has the pin in plastic, so you have to "mash" the two links to get the pin in.  This was pretty frustrating initially, as the tracks did not "mash" well.  I found the best way to get them together when "mashing" was to get the links perpendicular to each other, start the pin, then wiggle one of the links.  First set took me hours, but the second set probably only took an hour and a half.  Have a small set of pliers handy in case the pin doesn't want to play well, and be aware the pin will stick into your thumb quite easily.

You can see how they fit in the picture above.  They are "workable", but not quite as flexible as I thought they would be.  Overall, I think they were a good purchase.  I am going to try the Friuls for my next tank to compare, and decide if the extra $$ are worth it. 

Dwayne or Dman or just D.  All comments are welcome on my builds. 

  • Member since
    September 2013
  • From: San Antonio, Texas
Posted by Marcus McBean on Friday, September 29, 2017 12:20 PM

Nice work on that T-34.  How do you like those Kaizen tracks for that tank?  I have a set but have not used them yet.  I used Kaizen on a Jagdpanther and a Sherman which both came out very nice.

  • Member since
    September 2016
  • From: Albany, New York
Posted by ManCityFan on Friday, September 29, 2017 11:57 AM

Ixion

This kit appears to represent a Factory 183 vehicle. A drawing of a 183 version:

Missing from the kit, but present here, are two tie-down cleats, right where you want them. Use some wire and make them or pretend they are there and glue your bedroll in place! Wink


You sir, are awesome!  Thank you!

D

Dwayne or Dman or just D.  All comments are welcome on my builds. 

  • Member since
    December 2012
Posted by Ixion on Friday, September 29, 2017 11:18 AM

This kit appears to represent a Factory 183 vehicle. A drawing of a 183 version:

Missing from the kit, but present here, are two tie-down cleats, right where you want them. Use some wire and make them or pretend they are there and glue your bedroll in place! Wink

  • Member since
    September 2016
  • From: Albany, New York
Posted by ManCityFan on Friday, September 29, 2017 10:21 AM

Gamera

Oh cool! One of my first 1/35th tanks was the twin hatch 1943 version of this Tamiya kit, it's a great starter model! 

I'm no expert at all but I don't think I've ever seen bedrolls etc strapped to the side there. I think I'd fill the holes tie them to the handrails for the infantry tank riders. Just my two cents though, someone correct me if needed please!  


Thanks for the reply.  In reading about this kit on Missing Lynx, they said the turret is a better representation of factory 183 (not 112), who did not mount any handrails or extra fuel tanks, so that is the version I am building.  I am kind of stuck with where to put the bedrolls.  Maybe I can hang them on the turret from one of the turret rings.  Confused

Looks like there is some filling and sanding in my near future.

Dwayne or Dman or just D.  All comments are welcome on my builds. 

  • Member since
    November 2009
  • From: SW Virginia
Posted by Gamera on Friday, September 29, 2017 9:50 AM

Oh cool! One of my first 1/35th tanks was the twin hatch 1943 version of this Tamiya kit, it's a great starter model! 

I'm no expert at all but I don't think I've ever seen bedrolls etc strapped to the side there. I think I'd fill the holes tie them to the handrails for the infantry tank riders. Just my two cents though, someone correct me if needed please!  

"I dream in fire but work in clay." -Arthur Machen


  • Member since
    September 2016
  • From: Albany, New York
Tamiya 1/35 T-34/76 1942 Production Finished!
Posted by ManCityFan on Friday, September 29, 2017 9:45 AM

Been working on this for a while for the 1942 World at War GB, and thought I would post here as well.  Here is the kit:

I believe this kit is OOP, and has been in my stash for quite a while.  Construction has been typical Tamiya, with good fit and low part count.

 Put a coat of Tamiya Nato Black, and then the base coat of Russian Dark Olive by Mission Models Paints.  Here are a couple of quick pics.
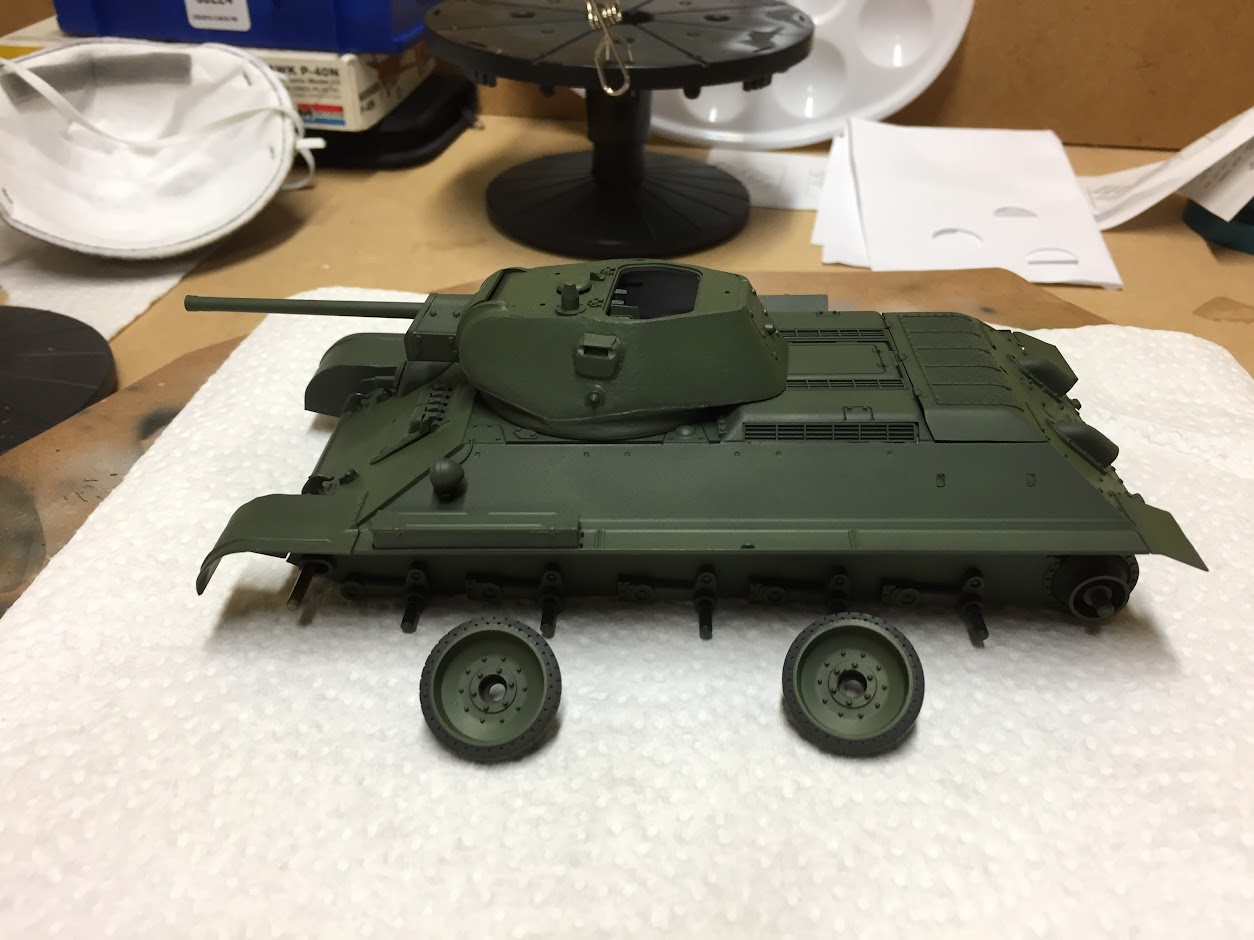
I did a little work on the inside of the turret even though it will initially be buttoned up.  I plan to attach the turret hatch with white glue so I can remove it later if I do the commander figure. 

I have to say that I am very pleased with the MM paints.  They are very forgiving.  There were a couple of spots where I got heavy handed, but you would never know when the paint dried. I used the Poly additive, and it seems to self level the paint.  I will be buying a lot more of these paints in the future.

The vinyl tracks that came with the kit were not great, so I ordered this from China, and received it a week ago.

Here is a picture of one pair of links done, and one of the pins,

I also finally got around to making the tow cables after cutting off the plastic cable pieces.

 finished the tracks this week.  Here is a close-up.  The links are molded quite well.  There are 36 pairs of link per track.  De-spruing and clean up was easy due to the sprue connections being quite fine.  Getting the pin into the track was initially fairly frustrating, but I learned how to get the links set up just so, and the second track went together quickly.  Test fitting shows the tracks do not sit on the road wheels, but a little CA will take care of that.  These tracks are SO much better than the vinyl kit tracks.

Here is a side view.  Decals (all two of them) are on.  There are slogans included with the kit, but I read on Missing-Lynx that slogans were really only used for propaganda photos, so I stuck with simple unit designations.  Did a pin wash, and attempted a dot filter.  Dot filter will have to be done again, as I think I took too much of the oil paint off.  Easy enough to try again.  Made a mud "slurry" with PVA glue, mud color Polly S paint and some dirt from the garden.  Looks good as dried mud, so I may make up another slurry with a darker shade for wet mud.
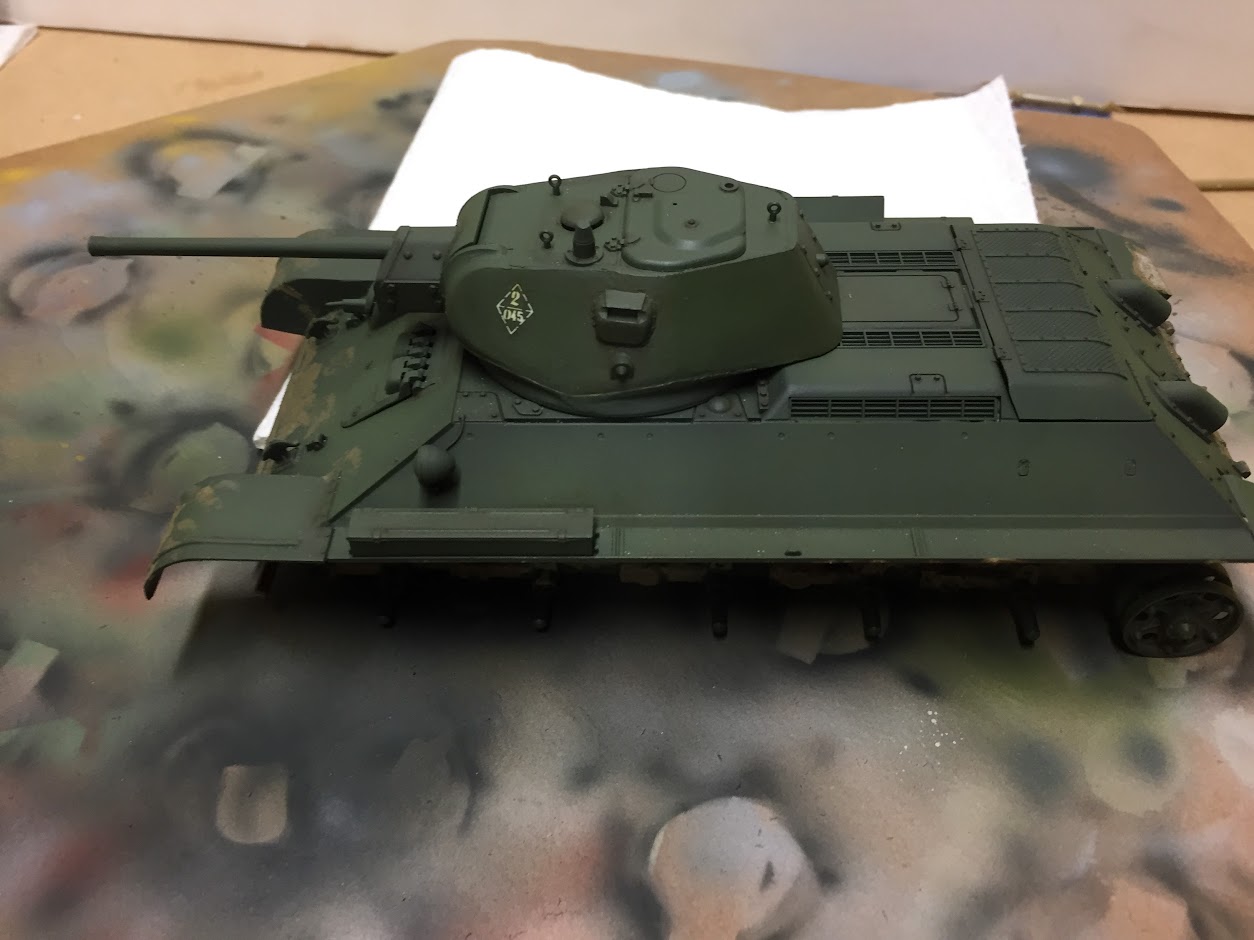
Here is a front view:

The tracks are a little tight, and "float" just a little above the road wheels:

I think a little CA on the tracks at the first and last road wheels will look right.  Pictures of T-34's in the field show no track sag between the road wheels, so getting the track to sit on the wheels will work. 

Now here is where I need some help.  I was planning to place bed rolls on the side of the tank where there are holes in thr model for placement of gas tanks I am not including.  I didn't stress filling the holes since they would be covered, and they are very visible. 
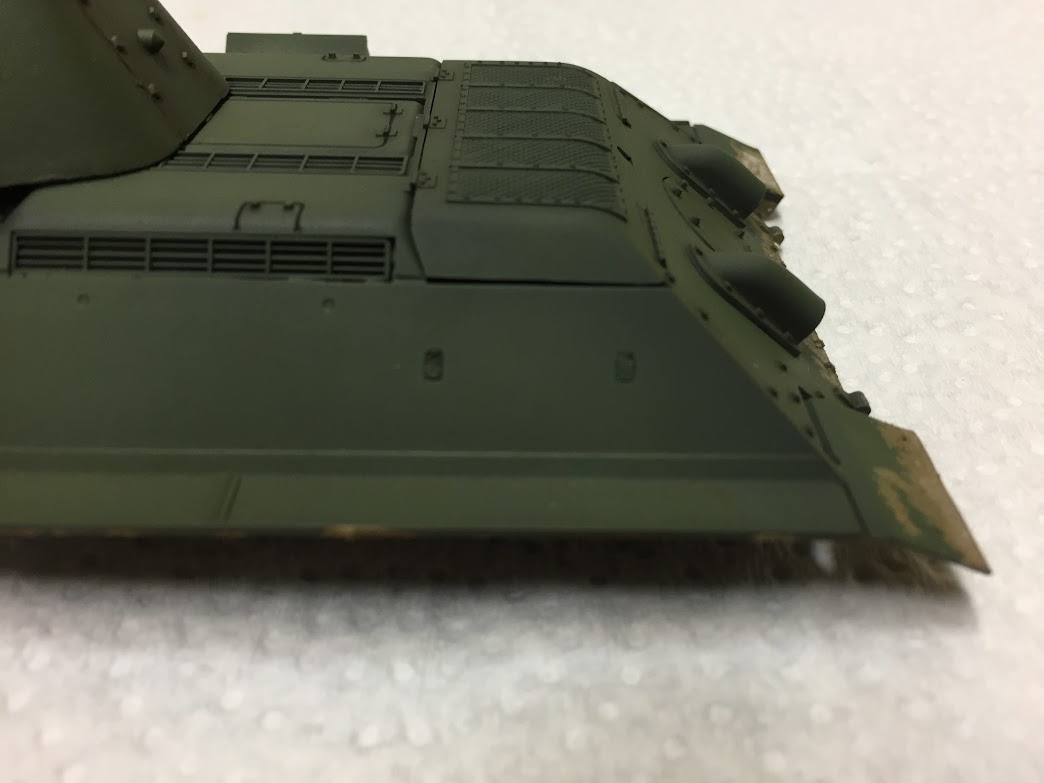
My concern is that there is no attachment point for the bedrolls.  They would just magically appear on the side of the tank. 

So my question is, do I do a proper job of filling the holes and try to figure out where else to put the bed rolls, or rig up brackets as a field modification?  Were field modifications like I am thinking of done?

Any feedback would be greatly appreciated. 

Thanks for looking,

D


Dwayne or Dman or just D.  All comments are welcome on my builds. 

JOIN OUR COMMUNITY!

Our community is FREE to join. To participate you must either login or register for an account.

SEARCH FORUMS
FREE NEWSLETTER
By signing up you may also receive reader surveys and occasional special offers. We do not sell, rent or trade our email lists. View our Privacy Policy.