SEARCH FINESCALE.COM

Enter keywords or a search phrase below:

AFV Club 1/35th Sd.Kfz 251/4 Ausf C Completed page 3

11767 views
92 replies
1 rating 2 rating 3 rating 4 rating 5 rating
  • Member since
    December 2002
  • From: Bury St Edmunds, Suffolk, England
Posted by Bish on Wednesday, April 4, 2018 3:18 PM

Cheers Chad. With the dust now added, i am really pleased with it. Now put it aside to focus on everything else.

I am a Norfolk man and i glory in being so


On the bench: Airfix 1/72nd Harrier GR.3/Fujimi 1/72nd Ju 87D-3

  • Member since
    April 2015
Posted by Mopar Madness on Wednesday, April 4, 2018 2:54 PM

Bish - The filters and streaks add the perfect amount of grime!

Chad

God, Family, Models...

At the plate: 1/48 Airfix Bf109 & 1/35 Tamiya Famo

On deck: Who knows!

  • Member since
    December 2002
  • From: Bury St Edmunds, Suffolk, England
Posted by Bish on Wednesday, April 4, 2018 9:08 AM

Cheers guys.

Joe, i have been useing Humbrol thinners which are not as harsh. But it wasn't as bad on this build as it had been on otehrs. At least the large flat areas on the sides came out ok, it was just a few small patches on the front corners. That leads me to think i either had not put enough layers on those areas or i was a bit aggresive with the brush.

I am a Norfolk man and i glory in being so


On the bench: Airfix 1/72nd Harrier GR.3/Fujimi 1/72nd Ju 87D-3

  • Member since
    August 2009
  • From: MOAB, UTAH
Posted by JOE RIX on Wednesday, April 4, 2018 8:44 AM

I like your subtle weathering Bish. It came out rather impressive. Interesting about the effects of white spirits, yes mineral spirits stateside, on the aqua gloss. Although I have yet to encounter that issue I tend to lean towards using turpenoid as it is a bit milder.

"Not only do I not know what's going on, I wouldn't know what to do about it if I did". George Carlin

  • Member since
    December 2015
  • From: providence ,r.i.
Posted by templar1099 on Wednesday, April 4, 2018 4:37 AM

I'm admiring the subtlety of the weathering, I think you've nailed it here for the look you wanted. It's still a struggle for me.

"le plaisir delicieux et toujours nouveau d'une occupation inutile"

  • Member since
    December 2002
  • From: Bury St Edmunds, Suffolk, England
Posted by Bish on Wednesday, April 4, 2018 1:44 AM

Thanks G.

I think you guys call it mineral spirits, but from what i can tell its the same thing. Worked ok on future, but seems to have an issue with Alclad aqua.

I am a Norfolk man and i glory in being so


On the bench: Airfix 1/72nd Harrier GR.3/Fujimi 1/72nd Ju 87D-3

  • Member since
    November 2009
  • From: SW Virginia
Posted by Gamera on Tuesday, April 3, 2018 7:38 PM

Oh she's lookin' good Bish!!!

Interesting about the white spirits. Don't think I've used them before but I'll try to keep your warning in mind.

"I dream in fire but work in clay." -Arthur Machen


  • Member since
    December 2002
  • From: Bury St Edmunds, Suffolk, England
Posted by Bish on Monday, April 2, 2018 8:10 AM

Thanks Clint. Pleased with how its come out.

I am a Norfolk man and i glory in being so


On the bench: Airfix 1/72nd Harrier GR.3/Fujimi 1/72nd Ju 87D-3

  • Member since
    August 2012
  • From: Parker City, IN.
Posted by Rambo on Monday, April 2, 2018 4:17 AM
Looking good even with the problems you ran into.

Clint

  • Member since
    December 2002
  • From: Bury St Edmunds, Suffolk, England
Posted by Bish on Monday, April 2, 2018 4:08 AM

Fell behind on this build a bit for sevceral reasons, one of those being the tracks. I had hoped i would have been done by this weekend, but i reckon it will be another week or so now.

So, while i am on the tracks, i managed to get them all together. As mentioned earlier, i didn't follow the instructions as i thought that would risk breaking the pics on the links. But the way i did it meant some glue got on some of those pins so the tracks were not as workable as they should be.

Next time i will try it their way.

The vehicle its self got the decals on, all 2 of them, the number plates. The Div Insignia was included but these broke up when i tried to apply them. I didn't have any more amongst the spares, but before i ordered some spares i checked some pics of 1. Pz Div Pz IV's in Greece in 43, i could not fins any of 251's. This vehicles didn't show any sign of unit markings, so i decided to leave them of my build.

Then onto some weathering. After 3 coats of Alclad aqua gloos i did some dot filtering and some streaking. I have tried to keep this light, somthing i struggled to master for a number of builds, but i think i have nailed the look i want with this, so really pleased with that.
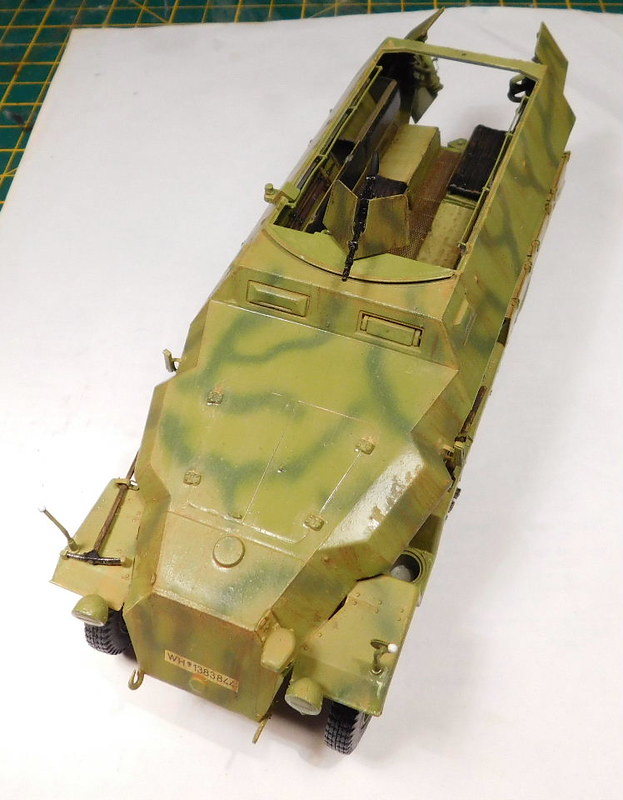
After doing the filters and streaks i got the toiols and tracks on and this is where issues started. One problem i have noticed in the past is that after doing old washes, the white spirits seems to attack parts of the plastic and soften it. This means that thin parts can often just fall apart. I have had axel arms come off with just the slightest touch. And with this build, some of the track links just fel apart. This combined with the not fuly workable track meant i had to put the tracks on bit by bit over 4 nights. I think i'l try useing Humbrol thinners for washing tracks next time.The tracks are not sitting completly right in a few places but they wil do.

The gun had also got the filter and streak treatment.
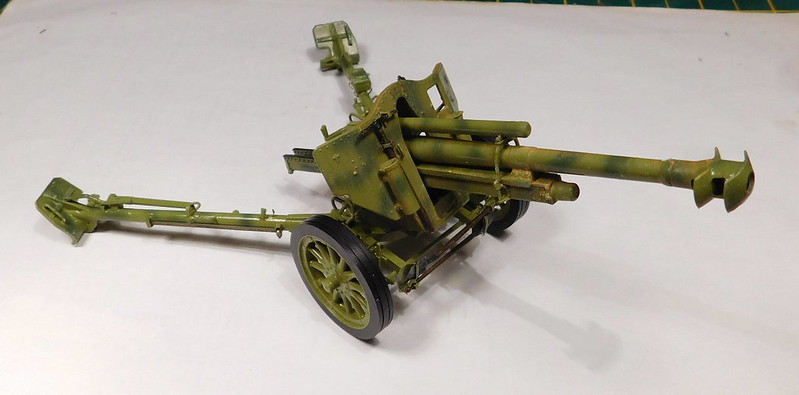
And then this weekend some dust effects. This was added and then excess is removed. I wanted to keep this on the light side, giviong the idea of driving through a hot dusty region but still leaving the scheme on show.

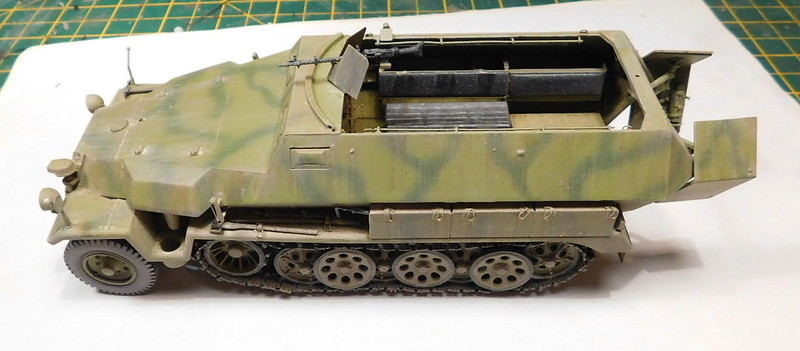
I just gave it a flat coat this morning, so the final touch will be some pigments, after i finish and add the exhaust. With a day off work today i am hoping to get a good session in, mainly working on the figures, ammo and other sundries.

I am a Norfolk man and i glory in being so


On the bench: Airfix 1/72nd Harrier GR.3/Fujimi 1/72nd Ju 87D-3

  • Member since
    December 2002
  • From: Bury St Edmunds, Suffolk, England
Posted by Bish on Tuesday, March 27, 2018 6:02 AM

Cheers Tojo.

I hope to have an update soon, fitting the tracks is proveing to be more of a challenge than i had anticipated.

I am a Norfolk man and i glory in being so


On the bench: Airfix 1/72nd Harrier GR.3/Fujimi 1/72nd Ju 87D-3

  • Member since
    March 2003
  • From: Western North Carolina
Posted by Tojo72 on Tuesday, March 27, 2018 5:55 AM
Wow,that interior is looking great.

  • Member since
    December 2002
  • From: Bury St Edmunds, Suffolk, England
Posted by Bish on Sunday, March 25, 2018 7:13 AM

Thanks Johan. Next time i get some pics, i'll be sure to get some close up's of the gun. I did find fitting the shield a bit fiddily, especially the braces at the rear.

I am a Norfolk man and i glory in being so


On the bench: Airfix 1/72nd Harrier GR.3/Fujimi 1/72nd Ju 87D-3

  • Member since
    March 2018
Posted by Arjay on Saturday, March 24, 2018 7:44 PM
Loving the work, I cant wait to see this finished!

"Set your course by the stars, not by the lights of every passing ship." - General Omar Bradley

  • Member since
    April 2005
  • From: Gothenburg
Posted by JohanT on Saturday, March 24, 2018 11:12 AM

Hi Bish,

Great progress pictures, would love to see more pics of the gun.
I had big difficulties assembling the armor shield but by the looks of it you managed just fine :)

Thank you for sharing!

Very Best Regards
Johan

  • Member since
    December 2002
  • From: Bury St Edmunds, Suffolk, England
Posted by Bish on Thursday, March 22, 2018 7:42 AM

Thanks Bruce. First stage of weathering is now done and i am really pleased with it. Will try and get some pics up at the weekend. Now finishing off the tools and tracks and will add everythinbg else before dust and pigments.

I am a Norfolk man and i glory in being so


On the bench: Airfix 1/72nd Harrier GR.3/Fujimi 1/72nd Ju 87D-3

  • Member since
    May 2013
  • From: From the Mit, but live in Mason, O high ho
Posted by hogfanfs on Thursday, March 22, 2018 7:34 AM

Bish, great job so far on this 251. Looking forward to seeing how you weather it!


 Bruce


 On the bench:  1/48 Eduard MiG-21MF

                        1/35 Takom Merkava Mk.I


  • Member since
    December 2002
  • From: Bury St Edmunds, Suffolk, England
Posted by Bish on Thursday, March 22, 2018 2:59 AM

Thanks Joe. I got the oil weathering done this weekend and for the most part had no issues this time. There are some very slight bubbling around the front edges, but i have a feeling i may have been a bit rough with the bruh and must have removed some of the alclad as it only happened after a few applications. But i find if i leave it, the bubbling settles back down.

Thats interesting about you getting a semi gloss finish. My Alclad was applied over gloss Xtracolour and it came out quite shiny. But i have had other occasions where it doesn't.

Even though i have plenty of enamels to be going onwith, i am going to use Mr paint on my next armour build, a Lowe, just to see how it handles oil washes and such.

Good catch with that the kit. Thats the base kit for the one i am doing, the only difference is mine has an extra instruction sheet which tells you which bits to leave out. Looking forwardto seeing you build yours.

I am a Norfolk man and i glory in being so


On the bench: Airfix 1/72nd Harrier GR.3/Fujimi 1/72nd Ju 87D-3

  • Member since
    August 2009
  • From: MOAB, UTAH
Posted by JOE RIX on Wednesday, March 21, 2018 7:45 PM

Hey Bish, you've made some really excellent progress since I last dropped by. Your interior painting and weathering looks good regardless that it is not quite what you were looking for. The camo, on the other hand, came out real sharp in my opinion. Over all I am very impressed with your effort so far.

As I recall, we both got into using Alclad clear coats together at the same time. I've just encountered an interesting issue with the Aqua Gloss. I sprayed a coat over the gloss sea blue on my Corsair and despite several thin coats, it didn't come out as a nice shiny gloss. Rather it's more like a semi gloss. Not sure if this a result of spraying over an already glossy paint. As such, it's not taking an oil based pin wash very well. When wiping the access off it's staining and streaking. I've been doing a lot of testing as such. Did discover that I can use a Flory wash on Aqua Gloss. That's cool.

Glad to hear your take on Mr. Paint. I've ordered some for painting my cold war era USN jets. Haven't tried them yet but, I'm excited to give them a shot. I may very well follow suit in replacing what's left of my MM collection.

Finally, per your recommendation, I won this on a FB auction this weekend for $20.00. According to the seller, it already had one front wheel and a couple of road wheels assembled. But, for the price that wasn't a big deal to me. Looking forward to it getting here.


"Not only do I not know what's going on, I wouldn't know what to do about it if I did". George Carlin

  • Member since
    December 2002
  • From: Bury St Edmunds, Suffolk, England
Posted by Bish on Monday, March 19, 2018 7:34 AM

Thanks G.

I am a Norfolk man and i glory in being so


On the bench: Airfix 1/72nd Harrier GR.3/Fujimi 1/72nd Ju 87D-3

  • Member since
    November 2009
  • From: SW Virginia
Posted by Gamera on Sunday, March 18, 2018 5:36 PM

Cool, you're making great progress there Bish.

"I dream in fire but work in clay." -Arthur Machen


  • Member since
    December 2002
  • From: Bury St Edmunds, Suffolk, England
Posted by Bish on Sunday, March 18, 2018 4:12 PM

Cheers MM. I don't build nearly enough armour, only manage a couple a year, i need to try and get more in myself.

I am a Norfolk man and i glory in being so


On the bench: Airfix 1/72nd Harrier GR.3/Fujimi 1/72nd Ju 87D-3

  • Member since
    April 2015
Posted by Mopar Madness on Sunday, March 18, 2018 4:10 PM

Bish, that camouflage looks smooth.  I need to put the propeller kits away and get back on “track”!

Chad

God, Family, Models...

At the plate: 1/48 Airfix Bf109 & 1/35 Tamiya Famo

On deck: Who knows!

  • Member since
    December 2002
  • From: Bury St Edmunds, Suffolk, England
Posted by Bish on Sunday, March 18, 2018 11:43 AM

Cheers Clint.

I am a Norfolk man and i glory in being so


On the bench: Airfix 1/72nd Harrier GR.3/Fujimi 1/72nd Ju 87D-3

  • Member since
    August 2012
  • From: Parker City, IN.
Posted by Rambo on Sunday, March 18, 2018 6:08 AM
Coming along nicely Bish!

Clint

  • Member since
    December 2002
  • From: Bury St Edmunds, Suffolk, England
Posted by Bish on Saturday, March 17, 2018 6:59 PM

Cheers Dwayne. I am planning on keeping this one lightly weathered, and hopeing the paint doesn't get damaged. And don't worry, i have enough for both of us Big Smile

I am a Norfolk man and i glory in being so


On the bench: Airfix 1/72nd Harrier GR.3/Fujimi 1/72nd Ju 87D-3

  • Member since
    September 2016
  • From: Albany, New York
Posted by ManCityFan on Saturday, March 17, 2018 6:39 PM

Cheers, Bish.  I have been following this build, and just realized I had not commented.  You are doing an excellent job on this kit!  Love the camo.  Looking forward to seeing the weathering.  I have no half tracks in my stash.  Gotta correct that oversight!

Dwayne or Dman or just D.  All comments are welcome on my builds. 

  • Member since
    December 2002
  • From: Bury St Edmunds, Suffolk, England
Posted by Bish on Saturday, March 17, 2018 12:46 PM

Managed to get both half track and gun complete for painting. Added side bins, all the PE and other exteriour parts.

And the last parts of the gun were put together.

And then time for paint. As i wasn't going to mask and as i have had the past week off work, i was able to get this primed, the DY on and then the green all in one day.

I've already dry brushed, decalled and added a couple of coats of Alclad clear so its all ready for weathering, but some pic sof that next time.

I am a Norfolk man and i glory in being so


On the bench: Airfix 1/72nd Harrier GR.3/Fujimi 1/72nd Ju 87D-3

  • Member since
    December 2002
  • From: Bury St Edmunds, Suffolk, England
Posted by Bish on Wednesday, March 7, 2018 9:05 AM

Thank G. One good thing about the 251 is that despite being open topped, because of the angle of the upper hull, it not that easy to see the sides especially. By the time i get some kit in there, a tarp and couple of figures, it should be ok. I actually do like the result, justa bit heavy for this build. But that partly because after adding the wash, i did not want to be to aggrsive in remove it so as not to cause more damage. But i have a good idea of what to do to the outside.

I am a Norfolk man and i glory in being so


On the bench: Airfix 1/72nd Harrier GR.3/Fujimi 1/72nd Ju 87D-3

  • Member since
    November 2009
  • From: SW Virginia
Posted by Gamera on Wednesday, March 7, 2018 7:21 AM

Nice going there Bish! 

And if there's any part of the weathering you really don't like I guess you could always have a tarp or camo net draped over the seat or whatever. Wink 


Yeah, I've been there, done that... 

"I dream in fire but work in clay." -Arthur Machen


JOIN OUR COMMUNITY!

Our community is FREE to join. To participate you must either login or register for an account.

SEARCH FORUMS
FREE NEWSLETTER
By signing up you may also receive reader surveys and occasional special offers. We do not sell, rent or trade our email lists. View our Privacy Policy.