SEARCH FINESCALE.COM

Enter keywords or a search phrase below:

Ukrainian subject - 1:35 ZiL-131 from Charkov - FINISHED PAGE 3

8894 views
92 replies
1 rating 2 rating 3 rating 4 rating 5 rating
  • Member since
    May 2009
  • From: Poland
Ukrainian subject - 1:35 ZiL-131 from Charkov - FINISHED PAGE 3
Posted by Pawel on Monday, May 2, 2022 12:53 PM

Hello!

I got this one for christmas some years ago:

1:35 ICM ZiL-131 Emergency

I tried to find this one in Polish service, but when the War started I thought - it would be fitting now to do it in the Ukrainian colors, and I had this nice photo:

ZiL-131 from Charkov

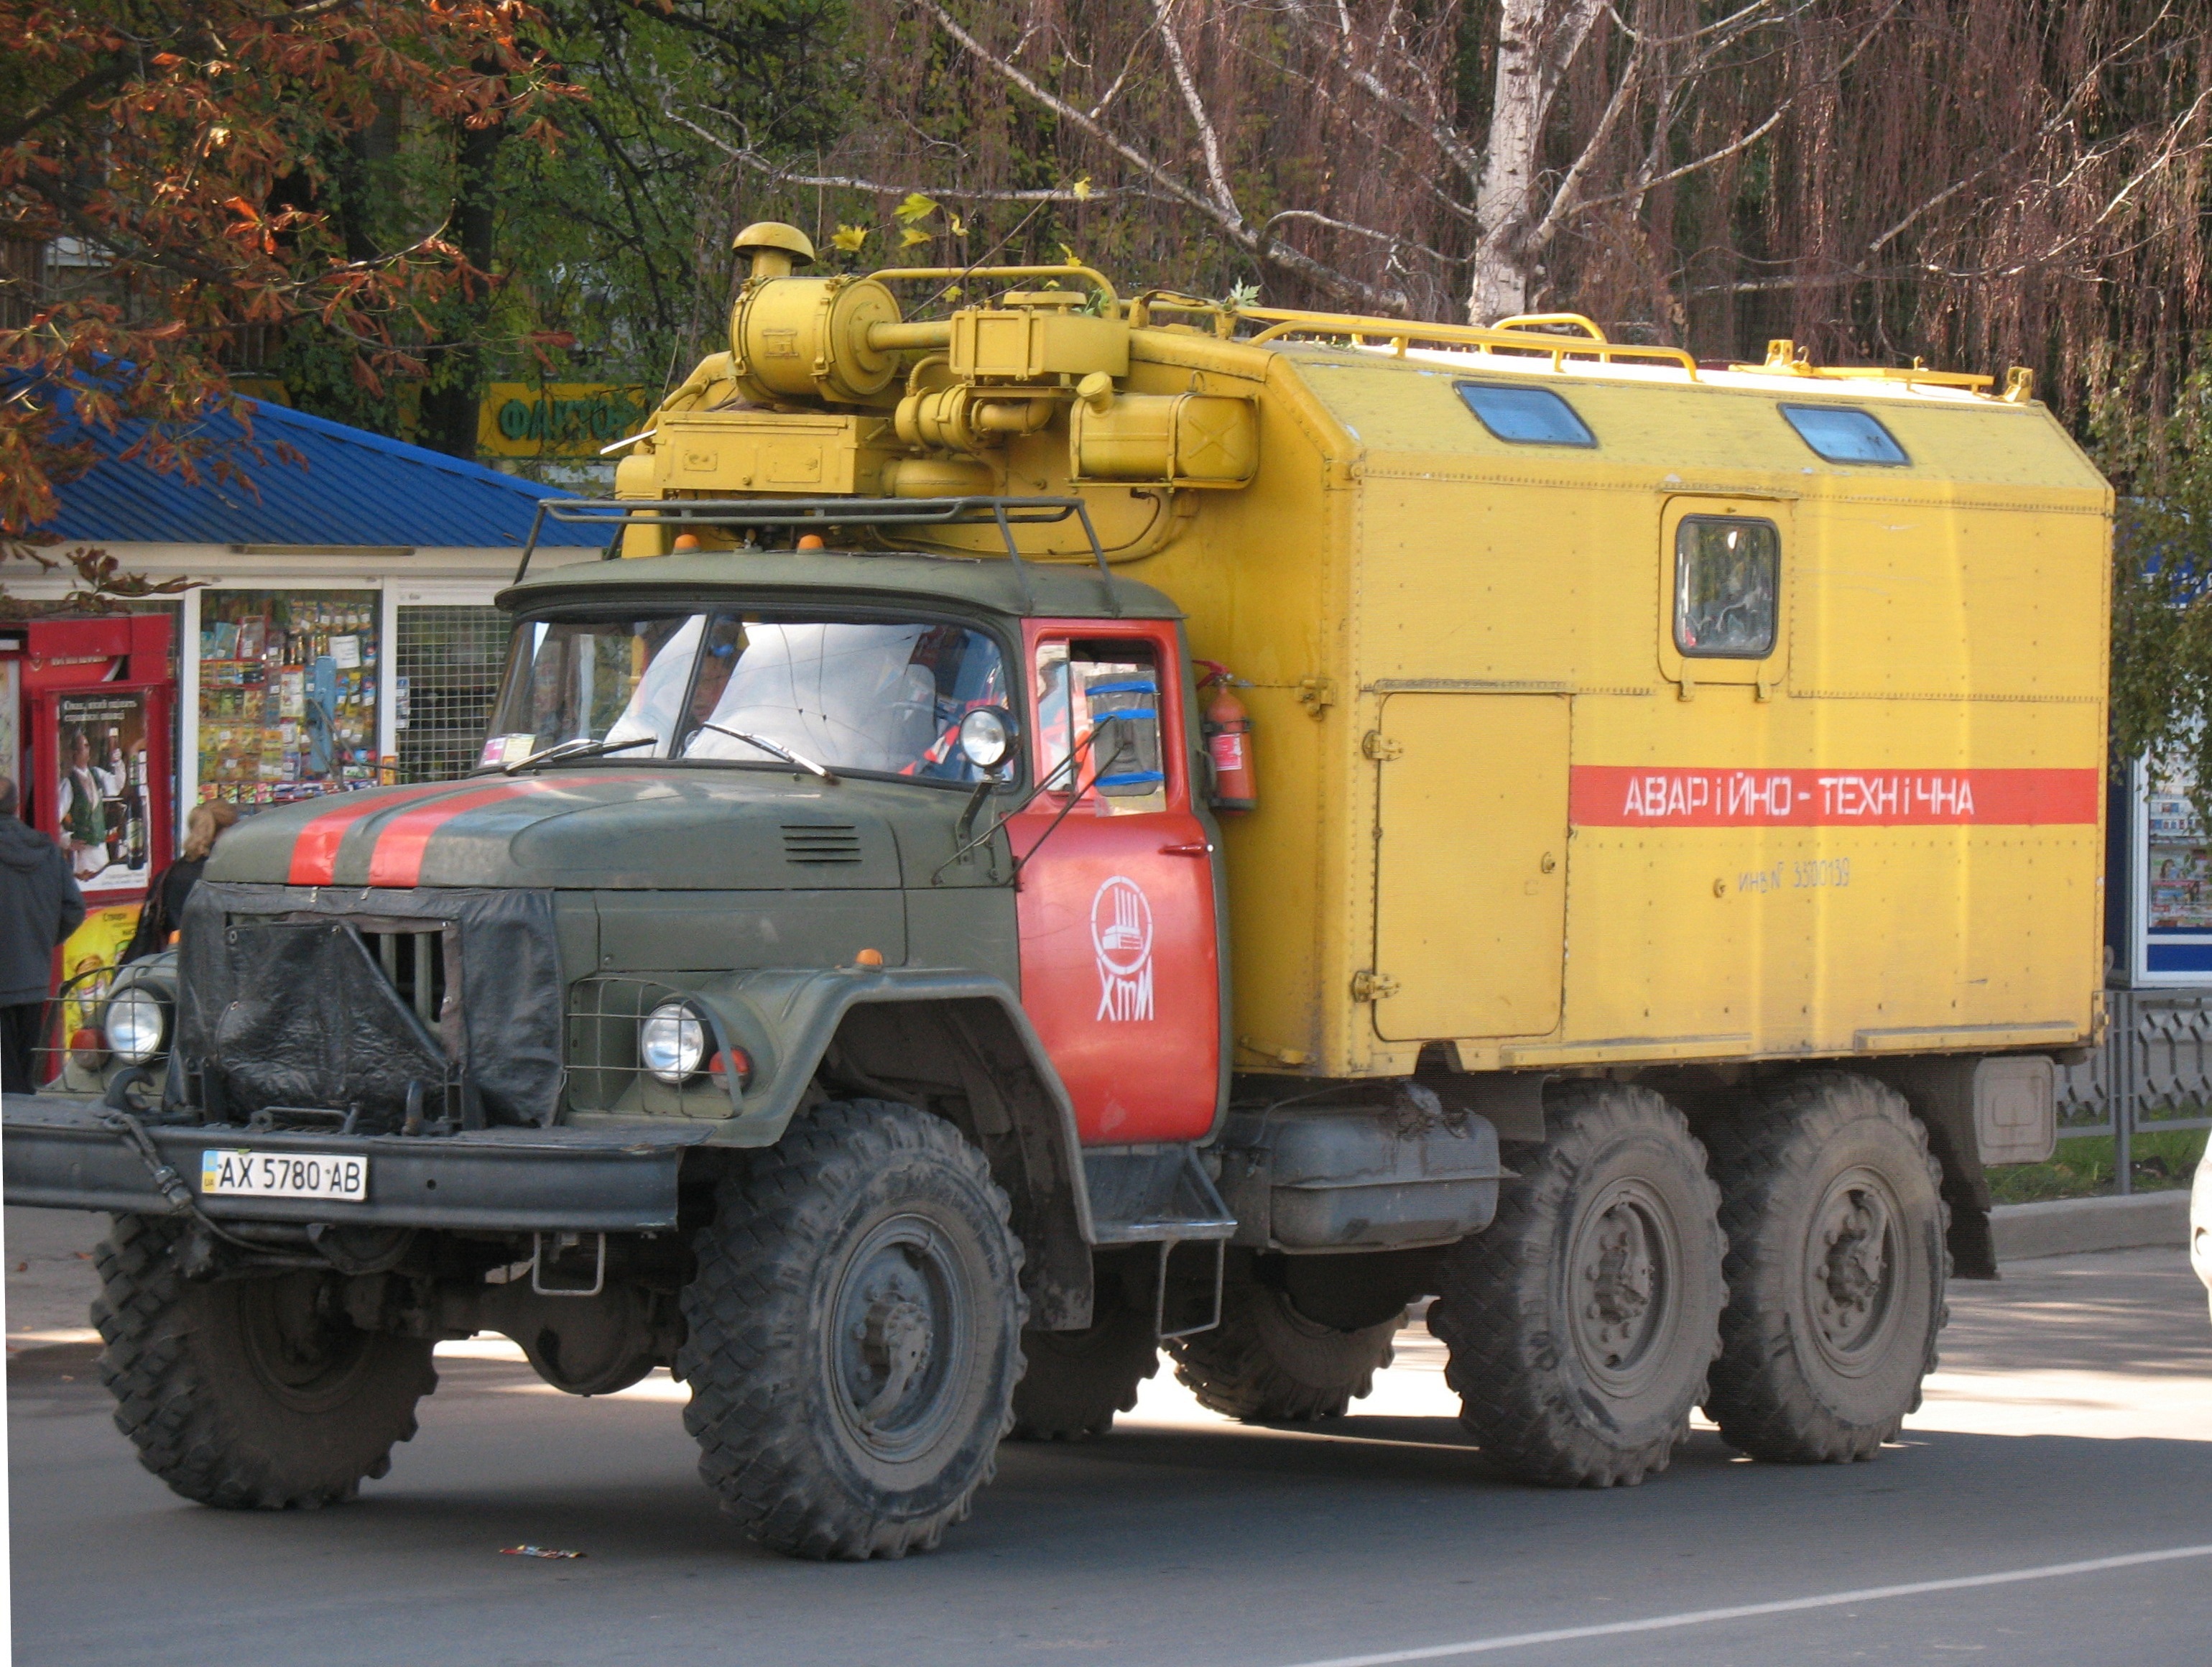
I intend to get as near as I can with this one.

And the ICM kit looks nice out of the box, but when you start to think about it some major simplifications become apparent - especially after you compare it to the Bronco kit - for example where are the brake chambers? Or why doesn't the steering wheel connect to the steering box in any way? To make this one really accurate you would have to take the chassis from the Bronco kit and only add the shelter/workshop - then again the Bronco offering is so detailed the build might just become tedious. So I said I'm staying with the ICM kit and I'll TRY to keep it MOSTLY OOB.

So I started building the chassis:

1:35 ICM ZiL-131 by Pawel

1:35 ICM ZiL-131 by Pawel

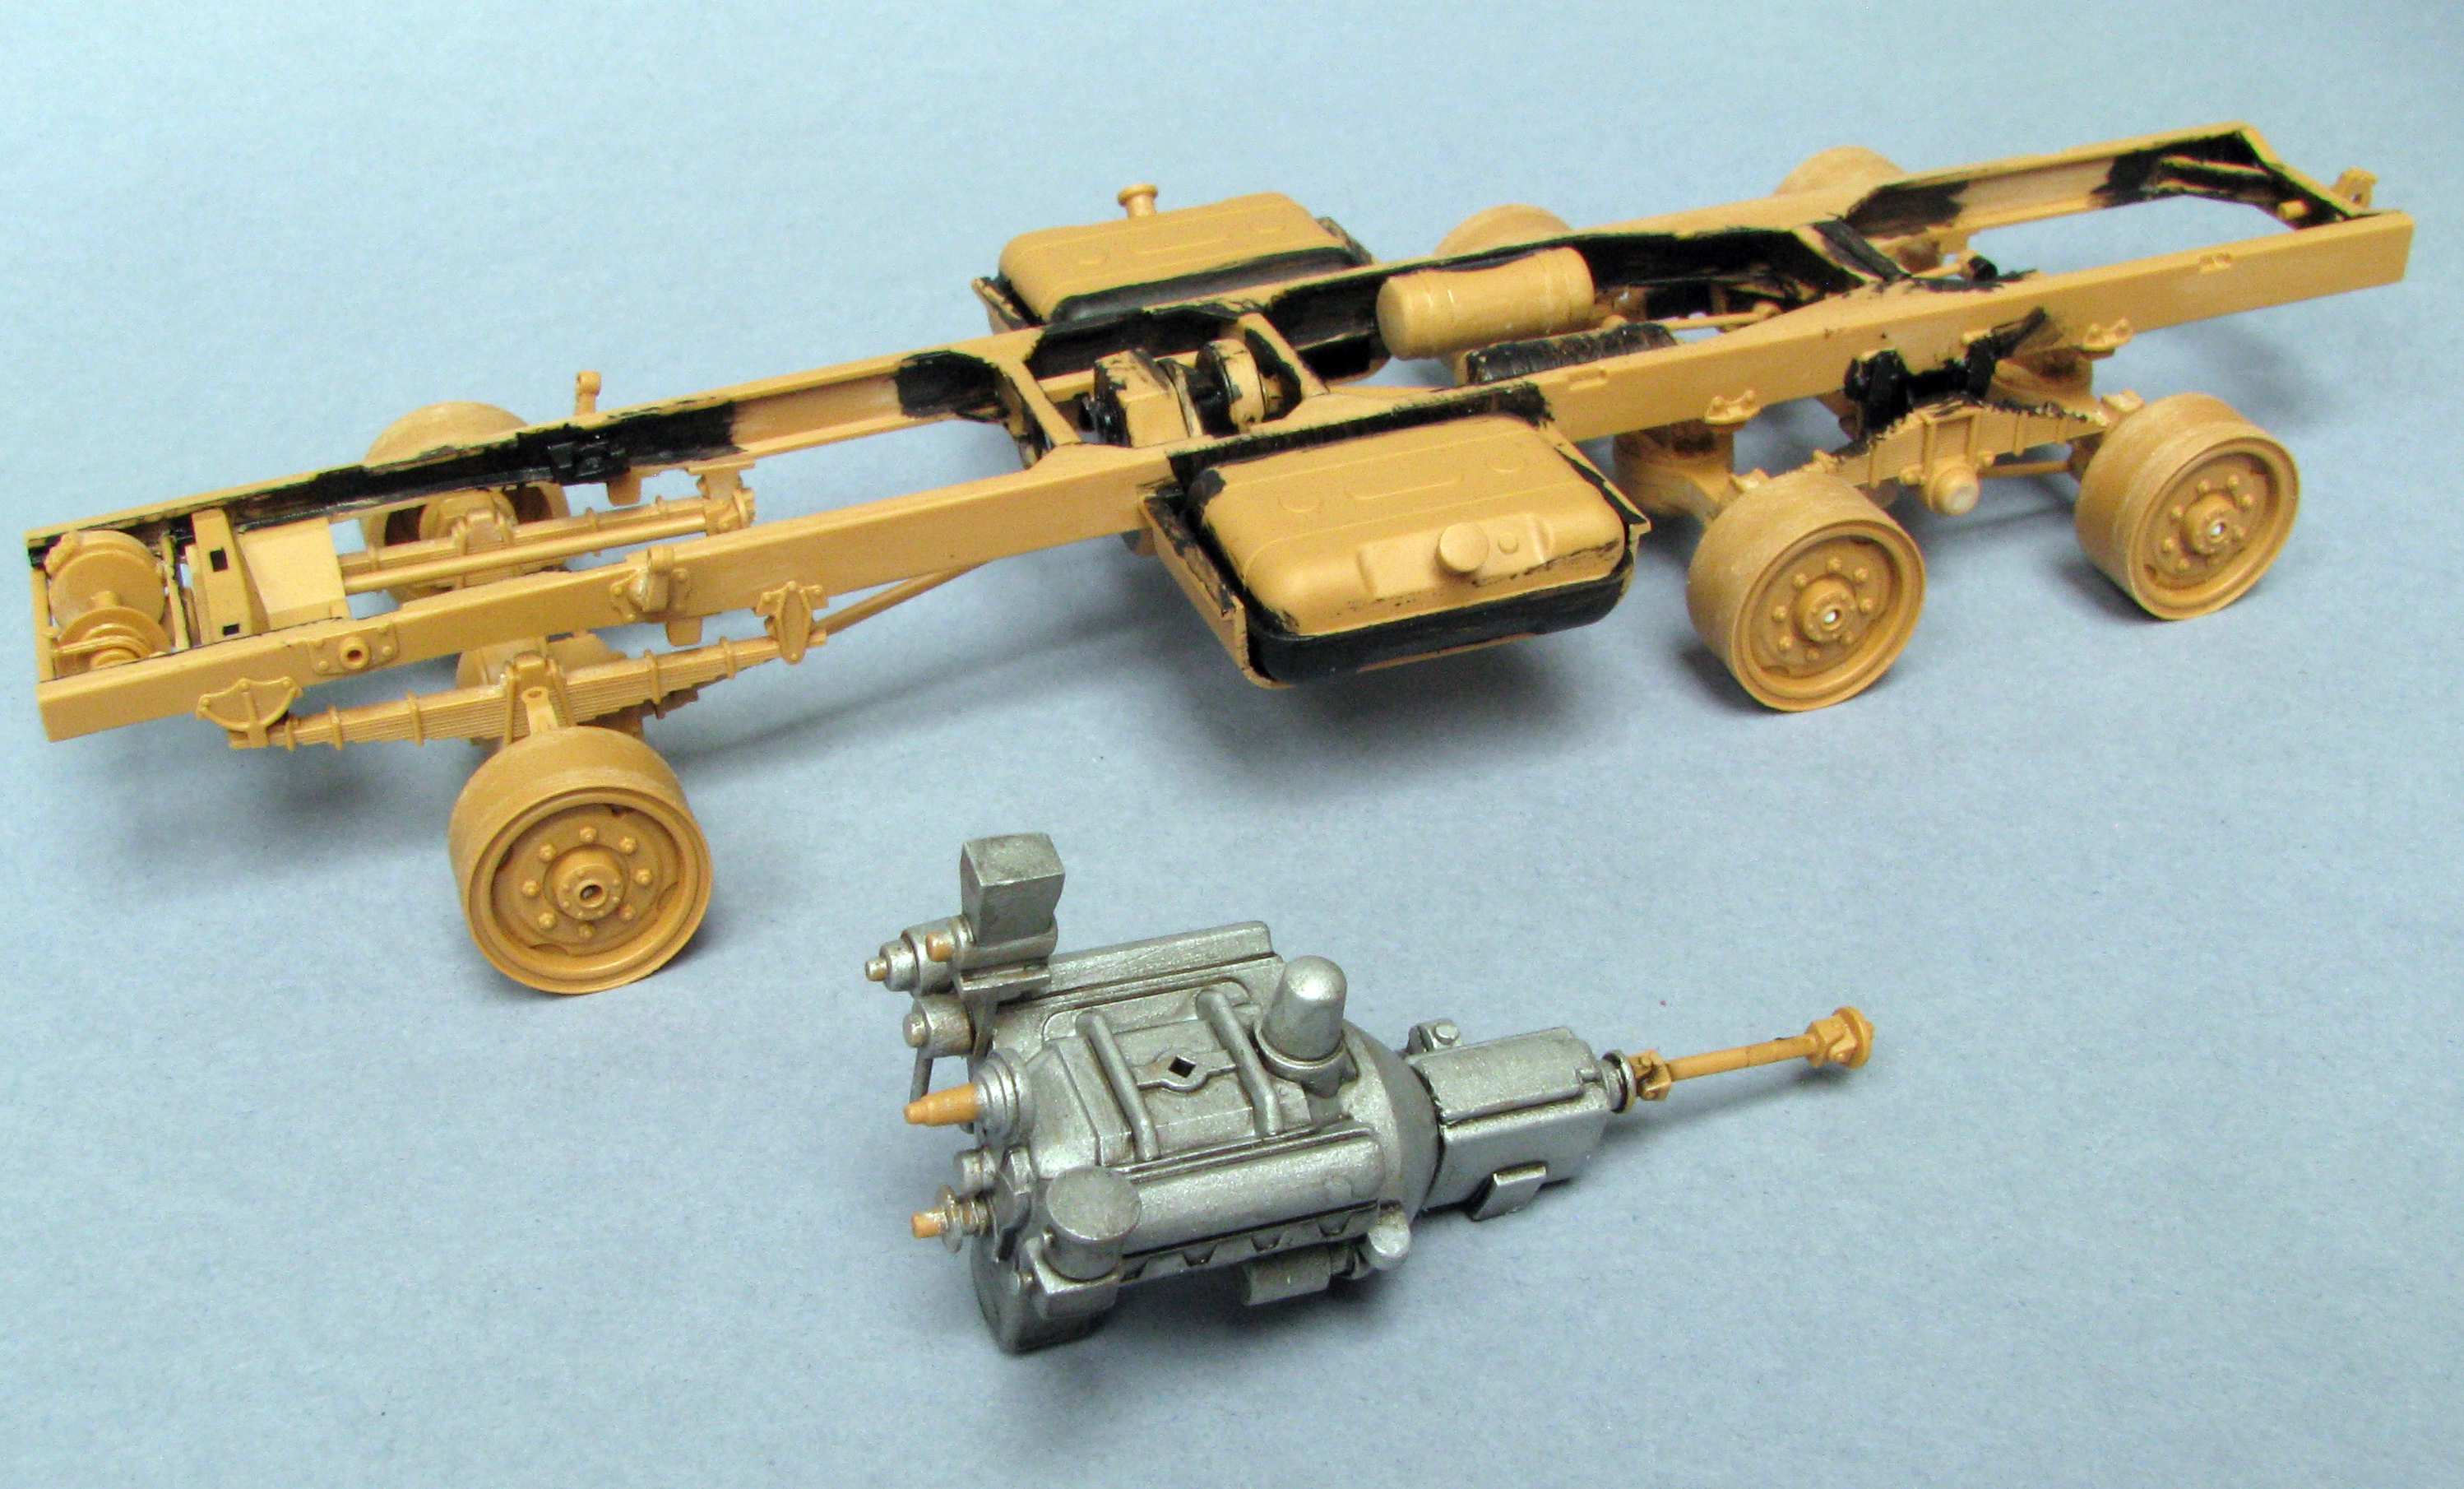
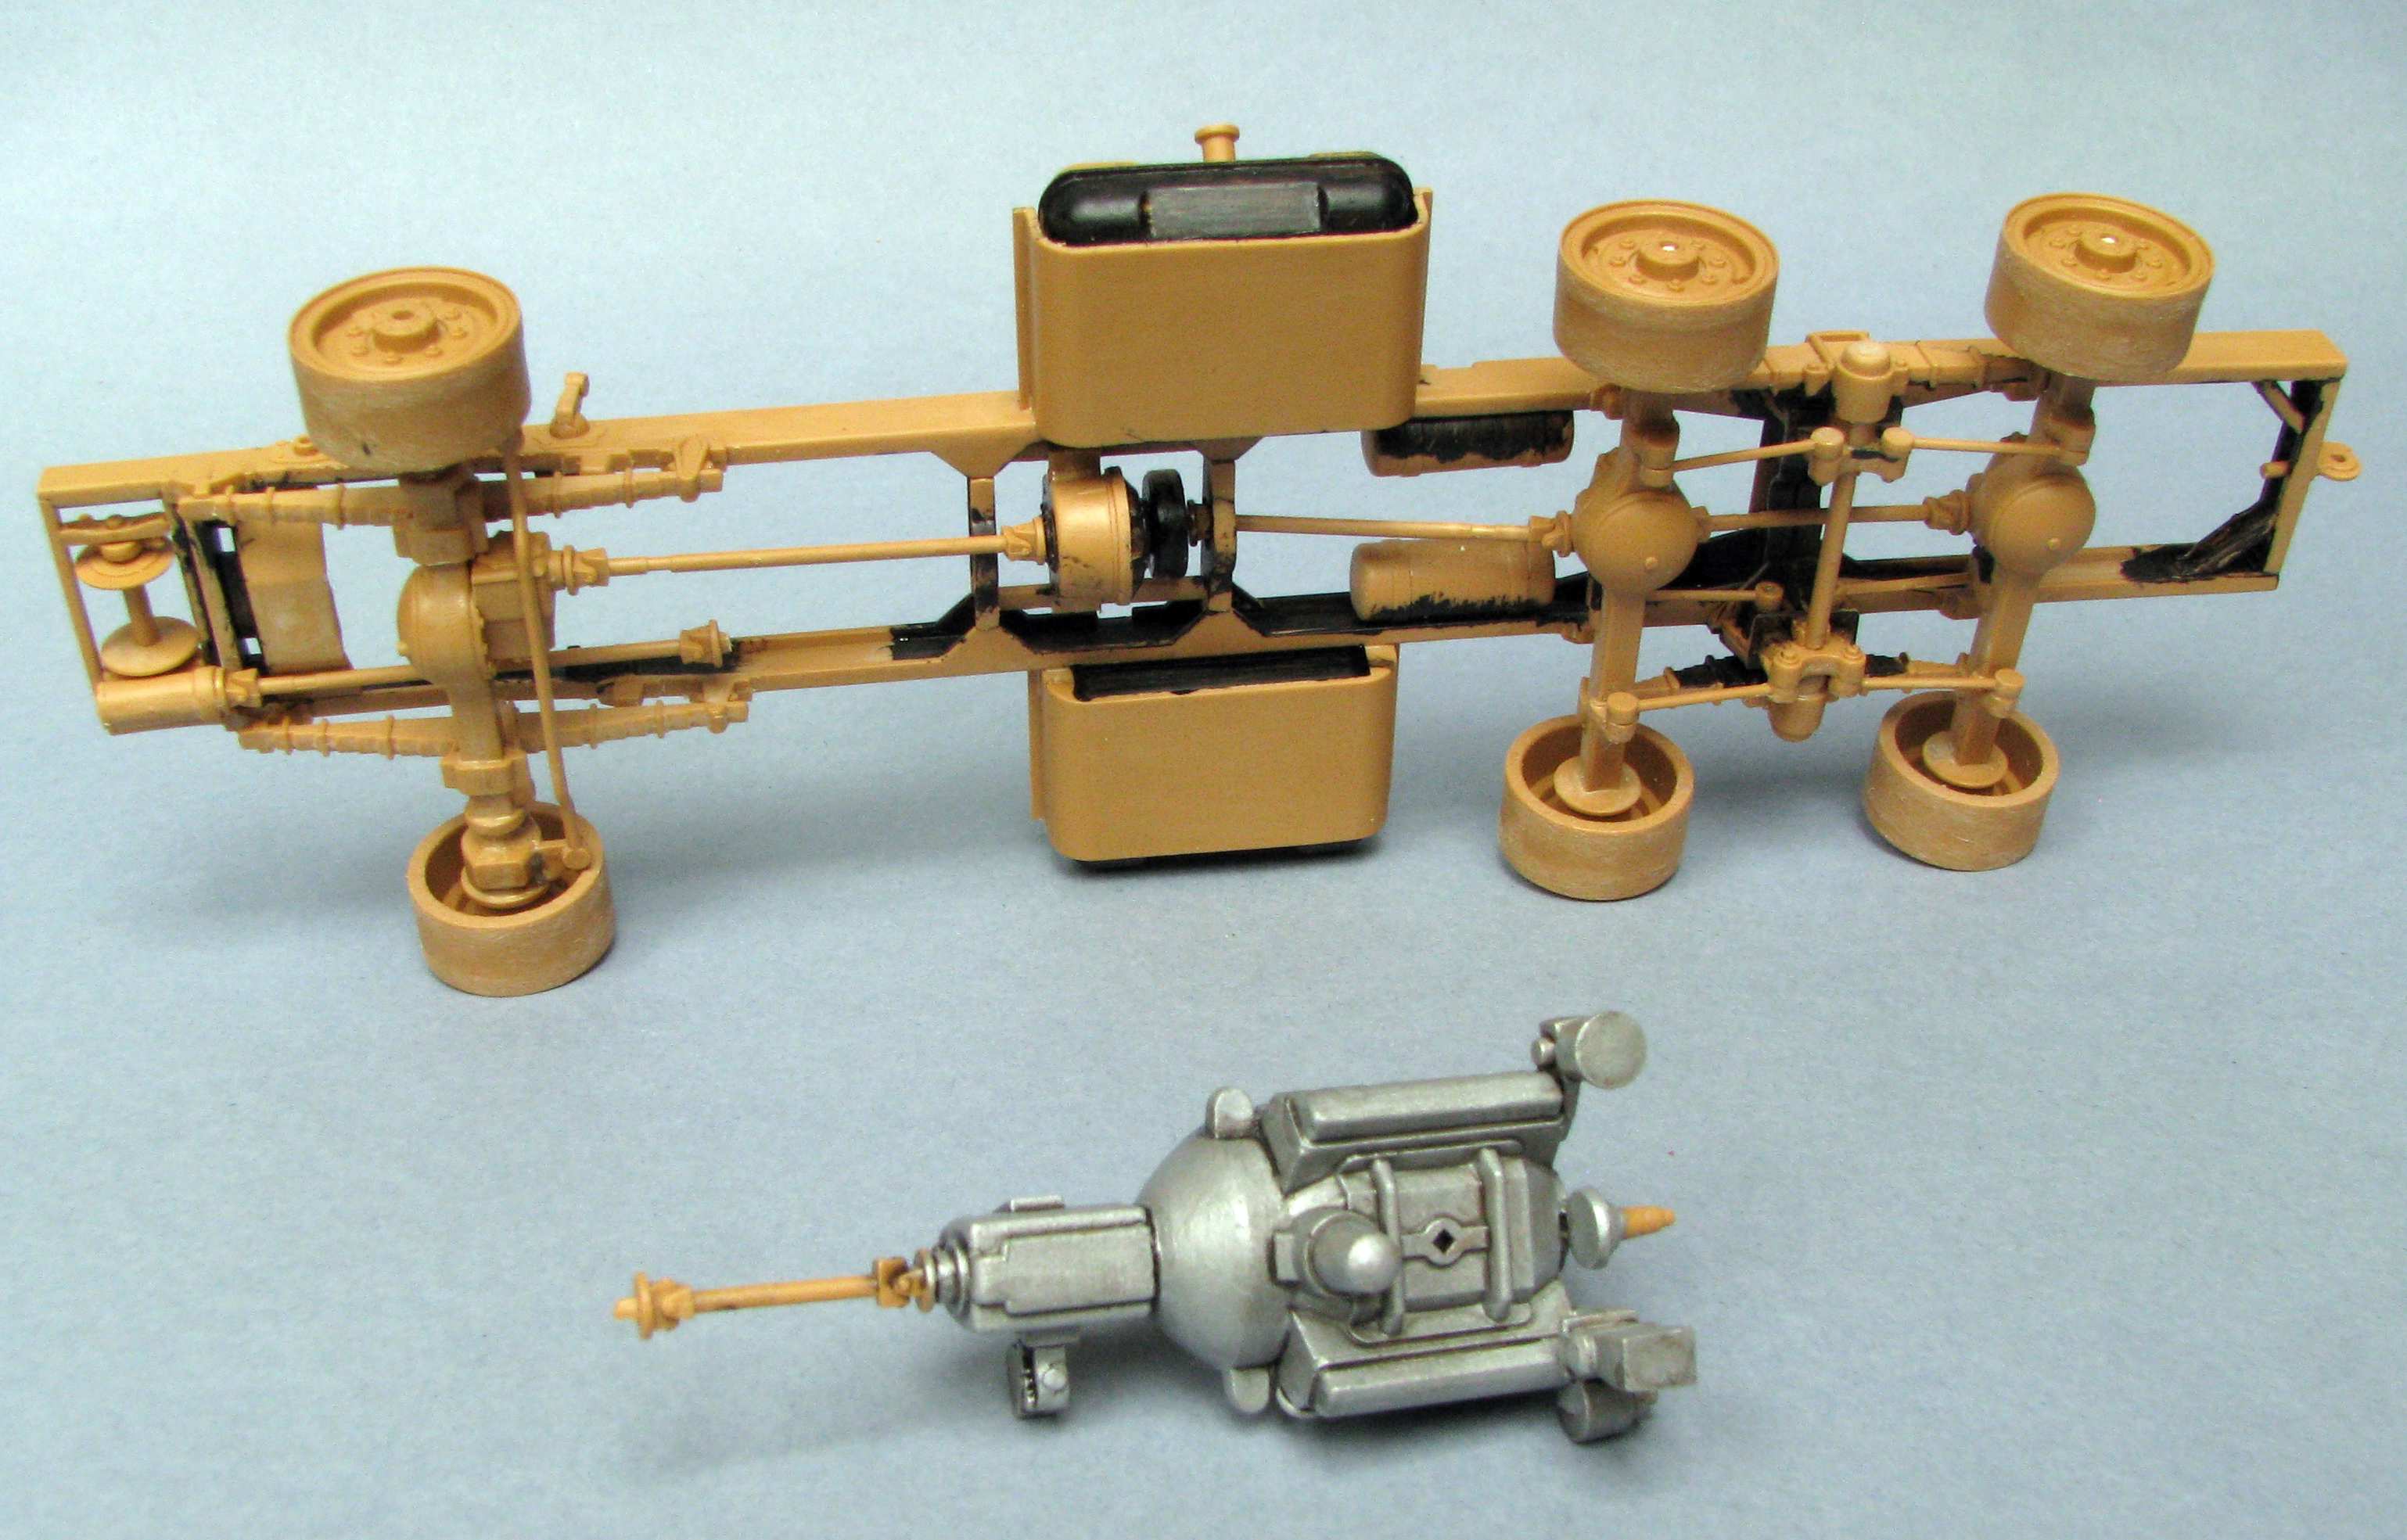
The winch and front axle are just dry fitted at this point. I painted the recesses black to aid in airbrush-painting the chassis later, and the Gunze paint doesn't need to be stripped for glueing with lacquer thinner, which is what I do.

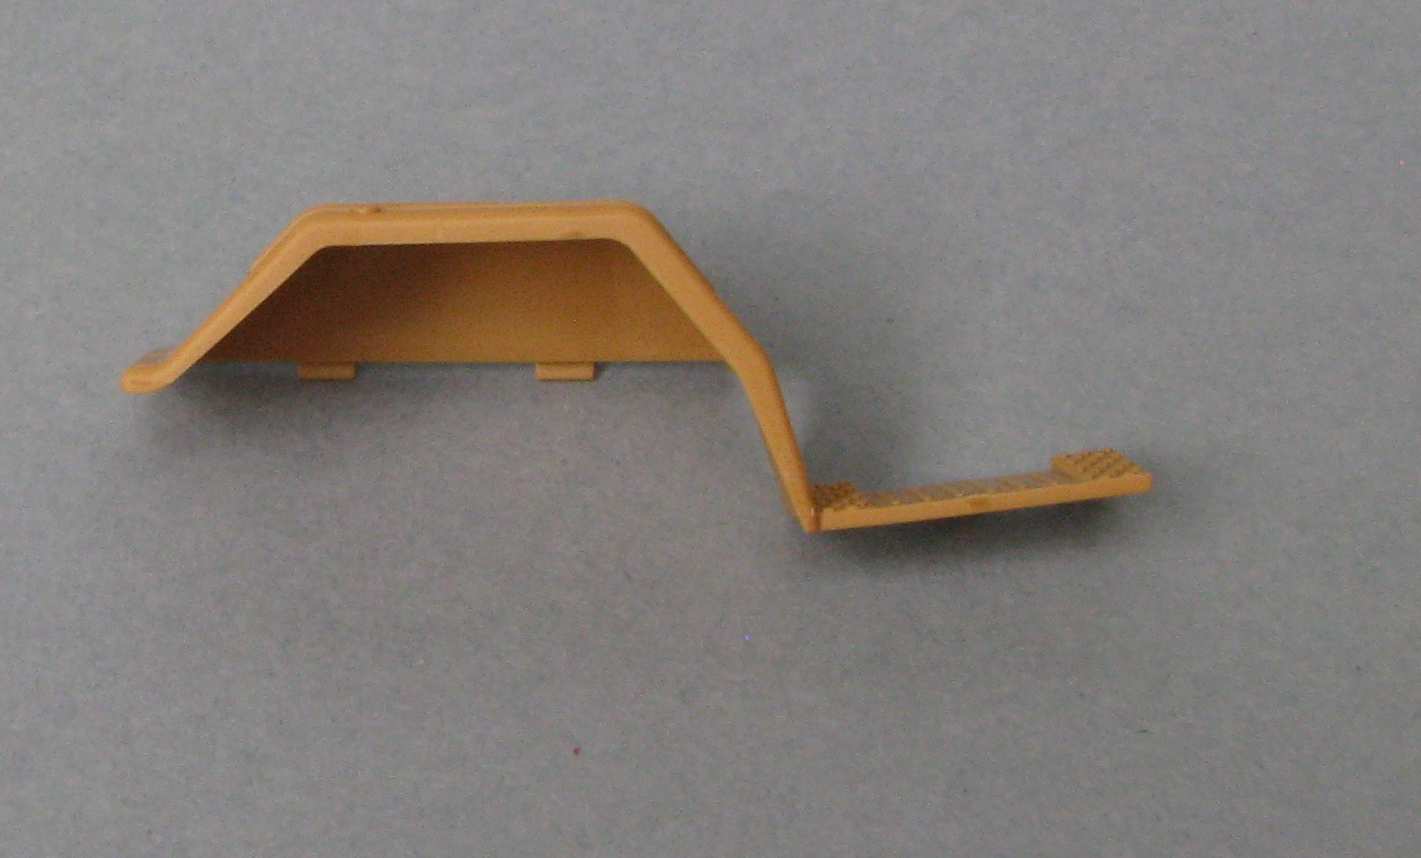
Planning a few steps ahead I noticed a pitfall: The instructions tell you to use the following sequence: Chassis-Engine-Winch-Front axle-Fenders(this is important)-the remainder of the cab. The problem is the fenders aren't exactly straight:

1:35 ICM ZiL-131 by Pawel

Now I think if I put those fenders on the frame I wouldn't be able to straighten them properly. And if I glued the cab together with the fenders, I would not be able to fit that over the engine on chassis (the engine is too wide - it's an american style V-8!). That's why I decided to make the cab first, then to put it on the frame and just then to install the engine.

So I started with the dashboard:

1:35 ICM ZiL-131 by Pawel
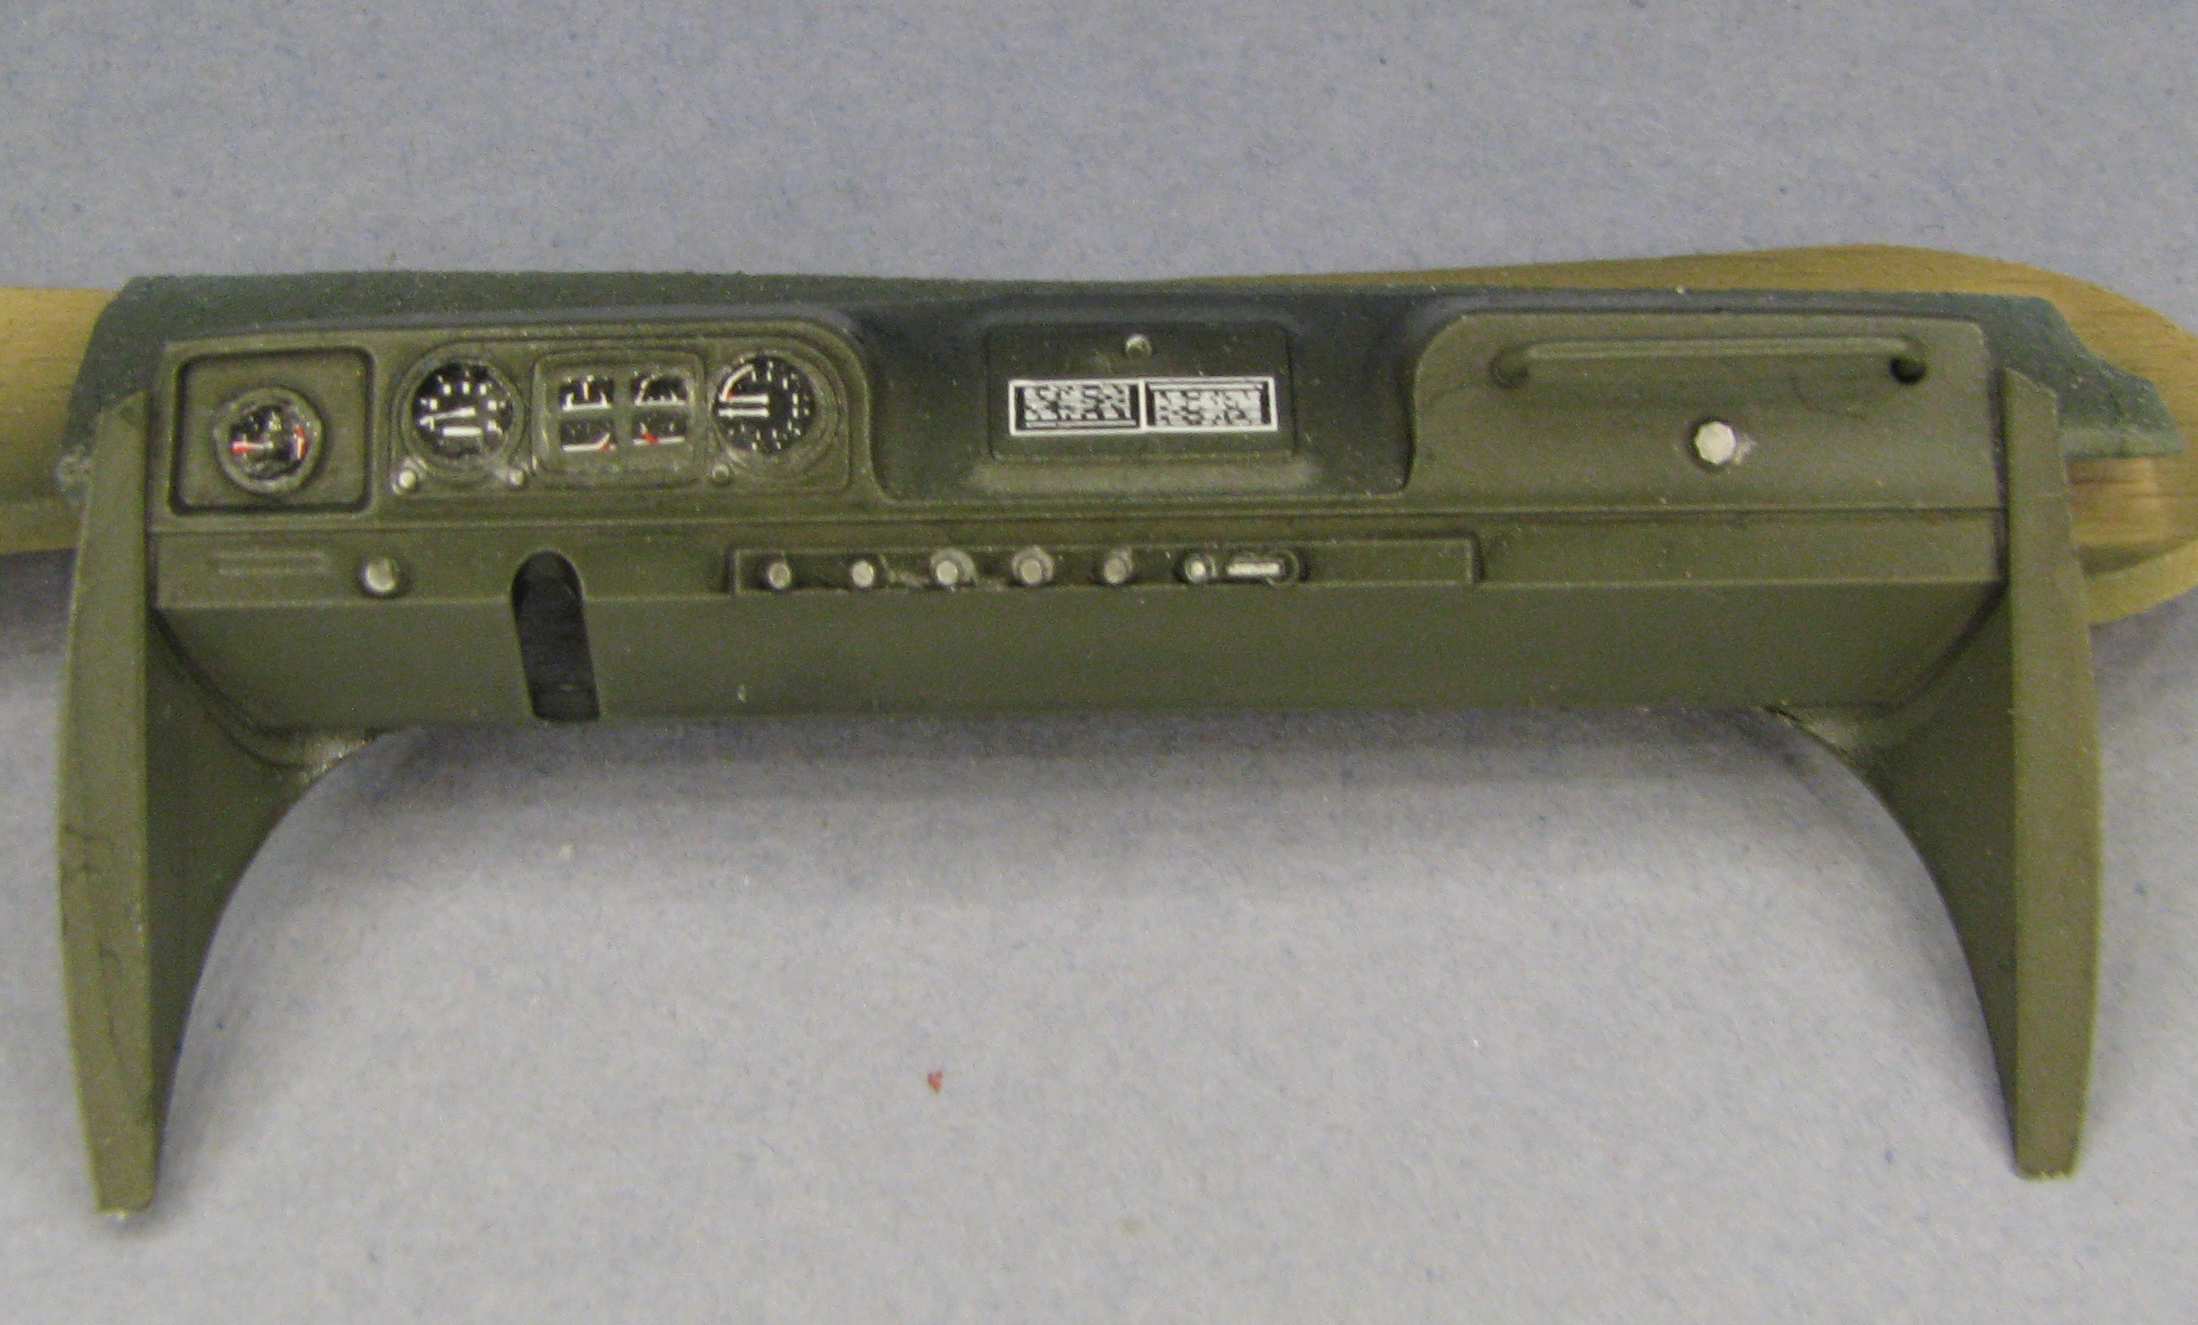
By the way the kit decals  are somewhat funny - they have this funny foil on top of everything that doesn't want to come off at first. The data plates in the middle are my fabrication.

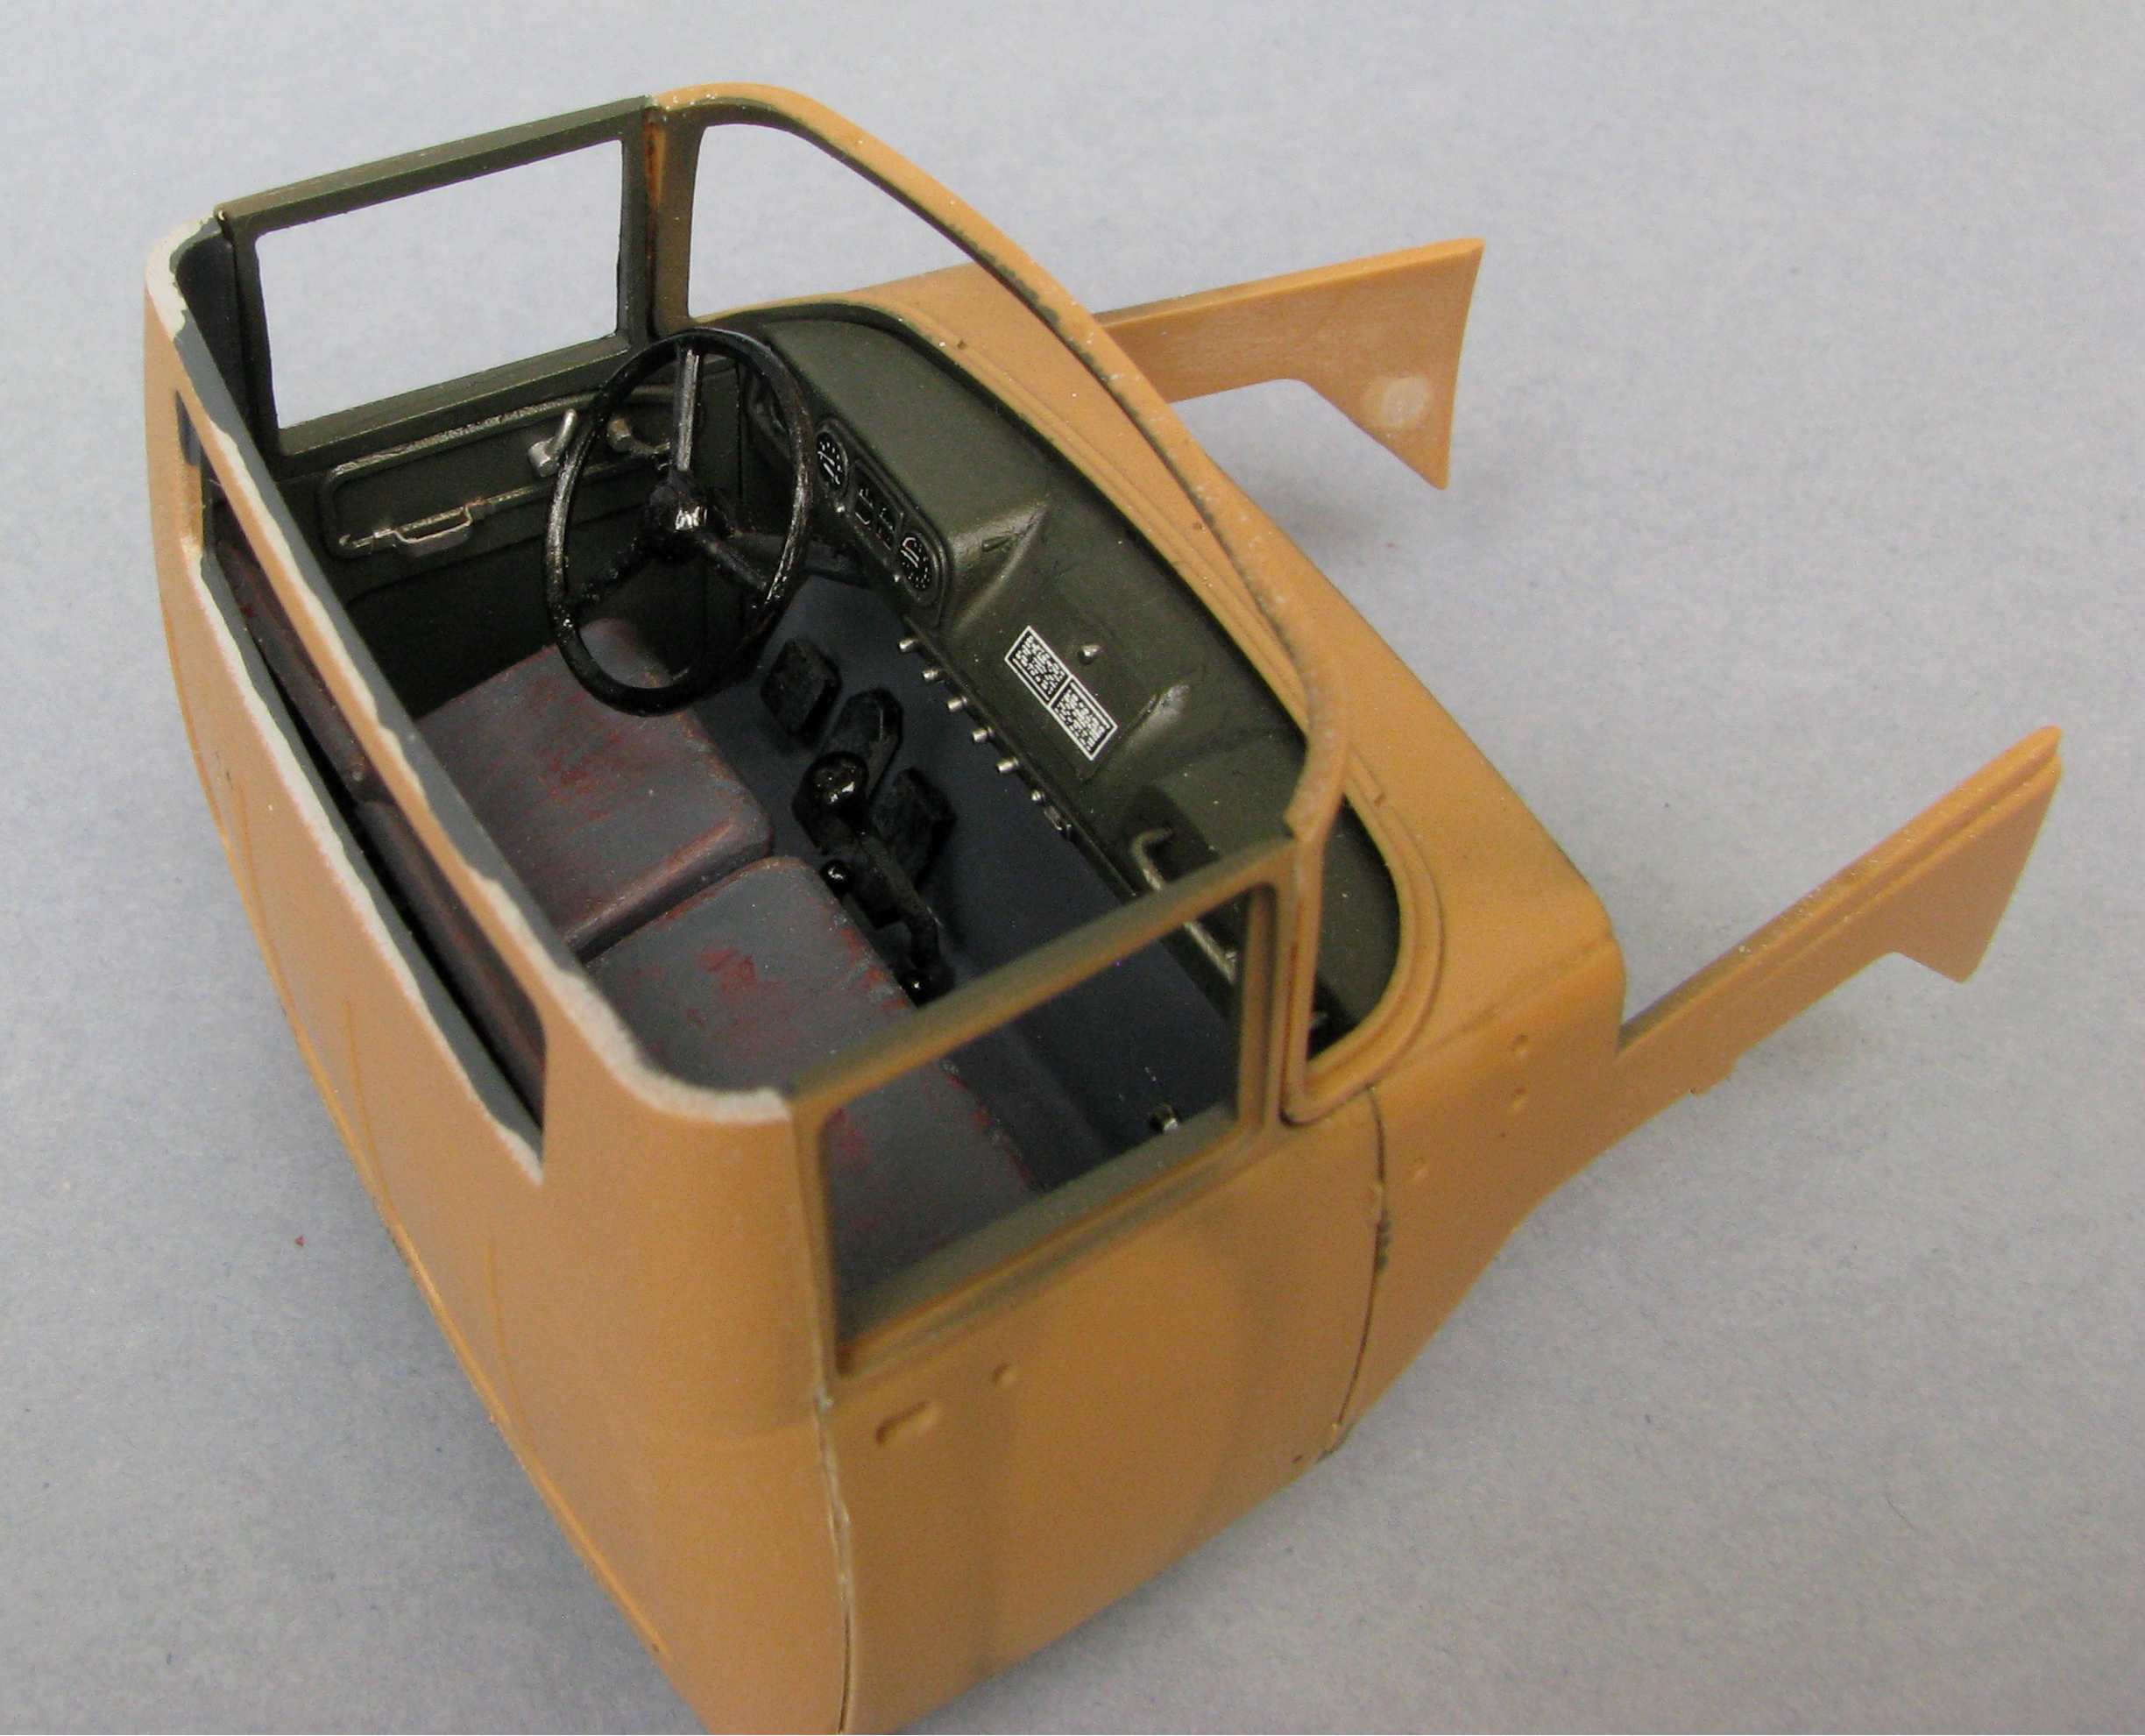
Then I prepared the doors and started glueing everything together. I thought about painting the doors separately - but the other cab parts are warped enough to make me think I wouldn't be able to fit the doors properly later. So I'm glueing them in place and I'll paint them red later. Here's how it looks like now:

1:35 ICM ZiL-131 by Pawel

And here's the general state of the project for now:

1:35 ICM ZiL-131 by Pawel

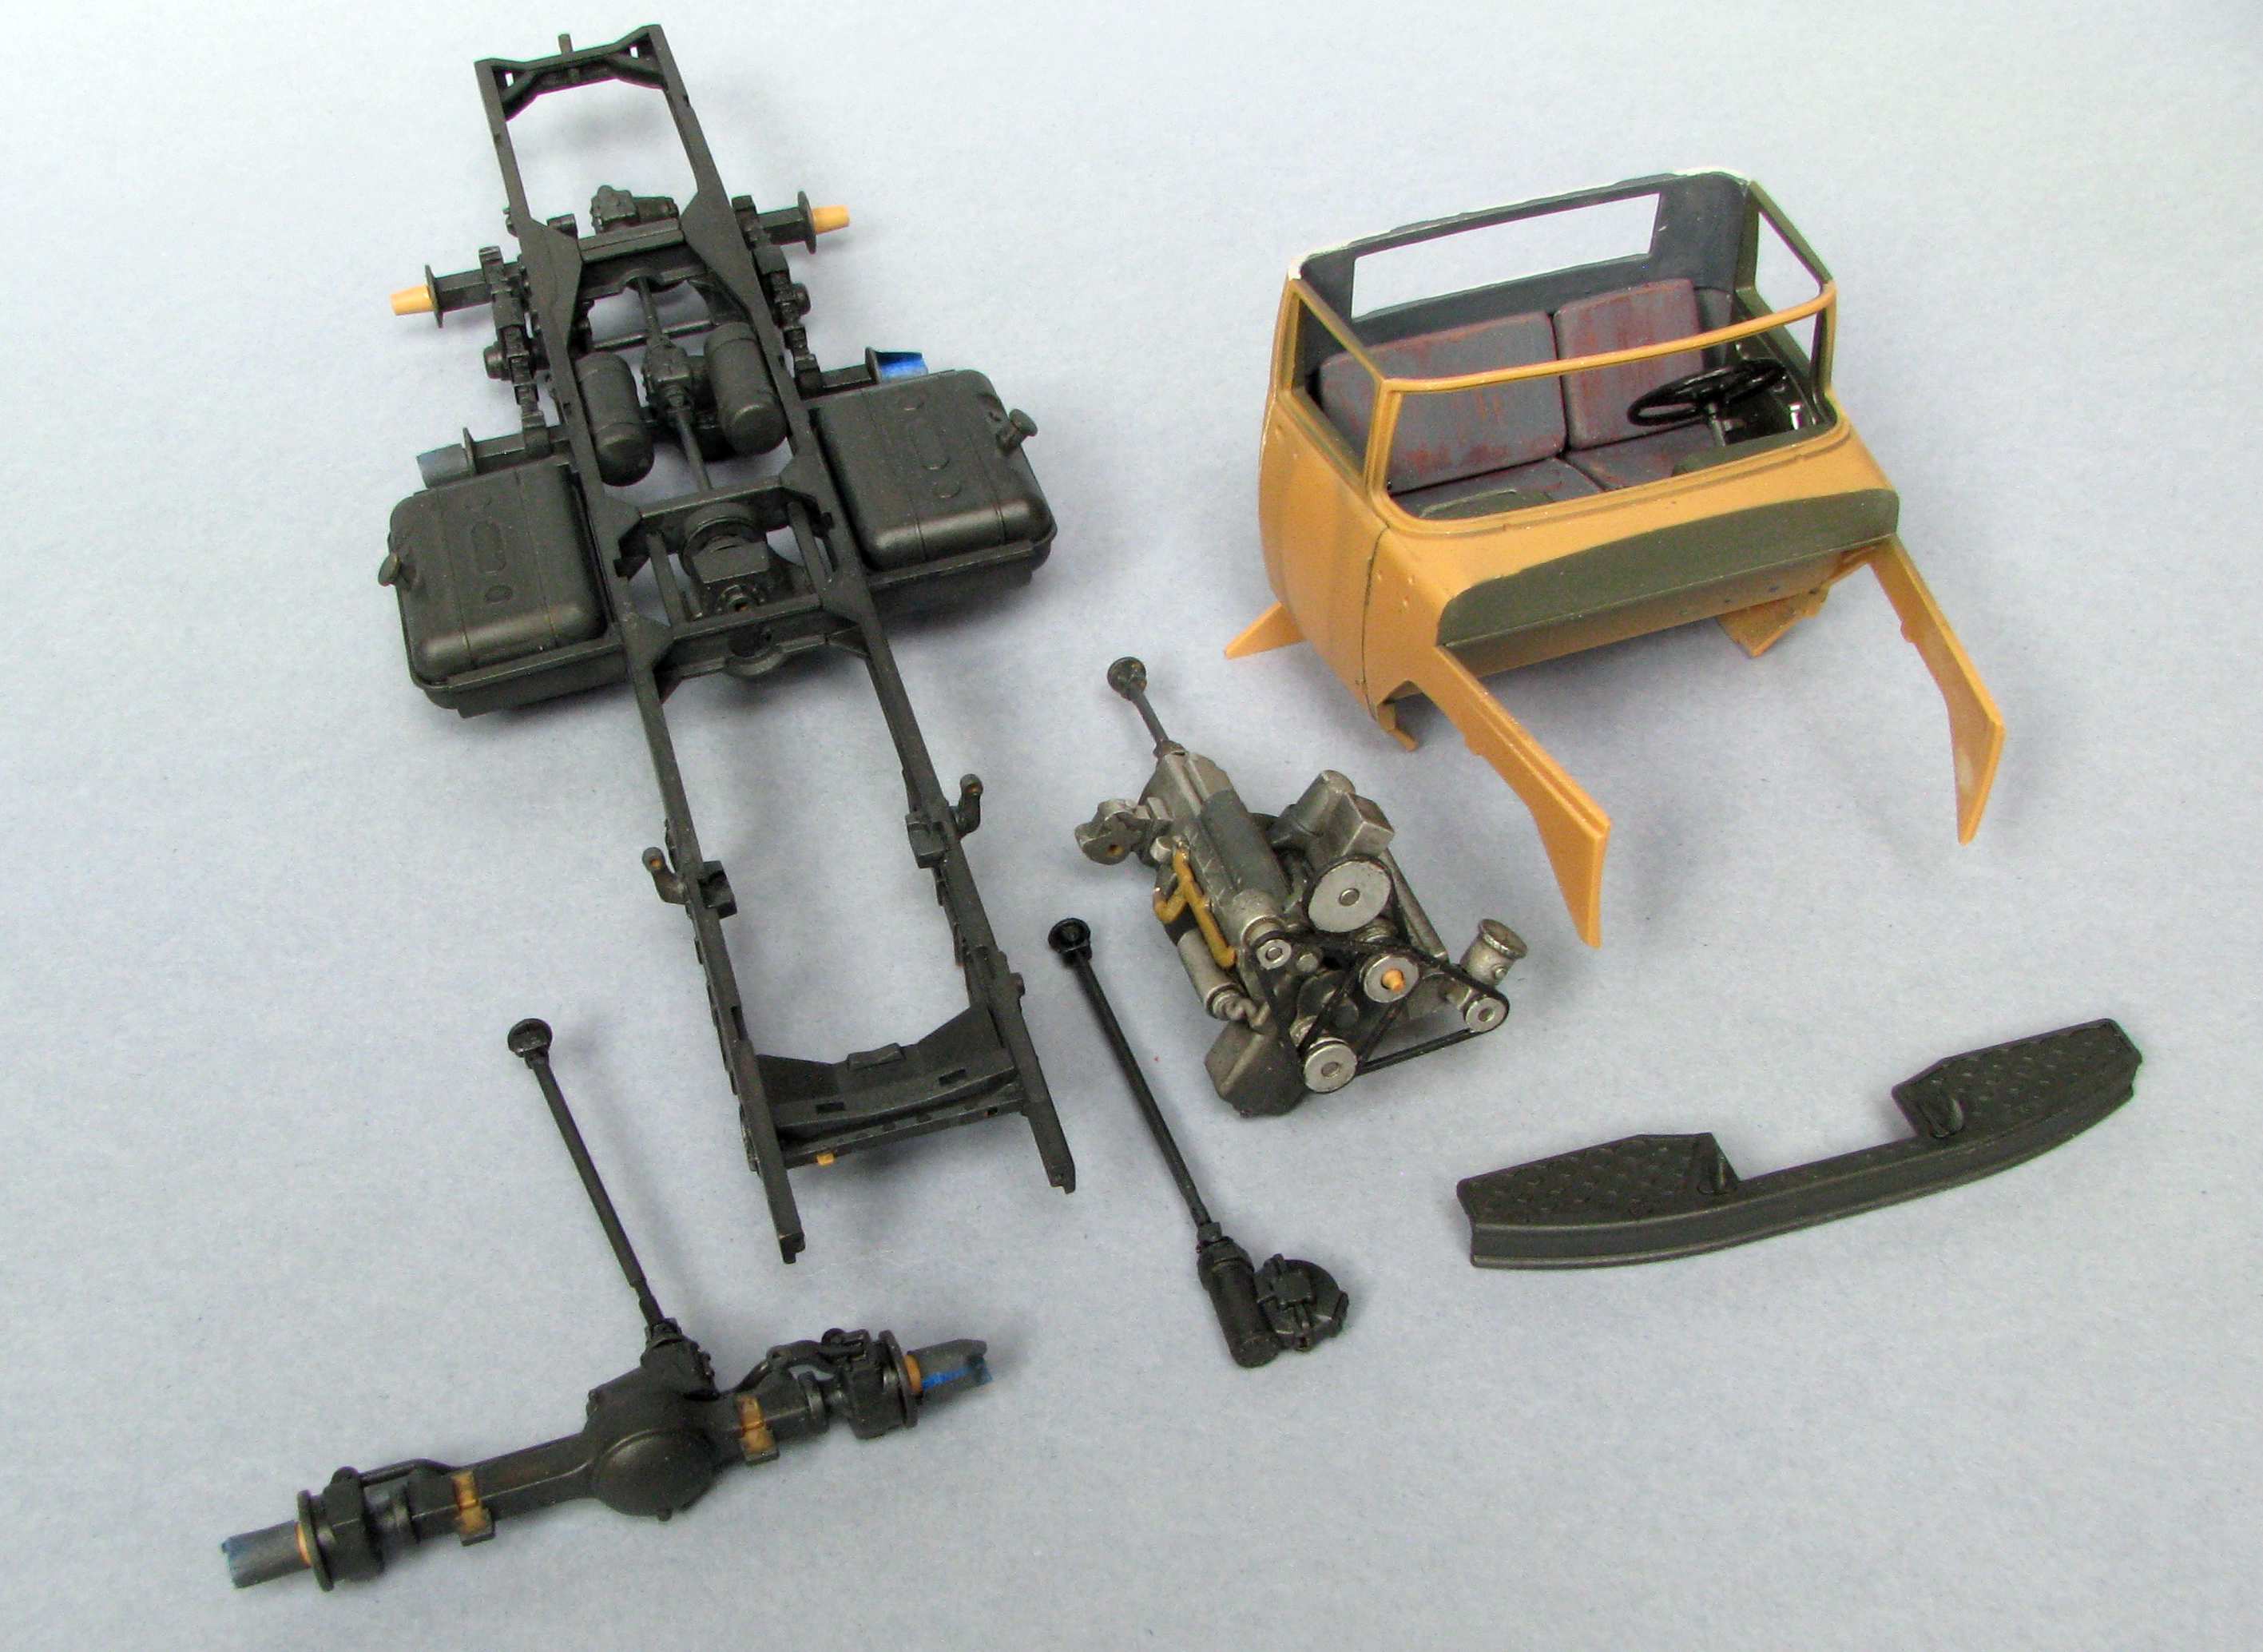
The idea is to put the most of the cab together, paint everything up and then assemble it - I mean the parts from the picture above for now.

Thanks for looking and have a nice day

Paweł

All comments and critique welcomed. Thanks for your honest opinions!

www.vietnam.net.pl

  • Member since
    April 2003
  • From: USA
Posted by keavdog on Monday, May 2, 2022 1:01 PM

 nice work so far.  Cab interior looks great.  Interesting subject.  Is it a medical vehicle?

Thanks,

John

  • Member since
    December 2002
  • From: Valrico, FL
Posted by HeavyArty on Monday, May 2, 2022 1:28 PM

Gino P. Quintiliani - Field Artillery - The KING of BATTLE!!!

Check out my Gallery: https://app.photobucket.com/u/HeavyArty

"People sleep peaceably in their beds at night only because rough men stand ready to do violence on their behalf." -- George Orwell

  • Member since
    July 2015
Posted by MR TOM SCHRY on Monday, May 2, 2022 1:54 PM

WOW!  That detail is amazing Pawel!  I haven't built an ICM kit yet but they look great.  Can't wait to see your next build update.  Please take care and stay safe.

tjs 

TJS

  • Member since
    September 2012
Posted by GMorrison on Monday, May 2, 2022 2:42 PM

Co0ming together very nicely.


Notice the windows on the cabin are different than the kit. I wonder if both sides are the same or not?


Bill

 Modeling is an excuse to buy books.


  • Member since
    May 2009
  • From: Poland
Posted by Pawel on Monday, May 2, 2022 6:39 PM

Hello everybody!

Thanks a lot for your comments!

keavdog - it's not a medical vehicle, it's a mobile workshop, used for emergency response in case something breaks, in this case in service of the heating network in Kharkov. The cool thing the kit has all the workshop equipment inside.

Gino - thanks a lot!

Tom - thanks a lot, and yes - despite some problems this is a very nice kit. I generally recommend the ICM kits.

Bill - good catch, it took me literally months to catch that window thing. In the moment I have no idea about the other side, because I couldn't find another photo of this machine showing it. My guess is they bought this machine from the military that used it for some special equipment that interfered with the windows so they were deleted. Sometimes they do it so that the sunlight doesn't interfere with radar screen reading. Unless proven otherwise I plan to keep all the windows on the other side to show off the interior better.

Thanks again, and have a nice day!

Paweł

All comments and critique welcomed. Thanks for your honest opinions!

www.vietnam.net.pl

  • Member since
    August 2021
Posted by lurch on Monday, May 2, 2022 7:22 PM

Cool subject matter. I like it. Coming together pretty good. You are doing a great job at it.

  • Member since
    November 2005
  • From: Formerly Bryan, now Arlington, Texas
Posted by CapnMac82 on Saturday, May 7, 2022 12:53 PM

Excellent work--and we don't really get to see eastern European vehicles other than AFV that often.

  • Member since
    May 2009
  • From: Poland
Posted by Pawel on Wednesday, May 11, 2022 9:20 AM

lurch, Cap'n - thanks a lot for your comments and for your kind words!

I got a chance to use my airbrush in the last days and this is what I managed to do:

First a little Tamiya primer from a spray can:

1:35 ICM ZiL-131 by Pawel

On top of that I put some red - Humbrol 60:

1:35 ICM ZiL-131 by Pawel

I masked the hood stripes with 5mm Tamiya tape strips, I have also masked off the doors. Then I sprayed satin olive green - Humbrol 163. After taking the masks off it looked like this:

1:35 ICM ZiL-131 by Pawel

1:35 ICM ZiL-131 by Pawel

I installed the windshield (to protect the fragile upper edge) and started thinking about mounting the cab on the frame. But the fenders, especially the front edges were a little crooked. I used a little CA to glue a popsicle stick across to straighten them out, and I hope that when I glue everything to the frame and let the glue dry really well, then maybe it will stay somewhat straight:

1:35 ICM ZiL-131 by Pawel

1:35 ICM ZiL-131 by Pawel

The popsicle stick will then be removed, of course. Then I can also intall the engine and winch and the front axle.

Thanks for looking and have a nice day

Paweł

All comments and critique welcomed. Thanks for your honest opinions!

www.vietnam.net.pl

  • Member since
    December 2002
  • From: Valrico, FL
Posted by HeavyArty on Wednesday, May 11, 2022 3:34 PM

Looking good.  The painting is coming along nicely.  Can't wait to see the box all painted up and installed as well.

Gino P. Quintiliani - Field Artillery - The KING of BATTLE!!!

Check out my Gallery: https://app.photobucket.com/u/HeavyArty

"People sleep peaceably in their beds at night only because rough men stand ready to do violence on their behalf." -- George Orwell

  • Member since
    November 2009
  • From: SW Virginia
Posted by Gamera on Wednesday, May 11, 2022 8:31 PM

That's so cool Pawel! And coming along great! Love this! 

"I dream in fire but work in clay." -Arthur Machen


  • Member since
    May 2009
  • From: Poland
Posted by Pawel on Friday, May 27, 2022 6:38 PM

Gino, Gamera - thanks a lot for your comments and for the kind words!

As I wrote the kit isn't very detailed, at least when it comes to the chassis, so I've been strugglin' to make the engine bay look a little more like the real thing.

Here's what it looks like OOB:

1:35 ICM ZiL-131 by Pawel

1:35 ICM ZiL-131 by Pawel

To even think about installing the engine after the fenders have been installed together with the remainder of the cab (this is contrary to the kit's instructions) you have to cut off the drive shaft and the funny "pot" on the rear of the engine - I read on the net, that it's a centrifugal oil cleaner, but I'm not sure if it's true. Since it was already cut off I decided to make a new one that's not so conical but more cylidrical. Out of the box the air cleaner is upside down and there's no trace of he carburator, neither. So I started detailing the engine and it's bay and here's how it looks like now:

1:35 ICM ZiL-131 by Pawel

1:35 ICM ZiL-131 by Pawel

1:35 ICM ZiL-131 by Pawel

It's still far from perfect, but it starts to give off the right vibe, so to say - and I'm leaving it like that now.

Thanks for reading and have a nice day!

Paweł

All comments and critique welcomed. Thanks for your honest opinions!

www.vietnam.net.pl

  • Member since
    November 2009
  • From: SW Virginia
Posted by Gamera on Friday, May 27, 2022 7:10 PM

Looks great Pawel! I never open the hood/engine bay so I've no experience with that type of stuff- I really need to try it one day. 

"I dream in fire but work in clay." -Arthur Machen


  • Member since
    June 2004
  • From: East Stroudsburg, PA
Posted by TigerII on Friday, May 27, 2022 11:39 PM

Wow, I want to echo Gino's comments on the exterior paint job. But I like how your engine is coming along. Good job so far. I'll be looking forward to the box being done.

Achtung Panzer! Colonel General Heinz Guderian
  • Member since
    November 2005
  • From: Formerly Bryan, now Arlington, Texas
Posted by CapnMac82 on Saturday, May 28, 2022 1:44 PM

Isn't ICM a Ukrainian company? 

  • Member since
    May 2009
  • From: Poland
Posted by Pawel on Saturday, May 28, 2022 5:09 PM

Hello!

Thanks a lot for your comments!

Gamera - thanks a lot and yeah, give it a try, motor are a lot of fun!

Tiger II - weathering the yellow seems to be a challenge, there are many models online with the box just painted plain yellow and that doesn't look good. And thanks a lot!

Cap'n - yup, it's an Ukrainian company.

Have a nice day!

Paweł

All comments and critique welcomed. Thanks for your honest opinions!

www.vietnam.net.pl

  • Member since
    August 2021
Posted by lurch on Saturday, May 28, 2022 11:59 PM

The engine bay looks great.

  • Member since
    July 2015
Posted by MR TOM SCHRY on Sunday, May 29, 2022 1:25 PM

Excellent progress Pawel!  She's really coming together for you.

tjs

TJS

  • Member since
    May 2009
  • From: Poland
Posted by Pawel on Saturday, June 4, 2022 7:26 PM

lurch, Tom - thanks a lot for your kind words!

I'm moving on with the build. As you can see on the real thing photo, it has a winterfront - I decided to get me one, too! To do this I mixed some Miliput, rolled it to a flat "pancake", then cut it to size and draped it over the kit part. Worked like a charm:

1:35 ICM ZiL-131 by Pawel

1:35 ICM ZiL-131 by Pawel

It was almost a pity to paint the black part, it matched the black vinyl so well... But I put some primer on and repainted it anyway. At the same time I installed the winch. I wound some nice thread around the drum and painted it "Leadbelcher" from the Games Workshop paint line. I have to find a hook yet, the kit doesn't include one:

1:35 ICM ZiL-131 by Pawel

 And with the hood on:

1:35 ICM ZiL-131 by Pawel

I hope you like it - thanks for reading and have a nice day

Paweł

All comments and critique welcomed. Thanks for your honest opinions!

www.vietnam.net.pl

  • Member since
    December 2002
  • From: Valrico, FL
Posted by HeavyArty on Saturday, June 4, 2022 9:20 PM

Looking good.  The winter cover for the front came out great.

Gino P. Quintiliani - Field Artillery - The KING of BATTLE!!!

Check out my Gallery: https://app.photobucket.com/u/HeavyArty

"People sleep peaceably in their beds at night only because rough men stand ready to do violence on their behalf." -- George Orwell

  • Member since
    May 2009
  • From: Poland
Posted by Pawel on Sunday, June 5, 2022 6:12 PM

Thanks a lot, Gino!

All comments and critique welcomed. Thanks for your honest opinions!

www.vietnam.net.pl

  • Member since
    November 2009
  • From: SW Virginia
Posted by Gamera on Sunday, June 5, 2022 8:14 PM

Yeah very cool Pawel, the grill cover looks great! Yes

"I dream in fire but work in clay." -Arthur Machen


  • Member since
    June 2014
Posted by BrandonK on Saturday, June 11, 2022 9:40 AM

Very nice work. The Zil is such a cool looking truck. Looking forward to seeing more.

BK

On the bench:

A lot !! And I mean A LOT!!

2024 Kits on deck / in process / completed   

                         14 / 5 / 2  

                              Tongue Tied

  • Member since
    May 2009
  • From: Poland
Posted by Pawel on Wednesday, June 22, 2022 7:41 PM

Gamera, Brandon - Thanks a lot for your comments and for your kind words!

The work is slowly going on.

Among other things I tried if I can improve on the kit's (pretty nice) headlight guards.

I took some copper strip and wire and started soldering...

1:35 ICM ZiL-131 by Pawel

1:35 ICM ZiL-131 by Pawel

As you can see I'm using masking tape to help me position the wires, and I bent the wires in an U-shape so that they hold their position relative to each other. After some cutting and bending the result looks promising:

1:35 ICM ZiL-131 by Pawel

1:35 ICM ZiL-131 by Pawel

When doing work like this the main concern is that when you heat a joint to solder it the next one can get hot and let go - that's why each wire is only soldered at one end and glued with CA on the other end. The place where the "rim" joins is also glued with CA.

So here's the comparison with the kit part:

1:35 ICM ZiL-131 by Pawel

There is some progress and I wonder if I could away with using thinner copper wires and strip - but I'll stay with what I got so far.

Thanks for looking and have a nice day!

Paweł

All comments and critique welcomed. Thanks for your honest opinions!

www.vietnam.net.pl

  • Member since
    December 2002
  • From: Valrico, FL
Posted by HeavyArty on Thursday, June 23, 2022 10:10 AM

Gino P. Quintiliani - Field Artillery - The KING of BATTLE!!!

Check out my Gallery: https://app.photobucket.com/u/HeavyArty

"People sleep peaceably in their beds at night only because rough men stand ready to do violence on their behalf." -- George Orwell

  • Member since
    October 2014
Posted by Vladimir on Thursday, June 23, 2022 11:15 AM

I agree  that it's interesting model and good job has done. Paweł, you found  interesting real model for idea. 

Will you use photo etching and what about interior of kung?

  • Member since
    November 2005
  • From: Formerly Bryan, now Arlington, Texas
Posted by CapnMac82 on Thursday, June 23, 2022 3:14 PM

HeavyArty
use an alligator clip

I also use the micro-sized "bulldog" clips, too.  They can be more "grippy."


  • Member since
    April 2020
Posted by Eaglecash867 on Thursday, June 23, 2022 5:40 PM

A little liquid flux brushed onto the area to be soldered helps tremendously too.  It makes the heat transfer more efficient so the solder flows without having to get the whole piece screaming hot.

"You can have my illegal fireworks when you pry them from my cold, dead fingers...which are...over there somewhere."

  • Member since
    July 2014
  • From: Rifle, CO. USA
Posted by M1GarandFan on Thursday, June 23, 2022 6:34 PM

I absolutely agree with the other posts here. Outstanding work on the guards. They look wonderful, as does the rest of your work on this project.

  • Member since
    May 2009
  • From: Poland
Posted by Pawel on Saturday, June 25, 2022 6:37 PM

Hello everybody!

Thanks a lot for your comments!

Gino, Cap'n, Eaglecash867 - thanks a lot for the soldering tips, solid advice I'll use next time I'll tackle something like this!

M1GarandFan - Thanks a lot for your kind words!

Vladimir - somehow this is such a cool foto! You can see that ICM has created the box art based on it and yet they didn't go with that paint scheme... Maybe because of the window configuration?

That shelter with three (instead of six) windows on the side is a command post shelter (as opposed to a mobile workshop shelter) but I will put the kit supplied workshop interior inside, anyhow, because it is so nice.

Any idea why it's called kung?

And no, I don't think I will use any photoetch here, I try to keep this build on budget.

I started to fill the unwanted windows with two layers of 0,5mm styrene sheet:

1:35 ICM ZiL-131 by Pawel

Thanks for reading and have a nice day

Paweł

All comments and critique welcomed. Thanks for your honest opinions!

www.vietnam.net.pl

JOIN OUR COMMUNITY!

Our community is FREE to join. To participate you must either login or register for an account.

SEARCH FORUMS
FREE NEWSLETTER
By signing up you may also receive reader surveys and occasional special offers. We do not sell, rent or trade our email lists. View our Privacy Policy.